![]()
3
Working in Outline View
In This Chapter
![]() Understanding the outline
Understanding the outline
![]() Focusing on substance instead of form
Focusing on substance instead of form
![]() Promoting and demoting, and the lateral arabesque
Promoting and demoting, and the lateral arabesque
![]() Adding a slide in the Outline tab
Adding a slide in the Outline tab
![]() Collapsing and expanding the outline
Collapsing and expanding the outline
Many presentations consist of slide after slide of bulleted lists. You might see a chart here or there and an occasional bit of clip art thrown in for comic effect, but the bread and butter of the presentation is the bulleted list. It sounds boring — and it often is. But in some cases, an endless stream of bullet points turns out to be the best way to get you through.
Such presentations lend themselves especially well to outlining. PowerPoint’s Outline View lets you focus on your presentation’s main points and subpoints. In other words, it enables you to focus on content without worrying about appearance.
Calling Up the Outline
 In Normal View, the left side of the PowerPoint window is devoted to showing thumbnail images of your slides. But you can easily switch your presentation into Outline View by clicking the Outline View button in the Ribbon’s View tab (shown in the margin). Then, your presentation appears as an outline, with the title of each slide as a separate heading at the highest level of the outline, and the text on each slide appears as lower-level headings subordinate to the slide headings. See Figure 3-1. (Note that if a slide doesn’t have a title, the slide still appears in the outline, but the top-level heading for the slide is blank.)
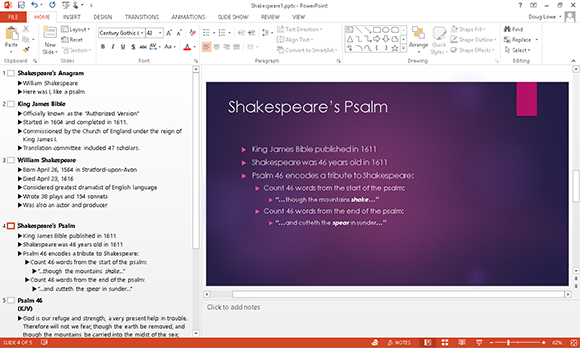
Figure 3-1: Viewing the outline.
 You can expand the area devoted to the outline by clicking and dragging the border of the Outline pane.
The following list highlights a few important things to notice about the outline:
![]() The outline is comprised of the titles and body text of each slide. Any other objects that you add to a slide — such as pictures, charts, and so on — are not included in the outline. Also, if you add any text objects to the slide in addition to the basic title and body text placeholders in the slide layout, the additional text objects are not included in the outline.
The outline is comprised of the titles and body text of each slide. Any other objects that you add to a slide — such as pictures, charts, and so on — are not included in the outline. Also, if you add any text objects to the slide in addition to the basic title and body text placeholders in the slide layout, the additional text objects are not included in the outline.
![]() Each slide is represented by a high-level heading in the outline. The text of this heading is taken from the slide’s title, and an icon that represents the entire slide appears next to the heading. Also, the slide number appears to the left of the Slide icon.
Each slide is represented by a high-level heading in the outline. The text of this heading is taken from the slide’s title, and an icon that represents the entire slide appears next to the heading. Also, the slide number appears to the left of the Slide icon.
![]() Each text line from a slide’s body text appears as an indented heading. This heading is subordinate to the slide’s main title heading.
Each text line from a slide’s body text appears as an indented heading. This heading is subordinate to the slide’s main title heading.
![]() An outline can contain subpoints that are subordinate to the main points on each slide. PowerPoint enables you to create as many as nine heading levels on each slide, but your slides will probably get too complicated if you go beyond two headings. You can find more about working with heading levels in the section “Promoting and Demoting Paragraphs,” later in this chapter.
An outline can contain subpoints that are subordinate to the main points on each slide. PowerPoint enables you to create as many as nine heading levels on each slide, but your slides will probably get too complicated if you go beyond two headings. You can find more about working with heading levels in the section “Promoting and Demoting Paragraphs,” later in this chapter.
Selecting and Editing an Entire Slide
When you work with the Outline tab, you often have to select an entire slide. You can do that by clicking the icon for the slide. This selects the slide title and all its body text. In addition, any extra objects, such as graphics, that are on the slide are also selected even though those objects don’t appear in the outline.
You can delete, cut, copy, or duplicate an entire slide:
![]() Delete: To delete an entire slide, select it and then press Delete.
Delete: To delete an entire slide, select it and then press Delete.
![]() Cut or copy: To cut or copy an entire slide to the Clipboard, select the slide and then press Ctrl+X (Cut) or Ctrl+C (Copy), or use the Cut or Copy button on the Home tab on the Ribbon. You can then move the cursor to any location in the outline and press Ctrl+V or use the Paste button to paste the slide from the Clipboard. (You can also cut or copy a slide by right-clicking the slide and choosing Cut or Copy from the menu that appears.)
Cut or copy: To cut or copy an entire slide to the Clipboard, select the slide and then press Ctrl+X (Cut) or Ctrl+C (Copy), or use the Cut or Copy button on the Home tab on the Ribbon. You can then move the cursor to any location in the outline and press Ctrl+V or use the Paste button to paste the slide from the Clipboard. (You can also cut or copy a slide by right-clicking the slide and choosing Cut or Copy from the menu that appears.)
![]() Duplicate: To duplicate a slide, select it and then press Ctrl+D. This step places a copy of the selected slide immediately after it. (Actually, you don’t have to select the entire slide to duplicate it. Just click anywhere in the slide’s title or body text.)
Duplicate: To duplicate a slide, select it and then press Ctrl+D. This step places a copy of the selected slide immediately after it. (Actually, you don’t have to select the entire slide to duplicate it. Just click anywhere in the slide’s title or body text.)
Selecting and Editing One Paragraph
You can select and edit an entire paragraph along with all its subordinate paragraphs. To do so, just click the bullet next to the paragraph that you want to select. To delete an entire paragraph along with its subordinate paragraphs, select it and then press Delete.
To cut or copy an entire paragraph to the Clipboard along with its subordinates, select it and then press Ctrl+X (Cut) or Ctrl+C (Copy). You can then press Ctrl+V to paste the paragraph anywhere in the presentation.
Promoting and Demoting Paragraphs
To promote a paragraph is to move it up one level in the outline. If you promote the “Psalm 46 encodes a tribute to Shakespeare” paragraph in Figure 3-1, for example, that paragraph becomes a separate slide rather than a bullet under “Shakespeare’s Psalm.”
![]() To promote a paragraph, place the cursor anywhere in the paragraph and then press Shift+Tab or click the Decrease List Level button in the Paragraph group on the Home tab. (Note that you can’t promote a paragraph that is already at the highest outline level.)
To promote a paragraph, place the cursor anywhere in the paragraph and then press Shift+Tab or click the Decrease List Level button in the Paragraph group on the Home tab. (Note that you can’t promote a paragraph that is already at the highest outline level.)
![]() To demote a paragraph is to do just the opposite: The paragraph moves down one level in the outline. If you demote the “Shakespeare was 46 years old in 1611” paragraph in Figure 3-1, it becomes a subpoint under “King James Bible published in 1611” rather than a separate main point.
To demote a paragraph is to do just the opposite: The paragraph moves down one level in the outline. If you demote the “Shakespeare was 46 years old in 1611” paragraph in Figure 3-1, it becomes a subpoint under “King James Bible published in 1611” rather than a separate main point.
To demote a paragraph, place the cursor anywhere in the paragraph and then either press the Tab key or click the Increase List Level button in the Paragraph group on the Home tab.
Note that you can’t promote a slide title. Slide title is the highest rank in the outline hierarchy. If you demote a slide title, the entire slide is subsumed into the preceding slide. In other words, the slide title becomes a main point in the preceding slide.
You can promote or demote paragraphs by using the mouse, but the technique is a little tricky. When you move the cursor over a bullet (or the Slide button), the pointer changes from a single arrow to a four-cornered arrow. This arrow is your signal that you can click to select the entire paragraph (and any subordinate paragraphs). Then, you can use the mouse to promote or demote a paragraph along with all its subordinates by dragging the selected paragraph left or right.
Be sensitive when you demote paragraphs. Being demoted can be an emotionally devastating experience.
Adding a New Paragraph
To add a new paragraph to a slide with the outline that appears on the Outline tab, move the insertion point to the end of the paragraph that you want the new paragraph to follow and then press Enter. PowerPoint creates a new paragraph at the same outline level as the preceding paragraph.
Note that if you move the insertion point to the end of the title line and press Enter, PowerPoint creates a new slide. However, you can then press the Tab key to change the new slide to a paragraph on the preceding slide.
If you position the insertion point at the beginning of a paragraph and press Enter, the new paragraph is inserted above the cursor position. If you position the cursor in the middle of a paragraph and press Enter, the paragraph is split in two.
After you add a new paragraph, you might want to change its level in the outline. To do that, you must promote or demote the new paragraph (as described in the preceding section). To create a subpoint for a main point, for example, position the cursor at the end of the main point and press Enter. Then, demote the new paragraph by pressing the Tab key.
Adding a New Slide
You can add a new slide in many ways when you’re working with the outline. This list shows the most popular methods:
![]() Promote existing text: Promote an existing paragraph to the highest level. This method splits a slide into two slides.
Promote existing text: Promote an existing paragraph to the highest level. This method splits a slide into two slides.
![]() Promote new text: Add a new paragraph and then promote it to the highest level.
Promote new text: Add a new paragraph and then promote it to the highest level.
![]() Press Enter: Place the cursor in a slide’s title text and press Enter. This method creates a new slide before the current slide. Whether the title text stays with the current slide, goes with the new slide, or is split between the slides depends on the location of the cursor within the title when you press Enter.
Press Enter: Place the cursor in a slide’s title text and press Enter. This method creates a new slide before the current slide. Whether the title text stays with the current slide, goes with the new slide, or is split between the slides depends on the location of the cursor within the title when you press Enter.
![]() Press Ctrl+Enter: Place the cursor anywhere in a slide’s body text and press Ctrl+Enter. This method creates a new slide immediately following the current slide. The position of the cursor within the existing slide doesn’t matter; the new slide is always created after the current slide. (The cursor must be in the slide’s body text, however, in order for this method to work. If you put the cursor in a slide title and press Ctrl+Enter, the cursor jumps to the slide’s body text without creating a new slide.)
Press Ctrl+Enter: Place the cursor anywhere in a slide’s body text and press Ctrl+Enter. This method creates a new slide immediately following the current slide. The position of the cursor within the existing slide doesn’t matter; the new slide is always created after the current slide. (The cursor must be in the slide’s body text, however, in order for this method to work. If you put the cursor in a slide title and press Ctrl+Enter, the cursor jumps to the slide’s body text without creating a new slide.)
![]() Insert a new slide: Place the cursor anywhere in the slide and use the keyboard shortcut Ctrl+M or click the Add Slide button in the Slides group of the Home Ribbon tab.
Insert a new slide: Place the cursor anywhere in the slide and use the keyboard shortcut Ctrl+M or click the Add Slide button in the Slides group of the Home Ribbon tab.
![]() Duplicate an existing slide: Select an existing slide by clicking the slide’s icon or triple-clicking the title, and then press Ctrl+D to duplicate it.
Duplicate an existing slide: Select an existing slide by clicking the slide’s icon or triple-clicking the title, and then press Ctrl+D to duplicate it.
Because the outline focuses on slide content rather than on layout, new slides receive the basic Title and Content layout, which includes title text and body text formatted with bullets.
Moving Text Up and Down
The outline is a handy way to rearrange your presentation. You can easily change the order of individual points on a slide, or you can rearrange the order of the slides.
You can rearrange your presentation by right-clicking the paragraphs that you want to move and then clicking the Move Up or Move Down button in the menu that appears. Or you can point to the bullet next to the paragraph that you want to move. Then, when the cursor changes to the four-cornered arrow, click and drag the paragraph up or down. A horizontal line appears, showing the horizontal position of the selection. Release the mouse button when the horizontal line is positioned where you want the text.
Be careful when you’re moving text in a slide that has more than one level of body text paragraphs. Notice the position of the horizontal line when you drag the selection; the entire selection is inserted at that location, which might split up subpoints. If you don’t like the result of a move, you can always undo it by pressing Ctrl+Z or clicking the Undo button.
Collapsing and Expanding the Outline
If your presentation has many slides, you might find that grasping its overall structure is difficult, even when looking at the outline. Fortunately, PowerPoint enables you to collapse the outline so that only the slide titles are shown. Collapsing an outline doesn’t delete the body text; it merely hides the body text so that you can focus on the order of the slides in your presentation.
Expanding a presentation restores the collapsed body text to the outline so that you can once again focus on details. You can collapse and expand an entire presentation, or you can collapse and expand one slide at a time.
To collapse the entire presentation, right-click anywhere in the outline and then choose Collapse⇒Collapse All or use the keyboard shortcut Alt+Shift+1. To expand the presentation, right-click and choose Expand⇒Expand All or press Alt+Shift+9.
To collapse a single slide, right-click anywhere in the slide and then choose Collapse⇒Collapse from the menu that appears. To expand a single slide, right-click the collapsed slide and choose Expand⇒Expand.