![]()
17
Collaborating in the Cloud
In This Chapter
![]() Saving a presentation to the cloud
Saving a presentation to the cloud
![]() Inviting others to view or edit a shared presentation
Inviting others to view or edit a shared presentation
![]() Sending your presentation via e-mail
Sending your presentation via e-mail
![]() Adding comments to a presentation
Adding comments to a presentation
![]() Comparing changes in a revised version of a presentation
Comparing changes in a revised version of a presentation
“Works well with others” is more than standard fare for rookie resumes. It’s also one of the PowerPoint mantras. Many presentations are designed not by and for a single presenter, but by a team of presenters. Fortunately, PowerPoint includes several simple tools that let you distribute your presentation to others and allow others to add comments to the presentation so you can get their feedback.
This chapter shows you how to use those features.
Sharing a Presentation in the Cloud
Recently, the term cloud computing has become one of the most popular of all computer buzzwords. Cloud computing refers to the idea of not being limited to local computer resources (such as disc storage or CPU cycles), but instead taking advantage of the nearly limitless resources that are available to you via the cloud (aka the Internet).
Microsoft has integrated cloud computing into PowerPoint 2013 by providing its own dedicated cloud storage resource, called SkyDrive, and designating it as one of the primary places you can store your PowerPoint presentations. When you install Office 2013, you are given the opportunity to create a free SkyDrive account that offers up to 7GB of free cloud storage, with the capability to purchase additional storage.
In addition to storing PowerPoint presentations on SkyDrive, you can also share your presentations with other SkyDrive users so that you can collaboratively view and edit your work. Before you can share a presentation with another user, you must first save the presentation to your SkyDrive account. To do so, just follow these steps:
1. Choose File⇒Save As.
The Save As page appears, which offers several locations to which the presentation can be saved as shown in Figure 17-1. The default location is your SkyDrive account.
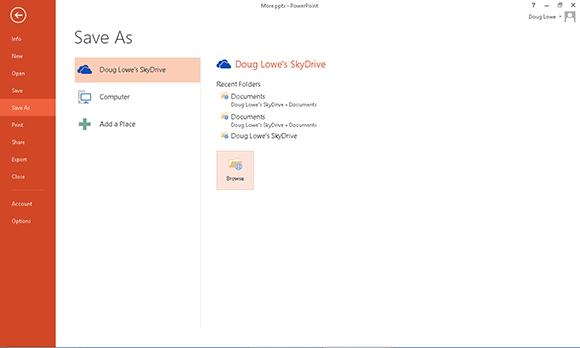
Figure 17-1: Saving a presentation.
2. Click the Browse button.
The Save As dialog box appears, as shown in Figure 17-2. As you can see, this dialog box automatically navigates to your SkyDrive account’s Documents folder.
3. Navigate to another SkyDrive folder or create a new SkyDrive folder.
You can navigate SkyDrive as if it were a local hard drive. And you can create a new folder by clicking the New Folder button.
4. Change the filename and then click Save.
The presentation is saved to your SkyDrive.
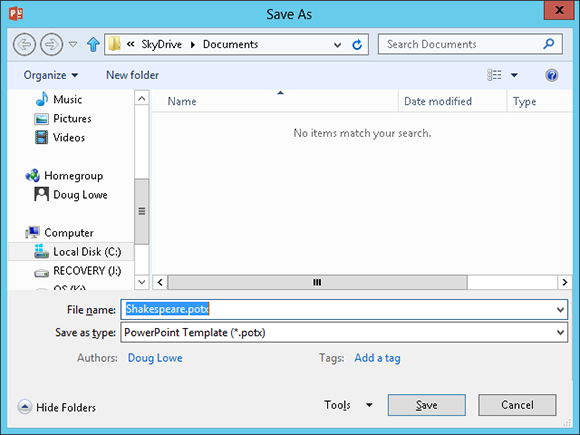
Figure 17-2: Browsing to your SkyDrive Documents folder.
Sharing a Presentation with Other Users
You can easily share a presentation with a friend or colleague by sending an invitation via e-mail. The invitation e-mail will include a link that will open the presentation in a web-based version of PowerPoint called the PowerPoint Web App. From the PowerPoint Web App, the user can view the presentation. If the user has PowerPoint installed on his or her computer, the user can also open the presentation in PowerPoint, edit the presentation, add comments (as described later in this chapter), and save the edited presentation in the original SkyDrive location.
Here are the steps to send an invitation:
1. Save your presentation to SkyDrive.
2. Choose File⇒Share and then click Invite People.
The Invite People page appears, as shown in Figure 17-3. On this page, you can craft an e-mail message that will be sent to the people with whom you’d like to share the presentation.
3. Type one or more e-mail addresses in the Type Names or E-mail Addresses text box.
If you have more than one e-mail address, just separate the addresses with commas or semicolons.
 You can click the Address Book icon to the right of the text box to bring up your address book. Then, you can select names from your address book rather than type the e-mail addresses manually.
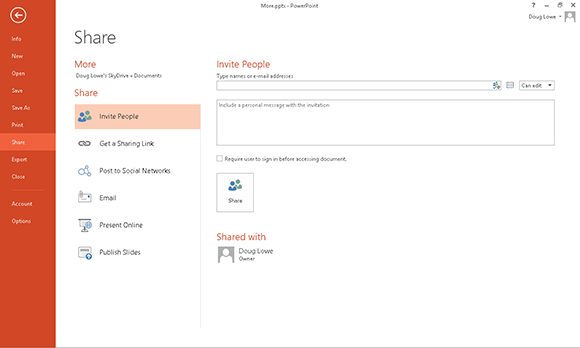
Figure 17-3: Sending an invitation.
4. Choose the sharing permission you want to grant.
The two options are Can Edit and Can View. Use the drop-down list to the right of the Address Book icon to select the permission.
5. If you wish, type a message in the Include a Personal Message with the Invitation text box.
The message is included in the e-mail that is sent to the recipients.
6. If you want to add extra security, select the Require User to Sign-In Before Accessing Document option.
If you select this option, users will have to log in to SkyDrive before they can access your presentation.
7. Click Share.
A confirmation message appears, indicating that the e-mails have been sent.
Figure 17-4 shows a typical invitation e-mail.
To open a shared presentation in PowerPoint Web App, simply click the link in the invitation. Figure 17-5 shows a presentation opened in Web App. You can view the entire presentation in Web App, or you can open the presentation in PowerPoint by clicking the Open in PowerPoint button. (Note that to open the presentation in PowerPoint, you must have a copy of PowerPoint installed on your computer).

Figure 17-4: An invitation to a shared PowerPoint presentation.
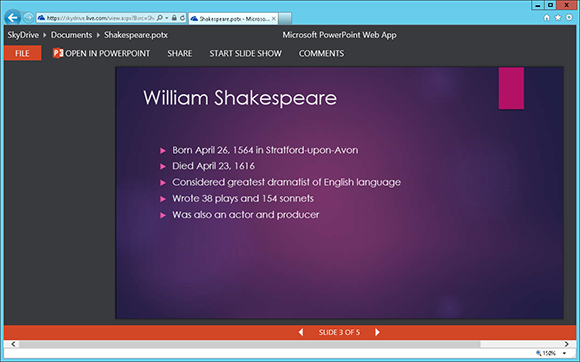
Figure 17-5: A shared presentation open in the PowerPoint Web App.
If you want to manually send your own e-mail with a link that allows users to view or edit your presentation, you can choose File⇒Share⇒Get a Link. This displays a page that allows you to create a View Link or an Edit Link, which you can then copy and paste as needed.
Sharing a Presentation on Social Networks
Another way to share a presentation is via a social network such as Facebook or Twitter. To do that, choose File⇒Share⇒Post to Social Networks. This displays the page shown in Figure 17-6, which lists the social networks that you have associated with your SkyDrive account. Select the permission option (Can View or Can Edit), add a personal message if you wish, and then click Post.
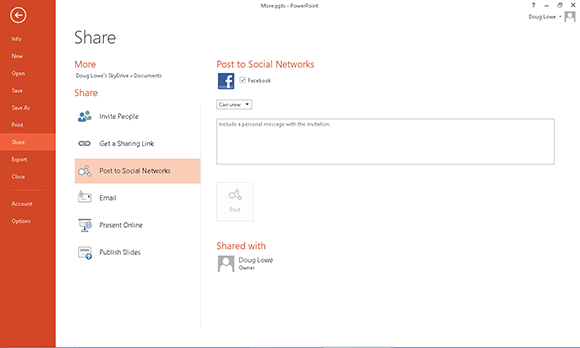
Figure 17-6: Sharing a presentation via social media.
Figure 17-7 shows how a PowerPoint presentation appears when posted on Facebook. Your friends can click the link to view or edit the presentation in the PowerPoint Web App.

Figure 17-7: A shared presentation posted to Facebook.
Sending Slides for Review Via E-mail
Another way to share a presentation with colleagues is to simply e-mail them a copy of the presentation. PowerPoint includes a built-in feature for doing that. Here are the steps:
1. Open the presentation that you want to send out for review.
If the presentation is already open, choose File⇒Save to save any changes you made since you opened it.
2. Choose File⇒Share⇒Email.
PowerPoint displays the page shown in Figure 17-8, which offers five options for sending the file. The five options are
• Send as Attachment: This is the most commonly used option. It simply creates an e-mail message with the presentation file inserted as an attachment.

Figure 17-8: Sending a presentation via e-mail.
• Send a link: This option works best if you’ve saved the presentation to SkyDrive. It then creates an e-mail that contains a link that the recipient can click to open the presentation.
• Send as PDF: This option creates a PDF version of the presentation, and then creates an e-mail that contains the PDF version as an attachment.
• Send as XPS: This option creates an XPS version of the presentation (XPS is Microsoft’s attempt at competing with PDF) and then creates an e-mail that contains the XPS version as an attachment.
• Send as Internet Fax: If you have an account with an Internet fax service, you can use this option to send a fax of your presentation. (This option would be more useful in today’s world if it could also send your presentation back in time, so that, for example, the recipient would receive the fax in 1983 — when faxing was popular.)
3. Click the option you want to use to send the e-mail.
Outlook fires up and creates an e-mail message with the correct attachment or link, depending on which option you choose.
4. In the To field, add an e-mail address for each person to whom you want to send a review copy.
You can type the e-mail addresses directly into the To field, or you can click the To button to open the Address Book. You can then use the Address Book to select your reviewers.
If you want to send the presentation to more than one person, separate the e-mail addresses with semicolons.
5. If you want, change the Subject field or message body.
By default, PowerPoint uses the filename as the message’s subject and leaves the message body blank. You probably want to say something a little more cordial.
6. Set any other e-mail options you want for the message.
Depending on the program you use for your e-mail, you have a bevy of options to set for e-mail messages, such as high or low priority, signatures, stationery, read receipts, plain or HTML formatting, and more.
7. Click the Send button.
Your message is whisked away and will be delivered as soon as possible.
Using Comments
So far in this chapter, I’ve showed you several ways to share a presentation with others so that two or more people can collaborate on a document. But after the presentation has been shared, what exactly can you do to work collaboratively? In this section, I show you one of the best ways to collaborate — by adding comments to a presentation.
A comment is a lot like a sticky note. The beauty of comments is that you can turn them on and off. Therefore, you can view the comments while you’re editing your presentation, and you can turn them off when it’s time for the show.
To add a comment to a presentation, follow these steps:
1. Call up the slide to which you want to add a comment.
2. Click where you want the comment to appear.
You can click anywhere in the slide.
3. Open the Review tab on the Ribbon and then click the New Comment button.
A comment bubble appears on the slide, and the Comments task pane opens to the right of the slide.
4. Type whatever you want in the Comment pane.
Offer some constructive criticism. Suggest an alternative approach. Or just comment on the weather. Figure 17-9 shows a completed comment.
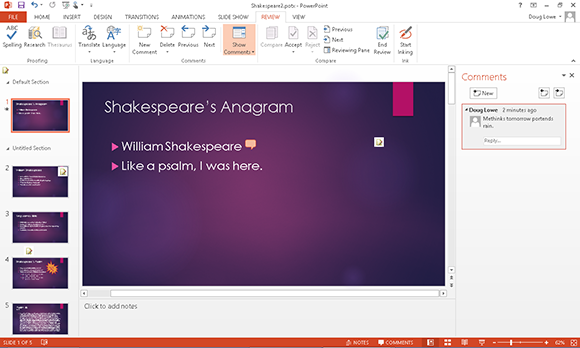
Figure 17-9: Creating a comment.
5. If you want, move the comment bubble.
You can move the comment closer to the slide item on which you’re commenting by dragging the comment tag around the slide.
Here are some additional thoughts concerning working with comments:
![]() To view a comment, click the comment bubble.
To view a comment, click the comment bubble.
![]() To change a comment, click the comment in the Comments pane and then edit the text in the comment until you’re satisfied.
To change a comment, click the comment in the Comments pane and then edit the text in the comment until you’re satisfied.
![]() You can move a comment by dragging it. Note that comments are not attached to any particular slide object or text. Therefore, if you move a comment near the text or object that the comment applies to and then edit the slide so that the text or object moves, the comment will not move along with the text or object. You have to manually move the comment if you want it to stay near the text or object it applies to.
You can move a comment by dragging it. Note that comments are not attached to any particular slide object or text. Therefore, if you move a comment near the text or object that the comment applies to and then edit the slide so that the text or object moves, the comment will not move along with the text or object. You have to manually move the comment if you want it to stay near the text or object it applies to.
![]() To delete a comment, click the comment to select it and then press Delete.
To delete a comment, click the comment to select it and then press Delete.
![]() To delete all the comments on a particular slide, click the down arrow beneath the Delete button on the Review tab. Then choose Delete All Markup on the Current Slide.
To delete all the comments on a particular slide, click the down arrow beneath the Delete button on the Review tab. Then choose Delete All Markup on the Current Slide.
![]() To delete all the comments in a presentation, click the down arrow beneath the Delete button and choose Delete All Markup in This Presentation.
To delete all the comments in a presentation, click the down arrow beneath the Delete button and choose Delete All Markup in This Presentation.
![]() You can quickly scan through all the comments in a PowerPoint presentation by using the Previous and Next buttons on the Review tab on the Ribbon.
You can quickly scan through all the comments in a PowerPoint presentation by using the Previous and Next buttons on the Review tab on the Ribbon.
![]() You can use the Show Comments button on the Review tab to show or hide comments from a presentation.
You can use the Show Comments button on the Review tab to show or hide comments from a presentation.
Comparing Presentations
The Compare feature lets you compare the differences between two versions of a presentation and accept or reject the differences. This feature is useful if you’ve sent a copy of the presentation to a reviewer and you want to selectively incorporate the reviewer’s changes.
Using the Compare feature is easy. Here are the steps:
1. Open the original version of the presentation.
2. On the Review tab of the Ribbon, click the Compare button.
A dialog box appears that lets you open the revised version of the presentation.
3. Navigate to the revised version of the presentation, select it, and click Open.
This action opens the revised version of the presentation and merges the two presentations together, keeping track of the differences between the original presentation and the revised version.
The differences between the original and the revised versions are highlighted, as shown in Figure 17-10. As you can see, the revisions are shown as check boxes, which allow you to select the individual changes you want to accept or reject. You can also select the All Changes . . . check box to accept or reject all the changes for a given object.
4. Use the check boxes to select the changes you want to accept or reject; then click either Accept or Reject on the Review tab of the Ribbon.
If you click Accept, the selected changes are incorporated into the drawing. If you click Reject, the original version of the selected changes is restored.
5. Click the Next button found in the Compare section of the Review tab to move to the next set of edits.
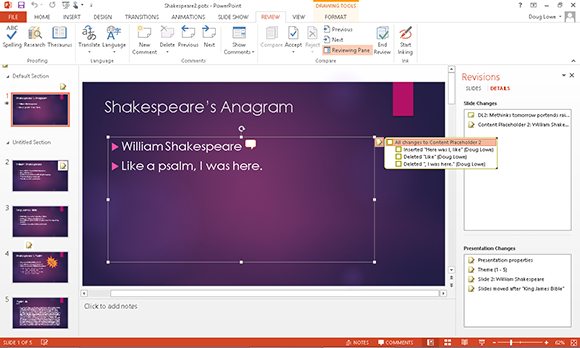
Figure 17-10: PowerPoint shows the differences between the original and revised versions of a presentation.
6. Repeat Steps 4 and 5 until you have accepted or rejected all the edits to the presentation.
7. Click the End Review button (in the Compare group of the Review tab of the Ribbon) when you’re finished.
This step hides any remaining edits that you haven’t yet accepted or rejected.
8. Save the presentation.