![]()
8
Designing Your Slides
In This Chapter
![]() Understanding how to use themes
Understanding how to use themes
![]() Using theme colors, fonts, and effects
Using theme colors, fonts, and effects
![]() Playing with the background
Playing with the background
One of the most bothersome tasks of putting together a good PowerPoint presentation is making the presentation look good. Always wanting to be helpful in such matters, Microsoft has endowed PowerPoint with a feature called themes that lets you create good-looking slides in minutes. One of the best features of themes is that they work not only in PowerPoint, but also in Word and Excel. Thus, you can use themes to create PowerPoint presentations, Word documents, and Excel spreadsheets that have a consistent appearance.
The main access to PowerPoint themes is from the Design tab on the Ribbon. This entire chapter is devoted to this Design tab. To keep things simple, I approach this most useful tab from left to right even though that’s not always the order in which you use the controls it contains.
Looking at the Design Tab
To get things started, Figure 8-1 shows the Design tab on the Ribbon. As you can see, the Design tab contains several groups of controls that let you set various aspects of the slide design used within your presentation. You can summon the Design tab by clicking it on the Ribbon or by using the handy keyboard shortcut Alt+G.

Figure 8-1: The Design tab.
The following list describes the general purpose of each group of controls on the Design tab:
![]() Themes: Lets you apply a theme to the presentation. This is the group you work with most while you play with the design of your slides.
Themes: Lets you apply a theme to the presentation. This is the group you work with most while you play with the design of your slides.
![]() Variants: Lets you choose from several minor variants of a given theme.
Variants: Lets you choose from several minor variants of a given theme.
![]() Customize: Lets you change the slide size and background appearance.
Customize: Lets you change the slide size and background appearance.
Working with Themes
The Themes group of the Design tab lets you select a theme to apply to your slides. PowerPoint 2013 comes with a ton of carefully crafted themes that give a professional look to your presentations. If you’re somewhat artsy, you can design your own themes, as well.
A theme is a set of design elements that are applied to one or more slides in a presentation. Each theme includes several basic components:
![]() A set of colors that work well together. Each theme has four colors that can be used for text or backgrounds and six colors that can be used for accents.
A set of colors that work well together. Each theme has four colors that can be used for text or backgrounds and six colors that can be used for accents.
![]() A set of fonts that looks good when used together. Each theme has a font used for headings and a font used for regular text.
A set of fonts that looks good when used together. Each theme has a font used for headings and a font used for regular text.
![]() A set of background styles, which are a combination of background colors and effects such as patterns or gradient fills.
A set of background styles, which are a combination of background colors and effects such as patterns or gradient fills.
![]() A set of design effects, such as line and fill styles and line styles.
A set of design effects, such as line and fill styles and line styles.
Office ships with 21 predefined themes. These themes are named as follows:
![]() Office Theme
Office Theme
![]() Facet
Facet
![]() Integral
Integral
![]() Ion
Ion
![]() Ion Boardroom
Ion Boardroom
![]() Organic
Organic
![]() Retrospect
Retrospect
![]() Slice
Slice
![]() Wisp
Wisp
![]() Banded
Banded
![]() Basis
Basis
![]() Celestial
Celestial
![]() Dividend
Dividend
![]() Frame
Frame
![]() Mesh
Mesh
![]() Metropolitan
Metropolitan
![]() Parallax
Parallax
![]() Quotable
Quotable
![]() Savon
Savon
![]() View
View
![]() Wood Type
Wood Type
Each of these 21 themes is available in for color variations, which yields a total of 84 distinct theme variants you can apply to your slides.
Applying themes
To apply a theme to an entire presentation, simply click the theme you want to apply in the Themes group on the Design tab. If the theme you want to apply isn’t visible, use the scroll buttons on the right side of the Themes group to display additional themes.
When you have selected a theme in the Themes group, variations on the theme will appear in the Variants group. You can then click on one of the variants you want to use.
 To see a preview of how your presentation will appear with a particular theme, hover the mouse over that theme in the gallery. After a moment, the current slide momentarily appears formatted with the theme. If you move the mouse off the theme without actually clicking the theme, the current slide reverts to its previous formatting.
You can click the down arrow in the scroll bars in the Theme gallery, which displays an expanded list of themes, as shown in Figure 8-2. As you can see, this window displays PowerPoint’s built-in themes and also includes links that let you browse for additional themes. A link even lets you save the current combination of theme elements as a new theme.
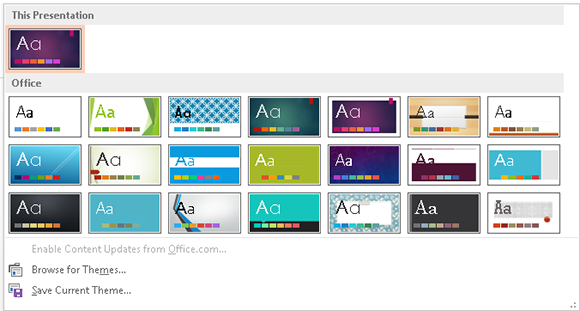
Figure 8-2: The Theme gallery.
Not all the slides in a presentation have to follow the same theme. To apply a theme to a single slide — or a set of slides — select the slide(s). Then, right-click the theme you want to apply and choose Apply to Selected Slides.
Using theme colors
Each PowerPoint theme includes a built-in color scheme, which consists of sets of colors chosen by color professionals. Microsoft paid these people enormous sums of money to debate the merits of using mauve text on a teal background. You can use these professionally designed color schemes, or you can create your own if you think that you have a better eye than the Microsoft-hired color guns.
As far as I’m concerned, the color schemes in PowerPoint themes are the best things to come along since Peanut M&Ms. Without color schemes, people like me are free to pick and choose from among the 16 million or so colors that PowerPoint lets you incorporate into your slides. The resulting slides can easily appear next to Cher and Lindsay Lohan in People magazine’s annual “Worst Dressed of the Year” issue.
Each color scheme has 12 colors, with each color designated for a particular use, as shown in this list:
![]() Four Text/Background colors: These four colors are designed to be the primary colors for the presentation. One from each pair is used for text, and the other for the background. (You could use the same color for both, but that would make the slides impossible to read!)
Four Text/Background colors: These four colors are designed to be the primary colors for the presentation. One from each pair is used for text, and the other for the background. (You could use the same color for both, but that would make the slides impossible to read!)
![]() Six accent colors: These colors are used for various bits and pieces of your slides that complement the basic text and background colors.
Six accent colors: These colors are used for various bits and pieces of your slides that complement the basic text and background colors.
![]() Two hyperlink colors: These colors are used only when your presentation includes hyperlinks.
Two hyperlink colors: These colors are used only when your presentation includes hyperlinks.
When you apply a theme, the color scheme for that theme is applied along with the other elements of the theme. However, PowerPoint lets you change the color scheme from the scheme that comes with the theme. For example, you can apply a theme such as Opulent but then change the color scheme to the scheme from the Verve theme.
Applying a color scheme
To change the standard color scheme used for your slides, you must first switch to Slide Master view. You find out more about working with Slide Masters in Chapter 10, but for now just realize that a Slide Master controls the overall appearance of one or more slides. To switch to Slide Master view, open the View tab in the Ribbon and click the Slide Master button. In the Background group, you’ll find a Colors button, which you can click to reveal the drop-down list shown in Figure 8-3. Then you can choose the color scheme you want to apply.

Figure 8-3: The Colors drop-down list.
Creating your own color scheme
If you don’t like any color schemes that come with the built-in themes, you can create your own color scheme. Here are the steps:
1. Select a color scheme that’s close to the one you want to use.
 Be warned that after you deviate from the preselected color scheme combinations, you’d better have some color sense. If you can’t tell chartreuse from lime, you should leave this stuff to the pros.
2. Click the Theme Colors button and then choose Create New Theme Colors.
The Create New Theme Colors dialog box appears, as shown in Figure 8-4.
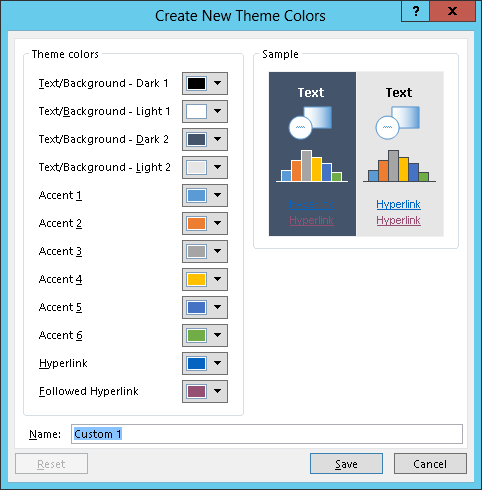
Figure 8-4: Creating new theme colors.
3. Click the button for the color you want to change.
For example, to change the first accent color, click the Accent 1 button. You then see a gallery of color choices, as shown in Figure 8-5.
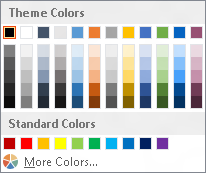
Figure 8-5: Changing a color.
4. Pick a color you like.
As you can see, a plethora of color choices are available. This gallery reminds me of the shelf of paint color chips in the paint section of a hardware store.
5. If you don’t like any of the choices, click the More Colors button.
Doing this brings up the Colors dialog box, as shown in Figure 8-6. As you can see, PowerPoint displays what looks like a tie-dyed version of Chinese checkers. (Note that this dialog box comes up with the Standard tab selected. If you used the Custom tab the last time you used this dialog box, the Custom tab will be selected instead.)
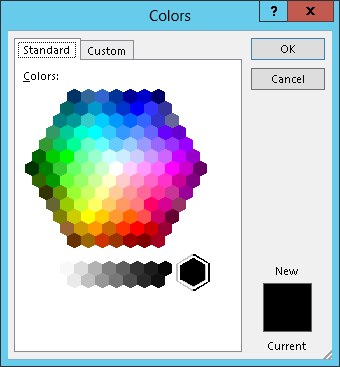
Figure 8-6: A wonderful world of color.
6. Click the color that you want and then click OK.
After you click OK, you’re whisked back to the Create New Theme Colors dialog box.
7. (Optional) Repeat Steps 3 through 6 for any other colors you want to change.
8. Click Save.
The new color scheme is saved.
 The Standard tab of the Colors dialog box (refer to Figure 8-6) shows 127 popular colors, plus white, black, and shades of gray. If you want to use a color that doesn’t appear in the dialog box, click the Custom tab. This step draws forth the custom color controls, as shown in Figure 8-7. From this tab in the dialog box, you can construct any of the 16 million colors that are theoretically possible with PowerPoint. You need a PhD in physics to figure out how to adjust the Red, Green, and Blue controls, though. Mess around with this stuff if you want, but you’re on your own.

Figure 8-7: PowerPoint offers 16 million colors from which you can choose.
Using theme fonts
Theme fonts are similar to theme colors, but theme fonts have fewer choices. Although there are 12 colors per theme, there are only two fonts: one for headings, the other for body text.
If you don’t want to use the fonts associated with the theme you’ve chosen for your presentation, you can use the Theme Fonts button at the right side of the Themes group on the Design tab on the Ribbon to choose fonts from a different theme. Then the fonts you select are applied throughout your presentation.
Note that changing the theme font is not the same as changing the font via the Font controls found in the Font group of the Home tab. When you use the Font controls on the Home tab, you’re applying direct formatting. Direct formatting temporarily overrides the font setting specified by the theme. As a general rule, you should use theme fonts to set the fonts used throughout a presentation. Use direct formatting sparingly — when you want to create a word or two in a font that differs from the rest of the presentation.
You can change the font used in a theme by clicking the Theme Fonts button and then choosing Customize Fonts. Doing this brings up the Create New Theme Fonts dialog box, as shown in Figure 8-8. Here you can change the font used for headings and body text.
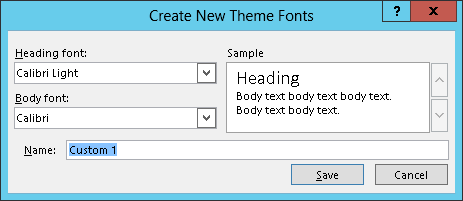
Figure 8-8: Changing theme fonts.
Applying theme effects
Another major component of PowerPoint themes are the theme effects, which apply subtle variations to the graphical look of your presentations. Theme effects are applied automatically whenever you apply a theme. However, you can apply theme effects from a different theme by clicking the Effects button at the right side of the Themes group on the Design tab on the Ribbon. This brings up the Theme Effects gallery, as shown in Figure 8-9. You can choose any of the theme effects listed.
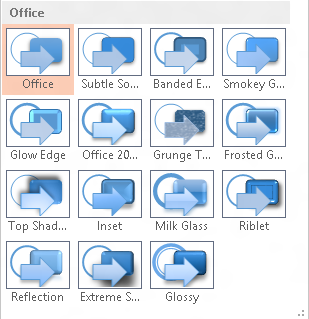
Figure 8-9: Changing theme effects.
Changing the Slide Size
The Customize group of the Design ribbon tab includes a Slide Size control that lets you change the size of the slide from standard to widescreen. You should use widescreen only if you plan on showing the presentation on a projector that displays in widescreen format.
Besides standard and widescreen formats, you can also click the Slide Size button and then choose Customize Slide Size. Doing this brings up the Slide Size dialog box, as shown in Figure 8-10. This dialog box gives you extra control over your presentation’s page setup.
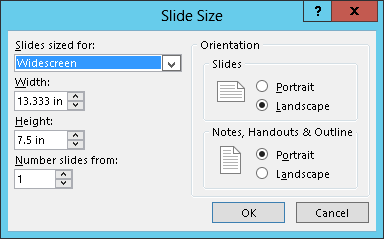
Figure 8-10: The Slide Size dialog box.
The following list describes the controls in this dialog box:
![]() Slides Sized For: This drop-down list lets you set the size of your slides based on how you plan to present them. The most common is to present the slides on a standard computer screen, which has an aspect ratio of 4:3. (Aspect ratio is the ratio of the screen’s width to its height. Although 4:3 is a common aspect ratio, many newer computers use widescreen displays, which usually have an aspect ratio of 16:10.) Other options on this drop-down list include different screen ratios (suitable for widescreen displays), standard sized paper, and even 35mm slides. A Custom option even lets you set whatever width and height you want for your slides.
Slides Sized For: This drop-down list lets you set the size of your slides based on how you plan to present them. The most common is to present the slides on a standard computer screen, which has an aspect ratio of 4:3. (Aspect ratio is the ratio of the screen’s width to its height. Although 4:3 is a common aspect ratio, many newer computers use widescreen displays, which usually have an aspect ratio of 16:10.) Other options on this drop-down list include different screen ratios (suitable for widescreen displays), standard sized paper, and even 35mm slides. A Custom option even lets you set whatever width and height you want for your slides.
![]() Width: Lets you set a custom width for your slides.
Width: Lets you set a custom width for your slides.
![]() Height: Lets you set a custom height for your slides.
Height: Lets you set a custom height for your slides.
![]() Number Slides From: If your slides include numbers, this option lets you set the number for the first slide. The default is 1.
Number Slides From: If your slides include numbers, this option lets you set the number for the first slide. The default is 1.
![]() Orientation: Lets you set the orientation to portrait (tall and skinny) or landscape (short and fat). You can set the setting separately for your slides, handouts, and notes. The most common setting is for the slides to use landscape orientation and the notes and handouts to use portrait.
Orientation: Lets you set the orientation to portrait (tall and skinny) or landscape (short and fat). You can set the setting separately for your slides, handouts, and notes. The most common setting is for the slides to use landscape orientation and the notes and handouts to use portrait.
Using Background Styles
A background style is a combination of a background color chosen from a theme color scheme and a background fill effect. The color scheme always includes four colors that can be used for the background — two light colors and two dark colors. In addition, you can choose from three background fill effects. These three fills are Subtle, Moderate, and Intense. For example, the Subtle fill might be a solid color, the Moderate fill might be a gentle pattern applied to the color, and the Intense fill might be a bold gradient fill.
Each combination of the four background colors and three background fills is a background style. Thus, each theme provides a total of 12 background styles.
To apply one of the theme’s background styles to your presentation, use the Background Styles control in the Background group on the Design tab. This control reveals the Background Styles gallery, as shown in Figure 8-11.
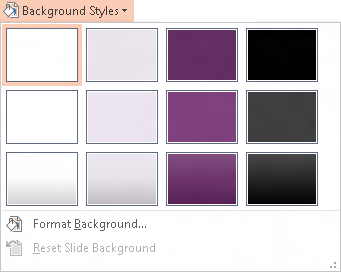
Figure 8-11: Changing the background style.
Using a gradient fill
You may have noticed that the slide background used in many PowerPoint templates is not a solid color. Instead, the color is gradually shaded from top to bottom. This type of shading — gradient fill — creates an interesting visual effect. For example, look at the slide shown in Figure 8-12. This slide was based on the standard Office Theme that comes with PowerPoint 2013. The background is light pink in the center and fades to darker pink on the edges.

Figure 8-12: Using a gradient fill to create an interesting background.
You can create your own custom gradient fill by following these steps:
1. Choose the slide that you want to shade.
This step isn’t necessary if you want to apply the shading to all slides in the presentation.
2. Click the Background Styles button in the Background group of the Design tab on the Ribbon.
The Background Styles gallery appears.
3. Click Format Background.
Doing this brings up the Format Background pane that appears to the right of the slide, as shown in Figure 8-13.
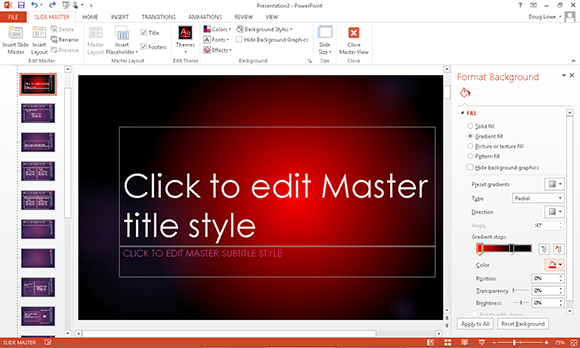
Figure 8-13: The Format Background pane.
4. Select the Gradient Fill radio button if it isn’t already selected.
5. Set the gradient fill options the way you want them.
You have to play with the controls until you get a feel for how they work. Start by selecting the present colors, which let you choose one of several predefined fill patterns. Then play with the controls until you get the fill to look the way you want. You can choose the colors to use for the fill, the transparency level, the direction, and several variants for each option.
6. Click OK.
Using other background effects
Besides gradient fills, you can use the Format Background dialog box to create several other interesting types of backgrounds. For example, you can assign a picture of your choosing, or you can use one of several predefined patterns supplied with PowerPoint.
To use a texture, select the Picture or Texture Fill radio button. Then click the Texture button to reveal the Texture gallery, as shown in Figure 8-14.

Figure 8-14: Using a textured background.
You can also use the Picture or Texture Fill radio button to select an image file of your own. Just click the File button and then select the file you want to use. Or, you can import an image from the Clipboard or select a clip art image. The remaining controls on this dialog box let you further tweak the appearance of the picture or text you select.