Chapter 6
Animating a Thrown Knife
This chapter is a continuation of the animation work you began in Chapter 5, “Animating a Bouncing Ball.” It introduces you to some new animation fundamentals—this time by animating a thrown knife.
Topics in this chapter include the following:
- Anticipation and momentum in knife throwing
Anticipation and Momentum in Knife Throwing
This exercise will give you more experience with 3ds Max® animation techniques. You will edit more in the Curve Editor (yeh!) and be introduced to the concepts of anticipation, momentum, and secondary movement. First, download the Knife project from this book’s companion web page (www.sybexcom/go/3dsmax2013essentials). Set your 3ds Max project folder by choosing Application ⇒ Manage ⇒ Set Project Folder and selecting the Knife project that you downloaded.
Blocking Out the Animation
To begin this exercise, open the Animation_Knife_00.max file in the Knife project and follow along here:
1. Move the Time slider to frame 30 and activate the Auto Key button.
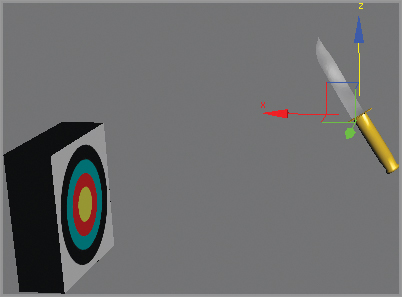
2. Move the knife to the Target object, as shown in
Figure 6-1.
3. Move the Time slider to frame 15, where the knife is halfway between its start and the target, and move the knife slightly up on the Z-axis so that the knife moves with a slight arc, as shown in
Figure 6-2.
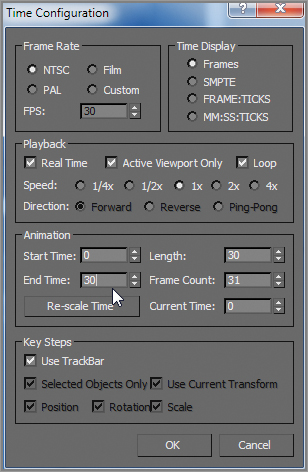
4. Click the Time Configuration icon (

) at the bottom of the UI next to the navigation controls.
Figure 6-3 shows the Time Configuration dialog box. In the Animation section, change End Time to 30 from 100 and click OK. The Time slider will reflect this change immediately.
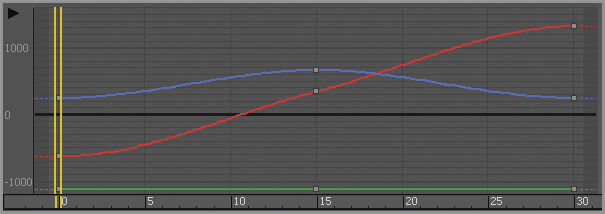
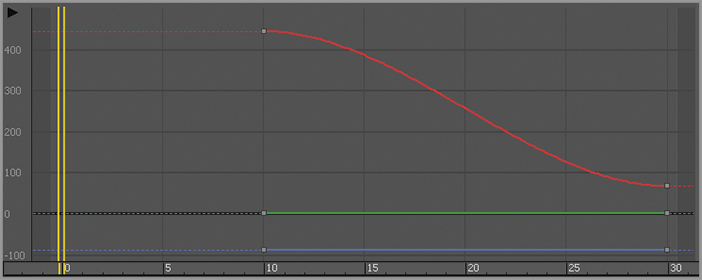
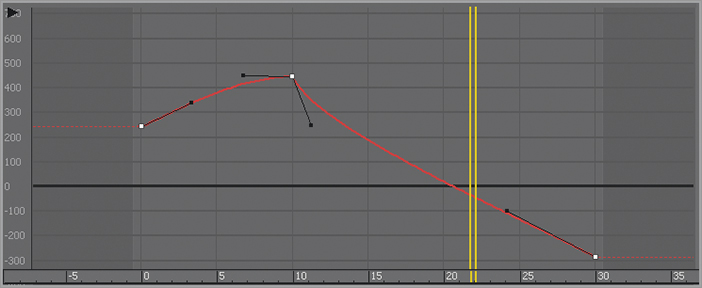
5. Play your animation, and you should see the knife move with a slight ease-out and ease-in toward the target, with a slight arc up in the middle. The animation of the knife needs to start at frame 0, so open the Curve Editor and scroll down in the Controller window until you see the X, Y, Z Position tracks for the knife. Hold the Ctrl key and select all three tracks to display their curves, as shown in
Figure 6-4.
6. Drag a selection marquee around the three keys at frame 0. In the Key Controls toolbar, select and hold the Move Keys tool (

) to access the flyout icons, and select the Move Keys Horizontal tool in the flyout (

). Use this tool to move the keys to frame 10.
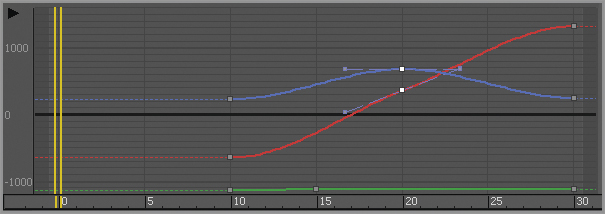
7. Doing so compacts the curve, so you need to move the keys at frame 15 to the new middle, frame 20. The finished curve is shown in
Figure 6-5.
That’s it for the gross animation (or blocking) of the shot. Did you have fun?
Trajectories
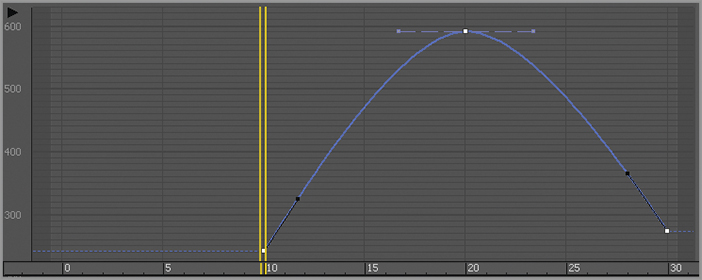
When it comes to animation, it is very helpful to be able to see an object’s trajectory (the path the object is taking over time). Select the Knife object, go to the Command panel, click the Motion icon ( ) to open the options shown in Figure 6-6, and then click Trajectories. Your viewports will display a red curve to show you the path of the knife’s motion as it arcs toward the target, as shown in Figure 6-7.
The large, hollow, square points on the trajectory curve represent the keyframes set on the knife so far. Let’s adjust the height of the arc using the trajectory curve. Select the Sub-Object button at the top of the Motion panel. Keys are your only sub-object choice in the pull-down menu to the right of the button. Select the middle keyframe and move it up or down to suit your tastes. Once you settle on a nice arc for the path of the knife, turn off Trajectories mode by clicking the Parameters button in the Motion panel.
As you can imagine, the Trajectories option can be useful in many situations. It not only gives you a view of your object’s path, but it also allows you to edit that path easily and in a visual context, which can be very important.
Adding Rotation
Throwing knives is usually a bad idea, but you can throw something else at a target (the inanimate kind) to see how to animate your knife. You’ll find that the object will rotate once or twice before it hits its target. To add rotation to your knife, follow these steps:
1. Move to frame 30, and press the E key for the Select And Rotate tool. Auto Key should still be active. In the Camera001 viewport, rotate on the Y-axis 443 degrees.
2. With the knife selected, go into the Curve Editor. Scroll down to find the X, Y, and Z Rotation tracks, and select them. Select the keys at frame 0, and then use the Move Keys Horizontal tool to shift the keyframes to frame 10. Press N to deactivate the Auto Key.
Figure 6-8 shows the Curve Editor graph for the knife.
3. Play the animation, and you will see that the knife’s position and rotation eases in and eases out. A real knife would not ease its rotations or movement. Its speed would be roughly consistent throughout the animation.
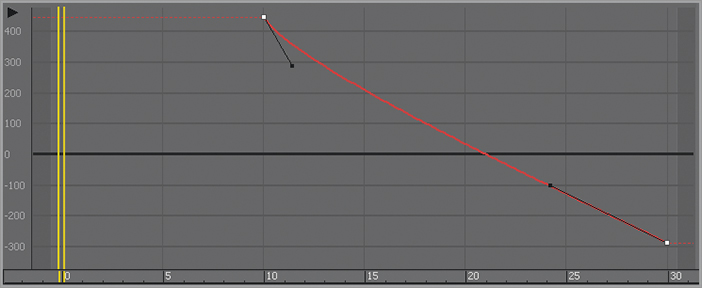
4. Go back to the Curve Editor; change Move Keys Horizontal back to Move Keys. Then select the X Position track, select all the keyframes, and switch the tangent to Linear. Now select the Z Position track; you’ll need to finesse this one a bit more than you did the X Position track. You are going to use the handles on the tangents that appear when you select a key. These handles can be adjusted; just center your cursor over the end, and click and drag using the Move Keys tool.
Figure 6-9 illustrates how you want the Z Position animation curve to look. This will give the trajectory a nice arc and a good rate of travel.
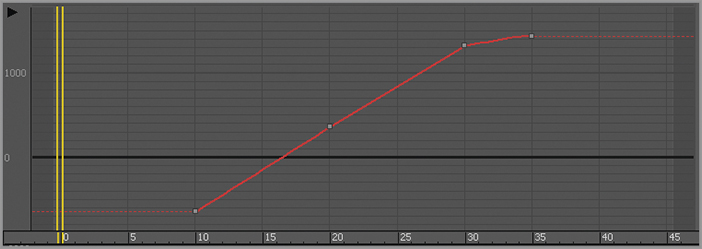
5. Now it is time to edit the Rotation keys. In the Curve Editor, scroll to find the X, Y, and Z Rotation tracks. The first thing you can do is add a bit of drama to the knife to make the action more exciting. To this end, you can say that the rotation on the knife is too slow. Select the X Rotation track and select its key at frame 30. In the Key Stats, change the value to –290. The higher the value, the faster the knife will rotate. This will add one full revolution to the animation and some more excitement to the action.
6. Adjust the tangent handles to resemble the curve shown in
Figure 6-10. The knife will speed up just a bit as it leaves the first rotation keyframe. The speed will be even as it goes into the last keyframe.
With just a little bit of fast rotation as the knife leaves frame 10, you give the animation more spice. The knife should now have a slightly weightier look than before, when it rotated with an ease-in and ease-out.
Adding Anticipation
Now let’s animate the knife to create anticipation, as if an invisible hand holding the knife pulled back just before throwing it to get more strength in the throw. This anticipation, although it’s a small detail, adds a level of nuance to the animation that enhances the total effect. Follow these steps:
1. Move the Time slider to frame 0. Go to the Curve Editor, scroll in the Controller window, and select the X Rotation track for the knife. In the Curve Editor toolbar, click the Insert Keys icon (

), bring your cursor to frame 0 of the curve, and click to create a keyframe. Doing so creates a key at frame 0 with the same parameters as the next key, as shown in
Figure 6-11.
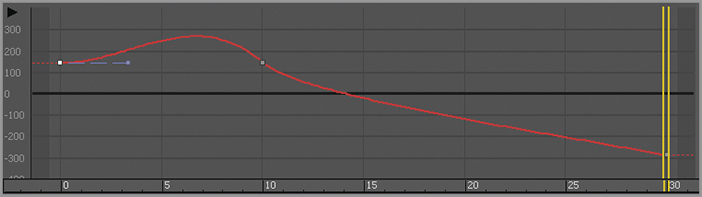
2. Select the Move Keys tool and select the key at frame 10. In the Key Stats type-in box, change the value of that key to 240. If you play back the animation, it will look weird. The knife will cock back really fast and spin a bit. This is due to the big hump between frames 0 and 10.
3. Keep the tangent at frame 0 set to the default, but change the tangent on the key at frame 10 to Linear (

). Play back the animation. You’ll have a slight bit of anticipation, but the spice will be lost and the knife will look less active and too mechanical.
4. To regain the weight you had in the knife, press Ctrl+Z to undo your change to the tangency on frame 10 and set it back to what you had. You may have to undo more than once. Now, select the Move Keys Vertical tool (

) and select the In tangent handle for keyframe 10. This is the tangent handle on the left of the key.
It’s common to try something and rely on Undo to get back to the starting point. You can use Undo several times when you find yourself at a dead end. You can also save multiple versions of your file to revert back to an earlier one.
5. Press Shift and drag the tangent handle down to create a curve that is similar to the one shown in
Figure 6-12. By pressing Shift as you dragged the tangent handle, you broke the continuity between the In and Out handles, so that only the In handle was affected. Play back the animation. It should look much better now.
Following Through
The knife needs more weight. A great way to show that in animation is by adding follow-through; have the knife sink into the target a little bit and push back the target. To add follow-through to your animation, use these steps:
1. You want to sink the knife into the target after it hits. Select the Time Configuration button and change End Time to 45 to add 15 frames to your frame range. Click OK. Doing so will not affect the animation; it will merely append 15 frames to the current frame range.
2. Select the knife and go to frame 30, where it hits the target. In the Curve Editor, select the X Position track of the knife. Add a keyframe with the Insert Keys tool at frame 35.
3. Note the value of the key in the type-in boxes at the top right of the Curve Editor (not the type-in boxes at the bottom of the main UI). In this case, the value in this scene is about –231. You will want to set the value for this key at frame 35 to about –224 to sink it farther into the target. If your values are different, adjust accordingly so you don’t add too much movement. Also make sure the movement flows into the target and not back out of the target as if the knife were bouncing out.
4. Keep the tangent for this new key set to Auto. With these relative values, scrub the animation between frames 30 and 35. You should see the knife’s slight move into the target. The end of your curve should look like the curve in
Figure 6-13.
5. You still need to add a little bit of follow-through to the rotation of the knife to make it sink into the target better. In the Curve Editor, select the X Rotation track to display its curve. Add a key to the curve at frame 35. The value of the key at frame 30 should already be about –652. Set the value of the keyframe at frame 35 to be about –655. Keep the tangent set at Auto. If your values are different, adjust accordingly to what works best in your scene.
Be careful about how much the knife sinks into the target. Although it is important to show the weight of the knife, it is also important to show the weight of the target; you do not want the target to look too soft.
Transferring Momentum to the Target
To make the momentum work even better for the knife animation, you will have to push back the target as the knife hits it. The trouble is, if you animate the target moving back, the knife will stay in place, floating in the air. You have to animate the knife with the target.
Parent and Child Objects
To animate the knife and target together, the knife has to be linked to the target so that when the target is animated to push back upon impact, the knife will follow precisely since it is stuck in the target. Doing this won’t mess up the existing animation of the knife because the knife will be the child in the hierarchy and will retain its own animation separate from the target. Just follow these steps:
1. Go to frame 30, about when the knife impacts. On the far left of the main toolbar, choose the Select And Link tool (

). Select the knife and drag it to the target, as shown in
Figure 6-14 (left). Nothing should change until you animate the Target object.
2. Move the Time slider to frame 34 and press the N key to activate the Auto Key tool. With the Select And Rotate tool, select the Target object and rotate it back about 5 degrees, as shown in the second image in
Figure 6-14 (right). The pivot of the target has already been placed properly, at the bottom back edge.
3. Go to the Curve Editor, scroll to find the Y Rotation track for the Target object, select the keyframe at frame 0, and move it to frame 30. Then hold the Shift key, and click and drag the keyframe (which will make a copy of it) to frame 37.
4. Change the tangent for the key at frame 30 to Fast and leave the other key tangents alone.
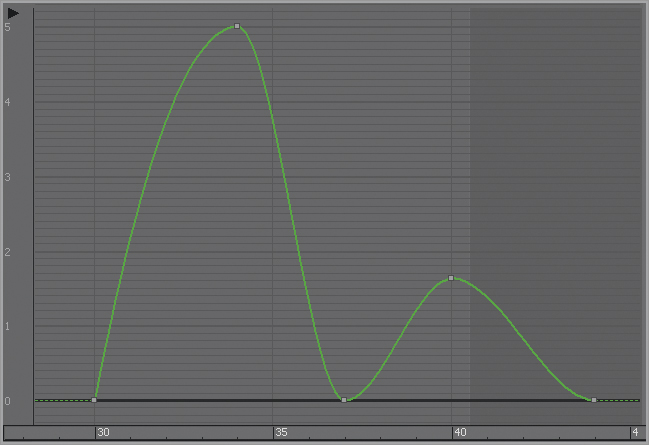
5. Add a little wobble to the target to make the animation even more interesting. This can be done easily in the Curve Editor. Use Insert Keys to add keys at frames 40 and 44. Using the Move Keys Vertical tool, give the key at frame 40 a value of about 1.7. Your curve should resemble the one in
Figure 6-15.
6. Finally, add a little slide to the target. Using the Select And Move tool, move the Time slider to frame 37, and move the target just a bit along the X-axis. Go to the Curve Editor, scroll to the X position of the Target object, select the keyframe at frame 0, and move it to frame 30 so the move starts when the knife hits the target. Change the tangent for frame 30 to Fast and leave the other tangent at Auto.
Done! Play back your animation. Experiment and change some of the final timings and values of the target’s reaction to the impact to see different weights of the knife and target and how the weight looks to the viewer.
You can see a sample render of the scene in the knife_animation.mov QuickTime file in the RenderOutput folder of the Knife project on the companion web page (or copied onto your hard drive). You can also download the Animation_Knife_01.max scene file from the Scenes folder of the Knife project to check your work.
The Essentials and Beyond
In this, our second chapter on animation, you further expanded your knowledge of creating and editing animation. You learned about hierarchies and how to link objects together to create a hierarchy useful for the knife animation as well as how pivot points are used. You also learned some key animation terms (such as anticipation, follow-through, and momentum) and how they apply to the animation.
Additional Exercises
- Try animating simple objects like boxes and just play around with anticipation, follow-through, and momentum.
- Again using simple primitives, create hierarchies and play around with anticipation, follow-through, and momentum.
- Constrain and animate a camera on a path through a nice modeled environment.
- Animate planets around the sun using paths.