Chapter 4. Configure access to resources
Users need access to resources, including but not limited to files, folders, network shares, and printers. Your job, at times at least, is to let those users access what they need, and nothing more. That’s how you keep resources secure and data in the right hands. This objective covers all aspects of this, from configuring shared resources to configuring file and folder (and printer) access, and on to configuring authentication and authorization for both workgroups and domains.
Objectives in this chapter:
Objective 4.1: Configure shared resources
There are multiple objectives in this lesson, and they all relate to how to share and manage resources on local networks. Here you’ll learn about homegroups, folder permissions, libraries, shared printers, and even SkyDrive. Regarding sharing, there are three ways to share discussed here: homegroup sharing, folder sharing, and public folder sharing. Folder sharing can be used in domain networks, too, although the way you handle it is a little different from simply sharing a few folders on a small, local network and letting users manage them as they like. (In an Active Directory Domain Services domain, network administrators manage authentication, authorization, and all aspects of sharing from the various servers they manage on the network.) SkyDrive can also be considered a sharing tool, although users might only use it to share data with themselves to have access to their files from anywhere.
Note
The name SkyDrive is changing to OneDrive and at some point the exam will also make the terminology change.
Configure HomeGroup settings
A homegroup lets home users easily share documents, printers, and media with others on their private, local network. This is the simplest kind of sharing, but it is limited in what permissions and restrictions can be placed on the data shared. By default, all users who join a homegroup (and there can be only one homegroup per network) have read-only access to what’s already shared. Users can reconfigure this, though, allowing both read and write access if desired.
When opting for a homegroup, users can do the following:
Create or join a homegroup from the prompt offered by Windows, provided the network is configured as Private.
Create or join a homegroup from the Network And Sharing Center, provided the computers that want to join are Windows 7- or Windows 8-based.
Work through the applicable homegroup wizard to create or join a homegroup. Windows will generate a random password other users will need to join.
Share files from their original locations and from their default libraries.
Grant read-only or read/write access to the data they’ve shared.
Limit access to only those network users who also have an account and password on their computer.
Configure the same permissions for all network users or set different permissions for individual users.
Exam Tip
There are reasons why a homegroup can’t be created or enabled, and one is that IPv6 isn’t enabled on a particular computer on the network.
Although we could spend a few pages walking you through how to create and join a homegroup, because it’s done with a wizard, that isn’t really necessary. However, you should create a homegroup on your own local network to see how it’s done and let other computers join it so that you are familiar with the process. Note that users might already be joined to a homegroup, as Windows detects existing homegroups automatically during setup. Figure 4-1 shows a computer that is connected to a private network and has joined a homegroup.

Once a homegroup is configured, users can share data with the homegroup from File Explorer on the Share tab (among other places). Note the Stop Sharing option for the selected folder, shown in Figure 4-2, and the option to allow the entire homegroup to view or view and edit the selected data. You can see here that a specific user, [email protected], also has an option.

If you don’t want to share the data with everyone in the homegroup, you can opt to share it with only specific people. You can also set different permissions for the people you choose. This is a very simple way to share data, and it will work on small home networks but not too many other places. To do this, follow these steps:
Open File Explorer and select any folder.
Right-click the folder and from the shortcut menu, point to Share With, and then click Specific People.
In the File Sharing window, click Homegroup and click Remove. See Figure 4-3.
Click the down arrow to the left of the Add option, and select the person to add. Then click Add to complete the task.
With that done, click the arrow beside the person you just added and choose Read or Read/Write.
Repeat to add other network users, as desired.

Configure shared folder permissions
There are two folder sharing options to discuss here: Public folder sharing and what we refer to as Any folder sharing. Any folder sharing is the more complex of the two and offers more options than Public folder sharing. You can also share from a command line, from a Microsoft Management Console (MMC), and using Windows PowerShell.
Public folder sharing
As you might guess, Public folder sharing involves the Public folders. There are several, including Public Documents, Public Music, Public Pictures, and Public Videos, and you can create your own. To use this kind of sharing you have to move the data to share to the applicable Public folder. (You could copy it, but this complicates document versioning and also creates duplicates on the computer.) The upside is that this is a very easy way to make data accessible to users who need it, at least after you’ve moved the data to share. The downside is that you have very little control of the level of sharing to configure.
Everyone with a user account and password on your computer can access the Public folder if Public folder sharing is enabled in this manner. You can make changes to Public Sharing from the Network And Sharing Center, Change Advanced Sharing Settings, and the All Networks option. There are two options:
Turn On Sharing So Anyone With Network Access Can Read And Write Files In The Public Folders or Turn Off Public Folder Sharing (people logged on to this computer can still access these folders).
Turn On Password Protected Sharing or Turn Off Password Protected Sharing. The former configures it so that users must have a user account and password on the computer to access shared files, printers, and the Public folders. The latter lets other people have access who do not have an account and password. You can also turn on file and printer sharing for the Private or Public profiles, if desired.
More Info: Share permissions
Understand that in these sections we are talking about Share permissions. There are three: Read, Change, and Full Control. However, there are also New Technology File System (NTFS) permissions you can configure, which you’ll learn about in Objective 4.2: Configure file and folder access. If both Share and NTFS permissions are applied to a share for a specific user, the least restrictive is calculated for both and then the two results are compared. The final permission applied to the share is the more restrictive of the two. However, Deny always overrides Allow.
Any folder sharing
Any folder sharing has a lot more options than the other types you’ve seen so far. Any folder sharing lets users do the following:
Share files from any location in addition to their original location
Set different permissions for individual users
Protect data in domain networks
Protect data in local networks that require more security than the homegroup or public folder option can offer
To get started you must first choose or create a folder to share. Then, you can right-click the folder, click Properties, and click the Sharing tab to display the Properties dialog box shown in Figure 4-4. It’s important to note that if you click Share in the Properties dialog box, you are given the same sharing options you saw earlier for homegroups (Figure 4-3). That’s not where the power in Any folder sharing lies. Instead, click Advanced Sharing to access the Advanced Sharing dialog box, also shown in Figure 4-4.
More Info: Share Characteristics
Share permissions have the following characteristics:
They apply only to users who gain access to the resource over the network. They do not apply to users who log on locally. To protect a resource in these cases, you must use NTFS to set permissions.
They are the only way to secure network resources on FAT and FAT32 volumes, because NTFS permissions are not available on those volumes.
They specify the maximum number of users who are allowed to access the shared resource or folder over the network.
When both Share and NTFS permissions are applied, the cumulative permission for both sets is compared and the more restrictive permission is applied.

Now you have several options. First, select the Share This Folder check box, which defaults to 20 simultaneous users. Next, click Permissions. Now you have access to the advanced sharing options shown in Figure 4-5. What you’ll likely want to do here is remove Everyone from the list (I’ve done this in Figure 4-5 already) and then add specific users or groups whom you want to have access (I’ve done that, too). The default permission is Read, but you can add Change or Full Control for the selected user or group. You could also opt to deny access, although this is not the generally accepted way to limit access to a share.

Exam Tip
No matter what share permissions are applied to a group or a user and no matter what combination of permissions one has, Deny always means deny. You might see a long question on an exam that gives lots of information about a user, what groups he is in, and so on, and there might be one lone Deny permission for a share he also has permission to access. If he’s denied access, that’s that. He’s denied access.
Table 4-1 shows the Share permissions and their limitations.
Share Permission | Limitations |
Read | Display folder names; display file names, data, and attributes; execute program files; access other folders inside the shared folder |
Change | Perform all read actions; create and add files to folders; change and append data to files; change file attributes; delete folders and files |
Full Control | Perform all change permissions; change file permissions; take ownership of files |
Here are a few more things to know about share permissions:
Share permissions are completely separate from NTFS permissions.
Share permissions are the simplest permissions you can configure.
On networks that employ NTFS, most of the time administrators simply grant the Share permission Full Control to Everyone and then configure the NTFS permissions as desired. When both Share and NTFS are applied, the more restrictive wins; in this case, that is the NTFS permission.
NTFS permissions on a subfolder inherit the permissions assigned to the parent folder. Share permissions do not combine in the same way. Succinctly, Share permissions applied to a folder that sits inside another folder do not inherit the parent folder’s permissions. They use the permissions explicitly assigned to the folder in question.
Other ways to share
You don’t have to use the available end-user tools to create and manage sharing. You can share at a command line by using the Shared Folders snap-in inside an MMC and by using Windows PowerShell. Although you might not opt to use these tools for sharing, it’s likely you’ll see questions about them on the exam.
Share from a command line
You can share folders at a command prompt. The command you use is net share, often in the form of net share [ShareName] to display information about a share and net share [ShareName=Drive:Path] to specify the path of the directory to be shared. You can also add these parameters:
/users: number. This parameter sets the maximum number of users who can simultaneously access the shared resource.
/unlimited. This parameter sets an unlimited number of users who can simultaneously access the shared resource.
/remark: “text”. This parameter adds a descriptive comment about the resource. Enclose the text in quotation marks.
/cache:automatic. This parameter enables offline client caching with automatic reintegration.
/cache:manual. This parameter enables offline client caching with manual reintegration.
/cache:no. This parameter advises the client that offline caching is inappropriate.
/delete. This parameter stops sharing the shared resource.
net help command. This parameter displays Help for the specified command.
Share using an MMC
To share using an MMC, add the Shared Folders snap-in. Click the Shares node in the left pane, right-click in the middle, and click New Share, as shown in Figure 4-6, to start the Create A Shared Folder Wizard. You can also view sessions and open files using the console.

Share using windows powershell
You can use Windows PowerShell to create and manage shares. One command you’ll likely use is New-SmbShare followed by the share name and path to the folder to share. (SMB stands for Server Message Block.) There are additional commands for managing shares using Windows PowerShell:
Get-SmbShare. Use this command to list the shares that already exist on the computer. See Figure 4-7.
Set-SmbShare. Use this command to modify a share.
Remove-SmbShare. Use this command to remove a share.
Grant-SmbShareAccess. Use this command to set permissions for a share.

Configure file libraries
Windows 8.1 comes with its own library structure that includes libraries for Desktop, Documents, Downloads, Music, Pictures, and Videos. Anything you save to the related folder is available in the library with the same name. This means if you save a file to the Documents folder, you’ll have access to it in the Documents library. The library doesn’t actually hold the files though; it only keeps a record of where the files are stored. By default, libraries only offer access to data in the related personal folder. Libraries do not offer access to the related Public folders or any others, although you can add them if you like. (Note that libraries offered access to the Public folders in Windows 7.) There isn’t that much more to know about libraries except how to create your own libraries and add folders to existing ones.
Note: Show Libraries in File Explorer
To show or hide the Libraries option in the Navigation pane of File Explorer, click the View tab in any applicable window, click Navigation Pane, and in the resulting list, click Show Libraries.
To create your own library, follow these steps:
Open File Explorer, and on the View tab, click Navigation Pane. Click Show Libraries.
Right-click inside the Libraries pane, click New, and then click Library. See Figure 4-8.
Double-click the new library and then click Include A Folder.
Double-click the folder to add.
To add more folders, click the Manage tab.
Click Manage Library.
Click Add and navigate to the folder to add.
Select the folder and click Include Folder.
Repeat as desired and click OK.

To add a location to an existing library, in File Explorer, double-click the library to which you’d like to add a folder and then click the Manage tab. From there, click Manage Library and add folders as desired.
Configure shared printers
If you’ve created a homegroup, your printers are already shared. Both the printer and the computer to which it’s connected must be turned on and ready for a request, but the sharing is done automatically. When a homegroup isn’t used, you have to share the printers manually. You might also have to enable file and print sharing in some instances, including if you’re sharing printers on a public network.
In a workgroup or domain setting, sharing is basically the same. You locate the printer and access the option to share it. You can share the printer with a mix of computers on your network, including x86-based and x64-based PCs. You only need to make sure the applicable drivers are available, and for the most part they are. You’ll likely need administrator approval to install drivers, though, so you need to keep that in mind if you think drivers are going to be an issue.
Add a printer and configure sharing
You can add a printer in Windows 8.1 from the Devices And Printers window, available in Control Panel. There, click Add A Printer and choose it from the list. If the printer you want isn’t listed, you can add it manually, which is likely what you’ll have to do if you have an old printer connected to an LPT port or if you need to add a printer using its TCP/IP address or host name. You can connect a wireless printer from this window, but you can also use the manual option to add a wireless printer if you need to. You can also use this option to type a path to the printer to locate it manually. See Figure 4-9.

Table 4-2 shows the basic printer permissions.
Permission | Limitations/capabilities | Default assignment |
Connect to a printer; print; control the user’s own print jobs | Everyone | |
Manage this printer | Cancel documents; share and delete printers; change printer properties; change printer permissions | Administrators |
Manage documents | Pause, resume, restart, and cancel all documents; control job settings for all documents | Creator Owner |
Share and configure a printer manually
To manually share a printer, right-click the device in the Devices And Printers window and then click Printer Properties. From there, use the Sharing tab to share the printer and configure other options. If the computer is a member of an Active Directory domain, you’ll see the List In The Directory check box. Select this check box to create a new printer object in the Active Directory database. This will enable domain users to locate the printer by searching in the directory. In this dialog box you can also opt to add drivers, if necessary.
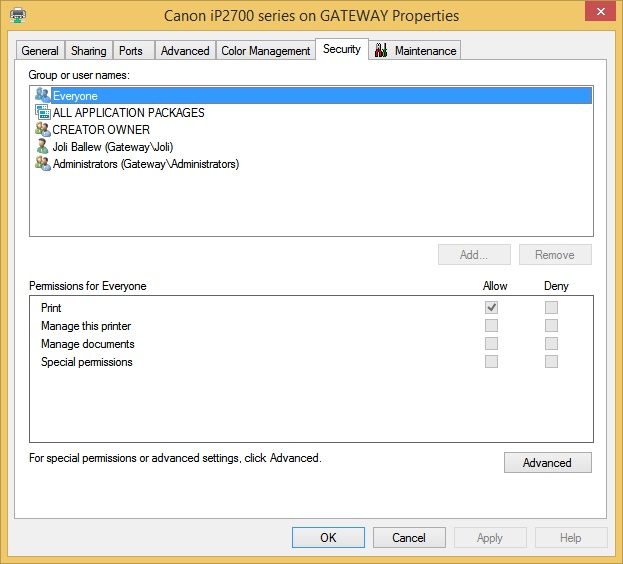
The other tabs offer additional options, including the option to configure when the computer is available and what types of users have access to the Print permissions: Print, Manage This Printer, Manage Documents, and Special Permissions. In Figure 4-10, you can see that the Everyone group has the ability to print. However, if you click Administrators in the Group Or User Names list, you’ll see that this group has Print, Manage This Printer, and Manage Documents set to Allow. Table 4-2 explains these options. Make sure you are comfortable with all of these graphical options available in Windows 8.1 before moving on.
Note: How to Assign Permissions
When assigning permissions in an Active Directory domain, you assign permissions for domain users, groups, and other objects. On a stand-alone computer, you select the local user and group accounts that should receive the permissions.
Exam Tip
Near Field Communication (NFC) is a radio-based communications technology (based on radio-frequency identification [RFID] standards) that lets users complete tasks with compatible objects, mostly to complete brief transactions without having to physically connect to the device or the network. In the case of printers, NFC allows mobile devices to submit print jobs to printers, provided compatible technologies exist between the two and the proximity between the devices is acceptable.
Know common print terms
Beyond the end-user-friendly options, there are a few terms you need to know about printers and a few features that aren’t obvious to most users.
Print device. This is the actual hardware, the printer.
Printer. This is the software interface through which a computer communicates with the print device. It might be LPT, COM, USB, IEEE, 1394, IrDA, Bluetooth, TCP/IP ports, or others.
Print server. This is a computer that receives print jobs and routes them to print devices.
Printer control language (PCL). A printer needs a printer driver to function. The driver takes the commands and converts them to something the printer understands. This is called the PCL. PostScript is an example of a PCL.
Password protected sharing. Just as you can configure password protected sharing for files and folders, you can also configure it for printers.
Printer priority. This is an option with which you can give users in your organization priority to print before other users, even when print jobs are in the queue.
Printer pool. Use this feature to connect multiple print devices so that a print job can be automatically sent to a printer that is not currently busy. You do this in Control Panel, in a printer’s Properties dialog box, on the Ports tab, by clicking Enable Printing Pooling.
Set up and configure SkyDrive
SkyDrive enables users to store data in the cloud almost seamlessly from their Windows 8.1 computers. SkyDrive is an app on the Start screen and an option on the File Explorer Navigation tab. When data is stored in SkyDrive, users can access that data from virtually any device that has an Internet connection. Users can also share any part of what they’ve stored there with others, allowing them to read or read and edit the data. Users need a Microsoft account and the applicable app or browser to access the data. Users can also access the files locally when a connection isn’t available.
Exam Tip
SkyDrive is a storage area that users can access to save data and manage data they’ve saved there. Be careful when SkyDrive is an answer for any scenario, because it doesn’t do much else for users. As an example, you can’t share, sync, or access apps from SkyDrive; syncing apps is part of the job of the Microsoft account and has nothing to do with SkyDrive.
Users can access SkyDrive in a number of ways:
Using a web browser. Browse to http://skydrive.com and log in to access, upload, share, and otherwise manage files and folders. You can also create and edit documents, presentations, notebooks, and so on here.
Using the SkyDrive app in Windows. Open the SkyDrive app from the Start screen to access, upload, open, and manage files and to create new folders.
Using the SkyDrive app on smartphones. This allows users to view and open files, view recently accessed files, view and access shared files, and upload files. Users can also create new folders and configure a few settings for uploading photos.
Through a desktop application. This method allows users to access SkyDrive from an application such as Microsoft Office 2013. See Figure 4-11.

Setting up SkyDrive only involves logging in to the Windows 8.1 computer with a Microsoft account. Windows does the rest. There are some configuration options to look at right away, though. You can configure the option to access all files offline from the Settings charm (click Options) from inside the SkyDrive app. See Figure 4-12. This might be the first thing you’ll want to configure if you have the available SkyDrive space.

Configuration options are available from PC Settings and on the SkyDrive website. Figure 4-13 shows what’s available in PC Settings. There are four tabs. On the File Storage tab you can buy more storage and configure your documents to save to SkyDrive by default. You can see that I have an enormous amount of space available on SkyDrive. That’s not typical. Make sure you explore all of the settings and options here as time allows.
Exam Tip
Know what can and can’t be saved to SkyDrive. You can save Windows settings, application settings, and some credentials, but you can’t save your Xbox music purchases, apps, or even entire folders (such as your Documents or Pictures folders). You must upload files one at a time, although you can upload compressed folders.

Finally, you can configure SkyDrive settings on the SkyDrive website. Once you log in at http://skydrive.com you can click the Tools icon in the top-right corner and click Options. See Figure 4-14. Note the options on the left side:
Manage Storage. This allows users to view available storage space and buy more.
Upgrade. Use this setting to view storage plans and select one.
Office File Formats. This allows users to choose a default format for Office documents: Microsoft Office Open XML Format (.docx, .pptx, .xlsx) or OpenDocumentFormat (.odt, .odp,. ods).
People Tagging. Use this option to state how people can tag you on SkyDrive (Your Friends or Just You) and to configure who can add people tags (Your Friends Who Can View Your Photo Album or Don’t Allow Anyone To Add People Tags).
Device Settings. Use this option to see all of your devices and the date those devices were last backed up.

More Info: Learn How to Set up a Microsoft Account
Refer to Objective 4.3: Configure authentication and authorization later in this chapter to learn more about setting up a Microsoft account.
Objective summary
Share permissions include Read, Change, and Full Control and can be used to secure data in workgroups and on computers configured with FAT32 file systems.
Homegroups, Public folder sharing, and Any folder sharing are three ways to share data on a private network.
You can share printers automatically by creating a homegroup or configure them manually with other types of sharing scenarios.
SkyDrive enables users to save data to the cloud and access it from virtually anywhere.
Objective review
Answer the following questions to test your knowledge of the information in this objective. You can find the answers to these questions and explanations of why each answer choice is correct or incorrect in the “Answers” section at the end of this chapter.
Q: | 1. Which of the following is true regarding homegroups? (Choose all that apply.)
|
Q: | 2. Which sharing option would you choose if you wanted to share files and folders that reside on your desktop and set permissions for select users and exclude others on a computer that was part of a public network? |
Q: | 3. You’ve shared a printer and need users to be able to print and control their own print jobs. How do you need to configure the Share permissions?
|
Q: | 4. With regard to SkyDrive, where do you configure the option to access all of the files you save there offline so they will be available even if the user does not have access to the Internet?
|
Objective 4.2: Configure file and folder access
You learned about Share permissions in Objective 4.1: Configure shared resources. These permissions are applied when the operating system is configured with FAT or FAT32 or any time you share a folder on a computer. There are only three shared permissions: Read, Change, and Full Control, which are available on the Sharing tab of the resource’s Properties dialog box. These sharing options don’t offer a lot of control, but they do offer some. Share permissions help you manage access to resources by users over a network, but they offer no security when a user logs on locally.
Because NTFS permissions are so much more robust than Share permissions, when the file system is NTFS, administrators make the most of it. They generally set the Share permissions for Everyone to Full Control and configure the NTFS permissions as desired. You configure NTFS on the Security tab of the resource’s Properties dialog box. Remember, the more restrictive of the two types of permissions is applied to the resource when both exist, so it doesn’t matter that the Share permissions give everyone unlimited access as long as NTFS is configured, too. NTFS also offers the ability to assign disk quotas, encrypt files and folders, and audit object access. These features are not available on FAT or FAT32 drives.
Configure NTFS permissions
There’s a lot to learn about NTFS permissions, the Windows permission architecture, the differences between basic and advanced permissions, and how permissions are inherited, among other things, and there just isn’t enough room here to discuss all of it. However, we’ll try to cover the most important facts you’ll need to know for the exam and how to apply NTFS permissions to secure a resource.
Exam Tip
Make sure you read and study the additional resources listed on the Microsoft certification webpage for this exam so that you are familiar with the test objectives. Navigate to this page and click Show All to obtain that list of additional resources: http://www.microsoft.com/learning/en-us/exam-70-687.aspx.
There are four kinds of permissions. You already know a little about two: Share and NTFS. There are two others: Registry permissions and Active Directory permissions. You might not ever assign these two types, but they do exist. All of these permissions are independent of one another and can be combined if desired.
Permission terminology and rules
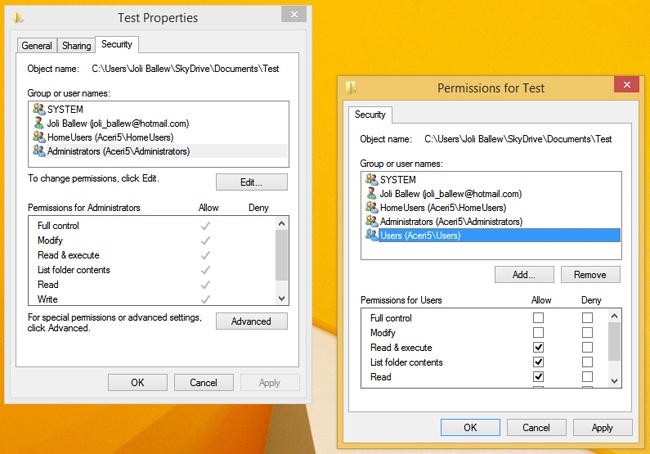
Any element or resource that is protected has an access control list (ACL). This is basically just a list of permissions that have been applied to it. The individual permissions applied are access control entries (ACEs). Every ACE has at least one security principal. A security principal is the user, group, or computer given permissions, along with the permissions that have been configured for it (them). This means that permissions are stored with the resource that is being protected. The permissions are not stored with the user, group, or computer that is granted access. This is why you configure permissions on the Security tab of the element’s Properties dialog box (see Figure 4-15). If you click Edit in the Test Properties dialog box, you gain access to the Permissions For dialog box shown on the right. There you can add or remove users, groups, and so on and apply the applicable NTFS permissions for those new entries.
You can use the basic permissions shown in Figure 4-15 to create very specific access options to a shared resource. You can grant a single user Full Control to a resource and at the same time grant all of the users in the Users group only Read access. You can configure it so that a specific person or persons can’t access the resource at all or so that an entire group, like HomeUsers, can read, write, list folder contents, and read and execute while using the resource, but can’t modify or take ownership of it. The scenarios are almost endless.
If a user is configured permissions to a resource from more than one place, the permissions granted are cumulative. As an example, if Bob is a member of the Users group and the Users group has only the NTFS permission Read, but Bob is also a member of the Sales group and the Sales group has the NTFS permission Modify, then Bob has both Read and Modify permissions. Remember, Share permissions are cumulative and NTFS permissions are cumulative, and if both exist, the more restrictive of the results of these are applied. Deny means deny though; if Deny is assigned to a user from anywhere, that user can’t access the resource.
Basic and advanced permissions
Basic permissions are combinations of advanced permissions. You can see the basic permissions on the Security tab of any NTFS resource’s Properties dialog box, as shown in Figure 4-15 earlier. There are six basic permissions:
Full Control. Modify, take ownership, delete items, and perform all other actions listed for the following permissions
Modify. Delete the folder, modify the file, delete the file, and perform other actions for Write and Read & Execute
Read & Execute. Navigate through folders, run applications, and perform actions for Read and List Folder Contents
List Folder Contents. View the names of the files and subfolders in a folder
Read. See files and subfolders, read the contents of a file, and view ownership, permissions, and attributes for a file or folder
Write. Create new files and subfolders inside a folder, modify folder attributes, view the ownership and permission for a folder or file, modify file attributes, and write over a file
There are 14 advanced permissions, and you can view these by navigating to the Advanced Security Settings For dialog box for any NTFS resource. You should know the names of these advanced permissions, how to find them, and how they protect the element. From this dialog box you can also view the assigned permissions, including Share permissions, and you can view the calculated effective access from the tab with the same name. To open this dialog box and view these settings and options, follow these steps:
Right-click any shared folder and click Properties.
Click the Security tab.
Click Advanced.
Click any permission entry (perhaps Administrators) and click View. See Figure 4-16. (Note the Disable Inheritance button. Keep this location in mind when you read the next section.)
In the resulting Permissions Entry For dialog box you can view the basic permissions that are assigned to this group.
Click Show Advanced Properties. The list of assigned advanced permissions is displayed, as shown in Figure 4-17.
Note in Figure 4-17 that you can’t edit the permissions listed for Administrators in this example. However, if you had created your own entry (say the Users group, Sales group, and so on) in the Properties dialog box, you would be able to edit the advanced permissions shown here.


Inheritance
Permissions generally run from top to bottom of any folder hierarchy, so if you grant NTFS Read access to a folder for a group of users and then you create a subfolder there, the same permissions are applied to it for the same group of users. If it didn’t work this way, assigning permissions would be nearly impossible.
There might be times that you need to turn off inheritance for a folder or other element. As shown in Figure 4-16, Disable Inheritance is an option. If you’d rather not disable inheritance but do need to deny access to a specific person or group, you can assign the Deny permission as applicable.
Exam Tip
You can assign contradicting explicit permissions when inheritance causes a problem. As an example, if the entire Sales group is denied access to a folder but a single member of the Sales group should have access to it (perhaps the CFO), you can explicitly assign that one user account the Allow permission for Full Control on the resource. Explicit permissions like these override inherited permissions and thus resolve the problem quite easily.
Move, copy, and permission inheritance
Sometimes you need to copy or move an NTFS-protected element. When you do, depending on the circumstances, permissions are sometimes retained and sometimes not. In most cases, the resource inherits the NTFS permission assigned to the parent folder.
Here’s how inheritance and move and copy work.
If you copy NTFS files or folders from one location to another on the same NTFS volume, the resource inherits its new parent folder’s permissions.
If you copy NTFS files or folders from one location to another on a different NTFS volume, the resource inherits its new parent folder’s permissions.
If you move NTFS files or folders from one location to another on the same NTFS volume, the existing permissions move with them.
If you move NTFS files or folders from one location to another on a different NTFS volume, they inherit permissions from the new parent folder on the new volume.
If you copy or move NTFS files or folders to a FAT or FAT32 drive, they lose all NTFS permissions because those aren’t supported on those file systems.
Icacls.exe
The Icacls.exe command lets you configure basic and advanced permissions from an elevated command line. You can view all of the Icacls.exe parameters on TechNet at http://technet.microsoft.com/en-us/library/cc753525.aspx. You should be ready for exam questions based on this, so it’s a good idea to review it.
Exam Tip
If you lock yourself out of an element you can reset the permissions for it from an elevated command prompt. Navigate to the folder and use the command icacls.exe <file name>/reset along with additional parameters as desired (perhaps /C to ignore errors).
Succinctly, the Icacls.exe command is used as so: icacls.exe <file name> /grant or icacls.exe <file name> /deny with various parameters including but not limited to:
F for full access
M for modify
RX for read and execute
R for read only
W for write
MA for maximum allowed
T to execute the command on all of the files and subfolders inside the <file name>
C to continue even if errors occur
Resource ownership
It’s possible to lock everyone out of a resource. The resource is said to be orphaned when this happens. A resource might also be orphaned if the user who originally created it is no longer available to provide access (perhaps to a confidential file or folder). To access the resource, as an administrator you need to take ownership of it. To do this, in the Advanced Security Settings For dialog box, shown earlier in Figure 4-16, click Change. Then you can take ownership of the resource yourself (as an administrator).
Configure disk quotas
Users will keep as much data and use as much server and storage space as you allow. Some users might never delete anything unless you force them to. As a network administrator you must be able to manage this, and you do so by configuring disk quotas.
Once you’ve enabled disk quotas (which you can do only on NTFS volumes, not on FAT volumes) you can also configure what happens when users meet those limits. You might want to give them a warning, or you might want to force them to delete data before they can save more. You configure NTFS disk quotas as follows:
In File Explorer, navigate to the volume to protect with disk quotas.
Right-click the volume and click Properties.
Click the Quota tab; click Show Quota Settings. See Figure 4-18.
Select the Enable Quota Management check box.
Configure the options as desired, including:
Deny Disk Space To Users Exceeding Quota Limit
Limit Disk Space To
Log Event When A User Exceeds Their Quota Limit
Log Event When A User Exceeds Their Warning Level
Click OK and click OK again to apply.

Encrypt files and folders using EFS
Encryption protects data from unauthorized access when other security measures fail. Much of the time failure has to do with someone gaining physical access to a machine and having the knowledge and time to figure out how to access the data on it. There are many ways this type of breach can occur. However, with Encrypting File System (EFS), the public and private keys that are generated during encryption ensure that only the user that encrypted the file can decrypt it. Technically, encrypted data can only be decrypted if the user’s personal encryption certificate is available, which is generated using the private key. Another user can’t access this key, and neither can a person who tries to access data to copy or move it who does not have the proper credentials.
Exam Tip
The public and private keys that are generated when data is encrypted are the basis of the Windows Public Key Infrastructure (PKI). For more information about PKI, refer to TechNet (search for PKI). Additionally, EFS uses the Advanced Encryption Standard (AES), which uses a 256-bit key algorithm (an industry standard) and can be used to encrypt nonsystem volumes or only selected files and folders.
Here’s a little more information about EFS:
Encryption and decryption performs its duties without any fanfare, and the process is invisible to the user. Encryption occurs when you close files and decryption occurs when you open them.
EFS can only be used on NTFS volumes and is not available on any form of FAT.
EFS keys aren’t assigned to a computer; instead they are assigned to a specific user. This means if another user logs on to the computer using his own user account, he has no access to another user’s private key and can’t access another user’s data.
Even if a hacker can sit down at a computer and access an option to copy protected files, she will receive an Access Denied message.
You can’t use EFS and compression together. You must choose one or the other.
After a file or folder is encrypted, it will appear in green in File Explorer.
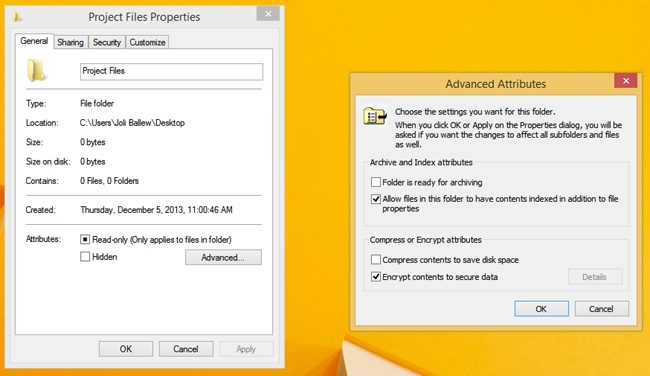
To encrypt a folder, right-click the folder to share then click Properties. In the Properties dialog box, on the General tab, click Advanced. Select the Encrypt Contents To Secure Data check box for the folder, as shown in Figure 4-19. You can use this same Advanced Attributes dialog box to remove encryption if you want to later.
After you’ve performed your first encryption, you’ll be prompted to back up your file encryption certificate and key. This helps you avoid permanently losing access to the encrypted files if the original certificate and key (that were generated when you encrypted it) are lost or corrupted. If you miss the prompt, you can follow the steps given next to perform the backup, but it’s likely you’ll be prompted to back up the key each time you log on anyway. You can back up your personal certificates manually using the Certificate Manager MMC (you should keep the EFS recovery key stored away from the computer in a safe place).
Use the Windows key+R to open a Run dialog box.
Type certmgr.msc and press Enter.
In the Certmgr window, expand Personal and click Certificates. See Figure 4-20.
Select all of the certificates.
Right-click the selected certificates, click All Tasks, and click Export.
Work through the Certificate Export Wizard, making sure to select Yes, Export The Private Key when prompted and type a complex password when prompted.

You can use CertMgr to recover your EFS encrypted files, too, by importing your EFS certificate backup. As with exporting certificates, this is achieved using a wizard. To get started, select the Personal folder, click Action, and then click All Tasks. From there, select Import. Work through the prompts to import the required data.
You can use the command line to manage encryption, too. You use Cipher.exe to perform encryption and decryption tasks. You might see this command on the exam. For more information about Cipher, refer to this page on TechNet: http://technet.microsoft.com/en-us/library/cc771346.aspx. Here are a few of the most common parameters used with Cipher:
/d. Use this parameter to decrypt specified files and directories.
/s:<Directory>. Use this parameter to perform the specified operation on all subdirectories in the specified directory.
/c. Use this parameter to display information about an encrypted file.
/u. Use this parameter to find all of the encrypted files on the local drives.
/? Adding this parameter displays help.
More Info: BitLocker and BitLocker to Go
For information about other types of security, including BitLocker and BitLocker To Go, refer to Chapter 5, and specifically Objective 5.3: Configure security for mobile devices. BitLocker encrypts the entire disk; this is a different type of protection from EFS.
Configure object access auditing
Network administrators often audit events to see which have occurred, often for the purpose of maintaining security on a particular object, such as a secure folder. It can also be a file, printer, or almost any other resource available from a computer. It can even be as small as a Registry key. Most of the time this type of object access auditing is done to see how many attempts have been made to access an object and how many times those attempts failed. All audited events appear in Event Viewer as they are captured.
Administrators can audit specific events, too, such as successful or failed logon attempts. This isn’t object access auditing, but it deserves a mention because the option is part of the Audit Policy options you’ll explore here. Also, it could be that objects are being accessed when they should not be, due to successful logons that aren’t performed by the desired users. (See the Real World example for more information on how this can happen.)
In the following set of steps you enable the option to audit successful logon events. You also enable auditing of failures on objects you specify in the second set of steps here.
To enable auditing for successful logons and object auditing, follow these steps:
Open a Run box and type gpedit.msc. Press Enter.
Navigate to Computer Configuration, Windows Settings, Security Settings.
Expand Local Policies and click Audit Policy.
Double-click any policy to enable auditing for it. Figure 4-21 shows that Audit Account Logon Events is selected.
Select the Success or Failure check box and click OK.
Double-click Audit Object Access.
In the Audit Object Access Properties dialog box, select the Failure check box.
Click OK.

The successful logon attempts will appear in Event Viewer with no other configuration. However, to see events for object access you must specify which objects you want to watch for. You enable auditing on an object in its Properties dialog box, on the Security tab. On the Security tab, click Advanced. This opens the Advanced Security Settings For dialog box you used earlier to disable permission inheritance, view permissions, and learn the effective access when multiple permissions are applied. To enable auditing, click the Auditing tab and click Continue. From there you can add the objects to audit. See Figure 4-22.

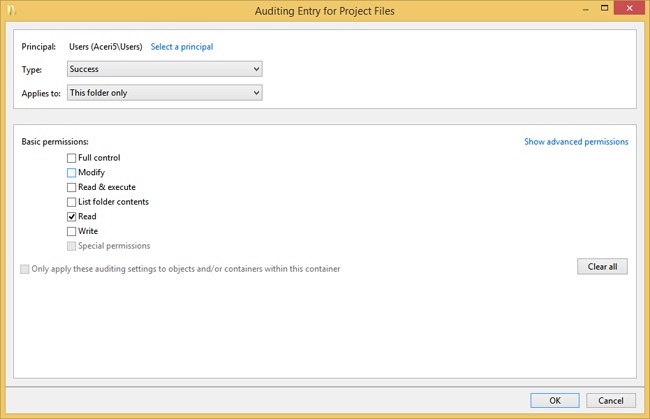
In the Advanced Security Settings For dialog box, click Add. In the resulting window, click Select A Principal and type the name of the users or groups to be audited. (As an example, you might opt for Users.) Select the auditing option, perhaps Success. Finally, choose an option to which the auditing applies (perhaps This Folder Only) and configure the basic permissions. See Figure 4-23. Click OK and close the open dialog boxes.
Note: Beware of Auditing Sprawl
You can create thousands upon thousands of events in only a few days if you audit too many folders, subfolders, and other objects. Be careful how many objects you audit!
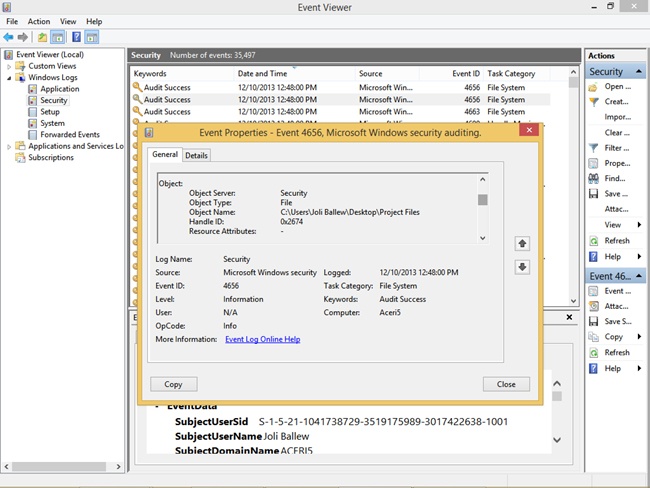
To view the audited events, open Event Viewer. Because the events will be entered into the Security logs, navigate to Windows Logs and then Security Logs. You’ll see the events listed there. Double-click any event to learn more. See Figure 4-24. (You have to trigger the event to have it appear in the Security log.)
Note: What to do if you don’t see any Events in Event Viewer
If you don’t see any events in Event Viewer after configuring auditing, make sure you’ve defined the group and what you want audited for each resource.
Exam Tip
If you are asked how to set an alert for an audited event, here is the process. In Event Viewer, right-click the event and click Attach Task To This Event. Use the wizard to choose a task and apply an action. You can opt to send an email, start a program, or display a message. Send an email and display a message are deprecated but are still options. (Deprecated means that the feature still works but is no longer considered the desired option and that Microsoft might remove the feature from future updates or newer products or editions.)
Real World: Auditing and the Overnight Shift
About five years ago a friend of mine worked for a company that had a cleaning crew come in during the night to clean offices, take out the trash, dust shelves, and vacuum floors. The work was acceptable at first, and the cleaning crew of five seemed quite responsible. As time passed, though, the work got sloppy. She knew the crew was arriving at the proper time and that they were there for the required number of hours because the security guard outside confirmed it.
She began to wonder what the cleaning crew was doing during their overnight shift if they weren’t working. She started auditing various events, including logon events for the computers in the main office. She suspected that the staff had figured out how to log on to a computer in the office and were spending time watching online videos, playing games, and so on instead of working. She was right; auditing showed that there were indeed successful logon events for a single computer in the main office during the night hours. The crew had found the user name and password taped to the underside of the keyboard tray and was using the computer during the night when no one was around. The problem was resolved quickly, the staff member was educated, and the cleaning crew was fired.
Objective summary
NTFS permissions are the most secure and flexible way to assign permissions to a resource. By using them, you can lock down any object to control access effectively.
NTFS inheritance is the backbone of NTFS control and is enabled by default.
Disk quotas enable you to easily manage how much storage space users can access and what happens when they meet or exceed their limit.
EFS lets users encrypt files and folders, and the encrypting and decrypting process is seamless to the user. EFS files are displayed in green in File Explorer.
Audit object access lets you monitor objects by logging successes and failures in a way that you configure.
Objective review
Answer the following questions to test your knowledge of the information in this objective. You can find the answers to these questions and explanations of why each answer choice is correct or incorrect in the “Answers” section at the end of this chapter.
Objective 4.3: Configure authentication and authorization
Authentication is the process of logging on to a computer, accessing a workgroup or networked computer, or logging on to a domain, which can be achieved using a Microsoft account, local user account, domain account, personal identification number (PIN), password, virtual or physical smart card, or biometrics, among other things. Authorization is what happens after authentication has been achieved; it is what enables authenticated users to access the data and perform the tasks they need to do their job.
In this objective, you learn the various ways users can be authenticated and how to configure user rights, manage credentials, and configure User Account Control (UAC) behavior.
Set up and configure a Microsoft account
The Microsoft account (what used to be called Windows Live ID) is a new way to log on to a computer running Windows 8. This type of account enables users to sync specific settings to the cloud for the purpose of having access to those settings from other computers that they can log on to using that same Microsoft account. With a Microsoft account, users can also access their own cloud space, called SkyDrive. Windows 8.1 comes with a SkyDrive app, and SkyDrive can be accessed from compatible applications, various web browsers, and File Explorer.
Users are prompted to set up a Microsoft account when they first set up their Windows 8 computers. They can opt to do that, or they can decline and create a local account instead. Users might also create a local account if the computer is unable to access the Internet during setup (because they won’t be able to create or confirm the Microsoft account if there is no Internet access). Child accounts can also be created. Users generally opt to create a Microsoft account later even when they start with a local account, because many apps are inaccessible if the user is logged in with a local account. Additionally, users cannot get apps from the Store without a Microsoft account.
Once a Microsoft account is created, the user doesn’t need to be connected to the Internet to log on in subsequent sessions. The account information is saved locally. If an Internet connection isn’t available, the last saved settings will also be applied because they are cached locally as well.
Exam Tip
Use this setting in Security Policy (local or domain) to block the use of Microsoft accounts: Block Microsoft Accounts. This setting is located here: Security Settings, Local Policies, Security Options.
You can switch from a local account to a Microsoft account from PC Settings. You can also create new users there and let them log on later with their own Microsoft account to finalize account creation. A wizard walks you through the process. To get started, in PC Settings, click Accounts. You switch from a local account to a Microsoft account on the Your Account tab, shown in Figure 4-25. You create additional users with the Other Accounts option by clicking Add An Account, also shown in Figure 4-25. Once the account is created you can return here later to change the account type if desired. (Control Panel is still an option for creating accounts, too.)

A Microsoft account can be used in a domain if it isn’t restricted through Group Policy. If it’s possible at your place of business, once connected you’ll see the same desktop background, app settings, browser history, and so on that you see on your main computer at home (or in another office). You make the change through PC Settings, from Users. Once there, click Connect Your Microsoft Account and work through the setup process.
Exam Tip
There are various ways to log on to a computer running Windows 8 beyond typing a Microsoft account name or local account name and password. You can also create a four-digit PIN or a Picture password. You can set these up from PC Settings, Accounts, and Sign-in Options. Make sure you know how to do this before taking the exam; you’ll likely be tested on it. Know that there are three gestures for a Picture password: tap, circle, and line.
Configure authentication in workgroups and domains
The weakest link when protecting computers is most often the password applied to the user account. The password could be nonexistent, too short, too simple, or too predictable. In some cases, the user might simply never change it. Often, users create and use the same password for multiple user IDs, too. This is a secondary weak link. If a hacker finds a password for a user’s online bank account, she will try that same password elsewhere, including the user’s computer. To protect authentication in both workgroups and domains, administrators can create local and group policies defining how passwords should be created, how often they can or must be changed, and what happens when a user fails to log on after making the attempt a specific number of times.
In this section we look at the password and account policies available in the Local Security Policy for a stand-alone computer or computers in a workgroup, but the same policies exist in Group Policy Management Console for domains as well.
Password policies
Because users likely won’t change their password every 30 days or use complex passwords just because you tell them to, administrators can force users to comply with the password policies through group policies. There are six policies that can be configured. To see these policies, open the Local Security Policy MMC. You can do this from a Run dialog box by typing secpol.msc. Expand Account Policies and click Password Policy. No policies are configured by default, but you can set them by double-clicking the policy to change. See Figure 4-26.

If you’re unsure what a particular policy does if enabled, click the Explain tab, also shown in Figure 4-26. There you can read a fairly lengthy description of the policy that includes the default settings, available parameters, and best practices, among other things. Briefly, these six policies are defined as follows:
Enforce Password History. Configure this when you want to require users to create unique passwords that have not been used before. For example, if you configure the setting to 5, users must create five different and new passwords before they can reuse the one they prefer over all others.
Maximum Password Age. Configure this when you want users to change their password after a specific number of days.
Minimum Password Age. Configure this when you want users to have to keep their new password for a specific amount of time before they can change it. This is important because if you don’t set it, but you do set Enforce Password History, users can just cycle through the required passwords one after another until they can reuse the one they like best.
Minimum Password Length. Use this setting to require the password to be a specific length or longer. There’s a fine line between security and client happiness and compliance. Although you might think a 14-character password is the most secure option, note that if you require something that long, users will likely just print the password and leave it on their desks for easy access.
Password Must Meet Complexity Requirements. Use this setting to require users to create passwords that meet complexity standards. When this is enabled, passwords must not contain the user’s account name or parts of the user’s full name, must be at least six characters long, and must contain characters from three of these four categories: uppercase letters, lowercase letters, numbers, and special characters (!, $, #).
Store Passwords Using Reversible Encryption. Configure this to have the operating system store the password with reversible encryption. Although it sounds like a good idea, it isn’t. When this is enabled, the operating system stores passwords essentially as plaintext versions. You have to select this if you’re using Challenge-Handshake Authentication Protocal (CHAP) through remote access or Internet Authentication Services (IAS). It is also required when using Digest Authentication in Internet Information Services (IIS).
Account Lockout policies
If a hacker has enough time and enough information, he might be able to crack a user’s password and gain access to the computer. This can be done manually but is often done with programs designed for this purpose. You can configure Account Lockout policies to prevent this. Like Password policies, you configure Local Security Policy for stand-alone and workgroup computers, and you use Group Policy Management Console for Active Directory domain networks. Figure 4-27 shows the Local Security Policy MMC.
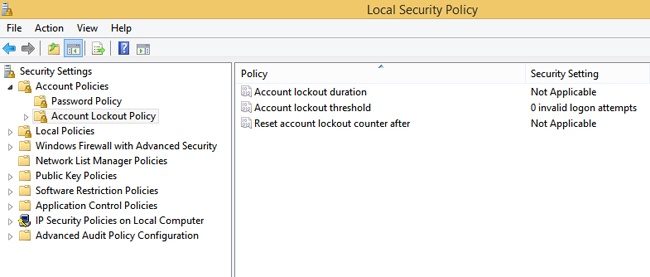
There are three Account Lockout policies to consider, and in most instances they must be configured together:
Account Lockout Duration. If you’ve configured an account lockout threshold, and if that threshold is met, this setting defines how long (in minutes) the user will be locked out of her computer. A setting of 5 to 15 minutes is usually fine.
Account Lockout Threshold. You must configure this to use the other options. This setting defines how many times users can try to log on to their computer and fail before they are locked out.
Reset Account Counter After. This setting defines the number of minutes that must pass after a failed logon attempt before the failed logon attempt counter is reset to zero. If an account lockout threshold is defined, this must be less than or equal to the number of minutes set there.
Configure virtual smart cards and biometrics
User names and passwords are inherently weak ways to protect a computer from unauthorized access. The user is generally the problem, because users can willingly give their password to a person, be tricked into it, or leave their password out on their desks or in a desk drawer. Smart cards can provide better security, especially if used with user names and passwords (or PINs) as part of a multifactor authentication policy (although it’s equally likely a user might give a coworker the card and the PIN willingly so that the coworker can access his workstation). Another option is also available: biometrics. This can be a fingerprint, eye scan, and so on.
Smart cards and virtual smart cards
A physical smart card often looks like a credit card, and users are expected to keep it with them. The smart card includes a chip that contains the user’s authentication information, which includes a personal certificate. The smart card is inserted into a card reader when the user wants access to the computer (or cash register, kiosk computer, medicine dispensary, and so on). Sometimes users secure their smart card in a wallet or purse, but more often they attach their smart card to a lanyard or smart card holder (which they then attach to a belt loop or article of clothing). Generally, a user knows when a smart card goes missing; in contrast, users don’t know when their passwords have been compromised.
Exam Tip
Windows 8 offers support for the Personal Identity Verification (PIV) standard. This makes it possible for Windows 8.1 to obtain the necessary drivers for PIV smart cards from Windows Update. The operating system also contains its own minidriver if Windows Update is not available.
More Info: There are policies available to manage smart cards
There are settings you can configure in Group Policy Management Console when using physical smart cards in an organization. You can configure these settings to require smart cards and to specify how Windows 8 should respond when the smart card is removed during a computer session. You can see these settings from Computer Configuration, Policies, Windows Settings, Security Settings, Local Policies, Security Options.
Virtual smart cards imitate the functionality of physical smart cards, but they are not physical cards. Instead, they are virtual and use the Trusted Platform Module (TPM) chip available on many newer computers to provide security. This eliminates the need for a card reader. To use virtual smart cards, you must have a personal computer running Windows 8.1 with an installed and fully functional TPM and a network configured to support the use of virtual smart cards.
For a worker in an organization that uses these kinds of virtual smart cards, it’s simply a smart card that is always available on the computer. At login, it shows as a user account and below it are options to sign in with the normal password or PIN. If a user needs to use more than one computer, a new virtual smart card must be issued for that computer. If multiple users share a computer, there are multiple virtual smart cards, one for each.
More Info: Understand virtual smart card technology
For more information, see Understanding and Evaluating Virtual Smart Cards at http://www.microsoft.com/en-us/download/details.aspx?displaylang=en&id=29076.
At sign in, Windows 8.1 detects whether a smart card reader was installed and if it was used to sign in the last time the computer was used. If a smart card was not installed and the user selects the smart card sign-in icon, the user is prompted to connect a smart card. Additionally, the Smart Card Service runs only when it needs to. The Smart Card Service (scardsvr) automatically starts when the user connects a smart card reader and automatically stops when a user removes a smart card reader and no other smart card reader is connected to the computer.
To configure Windows 8.1 virtual smart cards if you have the required technology and credentials available, follow these steps:
Open an elevated command prompt.
Type tpm.msc.
Verify that a compatible TPM can be found and that it is at least a 1.2 or later. If you receive an error but are sure a compatible module is available, enable it in the system BIOS before continuing.
Close the TPM management console.
At the command prompt, type TpmVscMgr create /name MyVSC /pin default /adminkey random /generate and press Enter. To provide a custom PIN value when creating the virtual smart card, use /pin prompt instead.
Use biometrics
Windows 8.1 includes a component called Windows Biometric Framework. This makes it possible to use a physical characteristic like a fingerprint to identify a user without having to go to the great lengths required to do so in Windows 7 (and earlier versions). It’s important to use this with a secondary authentication method, though, because scanners can fail and it is theoretically possible for the biometric identification method to be compromised. For example, I was able to unlock my smartphone that I configured to use facial recognition using my cat’s face instead of mine. That is an issue with the manufacturer and could be an issue for you, too.
You need to make sure the Biometrics Service is running in the Services console to use the service. You also need to install the biometric hardware, generally a scanner of some sort. Device Manager supports these types of devices, as does Windows Update; there are settings available in Group Policy to manage them (see Figure 4-28) and there is a Biometric Devices item in Control Panel that allows users to control the availability of biometric devices and state whether they can be used to log on to a local computer or domain. You can use a biometric device to grant User Account Control elevation, too.
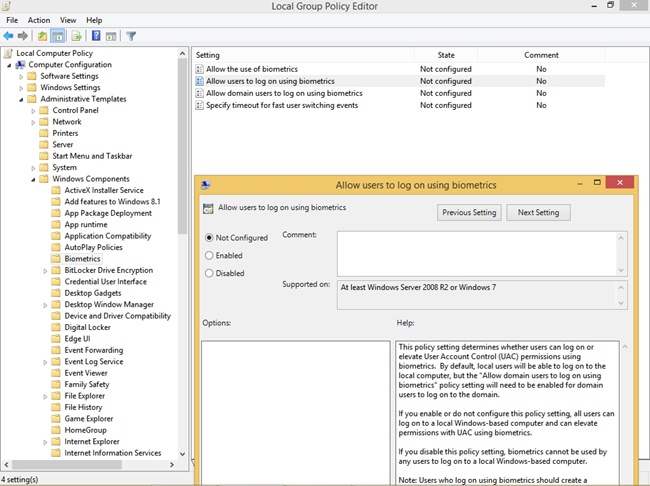
You can find Group Policy settings related to biometrics in the Group Policy Editor under Computer Configuration, Administrative Templates, Windows Components, Biometrics. There you can select from the following options:
Allow The Use Of Biometrics
Allow Users To Log On Using Biometrics
Allow Domain Users To Log On Using Biometrics
Specify Timeout For Fast User Switching Events
More Info: Learn more about biometrics
For more information about biometrics, refer to this article on TechNet: http://technet.microsoft.com/en-us/library/dn308564.aspx.
Local security settings
In the exam for Windows 8, there was an additional entry for Objective 4.2: Configure file and folder access, Local security settings. This was removed for the Windows 8.1 exam update. However, some of the items previously tested are still important to know (and it’s possible you might see remnants of them on this exam). Make sure you understand how to configure Local Security Policy (which we’ve covered in various sections in this book) and how to configure Secure Boot and make the most of the Unified Extensible Firmware Interface (UEFI). Know that a TPM chip is not required to use Secure Boot, but it is required for BitLocker (discussed in Chapter 5). To use Secure Boot, the computer must use the GUID Partition Table structure as well. Also take a look at the SmartScreen filter; this security enhancement protects your computer (and you) from running malicious software unintentionally.
Configure user rights
User rights allow users to perform computer-related tasks, such as changing the system time or the time zone, shutting down a computer, and taking ownership of files, among other things. User rights are preconfigured for the groups available in Windows 8.1, including Users, Administrators, Guests, HomeUsers, Hyper-V Administrators, and so on. (You can view all groups in the Computer Management console under System Tools, Local Users And Groups, Groups.)
You can configure user rights and privileges through the Security Policy console. You can also get a feel for how user rights are assigned already by viewing the entries in the Security Settings pane for a particular policy. Figure 4-29 shows the Local Security Policy console with Change The System Time selected. Note that only the LOCAL SERVICE and Administrators groups can perform this task by default.

You can add (or remove) users or groups to any entry in the User Rights Assignment pane. To do so, double-click the entry to change (we’ll chose Deny Access To This Computer From The Network), click Add User Or Group, and then use the Select Users Or Groups dialog box to complete the addition. See Figure 4-30. However, before you do this, remember that administrators generally add users to groups first and then go from there. In the case of user rights, administrators traditionally either add the user who should have the rights to the group that already has those rights assigned or assign user rights to groups they create and then add users to those groups when necessary.

Exam Tip
User rights and user permissions are two different things. User rights provide a user the ability to do something. Permissions provide a user the ability to access something. User rights are assigned to users and groups. Permissions are applied to objects like files and folders. User rights can follow a user. Permissions are assigned to users and are generally fixed.
Manage credentials and certificates
Credentials and certificates help secure the computer in different ways. Credentials are user names and passwords; certificates verify the security of a particular thing, like encrypted files or Internet downloads.
Credentials
Credentials are user names and passwords. Windows 8.1 comes with Credential Manager to help manage and maintain them. Credential Manager saves the credentials users enter when they use their own computer to access network servers and resources on local networks (Windows Credentials) and can be used to back up and restore them. The user has to select the Remember My Credentials check box when prompted, though, or else the credential won’t be saved. Credential Manager also offers Credential Locker, which saves user names and passwords associated with websites and Windows apps (Web Credentials). It saves all of these in an area called the Windows Vault.
More Info: How credentials are saved
Credentials are saved in encrypted folders on the computer under the user’s profile. Applications that support this feature, such as web browsers and Windows 8 apps, can automatically offer up the correct credentials to other computers and websites during the sign-in process.
If the user name or password has been changed since the last time it was saved and access is unsuccessful, the user is prompted to type the new credentials. When access to the resource or website is successful, Credential Manager and Credential Locker overwrite what was there.
The saved user names and passwords follow the users when they move from one computer to another in a workgroup or homegroup, provided the user logs on with his or her Microsoft account. This feature isn’t enabled on domains, though, for security reasons. You can open Credential Manager from Control Panel. Figure 4-31 shows Credential Manager.

Here are a few more things to know about Credential Manager:
Windows Store apps can be programmed to use Credential Locker.
Credential roaming requires the Microsoft account for synchronization.
Credential roaming is enabled by default on non-domain-joined computers, and it is disabled on domain-joined computers.
Credential Locker supports seamless sign in by using Windows Store apps that use Web Authentication Broker and remember passwords for services like Twitter and LinkedIn.
Note in Figure 4-31 that options exist to back up and restore credentials, but these options are only available when Windows Credentials is selected. When you click Back Up Credentials you are prompted first to browse to a location to which to save the credentials, name the file (it has a .crd extension), and then press Ctrl+Alt+Del to continue the backup process on the Secure Desktop. There you create a password for the file so that only you can access it.
Exam Tip
It’s important to understand that you can’t back up credentials you’ve saved in your web browser from inside Credential Manager. Those credentials are saved as part of your Microsoft account and are synchronized with it. (Those credentials do roam, provided you’ve logged on with the Microsoft account you used to create them.)
Certificates
Websites use certificates to verify that the site meets specific requirements for security. Executable files you download from the Internet often have certificates, too, to show they have not been tampered with since their creation. These generally come from verified certificate authorities if they are offerings from valid online entities that you can trust. Windows 8 creates its own certificates, including the self-signed certificates used with EFS, discussed earlier in this chapter. Although the use of certificates is invisible to the end user, you might want to manage them, specifically by backing them up. You might want to migrate them, for instance, or just provide one more tool for backup and recovery.
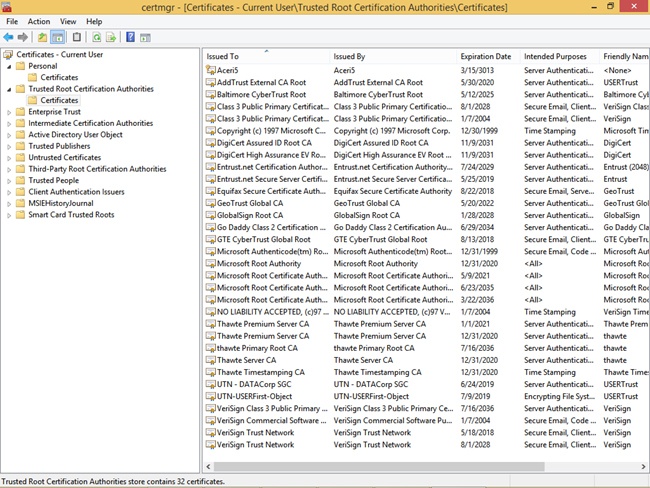
The only place to perform this particular backup task is from the Certificate Manager MMC. You can open it from a Run dialog box or the Start screen by typing certmgr.msc. You can see this in Figure 4-32. There are a lot of entries, and each represents a specific kind of certificate. Personal Certificates and Trusted Publishers are two of them. Figure 4-32 shows Trusted Root Certification Authorities expanded and Certificates selected. Look closely and you might recognize some of the names: VeriSign, Go Daddy, Microsoft, and Equifax.
To back up a single certificate, right-click the certificate to back up, click All Tasks, and then click Export. Work through the wizard to select the format to use. This is the only way to back up a certificate and have the options shown in Figure 4-33 available. If you select more than one certificate, you’ll have to choose Personal Information Exchange or Microsoft Serialized Certificate Store.
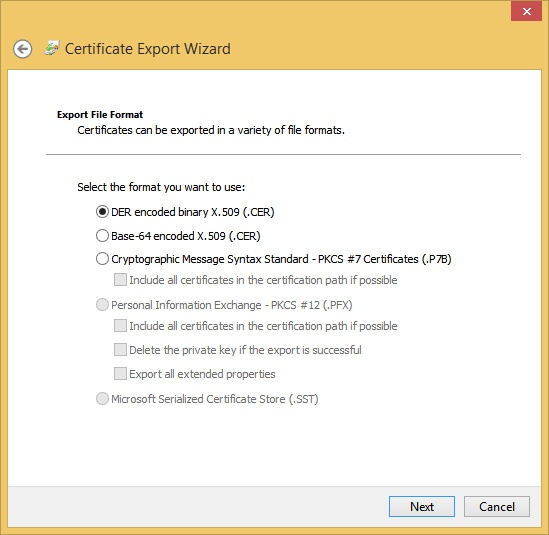
More Info: Supported file formats
Certificate import and export operations support four file formats:
Personal Information Exchange (PKCS #12)
The Personal Information Exchange format (PFX, also called PKCS #12) supports secure storage of certificates, private keys, and all certificates in a certification path. The PKCS #12 format is the only file format that can be used to export a certificate and its private key.
Cryptographic Message Syntax Standard (PKCS #7)
The PKCS #7 format supports storage of certificates and all certificates in the certification path.
DER Encoded Binary X.509
The Distinguished Encoding Rules (DER) format supports storage of a single certificate. This format does not support storage of the private key or certification path.
Base-64 Encoded X.509
The Base-64 format supports storage of a single certificate. This format does not support storage of the private key or certification path.
Configure User Account Control behavior
You are likely familiar with the User Account Control (UAC) prompt that appears when elevated privileges are required to perform a task. When logged on as a Standard user, the user must input both an Administrator user name and password in the UAC dialog box and click Yes before continuing. When logged on as an Administrator, the user must click Yes or No to continue. When these prompts appear, they appear on a Secure Desktop. Nothing can happen until the proper credentials or answer is input or that task attempt is canceled. Secure Desktop keeps anything from happening behind the scenes while the user decides what to do.
Note: All about tokens
Although Microsoft recommends that users perform their everyday computing tasks using a Standard account, most don’t heed this advice. Because of this, Administrator accounts are given two tokens (one for a Standard user and one for an Administrator user). Tokens define the user’s access level at logon. By default, the Standard user token is used most of the time. Administrators are still prompted when particular activities are attempted.
You might also know how to change the level of UAC in Control Panel using the slider available for that purpose. You can access this from the Action Center by clicking Change User Account Control Settings.
Exam Tip
If you are questioned about how to configure a computer to require elevated privileges for a specific task to be performed, note that the answer probably has to do with the UAC settings.
There’s a lot more to UAC than that, though. One option is to use Local Security Policy to specifically define how UAC is configured. There are too many options to list here, but you can review them in the Local Security Policy window from Local Policies, Security Options. Double-click any User Account Control policy option and click the Explain tab to learn about it. Figure 4-34 shows this, with User Account Control: Behavior Of The Elevation Prompt For Standard Users selected.

Here are a few more things to know about the UAC prompt in Windows 8.1. The elevation prompt color-coding is as follows:
Red background with a red shield icon. The application is blocked by Group Policy or is from a publisher that is blocked.
Blue background with a blue and gold shield icon. The application is a Windows Server 2012 administrative application, such as a Control Panel item.
Blue background with a blue shield icon. The application is signed by using Authenticode and is trusted by the local computer.
Yellow background with a yellow shield icon. The application is unsigned or signed but is not yet trusted by the local computer.
More Info: Learn more about UAC
Learn more about UAC at http://technet.microsoft.com/en-us/library/jj574202.aspx.
Objective summary
The Microsoft account is a new way to log on to a computer running Windows 8 and syncs various settings including web favorites, Start screen settings, and Internet passwords.
Virtual smart cards can be used to further secure log in, as can biometrics. There are group policies for both.
User Account Control gives both Standard users and Administrators the option to consider what they (or their computer) is attempting to do and decide whether to allow it. Secure Desktop keeps everything locked down until a decision is made.
There are many types of authentication, including PINs, Picture passwords, Microsoft accounts, local accounts, and domain accounts.
Rights enable users to do things like change the system time. Rights are already assigned to the groups available in Windows 8.
Objective review
Answer the following questions to test your knowledge of the information in this objective. You can find the answers to these questions and explanations of why each answer choice is correct or incorrect in the “Answers” section at the end of this chapter.
Chapter summary
There are many ways to share resources and protect those resources on local and domain networks, including but not limited to applying Share and NTFS permissions, using homegroups, configuring EFS, using various types of sharing including Any folder sharing, and more.
NTFS permissions allow for granular control of shared resources. There are six basic permissions and 14 advanced permissions. When combined with Share permissions, the more restrictive of the cumulative permissions is applied.
Disk quotas, EFS, and auditing are available on NTFS volumes and help administrators manage and maintain those volumes for multiple users.
Authentication can be achieved through user names and passwords, PINs, Picture passwords, physical and virtual smart cards, and biometrics, and these can be combined to configure multifactor authentication.
User rights let users do things; permissions let users access things. Both can be managed through group policies.
User Account Control helps secure a computer from malware and other threats by making users input the proper credentials or allow the task through a UAC dialog box. UAC settings can be changed in Control Panel and managed through Group Policies.
Answers
This section contains the solutions to the thought experiments and answers to the objective review questions in this chapter.
Objective 4.1: Thought experiment
Any folder sharing is best because the client can protect files and folders by specifically configuring access for only those who need it.
You must remove the Everyone group from all of the shares you want to configure.
20
Read and Change. Do not give Full Control; if you do, the user can do the things listed (change file permissions and take ownership).
Objective 4.1: Review
Correct answers: A and C
Correct: A wizard does walk you through the process of creating or joining a homegroup, and a password is generated for you.
Incorrect: You can reconfigure shares to include specific permissions for people you select.
Correct: Users can share their default libraries.
Incorrect: Homegroups can only be configured with Windows 7 and Windows 8–based computers.
Correct answer: A
Correct: Any folder sharing offers these features.
Incorrect: You’d have to move the data from the desktop to the applicable Public folder. Also, you could not have the control needed for this scenario.
Incorrect: You can’t configure a homegroup on a public network, only on a private network.
Incorrect: Any folder sharing is the correct answer.
Correct answer: D
Incorrect: Only the Print permission is required.
Incorrect: Only the Print permission is required.
Incorrect: Only the Print permission is required.
Correct: When you share a printer, the Everyone group has the Print permission so nothing else needs to be done.
Incorrect: You must configure this from your Windows 8.1 computer, not from the website.
Correct: This is where you configure this setting.
Incorrect: Although you can configure many options here, the option in this question isn’t one of them.
Incorrect: This does not offer the desired option.
Objective 4.2: Thought experiment
The Properties dialog box for the storage volume, on the Quota tab
Deny Disk Space To Users Exceeding Quota Limit and Limit Disk Space To
Probably not. As stated in the scenario, the other users don’t use much storage space. The only time this would become an issue is if one of those users suddenly needed more space.
Objective 4.2: Review
Correct answer: A
Correct: A security principal is the user, group, or computer given permissions and the permissions that have been configured for it (them).
Incorrect: Any element or resource that is protected has an access control list (ACL). This is basically a list of permissions that have been applied to it.
Incorrect: The NTFS permissions in the ACL are access control entries (ACEs). Every ACE has at least one security principal.
Incorrect: An element, object, or resource is what is being protected.
Correct answers: A, B, C, and D
Correct: This is a valid task that can be performed here.
Correct: This is a valid task that can be performed here.
Correct: This is a valid task that can be performed here.
Correct: This is a valid task that can be performed here.
Correct answer: C
Incorrect: Set-Acl is a command, but it is used to set the NTFS ACL for a specified resource.
Incorrect: Icacls.exe is used to apply permissions at a command line.
Correct: Cipher is the proper command-line tool.
Incorrect: You can configure encryption from a command line.
Incorrect: Encryption does protect against copy commands.
Incorrect: A hacker can get to data in any number of ways, even if the data is encrypted.
Incorrect: A hacker can’t remove the encryption attribute.
Correct: An Access Denied message will appear.
Objective 4.3: Thought experiment
You can use Security Policy or Group Policy Management Console consoles.
Password policy and Account Lockout policy
To do the following:
Require users to create complex passwords: Password policy – Password Must Meet Complexity Requirements
Limit user to 10 failed logons: Account lockout policy – Account Lockout Threshold (set to 10)
Lock out users for 15 minutes after the account lockout threshold has been met: Account lockout threshold – Account Lockout Duration (set to 15)
Require users change their password once a month: Password policy – Maximum Password Age (set to 30 or 31)
Objective 4.3: Review
Correct answers: A and B
Correct: You can access this policy from the Local Security Policy MMC.
Correct: You can access this policy from the Local Group Policy Editor MMC from Local PoliciesSecurity Options.
Incorrect: This is not a valid path to the desired policy. User rights do not offer this option.
Incorrect: This is not a valid path to the desired policy. Password policy can’t be set to exclude Microsoft accounts.
Correct answer: D
Incorrect: You can create accounts, change account types, remove user accounts, set up family safety, and more, but you cannot create a PIN or Picture password here.
Incorrect: You use Credential Manager to manage and maintain Windows and Web credentials.
Incorrect: You cannot make the desired change here.
Correct: This is where you create a PIN or Picture password.
Incorrect: This is where you create additional accounts or configure them.
Correct answers: B and C
Incorrect: This keeps users from reusing passwords they’ve previously created.
Correct: This requires users to keep their password for a certain amount of time; in this instance, 21 days.
Correct: This requires users to change their password after a specific amount of time has passed; in this case, 42 days.
Incorrect: Length has to do with how many characters a password contains and not with a length of time.
Incorrect: Length has to do with how many characters a password contains and not with a length of time.
Correct answer: D
Incorrect: This is where you configure policies for smart cards, but you do not have to enable any setting for the scenario stated.
Incorrect: The Smart Card Service (scardsvr) automatically starts when the user connects a smart card reader and automatically stops when the user removes a smart card reader and no other smart card reader is connected to the computer.
Incorrect: This is the command to configure a new virtual smart card.
Correct: This standard makes the scenario possible.
Correct answer: E
Incorrect: All of the items are correct, so E is the correct answer.
Incorrect: All of the items are correct, so E is the correct answer.
Incorrect: All of the items are correct, so E is the correct answer.
Incorrect: All of the items are correct, so E is the correct answer.
Correct: All of the entries are user rights.
Correct answer: C
Incorrect: This opens the Group Policy Editor.
Incorrect: This opens the Security Policy console.
Correct: This opens the Certificate Manager console.
Incorrect: This opens the Services console.