Chapter 3. Configure network connectivity
In almost all instances and scenarios, using a computer to complete tasks involves connecting to a network of some sort, even if it’s just to access the Internet or back up your work someplace other than your own PC. In many cases, it’s a local area network in a small business, and the resources are configured as a workgroup. In homes, networked computers are often configured as homegroups. The purpose of both of these types of networks is frequently to share an Internet connection and files, folders, printers, and other resources. In both cases and in nearly all scenarios, the users control their own data and manage resources locally.
In other scenarios, a network is the foundation for an enterprise, complete with Active Directory domain controllers that authenticate users centrally and secure network resources. These larger networks can contain additional servers that manage storage, email, faxes, printers, and so on as well. It’s important for all of the resources to be managed as a whole to keep everything secure and available, among other things.
No matter what kind of network you’re dealing with though, the underlying skills in which you must be proficient are mostly the same. You need to be able to configure IP and network settings and you need to know how to configure and maintain the security of the network. Sometimes, you also need to configure ways to manage the workstations in your network remotely.
Objectives in this chapter:
Objective 3.1: Configure IP settings
Networks are groups of computers and other resources. Networks can be public, private, or domains, and security settings are applied to your Windows 8.1 computer when you connect. Once connected, each resource that is connected to the network (computer, network printer, server, or other host) must acquire (or have previously been assigned) an exclusive address that will define it on that network. These addresses are unique, and you can’t have two hosts on the same network with the same address. This makes addressing a very important part of configuring networks.
Unique addresses are also required of hosts that connect directly to the Internet such as servers in Internet service providers (ISPs), entities with their own domain name such as http://www.microsoft.com, and so on. Individual computers that are positioned (virtually) behind routers, modems, or networks that share an Internet connection for the purpose of giving those computers access don’t connect directly and thus don’t have this requirement. In these cases, other technologies are used for addressing, like Network Address Translation (NAT).
Because computers communicate and are defined by a numerical address and not a name, and because requiring users to type the address to access hosts would be cumbersome if not impossible, there is a technology in place that enables users to type a computer name instead of an address to get to a website. This is called resolving an address and is handled by Domain Name System (DNS). You’ll learn about all of these things in this objective, as well as how to resolve connectivity issues when they arise.
Configure IP settings
Every computer (host) on a network (even the Internet) must have a unique Internet Protocol (IP) address. This address, when it’s configured as an IPv4 address, is a 32-bit number that is styled as four sets of octets. An example is 192.168.4.20. The IP address (combined with the proper subnet, something like 255.255.255.0) defines the network and the host. Because every resource on a network must have a defined address, you need to know how to configure those addresses. There are two ways to get an address to a resource: You can define it manually or it can be assigned by a Dynamic Host Configuration Protocol (DHCP) server. When an address can’t be assigned this way, Windows will assign its own IP address using a technology called Automatic Private IP Addressing (APIPA).
Exam Tip
Make sure to review the IP address ranges for Class A, B, and C and have an idea of how many networks and hosts each offers. Know their default subnet masks, too. Beyond that, know the private addresses available for local networks (192.x.x.x, 172.x.x.x, and 10.x.x.x for Class C, B, and A, respectively).
Explore the Local Area Network Connections Properties dialog box
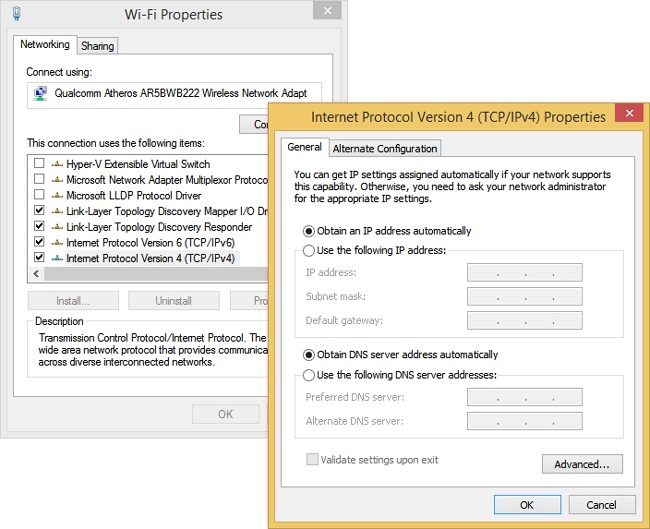
Figure 3-1 shows the Local Area Network Connections Properties dialog box for a Wi-Fi adapter, where you can configure networking. On the Networking tab you can access the available networking options, including TCP/IPv4, selected here.
Exam Tip
You might be asked how to configure IPv4 or IPv6 addresses from the command line. The command to do this is Netsh. Make sure you understand the options associated with this command. You might be asked to select the proper command to apply a static address for a host, among other things. That command would look like this: “netsh interface ipv4 set address “Ethernet” static 192.168.5.12 255.255.255.0 192.168.1.10”. If you want the address to come from a DHCP server, the command would look more like this: “netsh interface ipv4 set address name=“Ethernet” source=dhcp”.
Explore the options available from the dialog boxes shown in Figure 3-1 as time allows. Make sure you understand the terms listed here before continuing:
APIPA. This is a link-local (IP) address that is assigned by Windows when no other addressing mechanism can be found. This enables the host to function on the local network segment. Routers do not forward packets from these kinds of addresses.
Default Gateway. This hardware or software device lets hosts connect to other networks. Often that network is the Internet, but it could also be another network segment in an enterprise domain.
DHCP. DHCP is a networking protocol that dynamically configures IP addresses for hosts on a network. A DHCP server assigns these addresses. These IP addresses are generally granted for a specified interval and must be renewed when the interval is up.
More Info: DHCP
To learn more about DHCP, refer to this article: http://technet.microsoft.com/en-us/library/cc726865(v=WS.10).aspx.
DHCP Scope. A DHCP scope is a consecutive range of possible IP addresses that can be offered to hosts on a subnet (part of a network).
DNS. DNS is a service that enables users to type the name of the host to which they want to connect instead of its IP address. A DNS server resolves the name.
IPv4. This is an IP address that consists of 32 bits, notated by four 8-bit octets. It has two parts: the network ID and the host ID. The network ID describes the network, and the host ID defines the specific device on it. IPv4 addresses can be Unicast, Broadcast, or Multicast. See Subnet mask, next.
Subnet mask. This 32-bit number, notated by four 8-bit octets that consist of a set of 1s followed by a set of 0s, is used to define which part of the IPv4 address is the network ID and which part is the host ID. The 1s denote the network; the 0s the host. The default subnet masks are in the form 255.0.0.0 for Class A addresses, 255.255.0.0 for Class B addresses, and 255.255.255.0 for Class C addresses. Translated to binary, 255.0.0.0 looks like this: 11111111 00000000 00000000 00000000.
IPv6. The available IPv4 address combinations are dwindling, thus the need for a better option. IPv6 is that option. Instead of a 32-bit space, it’s a 128-bit space with 16-bit boundaries. This allows for many more addresses. An IPv6 address can look like this: 21DA:D3:0:2F3B:2AA:FF:FE28:9C5A.
Connect to a network
The first time you connect to a local network, you are prompted to choose from one of these options:
No, Don’t Turn On Sharing Or Connect To Devices. This option is intended for public networks and hot spots (libraries, coffee shops). The user’s computer can’t be seen or accessed by others, and the user can’t see other computers also accessing the network.
Yes, Turn On Sharing And Connect To Devices. This option is intended for private, trusted networks (home, work) and homegroups. Computers sit behind a trusted router and do not connect to the Internet directly.
These two options do not appear when you connect to an Active Directory Domain Services domain. However, when they do appear and when you choose an option, settings are configured automatically for network discovery, file and printer sharing, the state of the firewall, apps that can accept incoming connections, and so on. (Computers configured as Private or Domain have network discovery enabled; Public networks do not.)
If, for whatever reason, you are not prompted to connect to a known network, you can connect manually. To connect to a network manually, follow these steps:
Press the Windows key+I to open the Settings charm.
Click the Network icon.
Select the network from the list and click Connect.
If prompted, type the password or passcode to join the network.
If you need to connect to a network that’s hidden and not broadcasting its Service Set Identifier (SSID), follow these steps:
Open the Network And Sharing Center.
Click Set Up A New Connection Or Network.
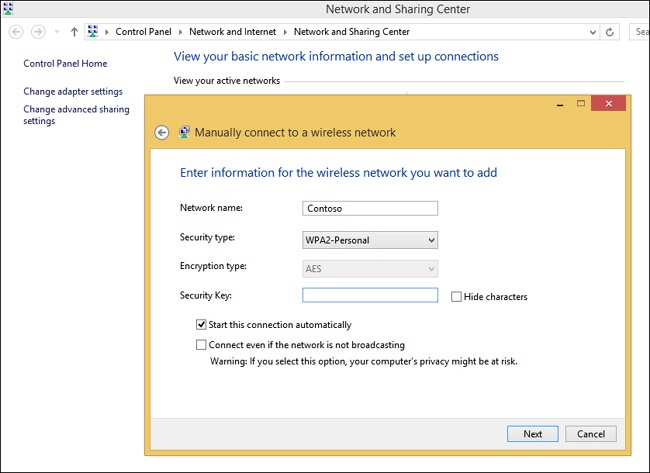
Click Manually Connect To A Wireless Network. Click Next.
Input the network name (SSID), the security type, the encryption type, and the security key as applicable and enable other options as desired (see Figure 3-2).
Click Next. The connection should be enabled.
More Info: Connect to a workplace
One of the options in the Network And Sharing Wizard that walks you through connecting to a hidden network is Connect To A Workplace. You’d choose this option to set up a virtual private network (VPN). VPNs are covered in Chapter 5.
Configure network locations
When you connect to a local area network and opt to share or not share on it, Windows automatically configures the settings for the network location. If you’ve joined a homegroup on the network, settings are also applied for you. Windows will always err on the side of caution when it can’t determine the location type though, and occasionally you’ll find that the location is configured incorrectly.
To make changes to the network location, if that location is a homegroup, you can run the Homegroup Troubleshooter. This might never happen in a homegroup, but it’s worth noting that the Homegroup Troubleshooter is an option. If the location is a local network in a workgroup, you make changes in the PC Settings as follows:
Open PC Settings.
Click Network.
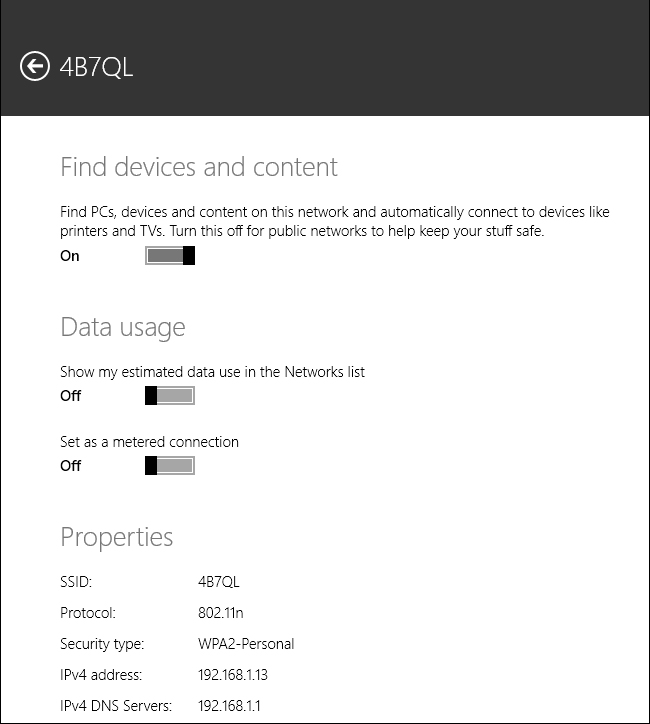
From the Connections pane, click the network to change.
Set Find Devices And Content to Off. See Figure 3-3.
Note: Advanced sharing
You can configure advanced sharing from the Network And Sharing Center by clicking Change Advanced Sharing Settings. From there you can change settings for the various profiles available, including Private, Guest Or Public, and All Network. Settings include network discovery, file and print sharing, and various settings for public folder sharing, media streaming, encryption for file sharing, and password-protected sharing.
Configure name resolution
Computers are represented by their unique IP address, and you can communicate with them using that address if you like. One way to communicate with an IP address is to do so at a command line. For instance, you can type something like ping 192.168.4.5 to troubleshoot connectivity to another host on a local area network segment. Communicating this way is cumbersome, at least in real life. (Ping is defined in the next section, Resolve connectivity issues.)
DNS enables users to type names instead of numbers, and the process is called name resolution. DNS servers store information about the names and addresses of Internet computers, and the lists they maintain are distributed among thousands of DNS servers available on the Internet, which are placed all over the world. The name resolution request is forwarded to one of these servers, and if the name can’t be resolved it’s passed to another and another, until it is.
You can configure a host to use a specific DNS server in the connection’s Properties dialog box. On a domain with a unique DNS server that the host is required to use, this is necessary. It might also be necessary in a VPN or in a virtual machine.
Resolve connectivity issues
When a host can’t reach a network, that host has connectivity issues. The issue might be isolated to only that device; perhaps the computer’s Ethernet cable has come unplugged or the computer’s wireless features have been disabled. Maybe there is an IP address conflict on the network and the user’s IP address needs to be released and renewed. Often, using the troubleshooting tools in the Network And Sharing Center can uncover the problem and offer a solution. If the issue isn’t isolated, though, you have larger problems. A network server, gateway, or other necessary resource might be down, a network segment or physical backbone might be damaged, or there could be an issue that is caused by the ISP, cloud services, or other technologies that are out of your control. In this section you’ll learn three ways to troubleshoot a connectivity problem. You can use the Network And Sharing Center, the Action Center, or command-line tools.
Note: Viewing connection status
To view the status of any connection, open the Network And Sharing Center, then click Change Adapter Settings. Double-click the icon that represents the connected network and click Details. In the dialog box that appears, you can view the physical address, DHCP information, and IP addresses. You can even see the IP address of the DNS server, default gateway, and DHCP server, along with when the DHCP lease was obtained and when it must be renewed.
Network and sharing center
The Network And Sharing Center enables you to view the status of your active networks. If there’s a problem, you can click Troubleshoot Problems to see if the Network And Sharing Center can resolve it. Sometimes it can, by releasing and renewing the IP address, resetting adapter settings, or uncovering a simple problem such as a disconnected Ethernet cable (which you can then reconnect).
If a problem exists but can’t be resolved automatically, you can choose from a list of troubleshooting options that include solving problems connecting to websites, accessing shared folders, finding computers or files in a homegroup, finding and fixing problems with wireless adapters, and troubleshooting incoming connections. Figure 3-4 shows this. When you select any option and start the troubleshooter, it generally finds the problem and performs the repair or prompts you to authorize the repair. It might also require you to do something first, like insert an Ethernet cable into the Ethernet port on the computer.

Action Center troubleshooting tools
If the Network And Sharing Center can’t help you determine or resolve the problem, you can check the Action Center. Again you’ll see a troubleshooting option. Here you can troubleshoot problems related to the network and to other things like hardware and sound or system and security. However, you might find something more valuable. Perhaps the network interface card’s driver needs to be updated. Action Center will alert you to this in most instances. You can also review problems with the network firewall, virus protection, Internet security settings, network access protection, and the user’s Microsoft Account, among other things. Sometimes you can resolve odd connectivity problems here.
Command-line tools
When the Network And Sharing Center and the Action Center can’t help resolve a connectivity problem, it’s likely a more complex issue. Perhaps a domain’s (or network segment’s) gateway is offline. Perhaps a router failed. Perhaps the DNS server isn’t available or has been incorrectly configured on the host. Perhaps the unique, corporate, IP address of the computer has been changed to an APIPA address because of a currently unresolved network issue. When these kinds of problems exist, you can use command-line tools to resolve them.
Here are some of the tools you can use:
Ping. This tool verifies IP-level connectivity to another TCP/IP computer. To do this, it sends Internet Control Message Protocol (ICMP) Echo Request messages to the recipient. The receipt of these messages is displayed, along with round-trip times, if the connection is successful. Ping is the primary command used to troubleshoot connectivity, reachability, and name resolution.
Ipconfig and Ipconfig /all. This displays all current TCP/IP network configuration values. It can also refresh DHCP and DNS settings. Used without the /all parameter, Ipconfig displays IPv4 and IPv6 addresses, the subnet mask, and the default gateway for all adapters installed on the host. Common parameters are /release, /renew, and /flushdns.
Tracert. This tool determines the path taken to a destination and shows information about each hop a packet takes to get to where it’s going. A hop is a pass through a router. You can use this information to see where the transmission fails.
Netstat. This displays a list of active TCP connections and the ports on which the computer is listening. It also displays Ethernet statistics, the IP routing table, and IPv4 and IPv6 statistics.
Netsh. This enables you to make changes to the network configuration of the current computer at the command line.
Nslookup. This tool displays information that you can use to diagnose problems with DNS.
Exam Tip
You should review as many command-line tools as time allows. You will see these on the exam, and they might include more obscure tools such as Icacls, Attrib, Cipher, Fsutil, Auditpol, and others, along with associated parameters. (You might also see commands associated with deployment outlined in Chapter 2, including DISM, DiskPart, Fdisk, BCDboot, and more.) Visit this page on TechNet to see a list of common command-line tools and their uses: http://technet.microsoft.com/en-us/library/cc754340.aspx#BKMK_a.
Objective summary
When you connect to a local network, you choose the network type and security settings are automatically configured. You are not prompted when you join a domain.
After you connect to a network, your computer is given a unique IP address on that network segment. Every host connected to a network must have an IP address.
Name resolution, handled by DNS, lets users type friendly names like http://www.microsoft.com instead of its IP address.
When connectivity problems ensue, you can troubleshoot the issue by using the Network And Sharing Center, Action Center, and various command-line tools.
Objective review
Answer the following questions to test your knowledge of the information in this objective. You can find the answers to these questions and explanations of why each answer choice is correct or incorrect in the “Answers” section at the end of this chapter.
Objective 3.2: Configure networking settings
There are various networking settings you can configure. You can connect to wireless and broadband networks and manage the list of wireless networks to which you’ve connected previously. You can configure location-aware printing to enable users to print to the desired local printer automatically. You can configure network adapters, too, to reconfigure default settings and tweak performance.
Connect to a wireless network
When a wireless network is available, you will likely be prompted to join it. This is especially true of mobile devices, although the prompt might not appear until you try to connect to the Internet. When you opt to connect, the process is often as simple as typing the password, if applicable. You learned in the previous section that you can connect to a network using the Set Up A New Connection Or Network option as well, by working through the wizard provided. When you connect this way, you are prompted to type the network name (SSID) and password and select the applicable security settings. There is another way not yet discussed, and that’s the simplest option of all: connecting to a network from the Settings charm.
To connect to a network from the Settings charm, follow these steps:
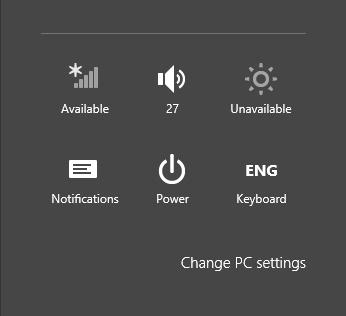
Press the Windows key+I to open the Settings charm and click the Network icon. See Figure 3-5. (You can also click the Network icon in the taskbar’s system tray on the desktop.)
Click the desired network. You can see and connect to available VPN and broadband connections here, too.
If desired, click Connect Automatically.
Click Connect. (You might be prompted to apply sharing options.)
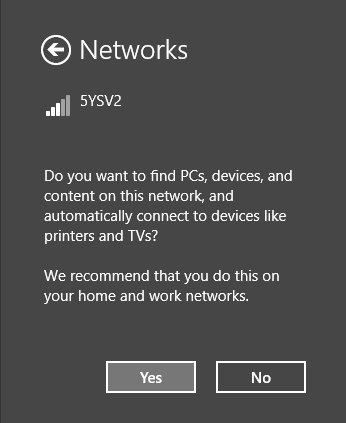
If prompted:
Type the password and click Next.
Click Yes or No as applicable and click OK. See Figure 3-6.
Exam Tip
You used to be able to right-click a network connection from the Settings charm and the list of networks you find there and forget a network. This enabled you to start fresh with network settings for that network the next time you connect. You can’t do that anymore. If you want to forget a network, refer to the directions in the next section, Manage preferred wireless networks.
Manage preferred wireless networks
Windows 8.1 keeps track of all of the networks to which you connect and prioritizes them automatically. When you have more than one connection option, Windows 8.1 determines which type it will connect to in this order: Ethernet, Wi-Fi, and then mobile broadband. To be clear, when all of these exist, it selects Ethernet. Otherwise, it selects Wi-Fi. If both become unavailable, then it connects with broadband (and will do so automatically if you’ve configured it to). With regard to the wireless networks to which you’ve connected in the past, when more than one of those is available at a given time, Windows 8.1 connects to the last one you used.
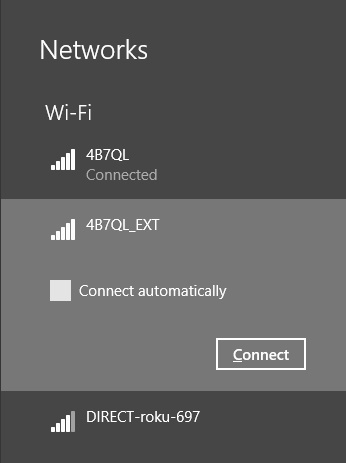
If you’re connected to a network automatically but want to choose another, click it from the list of networks. You can access this list by clicking the Network icon in the taskbar’s system tray on the desktop or by clicking the Network icon from the Settings charm. See Figure 3-7.
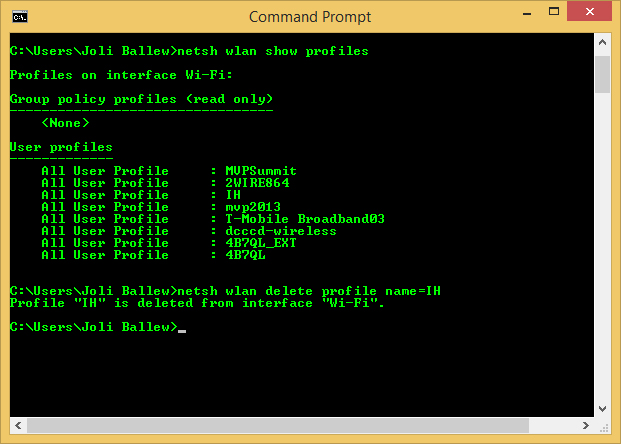
When you want to manage your list of wireless networks, you no longer have the option of using the Wireless Profile Manager you might have used in Windows 7, and there’s no longer an option to right-click a network and opt to forget it from the Networks list shown in Figure 3-7, as you could in Windows 8. Now you must use the Netsh command to remove network profiles.
Note: Forgetting a connection
You can forget a network from the Network list in one, specific instance. Try to connect to a network to which you have connected before, and when the connection fails, opt to forget that connection.
To use the Netsh command to forget a network, at a command prompt, follow these steps:
Type netsh wlan show profiles. Note the profile to forget. See Figure 3-8.
Type netsh wlan delete profile name=<profile name>. (Replace <profile name> with the name of the profile.) See Figure 3-8.
Press Enter.
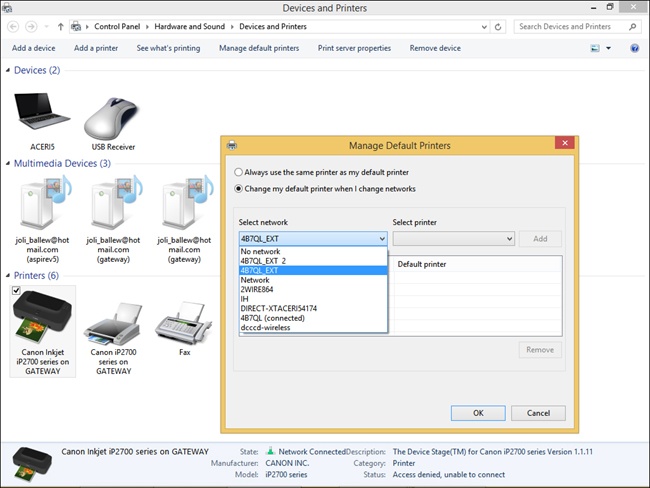
Configure location-aware printing
Users are becoming more and more mobile, which means that they’ll likely need to access printers from various locations. Those printers can be available on any kind of network, including a network at home, at the office, or even at a company kiosk. Having to choose a printer every time they connect to a new network can annoy users, thus the need for location-aware printing. With location-aware printing, a default printer can be set for each location from which the user prints. This also keeps the user from accidentally printing to the wrong printer, which poses a security issue if the printed data is confidential.
Exam Tip
Location-aware printing uses the Network Location Awareness service and the Network List service to determine the network location. The former collects and maintains network configuration information, and the latter identifies the network to which the computer is connected. If this feature doesn’t work, be aware that you need to check to make sure these services are running.
To configure location-aware printing, follow these steps:
Open the Devices And Printers window.
On the menu bar, click Manage Default Printers. (You won’t see this option on a desktop computer or if a default printer is not installed.)
Select Change My Default Printer When I Change Networks.
In the Select Network drop-down list, choose a network to configure as shown in Figure 3-9.
From the Select Printer drop-down list, select the printer to use.
To remove an entry, select it in the list of items you’ve added and click Remove.
Configure network adapters
A network adapter is a NIC. Depending on the type, it can transmit data via Ethernet, Wi-Fi, or both. You access the available adapters from the Network And Sharing Center by clicking Change Adapter Settings in the task pane on the left. From there it’s easy to tell which network adapter is being used. Figure 3-10 shows that the Wi-Fi adapter is connected. You can right-click an entry to access the options available for it.
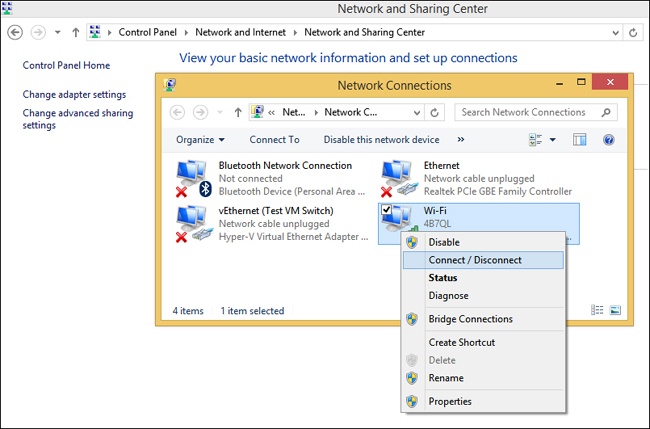
When you right-click an adapter in the Network Connections window, you can do any of the following:
Enable or disable the adapter. (This can help you solve connection problems or keep wireless adapters from searching for networks when you don’t need them to.)
Connect to or disconnect from the associated network.
See the status of the adapter or connection. (You can use this to view the number of bytes sent and received, to diagnose connection problems, to view signal quality and speed, and to view the SSID, among other things.)
Diagnose problems with the adapter or connection. (You can use this to run an automated tool that can assist in diagnosing connection problems.)
Bridge two or more connections. (You must select two connections that are LAN or High Speed Internet connections that are not being used by Internet Connection Sharing. A network bridge is a network device that connects to multiple network segments.)
Delete the entry, if the option is available.
Rename the adapter.
View the adapter’s properties. (You’ll see the familiar Properties dialog box you learned about earlier in this chapter. From there you can see the type of connection the adapter uses and install or uninstall protocols, Hyper-V Extensible Virtual Switch, Microsoft LLDP Protocol Driver, and more. When you select an option, you can view additional properties.)
Explore the options available from the adapters on a computer to which you have access. Make sure to click Configure in any Wi-Fi Properties dialog box to view the advanced options. You can, for instance, configure the computer to turn off that device to conserve power or to allow the device to wake up the computer (on the Power Management tab). You can also view events (Events tab), see adapter and driver details (Details, Driver, and General tabs), and view advanced configuration options (Advanced tab).
Objective summary
There are several ways to connect to a wireless network including using Control Panel, the Network icon in the desktop’s taskbar, and the network icon from the Settings charm.
There is a default priority for networks to which the user has previously connected: Ethernet, Wi-Fi, and mobile broadband. When there are two or more wireless connections available, Windows defaults to the last one used. You can manage networks by using the Netsh command.
Location-aware printing lets users configure a default printer for each network they connect to.
Each network adapter has options available for configuration. You can access these by right-clicking the network adapter in Network Connections and selecting an option from the shortcut menu.
Objective review
Answer the following questions to test your knowledge of the information in this objective. You can find the answers to these questions and explanations of why each answer choice is correct or incorrect in the “Answers” section at the end of this chapter.
Objective 3.3: Configure and maintain network security
There are a lot of ways to secure a stand-alone computer, but most of the options on which you’ll be tested in this objective are in the firewall settings. There are other places to secure a computer, of course, including but not limited to applying group policies, enabling Windows Defender or some other anti-malware software, selecting the appropriate network type when connecting, and even requiring complex passwords. Here, though, we’ll concentrate on what will be tested, as detailed next.
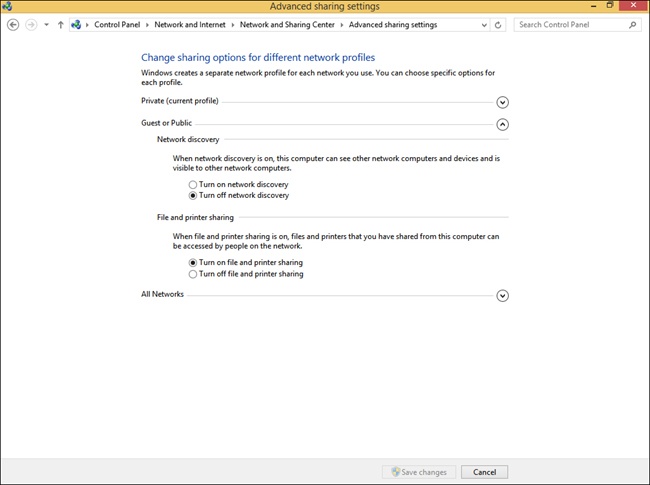
Configure Network Discovery
By default, Network Discovery is enabled for private and domain networks and disabled for public ones. Network Discovery enables a computer to locate other computers on a network and allows computers on the network to see it as well. This is fine when the network is trusted, but it isn’t a good idea when the network is not. By having these settings and others already configured for the various network types, along with the applicable settings for ports and protocols, the network administrator does not have to configure every aspect of a connection manually. There is one caveat. Even if Network Discovery is disabled, a Windows 8.1 computer can still access network resources if the user knows the names and locations of those resources (because they can’t be discovered by browsing).
It is possible to make changes to how Network Discovery is configured. You do this from the Network And Sharing Center by following this procedure:
Open the Network And Sharing Center.
In the left pane, click Change Advanced Sharing Settings.
Click the down arrow, if applicable, beside the network type for which to change the settings: Private or Guest Or Public.
Make the desired change for Network Discovery settings. Note the other options. See Figure 3-11.
Click Save Changes, not shown.
Configure Windows Firewall
Windows Firewall is a software solution that comes with Windows 8.1 that creates a virtual barrier between a computer and the network to which it is connected for the purpose of protecting the computer from unwanted incoming traffic (data) and protecting the network from unwanted outgoing traffic (data). The firewall allows specific types of data to enter and exit the computer and blocks others, and settings are configured by default (but they can be changed). This type of protection is called filtering. The filters are generally based on IP addresses, ports, and protocols.
IP Address. IP addresses are assigned to every computer and network resource connected directly to the network. The firewall can block or allow traffic based on an IP address of a resource (or a scope of addresses).
Port. Port numbers identify the application that is running on the computer. For example, port 21 is associated with the File Transfer Protocol (FTP), port 25 is associated with Simple Mail Transfer Protocol (SMTP), port 53 is associated with DNS, port 80 is associated with Hypertext Transfer Protocol (HTTP), and port 443 is associated with HTTPS (HTTP Secure).
Protocol. Protocols are used to define the type of packet being sent or received. Common protocols are TCP, Telnet, FTP, HTTP, Post Office Protocol 3 (POP3), Internet Message Access Protocol (IMAP), HTTPS, and User Datagram Protocol (UDP). (You should be familiar with the most common protocols before taking the exam.)
Although there are plenty of rules already configured for the firewall, you can create your own inbound and outbound rules based on ports, protocols, programs, and more to configure the firewall to suit your exact needs. You’ll learn how later in this chapter.
Monitor the Windows Firewall
You can monitor the state of the Windows Firewall in Control Panel. It’s easy to tell from here if the firewall is on or off, what incoming connections are blocked by default, what is the active network, and how you are currently notified when the firewall takes action. It’s all available in the main window. To make basic changes to the state of the firewall, in the left pane click Turn Windows Firewall On Or Off. From there you can change settings for both private and public networks. There are two options for each:
Turn On Windows Firewall (this is selected by default)
Block All Incoming Connections, Including Those In The List Of Allowed Apps
Notify Me When Windows Firewall Blocks A New App (This is selected by default.)
Turn Off Windows Firewall (not recommended)
What you’ll be most interested in as a network administrator, though, at least from this window, are the options available in the left pane. Specifically, you’ll use the Allow An App Or Feature Through Windows Firewall and Advanced Settings options. You’ll learn about the Advanced Settings in the next section, but here we discuss allowing an app through the firewall that is blocked by default.
Allow an app through the Windows Firewall
Some data generated with and by specific apps is already allowed to pass through the Windows Firewall. You can see which apps are allowed by clicking Allow Apps To Communicate Through Windows Firewall in the left pane of the Windows Firewall window in Control Panel. As you scroll through the list, you’ll see many apps you recognize, including Bing Food & Drink, Games, Maps, Music, Windows Media Player, and so on. See Figure 3-12. (Once you click Change Settings and give administrator approval, the Change Settings option will appear unavailable and the options in this list will be editable, as you see here.) You will also notice that some apps are not enabled by default, including Windows Media Player Network Sharing Service (Internet), Windows Remote Management, Remote Shutdown, Connect To A Network Projector, and so on.
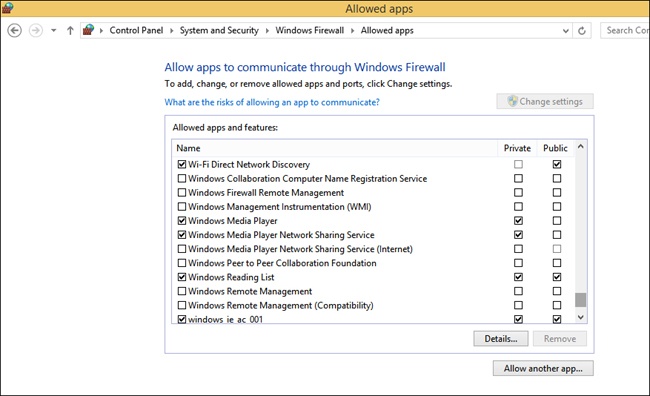
To allow an app through the firewall or stop one from getting through, select the check box under the appropriate network profile for which it should be configured. As shown in Figure 3-12, there are two options for each: Private and Public. If you don’t see the app you want to allow or block, click Allow Another App. You can then select the desired app from the Add An App dialog box.
Configure Windows Firewall with Advanced Security
Although you can configure a few options in the main Windows Firewall window, the real power lies with Windows Firewall with Advanced Security, shown in Figure 3-13. You can open this window in various ways, one of which is to click Advanced Settings in the Windows Firewall window shown in Figure 3-13.
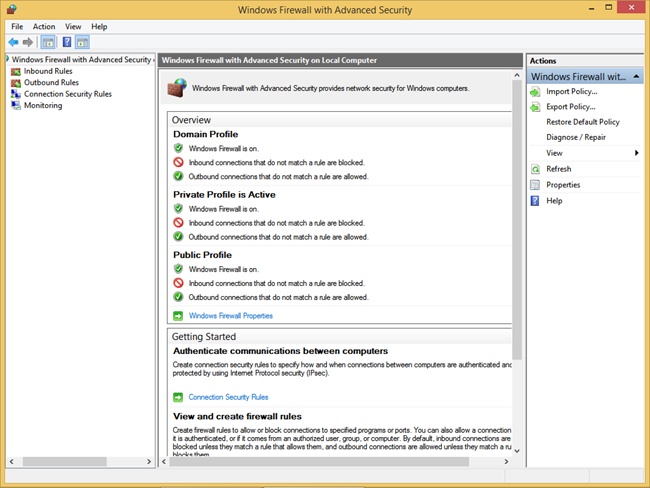
Once opened, there are several options and terms with which you need to be familiar.
In the left pane (note that the items in the middle and right panes change based on what you’ve selected here):
Inbound Rules. Lists all configured inbound rules and enables you to double-click any item in the list and reconfigure it as desired. Some app rules are predefined and can’t be modified much, although they can be disabled. Explore the other tabs as time allows. You can also right-click Inbound Rules in the left pane and create your own custom rule. Rule types include Program, Port, Predefined, and Custom, and they are detailed later in this section.
Outbound Rules. Offers the same options as Inbound Rules, but these apply to outgoing data. You can also right-click Outbound Rules in the left pane and create your own custom rule. Rule types include Program, Port, Predefined, and Custom, and they are detailed later in this section.
Connection Security Rules. Connection security rules you create manually appear here. Connection security rules establish how computers must authenticate before any data can be sent. IP Security (IPsec) standards define how data is secured while it is in transit over a TCP/IP network, and you can require a connection use this type of authentication before computers can send data, if desired. You’ll learn more about connection security rules in the next section.
Monitoring. Offers information about the active firewall status, state, general settings, and more for both the private and public profile types.
In the right pane (what you see depends on what you’ve selected in the left pane):
Import/Export/Restore/Diagnose/Repair Policies. Enables you to manage the settings you’ve configured for your firewall. Polices use the .wfw extension.
New Rules. Enables you to start the applicable Rule Wizard to create a new rule. You can also do this from the Action menu.
Filter By. Enables you to filter rules by Domain Profile, Private Profile, or Public Profile. You can also filter by state: Enabled or Disabled. Use this to narrow the rules listed to only those you want to view.
View. Enables you to customize how and what you view in the middle pane of the Windows Firewall with Advanced Security window.
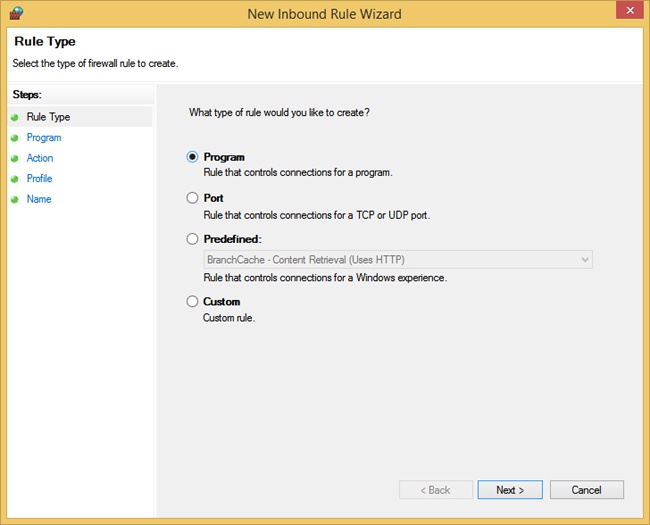
When you opt to create your own inbound or outbound rule, you can choose from four rule types. A wizard walks you through the process, and the process changes depending on the type of rule you want to create. The four types of rules are as follows:
Program. A program rule sets firewall behavior for a specific program you choose or for all programs that match the rule properties you set. You can’t control apps, but you can configure traditional programs whose file format ends in .exe. You can’t change items distributed through AppLocker either. Once you’ve selected the program for which to create the rule, you can allow the connection, allow the connection but only if the connection is secure and has been authenticated using IPsec, or block the connection. You can also choose the profiles to which the rule will be applied (domain, private, public) and name the rule. See Figure 3-14.
Port. A port rule sets firewall behavior for TCP and UDP port types and specifies which ports are allowed or blocked. You can apply the rule to all ports or only ports you specify. As with other rules, you can allow the connection, allow the connection but only if the connection is secured with IPsec, or block the connection. You can also choose the profiles to which the rule will be applied (domain, private, public) and name the rule.
More Info: Connectivity and security
When you create inbound and outbound rules, and when you opt to allow the connection only if the connection is secured by authenticating the connection with IPsec, the connection will be secured using the settings in the IPsec properties and applicable rules in the Connection Security Rules node. The next section covers how to create connection security rules.
Predefined. A predefined rule sets firewall behavior for a program or service that you select from a list of rules that are already defined by Windows.
Custom. A custom rule is one you create from scratch, defining every aspect of the rule. Use this if the first three rule types don’t offer the kind of rule you need.
Exam Tip
When you are working inside the Windows Firewall With Advanced Security window and subsequent dialog boxes, you have access to and can configure rules for every profile, even if they aren’t active. This includes Private, Public, and Domain profiles.
Exam Tip
We’re not sure if you’ll be asked questions regarding how to create a rule. Thus, you should spend a few minutes working through the wizard a few times, selecting different rule types each time to become familiar with the process.
There are other areas to explore. With Windows Firewall With Advanced Security selected in the left pane and using the Overview section of the middle pane, click Windows Firewall Properties to see the dialog box shown in Figure 3-15. From there you can make changes to the firewall and the profiles, even if you aren’t connected to the type of network you want to configure.
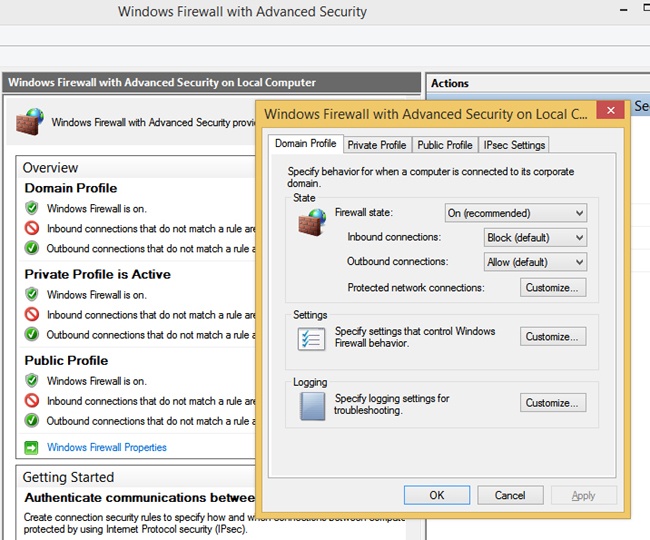
In Figure 3-15, the Domain Profile tab is selected. If you want to, you can configure the firewall to be turned off when connected to a domain network. Additionally, you can strengthen the settings for the Public profile and customize settings for the Private profile. Finally, you can customize IPsec defaults, exemptions, and tunnel authorization on the IPsec Settings tab. Make sure to explore all areas of this dialog box and research any terms you are not familiar with.
Configure connection security rules (IPsec)
You can create your own connection security rules in the Windows Firewall With Advanced Security window. When you do, you can create inbound and outbound rules that use the settings you’ve configured when you opt to create a rule that will allow the connection only if it is secured with IPsec. To begin, right-click Connection Security Rules (located just below Outbound Rules) in the shortcut list and click New Rule. See Figure 3-16.

There are several steps involved in creating a rule, and there is a wizard to guide you. The wizard pages that appear depend on the choices you make on the prior page. For instance, if on the first page where you choose a rule type, you choose Isolation, there are four additional steps to work through: Set the requirements, choose the authentication method, choose the profiles to which to apply the rule, and name the rule. However, if you choose to create an authentication exemption rule, you’ll be prompted to add the remote computers for which you want to configure authentication requirements before you can continue.
More Info: The primary benefit of using IPsec
IPsec is used to securely transmit data between computers. The primary benefit of securing information using IPsec is that all programs and services using IP for data transport can be protected.
Because there are numerous combinations of rule types and options, we can’t possibly go through every scenario. However, you should be familiar with the options and the rule types.
Isolation. Use this rule type to create a rule restricting connections based on credentials, such as domain membership, computer status or health, or compliance with policies, among other things. You can opt to request authentication for inbound and outbound connections, to require authentication for inbound and request for outbound, or to require authentication for all connections. Following that, you select the type of authentication to use. You can choose from the defaults already configured or use the appropriate Kerberos or advanced authentication method.
Authentication Exemption. Use this rule type to create a rule to state what connection types can be excluded from authentication. You can apply the rule to a single IP address, a subnet, an IP address range, or from a predefined set of computers (such as DHCP or DNS servers, to name a few). With that done, you can choose the profiles to which to apply the rule (domain, private, public) and name the rule.
Server-To-Server. Use this rule type to create a rule that applies to named IP addresses or to all IP addresses to request authentication for inbound and outbound connections, to require authentication for inbound and request for outbound, or to require authentication for all connections. You also choose the authentication method, which might be a certificate from a certificate authority or a health certificate issued from Network Access Protection. You can do this to protect specific computers (servers) from interacting with each other.
Tunnel. Use this rule type to create a rule that authenticates connections between two computers by using tunnel mode in IPsec, perhaps between two computers such as client-to-gateway or gateway-to-client. You can opt to exempt IPsec-protected connections and choose the authentication requirements, too.
Custom. Use this rule type to create a custom rule if the previous options don’t offer what you need.
Exam Tip
Connection Security rules specify how and when authentication occurs, but they do not allow those connections. To allow a connection, you must create an inbound or outbound rule. During the inbound or outbound rule creation, you choose the required conditions for the connection, including requiring that the connections have been authenticated by using IPsec. When you do, connections will be secured using the settings in the IPsec properties and rules in the Connection Security Rule node.
Create authenticated exceptions
When you configure a rule to allow traffic only when the connection between the communicating computers is secured using IPsec, you are creating an authenticated exception. You configure this option from the application Action page of the Rule Wizard when creating an inbound or outbound rule. When you choose the Allow The Connection If It Is Secure option on the Action page, you are configuring the rule to allow the connection using the settings in IPsec properties and rules in the Connection Security Rule node.
To create an inbound rule that applies to a single TCP port (Telnet, port 23) and create an authenticated exception for it, follow these steps:
In Windows Firewall with Advanced Security, select and then right-click Inbound Rules.
Click New Rule.
For the rule type, click Port and then click Next.
On the Protocol And Ports page, leave TCP selected and in the Specific Local Ports box, type 23. Click Next.
For the action to take, select Allow The Connection If It Is Secure and click Next.
To configure authorized users or authorized exceptions, select the applicable check box, click Add, and use the Select Users Or Groups dialog box to add the applicable entries.
Repeat step 6 for authorized computers and exceptions. Click Next.
Choose the profiles to which the rules should apply. Click Next. Name the rule. Click Finish.
Important: What will be on the exam
This book covers the objectives presented in the list of objectives for the exam. However, the Microsoft certification page for this exam clearly states, “Please note that the questions may test on, but will not be limited to, the topics described in the bulleted text.” This means that you’ll see questions on items that aren’t addressed here, and we can’t even guess at what those might be. However, to provide an example, you might see questions that ask you about the different types of Wi-Fi authentication, including Temporal Key Integrity Protocol (TKIP), Advanced Encryption System (AES), and the various Wi-Fi Protected Access (WPA) options. Likewise, you might be faced with questions that require you to know a specific file extension, such as .wfw, which is the file type used when you export a Windows Firewall policy. You might be expected to know a little about Branch Cache or Direct Access, too.
Because there is no way for us to address all of these things in a single book, it is vital you study and prepare for aspects other than what’s offered here. To find out where to access additional resources, visit http://www.microsoft.com/learning/en-us/exam-70-687.aspx and under Skills Measured, click Show All. For each objective there is a list of additional preparation resources. Review that list and become familiar with the options presented.
Objective summary
In Windows Firewall you can view the settings for private and public networks and make basic changes to the settings there. You can also disable the firewall there.
You can make changes to how Network Discovery is configured for the available public and private profiles using the Advanced Sharing Settings in the Network And Sharing Center.
In Windows Firewall, apps are either allowed through the firewall or not. You can create exceptions to configure specific apps to be able to get through the firewall.
Windows Firewall with Advanced Security offers many more options for administrators, including configuring their own inbound, outbound, and connection security rules; configuring authenticated exceptions; and making changes to existing firewall settings.
Objective review
Answer the following questions to test your knowledge of the information in this objective. You can find the answers to these questions and explanations of why each answer choice is correct or incorrect in the “Answers” section at the end of this chapter.
Objective 3.4: Configure remote management
With remote management tools and technologies, a network administrator can access a computer on the network, take control of it, and perform tasks on it, without having to be physically in front of the computer. This saves both time and money by reducing the number of trips required to service problematic computers. Users can also remotely access their own computers for the purpose of working at them while not physically sitting in front of them.
Configure and use Remote Assistance and Remote Desktop
There are two technologies both you and end users can employ to remotely access and manage a computer. Remote Assistance is one of those, and it enables a technician to take control of a computer to troubleshoot and perform maintenance tasks without having to physically travel to the problematic machine. This enables the technician to resolve problems without leaving his home or office. The end user must be there to authorize this, and the user can end the session at any time. This technology is generally used only to troubleshoot remote computers and is not used for telecommuting or accessing files or folders.
Remote Desktop is another remote option. Remote Desktop enables users to connect to their office computer from home for the purpose of telecommuting and accessing files and folders remotely. Once the connection is made, the remote computer is locked so that no one else can access it. The user can do anything that would be possible while sitting in front of the computer (short of pressing physical buttons or picking up print jobs), including running desktop programs and accessing files and folders. In another scenario, network administrators use this technology to service file servers, print servers, domain controllers, and so on without having to physically travel to the machine.
Remote Access and Remote Desktop are built-in, user-friendly tools. However, there are a few settings to take note of before sitting for the exam. You need to know how to enable or disable these features on an end user’s computer; you need to understand what options are available when configuring a remote desktop session; and you need to know how to configure and hold a remote assistance session.
Enable or disable remote features
By default, Remote Assistance connections are enabled for a Windows 8.1 computer and Remote Desktop connections are disabled. You can change both in the System Properties dialog box, shown in Figure 3-17. You can open this dialog box in many ways. One is to type System on the Start screen and click System in the results. In the System dialog box, click Advanced System Settings or Remote Settings in the left pane. The options you want to configure are on the Remote tab. (If you plan to access this computer via Remote Desktop, enable the option now.)

Exam Tip
You can’t access a computer remotely using Remote Desktop if the computer is in sleep or hibernation mode. Thus, if asked about why a Remote Desktop session can’t be enabled, even though the technology has worked before, consider this as an answer option. (You might also want to make changes to the Power Options in Control Panel to overcome this issue.)
Explore Remote Desktop options
You and your end users can access the Remote Desktop Connection dialog box by typing Remote on the Start screen and clicking Remote Desktop Connection in the results. When the dialog box opens, click Show Options to access all of the options shown in Figure 3-18.
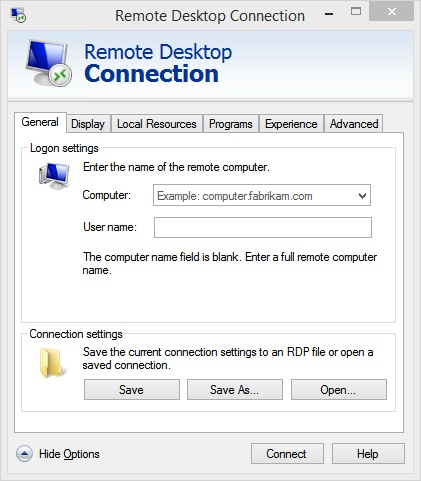
The available tabs offer the options you need to configure your Remote Desktop connection:
General. Use the settings on this tab to specify the computer name and, optionally, the user name and to save connection settings.
Display. Use the settings on this tab to choose the size of the remote desktop, which is set to Large by default. You can also choose the color depth. If your user is connecting over a free and fast network, these default settings are fine. However, for users who access their desktop over metered mobile broadband, you should opt for more bandwidth-friendly settings.
Local Resources. Use this tab to configure settings for audio (perhaps to disable audio altogether), whether access to printers and the Clipboard should be enabled, and when to enable Windows key combinations, among other things.
Programs. Use this tab to name a program that should start when the connection is made.
Experience. Use the settings on this tab to configure how the network should be configured to optimize performance. By default, Windows automatically detects the settings, but in the case of metered connections, you might want to change this to a specific setting such as low-speed broadband. When you manually configure this setting, you can configure what options you want to allow, including but not limited to the desktop background and menu and window animation. By default, Reconnect If The Connection Is Dropped is enabled, but it can be changed if desired.
Advanced. Use this tab to configure authentication options. Authentication is what verifies that the user is connecting to the intended remote computer. Options are Warn Me, Connect And Don’t Warn Me, and Do Not Connect. You can also configure the Connect From Anywhere setting, where you can specify that the user must connect to a dedicated remote desktop gateway server.
With the desired configuration set, you can now use the General tab to connect. You need to know the name of the computer to which to connect, though, and in a domain this can be a bit complicated. As you can see in Figure 3-18, that computer name looks something like this: computername.domainname.com. On a local area connection, the name is simply the computer name. Whatever the case, you also need to have the credentials to log on. In the case of Remote Desktop, that’s the user name and password. Take note, though, that the user name will have to be something like \computernameusername. You can’t just type the user name and get connected. To disconnect while in an active session, just click the X in the upper-right corner.
Configure and use Remote Assistance
To use Remote Assistance, the user must be at the problematic computer. A Remote Assistance session must be initiated by that user, and the user must approve the connection before it can be made. The key word to search for from the Start screen to initiate a Remote Assistance session is “invite,” not “Remote Assistance” as you might guess. The user needs to access the Invite Someone To Connect To Your PC And Help You, Or Offer To Help Someone Else option from the Start screen in the results. The user can also search for “Invite” or “Remote Assistance” in Control Panel. However the user gets there, the user must click Invite Someone You Trust To Help You in the Windows Remote Assistance dialog box shown in Figure 3-19.

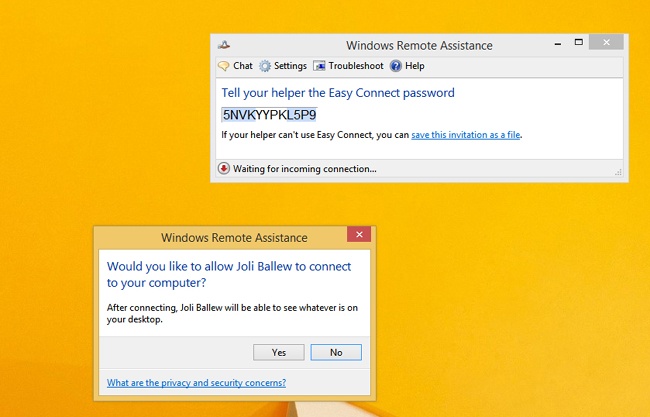
The user then has three options: Save This Invitation As A File (the user saves the file and gets that file using her method of choice to the help and support team); Use Email To Send An Invitation (the user sends the invitation using an email client on the machine but cannot send it using any form of web-based email); and Use Easy Connect (the easiest option if it is enabled by the help and support team). Because one of the objectives on the exam is to configure Remote Assistance (which we’ve done) including Easy Connect (which we haven’t done), we’ll look at the Easy Connect option here. However, you also should understand how the other two options work.
When the user opts for Easy Connect, an Easy Connect password appears. The user only needs to relay that password to the help and support team. This can be done by phone, fax, email, or even text. The support technician can then send a connection request, which the user then accepts. Both of these items are shown in Figure 3-20. Once the connection is made, the “Expert” can ask to control the computer to resolve the problem, train the user, or perform other tasks.
Make modifications remotely using an MMC
Although the Microsoft Management Consoles (MMCs) available in Windows 8.1 are all configured to manage local resources by default, you use them to make modifications on remote machines using Computer Management or built-in MMCs.
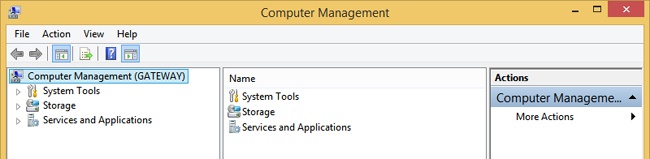
To see how to connect to another computer to manage it, open Computer Management; in the left pane, right-click Computer Management (Local); and click Connect To Another Computer. In the dialog box that appears, verify that Another Computer is selected, type the name of the computer to which to connect, and click OK. Wait while the connection is made. If you are prompted to enable something to pass through the firewall in Windows Firewall with Advanced Policy or enable a policy setting in Group Policy, do so. Then, click the desired item to manage in the left pane and make configuration changes as desired in the right pane. See Figure 3-21.
Explore Remote Management tools and configure settings
Windows Remote Management (WinRM) is a Windows 8.1 service that enables a network administrator to execute commands on networked computers remotely, using Windows PowerShell and Windows Remote Shell (WinRS.exe). There are Group Policy settings related to the WinRM Service and Windows Remote Shell you’ll want to familiarize yourself with as well.
Enable Remote Management
To use the Remote Management tools, you must enable them from a command prompt or use Group Policy on each computer you want to manage (including the one you’ll use to manage and the ones that need to be managed). The Group Policy setting is located here: Computer Configuration, Policies, Administrative Templates, Windows Components, Windows Remote Management (WinRM), WinRM Service container. You need to enable this for each Group Policy object to manage. It’s easier to enable this from a command prompt, though.
To enable Remote Management, follow these steps:
Open an elevated command prompt.
Type winrm quickconfig and press Enter.
When prompted to make these changes, type y and press Enter again.
When prompted again, type y and press Enter. See Figure 3-22.
Close the command prompt window.

Execute commands from a command prompt
With WinRM enabled, WinRS is used at an elevated command prompt (or a Windows PowerShell session) using the WinRS command. Here are some of the applicable parameters:
–r:computer. Use this parameter to specify the computer on which to perform commands. You can use a NetBIOS name or a fully qualified domain name (FQDN).
[-u:user]. Use this parameter to specify the account you’ll use to perform the command on the remote computer. This needs to be an account on the remote computer.
[-p:password]. Use this parameter to specify the password associated with the user account name. (You’ll be prompted if you don’t enter it here.)
Command. Use this parameter to specify the commands to use along with any additional associated parameters.
More succinctly: winrs [/<parameter>[:<value>]] <command>.
There are other options beyond typing the computer, user, and password while using WinRS, although these are the most common. To see additional commands and syntax, refer to this page: http://technet.microsoft.com/en-us/library/hh875630.aspx.
Make modifications remotely using Windows PowerShell
You can use Windows PowerShell v3 to remotely manage another computer, using an elevated Windows PowerShell session. If you enabled WinRM at a command prompt as instructed earlier, Windows PowerShell is ready to receive commands. To execute a Windows PowerShell command on a remote computer, you use the following syntax: icm computer {command}, where the computer is the remote computer name and the command is the Windows PowerShell command you want to use. ICM is short for Invoke-Command. To see more about the syntax in a Windows PowerShell session, type Winrs /? and icm -?.
More Info: ICM Syntax
For more information about ICM syntax, refer to this page on Technet: http://technet.microsoft.com/en-us/library/hh849719.aspx.
Access the applicable Group Policy settings
The Windows Remote Shell Group Policy settings are located here on a domain server: Computer Configuration, Policies, Administrative Templates, Windows Components, Windows Remote Shell container. You’ll need to configure any desired settings for each Group Policy object you manage. You can use these settings to change the default behavior of WinRS.
Some of the settings you might want to review include Allow Remote Shell Access, Specify Idle Timeout, and Specify Shell Timeout. These are available in the R2 update for Windows Server 2012.
The WinRM Service Group Policy settings are located here on a domain server: Computer Configuration, Policies, Administrative Templates, Windows Components, Windows Remote Management (WinRM), WinRM Service.
Some of the settings you might want to review include Allow Remote Server Management Through WinRM, Allow Basic Authentication, Allow Unencrypted Traffic, and Turn On Compatibility HTTP Listener. These are located in the R2 update for Windows Server 2012.
Objective summary
Remote Assistance can be used to troubleshoot problematic computers without having to physically access them. The user must be present, send an invitation, and accept your help when you offer it.
Remote Desktop is a technology that enables end users to access their desktop when they are away from it. This can be configured so that a user can work from home or on the road when circumstances require it.
It is possible to remotely manage a computer from a command line and in a Windows PowerShell session. Remote Management must be enabled on each computer first.
Objective review
Answer the following questions to test your knowledge of the information in this objective. You can find the answers to these questions and explanations of why each answer choice is correct or incorrect in the “Answers” section at the end of this chapter.
Chapter summary
A computer must have a unique IP address to communicate on a network; those addresses can be static, be assigned by DHCP, or come from Windows from APIPA.
Location-aware printing enables you to configure what printer users should print to based on the network to which they are currently connected.
You can make changes to IP addresses and name DNS servers, among other things, in a network adapter’s Properties dialog box.
Various network management tools are available, including command-line tools like Netsh, graphical tools like the Network And Sharing Center, and troubleshooting command-line tools like Ping and Tracert.
Windows Firewall and Windows Firewall with Advanced Security let you control all aspects of the firewall. You can allow apps through the firewall and create your own inbound, outbound, and connection security rules, too.
Several remote management tools are available, including Remote Assistance, Remote Desktop, and Remote Management Tools.
Answers
This section contains the solutions to the thought experiments and answers to the objective review questions in this chapter.
Objective 3.1: Thought experiment
There is probably something wrong with the wireless adapter. Maybe it isn’t enabled or needs an updated driver to work.
Probably. The Network And Sharing Center Internet Connection troubleshooter can discover that the Wi-Fi adapter is disabled, although it might not know why. If the adapter is functional, it can enable it with administrator approval.
You can try the Action Center to see if a new driver is available for the Wi-Fi adapter. If not, you can try to locate one using Device Manager. You can also refer to the manufacturer’s website to find out how to enable the Wi-Fi adapter, if that is the problem.
Objective 3.1: Review
Correct Answer: C
Incorrect. This is handled by a DHCP server.
Incorrect. There are technologies to handle this, including various tunneling options, but it is not the job of DNS.
Correct. DNS is responsible for this.
Incorrect. APIPA is performed by Windows to assign an IP address when one isn’t available.
Correct Answers: A and C
Correct. You can assign a static IP address from the adapter’s Properties dialog box.
Incorrect. You cannot assign an IP address here, although you can review the settings configured for the Network Firewall, Internet Security Settings, and so on.
Correct. Netsh can be used to assign IP addresses to hosts.
Incorrect. You cannot assign IP addresses in the Network And Sharing Center.
Correct Answer: B
Incorrect. This will display some, but not all, of the required information.
Correct. This will display the required information.
Incorrect. Ping is used to test connectivity between one host and another.
Incorrect. Tracert is used to determine the path a packet takes to get to its destination.
Correct Answer: D
Incorrect. You cannot change the network location here, but you can change many other settings, including assigning a static IP address.
Incorrect. This is not the proper place to change the network location. This is where you check for solutions to problems you’ve encountered.
Incorrect. This was how you changed the network location in Windows 8, but is no longer available in Windows 8.1.
Correct. This is the proper way to change the network location in Windows 8.1.
Objective 3.2: Thought experiment
Location-aware printing. This feature enables default printers to be configured based on the network the user is connected to. Location-aware printing uses the Network Location Awareness service and the Network List service to determine the network location.
Use the Netsh command to show the list of wireless profiles and then use this command to forget specific networks: Type netsh wlan delete profile name=<profile name>.
Objective 3.2: Review
Correct Answer: A
Correct. Windows always chooses Ethernet if it’s available over other networking options.
Incorrect. If there were only three wireless connections but no Ethernet, this would be correct, but Windows defaults to Ethernet when it is available.
Incorrect. Broadband is used as a last resort. Ethernet and Wi-Fi are chosen before broadband.
Incorrect. The user will not be prompted to connect to an Ethernet network, and Ethernet is what Windows will use.
Correct Answers: A and D
Correct. This is the first step to making the required configuration changes.
Incorrect. You do not need to install anything to make the required changes.
Incorrect. This is not the proper option for making the required changes.
Correct. This is the second step to making the required configuration changes.
Correct Answers: B and D
Correct Answer: B
Incorrect. Add is not a valid Netsh parameter.
Correct. This is where you set up a new network.
Incorrect. The network name will not appear in this list if it is not broadcasting its SSID.
Incorrect. Using a troubleshooting tool won’t help you connect to a network that is not broadcasting its SSID.
Objective 3.3: Thought experiment
You need to create an exception for the Media Player Network Sharing Server (Internet) in Windows Firewall.
You can perform this task in Windows Firewall. You will create an app exception.
Yes. You must be able to input Administrator credentials or be logged on as an Administrator to enable Change Settings in Windows Firewall.
Objective 3.3: Review
Correct Answer: D
Incorrect. Although IPsec plays a role, null encapsulation is an option if you choose Custom after selecting the Allow The Connection If It Is Secure option. However, it is not required.
Incorrect. This is the setting for Allow Connection, not Allow The Connection If It Is Secure.
Incorrect. This is an option if you choose Custom after selecting the Allow The Connection If It Is Secure option. Privacy and encryption are not required in this scenario.
Correct. This is called an authenticated exception.
Correct Answers: A and B
Correct. This is true; you can restrict connections based on domain membership.
Correct. This is true; you can restrict connections based on the health of the computer.
Incorrect. If this were true, you’d be creating a Tunnel rule.
Incorrect. You can name IP scopes of addresses in rules, such as server-to-server, but not with an isolation rule.
Incorrect. You make these changes in the Network And Sharing Center, from Advanced Properties.
Incorrect. You make these changes in the Network And Sharing Center, from Advanced Properties.
Correct. Yes, this is where you make these changes.
Incorrect. You make these changes in the Network And Sharing Center, from Advanced Properties.
Correct Answer: D
Incorrect. The rules are listed in Windows Firewall with Advanced Security.
Incorrect. The rules are listed in Windows Firewall with Advanced Security.
Incorrect. The rules are listed in Windows Firewall with Advanced Security.
Correct. Yes, this is where you can view a list of active firewall rules.
Objective 3.4: Thought experiment
Remote Assistance is the best tool to use here.
Yes, the user needs to be present so that she can accept your help when you offer it.
She must relay an invitation to you. She must also accept your help when you offer it.
Objective 3.4: Review
Correct Answers: B and D
Incorrect. You can have multiple instances of the same snap-in in a single console.
Correct. It is most likely a firewall issue.
Incorrect. Windows Remote Management (WinRM) does not have to be enabled for this technology to work.
Correct. You must have the proper credentials to gain access to remote data.
Correct Answer: C
Incorrect. WinRM is used for Remote Management, not WinRS.
Incorrect. You don’t type the computer name when enabling WinRM.
Correct. This is the correct syntax.
Incorrect. Startconfig is not a valid parameter.
Correct Answers: A, B, and C
Correct. This could be the problem because the option to accept Remote Desktop connections must be enabled.
Correct. The computer must be awake.
Correct. This is a common mistake. You can’t connect if you don’t type the proper credentials.
Incorrect. The settings here are configured with default settings. You don’t have to change them.
Correct Answers: C and D
Incorrect. WinRM is used to enable Remote Management. WinRS is used to send commands.
Incorrect. Although you can enable Remote Management in the Group Policy Management Editor, you can’t send commands from there.
Correct. You can use WinRS at a command line.
Correct. You can use WinRS in a Windows PowerShell session.