Chapter 2. Configure hardware and applications
It is fitting that what follows Objective 1, Install and upgrade to Windows 8.1, is Objective 2, Configure hardware and applications. That’s most likely what you’ll do immediately after an installation of Windows 8.1, no matter how large or small the deployment.
In this chapter, you’ll learn the various methods you can use to install and manage devices and their device drivers and control access to them. You’ll also learn how to manage users’ access to the Windows Store. While doing these things, you’ll explore a bit of Group Policy, including new options and settings created specifically for Windows 8 and Windows 8.1. You’ll discover ways to manage, control, and secure Internet Explorer 11, too, again incorporating Group Policy. Finally, you’ll learn how to configure Hyper-V (technically Client Hyper-V), which enables you to run multiple virtual machines on one computer.
Objectives in this chapter:
Objective 2.1: Configure devices and device drivers
Device drivers and computer hardware go hand in hand. Each requires the other to function properly. A long time ago, most devices came with their own device driver disk for installing the appropriate driver, but now driver installation is generally automatic. In most instances, the necessary device driver is available in the Windows 8.1 Driver Store (on the computer itself) or from Windows Update (on the Internet), and the driver obtained there works fine. Occasionally though, problems arise. This happens when a compatible Windows 8.1 device driver isn’t available, when the installed driver doesn’t function properly, or when the driver isn’t approved by the Microsoft Windows Hardware Certification Program (and is thus unsigned).
Install and manage drivers with Device Manager
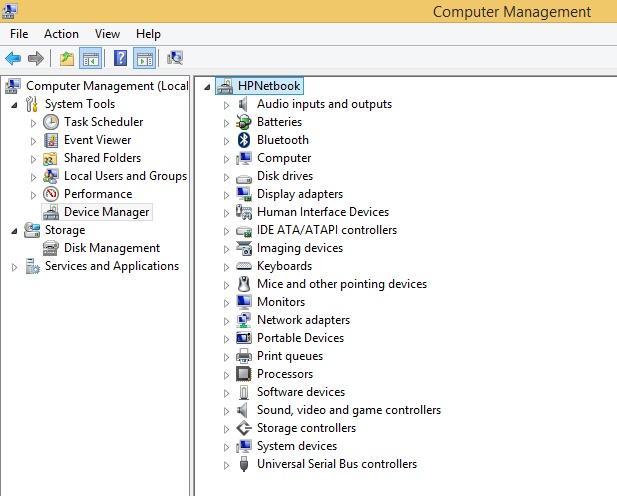
You use Device Manager to view, install, uninstall, disable, and otherwise manage hardware devices. You can access Device Manager from a number of places, including by right-clicking the Start button and clicking Device Manager from the resulting list. You can also find it in the Computer Management Console, under the System Tools node. By default, the list is organized by the various types of devices as shown in Figure 2-1, but there are other viewing and sorting options.
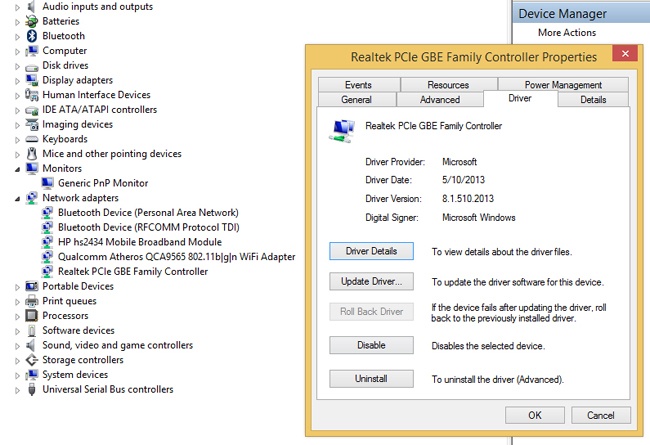
You can expand any node in Device Manager to view the installed device(s) that relate to the selected device family. In Figure 2-2, you can see that the Monitors entry only has one item listed, whereas Network Adapters has several. You can right-click any entry and select Properties to view information about its driver, among other things. You might see only four tabs for a simple device like a Plug-and-Play monitor (General, Driver, Details, and Events), or you might see more than that for more complicated devices like network adapters, also shown in Figure 2-2.
Additionally, Device Manager offers four menus you can use to work with any of the installed devices:
File. Your profile holds files that store information about the changes you’ve made to the console. You can delete these files from Options in this menu.
Action. This menu enables you to access several commands, including Update Driver Software, Disable, Uninstall, Scan For Hardware Changes, Add Legacy Hardware, Properties, and Help.
View. This menu enables you to change how you view devices in Device Manager. You can opt to view devices by type or connection or to view resources by type or connection. You can also opt to show hidden devices and customize the console.
Help. This menu offers access to help topics from various places including the TechCenter website.
Exam Tip
If you are presented a scenario in which you’ve made changes to a device driver in Device Manager, added hardware, updated a driver, or performed a related task but don’t see the changes, you should click Action, Scan For Hardware Changes. You can also press the F5 key to refresh the screen.
It’s important to note that nearly all of the options available from the Action menu are also available in a device’s Properties dialog box or from the options that appear when you right-click an entry. For example, Update Driver, Disable, and Uninstall are available on the Driver tab.
You can change the default view for Device Manager when you need to access other options beyond a list of devices by their type. You access these views from the View menu. One option is Show Hidden Devices. There might come a time when you need to view hidden devices to troubleshoot something obscure.
Beyond this you can opt to change the view in these other ways:
Devices By Connection. This view can be useful when viewing what is connected to a virtual machine, organized according to how the various devices in the computer are connected. You can view the Properties dialog box of these devices by right-clicking (or by double-clicking). You can likely find helpful information here, such as when the device was configured, when the driver was installed and started, and so on.
Resources By Type. Use this option to view resources organized by how they are connected to other types of system resources: Direct Memory Access (DMA), Input/Output (IO), Interrupt Request (IRQ), and Memory. Only experienced system administrators should make changes here because a misstep can render the system inoperable. Consider searching for conflicts found by Device Manager before you do anything here.
Resources By Connection. This view is useful when you want to view the device hardware resources by DMA, IO, IRQ, and Memory for the purpose of troubleshooting and repairing problems. Consider searching for conflicts found by Device Manager before you do anything here.
If you need to troubleshoot hardware because you believe there is a conflict of some sort among resources, it’s best to see if Device Manager knows of any by following these steps:
In Device Manager, select the view desired, either Resources By Type or Resources By Connection.
Double-click the suspected device.
Click the Resources tab.
Check for entries in the Conflicting Device List. See Figure 2-3.
Click OK to close.

Although there is a lot more to learn about drivers, including managing unsigned drivers, disabling driver signing at boot up, managing the drivers in the Driver Store, and even configuring Group Polices that define what types of drivers can be installed and by whom, we don’t have enough space here to go into great detail. However, there’s enough here to get you started, and we suggest you continue your studies using the resources on TechNet and other trusted places on the Internet.
Exam Tip
As is the case with other software installations, you can’t use a 32-bit driver for a 64-bit resource. You can’t use a 64-bit driver to communicate with a 32-bit resource either.
Install and uninstall
There are several ways to install drivers when they aren’t installed automatically or offered by Windows Update. One is by responding to a prompt from the Action Center. Although this is an end-user solution to a driver problem and not necessarily a network administrator solution, it’s still an option, especially when working with a home user. Action Center can discover problems and search for solutions automatically, and when a solution is found, it offers it up.
Another option for installing a driver is to download it from the manufacturer’s website and then double-click an executable file that contains the driver. You have to do this manually; there’s no automated task in place to do it for you.
Exam Tip
Updated drivers won’t be downloaded over metered connections. You might see a question on the exam that asks something based on this scenario. Expect that sometimes a simple answer such as “The user is on a metered connection” can be asked through a large, complex scenario, perhaps one or two paragraphs long, that includes lots of information that isn’t necessary for finding the solution.
Finally, you can use Device Manager. Because a driver will likely already be installed for a device, even if it doesn’t work properly, much of the time you’ll opt to update the driver. To get started, locate the device in Device Manager (try View > Devices by Type) and double-click the device. On the Driver tab, click Update Driver. In the Update Driver Software dialog box, choose how to locate the driver. If it’s one you’ve downloaded and saved to your computer, click Browse My Computer For Driver Software. Otherwise, click Search Automatically For Updated Driver Software, which will automatically look for a driver in all of the usual places. The latter is a good option if you think a driver is available from Windows Update.
Once you’ve located the driver, you can install it. If this goes well, the driver will be updated. However, sometimes Windows responds to your request with a message that states that the best driver is already installed (or a driver can’t be found), resulting in an unexpected complication. If Windows deems that the best driver is already installed, or if you want to install your own anyway, from the Properties dialog box in Device Manager, opt to uninstall the driver and make sure to select the Delete The Driver Software For The Device check box shown in Figure 2-4 (otherwise, Windows will keep reinstalling it).
Important: Manually uninstall a problematic device driver
Sometimes, even when you tell Windows to delete the software for a device, that software will continue to reinstall itself when you opt to scan for new hardware in Device Manager. When this happens you’ll have to delete the driver manually using the Pnputil.exe command-line tool, detailed later in this section, with the –f and –d switches.

Real World: Install legacy hardware
In many organizations, legacy hardware still plays a very important role in getting the job done. It might be a legacy printer, an infrared device, or even a modem. This hardware might not be detected automatically. There’s an option in Device Manager that can help you install these kinds of devices. To do so, insert any installation media you have for the device and then follow these steps:
Open Device Manager. On the Action tab, click Add Legacy Hardware.
Click Next on the Welcome page and then select one of these options:
Search For And Install The Hardware Automatically (Recommended)
Install The Hardware That I Manually Select From A List
Follow the resulting prompts. This might involve selecting a port for a printer, selecting the device from a list, or making other choices.
Once installed, you can manage the device in Device Manager.
Disable and rollback
You use similar methods to disable and troubleshoot drivers as you do to update them. Disable is an option on the Driver tab of the device’s Properties dialog box. When you disable a device, you turn it off. This is different from uninstalling a device. When the device is turned off, Windows can’t use it and won’t try to reactivate it. In contrast, if you uninstall a device such as a graphics or audio driver, Windows will reinstall the device on reboot in most instances. You might want to disable a device to determine if that specific device is causing a system conflict or problem. Additionally, you can disable devices that don’t work properly or that you don’t need to free up system resources.
There are instances when installing a new driver over an older driver causes more problems than it resolves. In these cases you can roll back the driver. The Roll Back Driver button is available only after you’ve installed a second driver, though; otherwise it is dimmed.
Exam Tip
It’s important to understand that the device driver rollback feature can only roll back to the previously installed driver. Thus, if you have driver A installed, then install driver B, and then install driver C, so when you roll back driver C it only rolls back to driver B (not to the original driver A).
Configure devices
With the proper driver installed you can now configure the installed devices. As is true with virtually any task in Windows 8.1, there are multiple ways to do this. There are two I’d like to introduce here: Devices and Printers and Device Stage. Although both are consumer and end-user tools, they can be of some use to network administrators.
Use Devices and Printers
Devices and Printers, available from Control Panel or by searching for it from the Start screen, offers a place to view connected devices including printers, mice, media devices, fax machines, and more. You can immediately discern if a device has a known problem because it will have an exclamation point over the top of it. You can right-click any device listed to configure device preferences, create a shortcut, troubleshoot the device, and view the device’s properties.
Depending on what you click on the shortcut menu, you can configure all kinds of settings and preferences for the selected device. For instance, if you click Printer Properties for any installed printer, you can access more than just whether you want to print on both sides of the page or print a test page. You can also configure the following (among other things):
Sharing. Use this option to choose whether to share the printer and render print jobs on client computers. You can also opt to provide additional drivers to other workstations that need it.
Ports. Use this option to add, delete, and configure the port to which the printer is connected. You can also enable printer pooling and bidirectional support here.
Security. Use this option to choose the groups or users that are allowed or denied access to the printer.
This is a quick way to access device properties and configure those devices, but Devices and Printers really shines in its ability to easily add wireless printers and other wireless devices (even Bluetooth devices). You can’t do that in Device Manager. Once those devices are found, the Internet Protocol (IP) or Media Access Control (MAC) address (or a unique identifier) is displayed as applicable. Of course, you can find network devices, including network printers, from here too.
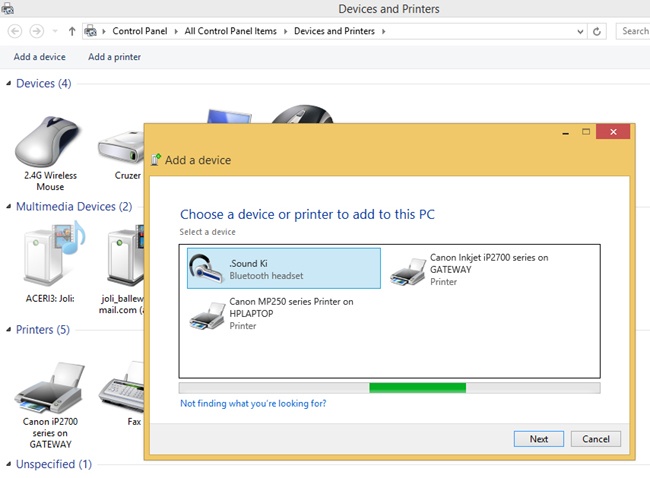
To add a device using the Devices And Printers window, follow these steps:
Open Devices And Printers using any method.
Click Add A Device.
Click the desired device in the list and click Next. See Figure 2-5.
Wait while the driver installs and setup completes. The new device will appear in the Devices And Printers window.
In the Devices And Printers window, right-click the new device to access configuration options. You can click Properties to see the device’s unique identifier and other data.
Use Device Stage
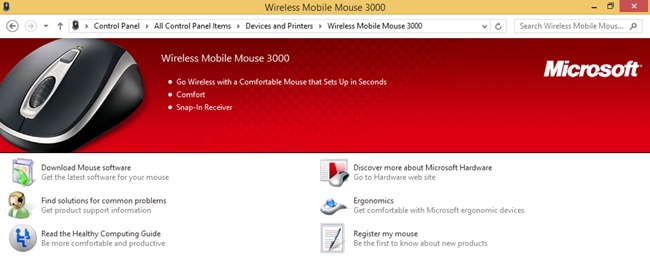
Sometimes you can double-click a device in the Devices And Printers window to access it in Device Stage. It has been my experience that Device Stage opens less and less frequently for installed devices, though. Double-clicking a printer often opens the print queue, not Device Stage. Double-clicking a Bluetooth headset opens its Properties dialog box. Only rarely does Device Stage open for a device, but for the sake of covering it, Figure 2-6 shows Device Stage for a wireless mouse. You can see that there are options to download software, find solutions, and even register your mouse. This feature appears to be fading out, though.
Device drivers have the potential to damage a computer if they are laced with hidden malware by dishonest programmers. Thus, a technology is in place to test, approve, and then sign drivers to verify they are safe to install and have not been altered since the testing and approval process has been completed. Once approved, the drivers are digitally signed with a digital signature by an approved authority (often a trusted organization or publisher). This signature is created using a cryptographic algorithm and is appended to the device driver. This verifies that the driver is authentic and secure when you get it, because the algorithm is verified.
Unsigned drivers can be the cause of various computer problems, especially those that are difficult to diagnose. You can check if any unsigned drivers are installed on any computer by using the command-line tool Sigverif.exe. To perform this check, follow these steps:
Right-click the Start button and click Command Prompt (Admin).
At the command prompt, type sigverif.exe and press Enter.
Click Start to run File Signature Verification and then view the results. See Figure 2-7.
Click Close (not shown).
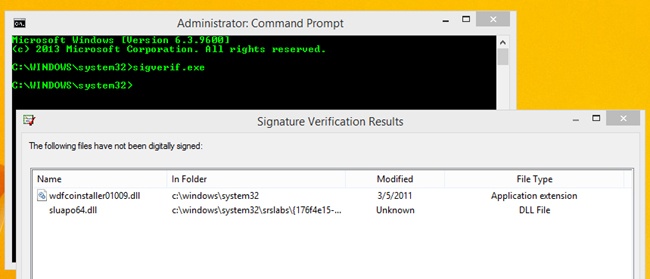
If you find unsigned drivers, you might be able to look at the path of those drivers to see where they are saved and perhaps what device they are installed with or refer to. This might help you uncover which device is causing difficult-to-diagnose system problems.
More Info: Learn more about digital signatures
For more information about digital signatures and signed drivers, refer to the MSDN article at http://msdn.microsoft.com/en-us/library/windows/hardware/ff543743(v=vs.85).aspx.
So, just how do unsigned drivers get on a system? For the most part, they either are installed by the computer manufacturer or installed by the end user. If Windows suspects a driver has been tampered with or knows the driver is unsigned, the user will receive a prompt and, in many cases, have the option to install it anyway.
Here are the three messages offered for unsigned drivers:
Windows Can’t Verify The Publisher Of This Driver. Either there is no digital signature or the signature has not been verified by a trusted authority (an organization or publisher that has been authorized to sign). If you must install the driver, make sure it is from the manufacturer of the device and that you download it from the manufacturer’s website.
This Driver Has Been Altered. The driver has been verified by a trusted authority but has been altered since then. The protected checksum (a value stored with the device dependent on the content) is not what it is expected to be. It might have been altered on purpose to include malware, or it might have been altered by the manufacturer. If you must install the driver, make sure it is from the manufacturer of the device and that you download it from the manufacturer’s website.
Windows Cannot Install This Driver. Windows 8.1 64-bit operating systems will not install a device driver that has been altered since it was verified or one that has not been verified at all. It is possible to bypass these digital signature requirements, but you must reboot the computer in Advanced mode.
If there is no way around the inability to install an unsigned driver, you can disable digital signing, reboot the computer, and install it anyway using PC Settings, on the Update And Recovery tab, under Recovery options. As shown in Figure 2-8, under Advanced Startup, click Restart Now.
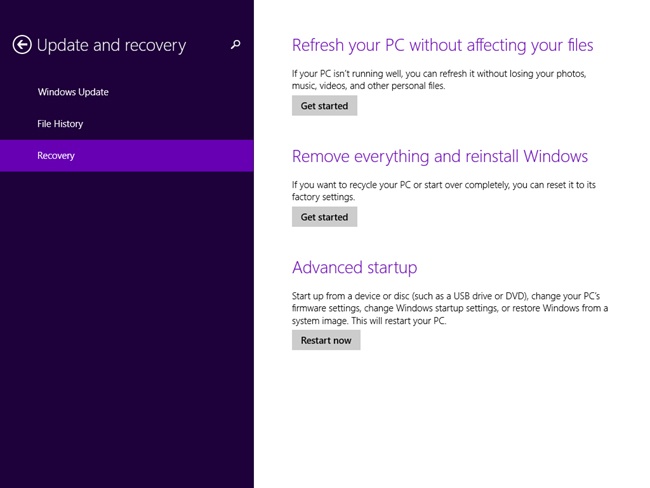
After you click Restart Now on the screen shown in Figure 2-8, follow these steps:
Click Troubleshoot.
Click Advanced Options.
Click Startup Settings.
Click Restart.
After the computer restarts into the boot menu, press 7 on the keyboard. (The computer restarts.)
You can now install unsigned drivers as necessary. When complete, restart the machine normally.
Use Pnputil.exe to manage the Driver Store
Windows 8.1 contains a Driver Store to hold device drivers that have been tested and approved by Microsoft and thus digitally signed. The Driver Store can be updated via Windows Update and other means. When you connect a device, this is where Windows looks for a driver first. If it doesn’t find one, it searches Windows Update. This method works in most circumstances, but sometimes Windows installs a driver it deems best and there’s no way to uninstall it, update it, or successfully delete the driver files by using Device Manager or other methods.
If you know this is the case for a specific device, you can install a driver manually before connecting the device. To do this you use the Pnputil.exe command at an elevated command prompt. You can also use the command to manage the Driver Store, including adding, deleting, and listing driver packages. A driver package consists of all of the data needed to install the driver, including but not limited to the following:
Driver files. Generally this is a dynamic link library (DLL) with the .sys file extension.
Installation files. These files have the file extension .inf and contain the installation files.
Driver Catalog file. Included with the installation files, this contains the information related to the driver’s digital signature. This is a .cat file.
Additional files. These could be icons, device property pages, and even items related to an installation wizard.
The syntax for the Pnputil.exe command is to type pnputil.exe –a <path to the driver> <drivername>.inf. The following are some parameters to consider:
-a to specify the path to the driver’s .inf file
-d to delete a specific .inf file
-f to force the deletion of a specific .inf file
If you are interested in seeing the DriverStore folder, navigate to C:WindowsSystem32DriverStoreFileRepository.
Important: Choices for updating new drivers
There are two schools of thought regarding updating drivers. You either want the latest and the greatest or you want to leave well enough alone (if it ain’t broke, don’t fix it). However, in the real world, you don’t always get to decide what you want to do with regard to a driver. Sometimes, a driver is installed as part of a Windows Update, and you might not know you’ve opted to install it. If this happens, you’ll have to roll back the driver by using Device Manager and then open Windows Update, locate the offending update, and uninstall it. Then, you should hide the update so it doesn’t get reinstalled the next time around. The general steps are as follows (after you’ve rolled back the driver in Device Manager):
Click View Update History.
Click Installed Updates.
Select the update and click Uninstall. Click Uninstall to verify and then click Close when prompted.
Return to Windows Update (click the Back arrow twice) and locate the update you just uninstalled.
Deselect the update.
Right-click the update and select Hide Update (see Figure 2-9).

Create a driver update policy
When working with a lot of users and computers, it is unsafe to leave users in charge of installing their own driver updates. You, as a network administrator, need to control what happens with driver updates by creating a driver policy. You might institute a driver policy that doesn’t allow anyone to install any device drivers until something stops working. Your driver policy might be the exact opposite of this, with your reasoning being that because drivers often address problems, offer new features, and even improve device performance, all updates (once tested) should be installed. Generally though, it isn’t this cut and dried. You’ll test and install some updates and you won’t worry with others.
Whatever you decide, you should set up a test lab, even it if is small, to try device drivers before you deploy them. In addition, just to be on the safe side, you should opt to install drivers only after a couple of weeks have passed since their availability so that any problems can be resolved by the manufacturer, if any exist. You should institute a rule regarding unsigned drivers or drivers that offer prompts during installation, too.
You can also apply Group Policy to manage what users can do with regard to driver installation. Here you’ll experience one item you can change: By default, only members of the Administrators group are allowed to install new device drivers on the system. If you enable this in Group Policy, then members of the Users group can install new drivers for device setup classes that you specify. If you disable it (or do not configure it), only members of the Administrators group can install new device drivers on the system. There are other settings to explore beyond what you find in the Driver Installation node you see here, as you’ll see in the next set of steps.
To sample how group policies can be applied to control driver installation on a local machine, follow these steps:
Open the Local Group Policy Editor. You can type gpedit.msc at the Start screen and click the first entry for gpedit in the results list if you are unfamiliar with this feature.
Expand the following nodes: Computer Configuration, Administrative Templates, System, and Driver Installation.
Double-click Allow Non-Administrators To Install Drivers For These Device Setup Classes, shown in Figure 2-10.

You can use this group policy and setting to restrict or enable access both on local machines and in domains.
Objective summary
Devices need device drivers to function properly. Device drivers can be signed or unsigned, 32-bit or 64-bit.
Device Manager enables you to easily install, update, disable (devices), and roll back drivers.
Unsigned drivers can often cause problems, and the Sigverif.exe command can help you find the source of those problems.
Pnputil.exe can help you manage the drivers in the Driver Store on the local machine.
You configure a driver policy to apply to a workgroup or domain to determine exactly how driver installation and management should be addressed.
Objective review
Answer the following questions to test your knowledge of the information in this objective. You can find the answers to these questions and explanations of why each answer choice is correct or incorrect in the “Answers” section at the end of this chapter.
Objective 2.2: Install and configure desktop apps and Windows Store apps
In this objective you learn how to install and configure desktop applications and Windows Store apps. For most end users, installation involves running an installation program for a desktop app or acquiring an app from the Windows Store. You can download and install desktop applications from the Internet, too, and even from network shares. Installation hasn’t changed much, except for the process of getting applications from the Windows Store. However, sometimes you need to install an application from a command prompt, and you’ll learn how to do that here using the MSIExec command. Beyond that, you’ll learn how to configure default programs and file associations when multiple apps exist for performing a task or viewing data and how to manage your users’ access to the Windows Store.
When a user performs certain tasks, such as opening an email attachment (a picture, PDF file, video file, spreadsheet, and so on), inserting a DVD, or even clicking a hyperlink in a document or email message, something specific happens. A program opens, a window opens, a web browser opens, and so on. The user can have multiple apps available that can open a single data type. As an example, clicking a link in an email message causes a web browser to open, but that web browser might be the Internet Explorer 11 app, Internet Explorer on the desktop, or even a third-party app like Google Chrome or Mozilla Firefox. In some instances, what happens is not what the user wants or expects. Beyond that, it might not be what you, as a network administrator, want either.
One way to configure which app opens when a user clicks a specific type of data is to configure default programs. To get started, open the Default Programs window from Control Panel. This is most easily accessed when Control Panel is configured to show large or small icons. See Figure 2-11.

Exam Tip
Some applications will name themselves as the default program without asking the user for permission or at least hide the prompt asking for permission in an obscure place the user might not notice while performing the installation. It might also happen when you open the program for the first time. You’ll have to open the Default Programs window to change the default back to what you want.
As you can see in Figure 2-11, there are four options:
Set Your Default Programs. Select this option to make a program the default for all file types and protocols it can open. This is one of the quickest ways to configure a default program and its file associations.
Associate A File Type Or Protocol With A Program. Use this option to select a single, specific file type or protocol, such as .bmp, to open with a specific program, such as Microsoft Paint. In this example, this won’t cause all picture files to open in the designated program, just one type of picture file (.bmp). This can be helpful when you want to call out one file type that has other, similar file types you do not want to reassociate.
Change AutoPlay Settings. Select this option to configure what happens when CDs and DVDs are inserted into the disk drive. This is where you’ll go to change settings users have put in place when they selected the option in a prompt to “always” do something specific when a certain type of media is inserted. This also lets you set what should always happen instead of offering a prompt to let the user decide.
Set Program Access And Computer Defaults. Use this setting to control access to specific programs that relate to specific activities the user will perform, such as sending email, and to specify what programs are available from the desktop and other locations.
To configure any of these four options, you click what you want to configure and then construct the settings for it.
To set a default program, follow these steps:
In the Default Programs window, click Set Your Default Programs.
Select the program to configure as a default. You can select apps and desktop apps.
Click Set This Program As The Default to configure it as the default for all compatible file types and click OK or click Choose Defaults For This Program and continue to step 4.
Clear the check boxes for any file types you do not want to include and click Save.
To associate a file type or protocol with a program, follow these steps:
In the Default Programs window, click Associate A File Type Or Protocol With A Program.
Select the file type or protocol in the left pane.
Click Change Program.
Select the desired program from the list or click More Options if you don’t see what you’re looking for.
To change AutoPlay settings, follow these steps:
In the Default Programs window, click Change AutoPlay Settings.
Use the drop-down lists to set the defaults for each media type.
Click Save.
To set program access and computer defaults, follow these steps:
In the Default Programs window, click Set Program Access And Computer Defaults.
Select one of the following:
Microsoft Windows, to configure all Microsoft Windows apps to be set as the default. If you’ve already set a program such as Microsoft Outlook as a default, that will not be changed. Click OK.
Non-Microsoft Windows, to remove access to all Microsoft apps including Internet Explorer, any Microsoft-based email program, Windows Media Center, Windows Media Player, and so on. Click OK.
Custom, to select exactly what you’d like to use for the five items shown in Figure 2-12. Click OK.

Install and repair applications
There are several ways to install and repair applications. You are probably aware of the traditional options: You can insert the application CD or DVD and choose the repair option, uninstall an application from Control Panel and then reinstall it by using other methods, or even select the program in Control Panel and click Repair. Here you’ll learn about two lesser-known options: using Windows Installer files (MSIExec) and the Application Compatibility Toolkit (ACT).
More Info: Try repairing using the traditional options first
As a first line of defense, especially on a workstation, you should try the more familiar options when an application needs to be reinstalled or repaired. Some of the options with which you might already be familiar include running the Program Compatibility Troubleshooter available from Windows 8.1; uninstalling, reinstalling, and automatically updating Windows Store apps from PC Settings; and even uninstalling desktop applications using Control Panel when a program simply won’t work.
MSIExec
MSIExec provides a way for network administrators to install, modify, and perform other operations with Windows Installer files at a command line. This involves typing the command MSIExec along with the appropriate command-line options. Before starting, you need to understand a few terms:
Package. Specifies the name (and location) of the Windows Installer package file.
ProductCode. Specifies the globally unique identifier (GUID) of the Windows Installer package file.
UpdatePackage. Specifies the update to apply.
This is the syntax for the command if you want to install a product: msiexec /i {Package | ProductCode}. The parameter /i is the command that states you want to install (or configure) a package. In use, the command could look like this: msiexec /i \servernamesharenamewindowsinstallerfilename.msi.
Table 2-1 details the most common command-line parameters for MSIExec. Remember, you can use MSIExec to repair installations, too.
Parameter | Additional commands | What it does |
/a | Applies the administrative installation option. | |
/f | Below are the additional commands you can use with /f and may be used as so: msiexec /fpecms Example.msi | Enables the use of various repair parameters and is used as so: msiexec /f [p][o][e][d][c][a][u][m][s][v]{Package | ProductCode} |
P | Reinstalls only if file is missing. | |
O | Reinstalls if file is missing or if an older version is installed. | |
E | Reinstalls if file is missing or an equal or older version is installed. | |
D | Reinstalls if file is missing or a different version is installed. | |
C | Reinstalls if file is missing or the stored checksum does not match the calculated value. | |
A | Forces all files to be reinstalled. | |
U | Rewrites all required user-specific registry entries. | |
m | Rewrites all required computer-specific registry entries. | |
s | Overwrites all existing shortcuts. | |
v | Runs from source and recaches the local package. | |
/x | Uninstalls a product. | |
/j | Below are commands you can use with /j and may be used as so: msiexec /j [{u | m}] Package | Advertises a product. |
U | Advertises a product to the current user. | |
M | Advertises a product to all users of the computer. | |
/p | Applies an update. |
Exam Tip
It’s highly likely that you’ll be asked to verify the proper syntax for an MSIExec command or to choose which command and parameters should be used. Make sure to learn all of the command-line options and parameters offered in Table 2-1.
Explore the Application Compatibility Toolkit
The Application Compatibility Toolkit (ACT) helps you determine whether the applications, devices, and computers in your organization are compatible with Windows 8.1. You can use it to obtain compatibility information from Microsoft and software vendors (and if desired, to share what you learn). In a large organization you can use ACT to do the following:
Take an inventory of applications, devices, and computers so you know exactly what you want to test.
Test the compatibility of the applications in your organization.
Manage the data you create during testing.
Analyze available compatibility information.
Prioritize the solutions and fix compatibility issues.
Exam Tip
ACT only tests desktop applications because apps from the Windows Store are already known to be compatible with Windows 8.1.
If you recall from Chapter 1, the Application Deployment Toolkit, which is a free download from Microsoft, contains ACT. ACT enables you to discover what applications are incompatible with Windows 8.1 and create “shims” to fix those problems. ACT can also help you create additional solutions, such as when applications try to write to protected areas of the operating system when they don’t need to (or shouldn’t).
To prepare ACT you must do the following (at a high level):
Create and configure an ACT database (which requires you to have and use Microsoft SQL Server or Microsoft SQL Server Express. The path to this is %SystemDrive%ProgramDataApplications Compatibility ToolkitCreateDB.sql.
Configure the proper permissions at the share level and folder level that are required by the ACT LOG Processing Service.
Work through the five tasks in the previous bulleted list using ACT and the database you created.
Run the Application Compatibility Manager and work through the setup wizard.
It’s likely that you won’t be tested on how to set up, configure, and use ACT and work with SQL Services databases; these are tasks required of experienced domain network administrators. However, you might see questions related to the steps involved in using the Application Compatibility Manager to perform the inventory, collect data, and analyze what you collect. To learn more about Application Compatibility, refer to http://technet.microsoft.com/en-us/windows/aa905066.
Exam Tip
You can verify the compatibility of your application, device, and computer with a new version of the Windows operating system by using ACT; test your applications for issues related to User Account Control (UAC) by using the Standard User Analyzer (SUA) tool; and test your web applications and websites for compatibility with new releases and security updates to Windows Internet Explorer by using the Internet Explorer Compatibility Test Tool.
Manage access to the Windows Store
By default, all users can access the Windows Store. You might want to change this behavior. There are two ways to modify access. You can configure it so users can’t access the Windows Store at all, or you can limit their use by allowing them to acquire only specific apps.
Disable access using Group Policy Editor
To disable access completely, you’ll use the Group Policy Editor. To restrict access to only some of the Windows Store content, you’ll use AppLocker. We look at these two features in detail next. Before that, though, there is one more Windows Store setting you need to know about, and that is how to disable app updates from the Windows Store (they are installed automatically in Windows 8.1).
To disable updates on a single client computer, follow these steps:
From the Start screen, click the Store app.
Press Windows key+I to open the Settings charm.
Move the slider under Automatically Update My Apps from Yes to No (see Figure 2-13).

If you need to manage a group of computers in a workgroup or domain, you’ll need to apply group policies. The location of the Group Policy setting is the same whether you use the Local Group Policy or the related Group Policy Management Console (GPMC) on your domain server. The path to the Local Group Policy setting (in Gpedit.msc) is Computer Configuration, Administrative Templates, Windows Components, Store. If you enable the setting Turn Off Automatic Download Of Updates On Win8 Machines, updates will be disabled.
Disable access using group policies
You can’t disable access to the Windows Store from the Settings charm like you can disable app updates. To disable access you must use the applicable Group Policy editor. You might want to do this if your employees are downloading and installing games, among other things. You might need to disable access to meet a company’s security needs. Whatever the case, to disable access to the Windows Store using the Local Group Policy Editor, follow these steps:
At the Start screen, type gpedit.msc and click it in the results. (You could also use the Run box on the desktop.)
In the Group Policy Editor, expand the following nodes: Computer, User Configuration, Administrative Templates, Windows Components, Store.
Double-click Turn Off The Store Application.
Select Enabled, as shown in Figure 2-14.
Click OK.

Exam Tip
There will be questions on the exam that ask how to open all manner of features by using various text-based shortcuts. For instance, instead of searching for the Local Group Policy Editor on the Start screen of a workstation computer, you might be expected to know you can also use Windows key+R, and in the Run box that opens, type gpedit.msc. So, as you work through this book and perform any task, know that there are likely other ways to do it.
Here are a few examples you can type in the Run box or on the Start screen to open a few of the popular Administrative and Computer Management tools: File Signature Verification Tool = sigverif; Group Policy Editor = gpedit.msc; Local Security Settings = secpol.msc; System Configuration Utility = msconfig; Task Manager = taskmgr; Computer Management = compmgmt.msc; Event Viewer = eventvwr.msc; Performance Monitor = perfmon.msc; Disk Management = diskmgmt.msc. To find more, perform a web search for “List Run command for Windows 8”.
Exam Tip
Users get apps from the Windows Store, but that’s not the only place they can be acquired. In an enterprise environment, network administrators often use a technique called sideloading (which must be enabled in Group Policy) to install apps they create onto the organization’s computers. Although sideloading is no longer listed as an objective for this exam, it’s possible a question or two might slip through. Look for commands like import-module.appx and others that end in the .appx file format. Remember, too, that this is a Windows PowerShell command.
Objective summary
Configure default settings and file associations to configure how specific file types should open.
Disable access to specific apps from the Set Program Access And Computer Defaults window.
Limit or disable access to the Windows Store by using Group Policy.
Use MSIExec at a command line to install and repair applications.
Explore the Application Compatibility Toolkit (ACT) and know it can be used to inventory the enterprise, test applications for compatibility, and help decide how to shim incompatible applications, among other things.
Objective review
Answer the following questions to test your knowledge of the information in this objective. You can find the answers to these questions and explanations of why each answer choice is correct or incorrect in the “Answers” section at the end of this chapter.
Objective 2.3: Control access to local hardware and applications
As a network administrator, you need to control access to various applications and hardware (such as removable devices). You also need to be able to control the installation of devices, create rules specific to your organization, and understand which of the available tools are available for what operating system editions. There are four tools you’ll learn about that can help you achieve this, each outlined in this section.
Note: Configure Store apps
To configure apps you get from the Store, open the app and then access the charms. Click Settings to see what options are available.
Configure application restrictions using AppLocker
It’s difficult, if not impossible, to prevent users from accessing specific apps without using the tools designed for that purpose. AppLocker (also known as application control policies) can help in this regard. By using it, you can control what applications and files users can run by creating specific rules with the restrictions you want to apply.
Important: When you can apply AppLocker rules
AppLocker rules can only be applied to computers running Windows 7, Windows 8, Windows Server 2008 R2, and Windows Server 2012. If you need to create rules for other operating systems, you’ll have to use an older technology, Software Restriction Policies, detailed in the next section.
On a high level, AppLocker, available inside the Group Policy Editor, is organized into four areas called rule collections, where you can create rules for the various types of applications in your workgroup or enterprise. You can see the four entries in the left pane in Figure 2-15. No rules exist by default. The four areas of rule collections (or containers) are executable files (.exe, .com), scripts (.ps2, .bat, .js, .cmd, .vbs), Windows Installer files (.msi, .mst, .msp), and packaged apps (.appx). AppLocker uses these rules to determine which applications users can run. The path is Computer Configuration, Windows Settings, Security Settings, Application Control Policies, AppLocker.
After you’ve decided which container to use for your rule (your choices are Executable Rules, Windows Installer Rules, Script Rules, or Packaged App Rules), you need to decide what kind of rule to create. There are three choices:
Publisher rules. Use this selection to create rules for applications that are digitally signed by a software publisher. This type of rule uses the digital certificate (publisher name and product name) and properties of the file (file name and file version). You can create the rule to apply to entire product suites.
Path rules. Use this selection to create rules that are based on the file or folder’s installation path to specific application(s).
File hash rules. Use this selection to create rules based on the unique file hash that Windows cryptographically computes for each file. If a publisher updates a file, you must create a new rule, because the file is unique and will change with an update.
If you plan to use AppLocker, understand that once enabled and in use, AppLocker blocks all executable files, installer packages, and scripts unless otherwise noted. You therefore must create default rules that enable users to access the files needed to run their system first. After that, you can begin configuring what you do and do not want them to use.
More Info: AppLocker file types you can manage
In Windows Server 2008 R2 and Windows 7, you can manage four types of files: executable (.exe), Windows Installer (.msi and .msp), script (.bat, .cmd, .js, .ps1, and .vbs), and DLL (.dll and .ocx). Each of these file types is managed in its own rule collection. In Windows Server 2012 and Windows 8, you can also manage .mst and .appx files.
One way to apply AppLocker is to create a rule to deny access to a specific app that appears on the Start screen. You might want to do this on a machine if you find the users are playing games, using Skype, and so on. On a high level you’ll need to open the applicable Group Policy Editor, create a Packaged App Rule, opt to automatically generate rules for everyone, and then locate an entry such as Microsoft.BingTravel. Using the wizard, opt to deny the app. You’ll also need to enable and start the Application Identity Service on the local machine to which you want to apply the restriction. This is necessary because you could create a set of rules that doesn’t allow access to files Windows needs to run.
Configure application restrictions using Software Restriction Policies
In scenarios in which AppLocker won’t work, you’ll have to create your rules using Software Restriction Policies. This feature has been around a long time, so it is backward-compatible with Windows XP and Windows Vista and can also be used for Windows 7 and Windows 8 computers if you only want to use one feature to manage all the computers in your organization. Because the feature is older, it isn’t as efficient as AppLocker, though. It can’t generate rules automatically, for one thing, which means you must configure rules manually and one at a time.
As with AppLocker, you can create rules based on specific conditions:
Certificate rules. Use this choice to create rules for applications that are digitally signed by a software publisher. This type of rule uses the digital certificate (publisher name and product name) and properties of the file (file name and file version).
Hash rules. Use this option to create rules based on the unique file hash that Windows cryptographically computes for each file. If a publisher updates a file, you must create a new rule, because the file is unique and will change with an update.
Network zone rules. Use this choice to create rules for Windows Installer (.msi) packages that come from the Internet through Internet Explorer. You can configure rules based on the security zone the website is from.
Path rules. Use this option to create rules that are based on the file or folder’s installation path to specific application(s).
To create a Software Restriction Policy you use Group Policy Editor. Navigate to a Group Policy object and then to Computer Configuration, Windows Settings, Security Settings, Software Restriction Policies. Right-click Software Restriction Policies and click New Software Restriction Policies. You can now create rules of your own.
Click Additional Rules to get started. Right-click inside the Additional Rules pane and click the desired option for creating a new rule. You’ll have to configure your rule manually, without a wizard, by inputting the required components. See Figure 2-15.

When you configure rules, there are three settings:
Disallowed, to prevent the configured installation from running.
Basic User, to allow all applications that do not require administrative approval to run. If they do require approval, they must match a configured rule.
Unrestricted, to allow an application that matches the rule to run.
Manage installation of and access to removable devices
It’s common for users to carry USB flash drives with them everywhere they go. I have a USB key on my keychain (really, it is shaped like a key!). Having access to a portable drive makes it easy for users to take data with them without having to carry a laptop, connect to a network or domain, transfer data to a tablet or phone, or access a cloud drive. Unfortunately, this is also a common way for viruses to spread and for sensitive data to be taken off premises (and potentially lost or stolen). In an even worse scenario, a malicious user could access another’s computer and copy data without anyone knowing, should the ability arise due to a workstation left unattended or unlocked. Beyond USB drives, users can also copy data to CDs and DVDs and even memory cards.
Deciding who can use these kinds of drives to transfer data is a difficult task. Some employees will need this ability. Some won’t. You’ll have to take careful inventory and decide which employees fit into these two groups and then configure your group polices accordingly. Whatever you decide, the option to configure settings for removable storage access, whether on a local machine or on a domain server, is available in the Group Policy Editor.
To access removable access policies, follow these steps:
Open the Group Policy Editor (gpedit.msc).
Navigate to Computer Configuration, Administrative Templates, System, Removable Storage Access. Note the options. See Figure 2-16.
Alternatively, to configure this for an individual user, navigate to User Configuration, Administrative Templates, System, Removable Storage Access.
Double-click the setting to configure. To enable the setting, click Enabled.
Click OK.

Exam Tip
What can a remotely logged-in user access with regard to removable media? Read from USB and DVD only.
Take some time now to open the screen shown in Figure 2-16 and double-click each entry to see what it offers. You need to be able to name the policies and know what they do if you enable them. For instance, the setting All Removable Storage Classes: Deny All Access enables you to block access to all classes of removable storage devices, and this policy takes precedence over all of the policy settings for individual classes. Similarly, CD And DVD: Deny Read/Write/Execute Access, if enabled, denies users all access to the CD or DVD drivers in the computer or gives users only the access you specifically allow or deny.
Configure Assigned Access
Assigned Access is a new feature offered in Windows 8.1 RT, Windows 8.1 Pro, and Windows 8.1 Enterprise. In a nutshell, it’s a type of “device lockdown” technology. With it, you can use PC Settings to choose a specific user profile and assign an app to that profile. This gives a single Windows Store application experience on the device by opening a specified app at boot up and after authentication of the user. You can prevent other apps from opening and configure filters to keep the logged-in user from changing system settings or even using specific keys on the keyboard.
You can configure Assigned Access in situations in which the user only needs to access one thing. Perhaps it’s a reading app used by elementary school students. Perhaps it’s a tablet that’s available at a makeup counter in a department store. It could even be a specialty device offered by a manufacturer to only do one thing, such as manage a fantasy football team using a single app designed for just that.
To use Assigned Access you need to configure at least one standard user account. You can do this in many ways, the easiest being using PC Settings. Click Accounts and work through the process required to create the account if one does not exist. Once created, you see the Set Up An Account For Assigned Access option.
Then you do the following (see Figure 2-17):
Choose the account to use.
Choose an app.
Restart your computer.
Log on with the user account.

When you reboot the computer, the standard user account will be the only option available and the app you’ve configured as the single available app will be available, too.
Important: How to stop using Assigned Access
If you want to stop using your Assigned Access account but still want it to be available on your PC, quickly press the Windows key five times. This will restart your PC and allow you to sign in with a different account. To turn off Assigned Access, log on as Administrator and in PC Settings, Accounts, Other Accounts, click Set Up For Assigned Access. Choose the standard account and click Don’t Use Assigned Access.
To really personalize Assigned Access for large-scale deployments, you’ll need to use Windows Embedded and Lockdown features. When you do, you can employ remote scripting and management, customization of gestures, limitations on the use of keyboard, and restrictions configured for system notifications, among other things. There’s a seemingly unlimited number of combinations that can be assigned to different users on a device, allowing for different levels of restriction. For more information about Windows Embedded technologies, refer to this article on MSDN: http://blogs.msdn.com/b/windows-embedded/archive/2013/10/16/windows-embedded-8-1-assigned-access-and-windows-embedded-lockdown.aspx.
Objective summary
You use AppLocker to create rules that can restrict what applications employees can access and use. The available containers for rules are Executable Rules, Windows Installer Rules, Script Rules, and Packaged App Rules. These can be generated automatically and applied to newer Windows operating systems.
You can use Software Restriction Policies to restrict applications on legacy Windows Vista and Windows XP computers, but you can also apply them to Windows 7 and Windows 8 computers. There are Certificate, Hash, Network Zone, and Path rules.
You will likely need to manage the installation of and access to removable devices such as CDs, DVDs, and USB flash drives. You can configure this in Group Policy on the local machine or domain controller.
You can use Assigned Access to lock down a machine for one user and one Windows Store app to create a specific user experience.
Objective review
Answer the following questions to test your knowledge of the information in this objective. You can find the answers to these questions and explanations of why each answer choice is correct or incorrect in the “Answers” section at the end of this chapter.
Objective 2.4: Configure Internet Explorer 11 and Internet Explorer for the desktop
Windows 8 and Windows 8.1 have two options for Internet Explorer (IE) 11. There is an app on the Start screen and Internet Explorer on the desktop. The former is like other apps, streamlined with charms you can use to configure settings and preferences, among other things. The latter is the traditional IE 11 app with which you’re already familiar, complete with menus you can opt to show and access to all of the IE settings, including privacy and security. The app you find on the Start screen uses the entire screen and does not contain menu bars or commands, is optimized for touch, and is popular with tablet and laptop users. IE 11 on the desktop is generally used when that app doesn’t provide what the end user needs or when the user prefers that traditional look and feel of IE. The two are the same application, but they have different interfaces. Thus, changes you make in one are applied to the other.
In this section you won’t learn how to use these apps. You won’t learn much about the end-user settings you find in the various menus and toolbars in IE on the desktop either. You won’t learn about what’s available in the app’s charms. You’ll need to explore those features and be familiar with them, but I’ll use the pages here to discuss the objectives on the exam; namely, how to use Compatibility View, configure security and privacy, and configure the Download Manager.
Configure Compatibility View and explore Group Policy settings
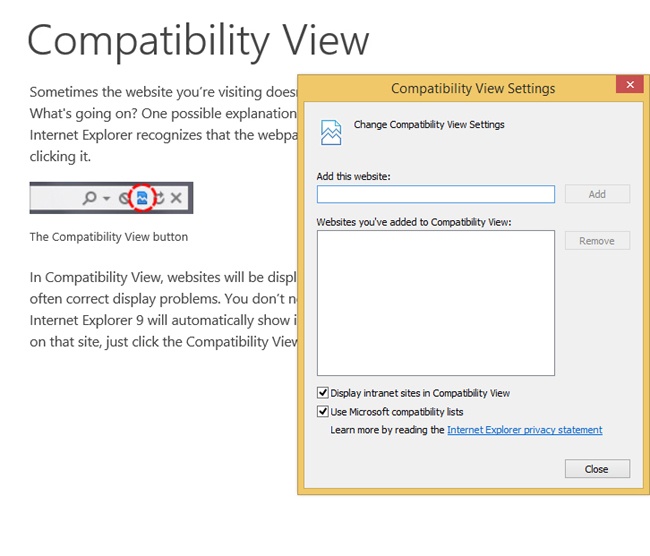
The technology used to create websites is ever-changing, like everything else that has anything to do with computing. The transitions that have occurred over the years have left some websites (and website managers) behind the times. Older websites, whether they are Internet or intranet, that are still configured with the older technologies often don’t display well when opened and viewed in newer web browsers like IE 11. Thus, IE 11 offers Compatibility View. When enabled, the browser displays the selected page in Compatibility View mode and the webpage can be viewed properly.
An end user can quickly enable Compatibility View mode for a webpage by clicking the Compatibility View icon in the IE 11 address bar on the desktop. This button will be available to the end user if the site is on Microsoft’s list of websites that aren’t compatible. Users can also manually add websites to their own personal lists. Figure 2-18 shows what the Compatibility View icon looks like and the Compatibility View Settings dialog box. To add a website manually, type the name of the website in the Add This Website text box and click Add and then click Close.
In larger organizations, you will probably want to control what happens with Compatibility View using Group Policies. You can find the options for Compatibility View in the Group Policy Management Editor from Computer Configuration, Policies, Administrative Templates, Windows Components, Internet Explorer, Compatibility View. Make sure you are familiar with all of these options.
Table 2-2 outlines the available Group Policy settings for IE 11.
Location | Setting the policy object | |
Turn on Compatibility View for all intranet zones | Administrative Templates, Windows Components, Internet Explorer, Compatibility View | Double-click Turn On Internet Explorer Standards Mode For Local Intranet and then click Disabled. |
Turn on Compatibility View for all websites by using Group Policy | Administrative Templates, Windows Components, Internet Explorer, Compatibility View | Double-click Use Policy List Of Internet Explorer 7 Sites and then click Enabled. Users will be able to add or remove sites manually to their local Compatibility View list, but they won’t be able to remove the sites you specifically added. |
Turn on Quirks mode for all websites by using Group Policy | Administrative Templates, Windows Components, Internet Explorer, Compatibility View | Double-click Use Policy List Of Quirks Mode Sites and then click Enabled. |
Ensure your users are using the most up-to-date version of Microsoft’s compatibility list | Administrative Templates, Windows Components, Internet Explorer, Compatibility View | Double-click Include Updated Web Site Lists From Microsoft and then click Enabled. |
Restrict users from making security zone configuration changes | Administrative Templates, Windows Components, Internet Explorer, Internet Control Panel | Double-click Disable The Security Page and then click Enabled. |
Control which security zone settings are applied to specific websites | Administrative Templates, Windows Components, Internet Explorer, Internet Control Panel, Security Page | Double-click Site To Zone Assignment List, click Enabled, and then enter your list of websites and their applicable security zones. |
Turn off Data Execution Prevention (DEP) | Administrative Templates, Windows Components, Internet Explorer, Security Features | Double-click Turn Off Data Execution Prevention and then click Enabled. |
Configure security and privacy settings
IE 11 also offers various security and privacy options. You can access the same feature as any end user can by using the Tools button and clicking Internet Explorer Options. There are two tabs to explore: Security and Privacy. These two tabs offer options related to security settings for the four zones (Internet, Local intranet, Trusted sites, Restricted sites) and how you want to protect your privacy (such as never allowing websites to require your physical location, using the Pop-Up Blocker, and so on).
The other tabs offer a few security and privacy options, too. For example, the General tab offers the ability to delete your browsing history each time you exit IE 11. The Content tab lets you manage AutoComplete settings and how you’d like to use certificates for encrypted connections and identifications. You’ll need to explore each of these tabs to see what’s available and to make sure you know how to make changes. Understand that the changes you make here also affect the IE app on the Start screen. You can open the Internet Options dialog box by clicking the Tools button and then clicking Internet Options. For the most part though, you’ll control IE through Group Policy.
Exam Tip
You might be asked how older websites can configure their webpages to always show in Compatibility mode. They do this by adding this tag into their HTML files: <meta http-equiv=“X-UA-Compatible” content=“IE=EmulateIE7”/.
There are lots of new IE 11 Group Policy settings you need to be familiar with. Make sure you understand what happens when you enable, disable, or do not configure various policies. Figure 2-19 shows some of the options in Group Policy that are available to configure in the Local Group Policy Editor. Note these options specifically: Turn Off InPrivate Filter and Turn Off InPrivate Browsing.

There are other areas of Group Policy to explore beyond the Privacy node. For example, if you click Internet Explorer in the left pane, in the right you’ll see options that include Security Zones: Do Not Allow Users To Change Policies and Disable Automatic Install Of Internet Explorer Components.
Exam Tip
We don’t think you’ll be tested too heavily on Group Policy settings for IE 11, but you should familiarize yourself with the newly added entries. Some of these directly relate to security and privacy settings. This list is available on TechNet at http://technet.microsoft.com/library/dn321453.aspx.
Exam Tip
You might be asked about InPrivate Browsing on the exam. InPrivate Browsing prevents the browser from collecting any data during the session, including cookies, tracking, browsing history, passwords, and user names. Like other features, you can control InPrivate behavior through Group Policy.
Manage add-ons, toolbars, extensions, search providers, and more
There’s another area of IE 11 on the desktop to explore, and that is the Manage Add-Ons dialog box, shown in Figure 2-20. From there you can view information about the following and how each is configured on the local computer:
Toolbars And Extensions. Click this choice to see what toolbars have been added to IE 11 and disable them if desired. These are sometimes from Microsoft Corporation, as you can see in Figure 2-20, and other times they are from third parties. This is where some malware appears, too. Click any entry to see options to enable or disable it.
Search Providers. Use this option to see what search providers are in use on the local computer. You’ll see Bing, but you might also see additional providers such as eBay, Ask.com, Amazon Search Suggestions, and so on. You can select any item in the list and remove it, set it as the default, or disable suggestions from it. You can also change the order of the list. Select and then right-click any entry to see additional options that do not appear in the dialog box itself.
Accelerators. Choose this option to view the accelerators configured for the local machine. You’ll probably see Map with Bing Maps, Translate with Bing, and perhaps others. These features help users perform tasks in a single click (such as getting directions to a place by using Bing Maps). Click any entry to disable, remove, or set it as the default.
Tracking Protection. Use this option to get a Tracking Protections List online and use it to help enhance your privacy by preventing websites from automatically sending data they collect about your visits to websites and content providers. Those providers use the information to tailor advertisements based on what you do online. You have to right-click Your Personalized List and click Enable to get started. Once you’ve selected a list you can configure settings for it that include the ability to block all content or choose the content to block or allow.

Exam Tip
Objective 2, which is what this entire chapter covers, is only about 10 to 15 percent of the exam. That means that if your test contains 50 questions, only five to eight questions will come from the material in this chapter. If one of those questions is about Tracking Protection, InPrivate Browsing, or the available Security levels in the Internet Options dialog box, it sure would be a shame to miss it! Spend some time getting to know all of the features of IE before you take the exam.
More Info: Review all options available in IE 11
On the Tools menu in the IE 11 desktop app, point to Safety and review the options there. You can delete your browsing history and report unsafe websites, among other things. Make sure you understand what each entry does, including the SmartScreen filter.
Configure Download Manager
Download Manager is a feature in IE 11 that keeps track of your downloads and download processes. The names of the files you’ve downloaded are maintained in the list, which makes these easily accessible at any time. You can open Download Manager from IE on the desktop from the Tools menu; just click View Downloads. Once it’s open, note the Options link. This is where you configure options for Download Manager, specifically where to store downloads by default and whether to be notified when a download completes. Figure 2-21 shows Download Manager.

You can also right-click any entry in the list to delete the download, copy the download link, go to the download webpage, open the containing folder, report that the file is unsafe, and rerun the security checks that were run after the file finished downloading. You can manage Download Manager in Group Policy.
Objective summary
Use Compatibility View mode to make older websites that do not yet meet new standards display properly.
Use Group Policy to configure Internet Explorer (IE) 11 for an entire organization or group easily.
Configure security and privacy settings from the Internet Options dialog box. There are many options to explore.
Manage add-ons, toolbars, extensions, search providers, and more with the Manage Add-Ons dialog box.
Use Download Manager to keep track of and manage the files you download from the Internet.
Objective review
Answer the following questions to test your knowledge of the information in this objective. You can find the answers to these questions and explanations of why each answer choice is correct or incorrect in the “Answers” section at the end of this chapter.
Objective 2.5: Configure Hyper-V
With Windows 8 Professional and Windows 8 Enterprise, you can create virtual machines that are housed inside a single operating system on a single computer. These virtual machines can run their own operating systems, and you can separate and secure them with virtual switches. A Hypervisor keeps these child operating systems separate from the parent operating system. This enables network administrators to combine multiple machines into one, which saves money, power consumption, resources, and space, among other things. In Windows 8.1, this technology is called Client Hyper-V and is a free component.
To use Client Hyper-V, you’ll need the following:
Windows 8.1 Professional or Enterprise, 64-bit
Second Level Address Translation (SLAT) processor
2 GB of RAM (in addition to the 2 GB for the operating system)
BIOS-level Hardware Virtualization support
Create and configure a virtual machine
If you have a computer that is compatible, you can create and configure a virtual machine. However, you must first install Client Hyper-V. You do this in Control Panel, under Programs. Click Turn Windows Features On Or Off, locate Hyper-V, and select all related entries. See Figure 2-22. Once enabled, click OK and restart the computer.
Important: BIOS must support virtualization
You might have to enter the BIOS to enable virtualization support.
Exam Tip
You can enable Hyper-V in Windows PowerShell: Enable-WindowsOptionalFeature –FeatureName Microsoft-Hyper-V –All.

Note: Sometimes Hyper-V isn’t available in the Windows Features dialog box
If you don’t see any entries for Hyper-V in the Windows Features dialog box, the computer is either running Windows 8.1 (not Professional or Enterprise) or is 32-bit. If you see everything, but Hyper-V Platform is unavailable and everything else is okay, then the computer’s processor isn’t SLAT.
Create a virtual machine
You use the Hyper-V Manager (Figure 2-23) to create a virtual machine. You can open this manager from the Start screen by typing Hyper-V Manager and clicking it in the results. By default, no virtual machines exist. The Hyper-V Manager window is separated into five panes:
Hyper-V Hosts, which enables a local and remote connection to Hyper-V host computers.
Virtual Machines, which lists the virtual machines on the selected Hyper-V host.
Actions, which enables you to configure host networking and settings.
Checkpoints, which enables you to access saved checkpoints (or snapshots) of the selected virtual machine. (A checkpoint is like a picture of a virtual machine; it is a point-in-time image of the current settings and configurations.)
Details, which enables you to view available tabs to configure functionality options.

To create a virtual machine, follow these steps:
Log on with Administrator credentials, open the Hyper-V Manager, and from the Action menu, click New>Virtual Machine.
Click Next to start the creation process.
Specify the name and location of the new virtual machine. It’s best, for now, to keep the default location, so click Next. See Figure 2-24.
Choose the Generation option that best suits your needs and click Next:
Generation 1 supports the same virtual hardware that the previous version of Hyper-V did. You can use it on operating systems including Windows Server 2008 and Windows 7, among others.
Generation 2 supports Secure Boot, SCSI boot, and PXE boot using a standard network adapter. Guest operating systems must run at least Windows Server 2012 or 64-bit versions of Windows 8 or Windows 8.1.
Enter the amount of startup memory required and choose whether to use dynamic memory for this machine. Click Next.
On the Configure Networking page, click Next. You’ll only see options here if you’ve previously created Network Switch settings.
Verify that the Create A Virtual Hard Disk option is selected and that the settings are correct. Click Next. See Figure 2-25.
For our example here, leave Install An Operating System Later selected and click Next. (You could opt to install an operating system now, though.)
Click Finish (note the new virtual machine in the bottom pane of the Hyper-V Manager).
Leave the Hyper-V Manager open.


Configure a virtual machine
Once you’ve created the virtual machine, you can configure it; until then, it isn’t really useful. This involves installing an operating system and configuring the hardware settings to suit your current needs. Before you start, locate an operating system disc or disc image. In this example, we’ll insert a Windows 8 disc into the DVD drive.
To configure a virtual machine, follow these steps:
In the Hyper-V Manager, in the top-middle Virtual Machines pane, click the virtual machine to configure. See Figure 2-26.
Click Action and click Settings.
In the Settings For window, under IDE Controller 1 (in our scenario), click the DVD drive.
In our scenario, in the DVD Drive pane, click Physical CD/DVD drive and verify the correct drive is selected if more than one exists. See Figure 2-27.
Note: Explore all options in the Settings For window
Make sure to explore the options in the right pane of the Settings For window shown in Figure 2-27. Click each one to see what’s available. It’s generally self-explanatory: BIOS, Memory, Processor, and so on.
In the Virtual Machines pane, click the newly created VM again.
Right-click the VM you selected and then click Start.
Right-click the VM again and click Connect.
If setup doesn’t start, inside the virtual machine’s window, click Action, and click Ctrl+Alt+Del. This will restart the virtual machine and allow the installation process to start. You can see the Action menu in Figure 2-28, as well as the first screen of the Windows 8 installation process.


Important: A virtual machine needs a product ID
If you’re installing a new client on a Windows 8.1 Professional machine, you’ll need a valid product ID.
Once installation completes, you can work with the new VM just as you’d work with any operating system. Figure 2-29 shows an example of what a running, installed, VM looks like.

Install integration services
Hyper-V includes a software package called Integration Services to improve integration between the physical computer and the VM. For the most part, you should install Integration Services after you install the desired operating system. After the installation of these services completes, all integration services will be enabled.
Exam Tip
Integration Services can only be installed using the Hyper-V Manager. It can’t be automated or performed with Windows PowerShell.
To install Integration Services onto the new VM, follow these steps:
In Hyper-V Manager, right-click the virtual machine and click Connect.
On the Action menu of Virtual Machine Connection, click Insert Integration Services Setup Disk. (If you don’t see the menu, put the VM window in Restore mode.)
Click the notification that appears in the right corner of the VM window and then click Install HyperV Integration Services.
Click Yes in the User Account Control box.
If you see a prompt that says This Computer Is Already Running The Current Version Of Integration Services, click OK. Otherwise, work through the installation process.
Client Hyper-V is often the perfect tool for testing software on different platforms and with varying hardware and deployment scenarios. It has some limitations, though, and many enhancements. Review all of the information you find here to verify you are familiar with all of these features and limitations: http://technet.microsoft.com/en-us/library/hh857623.aspx.
Create and manage checkpoints
If you were familiar with Client Hyper-V before you started using it in Windows 8.1, you probably know the term snapshot. This has been replaced with a newer term, checkpoint. You manually create a checkpoint to save the state of a virtual machine. This saves all of the hard disk’s contents, including application data files, settings, configurations, and so on. When you’re sure you don’t need the checkpoint anymore, you can delete it (these files can be quite large). Additionally, checkpoints are portable.
To create a checkpoint, follow these steps:
In the Hyper-V Manager, click the new VM you just created and configured.
As applicable, click Action and click Start; then click Action and click Connect.
Right-click the VM and click Checkpoint. See Figure 2-30.
In the Checkpoints pane, right-click the new checkpoint and click Rename.
Name the checkpoint appropriately (Day1AfterInstall, for instance).

To test a checkpoint, follow these steps:
Note: Differencing disks
A differencing disk is a virtual hard disk (VHD) you create to quarantine changes you’ve made to a VHD or the guest operating system. You store these changes in a separate file. The differencing disk is associated with another VHD (that already exists) and can be any kind of virtual disk. You choose the disk when you create the differencing disk. This VHD is called the parent disk, and the differencing disk is the child disk.
Create and configure virtual switches
Client Hyper-V provides a Layer 2 network switch, which is software based. This is what enables the VMs you create to connect to networks. You can use the switch to connect to a physical, external network or to virtual networks you’ve already configured in other Hyper-V hosts. The switch also provides security for the VM because it is positioned between the host’s physical network interface card (NIC) and the VM’s virtual NIC. Additionally, the Hyper-V Virtual Switch has policies already in place for various isolation, security, and service levels and protects against malicious VMs and external ones. The switch is already installed.
Before you create a switch, there are a few terms with which you should be familiar:
ARP/ND Poisoning (spoofing) protection. Use this to protect against malicious VMs that try to steal IP addresses from other virtual machines. When IPv6 is involved, it also protects against Neighbor Discovery (ND) spoofing. It uses Address Resolution Protocol (ARP) to do this.
DHCP Guard Protection. This protects against malicious VMs that employ man-in-the-middle attacks that represent themselves to be DHCP servers when they are not.
Port Access Control Lists (ACLs). These lists filter traffic so that you can set up virtual network isolation scenarios. It bases these filters on MAC addresses and IP addresses and ranges.
Trunk mode to a Virtual Machine. Use this to set up a VM as a virtual appliance so that it can be used to direct traffic from other virtual area local networks to that VM.
Network traffic monitoring. This reviews traffic that traverses the network switch.
Isolated (private) VLAN. This segregates traffic on multiple virtual area local networks to better create isolated networks.
You can create three types of virtual switches:
External, to let the VM connect to a physical NIC on the computer to communicate with the external network, perhaps for the purpose of connecting to the Internet. If desired, it can also be configured to connect to the host computer. The physical NIC can only connect to one network in this scenario.
Internal, to let the VM communicate with other VMs and with the host computer.
Private, to let the VM communicate with other VMs but not with the host computer.
Exam Tip
It’s highly likely you’ll see something about the three types of virtual switches on the exam: External, Internal, and Private. Additionally, you should know that nearly anything you want to do in the Hyper-V Manager requires you to log on with an Administrator account.
To create and configure a virtual switch, follow these steps:
In the Hyper-V Manager, click Action and click Virtual Switch Manager.
In the Virtual Switch Manager For window, select the type of switch to create. (We click External here.)
Click Create Virtual Switch. See Figure 2-31.
From the drop-down list under What Do You Want To Connect This Virtual Switch To, select the external network to use, if applicable. For now, make sure to select an Ethernet-based solution. You can also enable virtual LAN identification if the network switch is going to be used with a specific VLAN.
Click OK.
If prompted, click Yes to apply the changes.

After you have created the switch, you can test it. If you created an external switch, for instance, you can test connectivity to the Internet easily. You can also open the Virtual Switch Manager from the Action pane on the right side of the Hyper-V console and rename the new switch or make notes regarding it.
Important: Regarding device drivers
If you had to install a device driver for the host machine’s network adapter, you might have to install that same driver on the VM.
In the set of steps that precedes this paragraph, you were instructed to select an Ethernet-based solution when selecting the network to which to connect. That’s because the virtual switch in Hyper-V is a Layer 2 switch, and data can only be sent and received through a physical network adapter. A wireless adapter won’t work. So, if you want to use a wireless connection, you need to configure a workaround. However, employing the workaround is a fairly complicated task, so if Ethernet is an option, use it.
More Info: Hyper-V and the wireless connection workaround
There is a long, detailed explanation for why you can’t select a wireless adapter and have it connect to external networks when creating a switch. Additionally, there are specific steps you’ll have to take to create a workaround if you do need the capability. To learn more about why this happens and how to work around it, refer to the following articles:
Bringing Hyper-V to “Windows 8” at http://blogs.msdn.com/b/b8/archive/2011/09/07/bringing-hyper-v-to-windows-8.aspx
Hyper-V: How to Run Hyper-V on a Laptop at http://social.technet.microsoft.com/wiki/contents/articles/185.hyper-v-how-to-run-hyper-v-on-a-laptop-en-us.aspx
Configuring Virtual Networks at http://technet.microsoft.com/en-us/library/cc816585(v=WS.10).aspx
Create and configure virtual disks
Virtual machines need virtual hard disks to function. VHDs are files that you can transport on a USB flash drive. These files are in the format of either VHD or VHDX. VHDs reside on the host computer and contain either an operating system or data that is used by the VMs. You can boot to a VHD if the host is running Windows 7 or Windows 8. You learned quite a bit about VHDs in Chapter 1, specifically how to install Windows 8.1 onto a VHD. You also learned quite a bit about VHD technology. If you haven’t read that part of Chapter 1, read it now and return here when you’re done.
There are two main differences between the two types of VHD formats:
VHD can be as large as 2048 GB (about 2 TB), and the technology has been around a long time. It was even used in the older Virtual PC and the last version of Hyper-V. You use this format when you know you’ll be running the VHD on older operating systems, specifically anything before Windows Server 2012 and Windows 8.
VHDX can be much larger, up to 64 TB. It is not compatible with versions of Hyper-V or operating systems created before Windows Server 2012 or Windows 8. You use this format when you know you’ll be using the VHD on compatible machines.
If you can use the VHDX format, you will have access to the larger file size and these features not available in the older VHD format:
Protection against data corruption when there is a power failure (because updates are logged effectively).
Larger block sizes for dynamic and differencing disks to enhance performance.
Custom metadata that can be used to record information about the file such as operating system version, among other things.
The use of “trim” technology to reduce file size and access and use free disk space. (Trim requires disks to be directly attached to the VM, and hardware must be compatible.)
To create a VHD from the Hyper-V Manager, in the Action pane, click New, and then click Hard Disk. Work through the wizard and select the file type format to use (VHD, VHDX), the size (Fixed, Dynamically expanding, Differencing), and name and location, and then opt how to configure the disk. If you want to apply the VM you created in this section, in the Name box you’ll need to type the name of the VM to use. When prompted, create a new blank VHD. You can now attach the hard disk to a VM, export it, import it, inspect it, and so on.
Move a virtual machine
The easiest way to move a VM is to shut it down, export it to the new disk, and then import it to the desired location. You might need to export a VM from your production environment, open it somewhere else (perhaps on your desktop with Client Hyper-V), perform any required troubleshooting, and then export it back into the production environment.
To move a virtual machine, follow these steps:
In Hyper-V Manager, right-click the VM to move and click Shut Down. Click Shut Down again to verify.
Wait until the state of the VM shows Off. Then right-click the VM and click Export.
Specify where to save the file or click Browse to choose a location. If you receive an error, save to a different location or create a subfolder.
Click Export.
If desired, open the folder that contains the exported VM and note the subfolders: Snapshots, Virtual Hard Disks, and Virtual Machines.
When you import the VM, you work through a similar wizard that prompts you to browse to the VM, select the VM, and so on. Once you’ve done that, you are prompted to select an import type. The three options are described here:
Register The Virtual Machine In-Place (Use The Existing Unique ID For The VM). If you only need to start using the VM where it is currently stored and you do not want to move it or copy it, choose this option.
Restore The Virtual Machine (Use The Existing Unique ID For The VM). If your VM files are stored on a file share, a removable drive, a network drive, and so on, and you want to move it, choose this option.
Copy The Virtual Machine (Create A New Unique ID For The VM). If you have a folder of VM files that you want to import multiple times (perhaps you are using them as a template for new VMs), choose this option and copy the files.
To import a VM, follow these steps:
To import the VM to another location, open Hyper-V on the target computer.
In the Actions pane, click Import Virtual Machine.
Click Next on the Import Virtual Machine Wizard.
Click Browse to locate the top-level folder associated with the export process. Click Next.
Select the VM to import (see Figure 2-32). Click Next.
Read the options available to you and choose how to register the VM. (Here we restore the VM and use the existing unique ID.) Click Next.
Accept the default store folder for the VM files and click Next. If you receive an error, create a new folder inside the default store to hold the files.
Accept the default store folder for the VHDs and click Next. If you receive an error, create a new folder inside the default store to hold the VHD.
Click Finish.
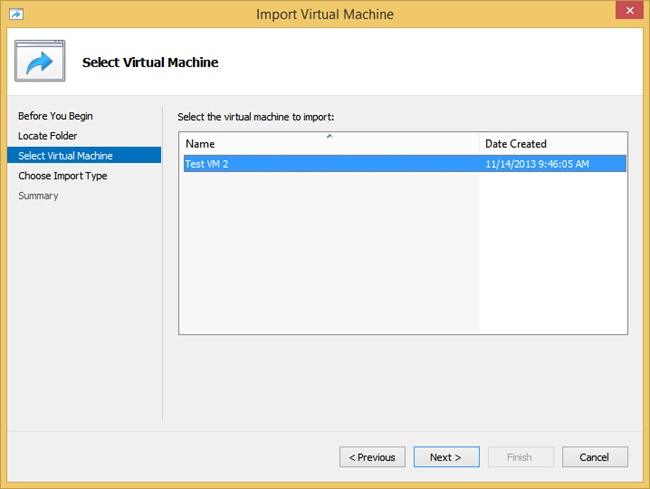
Objective summary
To use Client Hyper-V the host computer must:
Have Windows 8 or Windows 8.1 Professional or Enterprise 64-bit installed.
Have a compatible Second Level Address Translation (SLAT) processor.
Have an additional 2 GB of RAM and BIOS-level Hardware Virtualization support.
You create VMs to use a single computer to house multiple operating systems to test various hardware and software scenarios and to save money, resources, space, power consumption, and more.
Checkpoints let you take snapshots of the configuration of a VM. You can restore to a saved checkpoint at any time.
Virtual switches can be used to separate and secure multiple VMs.
Virtual disks let you port VMs and are saved as either VHM or VHDX file formats. VHDX is the newer format and is compatible only with Windows Server 2012 and Windows 8 and Windows 8.1.
Objective review
Answer the following questions to test your knowledge of the information in this objective. You can find the answers to these questions and explanations of why each answer choice is correct or incorrect in the “Answers” section at the end of this chapter.
Chapter summary
You can configure devices and device drivers in a number of ways, including but not limited to using Device Manager, the Devices And Printers window, Device Stage, and command-line tools like Sigverif.exe and Pnputil.exe.
To manage what applications open and how the computer responds to DVDs, USB drives, and so on, you can configure preferences by using the Default Programs window.
MSIExec provides a way for network administrators to install, modify, and perform other operations with Windows Installer files at a command line. The Application Compatibility Toolkit (ACT) helps you determine whether the applications, devices, and computers in your organization are compatible with Windows 8.1.
You can control access to the Windows Store, applications, removable hardware, and more by using Group Policies.
AppLocker, Software Restriction Policies, and Assigned Access can help you further control users’ access to software and hardware.
You can use the options in Internet Explorer (IE) 11 to control user access, secure and protect, and manage downloads, and you can use Group Policy to manage groups of users.
Hyper-V is a virtualization technology you can use to run multiple operating systems in their own space on a single host computer. This saves money, time, resources, power consumption, and much more.
Answers
This section contains the solutions to the thought experiments and answers to the objective review questions in this chapter.
Objective 2.1: Thought experiment
You need to configure the computers to bypass digital signature requirements.
Open PC Settings, Update And Recovery, and the Recovery tab. Under Advanced Startup, click Restart Now. During the reboot:
Click Troubleshoot.
Click Advanced Options.
Click Startup Settings. Click Restart.
Press 7 on the keyboard. (The computer restarts.)
Use the command-line tool Pnputil.exe with –d and –f.
Objective 2.1: Review
Correct answers: B and D
Incorrect. A manufacturer’s extensive testing does not mean the driver is certified. It must be certified by an independent and authorized organization or publisher.
Correct. The driver has undergone testing by Microsoft and its Windows Quality Hardware lab.
Incorrect. Being a 32-bit driver does not make it a signed driver.
Correct. Signing proves that the driver has not been altered.
Correct answers: A and B
Correct. When you connect a hardware device, Windows looks first to the Driver Store on the local machine and then to Windows Update.
Correct. When you connect a hardware device, Windows looks first to the Driver Store on the local machine and then to Windows Update.
Incorrect. Windows can’t do this. Windows can only get drivers from the Driver Store and Windows Update.
Incorrect. Although you might be able to click Update Driver from Device Manager to have it located in the Driver Store, it doesn’t do this when hardware is first connected.
Correct answers: A and D
Correct. To install a device on a machine that runs a 64-bit operating system you must use a 64-bit driver. You’ll have to hope you can find one.
Incorrect. If you disable driver signing, you would be able to install an unsigned driver, but not one designed for another platform (32-bit on a 64-bit machine).
Incorrect. You can’t install a 32-bit driver on a 64-bit machine, even with Device Manager.
Correct. You can wait, and Action Center and Windows Update will get the updates once the driver is signed.
Correct answer: C
Incorrect. It’s highly unlikely that Device Manager could be used to resolve this problem, and besides, it’s pretty risky.
Incorrect. This enables you to install unsigned drivers and has nothing to do with those already installed.
Correct. It is likely that the user installed an unsigned driver. Sigverif.exe will help you determine if this is the problem.
Incorrect. If you could find the driver in Device Manager you would not find a previous driver to roll it back to.
Correct answer: D
Incorrect. You can’t use Device Manager to install wireless devices.
Incorrect. Wireless devices aren’t Plug and Play and won’t be installed automatically.
Incorrect. Device Stage offers a place to view information about an installed device, purchase supplies for it, get help, and so on.
Correct. Devices And Printers enables you to easily connect to wireless devices.
Objective 2.2: Thought experiment
Yes.
Use the Default Programs window. From there, you select Set Program Access And Computer Defaults.
You can’t choose Microsoft Windows because that would configure all Microsoft programs as the default. Selecting Non-Microsoft would disallow access to all Microsoft programs. Custom is what you’d choose to configure settings only for the default media player.
Objective 2.2: Review
Correct answer: A
Correct answer: D
Incorrect. There is no entry in the Local Security Policy console to configure this.
Incorrect. The option is not available here.
Incorrect. This command is used to install and repair applications at a command line and can’t be used to disable app updates.
Correct. This is the proper place to configure the setting.
Correct answers: A and B
Correct. You can get apps for the Start screen at the Windows Store.
Correct. You can get apps from a network through sideloading.
Incorrect. MSIExec can’t be used to install apps, only desktop applications.
Incorrect. ACT can’t be used to install apps; it is used to test compatibility.
Correct answer: D
Incorrect. This makes a program the default for all compatible file types.
Incorrect. This is used to make a file type or protocol always open in a specific program.
Incorrect. This enables you to control access to certain programs on the computer.
Correct. You can configure this setting in the AutoPlay options.
Objective 2.3: Thought experiment
Software Restriction Polices can be applied to workstations running Windows Vista (and the others listed), but you can’t automate those rules.
Use AppLocker, and yes, you can create rules automatically.
You’d use the Windows Installer Rules container. You must create a rule for Windows Installer files in that window.
Objective 2.3 Review
Correct answer: D
Incorrect. This is based on the assigned certificate, not the digital fingerprint.
Incorrect. This rule is used to specify a specific path to a file.
Incorrect. This type of rule is applied to script files like .bat, .vbs, and .cmd files.
Correct. This is the proper type of rule to create.
Correct. This is the setting that enables you to configure these settings either together or separately.
Incorrect. This is not a valid setting.
Incorrect. This configures read, write, or execute access (or a combination of these) but applies the settings to all removable disks in the computer, not just DVDs.
Incorrect. All of the above is not correct because B and C are incorrect.
Correct answer: B
Incorrect. AppLocker is used to test applications for compatibility, create reports, and fashion solutions.
Correct. Assigned Access provides this functionality.
Incorrect. Software Restriction Policies limit how users can access all software on the machine and can’t limit that access to only one app that boots when the computer starts up.
Incorrect. This is a type of AppLocker rule and won’t limit the device to only one app for one user.
Correct answer: C
Incorrect. Before you can do this, you must first log off and log back on as an Administrator.
Incorrect. The proper key combination is to press the Windows key five times. In many instances, F12 at boot will offer boot options. However, boot options won’t help you here.
Correct. This is the proper way to resolve this issue.
Incorrect. This is not how to resolve this issue.
Objective 2.4: Thought experiment
Compatibility View mode
You would not opt to go from desktop to desktop and configure each machine separately; you also would not want to configure Local Group Policies on each. Instead, you should use Group Policy.
You’d configure this in the Group Policy Management Editor here: Computer Configuration, Administrative Templates, Windows Components, Internet Explorer, Compatibility View. The name is Turn On Compatibility View For All Intranet Zones.
Objective 2.4: Review
Correct answer: A
Correct. Administrative Templates, Windows Components, Internet Explorer, Compatibility View is the proper path.
Incorrect. Administrative Templates, Windows Components, Internet Explorer, Compatibility View is the proper path.
Incorrect. Administrative Templates, Windows Components, Internet Explorer, Compatibility View is the proper path.
Incorrect. Administrative Templates, Windows Components, Internet Explorer, Compatibility View is the proper path.
Correct answer: B
Incorrect. The General tab offers a place to configure home pages and how IE 11 starts, includes the ability to delete your browsing history, and more.
Correct. You configure security levels on the Security tab.
Incorrect. The Content tab offers a place to set up Family Safety, manage certificates, and configure AutoComplete settings, among other things.
Incorrect. The Programs tab lets you configure add-ons, set programs, set file associations, and more.
Incorrect. The Advanced tab lets you configure advanced settings but does not offer a place to configure security for a specific zone.
Correct answers: A and D
Correct. This is a valid option for deleting your browsing history.
Incorrect. This is not a valid option for deleting your browsing history. The Content tab offers options regarding Family Safety, Certificates, AutoComplete, and Feeds and Web Slices.
Incorrect. This is not a valid option for deleting your browsing history. The Tools button offers many options, but not one for deleting your browsing history. Tools include but are not limited to managing add-ons, configuring the pop-up blocker, and showing specific Explorer bars.
Correct. This is a valid option for deleting your browsing history.
Correct answer: C
Incorrect. This is a valid feature, but it was an option in Group Policy in previous operating system editions.
Incorrect. This is a valid feature, but it was an option in Group Policy in previous operating system editions.
Correct. Flip ahead is a new feature in Windows 8 and is thus a new entry in Group Policy.
Incorrect. This is a valid feature, but it was an option in Group Policy in previous operating system editions.
Correct answer: B
Incorrect. Add-ons are things like toolbars, extensions, and search providers; they are not downloaded files.
Correct. This is the proper way to locate the downloaded file.
Incorrect. No downloaded file will be automatically deleted if you don’t use it.
Incorrect. The Set Programs option is used to select default programs for various file types and protocols.
Objective 2.5: Thought experiment
Generation 2, because it supports the listed requirements and Generation 1 doesn’t.
Yes. All installations of an operating system, even those installed on virtual drives, require a product ID.
Private. You want the VM to be able to communicate with other VMs on the host computer but not with any host computer directly. The other options, External and Internal, do not meet these criteria.
VHDX. Although you won’t likely need the feature that enables the disk to be up to 64 TB, you do use this format when you know you’ll be using the VHD on Windows Server 2012 and Windows 8 only.
Restore The Virtual Machine (Use The Existing Unique ID For The VM). If your VM files are stored on a file share, a removable drive, a network drive, and so on, and you want to move it, choose this option.
Objective 2.5: Review
Correct answer: A
Correct. If everything else is available except for Hyper-V Platform, the processor is not compatible.
Incorrect. If the computer were running Windows 8.1, no Hyper-V options would appear.
Incorrect. If the computer were running a 32-bit operating system, no Hyper-V options would be available.
Incorrect. You can enable Hyper-V this way, but if the Hyper-V Platform can’t be enabled from Control Panel it can’t be enabled this way either.
Correct answer: D
Incorrect. The Hyper-V Hosts pane lists the virtual machines available on the hosts.
Incorrect. The Checkpoints pane shows a list of saved checkpoints for the selected VM.
Incorrect. The Details pane shows information about the selected VM.
Correct. The Actions pane offers a list of tasks you can perform.
Correct answer: B
Incorrect. Generation 1 does support earlier operating systems, but uninstalling Integration Services is not required.
Correct. Generation 1 supports the desired operating systems.
Incorrect. Generation 2 does not support older operating systems.
Incorrect. Generation 2 with Integration Services does not support older operating systems.
Correct answer: C
Incorrect. Internal is a valid option for a virtual switch.
Incorrect. External is a valid option for a virtual switch.
Correct. Public is not a valid option for a virtual switch.
Incorrect. Private is a valid option for a virtual switch.
Correct answers: A, B, and C
Correct. Protection against data corruption when there is a power failure (because updates are logged effectively) is a valid feature.
Correct. Improved performance on large sector disks is a valid feature.
Correct. Larger block sizes for dynamic and differencing disks to enhance performance is a valid feature.
Incorrect. You can create differencing disks with both file types.