Chapter 1. Install and upgrade to Windows 8.1
Deploying a new operating system, whether it is to a single computer for a home user, a dozen computers for a small business, or 10,000 computers for a large enterprise (complete with myriad laptops, tablets, and other mobile devices), requires, in a nutshell, careful planning, researching, and testing.
First, you must decide which edition of Windows 8.1 will meet your clients’ needs. That requires some research and a knowledge of what each edition offers. Next, you’ll need to determine if there are existing hardware and software compatibility issues and decide what to do when compatibility poses a problem. You’ll also have to choose a clean installation or an upgrade given the scenario, and you’ll have to know what limitations exist for these options with regard to the currently installed operating system. Beyond that, you’ll need a plan to migrate users’ data, accounts, user profiles, Windows settings, and even applications before installing the new operating system.
Important: Have you read page xvi?
It contains valuable information regarding the skills you need to pass the exam.
Once you’ve done all of this, you might also have to determine how you’ll do it. You might perform the installation using an installation disk or installation files you’ve downloaded. There are other ways to deploy an operating system, though, especially if you have a lot of machines to update, which can include using the available large-scale assessment and deployment tools from Microsoft including the Application Compatibility Toolkit (ACT), the Windows Assessment and Deployment Toolkit (ADK), and the Microsoft Deployment Toolkit (MDT) 2013, among others. It all starts with evaluating existing hardware and software and assessing compatibility, though, so that’s where we’ll start.
Objectives in this chapter:
Objective 1.1: Evaluate hardware readiness and compatibility
Windows 8.1 is available in four editions. One, Windows RT, only runs on the ARM platform, but the other three can be installed on traditional 32-bit or 64-bit computing platforms. Beyond that, there are minimum requirements for installing each edition. There are various upgrade paths to consider, too, should you decide to go that route.
Choose the ideal Windows 8.1 edition
There are four Windows 8.1 editions, and each offers specific features. You can narrow your options for selecting an operating system by learning the basics about each:
Windows RT. This edition comes preinstalled on tablets and similar devices that run on ARM processors. You can’t buy it as a stand-alone product. It won’t run on anything other than ARM processors, so there is no need to consider it if you are looking for an operating system to install on a typical laptop or desktop PC. In addition, it can run apps from the Windows Store, but it cannot be used to install or run the traditional Windows x86/x64 applications you’d normally obtain from the Internet, network shares, CDs, or DVDs. Windows RT devices come with a special version of Microsoft Office for completing tasks that require it, but they do not come with Windows Media Player and have other limitations.
Windows 8.1. This edition is the popular retail edition of Windows. It is most often used by home users but might also work for some home office users. This edition comes preinstalled on the majority of PCs available from big-box stores, and you’ll see it on most of the devices your end users bring to work (from home). You can buy this edition and install it on x86/x64 platforms. The main limitation of this edition in an enterprise is that it can’t join a domain. Thus, if your client needs to join a domain, this isn’t the edition you’ll select. (It’s easy to upgrade to Windows 8.1 Professional, though, should that be necessary.)
Windows 8.1 Professional (Windows 8.1 Pro). This edition is used mostly by small to medium-sized businesses (with or without a domain) and by larger enterprises. It offers features not available in Windows 8.1 or Windows RT such as BitLocker (computers running Windows RT, Windows RT 8.1, or Windows 8.1 can be protected using Device Encryption, which is a customized version of BitLocker) and BitLocker to Go, the ability to host a Remote Desktop Connection, Client Hyper-V, and Virtual Hard Disk (VHD) Boot. If your client needs any of these features and you don’t have (and don’t want) a volume licensing agreement to purchase Windows 8.1 Enterprise, this is the edition you’ll choose.
More Info: BitLocker
To learn more about BitLocker, refer to this TechNet article: http://technet.microsoft.com/en-us/library/hh831507.aspx#BKMK_Overview. There is quite a bit of information here you might see on the exam, such as the following: BitLocker does not support dynamic disks; the boot order must be set to start first from the hard disk, and not the USB or CD drives; and BitLocker supports multifactor authentication for operating system drives.
Windows 8.1 Enterprise. This edition is only available through the Microsoft volume licensing program. Customers can purchase an Enterprise Agreement (EA), Select Agreement, or Open License. Customers have the ability to purchase Software Assurance (SA) with each license for Windows 8. Not all customers buy SA on Windows and therefore sometimes pay after each product release. If you are enrolled, you’ll get all of the features in Windows 8.1 Professional and these features that are exclusive to Windows 8.1 Enterprise: Start screen control, Windows To Go Creator, AppLocker, BranchCache, DirectAccess, and Virtual Desktop Infrastructure (VDI) Enhancements.
Each Windows 8.1 edition has minimum and maximum system settings for CPU sockets and RAM, among other things. The hardware you use to install Windows 8.1 must meet these requirements.
Table 1-1 details minimum system requirements for Windows 8.1.
32-bit (x86) | 64-bit (x64) | |
Processor speed | 1 gigahertz (GHz) or faster | 1 GHz or faster |
System memory (RAM) | 1 GB | 2 GB |
Available hard disk space | 16 GB | 20 GB |
Graphics adapter | DirectX 9 graphics adapter with WDDM driver | DirectX 9 graphics adapter with WDDM driver |
Secure Boot | Unified Extensible Firmware Interface (UEFI)–based BIOS | UEFI-based BIOS |
Exam Tip
You might be asked why certain features won’t work on a specific machine, and you’ll be given the machine’s specifications. One notable problem is that you can’t snap two apps on the screen unless the screen resolution is at least 1024 x 768. It’ll need to be 1600 x 1200 to snap three. It will have to be higher than this to snap four.
It’s important to note, when talking about 32-bit and 64-bit operating systems, that you can’t perform an in-place upgrade of a compatible and upgradable 32-bit operating system to a 64-bit operating system (in-place means you can opt to keep the user’s personal files, applications, and Windows settings, or some combination of those). You’ll have to perform a clean installation in these instances, and your hardware will have to support the 64-bit edition.
There are lots of other features to compare among these four Windows 8.1 editions. The best way to see every option is to visit http://www.microsoft.com and search for Compare Windows 8.1 Editions and then choose Windows 8.1 Enterprise | Compare Editions in the results. However, Table 1-2 shows the most notable differences among them, which will certainly be enough information to rule out editions that won’t work for a client. (Don’t worry if you aren’t familiar with all of the features in the list; you’ll learn about most, if not all of them, throughout this book.)
Exam Tip
The questions on the exam won’t ask you to recite what features are included with which editions of Windows 8.1. Instead you’ll be asked to choose an edition based on a specific scenario. Cost might be a factor; the limitations of an installed CPU or RAM might be a factor, too. Incompatible proprietary software (perhaps 32-bit) or software applications that can’t be updated might rule out a 64-bit edition (or even the upgrade itself). Make sure that you know what edition you’d need to select if, say, a question on the exam states that a client needs to join a domain, install and run desktop apps, or use Client Hyper-V.
Table 1-2 details the most notable differences among the four Windows 8.1 editions.
Windows RT 8.1 | Windows 8.1 | Windows 8.1 Professional | Windows 8.1 Enterprise | |
Install and run desktop apps | No | Yes | Yes | Yes |
Microsoft Office Home and Student 2013 RT included | Yes | No | No | No |
Windows Media Player | No | Yes | Yes | Yes |
Storage Spaces | No | Yes | Yes | Yes |
VHD Boot | No | No | Yes | Yes |
Assigned Access | Yes | No | Yes | Yes |
Client Hyper-V | No | No | Yes | Yes |
Domain Join | No | No | Yes | Yes |
Group Policy | No | No | Yes | Yes |
Side-loading LOB apps | Sold separately | No | Sold separately | Yes |
Smart Screen control | No | No | Yes | Yes |
Windows To Go Creator | No | No | No | Yes |
AppLocker | No | No | No | Yes |
BitLocker and BitLocker To Go | No | No | Yes | Yes |
BranchCache | No | No | No | Yes |
DirectAccess | No | No | No | Yes |
Remote Desktop Host | No | No | Yes | Yes |
VDI Enhancements | No | No | No | Yes |
There are a few other requirements not listed thus far; you’ll need an Internet connection to access the Windows Store and to get online, and you’ll need a compatible touch device to use touch features. Users will also need a Microsoft Account to use certain apps and the Windows Store.
Note: Study for the exam with the ideal operating system
Throughout this book I assume you are running Windows 8.1 Professional or Enterprise edition.
Finally, all editions offer automatic app updates from the Windows Store, Internet Explorer 11, 3-D printing support, Biometric Enrollment, InstantGo, MiraCast Wireless Display Support, Mobile Hotspot and Wi-Fi Tethering, Wi-Fi Direct Wireless Printing Support, Device Enrollment, Exchange ActiveSync, Open MDM Support, Work Folders, Workplace Join, Device Encryption, Family Safety, Multifactor Authentication for Bring Your Own Device (BYOD) support, Remote Business Data Removal, Trusted Boot, Windows SmartScreen, Built-In Virtual Private Network (VPN) Clients, Remote Desktop Client, and others. Make sure you are familiar with the entire list of features before sitting for the exam.
Perform readiness tests
After you have decided which edition of Windows 8.1 you want to install on a particular workstation or in a specific scenario, you’ll need to verify the computer meets the minimum requirements to support it. One way is to manually compare the requirements to the hardware that is installed on the workstation(s) in question.
Real World: The minimum requirements aren’t enough
If you install Windows 8.1 on a computer that meets or barely exceeds the minimum requirements for RAM shown in Table 1-1, you can expect that the user will encounter problems while using the computer. In my experience, the computer can run so slowly that the user will become agitated and frustrated. If the computer freezes at the wrong moment, the user may well unplug the machine to restart it (or worse).
If you install Windows 8.1 on a computer with 16 GB, 20 GB, or even 40 GB of free hard disk space, in cases involving home and small business users who are not part of a domain, you’re setting up yourself and your end user for trouble. Although you can perform an installation, you can expect that ordinary users will run out of disk space quickly (if that’s where they save their data).
If you install Windows 8.1 on a computer that will be used primarily for gaming, you will need to have more than a DirectX 9 graphics adapter. Many new games require DirectX 10. You’ll also need much more RAM and a much faster CPU for games to play properly and without any lag.
Beyond frustration, a full hard drive, and problems playing certain games, there are other instances when minimum requirements just won’t do. Client Hyper-V requires a 64-bit system with Second Level Address Translation (SLAT) capabilities and additional 2 GB of RAM in Windows 8.1 Professional or Enterprise, for example. This isn’t mentioned in the basic list of minimum requirements.
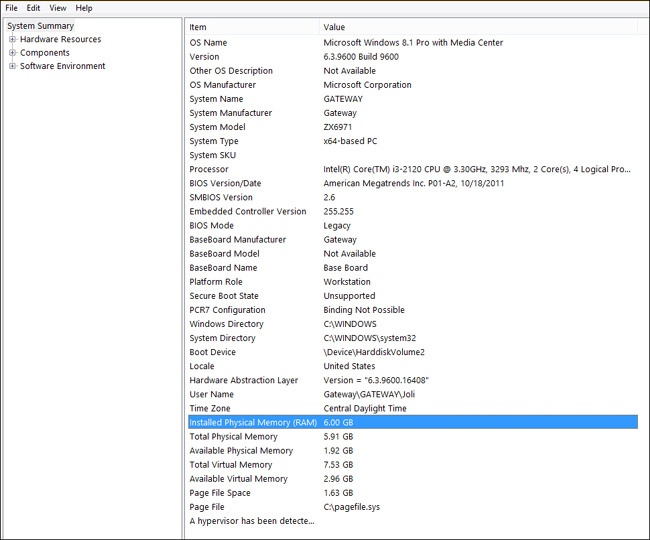
There are several ways to check a computer for hardware readiness; if you only have a handful of computers to evaluate, you can you do so using the System Information tool. You can manually compare what is listed there to the list of minimum requirements for the edition of Windows you want to install. This will become tedious quickly though, especially if you have more than a half-dozen or so workstations to assess. You can access the System Information window (see Figure 1-1) by typing msinfo32.exe on the Start screen.
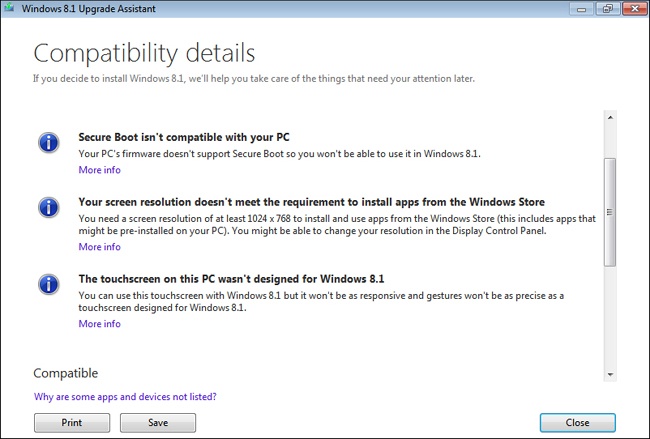
If you’d rather automate the task of assessing a computer, you can use the Windows Upgrade Assistant, which is much more user-friendly than manual evaluations. Again, though, this is a per-computer evaluation. You can access the Windows 8.1 Upgrade Assistant from http://windows.microsoft.com/en-US/windows-8/upgrade-to-windows-8. Click the link to Windows 8.1 Upgrade Assistant. That webpage is shown in Figure 1-2.
You should, in any circumstance, run the Windows 8.1 Upgrade Assistant at least on a user’s single computer, on all computers if possible in a small business (because their configurations and software will likely vary from one computer to another), and on machines that are representative of what you want to upgrade in an enterprise. This can help you uncover problems you might not have thought of (or will need to test for later). For instance, the screen resolution of a small netbook might not be supported by Windows 8.1. This type of conflict will certainly cause problems. You might also discover that software you currently use will have to be updated to work with Windows 8.1 or that you need new device drivers for legacy printers and other hardware. Figure 1-3 shows a sample compatibility report.
Note: Use enterprise tools to evaluate readiness in a domain
If you are assessing an enterprise group of computers that are part of a domain (hundreds or even thousands, perhaps), you’ll want to use a program or application that is capable of comparing what is currently in inventory to what is required of the new operating system you’ve selected. Neither of the options offered thus far (manual comparison or Windows Upgrade Assistant) would work in an enterprise with a large number of computers. Additionally, you’ll likely incorporate programs such as the Application Compatibility Toolkit (ACT) to help you determine the readiness of your software.
After you’ve determined what edition of Windows 8.1 to install and assessed the available hardware, you might have to perform some hardware upgrades. You might even have to replace older computers with new ones. Often though, you can repurpose the older computers and buy new ones for only those clients that require them to help minimize costs.
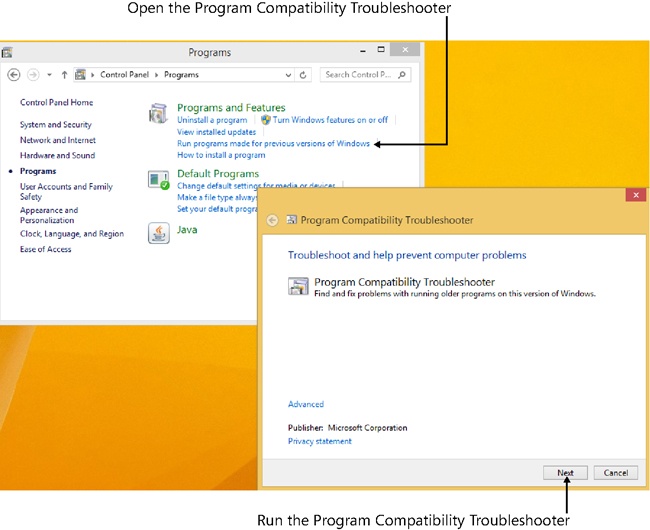
With the hardware evaluation complete, you’ll need to take a few more steps. One of the most important is to verify that the software the client uses and depends on works properly with Windows 8.1. You’ll have to set up a test machine (or multiple test machines) to determine this, and if the software doesn’t work you can try it in Program Compatibility mode (see Figure 1-4). You open the Program Compatibility Troubleshooter from Control Panel and work through it to define the problem and try solutions. For the most part, the solution comes down to running the problematic application in the mode in which it was designed to run (perhaps Windows Vista or Windows XP). If problems persist or can’t be resolved, you’ll have to reassess the upgrade or try other options such as hosting the application on a network server or in the cloud. (A better option is to replace the outdated software with something that is compatible for the long term, but this isn’t generally something that’s easy to do.)
If Program Compatibility mode doesn’t resolve compatibility problems, you still have options. You can use Microsoft Application Virtualization software (MS App-V), which allows applications to be streamed to any client from a virtual application server. It removes the need for traditional local installation of the applications, which resolves problems associated with incompatibility. On single workstations, Client Hyper-V might be more suitable. However, Client Hyper-V only runs on 64-bit PCs that are running the 64-bit version of Windows 8 Professional or Enterprise.
In the end, you might determine that you can’t afford the upgrade, that proprietary company software has to be updated to something compatible before you can, that you’ll need to stream the application or run it on a virtual machine, or that an upgrade is warranted and will be successful. If you decide that an upgrade is warranted, you’ll have to choose to install the operating system as an upgrade or to install the operating system clean.
Note: There’s more to upgrading than installing the operating system
If you are updating all of the computers in a company from, say, Microsoft Windows XP to Windows 8.1, you’ll have more to worry about than the cost of upgrading the hardware, finding compatible drivers for legacy peripherals, and upgrading software. You have to also consider the cost required to retrain users, make hardware and software purchases, and create a substantial help desk infrastructure, at least for a while, to get help to users immediately when they need it.
Choose an installation option (clean or upgrade)
The question of whether to install an operating system clean or to upgrade what’s already there, for a home or small business user at least, often comes down to how much data there is to move. It could also depend on whether the user has the product ID codes required to reinstall applications if a clean installation is performed, whether the computer is functioning normally and efficiently, and whether it is also free of malware and viruses. What operating system is being upgraded also matters; you can perform an in-place upgrade on a Windows 7 or Windows 8 computer, which retains the user’s personal data, applications, and configuration settings, which a home user often desires.
Exam Tip
In many, if not most instances, opting to perform a clean installation is a better solution to upgrading. If you see a test question that asks about this, carefully assess the information given. You might be better served by migrating the data off the machine, performing a clean installation, and then transferring the data back.
Often, upgrading a healthy Windows 7 computer is preferable for end users who aren’t computer savvy because (except for the changes in the operating system itself) their settings, applications, printer configurations, network settings, desktop backgrounds, screensavers, and so forth come out of the installation unscathed. Users aren’t bombarded with change when an in-place upgrade is performed, and you don’t have to reinstall their applications, network, and so forth.
Note: Understand supported upgrade paths from Windows 7
Within Windows 7 editions, there are limitations as to which Windows 8.1 edition you can upgrade to. You can upgrade Windows 7 Starter, Windows 7 Home Basic, and Windows 7 Home Premium to Windows 8.1 or Windows 8.1 Professional. You can upgrade Windows 7 Professional and Windows 7 Ultimate to Windows 8.1 Professional. You can update Windows 7 Professional and Windows 7 Enterprise to Windows 8.1 Enterprise, too, provided there is a volume licensing agreement in place.
Upgrading isn’t always an option for home users (or for that matter, any user). If a computer must be replaced because it is old or incompatible, or if the computer is plagued with impossible-to-remove malware, web browser toolbars, and unwanted search engines, the in-place upgrade can’t be performed. In general, it’s best to do a clean install. True in-place upgrades can’t be performed on computers that run any compatible operating system before Windows 7 either. Table 1-3 outlines what is and isn’t transferred when any kind of upgrade is performed.
Upgrading from | What you can keep |
Windows 8 | Windows Store apps, desktop applications, personal files, Windows settings |
Windows 7 | Applications, personal files, Windows settings |
Windows Vista SP 1 | Personal files, Windows settings |
Windows XP SP3 | Personal files |
Note: Understand upgrade paths from Windows 8
Within Windows 8 editions, there are limitations as to which Windows 8.1 edition you can perform an in-place upgrade to. You can upgrade Windows 8 to Windows 8.1. You can upgrade Windows 8, Windows 8 Professional, and Windows 8 Professional with Media Center to Windows 8.1 Professional. You can upgrade from Windows 8 Professional, Windows 8 Professional with Media Center, Windows 8 Enterprise, and Windows 8.1 Professional to Windows 8.1 Enterprise provided there is a volume license in place.
In larger enterprises, the decision to upgrade or perform a clean installation depends on the factors listed thus far (and perhaps others, such as how much time and money it will cost to retrain thousands of employees, install updated hardware, update proprietary software, and so on), but more often than not a clean installation will be performed on computers in an enterprise. The reasons are many, but knowing exactly what is on each machine lets the enterprise reduce costs associated with training, support, and upgrades, which is always a major coup for network administrators. Also, network administrators can test Windows updates, app updates, and other software before it’s installed, knowing that it is an appropriate test for all of the affected computers. A clean install also strips the computer of lingering problems or hidden malware.
In addition, in enterprises, most users store their data on network servers, and those same servers maintain user profiles including but not limited to configuration settings and logon credentials, which makes migrating data pretty straightforward (and safe). Data is stored on servers, too, so you don’t have to worry too much about accidental data loss. Additionally, larger domains likely have the tools already in place to migrate user data, profiles, settings, and so on, and making use of those tools is a plus. Whatever the reason, when all of the computers are virtually identical, they are much easier to manage. There are lots of enterprise-compatible options to help you assess upgrade strategies, many of which are introduced later in this chapter.
Objective summary
There are four Windows 8.1 editions: Windows RT, Windows 8.1, Windows 8.1 Professional, and Windows 8.1 Enterprise.
Each Windows 8.1 edition offers its own set of features. You choose the edition to install based on the features you need.
There are upgrade paths from Windows XP, Windows Vista, Windows 7, and Windows 8, but you can only perform an in-place upgrade from Windows 7 and Windows 8 (to keep applications, personal files, and Windows settings intact). A clean installation is best in most instances, if feasible.
In most instances, you can use Program Compatibility mode to force older, noncompatible programs to function in Windows 8.1. You can also opt for App-V or Client Hyper-V if necessary.
Objective review
Answer the following questions to test your knowledge of the information in this objective. You can find the answers to these questions and explanations of why each answer choice is correct or incorrect in the “Answers” section at the end of this chapter.
Objective 1.2: Install Windows 8.1
There are lots of ways to install Windows 8.1 and lots of scenarios to consider. There are upgrades, including in-place upgrades from Windows 7 and Windows 8 and limited upgrades from earlier operating systems. Depending on the currently installed operating system, you will be able to keep some combination of user accounts, user profiles, personal files and folders, Windows settings, and applications, which you learned about in the previous section.
There is also the clean installation, in which you format the hard drive before you install the operating system. If you need a clean installation on a computer that contains user data you need to keep, you have to back up the data before you begin. You can opt to migrate user data off the machine, perform a clean installation, and transfer the data back. In a similar scenario, you can migrate data off an old computer and onto a new one. (Migration options are detailed in Objective 1.3: Migrate and configure user data.) These are traditional installations and migration options, but now there are more installation options to consider, including installing Windows 8.1 as Windows To Go and to VHD.
On an enterprise level, installations are automated and customized. It would be extremely time-consuming to go from machine to machine to perform the upgrades manually. Although you won’t learn how to perform an automated installation or create a custom Windows 8.1 image here (that topic could fill more than a couple of chapters), you will gain a high-level understanding of it. You’ll likely be tested on general knowledge related to automated installations.
Perform manual installations and upgrades
Most installations that you perform manually go smoothly, whether they are clean installs or upgrades. A wizard walks you through the tasks necessary and lets you configure your own disks and partitions if you choose; the computer reboots when it needs to without interaction from you; and once the process is complete you are prompted to work through various setup tasks to personalize the computer with settings, account information, available networks, and even the color of the Start screen, among other things. No matter which option you choose (clean or upgrade), though, you should always back up the users’ data before you start.
More Info: Windows Easy Transfer
Windows Easy Transfer (WET), outlined in Objective 1.3: Migrate and configure user data in this chapter, is a tool that you can use to migrate user profile information, data, and settings off the computer before you reinstall it. You use WET again to put the data back on. You can also use WET to transfer data from an old computer to a new one. It’s a popular tool for home users and small businesses because it is graphical and wizard-led. Consider using WET before you perform a clean installation. Similarly, the User State Migration Tool (USMT) is also discussed in Objective 1.3: Migrate and configure user data. This command-line migration tool is used by larger organizations.
Perform a clean installation
A clean installation is the simplest way to install Windows 8.1 on a new computer or a computer or disk partition off of which you are willing to wipe all data (format). After you’ve backed up the users’ data (if applicable), there are two ways to get started: You can supply a boot disk if the computer has no operating system on it, or you can boot the computer from the Windows 8.1 installation files if it does. During the installation you might opt to choose a custom installation option, in which you will choose on which partition to install Windows if multiple options exist or create and delete partitions as applicable.
Note: One partition and a multiboot system
You can create a multiboot system on a computer that contains only one partition by using Disk Management to first shrink the partition and then create a new simple volume on it. Then, during the normal installation of Windows 8.1, choose this partition using the Custom Installation option.
These are the steps for installing the operating system clean on a computer that already has one installed (and you’ll see some of the related screens throughout this chapter). This is the simplest installation scenario (except for upgrading a Windows 8 computer to Windows 8.1).
Turn on the computer and insert the Windows 8.1 installation media into the DVD drive or USB port.
If prompted, opt to boot from the DVD or USB drive (or other applicable media). You’ll have to restart the computer and press a specific key such as F12 or F2 to see this prompt if the computer doesn’t offer it on its own. The key you’ll choose is assigned by the manufacturer.
Choose your language, time zone, and keyboard or input method and click Next.
Click Install Now.
Select the I Accept The License Terms check box and click Next.
Choose Custom: Install Windows Only (Advanced).
From the list provided, select the partition on which to install Windows. Click Drive Options (Advanced) to add or delete existing partitions if desired and necessary.
Wait while the installation completes.
Work through the setup process to do the following:
Agree to the license terms.
Configure default settings.
Sign in to your account.
Choose a method to verify your account.
Opt to use SkyDrive (or not). Note that the name SkyDrive is changing to OneDrive and at some point the exam will also make the terminology change.
Note: Custom installations offer more options
When you choose to install Windows with a custom installation, you’re presented with the “Where do you want to install Windows?” options. From there, you can either select an available partition or click Drive Options (Advanced) to delete, format, and create new partitions.
Upgrade from Windows 7
To upgrade a computer running Windows 7 to a compatible, upgradable edition of Windows 8.1, perform the following steps (the steps you take might be slightly different from these depending on the edition you’re installing). These are the steps for upgrading Windows 7 Ultimate to Windows 8.1 Enterprise.
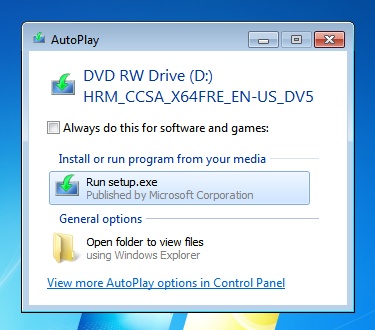
Insert the Windows 8.1 installation disk into the DVD drive.
Click Run Setup.exe (Figure 1-5).
Select the Go Online And Install Updates (Recommended) button and click Next.
Select the I Accept The License Terms check box and click Accept.
Verify that the items to keep are correct and click Next.
Click Install.
After the installation completes, work through the setup process.
The setup process for Windows 8.1 requires you work through the same setup steps. You’ll need to do the following:
Agree to the license terms.
Configure default settings.
Sign in to your account.
Choose a method to verify your account.
Opt to use SkyDrive (or not).
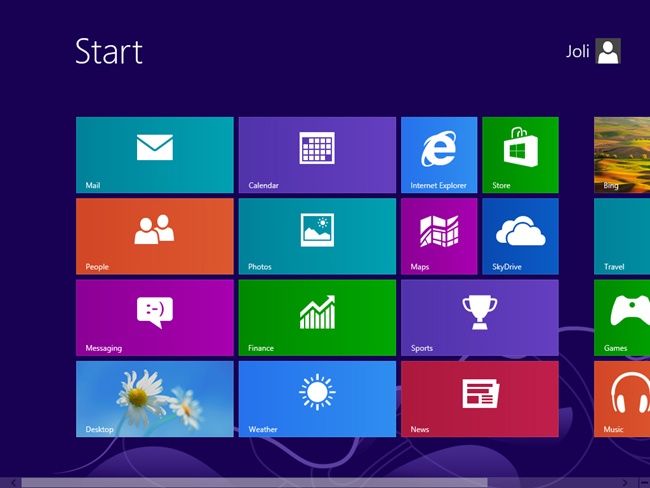
When the installation and setup is complete, you’ll see the Windows 8.1 Start screen, shown in Figure 1-6.
Upgrade from Windows 8
To upgrade Windows 8 to Windows 8.1, you’ll use the Windows Store, provided the user has a retail or OEM-activated version of Windows 8. If the computer was activated using Volume Licensing, the user won’t be offered the update there.
Note: Upgrade options for Windows 8 to Windows 8.1
Windows 8.1 upgrades are available in the Windows Store or on media. Note that when you upgrade to Windows 8.1 from the Windows Store, you cannot change editions. Upgrading to a different edition of Windows 8.1 is supported from media only. However, you can upgrade Windows 8.1 to Windows 8.1 Professional, as outlined later in this chapter.
To install Windows 8.1 from the Windows Store, follow these steps:
On the Start screen, click Store.
Click the option to update Windows 8.1.
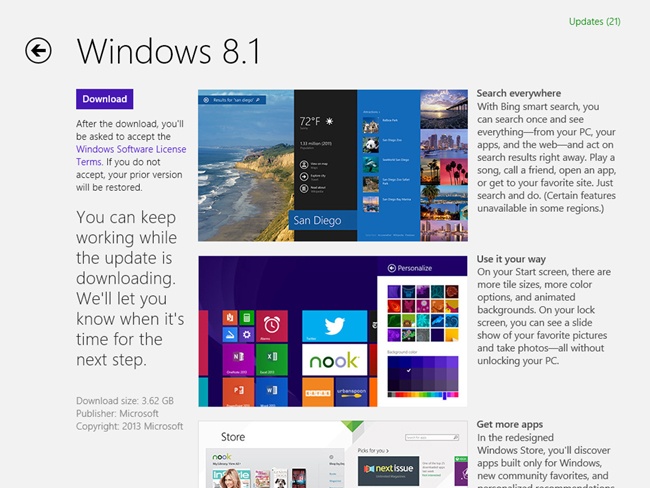
Click Download (see Figure 1-7).
Click Restart Now when prompted.
Follow the prompts to complete setup.
Exam Tip
Sometimes you’ll be asked to identify the path to a specific setting in Group Policy. Group Policy enables network administrators to assign specific permission to groups of users to secure resources, among other things. (You’ll learn about Group Policy in various chapters in this book.) Here’s one you might see: If you want to prevent users from seeing the option to update to Windows 8.1 from the Windows Store under any circumstances, you can set the Group Policy Turn Off The Offer To Upgrade To The Latest Version Of Windows located under ComputerAdministrative TemplatesWindows ComponentsStore. Make sure you’re familiar with Group Policy and the most used settings before attempting the exam. For more information about this and other frequently asked questions regarding Windows 8.1, refer to the article at http://technet.microsoft.com/en-us/windows/jj721676.aspx.
Migrate from previous versions of Windows
You learned earlier that it is possible to upgrade Windows XP and Windows Vista machines to Windows 8.1. The steps for performing the installation are the same as outlined already in this objective. However, you also learned that not everything gets transferred during the upgrade. If you upgrade Windows XP to Windows 8.1, only the users’ personal files are carried over. Applications must be reinstalled and Windows settings re-created. If you upgrade Windows Vista to Windows 8.1, only the users’ personal files and Windows settings are maintained, and applications must be reinstalled.
Therefore, before you upgrade any machine that has Windows XP or Windows Vista installed, you should carefully and methodically back up the data on it. I say carefully and methodically because if a computer is that old, there could be user data everywhere, including the root drive, the Program Files folder, and other places that a common backup won’t normally include. With that done, you can perform the installation upgrade.
However, upgrades aren’t generally the better option. Clean installations provide more reliable results. Thus, if there’s any way to perform a clean installation instead of an upgrade, you should opt for it. There are several migration options from which to choose when this is the case.
Use the Windows Easy Transfer Wizard on stand-alone workstations
Because it is difficult if not impossible to back up all of the users’ settings and profile information before performing a clean installation, it’s best to use a migration tool. Migration tools enable you to back up files, folders, Windows settings, profile settings, and more, and then that backup can be applied to repopulate the machine after you’ve installed Windows 8.1 on it. Knowing that migration options exist also makes it more likely that you and your clients will opt to perform a clean installation, too, which is always a better option when dealing with a machine that is older.
To learn about migration options, refer to Objective 1.3: Migrate and configure user data in this chapter. For home users and businesses with a manageable number of computers to upgrade, consider the Windows Easy Transfer Wizard. For larger organizations, consider the User State Migration Tool.
Automate installations in enterprises
You can also automate installations. This is how enterprises install upgrades for hundreds or thousands of workstations. To automate an installation, you’ll need to have a Windows 8.1 Volume Licensing Agreement with Microsoft. Then, to start, you’ll need to create an installation image and choose a way to deploy that image. You might have multiple images, perhaps one image for all of the computers used by the Sales department, another for computers in the Inventory department, and so on. You need the Microsoft Deployment Toolkit (MDT), Windows Assessment and Deployment Kit (ADK), a file server to hold the installation files (as a share), and media that can be used to start the computers during deployment or a server configured with the Windows Deployment Services (WDS) role (and network cards on the PCs to upgrade that can boot to the installation image). If you have all of this in place, Microsoft recommends a Lite-Touch, High-Volume Deployment strategy if your enterprise has between 200 and 500 computers and recommends a Zero-Touch, High-Volume Deployment strategy if your enterprise has 500 or more machines.
Regarding images, an image is a custom installation file that can contain device drivers, applications, specific settings for the desktop background, and so on. There are thin images and thick images. A thin image has little or no customization, and most of the device drivers, applications, and updates are installed using another method on each client computer. A thick image includes applications, device drivers, and updates, among other things, and requires much more planning, network bandwidth, and other resources than a thin image. Microsoft recommends using thin images in most instances, because they can reduce installation time, maintenance time, storage requirements, and costs, among other things. MDT makes using thin images with the Lite-Touch, High-Volume Deployment strategy pretty straightforward for experienced network administrators. For more information visit http://technet.microsoft.com/en-us/windows/dn282138.
Exam Tip
In previous editions of this exam and the related exam for Windows 7, automated installations were a big part of Objective 1. The objectives have changed quite a bit though, and we don’t think that they’ll be covered as heavily as before (if at all). However, you should understand the big picture with regard to automated installations, just in case.
Install additional Windows features
After installation is complete, you might need or want to install additional Windows features. There are two areas where you can do this. You can install Windows features from Control Panel (which is technically turning them on, not installing them), and you can install additional features by purchasing those features from Microsoft. You can also configure Windows 8.1 for additional languages.
Install additional features
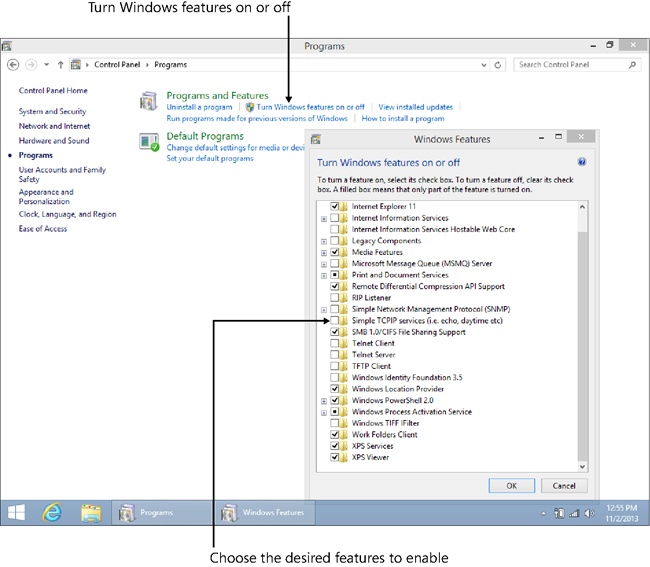
One place to enable additional features is Control Panel. If you’re new to Windows 8.1, you can right-click the Start button in the lower-left corner of the screen to get to it quickly. Once in Control Panel, in Category view, click Programs, and then select Turn Windows features on or off, as shown in Figure 1-8.
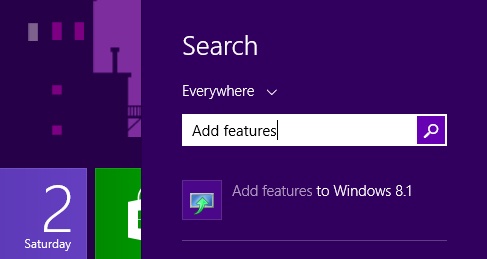
You can also add new features to Windows 8.1 that are not included with it. If you have Windows 8.1 installed, you can add the Windows 8.1 Pro Pack, which gives you access to all of the features in Windows 8.1 Pro and Media Center. If you have Windows 8.1 Pro already, you can just add Media Center. To get started, type add features on the Start screen and in the results click Add features To Windows 8.1 (see Figure 1-9). You can also navigate to http://windows.microsoft.com/en-US/windows-8/feature-packs using Internet Explorer.
After you click Yes to bypass the User Account Control box, you’ll have the option to either buy a key online or type a product key you already own. Whichever you select, follow the prompts to purchase and install the new features. Once installation completes (the computer will restart during the installation), you’ll see the new features.
Configure Windows for additional languages
Windows 8.1 includes support for additional languages. By adding a language, you can change the language you use to read and write in Windows, apps, and the web. Adding a language involves five steps, each outlined in its own section here.
Add a language
To add a language (using the Windows 8.1 charms with which you should become familiar), follow these steps:
Position your cursor at the bottom or top right of the screen, click Settings, and then click Change PC Settings.
Click Time And Language, click Region And Language, and then click Add A Language.
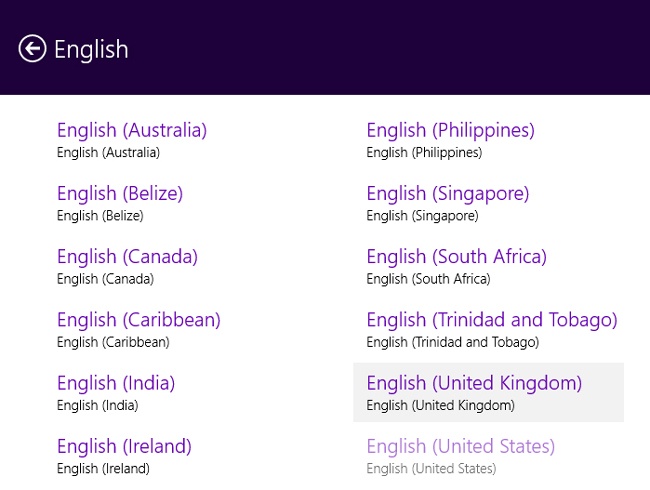
Click the desired language from the list. If another list appears, click the desired option (see Figure 1-10).
Download and install language packs
To see your preferred language used in Windows and apps, you might need to download the appropriate language pack. To download a language pack, follow these steps:
Continuing from the previous set of steps, click the language you want to use in the right pane.
Some languages such as English (United Kingdom) have Language Pack Available underneath them. If that is the case, click Options.
Click Download. (This might take some time.)
Change your Windows display language
To change your display language, follow these steps:
Continuing from the previous set of steps, return to the Time And Language, Region And Language section of PC Settings if applicable.
Click the language to set as the primary language.
Click Set As Primary. If the language can become your Windows display language, you’ll see Will Be Display Language After Next Sign-In appear under the language.
Sign out and then sign back in to finish.
Switch between keyboards
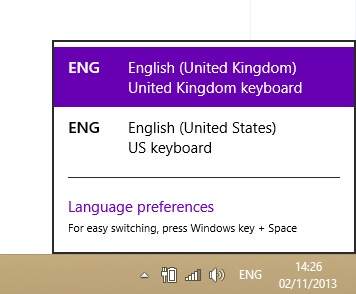
When you add a language, you can type in that language. Before you can do that, you must switch between keyboards or input methods. The easiest way is to press the Windows key + Spacebar. You can also switch by using the language abbreviation on the taskbar (see Figure 1-11). Note that the taskbar shows the time and date format the way it is displayed in the selected language.
Add a keyboard layout for a language
Finally, you’ll need to add a keyboard layout for your language and possibly make it your default keyboard. To add a keyboard layout for a language, follow these steps:
Open Control Panel and in Small Icons or Large Icons view, click Language.
Click Advanced Settings.
Under Override For Default Input Method, choose the keyboard layout you’d like to make your default keyboard and then click Save.
Install as Windows To Go and to VHD
There are two more ways to install Windows 8.1 to discuss here. You can install as Windows To Go and you can install Windows 8.1 onto a VHD. You’ll need to be able to activate the operating system in either instance, so make sure you have the proper activation codes (or volume licensing) to do so before you start.
Exam Tip
Sometimes you’ll be asked to choose the correct syntax for performing a task at a command prompt. You might have never seen or heard of the command before—either in this text or in others you’ve read. There’s really no way to prepare for such questions short of trying to memorize all of the syntax available, but this makes for an important tip all the same. Here’s an example of something you might see: What command can you use to check the activation status of a computer? The answer is slmgr.vbs /dlv. The acronym stands for (Windows) Server License Manager Script, and dlv stands for Display License information (Verbose). If you’ve never heard of a command, try figuring out what the letters in the command might stand for, and you might be able to make an educated guess.
Install as Windows To Go
You can give users a Windows To Go USB flash drive that holds a copy of Windows 8.1 Enterprise. They can use this USB drive to run Windows from a computer other than their own, provided the computer can be configured to boot to a USB drive.
There are a few things that are unique about Windows To Go:
You can only create Windows To Go drives from a Windows 8–based Enterprise edition computer.
The computer used to boot to the drive must meet Windows 7 certification requirements, but it doesn’t have to be running Windows 7.
The Windows To Go drive can hold the same image used on enterprise workstations and can be managed using the same methods.
Windows To Go isn’t a desktop replacement operating system; it is simply a short-term solution when the user can’t be at his or her workstation.
The host computer’s internal hard disks aren’t accessible to ensure data isn’t accidentally or maliciously accessed. Likewise, Windows To Go won’t be listed in File Explorer.
Trusted Platform Model (TPM) can’t be used with Windows To Go drives. TPM protects a specific computer from unauthorized access, and Windows To Go is used on more than one computer. When BitLocker is used, though, you can configure a system boot password.
Hibernate and sleep aren’t enabled by default, although they can be enabled through Group Policy.
Neither Windows Recovery Environment (RE) nor resetting or refreshing is available. Problematic drives should be reimaged.
For Windows To Go images that are running Windows 8.1, Windows Store apps can roam between multiple PCs on a Windows To Go drive.
The USB drive you use must be Windows To Go certified.
To create a Windows To Go drive, you use the Windows To Go Creator Wizard. You will have to have access to a .wim file, which can be on a network share, a DVD, or a USB drive. A .wim file contains a disk image that can be mounted inside the Windows operating system. In simple terms, it’s a type of installation file. These files allow a user to use the disk image on multiple computer platforms, including a Windows To Go drive.
To create a Windows To Go USB drive, follow these steps:
Sign into your Windows 8–based Enterprise computer using your Administrator account credentials.
Press Windows key + W to open Search Settings, type Windows To Go, and then press Enter.
If the User Account Control dialog box appears, click Yes.
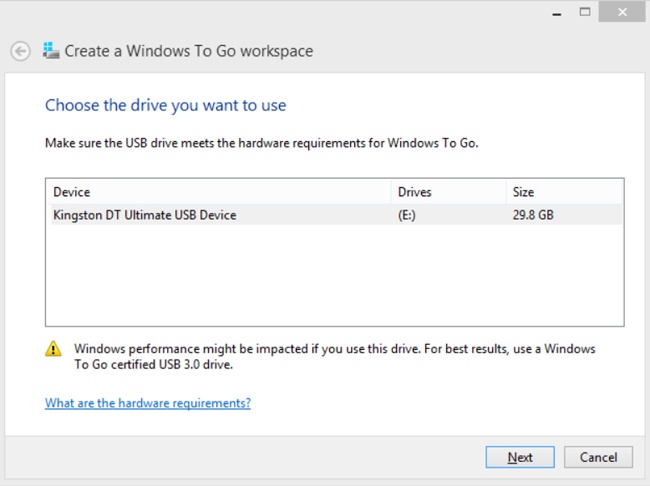
On the Choose The Drive You Want To Use page, select the drive that represents the USB drive you inserted previously and then click Next.
On the Choose A Windows 8 Image page, click Add Search Location and locate the .wim file.
Click Select Folder and then click Next.
If desired, select the Use BitLocker With My Windows To Go Workspace check box and enter the required passwords and password hint.
Click Create. Note that any data on the drive will be erased.
Wait for the process to complete, which could take up to 30 minutes.
Install to VHD
A VHD contains the entire contents of a hard disk in a portable file that network administrators can use to transport entire virtual machines (VMs) from one host computer to another. A VHD functions exactly like a hard disk does in a physical machine. VHDs can also exist on a computer for the long term, without any intention of porting them. In this instance, a single computer, even with a single partition, can host multiple VHDs, all running different operating systems at the same time, giving network administrators a single computer for testing software on various operating systems easily. These types of VHDs are created on computers that have a parent operating system, meaning an operating system is installed on the computer that hosts the VHD. A native-boot VHD is a VHD that is created and runs without a parent operating system. Windows 8.1 supports native boot to these types of VHDs.
Often, VHDs are used to test applications and hardware under various circumstances, but there are lots of other reasons to use them. VHDs are quite useful in circumstances in which the operating system(s) needs to be reinstalled often, which is true of testing environments but also true of public kiosks, school computer labs, public libraries, and anywhere else a computer is open to guests or otherwise apt to be compromised. They’re also useful in companies with a high turnover rate because computers can be repurposed easily. When you need to reinstall the VHD, you just copy your master VHD back over it and the VHD is as good as new. You can create a VHD by using DiskPart or the Disk Management Console.
In this set of steps, you’ll install Windows 8.1 into a VHD by using the Disk Management Console. You can use an existing VHD if you have one, or you can create a new VHD here. Before you start, you need to locate your Windows 8.1 installation media. The computer on which you are going to install the VHD must also have the Windows ADK installed on it. You can download the ADK from http://www.microsoft.com/en-us/download/details.aspx?id=39982.
To create a VHD and install Windows 8.1 on it, follow these steps:
In File Explorer, right-click This PC and then click Manage.
In the left pane, click Disk Management.
Right-click Disk Management and click Create VHD. See Figure 1-12.
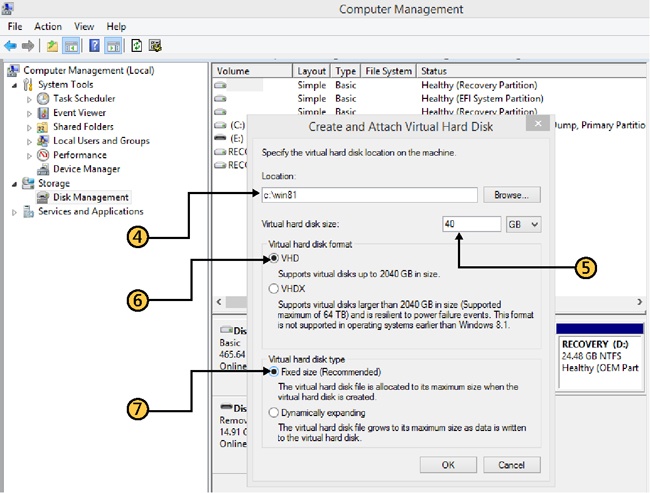
In the Location box, type the location and name of the VHD you want to create.
In the Virtual Hard Disk Size box, choose GB to avoid calculation errors and type a number in the box. See Figure 1-13.
Under Virtual Hard Disk Format, choose VHD or VHDX after reading the information offered.
Choose Fixed Size (Recommended) or Dynamically Expanding.
Click OK.
Wait while the VHD is created.
Right-click the new disk and click Initialize Disk, as shown in Figure 1-14.
Choose MBR or GPT, noting that GPT is not recognized by all previous versions of Windows, and click OK.
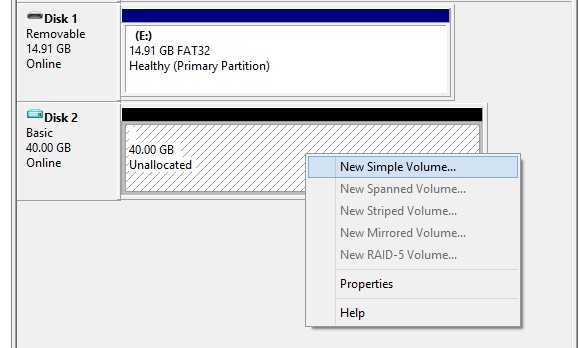
Right-click the new disk near Unallocated, and click New Simple Volume, as shown in Figure 1-15.
Click Next four times to accept the defaults for the new volume and then click Finish.
Make a note of the drive letter assigned to the new disk (mine is F).
Locate Windows ADK on your computer. The best way is to open File Explorer and search for Windows ADK.
Right-click the shortcut to Deployment And Imaging Tools Environment and click Run As Administrator.
At the command prompt, type the following command, also shown in Figure 1-16, and press Enter.
Dism /apply-image /imagefile:<path to install.wim> /index:1 /ApplyDir:<drive
letter of VHD>
Once the process completes, at the command prompt type bcdboot F:windows to add the VHD to the boot menu (if desired).
At any time, you can right-click the VHD in Disk Management and click Detach VHD. (Click Attach VHD from Disk Management in the left pane when you need it again.)
You can now restart the computer and choose the VHD from the boot menu. You’ll have to work through the setup process just as you would with any new installation, which includes inputting a product key, choosing the color of the Start screen, joining a network, and so on.
Exam Tip
Make sure to familiarize yourself with the tools in the ADK. Deployment Imaging Servicing and Management (DISM) is a command line tool you can use to apply, capture, delete, export and perform other tasks with images. This new command line tool replaces ImageX, so if you see that command in an answer it’s probably a red herring. Refer to the article here to learn more about DISM: http://technet.microsoft.com/en-US/library/hh825258.aspx. At the very least, read the Windows ADK Quickstart document.
Explore the custom Windows 8.1 installation
Network administrators often create their own custom installation files with Windows 8.1 so that the installation file contains device drivers, software, updates, custom wallpapers and screensavers, and other items required by the target computers. You can add these to minimize what must be done after installation completes. There are a lot of steps involved in creating a custom installation, and a high-level outline is provided here.
To create a custom installation, you’ll need to download and install the Windows ADK. The ADK contains the tools you’ll need to perform the required tasks. You’ll also need a reference computer that you’ll set up to represent a typical computer in your organization. You’ll need a test computer to test the installation image you’ll create from the reference computer, an empty USB drive or CD for creating a Windows PE disk, and an external storage device where you can create the share that contains the installation files.
With all of those things in place, you’ll do the following:
Create a share on the network to hold the installation files and other files related to the deployment of Windows 8.1.
Create a reference computer that will serve as a template for the workstation configuration, complete with all of the software you want to install, language packs, settings, required device drivers, custom wallpapers, and anything else you want to include.
Prepare the reference computer for imaging by removing certain values unique to the reference computer. You’ll use the following commands:
Sysprep /generalize to remove unique IDs. You might add other command-line options like /oobe (to give the installation an out-of-box experience).
Copype.cmd to create a Windows PE boot disk, with the proper command-line options like c:winpe (to note the location of the required PE files).
Oscdimg.exe to package the Windows PE files into a sector-based image file, along with proper command-line options.
Capture an image of the reference computer, which results in an image file. Using this file, you can install as many workstations as desired and apply your image to all of them, creating uniformity. You’ll use these commands:
DISM with command-line options including /capture-image to capture the image of the computer’s hard disk.
Net use with command-line options including something like z: \servershare to denote the location of the network share where the files are stored.
Create an answer file to partially automate the installation or an unattended answer file to completely automate the answers asked during installation. You’ll use tools including Windows System Image Manager (SIM; available in Windows ADK) to select the image and create and apply the answer file.
Boot the target computers with either a Windows PE disk or a boot image that the computer can download from the server.
Apply the reference computer image to create your duplicate workstations. This will include copying and applying the desired image, among other things.
Objective summary
You can upgrade Windows XP, Windows Vista, and Windows 7 computers, but you won’t get to keep everything in the case of Windows XP and Windows Vista.
You can install additional features from Control Panel and from Microsoft. Windows Media Center and Windows 8.1 Pro Pack are options from the latter.
You can change the language Windows uses in apps, windows, and other areas, and you can configure matching keyboards.
You can install Windows 8.1 as Windows To Go and to a VHD.
Objective review
Answer the following questions to test your knowledge of the information in this objective. You can find the answers to these questions and explanations of why each answer choice is correct or incorrect in the “Answers” section at the end of this chapter.
Objective 1.3: Migrate and configure user data
Users have data you need to back up prior to performing any type of installation task. They have more than data, though; they have settings unique to their computers, including desktop wallpaper, application settings and preferences, configurations for when the computer should sleep, and even settings for how the taskbar looks or what items appear in the Notification area. If you are upgrading Windows 7 or Windows 8 computers, you can keep all of these settings along with users’ personal files, but this kind of installation is only one of many scenarios. As you’ve learned already, there is no direct upgrade path from Windows XP or Windows Vista to Windows 8.1. Also, you can’t effectively back up and restore all of these settings and data using ordinary backup tools. To update these operating systems successfully while also maintaining user data, you need to use a data migration tool.
In this section, you’ll learn about two migration tools. The first is Windows Easy Transfer (WET), a tool best suited for migrating data for home users, small office users, and anywhere a limited number of workstations exist. The second is the User State Migration Tool (part of the MDT). This tool is best suited for experienced administrators who are migrating data in large enterprises. You’ll also learn about folder redirection and the various types of user profiles, both of which are important to larger organizations. Following migration options, you’ll learn how to change the location where files are stored by default and the various kinds of user profiles.
Important: Back up, back up, back up!
Always back up data before any migration or installation. Things can and do go awry, and it’s better to be safe than sorry.
Use Windows Easy Transfer
There are two scenarios to consider when a migration of data is required. The first is when the user wants to upgrade a single computer that is currently running Windows XP or Windows Vista to Windows 8.1. This type of migration is called wipe-and-load because that’s what you do; you migrate the data off the hard drive and store it somewhere else, and then you format (wipe) the hard disk and install (load) the new operating system. With a wipe-and-load migration, you need somewhere to store the data temporarily, until you can transfer it back. This is generally a network drive or an external hard drive.
The other migration scenario is when the user obtains a new computer and wants to migrate data from the old computer to the new one. This is called a side-by-side migration because that’s what you have; there is an old computer with data on it sitting next to (physically or virtually) the new one to which you’d like to transfer the data. You can connect these computers directly to transfer the data. Generally this involves connecting the two with a Windows Easy Transfer cable. However, you can also use this method to migrate files, settings, accounts, and so on over a network to another computer.
You can achieve migrations using the Windows Easy Transfer Wizard by either starting from the old computer or starting, if applicable, from the new one. If you have a new computer that already runs Windows 8.1, you can type migwiz at the Start screen to begin. You’ll be prompted to go to the old computer and run WET from there though, so it doesn’t really matter where you start. If you only have one computer, you have several options for starting Windows Easy Transfer:
In Windows Vista, click Start, All Programs, Accessories, System Tools, and then click Windows Easy Transfer. Click Next to proceed.
In Windows XP, locate the Getting Started folder and click Transfer Your Files.
Alternatively, you can locate WET on your physical installation media here: E:supportmigwiz (assuming E is the letter of your DVD drive).
Whatever option you choose, once you’ve launched Windows Easy Transfer, you can begin the migration process. The wizard will walk you through the migration process. There are a lot of scenarios because there are various options regarding where to save the data, what to save, and whether you’re starting from the old computer, starting from the new one, or upgrading a single computer. Instead of covering each scenario here, I’ll list the general process you’ll work through as you follow the wizard’s prompts. Remember, you’ll need to have an area where you can store the files you collect until you can transfer them or have a network in place for transferring them.
The Windows Easy Transfer Wizard will ask for the following information:
How you will perform the transfer (direct link to another computer, external hard disk, or over a network).
Whether this computer is the old one or the new one.
If you are transferring files over a network, you’ll need to write down the code given so that you can enter it on the host PC when prompted.
What to transfer. You can accept the defaults or opt to customize what parts of the user account and files you’d like to transfer. If you opt for the defaults, you’ll be transferring virtually everything related to the user.
Important: Transfer only what you need
The migration can take a lot of time if there’s a lot of data to move. Instead of transferring everything, carefully select the files to transfer. You might not want to transfer downloaded movies, podcasts, audiobooks, or other large files you might not need.
Explore the User State Migration Tool
USMT is a scriptable command-line tool that you can use to migrate user data from a previous edition of Windows to Windows 8.1. By using USMT, you can copy the user data you select (and exclude any data that does not need to be migrated) and then transfer the data back to the computer once it’s been installed clean with Windows 8.1. You can also transfer the data to a brand-new or newly installed Windows 8.1 computer. It’s somewhat like using Windows Easy Transfer. However, although USMT has the same basic capabilities as WET, USMT is a command-line tool and WET is graphical. This isn’t a disadvantage in a large organization, because administrators can use USMT to incorporate USMT tasks into scripts, which are better suited for domains and enterprises and automated deployments. (Scripts, task sequences, answer files, and so on are what help automate a deployment.) Two of the tools included with USMT are ScanState and LoadState, both command-line tools.
When you use USMT, you’ll also use the Windows Preinstallation Environment (Windows PE). You’ll need to know a little about Windows PE to understand how USMT works, so let’s start there.
Exam Tip
Windows PE and USMT are available in Windows ADK; you might be required to know this to select the proper solution given a scenario. Additionally, it’s likely you’ll see one question on the exam regarding ScanState and LoadState and their related parameters. To learn about the parameters available for these two commands, refer to the USMT Technical Reference sheet offered at http://technet.microsoft.com/en-us/library/hh825256.aspx.
Explore Windows PE
The boot process has changed over the years. When Windows ME was retired, so was MS-DOS. Windows 8, Windows 7, and Windows Vista no longer rely on MS-DOS for any part of the installation and boot process. To replace it, Windows uses Windows PE. Windows PE is a minimal operating system you can use to prepare a computer for a Windows installation, and it can start a computer that has no operating system (or has other problems). When deploying Windows 8.1, Windows PE can be used to partition and format hard drives, copy disk images to a computer, and initiate Windows Setup from a network share. You can create a Windows PE disk using the tools in the ADK. With regard to USMT, you use a customized Windows PE boot disk to boot the source computer (the computer that holds the files to migrate) and use the tools available on the disk to collect the data you want to migrate.
Exam Tip
Windows PE can help you deploy custom Windows 8.1 images to computers. It can help you create disk partitions and format hard drives, too, but notably it helps initiate an installation from a network share. There is also something called the Windows Recovery Environment (Windows RE). Windows RE is built from Windows PE, which makes sense. Both assist in installations (and recovery).
Windows PE offers the following improvements and advantages over MS-DOS (as you read through this list, think about how important each of these entries is to automated and custom operating system deployments):
Native 32-bit or 64-bit support (MS-DOS is a 16-bit operating system).
Native 32-bit and 64-bit driver support, or the ability to use the same drivers as a full Windows 8 installation.
Internal networking support.
Internal NTFS support.
Scripting language support for a subset of Win32 application programming interface (API), Windows Management Instrumentation (WMI), Windows Data Access Components (Windows DAC), HTML Applications (HTAs), and Windows Script Host. Administrators can create scripts that are much more robust than the MS-DOS batch files.
Myriad boot options, including CDs, DVDs, USB devices such as flash drives, a temporary folder on a hard disk, RAM disk, network share, and Windows Deployment Services (WDS) server.
Support for offline sessions and offline servicing of images.
Inclusion of Hyper-V drivers (except display drivers), which enables Windows PE to run in a hypervisor. Support includes mass storage, mouse integration, and network adapters.
Exam Tip
There are other tools besides Windows PE and USMT included with the ADK that you might have heard of but that won’t be discussed here: the Application Compatibility Toolkit (ACT), various deployment tools including the DISM command-line tool, DISM PowerShell cmdlets, DISM API, Windows System Image Manager (Windows SIM), and OSCDIMG. The ADK also includes the Volume Activation Management Tool (VAMT), Windows Performance Toolkit (WPT), Windows Assessment Toolkit, and Windows Assessment Services. Make sure you are familiar with these tools. An overview is available at http://msdn.microsoft.com/en-us/library/windows/hardware/hh825486.aspx.
Windows PE has various restrictions, not limited to the following: Windows PE restarts after 72 hours so it can’t be used as an operating system for the long term; it does support TCP/IP and NetBIOS over TCP/IP, but doesn’t support other methods, like the Internetwork Packet Exchange/Sequenced Packet Exchange (IPX/SPX) network protocol; Windows PE doesn’t support applications that are packaged through Windows Installer (.msi files); and it doesn’t support cross-platform scenarios like installing a 64-bit Windows image on a 32-bit computer (among others).
More Info: Windows PE
Visit www.msdn.com and type What is Windows PE? in the search box to locate related technical information.
Explore USMT
USMT provides a highly customizable user-profile migration experience. As mentioned earlier, USMT includes two unique command-line tools: ScanState.exe and LoadState.exe. You use these tools to collect and restore user data from the host computer. Another command-line tool, UsmtUtils, can be used to verify that the data you collect isn’t corrupt before you continue. USMT also includes a set of three customizable .xml files—MigApp.xml, MigDocs.xml, and MigUser.xml—that you can use to customize the migration. You create your own .xml files to support your migration needs. You’ll use a Config.xml file to further customize the migration and to exclude specific files from migrations.
Here is a breakdown of the tools you’ll use with USMT in the ADK:
ScanState.exe. Use this tool to state what data to migrate from the source computer (and to migrate it to a migration store). You can choose files, settings, and account information, among other things.
UsmtUtils. Use this tool to verify that the migration store data is not corrupt, to extract compressed files from the migration store, to delete hard link stores that cannot be deleted because of a sharing lock, and to determine cryptographic options for your migration.
LoadState.exe. Use this tool to import the data you exported with ScanState.exe to the destination computer.
MigUser.xml. Use this file to detail what user accounts to migrate.
MigDocs.xml. Use this file to detail the documents and files to migrate.
Custom.xml. Use this file to create a custom file to migrate additional files and data or modify the default migration behavior.
Config.xml. Use this file to exclude certain items from migration. You can create this file with the /genconfig option with the ScanState.exe command.
At a very high level, the process involved in migrations includes, among other things, deciding what to migrate. You might need to migrate account information, application settings, operating system settings, personal files and folders, and registry keys. You’ll also have to determine where you’ll store the data you collect from each computer (this is called the migration store). You’ll also modify or create XML files to modify the migration behavior and exclude files you don’t want transferred. You might also use MDT to incorporate migration tasks into an installation script called a task sequence; a task sequence can be used to perform the entire migration, installation, and restoration of data with little or no interaction from the user.
No matter what you decide during the planning stages, when you’re ready to perform the migration you’ll use the following commands along with the appropriate parameters to perform the migration (this is a high-level overview):
Install Windows ADK on a technician computer.
Modify the Config.xml file to include user-group membership.
If needed, create an optional Offline.xml file to include information on how to work with additional drives on the destination computer if those drives exist.
Copy the customized USMT files and tools to a USB flash drive (or network share).
Suspend BitLocker if applicable and boot the source computer using the Windows PE disk. Booting to a share is more complex but certainly possible.
Use the ScanState command on the source computer to collect files and settings and save them to a migration store.
Install Windows 8.1 and additional applications on the destination computer.
Copy the USMT files to the destination computer and then run the LoadState command to apply the saved files and settings to the new computer.
Exam Tip
You’ll be asked to verify specific ScanState and LoadState syntax for some command-line options. Often these are obscure, or at least seem to be. Review ScanState syntax at http://technet.microsoft.com/en-us/library/hh825093.aspx and LoadState syntax at http://technet.microsoft.com/en-us/library/cc766226(v=WS.10).aspx.
Configure folder location
In a domain, users do not generally store their files on their workstations. Instead, they store their files on file servers. This provides a great deal of security because files and folders can be backed up on a regular basis, access can be globally controlled and limited to only those who require it, and users can access the data when away from their workstations from virtually any computer. Also, a computer can be reimaged quickly because the users’ data and profile information is stored off of their workstation; a full migration isn’t needed. Additionally, if a user loses a laptop, data that is stored on the file server doesn’t go missing with it; the data is safe on the central server. Often, this type of configuration is complimented with other technologies such as BitLocker, roaming user profiles, offline files, and even technologies related to accessing data from domain servers over the Internet using various forms of secure connections. In an enterprise, redirecting where data is saved involves connecting the workstation to an Active Directory Domain Services domain and creating a Group Policy object that specifies what folders to relocate and where that new location is.
On a Windows 8.1 workstation, you can configure something similar. You can change the save location to another folder on the same computer, another drive on the computer, a drive attached externally, or a share in a workgroup.
To configure folder location on a Windows 8.1 computer, follow these steps:
Open File Explorer and locate the folder to redirect to a new location.
Right-click the folder and click Properties.
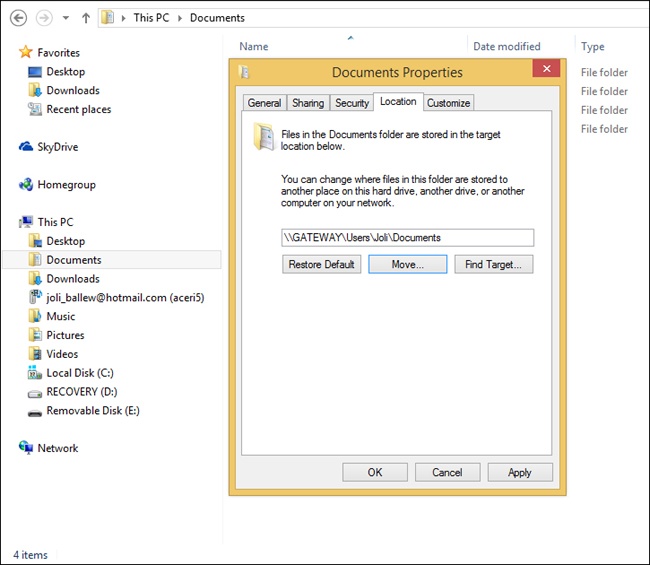
Click the Location tab, shown in Figure 1-17.
In the Select A Destination dialog box, navigate to the folder to use.
Click Select Folder.
Note the new location in the Properties dialog box.
Click OK.
When prompted Do You Want To Move All Of The Files From The Old Location To The New Location? as shown in Figure 1-18, click Yes, No, or Cancel, as applicable.
Click OK again to close the Properties dialog box, if applicable.
More Info: Remotely accessing data
For more information on remotely accessing data from a file server, refer to Chapter 5. In that chapter, you’ll find information regarding offline file policies, Work Folders, and other mobility options.
There are other methods to redirect and manage data for the mobile user: Sync Center, Work Folders, Offline Files, and Roaming User Profiles. Sync Center, Work Folders, and Offline file policies are outlined in Chapter 5. Roaming user profiles are detailed in the next section.
Configure profiles
A user profile consists of the user’s personal folders, library data, user-specific registry settings, desktop backgrounds, Internet Explorer favorites, and various application settings and computer configurations, among other things. A user profile is configured automatically the first time a user logs on to a computer, whether it is a single computer, a computer in a workgroup, or one that is part of a domain, and it is then reloaded every time the user logs in. There are three traditional types of profiles: Local, Roaming, and Mandatory. With Windows 8 and Windows 8.1, a new kind of profile has emerged, though. Let’s look at that first.
Explore and configure a Microsoft Account profile
Starting with Windows 8, users are encouraged to create and log on to their new Windows 8–based computers with a Microsoft Account. This Microsoft Account is really a new kind of limited user profile. When applied, part of the user’s profile is stored in (synced to) the cloud and saved there. When the user logs on with the same account to that same computer or any other computer, the profile is automatically downloaded and applied, provided an Internet connection is available to obtain the latest saved profile. This means that a fair portion of the user’s profile follows from computer to computer.
Some items that are synced to the cloud and included in the profile are the Start screen background color, screen tiles, and tile layout; lock screen and account pictures; desktop themes, taskbar settings, web browser favorites, open tabs, and history; language preferences; Ease of Access settings, and more. A Microsoft Account is required to use the Windows Store, SkyDrive, Calendar, and other Windows 8–based features as well. Figure 1-19 shows some of the settings that can be synced.
Your clients might not want to sync everything to the cloud. To change what is synced to the cloud with a Microsoft Account, follow these steps:
Open PC settings.
On the main PC settings screen, click SkyDrive.
Click Sync settings.
Move the sliders as applicable to configure what to sync.
Understand the local user profile
A local user profile is a profile that is applied to a single computer. The profile defines the user to the computer, including where folders are saved and what settings have been applied. If you have multiple users who access a single computer and they all have their own user accounts, each user has his or her own profile.
A typical user has these folders to hold data:
There isn’t much more to know about an end user’s local profile. Changes will be saved automatically, and the profile will be applied each time the user logs on to the local machine.
Configure a roaming user profile
A roaming user profile is a copy of a local user profile that is stored on a network server. Thus, the profile is available no matter what computer the user logs on to in the workplace. If a user makes any changes to the profile during a computing session, the changes are saved to the network server when the user logs off.
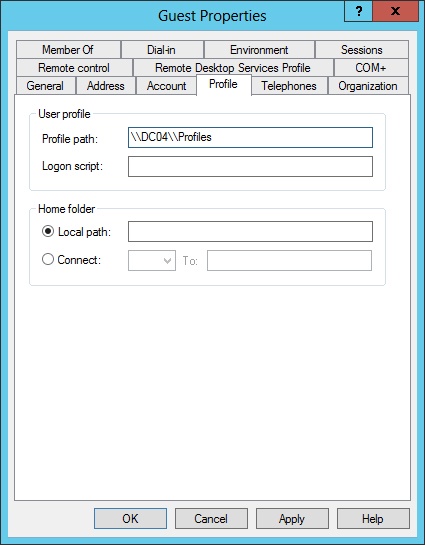
Roaming user profiles aren’t enabled by default. In the workplace, specifically in an Active Directory domain, administrators create a share for saving roaming user profiles and then the path to the profile is added to the user’s Properties dialog box (see Figure 1-20).
Exam Tip
Because users must access and download their profile when they log on, make sure you save profiles to a file server that you back up frequently. Also, if the network bogs down in the morning when users log on, consider moving the share to a member server instead of a domain controller.
Here’s how the roaming user profile is applied when the user logs on:
The first time a user logs on, the entire user profile is copied from the server to the local drive. This allows access to the profile should the server become unavailable.
The profile is applied, and any changes made to the profile during the computing session are saved to the local drive.
When the user logs off, the profile is copied back to the server and includes any changes the user made during the session.
At the next logon, only the parts of the profile that are changed are copied from the server to the local machine, which speeds up the logon process.
Understand the mandatory user profile
A mandatory user profile is a roaming user profile the user can’t change for the long term. With a mandatory user profile, although users can make changes (such as changing the desktop background) and use those changes during their computing session, the changes won’t be saved at logoff. The profile is read-only. The next time the user logs on, the original profile will be reapplied. A network administrator can create a single mandatory profile and apply it to multiple users. To create a mandatory user profile, you must locate the folder that contains the roaming user profile. Then, you must change the name of that profile from Ntuser.dat to Ntuser.man.
Objective review
Answer the following questions to test your knowledge of the information in this objective. You can find the answers to these questions and explanations of why each answer choice is correct or incorrect in the “Answers” section at the end of this chapter.
Chapter summary
There are four Windows 8.1 editions: Windows RT, Windows 8.1, Windows 8.1 Professional, and Windows 8.1 Enterprise. Each offers its own set of features.
It is extremely important to know which features are unique to both Windows 8.1 Professional and Windows 8.1 Enterprise so that you can select the proper operating system for the corporate client.
You can perform upgrades, but in-place upgrades to keep users’ files, Windows settings, and applications can only be performed from Windows 7 and Windows 8.
Various tools exist to help enterprises plan, test, and deploy Windows 8.1 including, but not limited to, Windows Application Deployment Toolkit (Windows ADK), Microsoft Deployment Toolkit (MDT), and Application Compatibility Toolkit (ACT).
When applications aren’t compatible with Windows 8.1, you can try to force compatibility by using Program Compatibility mode.
You can automate installations in large enterprises with various tools including the Windows ADK. You’ll use tools including Sysprep, DISM, ScanState, and LoadState, among others.
Answer files can be used to answer questions asked during installation without user input.
Windows To Go lets users take Windows with them on a USB flash drive.
You can install Windows 8.1 on a VHD. Windows 8.1 supports booting to native VHDs.
You can migrate user data with Windows Easy Transfer and the User State Migration Tool. The former is better for a small number of computers; the latter is better for larger organizations.
You can change where data is saved by default using folder location.
User profiles define users to a computer, and there are three user profiles: Local, Roaming, and Mandatory. The Microsoft Account provides a new type of limited user profile.
Answers
This section contains the solutions to the thought experiments and answers to the objective review questions in this chapter.
Objective 1.1: Thought experiment
You’d suggest Windows 8.1 Professional because it can be used to join a domain. Windows 8.1 cannot. Windows Enterprise is not an option because of the volume licensing requirement. Windows RT comes preinstalled on tablets and similar devices, not workstations, so you can’t select that either. You’d choose 32-bit because you know all computers support it and because you can perform an upgrade from Windows Vista (even though you’d have to install Service Pack 1 and its applications). If you opted for 64-bit, you’d have a lot more testing to do and likely have hardware upgrading as well, which increases cost.
You would start by setting up test machines to represent all of the computers on the network. If there are five different computer manufacturers, you’d need at least five test machines. You would install Service Pack 1 for Windows Vista before performing the test upgrade. You’d need to test the database program too, and if the program proved problematic, you’d need to try to run it in Program Compatibility mode or host it on the server if it isn’t already hosted there. Based on those tests, more planning might be required before you can roll out the upgrade.
Because there are computers from five different computer manufacturers, a clean installation is probably best. You could, at the very least, reduce problems that arise due to hidden malware, unwanted temporary files, and data fragments, and minimize the differences that carry over from desktop settings, personal files, unwanted files, and so forth. Generally, a clean installation is best no matter the circumstance, when feasible.
Objective 1.1: Review
Correct answers: C and D
Incorrect: Windows Vista SP1 can keep personal files and Windows settings during an upgrade. Windows Vista without SP1 can’t be upgraded.
Incorrect: Windows XP SP3 can only keep personal files during an upgrade.
Correct: Windows 7 Home Premium can keep personal files, Windows settings, and applications.
Correct: Windows 8 can keep personal files, Windows settings, and applications.
Correct answers: A, C, and D
Correct: The hard disk must have at least 20 GB of free disk space. It only has 16 GB.
Correct: The screen resolution must be at least 1024 x 768. Something will need to be upgraded to make it compatible, which might or might not be possible.
Correct: To install a 64-bit operating system requires at least 2 GB of RAM.
Correct answer: D
Incorrect: The only edition of Windows 8.1 that supports all of these features is Windows 8.1 Enterprise.
Incorrect: The only edition of Windows 8.1 that supports all of these features is Windows 8.1 Enterprise.
Incorrect: The only edition of Windows 8.1 that supports all of these features is Windows 8.1 Enterprise.
Correct: The only edition of Windows 8.1 that supports all of these features is Windows 8.1 Enterprise.
Correct answers: B and D
Incorrect: Windows 7 Home Premium can be upgraded to Windows 8.1 Professional.
Correct: Windows 7 Enterprise cannot be upgraded to Windows 8.1 Professional. (It can be upgraded to Windows 8.1 Enterprise, though.)
Incorrect: Windows 7 Ultimate can be upgraded to Windows 8.1 Professional.
Correct: Windows 7 Professional (Volume License) cannot be upgraded to Windows 8.1 Professional.
Objective 1.2: Thought experiment
Windows 7 and Windows 8.
Because there are only five computers, it’s best to use WET. USMT is intended for administrators who need to perform large-scale automated deployments, which this scenario is not.
It would be unwise to try to upgrade the hard drive and the graphics adapter in a computer that is as old as this one apparently is. Your best option is to copy the data from the computer and save it where it is needed. This could be on other computers, on an external hard drive, or on CDs and DVDs. You can still use the Windows XP machine, at least until it is no longer functional.
Objective 1.2: Review
Correct answer: B
Incorrect: Windows XP cannot be upgraded while keeping files and settings, just files.
Correct: Windows 7 can be upgraded to Windows 8.1 while keeping files, settings, and applications. When upgrading from Windows XP to Windows 8.1, only personal files can be saved.
Incorrect: Windows 7 can be upgraded to Windows 8.1 while keeping files, settings, and applications. When upgrading from Windows XP to Windows 8.1, only personal files can be saved.
Incorrect: Windows 7 can be upgraded to Windows 8.1 while keeping files, settings, and applications. When upgrading from Windows XP to Windows 8.1, only personal files can be saved.
Correct answers: C and D
Incorrect: You cannot perform an installation on Windows 8.1 from a Windows To Go drive. Windows To Go is Windows on a USB drive and is portable.
Incorrect: The proper file name is Setup.exe, not Install.exe.
Correct: This is a valid way to install Windows 8.1.
Correct: This is a valid way to install Windows 8.1.
Correct answers: A and D
Correct: Windows To Go drives can only be created using Windows 8 or Windows 8.1 Enterprise.
Incorrect: Hibernate and sleep are disabled by default when using Windows To Go.
Incorrect: The USB drive must be compatible with Windows To Go.
Correct: For security reasons, Windows To Go blocks access to local drives by default.
Correct answers: B and C
Incorrect: Windows PE is used to boot a computer using a minimized operating system, often for the purpose of installing or repairing one.
Correct: DiskPart is a valid command-line tool for creating VHDs.
Correct: Disk Management is a valid graphical tool for creating VHDs.
Incorrect: SysPrep is a tool used before capturing an image of a reference computer to strip away personalized information such as the activation ID.
Objective 1.3: Thought experiment
Use WET to transfer the user’s local profile to her domain profile.
Configure folder location.
Configure a roaming user profile.
Objective 1.3: Review
Correct answer: D
Incorrect: Choosing a different location for the default folders to save to will only change where they are saved. You can’t configure three different places for one folder.
Incorrect: Roaming user profiles are used in domains. This would not solve the problem.
Incorrect: If you were to create accounts for each user, you could then apply passwords to protect those accounts.
Correct: You need to create an account for each user. The first time each user logs on, a user profile will be created. Then, each user will have his or her own secure place to save personal files, and the files won’t be mixed together. (You’ll have to move the existing files to the proper folders, too.)
Correct answers: A, C, and D
Correct: You must state how you will store and transfer the data prior to the migration.
Incorrect: Task sequences are part of the USMT and do not apply here.
Correct: Because you can start from either the old computer or the new one, this is a valid question that must be answered.
Correct: You must state what you want to transfer.
Incorrect: User profiles are automatically included and do not need to be manually called out.
Correct answer: C
Incorrect: Mandatory user profiles don’t allow any changes to the profile to be saved.
Incorrect: The user can make changes during the session, but they won’t be saved to the mandatory user profile.
Correct: This is the correct behavior.
Incorrect: This does not happen. These two terms refer to how to make a roaming user profile mandatory, but it doesn’t work both ways.
Correct answer: A
Correct: The is the proper tab and dialog box.
Incorrect: Location is configured from the folder’s Properties dialog box on the Location tab.
Incorrect: Location is configured from the folder’s Properties dialog box on the Location tab.
Incorrect: Location is configured from the folder’s Properties dialog box on the Location tab.
