Chapter 5. Configure remote access and mobility
More people are working away from their offices than ever before. They work from home, from hotel rooms, from airplanes, and from company branch sites. Those users need to be able to connect to their own desktop and the company network through secure virtual private networks (VPNs), and they need to be reconnected if the connection is lost. They need to connect using their own broadband connection, too, no matter the carrier or connection type. Finally, they need to work in various ways over the Internet, including from airplanes and via hotel Wi-Fi.
Beyond this, though, their mobile devices need to be protected in case of theft or sabotage. You need to be able to configure BitLocker and BitLocker To Go and configure the appropriate startup and recovery keys to do this. Those users will also need you to set group policies for using offline files and syncing and teach them how to best configure their machines with the most applicable power policies for any situation. There’s more, though, including understanding Windows To Go and offering it as an option when applicable.
Objectives in this chapter:
Objective 5.1: Configure remote connections
There are two remote connection options that we have already discussed in this book: Remote Assistance and Remote Desktop. To review those, refer to Chapter 3, and specifically Objective 3.4: Configure remote management. We’ll revisit some of that here, but not too heavily. Most of this objective focuses on remote authentication in various scenarios, Remote Desktop technologies, and the types of connections you can use, including VPNs and broadband.
Configure remote authentication
You’re going to see quite a few questions on the exam that involve understanding what is and is not applicable to a specific type of connection protocol. These protocols are required to configure and complete remote authentication and thus verify that the user who wants to connect is actually the one you want connecting. Before we move forward, make sure you are familiar with the following protocols.
VPN protocols
Windows 8.1 supports lots of protocols, and the ones listed here are used with VPNs (loosely listed from oldest to newest and least secure to most secure):
Point-to-Point Protocol (PPP). When a dial-up connection is used to connect a client to a server, a dedicated link is used and that connection is maintained throughout the session. This link is called Point-to-Point Protocol (PPP) and is a notably secure connection because it is difficult to hack into, being dial-up. PPP can also be used with a VPN over the Internet. This is less secure than a dial-up connection, because it’s much easier for a hacker to get to the data transmitted over the Internet. This is not a recommended protocol for these reasons and more, and it should only be used when no other options exist.
Point-to-Point Tunneling Protocol (PPTP). This is the least secure of all of the VPN protocols. PPTP does not require the use of certificates to ensure security. It is a better option than PPP, though, because the packets are encapsulated through tunneling technologies and are better protected during transmission. PPTP only supports the Microsoft Challenge Handshake Authentication Protocol version 1 and version 2 (MS-CHAP v1 and MS-CHAP v2), Extensible Authentication Protocol (EAP), and Protected Extensible Authentication Protocol (PEAP).
Layer 2 Tunneling Protocol (L2TP). This protocol uses the IP Security extension (IPsec) for encryption and encapsulation. It encrypts with Data Encryption Standard (DES) or Triple DES (3DES) with keys obtained from the IPsec Internet Key Exchange (IKE). L2TP/IPsec uses preshared keys or certificates and offers data integrity checks. L2TP/IPsec is supported on Windows XP, Windows Vista, Windows 7, Windows 8, Windows 8.1, Windows Server 2003, and Windows Server 2008.
Secure Socket Tunneling Protocol (SSTP). This protocol encapsulates PPP traffic through the Secure Sockets Layer (SSL) protocol and uses certificates for authentication. Authentication involves Extensible Authentication Protocol-Transport Layer Security (EAP-TLS) and provides integrity checks. SSTP is supported on Windows Vista, Windows 7, Windows 8, Windows 8.1, Windows Server 2008 R2, and Windows Server 2012.
Internet Key Exchange, Version 2 (IKEv2). This protocol supports IPv6 and VPN Reconnect, authentication with EAP, PEAP, EAP-MSCHAPv3, and smart cards. It doesn’t support Password Authentication Protocol (PAP) and CHAP as authentication methods. IKEv2 is useful when a user moves from one type of connection to another (wireless to wired, for example) and in many other scenarios. Windows 8.1 clients try to use this protocol first when connecting to remote servers. IKEv2 is supported on Windows 7, Windows 8, Windows 8.1, Windows Server 2008 R2, and Windows Server 2012.
Authentication protocols
Clients must be authenticated before they can access network resources. Here are the most common authentication protocols:
PAP. This protocol is the least secure and uses plaintext passwords. It is used as a last resort when other authentication methods can’t be negotiated. It’s not enabled by default on a Windows 8–based client and is not considered secure.
CHAP. The protocol uses a three-way handshake between the client and server using a key for encryption. This is best used for legacy connections and is better than PAP, but other methods are preferred.
MS-CHAP v2. This protocol uses a two-way mutual authentication and is stronger than CHAP. Still, better protocols exist, including EAP.
EAP-MS-CHAPv2. This protocol authenticates using EAP. EAP offers the strongest and most flexible security option. With it, authentication can be negotiated using something other than passwords, including certificates and smart cards. This is the default selection for new connections on Windows 8–based machines.
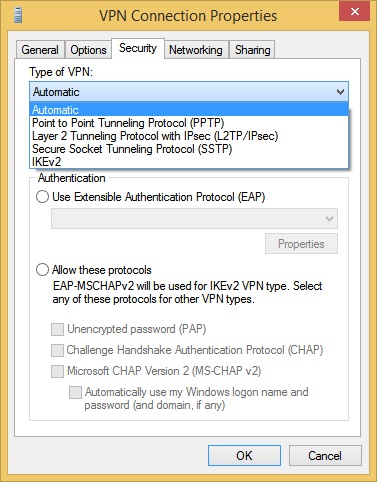
You can explore these protocol and authentication options from a VPN connection’s Properties dialog box. An example is shown in Figure 5-1.
Configure Remote Desktop settings
You learned how to use Remote Desktop in Chapter 3, and you also learned how to make configuration choices in the Remote Desktop Connection dialog box and the available tabs there (General, Display, Programs, Experience, Advanced). Here you’ll learn a bit more about the technical aspects of Remote Desktop.
The Remote Desktop Protocol (RDP) is the protocol used to connect workers to their desktops when they are away from them, perhaps when they are at home or in a hotel. Additionally, Remote Desktop is used by network administrators to remotely administer computers and servers, often from another company computer in the same building or in another one close by. Users can connect to a remote desktop from almost any type of computer, including those running Windows XP, Windows Vista, Windows 7, Windows 8, Windows 8.1, or Windows RT. The computer that is the host must be running Windows XP Professional, Windows Vista Enterprise, Windows Vista Ultimate, Windows Vista Business, Windows 7 Ultimate, Windows 7 Enterprise, Windows 7 Professional, Windows 8 Pro, Windows 8.1 Pro, Windows 8 Enterprise, or Windows 8.1 Enterprise.
You can open the Remote Desktop Connection dialog box by typing mstsc.exe at a command prompt. You can see both in Figure 5-2.

There are parameters you can use with the command mstsc.exe when using Remote Desktop:
<connection file>. This parameter specifies the name of an .rdp file for the connection.
/edit <connection file>. This parameter opens the specified .rdp file for editing.
/v:<Server[:<Port>]. This parameter specifies the remote computer and, optionally, the port number to which you want to connect.
/admin. This parameter connects you to a session for administering the server.
/f. This parameter starts Remote Desktop Connection in full-screen mode.
/w:<Width>. This parameter specifies the width of the Remote Desktop window.
/h:<Height>. This parameter specifies the height of the Remote Desktop window.
/public. This parameter runs Remote Desktop in public mode. In public mode, passwords and bitmaps are not cached.
/span. This parameter matches the Remote Desktop width and height with the local virtual desktop, spanning across multiple monitors if necessary.
Configure VPN connections and authentication
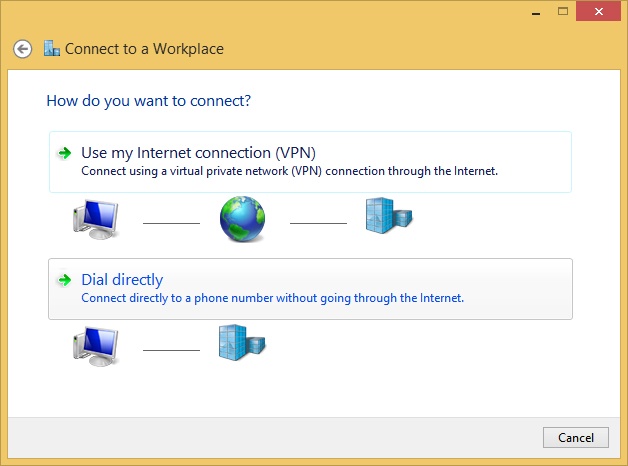
You can create a VPN from the Network And Sharing Center by clicking Set Up A New Connection Or Network. In the resulting dialog box, choose Connect To A Workplace and click Next. Once there, you choose how to create the VPN: Use My Internet Connection (VPN) or Dial Directly. See Figure 5-3.
Note: How VPNs work
VPNs establish secure connections that use encrypted tunnels to transmit data. Often these connections are used to create a connection from one company site to another or from a worker’s home to his office. These are site-to-site and remote access connections, respectively. VPNs can connect via Wi-Fi and broadband, but because of reliability issues with both, it’s best to bundle this with VPN Reconnect, discussed in the next section.
In the resulting dialog box you do the following:
You’ll see the connection in the Networks pane, shown in Figure 5-4. To activate the connection, click it and input the required credentials. The connection will be made.

Now you can configure the properties for the VPN using its Properties dialog box, available from the Network Connections window in Control Panel. The options enable you to perform tasks including but not limited to the following:
On the General tab, changing the host name
On the Options tab, opting to remember your credentials or configuring protocol settings
On the Security tab, changing the options for type of VPN (automatic, PPTP, L2TP, SSTP, IKEv2); data encryption options (none, options, required, maximum strength); use EAP; allow other protocols
On the Networking tab, changing or reconfiguring TCP/IP settings and others
On the Sharing tab, allowing other network users to connect through this computer’s Internet connection; select a home networking connection type
Enable VPN Reconnect
When a user connects to a remote site using a VPN and that connection is lost, the user has to reconnect. This is an annoyance for users because it distracts them from their work and takes time. Additionally, with the prevalence of working via broadband and free Wi-Fi on the road, in subways, through tunnels, and on trains, service disruptions can happen frequently. When possible, it’s best to use and configure VPN Reconnect for your remote users.
To enable VPN Reconnect—and remember that this feature is only available if IKEv2 is used as the VPN protocol—follow these steps:
Open the Network Connections window and locate the VPN connection to configure.
Right-click the connection and click Properties.
In the Properties dialog box, click the Security tab.
Click Advanced Settings.
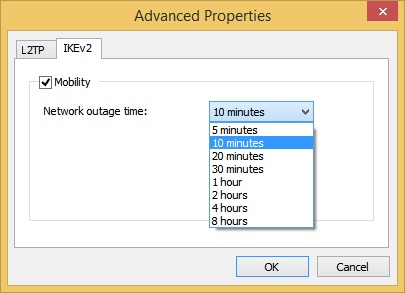
In the Advanced Properties dialog box, click the IKEv2 tab. See Figure 5-5.
Configure the Network Outage Time setting and click OK.
Click OK again to close the VPN Connection Properties dialog box.
Exam Tip
You might see references to other remote technologies and terms on the exam, although the ones listed here are not specifically named as objectives. It’s best to cast a wide net when you study, though, so make sure you are at least familiar with the following terms and features:
BranchCache. Distributed and Hosted cache modes reduce network bandwidth usage by caching frequently accessed data between company sites.
Network Access Protection (NAP). Helps prevent potentially dangerous local or remote clients from connecting to a network.
DirectAccess. Enables users to connect to the company network automatically whenever they have Internet access.
Configure broadband tethering
Some users have mobile devices that let them connect to the Internet when traditional options are unavailable. Traditional options include free and personal Mi-Fi networks, VPNs, workgroup and domain networks, broadband connections from ISPs, and connections to networks via Ethernet. When these options are unavailable, the user can opt for a built-in or personal cellular or metered broadband connection option or for another person’s shared Internet connection.
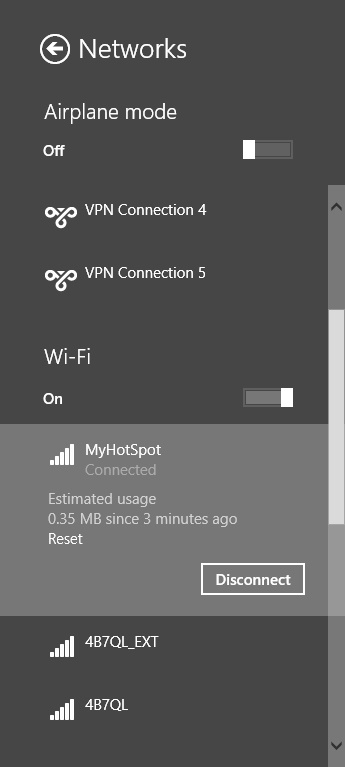
Windows 8.1 comes with built-in support for these newer connectivity models. For instance, any Windows 8.1 user can connect to a shared personal hotspot provided she has the required credentials. The connection is made through the traditional Networks pane used to connect to all other networks. Users can use that pane to disconnect as well. Figure 5-6 shows the Networks pane where the connected network is a shared personal hotspot. Note that the user can also opt to show usage for metered connections (from PC Settings, detailed next).
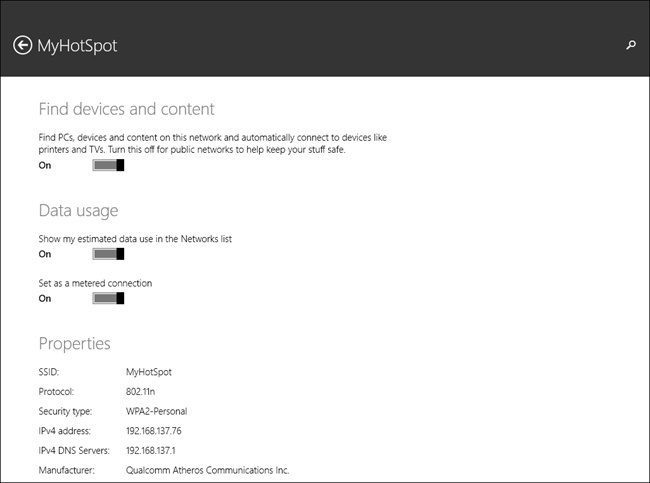
To configure the Networks pane to show the estimated usage, navigate to PC Settings, Network, Connections, and select the connection from the list. From there, enable the desired network settings. See Figure 5-7.
Some mobile devices (including those that are Long Term Evolution (LTE)–enabled) come with mobile broadband technology built in. Windows 8.1 supports this, too, and users can share these types of connections with others. This is the same as sharing a connection via a smartphone, but is provided by the mobile tablet. Users connect to the Internet using the connection they have available on their own devices, and then they can opt to share the connection with others. Again, this is done in PC Settings, Network, Connections by clicking the connection to share. Once shared, users can also change the SSID, change the password for the Wi-Fi network, and see how many people are sharing the connection. The person sharing the connection has to have purchased a data plan that supports tethering for this to work.
More Info: Learn more about broadband features in Windows 8.1
Refer to this article for more information about the new features for broadband in Windows 8.1: http://msdn.microsoft.com/en-us/library/windows/hardware/dn247045.aspx.
Objective summary
Users need to access the workplace remotely in various ways, including through VPNs, broadband, Remote Desktop, personal hotspots, and more.
There are many types of VPN and authentication protocols, and each offers a different level of features and security. You should use the protocol with the most security for your network infrastructure.
VPN Reconnect makes it easier for remote users to stay connected by automatically reconnecting when a connection is lost.
Windows 8.1 supports broadband tethering and Internet sharing to let users get online when traditional methods aren’t available.
Objective review
Answer the following questions to test your knowledge of the information in this objective. You can find the answers to these questions and explanations of why each answer choice is correct or incorrect in the “Answers” section at the end of this chapter.
Objective 5.2: Configure mobility options
Once users are connected to the network and authenticated on it (using any protocol or connection method you choose), the tasks required of you, the network administrator, shift. Now you must make sure that users are able to work effectively, both when they are connected to the network and when they aren’t. This involves configuring sync folders, work folders, offline file policies, power policies, and more. When users can’t or don’t want to carry a mobile device with them, you can also opt for Windows To Go. Windows To Go is basically Windows on a USB stick, with some limitations. You’ll learn about this and more in this section.
Configure offline file policies
Users can connect to their desktop computers and network file servers when they are away from the office using many technologies, including connecting through VPNs and cellular connections as detailed in the first part of this chapter. Sometimes, though, no connection can be made, but this doesn’t stop the users from needing access to their work files and work folders. You can allow offline access so your users can access their data under these circumstances. You need to start by configuring Offline Files and then creating policies to manage it.
Note: How to sync a folder
To synchronize a Windows 8.1 computer with a network folder, you can browse to the folder using File Explorer, right-click the folder name, and select Always Available Offline. Windows 8.1 does the rest and copies the contents of the selected folder to the local hard drive. Along those lines, administrators can prevent users from saving offline copies of files. Administrators use the Advanced Sharing dialog box and click Caching to open the Offline Settings dialog box. There they can configure specific settings.
When Offline Files are enabled and configured, when the user works online files can be accessed from the network server. When the user must work offline, files are retrieved from the Offline Files folder available from the computer. A computer switches to Offline Mode when:
The new Always Offline mode has been enabled. This feature provides faster access to files and uses less bandwidth by letting the user always work offline, even when a connection is available.
Cost-Aware Synchronization is configured and enabled. This helps users avoid high data usage costs from synchronization while using metered connections that have usage limits or while roaming on another provider’s network.
The server is unavailable due to a network outage or server malfunction.
The network connection is slower than a threshold you’ve configured, and thus working offline would be more efficient for the user.
The user manually switches to Offline Mode (perhaps to optimize bandwidth usage on a metered connection) by using the Work Offline button in File Explorer.
Note: Use Always Offline mode
To use the new Always Offline mode, clients must use Windows 8 or later and the Active Directory domain server must be Windows Server 2012 or later.
Administrators create policies that define the use of Offline Files, either in a domain or on the local machine. Those policies can be located in the applicable Group Policy Editor. Two policies are discussed here—enabling Always Offline mode and enabling file synchronization on costed networks—but you should become familiar with all of the Group Policy options for working with Offline Files.
To enable the Always Offline mode, use Group Policy to enable the Configure Slow-Link Mode policy setting and set the latency to 1 (millisecond). Doing so causes client computers running Windows 8, Windows 8.1, or Windows Server 2012 to automatically use the Always Offline mode. Follow these steps:
Open Group Policy Management Console.
Right-click the Group Policy Object (GPO) you want to use and click Edit.
Navigate to Computer Configuration, Policies, Administrative Templates, Network. Expand Offline Files.
Right-click Configure Slow-Link Mode and click Edit.
Click Enabled.
In the Options box, click Show (you might have to scroll).
In the Value Name text box, specify the file share for which you want to enable Always Offline mode or type *. to enable this for all file shares. See Figure 5-8.
Click OK again.

To enable background file synchronization of Offline Files for a group of users while using metered connections, use Group Policy to enable the Enable File Synchronization On Costed Networks policy setting for the appropriate GPO by following this procedure:
Open Group Policy Management Console.
Right-click the GPO you want to use and click Edit.
Navigate to Computer Configuration, Policies, Administrative Templates, Network. Expand Offline Files.
Right-click Enable File Synchronization On Costed Networks and click Edit.
Click Enabled.
Click OK and click OK again.
Configure power policies
You can switch power plans from Control Panel, Hardware And Sound, Power Options. From there you can also configure these options:
Require a password on wakeup
Choose what the power buttons do
Choose what closing the lid does
Create a power plan
Choose when to turn off the display
Change when the computer sleeps
If you aren’t already familiar with these features, take some time now to explore them. Make sure to create your own personal power plan by using the Create A Power Plan option in the Tasks pane of the Power Options window, as you might see something about that on the exam. You might also be asked to state how many minutes must pass for each of the three default plans (Balanced, High Performance, Power Saver) before the computer goes to sleep or turns off the display, when running on its battery, or when plugged in.
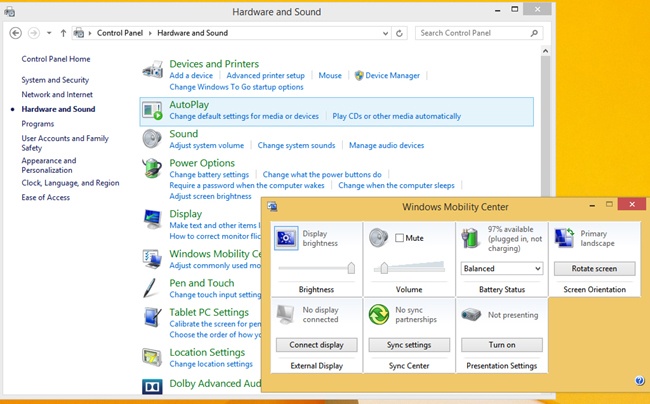
Additionally, and you can explore this on your own, you’ll have to know how to monitor battery usage (from the Notification area of the Taskbar and from Mobility Center) and how to use Mobility Center to change common mobility settings such as the power plan type, display brightness, and so on. Control Panel, the link to Power Options, and the Mobility Center are shown in Figure 5-9.
Beyond these end-user tools for managing power, there are other power-related items on which you’ll be tested, including how to use the command-line tool Powercfg.exe to view and export power plans and configure power policies using Group Policy. Because these are less common and likely less familiar, we’ll use these pages to cover these concepts.
Use powercfg.exe
Powercfg.exe is a command-line tool you can use to configure settings that aren’t available from Control Panel or Group Policy. One of the things you can do here is to export a power management plan to a file and then import it to another computer. To get a list of the available power plans using this command, type powercfg.exe –list at a command prompt. If you haven’t yet created any custom plans, you’ll only see the three default plans that come with Windows 8.1, as shown in Figure 5-10. Choose the plan to export and note the GUID value. To export the policy, type powercfg.exe –export power.pow GUID (where this is the GUID value for the plan to export).

There are some other parameters you can use with Powercfg.exe, and they are listed here: http://technet.microsoft.com/en-us/library/cc748940(v=WS.10).aspx. You should review these so that you are familiar with everything that’s offered. Here are a few you might want to try now, just to get a feel for the command:
–changename
–delete
–setactive
–deviceenablewake and –devicedisablewake
Create power policies
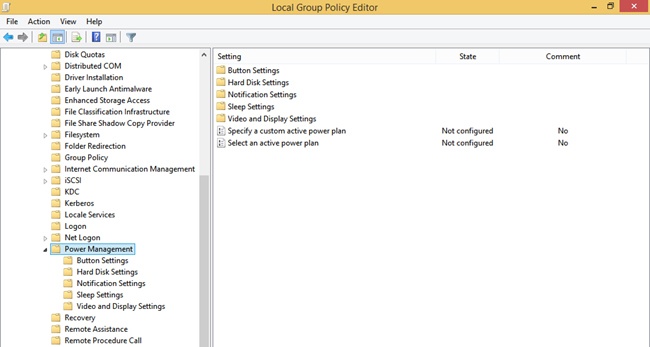
As with practically everything else, you can use Group Policy to set policies related to the available power plans. Use the Group Policy Management Editor to navigate to Computer Configuration, Policies, Administrative Templates, System, Power Management. When you expand Power Management in the left pane you can see the additional containers: Button Settings, Hard Disk Settings, Notification Settings, Sleep Settings, and Video And Display Settings. In the right pane you can see two options: Specify A Custom Active Power Plan and Select An Active Power Plan. The available options from Windows 8.1 using the Local Group Policy Editor are shown in Figure 5-11. As with any other Group Policy, you double-click the policy to access the options to configure it.
When you click one of the five nodes under Power Management, more options appear. You can control every aspect of the power options here. For instance, in the Sleep Settings node you can configure, enable, and disable the following (and more):
Specify the system sleep timeout (plugged in)
Specify the system sleep timeout (on battery)
Require a password when the computer wakes (plugged in)
Require a password when the computer wakes (on battery)
Allow standby states (S1–S3) when sleeping (plugged in)
Allow standby states (S1–S3) when sleeping (on battery)
Make sure to explore all of the policies in every node before continuing.
Configure sync options
This objective focuses on configuring sync options, not on creating sync partnerships. However, you should know how to create a sync partnership anyway, so we briefly cover that here. With that done, you’ll learn how to configure sync options in Sync Center, including scheduling when syncing should happen and under what circumstances.
You can also configure Sync Settings from PC Settings, but this doesn’t have anything to do with syncing offline files. However, because it does have to do with syncing in general, we mention it for good measure. This kind of syncing is what occurs when the user logs on to multiple computers with her Microsoft account and what settings sync when she does.
You’ll also learn about a new feature in Windows 8.1, Work Folders. There are several steps to designing a Work Folder implementation in a domain, including installing Work Folders on the Active Directory Domain file server, creating security groups for those Work Folders, and creating sync shares for user data. Although that’s beyond the scope of this book, we introduce the concept here, and Work Folders is an option for end users in the Windows 8.1 Control Panel. There, users can opt to set up Work Folders (if you have set it up and configured it on the company network), if desired.
Sync Center and configuring Sync Options
To practice with Sync Center and configure options you must first create a sync partnership on a computer running Windows 8.1. To do this, navigate to a share on a different computer or file server, right-click that share, and click Always Available Offline. After that is done, on that same Windows 8.1 computer, open Sync Center. You can type Sync Center on the Start screen, if desired. You should see what’s shown in Figure 5-12. Make a note of the options on the left side before moving forward here; you can use these once syncing is configured to manage syncing. One option, Manage Offline Files, lets you view the Offline Files dialog box, where you can disable offline files, view offline files, check disk usage, encrypt your files, and more.
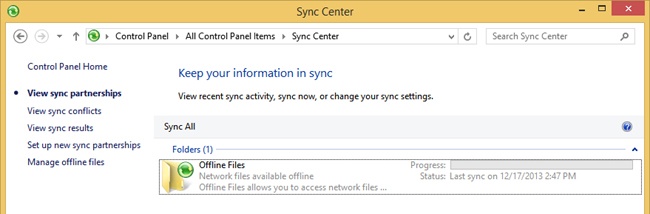
In Sync Center, once a sync partnership is available, you can opt to sync everything (Sync All is shown in Figure 5-12) or you can select the Offline Files folder, click Schedule (not shown), and work through the wizard provided to configure sync settings. There are two options:
At A Schedule Time; for example, every Monday at 11 A.M. or every day at 2 A.M.
When An Event Occurs; for example, every time you log on to your computer
Depending on your choice you can opt for more scheduling options, such as only syncing when the computer has been idle for a specific amount of time or if the computer is running on external power (and not on its battery). Figure 5-13 shows the options to schedule a time for syncing and the optional scheduling options.
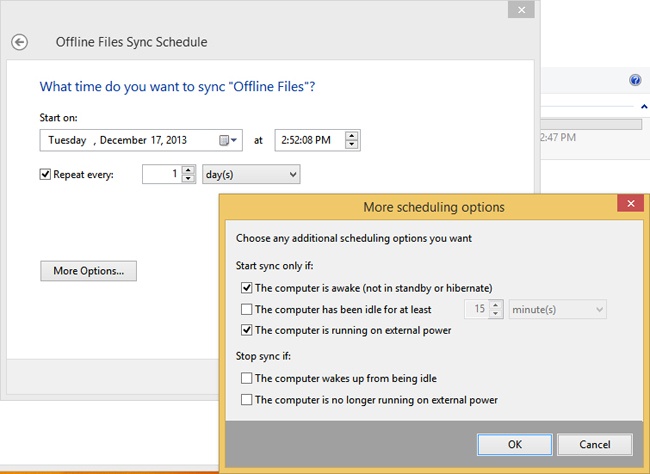
Figure 5-14 shows the options that appear when you opt to trigger synchronization to coincide with a specific event. Again, there are additional scheduling options to configure (if you click More Options) and various events from which to choose, including When I Log On To My Computer.

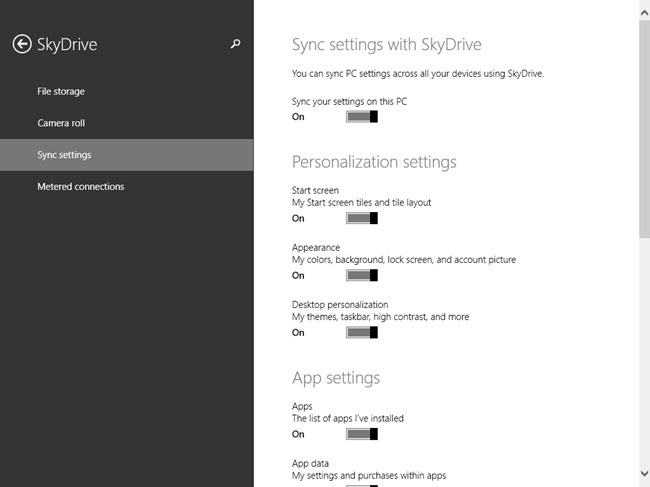
Configure sync options in PC Settings
When you create and sign in with a Microsoft account, you are able to sync settings related to your Start screen, desktop, web browser, some passwords, language preferences, and so on, to servers in the cloud. Whatever you opt to sync will be applied to any computer you log on to later using that account. You configure what to sync in PC Settings, from SkyDrive and Sync Settings. These options are shown in Figure 5-15. Make sure you are familiar with what can be synced here; you might be tested on it.
Work Folders
Work Folders is a new feature in Windows 8.1. Work Folders allows users to sync data from their user folder, located in their company’s domain or data center, to their device and back again. This is done automatically and is part of the file system. Before this feature was introduced, users had to be joined to the domain or were at least required to input domain credentials before syncing could occur. Now, users can retain local copies of their work files on their devices, with automatic synchronization back to the company file servers occurring behind the scenes.
There are Group Policies available for Work Folders that you as an administrator should be aware of. There are two to consider:
From User Configuration, Policies, Administrative Templates, Windows Components, WorkFolders, you can specify Work Folders settings.
From Computer Configuration, Policies, Administrative Templates, Windows Components, WorkFolders, you can force automatic setup of Work Folders for all users.
There is also an option end users can configure on their Windows 8.1 computers from Control Panel, Work Folders. To get to this option, open Control Panel, switch views to either Large Icons or Small Icons, and then click Work Folders. The Work Folders window appears with Set Up Work Folders available for configuring. See Figure 5-16.

For users to set up their own work folders, you have to have set up the Work Folders infrastructure required for them to have access to perform the setup tasks. A great walkthrough of the process is available at http://blogs.technet.com/b/canitpro/archive/2013/11/13/step-by-step-creating-a-work-folders-test-lab-deployment-in-windows-server-2012-r2.aspx.
Once the infrastructure is ready, when users opt to set up Work Folders they must work through the following setup tasks:
They must input their company email address.
They must wait while the wizard searches the network for their Work Folders.
Once the folders are found, the users must accept (or change) where the files will be saved on their computer.
The users must read the security policy and then accept those policies.
Once that is done, Work Folders appears, as a folder, in File Explorer when This PC is selected in the Navigation pane.
Users can now access the documents under the Work Folders location from any device, and the documents will be kept in sync by Work Folders automatically.
Note: Work Folders requirements
When using Work Folders, the client and server must be running the same milestone release for Work Folders to function properly. For example, if the server is running this milestone release of Windows Server 2012 R2, the client must be running the same milestone release of Windows 8.1.
More Info: Learn more about Work Folders
To learn more about Work Folders, refer to this article on TechNet: http://technet.microsoft.com/en-us/library/dn265974.aspx.
Configure Wi-Fi Direct
Windows 8–based computers can now directly connect to compatible devices one on one, using Wi-Fi Direct, without requiring an intermediary like a router or network access point. Users might use these types of connections to quickly transfer files with other workers using a computer-to-computer connection, or they might even transfer media or perform media streaming to other devices as they become compatible. Those devices might include smartphones and music players, as examples. Wi-Fi Direct might even replace Bluetooth eventually.
For now, you’ll need to use the Netsh command you learned about in Chapter 3 to pair the two devices (only one of which has to support Wi-Fi Direct). There aren’t any apps or GUIs built into Windows 8.1 for this feature yet. Once connected, the connected device will appear in PC Settings in the same way other devices do when they are connected (like smartphones).
More Info: Learn more about hosted networks
For more information about hosted networks, refer to this MSDN article: http://msdn.microsoft.com/en-us/library/windows/desktop/dd815243(v=vs.85).aspx. For more information about Wi-Fi Direct, search for the term on TechNet. There wasn’t very much written about it at the time this book was published.
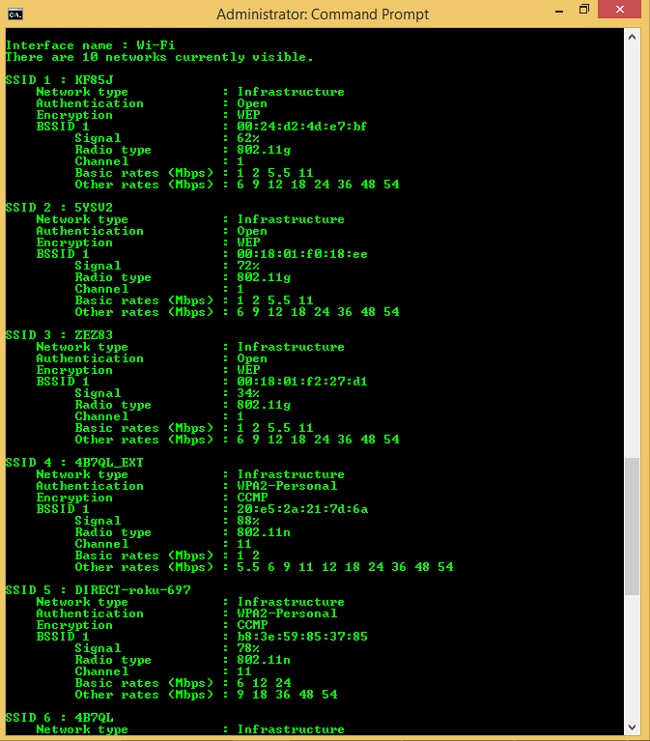
You’ll combine Netsh with wlan and the desired parameters to connect with Wi-Fi Direct. Here are some of the available parameters you can use with Netsh wlan at an elevated command prompt:
Connect. This parameter connects to a wireless network. You’ll have to use connect name= to input the profile name and SSID= to input the SSID.
Export hostednetworkprofile. This parameter saves wireless local area network (WLAN) profiles to Extensible Markup Language (XML) files.
Refresh hostednetwork. This parameter refreshes hosted network settings.
Set. This parameter sets configuration information. You’ll have to add tags such as the SSID, name of the profile, and so on.
Show all. This parameter displays information for all networks that are currently visible. Figure 5-17 shows the partial results of running this command.
Start hostednetwork. This parameter starts the hosted network.
Stop hostednetwork. This parameter stops the hosted network.
Configure Windows To Go
Windows To Go is a new feature that lets users run Windows 8.1 from a USB stick. They can use this on any computer that can be booted to a USB drive. It’s like having a virtual PC in your pocket. However, it does have limitations and specific requirements.
Exam Tip
A new feature in Windows 8.1, a Windows To Go image running Windows 8.1 is capable of booting from a drive that contains a built-in smart card. These kinds of drives are composite drives and have both a mass storage drive and smart card together in one device.
The host PC must meet the Windows 7 Certification requirements, but it can run any operating system. Those requirements are available here: http://msdn.microsoft.com/en-us/library/windows/hardware/dn423132. They include but are not limited to USB boot compatibility, 1 gigahertz (GHz) or faster processor, 2 GB or more RAM, DirectX 9 graphics device with Windows Display Driver Model (WDDM) 1.2 or greater driver, and an available USB 2.0 port or greater.
Windows To Go is not intended to replace desktops, laptops, or mobile devices such as tablets. It is meant to support short-term, alternative workplace scenarios.
Windows To Go is only available for Enterprise customers who are part of the Microsoft Software Assurance program.
Internal disks are offline to ensure data isn’t accessed from the Windows To Go device. Likewise, if a Windows To Go drive is inserted into a running system, the Windows To Go drive will not be listed in File Explorer by default.
Trusted Platform Module (TPM) can’t be used because TPM is tied to a specific computer and Windows To Go drives are associated with multiple computers.
Hibernate is disabled by default in Windows To Go, although this can be changed in Group Policy settings.
Windows Recovery Environment isn’t available, and neither is refreshing or resetting. If there is a problem with Windows To Go, the drive should be reimaged.
In addition to the USB boot support in the BIOS, the Windows 8.1 image on the Windows To Go drive must be compatible with the processor architecture and firmware type (32-bit Windows To Go for 32-bit hosts, 64-bit Windows To Go on 64-bit hosts for Unified Extensible Firmware Interface [UEFI] BIOS, and 32-bit Windows To Go on 64-bit Legacy BIOS).
Windows To Go also has these features:
Store apps can roam between multiple PCs on a Windows To Go drive.
Windows To Go will detect all hardware on the host computer and install necessary drivers. When the Windows To Go workspace is used again on that same computer it will recognize it’s already been used and load the correct set of drivers automatically.
Administrators can create Windows To Go drives using the same deployment tools they use to deploy Windows in an enterprise, namely DiskPart and the Deployment Image Servicing and Management (DISM) tool. When creating an image, make sure to include everything you’ll need, such as device drivers, sync tools, and remote connectivity options if used outside the company network.
Windows To Go is best configured on certified Windows To Go USB drives. The drives must be USB 3.0, although they can be used in USB 2.0 ports on a host computer.
Exam Tip
Make sure that the applications that you want to use from Windows To Go support roaming. Some applications bind to the computer hardware and thus can’t be used on multiple host computers.
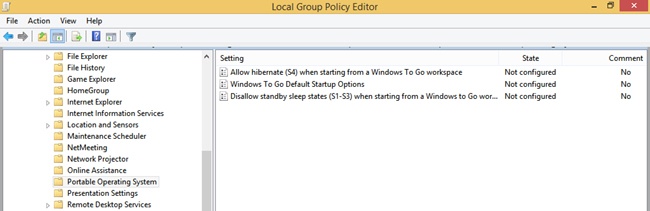
There are also a few Group Policy settings for Windows To Go. You can find those settings in Computer Configuration, Administrative Templates, Windows Components, Portable Operating System. Figure 5-18 shows this in the Local Group Policy Editor. You can enable or disable these to manage hibernation options and sleep states and to set default startup options. To learn more about these settings, double-click an option to review and read the relevant information in the Help window. The Help information for Allow Hibernate (S4) When Starting From A Windows To Go Workspace offers this: Specifies whether the PC can use the hibernation sleep state (S4) when started from a Windows To Go workspace. It goes on to explain that if enabled, the PC can hibernate; if disabled, the PC can’t hibernate.
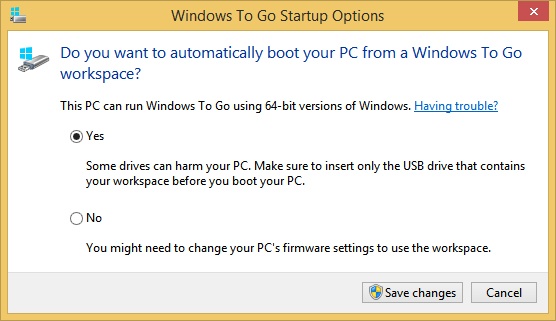
On the host side, users can search for Windows To Go from the Start screen and click Change Windows To Go Startup Options. From there they can enable the host to boot from a Windows To Go workspace. Note this and the Windows To Go requirements in the dialog box shown in Figure 5-19.
To boot to the Windows To Go workspace, insert the USB drive and do one of the following:
If the computer has already been configured to boot to the USB drive and a Windows To Go workspace as shown in Figure 5-19, the user can simply reboot or turn on the computer.
If the computer is not USB boot enabled, the user can reboot the computer, press the required key combination to access the boot menu (perhaps F12 or F2), and choose the USB Drive from the list.
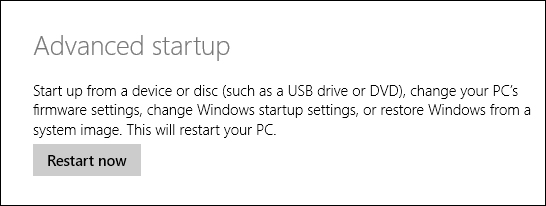
If the computer is turned on and the operating system is available, the user can use the PC Settings Advanced Startup options to reboot using a device. You’ll find that under PC Settings, Update And Recovery, Recovery, shown in Figure 5-20.
More Info: Learn more about Windows To Go
To learn more about Windows To Go, including the differences between a Windows installation and Windows To Go, how roaming works with Windows To Go, how to prepare for a Windows To Go deployment, and hardware considerations, refer to this article on TechNet: http://technet.microsoft.com/en-us/library/hh831833.aspx#BKMK_newblue. To learn about best practices regarding Windows To Go, refer to the article here: http://technet.microsoft.com/en-us/library/jj592681.aspx.
Create a workspace with the Create a Windows To Go Workspace Wizard
To create a Windows To Go workspace on a USB drive, you must work through the Create A Windows To Go Workspace Wizard. There’s a video on TechNet that shows you all of the steps for doing so (although it is on a Windows 8 machine and not on Windows 8.1) at http://technet.microsoft.com/en-us/windows/dn127075.aspx. The basic steps are outlined here.
Mount the Windows 8.1 installation file or image on the Windows 8.1 Enterprise computer.
Insert the certified Windows To Go 3.0 USB drive into an available USB port and start the Create A Windows To Go Workspace Wizard.
Work through the wizard to do the following:
Select the USB flash drive to use
Select the image to use
Opt whether to protect and encrypt the drive with BitLocker and a password, which is a good idea because USB drives can be lost or stolen easily
Opt whether to boot to the new Windows To Go workspace now
Create a workspace with Windows PowerShell
You can use Windows PowerShell to create a Windows To Go workspace. Although the wizard is easier to use, you’ll need to use Windows PowerShell if you want to automate or customize the process or if you want to create multiple workspaces simultaneously. The script required to perform these tasks is quite complex and includes preparing the flash drive with a system partition and a Windows partition and assigning drive letters. You’ll have to apply the image using the available DISM tools. You can use the Bcdboot command to install the applicable boot files for both UEFI and BIOS. There are quite a few steps involved, but in an enterprise it’s worth the effort. You can view a sample Windows PowerShell script here: http://technet.microsoft.com/en-us/library/jj721578.aspx.
Objective summary
Offline Files and Work Folders enable users to work with their personal files even when they aren’t connected to the network. Administrators can control behavior through group policies.
Power plans help users manage battery life. Administrators can manage their plans using Powercfg.exe and Group Policy.
Wi-Fi Direct lets users share files without an intermediary network device. For now, you can only create connections using the Netsh wlan command.
Windows To Go enables users to use Windows 8.1 from other computers using a USB stick that contains the operating system.
Objective review
Answer the following questions to test your knowledge of the information in this objective. You can find the answers to these questions and explanations of why each answer choice is correct or incorrect in the “Answers” section at the end of this chapter.
Objective 5.3: Configure security for mobile devices
You can prevent data from being accessed when mobile devices (or hard drives) are lost or stolen. You can use the same technologies to protect against boot attacks, too, like rootkits. There are other ways to secure devices, though, by using group policies, preventing apps from obtaining a user’s location, encrypting data, using VPNs, and more. Here, you’ll learn only about BitLocker and BitLocker To Go and how to manage startup keys.
Configure BitLocker
BitLocker Drive Encryption lets you encrypt entire hard disks and disk volumes, which include the Windows operating system drive, user files, and system files. This is not EFS. EFS encrypts user files; BitLocker Drive Encryption protects the entire disk. You can use BitLocker to protect 32-bit and 64-bit computers running Windows 8.1 Professional, Windows 8.1 Enterprise, and Windows Server 2012. On computers that have a TPM version 1.2 or 2.0, BitLocker can also ensure that data is accessible only if the computer’s boot components haven’t been compromised (altered) and if the disk is still installed in the original computer.
Exam Tip
You can enable BitLocker before you deploy the operating system. When you do, you can opt to encrypt used disk space only or encrypt the entire drive.
When using BitLocker, you can require users to enter a password to unlock the drive when they want to use it. However, you can require multifactor authentication, too—perhaps by adding a smart card or a USB drive with a startup key on it—on computers with a compatible TPM. BitLocker can also be managed through Group Policy. For instance, you can require that BitLocker be enabled before the computer can be used to store data.
Exam Tip
Two partitions are required to run BitLocker because prestartup authentication and system integrity confirmation have to occur on a separate partition from the drive that is encrypted.
You’ll need to read all you can about BitLocker on TechNet, because there isn’t enough room here to discuss everything. Here, only the most basic information is listed. Refer to http://technet.microsoft.com/en-us/library/hh831507.aspx#BKMK_Overview to learn more about the following:
The requirements for hardware and software. This includes TPM versions, BIOS configuration, firmware requirements, drive size, and so on.
How to tell if your computer has a TPM. An administrator might opt to type TPM.msc and press Enter in a Run dialog box. An end user might opt to access Control Panel, All Items, open BitLocker Drive Encryption and see if he can turn on BitLocker. If a TPM isn’t found, you’ll have to set the required Group Policy, Require Additional Authentication At Startup, which is located in Computer Configuration, Administrative Templates, Windows Components, BitLocker Drive Encryption, Operating System Drives. You must enable this and then select the Allow BitLocker Without A Compatible TPM check box. See Figure 5-21.
Figure 5-21. If the computer doesn’t have a compatible TPM, opt to require additional authentication in Group Policy.Exam Tip
You can only enable BitLocker on an operating system drive without a compatible TPM if the BIOS or UEFI firmware has the ability to read from a USB flash drive in the boot environment. This is because BitLocker requires a startup key. If you do this, though, you won’t be able to take advantage of the prestartup system integrity verification or multifactor authentication.
What credentials are required to configure BitLocker. Only Administrators can manage fixed data drives, but Standard users can manage removable data drives (the latter can be disabled in Group Policy). Standard users can also change the PIN or password on operating system drives to which they have access via BitLocker.
How to automate BitLocker deployment in an enterprise. One way is to use the command-line tool Manage-bde.exe. Manage-bde command-line tools you might use in your own work are detailed later in this section. There are other ways, including using Windows Management Instrumentation (WMI) and Windows PowerShell scripts.
The reasons why BitLocker might start in recovery mode. Reasons include disabling the TPM, making changes to the TPM firmware, making changes to the master boot record, and so on.
How to manage recovery keys. Recovery keys let you access a computer if BitLocker won’t allow access. There are many ways to store these keys for fixed drives including saving them to a folder or your Microsoft account online, printing them, and storing the keys on multiple USB drives.

Configure BitLocker from Control Panel
Before you configure BitLocker, there are a few more things to know. The first time you enable BitLocker you’ll be prompted to create a startup key. This is what’s used to encrypt and decrypt the drive. The startup key can be stored on a USB drive or the TPM chip. If you opt for USB, you’ll have to insert that USB drive every time you want to access the computer, and you’ll also have to enter the key. If a compatible TPM chip is used, the key retrieval is automatic. You can also opt for a PIN. This can be created only after BitLocker is enabled. If you lose the startup key, you’ll have to unlock the drive using a recovery key. This is a 48-digit number that can be stored in numerous ways, including on a USB drive.
There are five authentication methods for protecting encrypted data using BitLocker, consisting of various combinations of TPM, startup PIN, and startup keys; just a TPM; or just a startup key. Here is a brief summary of these options:
TPM + startup PIN + startup key. This is the most secure, but it requires three authentication tasks. The encryption key is stored on the TPM chip, but an administrator must type a PIN and insert the startup key (available on a USB drive).
TPM + startup key. The encryption key is stored on the TPM chip, and an administrator must insert a USB flash drive that contains a startup key.
TPM + startup PIN. The encryption key is stored on the TPM chip, and an administrator must enter a PIN.
Startup key only. An administrator must insert a USB flash drive with the startup key on it. The computer does not have to have a TPM chip. The BIOS must support access to the USB flash drive prior to the operating system loading.
TPM only. The encryption key is stored on the TPM chip, and no administrator login is required. TPM requires that the boot environment has not been modified or compromised.
In addition, the drive that contains the operating system must have two partitions, the system partition and the operating system partition, both of which must be formatted with NTFS.
To configure BitLocker and encrypt the operating system drive on a Windows 8.1 computer, follow these steps:
Open Control Panel, change the view to Small Icons or Large Icons, and click BitLocker Drive Encryption.
Click Turn On BitLocker. (If you receive an error that no TPM chip is available, enable the required Group Policy setting. See Figure 5-20 earlier.)
Choose how to unlock your drive at startup; we’ll choose Enter A Password in this example. See Figure 5-22.
Enter the password, reenter to confirm, then click Next.
Make a choice to save the password; we’ll choose Save To Your Microsoft Account. Click Next. (In this instance, you can perform this step again to perform a secondary backup before moving on.)
Choose to encrypt either the used disk space or the entire drive. Click Next.
Leave Run BitLocker System Check selected and click Continue.
Click Restart Now. If prompted, perform any final tasks, such as removing CDs or DVDs from drive bays, and then click Restart Now again if necessary.
On boot up, type or provide the startup key.
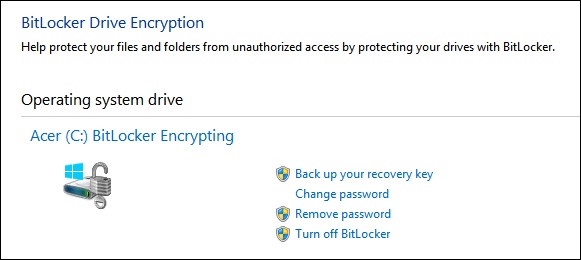
Note the pop-up notification in the Desktop taskbar that encryption is in progress. It will take some time to complete.

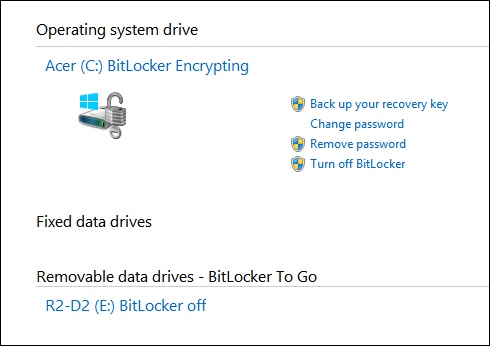
Return to Control Panel and review the BitLocker window. Note that from there you can perform additional tasks, including backing up your recovery key, changing your password, removing the passwords, and turning off BitLocker. You can see which actions require administrator approval by the icon next to the options. See Figure 5-23.
Exam Tip
We’re not sure how many, if any, questions you’ll see on the exam about the available Group Policy settings for BitLocker and BitLocker To Go. However, it’s better to be safe than sorry. Make sure to at least scan the available options here: Computer Configuration, Administrative Templates, Windows Components, BitLocker Drive Encryption from a Group Policy Editor console. There are three folders (Fixed Data Drives, Operating System Drives, and Removable Data Drives), along with a few stand-alone options you’ll find when the BitLocker Drive Encryption container is selected.
Configure BitLocker using Manage-BDE
You don’t have to use Control Panel to manage BitLocker Drive Encryption. You can work from a command line. A few of the commands you can use will turn on or turn off BitLocker, specify unlock mechanisms, update recovery methods, and unlock BitLocker-protected data drives. Many of these commands are used in large enterprises and are not applicable to this objective; however, there are several parameters you might use with the Manage-BDE command, including but not limited to the following:
–status. Use this parameter to provide information about the attached drives including their BitLocker status, size, BitLocker version, key protector, lock status, and more.
–on. This parameter encrypts the drive and turns on BitLocker, used with a drive letter such as C that follows the –on parameter.
–off. This parameter decrypts and then turns off BitLocker, used with a drive letter such as C that follows the –off parameter.
–pause and –resume. Use –pause with a drive letter to pause encryption; use –resume and a drive letter to resume encryption.
–lock and –unlock. Use these parameters to lock and unlock the drive, used with a drive letter.
–changepin. This parameter changes the PIN for the BitLocker-protected drive.
–recoverypassword. Use this parameter to add a numerical password protector.
–recoverykey. This parameter adds an external key protector for recovery.
–password. Use this parameter to add a password key protector.
Exam Tip
Refer to this article on TechNet to see all of the available parameters: http://technet.microsoft.com/en-us/library/dd875513(v=WS.10).aspx. You can also type manage-bde /? at a command prompt to see a list on your own computer.
Configure BitLocker To Go
BitLocker To Go lets you protect removable USB devices with BitLocker Drive Encryption. These devices can be flash drives, Secure Digital (SD) cards, or removable hard disks formatted with NTFS, FAT16, FAT32, or exFat file systems. Just like BitLocker, users must input a password or a smart card with a PIN to unlock the drive. It can be automatically unlocked as well, with administrator approval. TPM isn’t required because there’s no boot device like there is with a laptop, tablet, or desktop computer.
The process used to create a BitLocker To Go drive is similar to the process used to encrypt a fixed disk using BitLocker. Just insert the USB drive, open Control Panel, and access the BitLocker window. Under Removable Data Drives – BitLocker To Go (see Figure 5-24), work through the setup process.
As noted in an Exam Tip earlier, you should familiarize yourself with the available BitLocker and BitLocker To Go Group Policy settings. You can locate them in a Group Policy Editor in Computer Configuration, Administrative Templates, Windows Components, BitLocker Drive Encryption. The BitLocker To Go options are available in the Removable Data Drives container. The eight items listed are summarized briefly here.
Control Use Of BitLocker On Removable Drives. This option defines whether users can add or remove BitLocker encryption from removable drives.
Configure Use Of Smart Cards On Removable Drives. This option defines whether users must use a smart card to access an encrypted drive.
Deny Write Access To Removable Drives Not Protected By BitLocker. This setting prevents users from writing to removable drives that aren’t encrypted.
Configure Use Of Hardware-Based Encryption For Removable Data Drives. This option defines whether BitLocker software encryption can be used instead of hardware encryption on computers that do not support the latter.
Enforce Drive Encryption Type Of Removable Data Drives. This option defines a specific encryption type that must be used with removable drives: Full encryption or Used Space Only encryption. (This option was added in Windows 8.1, so look for it on the exam.)
Allow Access To BitLocker-Protected Removable Data Drives From Earlier Versions Of Windows. This setting defines whether FAT-formatted removable BitLocker drives are accessible from earlier versions of Windows.
Configure Use Of Passwords For Removable Data Drives. This setting defines whether removable drives must be password-protected.
Choose How BitLocker-Protected Removable Drives Can Be Recovered. This option defines whether Data Recovery Agents (DRAs) can be used to access the data on removable BitLocker Drives. The DRA is a user account that an administrator has authorized to recover BitLocker drives in an organization. By default, domain administrators are DRAs.
Configure startup key storage
This objective covers how to configure startup key storage. However, to understand what a startup key is, you must first understand what it isn’t. There are several key management terms to contend with:
TPM owner password. You must initialize the TPM before you can use it with BitLocker Drive Encryption. When you do, you create a TPM owner password that is associated only with the TPM. You supply the TPM owner password when you need to enable or disable the TPM or reset the TPM lockout.
Recovery password and recovery key. The first time you set up BitLocker, you are prompted to configure how to access BitLocker-protected drives if access is denied. This involves creating a recovery key. You will need the recovery key if the TPM cannot validate the boot components, but the majority of the time a failure to access a BitLocker drive occurs because the end user has forgotten the PIN or password.
Password. A password can be used to protect fixed, removable, and operating system drives. It can also be used with operating system drives that do not have a TPM. The password can consist of 8 to 255 characters as specified by the Configure Use Of Passwords For Operating System Drives, Configure Use Of Passwords For Removable Data Drives, and Configure Use Of Passwords For Fixed Data Drives Group Policy settings.
PIN and enhanced PIN. If you use a TPM, you can configure BitLocker with a PIN that the user has to type to gain access to the computer. The PIN can consist of 4 to 20 digits as specified by the Configure Minimum PIN Length For Startup Group Policy setting. Enhanced PINs use the full keyboard character set in addition to the numeric set to allow for more possible PIN combinations. You must enable the Allow Enhanced PINs For Startup Group Policy setting before adding the PIN to the drive.
Startup key. You use a startup key, which is stored on a USB flash drive, with or without a TPM. The USB flash drive must be inserted every time the computer starts. The USB flash drive must be formatted by using the NTFS, FAT, or FAT32 file system.
Now that you know what a startup key is, you can save your computer’s startup key on a USB flash drive. Right-click the BitLocker-protected drive to get started and then follow the prompts.
Exam Tip
BitLocker Network Unlock makes it easier to manage BitLocker-enabled TPM + PIN workstations and servers in a domain. Network Unlock allows the PIN entry prompt to be bypassed when a domain-connected computer reboots. The computer is automatically unlocked using a trusted key that is provided by the Windows Deployment Services server as its secondary authentication method.
Objective summary
BitLocker and BitLocker To Go can be used to protect mobile devices and mobile drives from theft, loss, or attacks by hackers.
You need to carefully manage startup keys, recovery keys, and other items related to BitLocker Drive Encryption so that you can get back into the drive if it is compromised or if the user forgets the PIN or password.
The command-line tool Manage-bde along with applicable parameters lets you manage BitLocker from a command line.
Objective review
Answer the following questions to test your knowledge of the information in this objective. You can find the answers to these questions and explanations of why each answer choice is correct or incorrect in the “Answers” section at the end of this chapter.
Chapter summary
Users must be able to connect to your organization remotely and securely. There are many options you can consider including VPNs, broadband, cellular, and so on.
You must choose the best VPN authentication method for your network infrastructure and client support. IKEv2 is currently the best option for Windows 8.1 users on Windows Server 2012 domain networks.
VPN Reconnect lets users automatically reconnect to the network through a VPN when the connection is lost.
Windows 8.1 supports tethering and can connect to shared, personal hotspots created by others.
Sync Center, Offline Files, and Work Folders allow users to work away from the office and sync data between their computers and network servers when it is appropriate or configured by Group Policy.
Windows To Go is Windows 8.1 on a USB flash drive. This offers workers additional options when working away from the office.
Wi-Fi Direct lets users share files without a network intermediary like a router or access point and is currently enabled and managed with third-party apps and the command-line tool Netsh.
BitLocker, BitLocker To Go, and the various authentication options (with and without a TPM) help keep mobile computers and the data on them safe even if those devices are lost, stolen, or hacked.
Answers
This section contains the solutions to the thought experiments and answers to the objective review questions in this chapter.
Objective 5.1: Thought experiment
IKEv2 supports VPN Reconnect and can be used on Windows 7, Windows 8, and Windows Server 2012 computers.
Yes, IKEv2 supports smart cards and EAP authentication.
No. IKEv2 and EAP support Windows Server 2008 R2.
Objective 5.1: Review
Correct Answer: C
Incorrect: This protocol does not support the use of a preshared key.
Incorrect: This protocol does not support the use of a preshared key.
Correct: This is the only protocol listed that supports the use of a preshared key.
Incorrect: This protocol does not support the use of a preshared key.
Incorrect: This is Remote Desktop Protocol and is not correct.
Correct Answers: A, B, and C
Correct: The host must be running Windows XP Professional, Windows Vista Enterprise, Windows Vista Ultimate, Windows Vista Business, Windows 7 Ultimate, Windows 7 Enterprise, Windows 7 Professional, Windows 8 Pro, or Windows 8 Enterprise.
Correct: The host must be running Windows XP Professional, Windows Vista Enterprise, Windows Vista Ultimate, Windows Vista Business, Windows 7 Ultimate, Windows 7 Enterprise, Windows 7 Professional, Windows 8 Pro, or Windows 8 Enterprise.
Correct: The host must be running Windows XP Professional, Windows Vista Enterprise, Windows Vista Ultimate, Windows Vista Business, Windows 7 Ultimate, Windows 7 Enterprise, Windows 7 Professional, Windows 8 Pro, or Windows 8 Enterprise.
Incorrect: The host cannot be running Windows RT, although Windows RT can be used to connect to a Remote Desktop host.
Incorrect: The host must be running Windows XP Professional, Windows Vista Enterprise, Windows Vista Ultimate, Windows Vista Business, Windows 7 Ultimate, Windows 7 Enterprise, Windows 7 Professional, Windows 8 Pro, or Windows 8 Enterprise.
Incorrect: mstsc.exe /f is the correct answer.
Incorrect: mstsc.exe /f is the correct answer.
Incorrect: mstsc.exe /f is the correct answer.
Correct: This is the proper syntax and /f is the correct parameter.
Correct Answer: C
Incorrect: You can connect to a VPN via broadband.
Incorrect: VPN Reconnect is enabled and is set to 30 minutes.
Correct: The VPN protocol must be IKEv2.
Incorrect: The VPN protocol can’t be L2TP, it must be IKEv2.
Correct Answer: B
Incorrect: Windows 8.1 does support connections to personal hotspots.
Correct: They must select the connection from the Networks pane.
Incorrect: This feature is enabled by default.
Incorrect: The computer can be running any edition of Windows 8 or Windows 8.1 to use this feature.
Objective 5.2: Thought experiment
Cost-Aware Synchronization
Always Offline mode
No, the computer will go offline when the threshold is met.
No. Always Offline and Cost-Aware Synchronization are only available for clients and servers running the latest operating systems, currently Windows 8 and Windows Server 2012.
Objective 5.2: Review
Correct Answer: B
Incorrect: You must configure the Slow-Link Mode setting to 1 millisecond to achieve your goal.
Correct: This is the proper way to make the configuration change.
Incorrect: You must configure the Slow-Link Mode setting to 1 millisecond to achieve your goal.
Incorrect: Always Offline mode is a setting in Group Policy, not in Sync Center.
Correct Answers: A and B
Correct: First, you must list the power plans to obtain the GUID for the one to export.
Correct: Second, you must export the power plan using this command.
Incorrect: The parameter –show all is used with the Netsh command and is not used here to list the available power plans.
Incorrect: You must include a name for the file, such as power.pow, in the command.
Correct Answer: D
Incorrect: In Sync Center, you can click Offline Files and then click Schedule to configure when to sync files, but you must first have set up a sync partnership for which to schedule syncing.
Incorrect: In Sync Center, Set Up New Sync Partnerships is an option, but you are only prompted to configure the sync partnerships manually. There is no option there to click to set up new sync partnerships.
Incorrect: In Sync Center, you can click Manage Offline Files, and there is a General tab. However, the first step to configuring Offline Files is to set up a sync partnership.
Correct: You must navigate to a share on a different computer or file server, right-click that share, and click Always Available Offline to get started.
Correct Answer: A
Correct: Computer Configuration, Policies, Administrative Templates, Windows Components, Work Folders.
Incorrect. Workplace Join is not related to Work Folders and is not the proper place to configure the desired option.
Incorrect: User Configuration, Policies, Administrative Templates, Windows Components, Work Folders is where you specify Work Folders settings. You do not configure this in Software Settings.
Incorrect. User Configuration, Policies, Administrative Templates, Shared Folders is a valid path, but it is not where you configure Work Folders.
Correct Answer: D
Incorrect: All answers are correct.
Incorrect: All answers are correct.
Incorrect: All answers are correct.
Correct: All of the above are correct.
Objective 5.3: Thought experiment
TPM.msc.
You’ll have to set the required Group Policy Require Additional Authentication At Setup, which is located in Computer Configuration, Administrative Templates, Windows Components, BitLocker Drive Encryption, Operating System Drives. You must enable this and then select the Allow BitLocker Without A Compatible TPM check box.
The BIOS or UEFI firmware must have the ability to read from a USB flash drive in the boot environment.
TPM + startup PIN + startup key
Objective 5.3: Review
Correct Answers: A and B
Correct: This is true.
Correct: This is true.
Incorrect: The computer does not need a compatible TPM chip. It can have one, but it doesn’t have to.
Incorrect: Because C is incorrect, this is incorrect also.
Correct Answer: B
Incorrect: Control Use Of BitLocker On Removable Drives defines whether users can add or remove encryption from removable drives.
Correct: You should enable the Group Policy Deny Write Access To Removable Drives Not Protected By BitLocker.
Incorrect: Enforce Drive Encryption Type Of Removable Data Drives relates to how much of the drive should be encrypted with BitLocker.
Incorrect: Because A is not correct, this is not correct.
Correct Answer: D
Incorrect: –forcerecovery is not a key-related parameter.
Incorrect: –unlock is used to allow access to BitLocker-encrypted data.
Incorrect: –enable is used to enable automatic unlocking of a drive.
Correct: This is the proper syntax. –recoverypassword and –recoverykey are both key protectors.
Correct Answer: F
Incorrect: Because all answers are correct, F is the correct answer.
Incorrect: Because all answers are correct, F is the correct answer.
Incorrect: Because all answers are correct, F is the correct answer.
Incorrect: Because all answers are correct, F is the correct answer.
Incorrect: Because all answers are correct, F is the correct answer.
Correct: All of the above are true of BitLocker To Go drives.