
Chapter at a glance
Organize
Organize slides by using sections, Adding and renaming sections

Comment
Finalize

Present
Practicing with Presenter view
IN THIS CHAPTER, YOU WILL LEARN HOW TO
Add and rename sections.
Insert comments.
Print a presentation.
Finalize a presentation.
Deliver a presentation.
Practice with Presenter view.
You may need to collaborate with others as you develop your presentation. Microsoft PowerPoint 2013 makes this process easy, with features that support commenting, sharing, and broadcasting online. You may also need to use these tools and others as you finalize and deliver your presentation.
In this chapter, you’ll work with sections, comments, and tools such as the Document Inspector and the Accessibility Checker.
Practice Files
To complete the exercises in this chapter, you need the practice files contained in the Chapter16 practice file folder. For more information, see Download the practice files in this book’s Introduction.
Sections are a useful administrative tool for grouping slides. For example, you might divide a presentation by subject to make it easier to navigate when you’re giving the presentation. Or you might divide it among a number of colleagues, each of whom takes responsibility for developing the slides in one section of the presentation. Whatever the reason, sections can be tremendously helpful for managing content within a PowerPoint file.
In this exercise, you’ll add and manipulate sections.
Set Up
You need the SampleContentA_start presentation located in the Chapter16 practice file folder to complete this exercise. Open the SampleContentA_start presentation and click Enable Content if you’re prompted to do so. Save the presentation as SampleContentA. Then follow the steps.
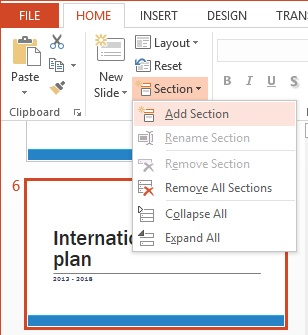
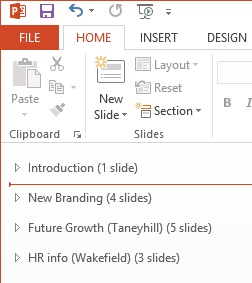
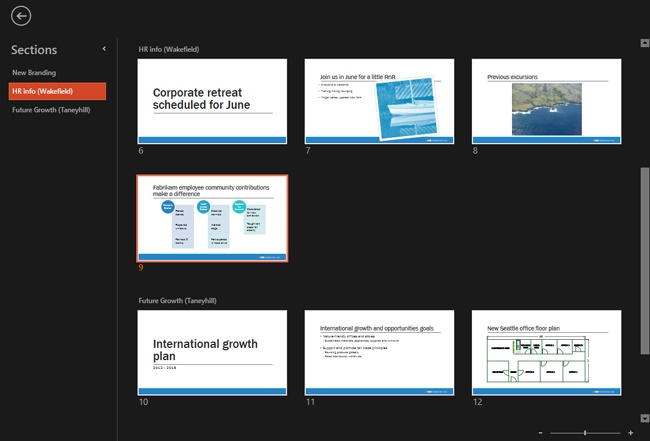
With slide 6 selected, on the Home tab, in the Slides group, click Section, then Add Section. A section called Untitled Section will be added, and the slides in it (slides 6 through 10) will be selected. (Another existing section begins with slide 11.)
With the Untitled Section still selected, click the Section button on the Home tab again and choose Rename Section.
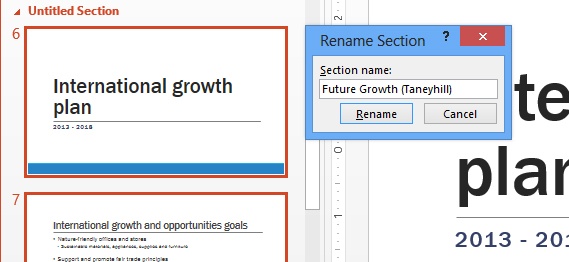
In the Rename Section dialog box, enter Future Growth (Taneyhill) and click Rename. Untitled Section changes to Future Growth (Taneyhill) in the Slides pane.
On the View tab, click Slide Sorter to switch to Slide Sorter view.
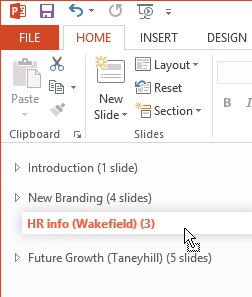
On the Home tab, click Section, then Collapse All to collapse all sections.
Click the last section, HR info (Wakefield), to select it. Drag the section ahead of the previous Future Growth section. When you release the mouse button, the section will be repositioned.
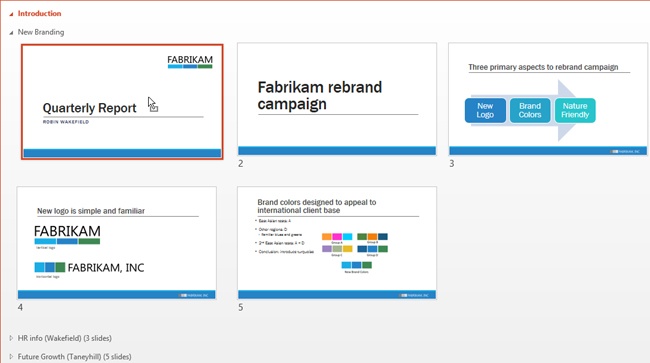
Click the arrows next to the Introduction and the New Branding sections to expand them.
Click slide 1 to select it. Drag it into the New Branding section just before slide 2, the Fabrikam rebrand campaign slide. Release the mouse button to place the slide in the New Branding section.
Click the Introduction section, and on the Home tab, click Section, then Remove Section to delete the empty Introduction section.
Like sections, comments are also very helpful when developing a presentation. When you add a comment to a slide or an object, anyone reviewing the file in Normal view will be able to view and respond to it, but the comments will not be displayed in Slide Show view. This makes comments a handy way to communicate with colleagues as you’re developing a presentation. The introduction of the new threaded Comments pane improves this feature in PowerPoint 2013, especially to enhance collaboration via the cloud.
In this exercise, you’ll add comments to your PowerPoint file.
Set Up
You need the SampleContentB_Start presentation located in the Chapter16 practice file folder to complete this exercise. Open the SampleContentB_Start presentation, and save it as SampleContentB. Then follow the steps.
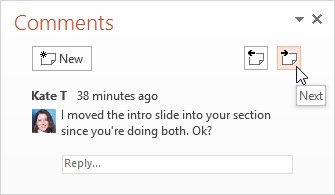
Click the Comments button on the status bar to open the Comments pane.
With slide 1 selected, in the Comments pane, click the Next button to move to the next comment in the file.
You’ll be taken to slide 3.
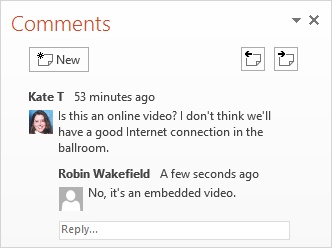
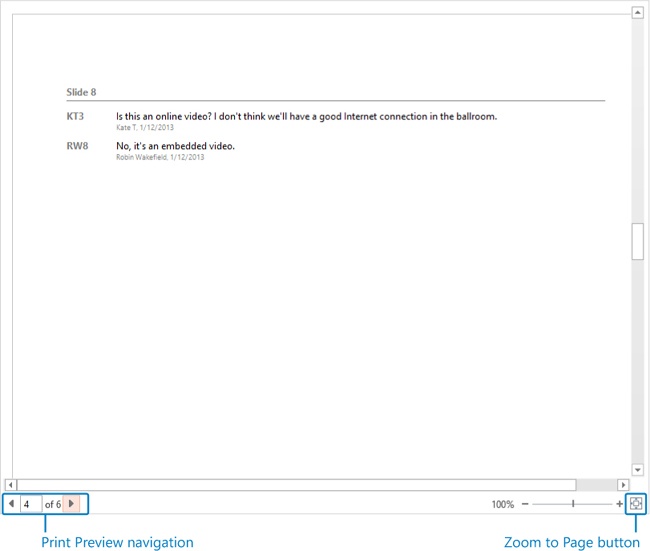
Click Next again, and you’ll be taken to slide 8. In the Comments pane, click inside the Reply box and enter No, it’s an embedded video. Then press Enter to create the comment.
Select slide 5 and in the Comments pane, click New to add a new comment. Enter Kate, be sure to review notes, and then press Enter to create the comment.
Click the Next button four times, until Kate’s comment on slide 13 is selected.
Click the X in the upper-right corner of Kate’s comment to delete it.


Although we’re moving to a more digital world and printing less and less, sometimes you still need to print your slides or your notes. PowerPoint gives you a number of options for this. You can print full page slides if you need to display one slide per page. Or you can print handouts, which lets you choose how many smaller slide thumbnails should appear on each page. You can also print the note pages, which include a slide thumbnail plus any speaker notes you added in the Notes pane. There are also options to print comments or print only a specific section.
In this exercise, you’ll print your PowerPoint file.
Set Up
You need the SampleContentC_Start presentation located in the Chapter16 practice file folder to complete this exercise. Open the SampleContentC_Start presentation, and save it as SampleContentC. Then follow the steps.
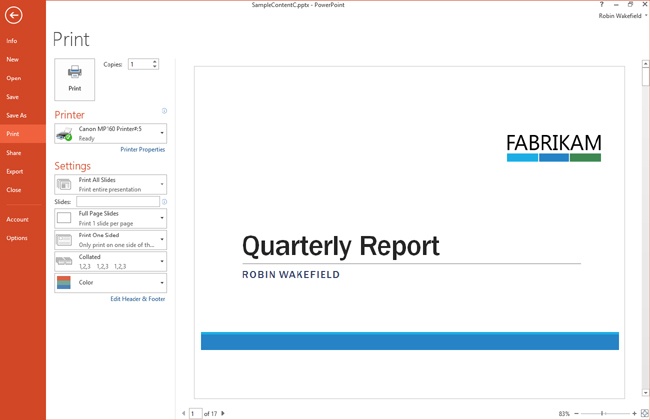
Choose File, then Print.
Tip
If there are comments in the file, PowerPoint will print them by default. If you do not want to print comments, deselect them by going to File, Print. In the Print Layout options (where you can choose to print full page slides or multiple slides per page), clear the option to Print Comments And Ink.
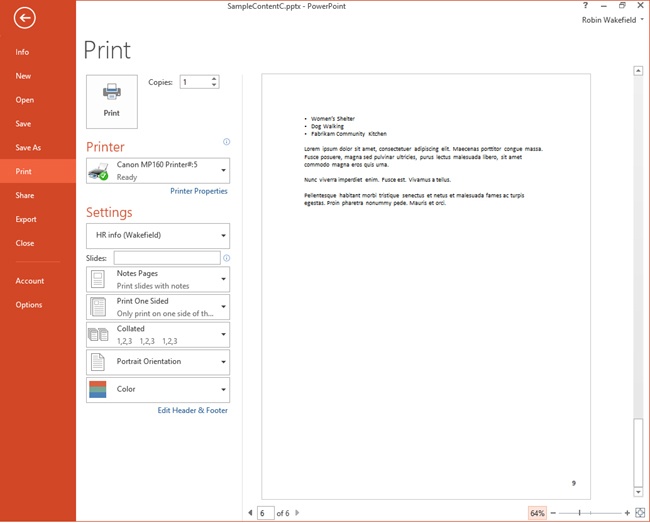
In the Print dialog box, click Print All Slides to access options for which slides to print. Choose HR info (Wakefield) in the Sections options to print only slides included in that section.
Click Full Page Slides to access the Print Layout settings.
Select Notes Pages to print your slides with their speaker notes. Also make sure that Print Comments and Ink Markup remains checked so the comments included in the file will print.
Below the preview of the slides, use the next and previous arrows to move through the pages to see how your notes pages will look when printed.
When you get to page 4, Use the Zoom slider at the lower-right of the Print page to help you view the comments more clearly, then click the Zoom to Page button to view the entire page again.
Click the Print Preview nagivation arrow to show the print preview of page 5. Click it again to view a preview of page 6, which displays the leftover notes from slide 5.


PowerPoint has a number of tools you might want to use as you finalize your presentation. Although you can check spelling from the Review tab, most of the other finalization tools are located in the Backstage view. To access them, click the File tab, then Info.
If there are any multimedia files in your presentation, you may find options to Optimize Compatibility and Compress Media. Clicking Optimize Compatibility converts older .wmv files as well as video file types such as QuickTime .mov files to newer Windows Media Video format so they’re more likely to play on other PCs. It also prompts you to embed any linked multimedia files so they’re not lost if you transfer your presentation to another computer. Use Compress Media to make the media files smaller, which in turn makes your PowerPoint file size smaller. Be sure to run the presentation in Slide Show view after you compress it to ensure that the media quality hasn’t suffered.
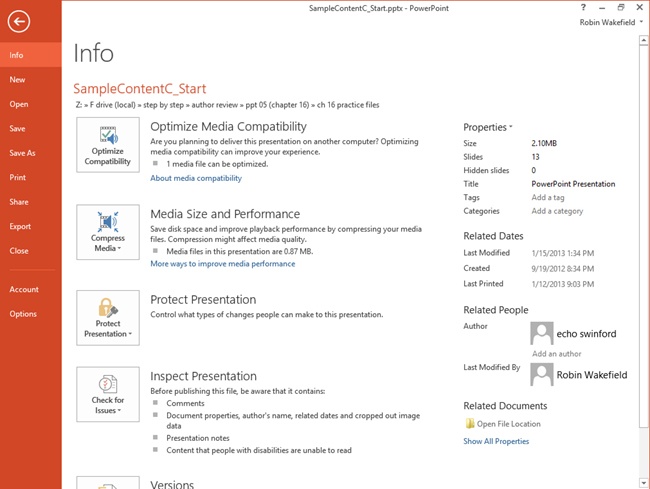
Protect Presentation includes an option to Mark As Final, which prevents users from making changes to the file. Note that this is only an administrative tool. Its sole purpose is to prevent users from making inadvertent changes to the presentation. Anyone can simply click Mark As Final again to unmark the presentation and allow changes again, or someone can click the Edit Anyway button that appears when a presentation that’s been marked as final is opened.
Inspect Presentation includes tools to Inspect Document, Check Accessibility, and Check Compatibility.
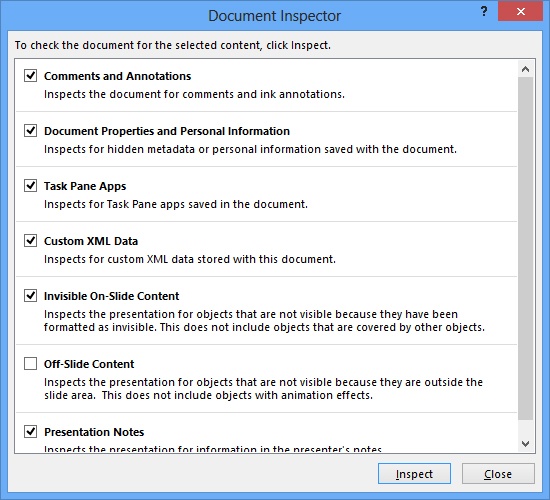
The Document Inspector is a great way to remove unwanted or personal content from your presentation all at once. For example, if you want to remove your speaker notes before sending your presentation to a client, click Inspect Document and choose the Presentation Notes option. Be sure to do this on a copy of your presentation, so you don’t lose the only copy of your notes! You can also remove all comments and ink annotations in the file by using the Document Inspector.
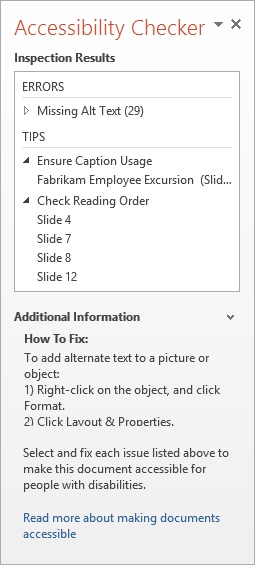
Check Accessibility helps you make your presentation easier for people with disabilities to read. Select an object in the Accessibility Checker pane and then scroll through the Additional Information to get tips for fixing the associated accessibility problems.
The Compatibility Checker tells you what issues you may experience when you save your file in a format for a previous version of PowerPoint (with a .ppt file extension). It runs by default when you save in that earlier file format, but you can access it at any time. For example, running the Compatibility Checker is helpful if you’re wondering what types of issues people using previous versions of PowerPoint might encounter when trying to edit or view your .pptx file.

To deliver a presentation to an audience, you must first put the presentation into Slide Show view. There are a number of ways to do this. You can click the shortcut icon on the status bar, click one of the options in the Start Slide Show group on the Slide Show tab, or press F5 on your keyboard.
Keyboard Shortcut
Press F5 to start a presentation from the beginning. Press Shift+F5 to begin the presentation from the slide that’s currently selected.
If your computer doesn’t have another monitor (or a projector) attached to it, any of those actions will open the Slide Show view of your presentation. This is the full-screen presentation that your audience sees.
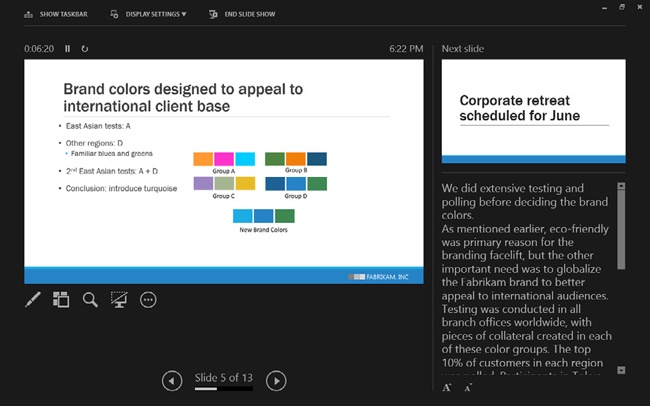
If you have a second monitor or a projector attached to your computer, PowerPoint will also open Presenter view by default when you begin a slide show. Presenter view displays thumbnails of your current slide and the next slide, your speaker notes, a timer, and various navigation and inking tools. Your audience will see everything that happens in Slide Show view, but only you will see Presenter view.

Troubleshooting
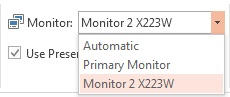
If you start a slide show and don’t see the full-screen Slide Show view on the correct monitor, choose a different monitor in the Monitors group on the Slide Show tab.
When you’re in Slide Show view, there are a number of ways to navigate. Press the mouse button to move forward. On a touch device, you can swipe backward and forward. If you have a keyboard available, you can also press the spacebar, the Right Arrow key, the Down Arrow key, or the N key to move to the next slide. The Left Arrow key, the Up Arrow Key, or the P key will take you to the previous slide. Pressing the B key will black out the screen, which is a great way to bring focus back to you during a question and answer session, for example. If you know your content well, you can also enter the slide number and press the Enter key to jump to that slide. If you don’t want to remember all those slide numbers (and who does?), PowerPoint 2013 also has a new See All Slides feature that shows thumbnails of all your slides, which allows you to quickly jump to any slide in the presentation.
Tip
To view a complete list of shortcuts available during a presentation, press F1 while you’re in Slide Show view.
Tip
If you don’t want Presenter view to activate when you’re running Slide Show view with two monitors, clear the Use Presenter View check box in the Monitors group of the Slide Show tab.
In this exercise, you’ll begin a presentation and navigate through some of the slides.
Set Up
You need the SampleContentD_Start presentation located in the Chapter16 practice file folder to complete this exercise. Open the SampleContentD_Start presentation, and follow the steps.
Select slide 2 in the Slides pane.
With slide 2 selected, click the Slide Show button on the status bar to begin your slide show from the selected slide.
While in Slide Show view, press the Down Arrow key to advance one slide.
Press the Up Arrow key to move back to slide 2.
Press the Spacebar to advance to slide 3.
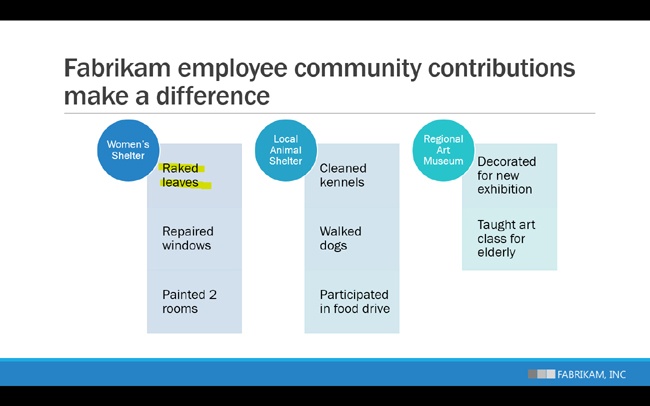
Press the 9 key and then press Enter to jump to slide 9, which is titled Fabrikam employee community contributions make a difference.
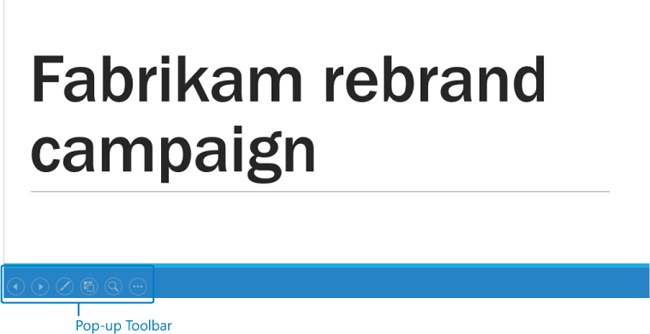
Move your mouse pointer to the lower-left corner of the screen to activate the Pop-up Toolbar.
Click the See All Slides button to open the Navigation Grid that displays thumbnails of all the slides in the presentation.
Important
If you activate the Navigation Grid in Slide Show view, your audience will see it. If you don’t want the audience to see the Navigation Grid, activate it in Presenter view (see the section, Practicing with Presenter view, later in this chapter).
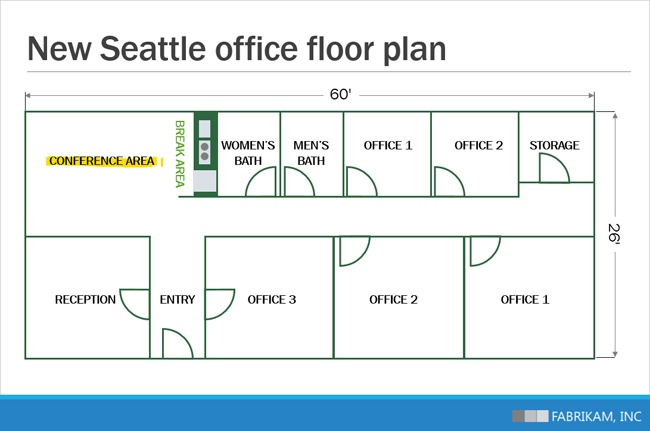
Click the slide 12 thumbnail to see slide 12 in full-screen Slide Show view.
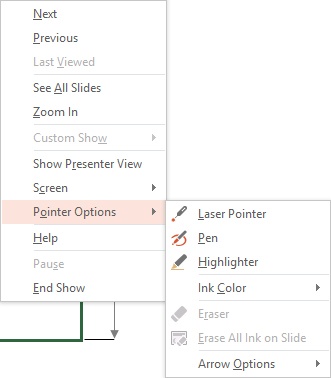
In Slide Show view, right-click anywhere on the screen and choose Pointer Options, then Highlighter.
Drag the yellow highlighter cursor over the words Conference Area to highlight them on the slide.
Press Esc to turn off the highlighter and return to the arrow pointer.
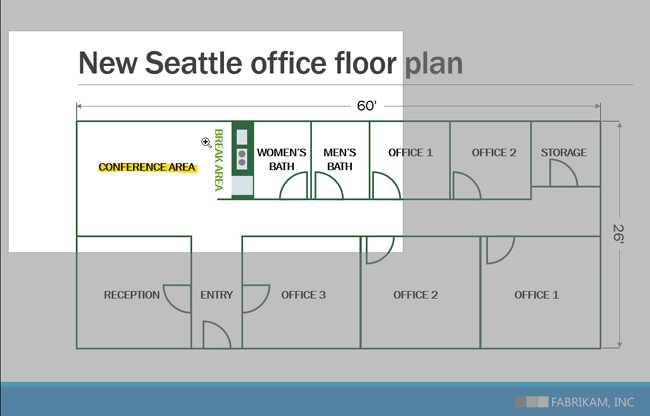
Click the Zoom tool on the Pop-up Toolbar.
When the pointer becomes a magnifying glass icon, click near the highlight you just added to zoom in on the conference area of the slide.
When the pointer turns into a hand icon, drag to pan around the slide.
Press Esc to exit pan and zoom mode.
Press Esc again to end your slide show and return to Normal view.
Click Keep if prompted to keep or discard your ink annotations.

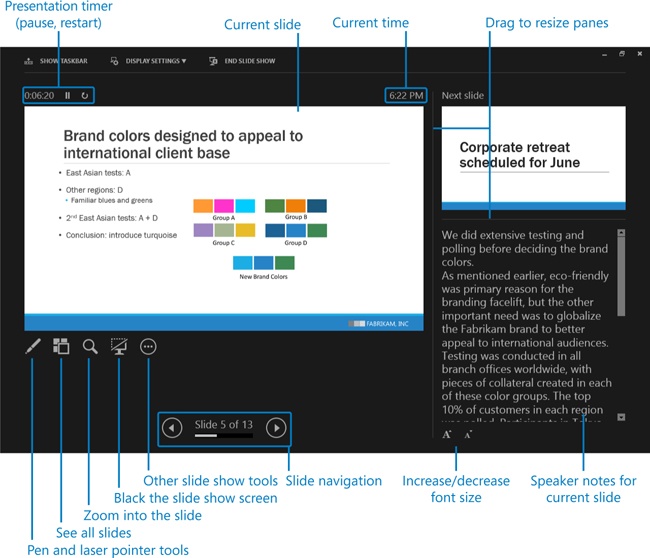
Presenter view has been included in PowerPoint for many versions. It’s an option that lets you see your slide thumbnails and speaker notes on your computer, while your audience sees only your full-screen slides on the projected screen.
PowerPoint 2013 takes Presenter view to a whole new level. Not only is it easier to find on the Slide Show tab of the ribbon, but it’s also already turned on by default. Probably the most important enhancement is that you can now use Alt+F5 to open Presenter view without having a projector attached to the computer! This makes it simple and convenient to practice your delivery with Presenter view so you’re fully prepared once you do get in front of an audience.
In this exercise, you’ll open a presentation in Presenter view and navigate through it.
Set Up
You need the SampleContentE_Start document located in your Chapter16 practice file folder to complete this exercise. Open the SampleContentE_Start document, and then follow the steps.
Press Alt+F5 to open the presentation on slide 1 and access Presenter view.
Click the right arrow at the bottom of the Presenter view screen until you get to slide 5.
Move your mouse pointer over the vertical line separating the current slide from the notes and the next slide. When the mouse pointer turns into a double-headed arrow, drag to the left to increase the width of the Next Slide and Notes panes.
Move your mouse pointer over the horizontal line separating the next slide from the notes. When the mouse pointer turns into a double-headed arrow, drag up to increase the height of the Notes pane and decrease the height of the Next Slide pane.
Click the Increase Font Size button at the bottom of the screen to increase the size of your notes.
Click the See All Slides button to open the Navigation Grid.
You will see thumbnails of all your slides, but your audience won’t.
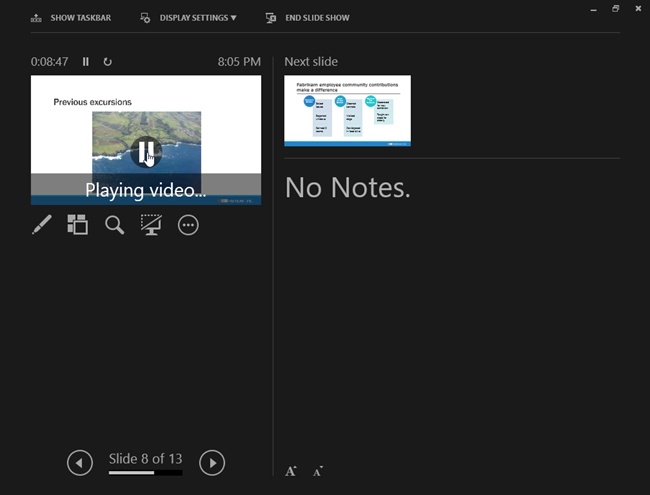
Click slide 8 in the Presenter view Navigation Grid to advance the presentation to that slide.
In the current slide thumbnail in Presenter view, click the video to start it.
Your audience won’t see this happen. They will only see the video begin to play in Slide Show view.
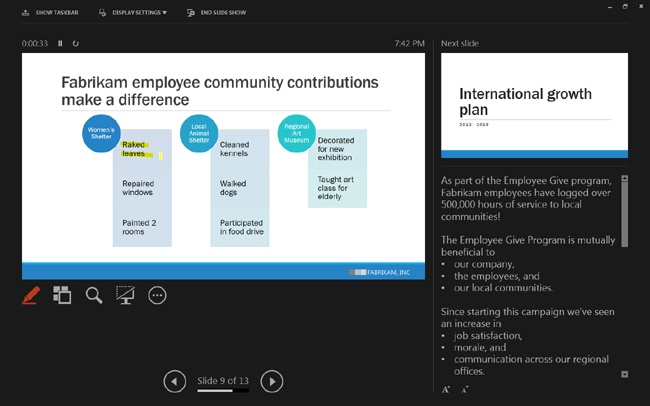
Navigate to slide 9 by using the arrows at the bottom of Presenter view.
Click the Pen and Laser Pointer Tools icon and select Highlighter.
Your mouse pointer changes to a yellow rectangle.
On the slide thumbnail in Presenter view, drag over the words Raked Leaves to highlight them. When you let go of the left mouse button, the highlight will appear in Slide Show view also.
Click the End Slide Show button at the top of the Presenter view window to end the presentation and leave Presenter view.
Click Keep if prompted to keep or discard your ink annotations.
Sections are very helpful for managing content and for presentation development.
Mark As Final doesn’t keep people from making edits to your presentation.
PowerPoint 2013 uses a friendly threaded Comments pane.
The redesigned Pop-up Toolbar makes slide show tools easier to access using touch-enabled devices.
You can click the Zoom tool in Slide Show view or Presenter view to pan and zoom on your slide.
You don’t have to have a second monitor to practice with Presenter view.