
Chapter at a glance
Add

Apply
Applying enhanced fills and effects

Create
Insert
Inserting, cropping, and formatting pictures
IN THIS CHAPTER, YOU WILL LEARN HOW TO
Add and format shapes.
Apply enhanced fills and effects.
Create your own shapes.
Insert, crop, and format pictures.
Many people don’t realize it, but Microsoft PowerPoint is actually an extremely powerful drawing application. Not only can you format shapes as you’d expect by applying solid and gradient fills and outlines, but you can also add 3-D effects and other enhancements, such as shadows and reflections. PowerPoint even gives you some new tools to create your own shapes.
You can apply most of this formatting to pictures as well, all of which helps you create an attractive, cohesive presentation. Picture features in PowerPoint 2013 include a background removal tool, a picture cropping tool, recoloring options, and artistic filters to go along with the more common shadows, reflections, and 3-D settings.
After you’ve gotten your shapes and pictures looking beautiful, you need to position them on the slide. PowerPoint 2013 has a number of enhanced features to help with alignment and distribution, including enhanced Smart Guides and new colorable guides that can be locked to the slide master.
In this chapter, you’ll learn all about creating and formatting shapes and pictures. You’ll also learn about using the alignment tools and the new guides and Smart Guides to position objects after you’ve created them.
Practice Files
To complete the exercises in this chapter, you need the practice files contained in the Chapter14 practice file folder. For more information, see Download the practice files in this book’s Introduction.
You may already be familiar with the Shapes gallery in PowerPoint. It gives you common shapes like lines, rectangles, arrows, and other frequently used shapes. What you may not realize is that there are a number of different ways to add and format these shapes.
In this exercise, you’ll insert a shape. You’ll also position shapes by using the Smart Guides, and format them by using the Shape Styles gallery, the Theme Color palette, and the new Eyedroppers.
Set Up
You don’t need any practice files to complete this exercise. Open PowerPoint to a new, blank presentation, and then follow the steps.
Select the first (and only) slide. On the Home tab, click the Layout button and choose the Blank layout so the content placeholders don’t get in your way while you’re drawing.
On either the Home or the Insert tab of the ribbon, click the Shapes button to expand the Shapes gallery.
See Also
For more information about how screen resolution and window size affect your display, see Chapter 1.
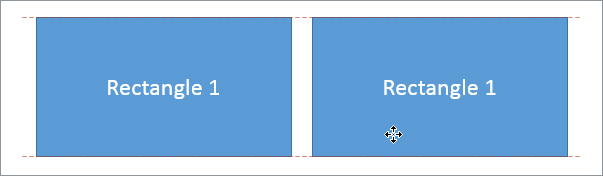
Click the Rectangle tool, (accessed from Rectangles or Recently Used Shapes), then click and drag on the slide to create a rectangle.
Select the rectangle and enter Rectangle 1.
The text is added to the rectangle.
Select the rectangle and press Ctrl+D to duplicate it.
Drag the duplicated rectangle alongside the original rectangle.
Smart Guides appear to help you align the two shapes.
Press Ctrl+D again. PowerPoint creates a duplicate rectangle perfectly aligned and distributed with the other two! Press Ctrl+D again to create a fourth aligned and distributed rectangle.
Select the number 1 in the second rectangle. Enter 2 so the text reads Rectangle 2. Change the text in the third and fourth shapes to Rectangle 3 and Rectangle 4.
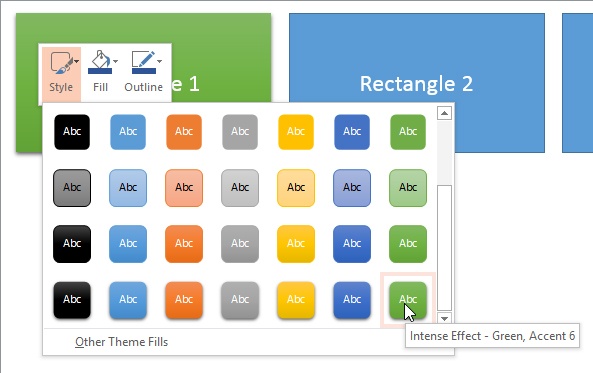
Right-click Rectangle 1. Click the Style button to expand the Shape Styles gallery.
Point to the different formatting chips in the gallery to view how each would affect the selected shape. (This is called Live Preview.) Scroll to the bottom of the gallery and click the green chip in the bottom row to apply it. (It’s labeled Intense Effect - Green - Accent 6.)
Right-click Rectangle 2. Click the Fill button, then select the chip that represents Orange, Accent 2 on the top row of the Theme Colors palette.
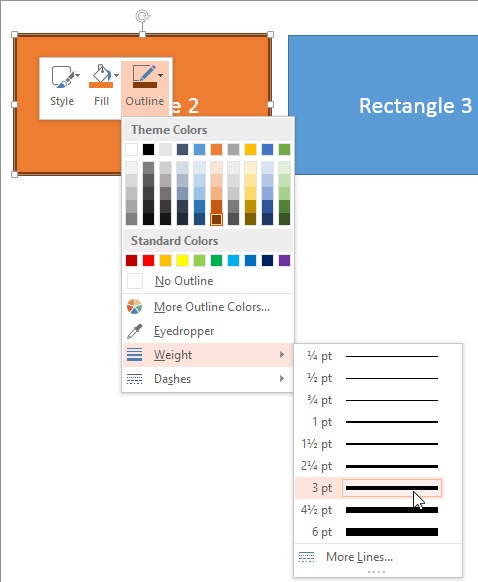
Click the Outline button and select the last chip in the Accent 2 Orange column to change the outline color of the rectangle to dark orange.
Click Outline again, then Weight, then 3 pt to add a thicker border to the rectangle.
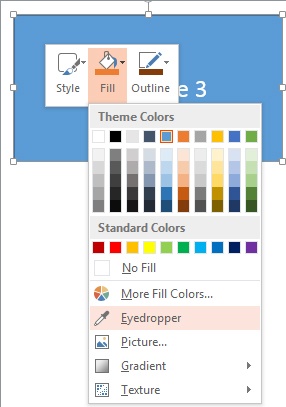
Right-click Rectangle 3. Click the Fill button to expand the Fill Colors gallery, and choose Eyedropper from the list.
Move the Eyedropper to Rectangle 2 and click when the color swatch turns orange to apply the orange color to Rectangle 3.
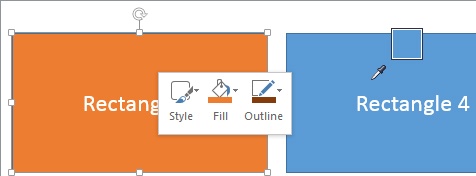
Right-click Rectangle 3 and click Outline, then Eyedropper. Move the Eyedropper over Rectangle 4 until it turns blue, then click to apply a blue outline to Rectangle 3. Click Outline again, then Weight, then 3 pt to apply a 3-point border to Rectangle 3.
Alignment tools
The enhanced Smart Guides in PowerPoint 2013 are extremely helpful. They assist not only with alignment, but also with spacing (also known as distributing) objects on the slides. But sometimes they can get in the way. If that happens, you can always turn them off by right-clicking the slide and choosing Grid And Guides. Clear the Smart Guides option to turn them off. Of course, select the Smart Guides option if you want to turn them on again.
In addition to the powerful Smart Guides, PowerPoint 2013 also has enhanced guides. Guides are dotted lines that show up on the sides. They’re very useful for indicating text-safe zones and margins, for example. To turn them on, right-click the slide, choose Grid And Guides, and then either Add Horizontal Guide or Add Vertical Guide. Turn the guides on and off by selecting Guides in that same dialog box. To change the color of any guide, right-click it, and then select Color. Drag to position guides on your slide.

Keyboard Shortcut
Use Alt+F9 (the function key) to toggle guides on and off. Press Ctrl and drag a guide to create more guides.
New in PowerPoint 2013 is the ability to add guides to the slide master and layouts! Users have asked for lockable guides for a long time, and this is the next best thing. Put guides that you don’t want to grab and move by mistake onto the slide masters and layouts. You can still create guides directly on the slides when you need them quickly, and these guides will be selectable and moveable on the slides.
Finally, the conventional Alignment And Distribution tools are still available from the Arrange group on either the Home tab or tool tabs, but with the new guides and Smart Guides, you may never need to use them!
Theme colors vs. direct colors
It can be really confusing when you copy objects or slides from one presentation to another and all the colors change. It might seem like PowerPoint is doing something wrong, but it’s actually just PowerPoint trying to be helpful.
The colors at the top of any of the Color galleries are called Theme Colors, and as you learned in Chapter 12, all templates and presentations have a set of theme colors built in. If you think about the theme colors as being positional, that might help. For example, if you apply the Accent 2 color—whatever it might be—to a rectangle, when you apply a different template (which often happens if you copy a slide into a new presentation), then the rectangle updates its color to the new template’s Accent 2 color.
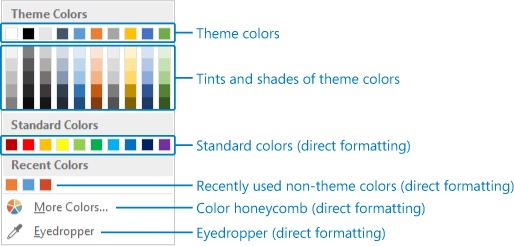
Not all colors are theme colors, though. If you click More Colors, the familiar honeycomb will appear. You can select colors from it, or you can click the Custom tab and input your own RGB (red, green, and blue) values.
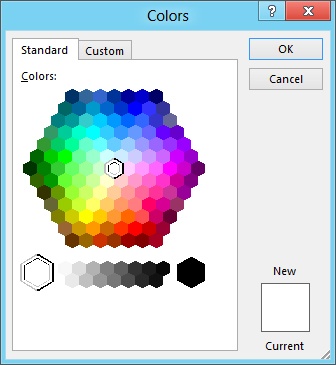
The colors you select in this dialog box show up in the Color Gallery as Recent Colors, and they are all considered direct or absolute formatting. This means that they are not theme colors, so they will not change when you apply a new template or color theme. Any colors you apply with the Eyedropper tools are also direct colors, not theme colors.
Finally, the Standard Colors are also direct colors. Hey, sometimes a red is just a red and you need it even though there’s not a red in your template color theme. That’s the purpose of the standard colors.
Although the Shape Styles gallery often includes at least one gradient style, there are times when you need to create your own. In addition to enhanced fills, PowerPoint also offers a wide variety of effects; for example, soft shadows, reflections, and bevels.
In this exercise, you’ll apply and edit a gradient fill. You’ll also apply a shadow and 3-D effects to a shape.
Set Up
You don’t need any practice files to complete this exercise. Open PowerPoint to a new, blank presentation, and then follow the steps.
Select the first (and only) slide. On the Home tab, click the Layout button and choose the Blank layout so the content placeholders don’t get in your way while you’re drawing.
Draw a rectangle on the slide.
Double-click the rectangle to activate the Drawing Tools Format tool tab, and then click the Shape Fill button to open the Shape Fill list.
Click Gradient and then select the Linear Down option from the gallery.
Right-click the rectangle and choose Format Shape to open the Format Shape pane.
On the Shape Options Fill and Line (paint bucket) pane, click Fill to expand the fill options part of the pane.
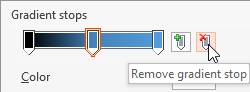
Look for the Gradient stops slider. Click the first gradient stop on the left, then click the Color button and select the black swatch in the Theme Colors gallery to change the first gradient stop to black.
Select the second gradient stop (in the middle), and then click the Remove Gradient Stop button to delete it.
In the Format Shape pane, with the Fill and Line pane still active, click Line to expand that section of the pane, and then click No Line to remove the border from the rectangle.
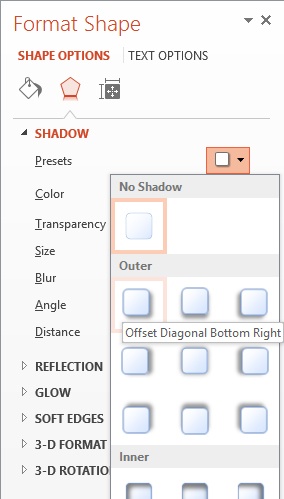
In the Format Shape pane, click Shape Options, then click Shadow to access the shadow options. Click Presets and choose Offset Diagonal Bottom Right to apply a soft drop shadow.
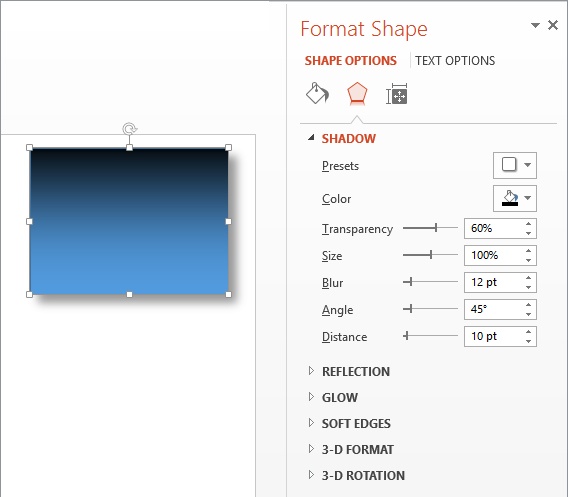
In the Distance field, enter 10. In the Blur field, enter 12 to soften the shadow.
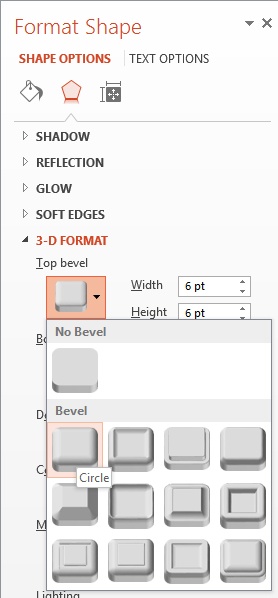
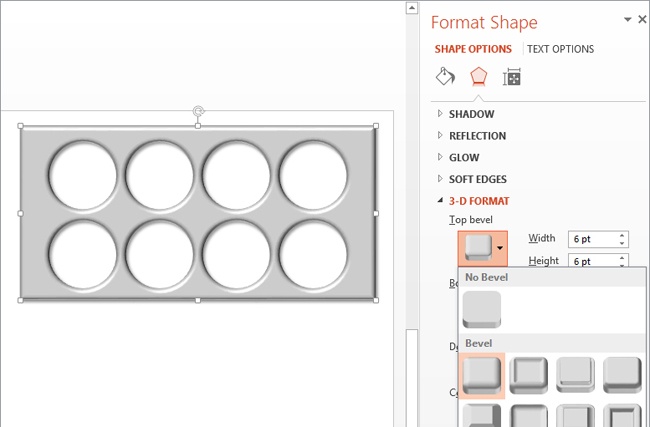
With the rectangle still selected, click Shadow in the Format Shape pane to collapse those tools. Click 3-D Format to expand those options.
In the Format Shape pane, in 3-D Format tools, click Top Bevel and choose the Circle option. In the Depth field, enter 75.
Tip
All the fills, outlines, and effects that you can apply to shapes can also be applied to text, because PowerPoint 2013 considers text to be just another type of shape. Look for the text formatting tools on the Drawing Tools Format tool tab in the WordArt Styles group. Or click Text Options in the Format Shape pane.
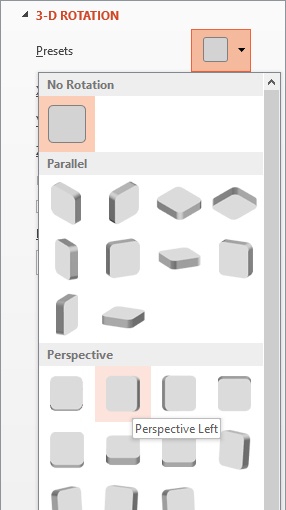
Collapse the 3-D Format tools and expand the 3-D Rotation options. Click the Presets button (which is also available on the Drawing Tools Format tool tab in the Shape Effects list) and choose Perspective Left.
Enter 40 in the X Rotation field, 5 in the Y rotation field, and 50 in the Perspective field.
Expand the Shadow tools in the Format Shape pane and change the Angle to 0.


In addition to allowing you to format shapes with a huge variety of options, PowerPoint gives you the ability to manipulate shapes as well as create your own. These are wonderful things to know about so you can create exactly the shape you need.
In this exercise, you will use the adjustment handles and edit points to modify shapes. You’ll also use the new Merge Shapes tools to create your own.
Set Up
You need the SampleContentA_start presentation located in the Chapter14 practice file folder to complete this exercise. Open the SampleContentA_start presentation, and save it as SampleContentA. Then follow the steps.
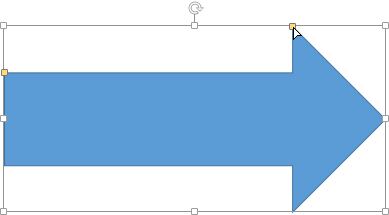
Select the arrow on the first slide.
Click the yellow adjustment handle on the head of the arrow and drag it to the left. Release the mouse button to apply the change to the arrow.
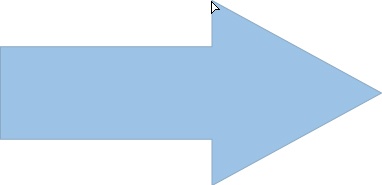
Click the yellow adjustment handle on the shaft of the arrow and use it to make the arrow slightly narrower.
Select the rounded rectangle. Drag the adjustment handle to the left to make the round corner less round.
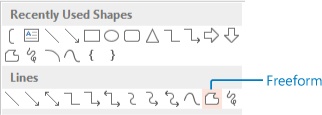
On either the Home or Insert tab, in the Shapes Gallery, in the Lines area, choose Freeform.
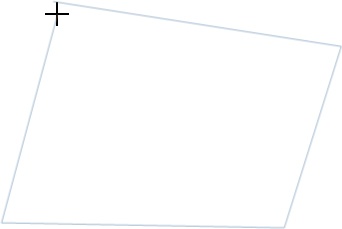
Click the slide to begin your freeform. Click again a few inches away. Click again as though you were creating a rough rectangle. Click a fourth time near the first point to close the rectangle.
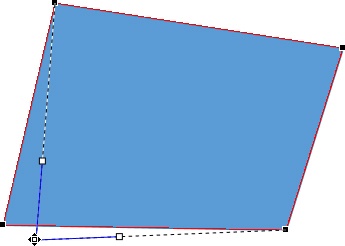
Right-click the shape and choose Edit Points, the PowerPoint equivalent of Bezier Curves.
Click one of the points and move it to change the shape of the freeform.
Click away to deselect the shape and exit Edit Points.
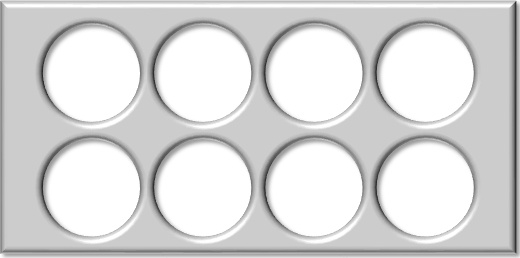
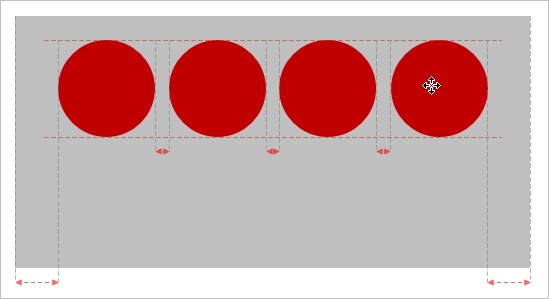
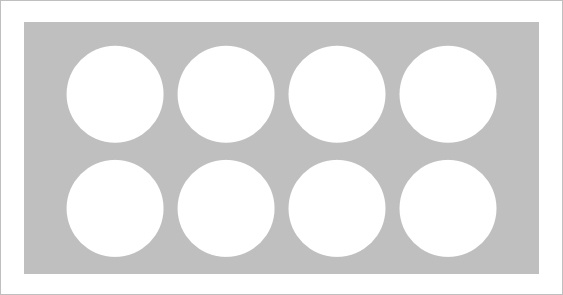
On Slide 2, select the red circle on the right and drag it toward the two circles above. Let go when the arrows appear on the Smart Guides to indicate that the distance between the circles is equal.
Duplicate one of the circles and drag it into place at the end of the row.
Press Shift and click each circle to select all four. Press Ctrl+C to copy them and Ctrl+V to paste.
With all four circles still selected, drag them into place below the top row. The Smart Guides will appear again to assist.
Press the Esc key to ensure you have nothing selected. Click the gray rectangle to select it. Press Shift and click each red circle in turn to select them all.
On the Drawing Tools Format tool tab, click Merge Shapes, then click Combine to cut out the circles from the rectangle.
Right-click the shape and choose Format Shape to open the Format Shape pane. Use the techniques you learned in the previous exercise to apply a bevel and shadow to the shape.


As with most things in PowerPoint, there are a number of ways to insert pictures into your presentation. And, as with most other types of graphics in PowerPoint, pictures have a huge set of formatting tools to enhance their look and feel. Applying these effects to pictures throughout your presentation can also make a set of disparate images look like they go together.
In this exercise, you’ll insert a screen shot as well as a picture from your computer. You’ll use the crop tool and the picture formatting tools to enhance it.
Set Up
You need the SampleContentB_start presentation and the SamplePictureB image file located in the Chapter14 practice file folder to complete this exercise. Open the SampleContentB_start presentation, and save it as SampleContentB. Then follow the steps.
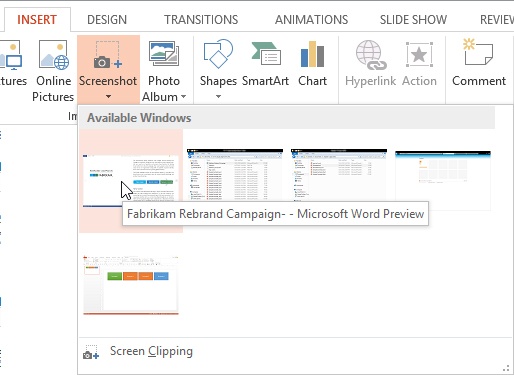
Select the last slide, and then on the Insert tab of the ribbon, click Screenshot.
Thumbnails of your open windows appear. This includes other PowerPoint files, but not the current file. (If only PowerPoint is open, there will be only one thumbnail.) Click a thumbnail to add it to your presentation.
Press Ctrl+Z to undo the action and remove the screen shot.
On the Insert tab, click Pictures to insert a picture from your computer or network drives. Navigate to the SamplePictureB.png file and click Insert to add it to the slide.
Important
If you have an empty content or picture placeholder on your slide, your picture will fill the placeholder when you insert it, even if you use the Insert Picture tools on the Insert tab of the ribbon. If you want PowerPoint to stop putting your pictures into placeholders, then insert it on a blank or Title Only slide and paste it onto the slide with the placeholder.
See Also
For more information about inserting online pictures, see Chapter 2.
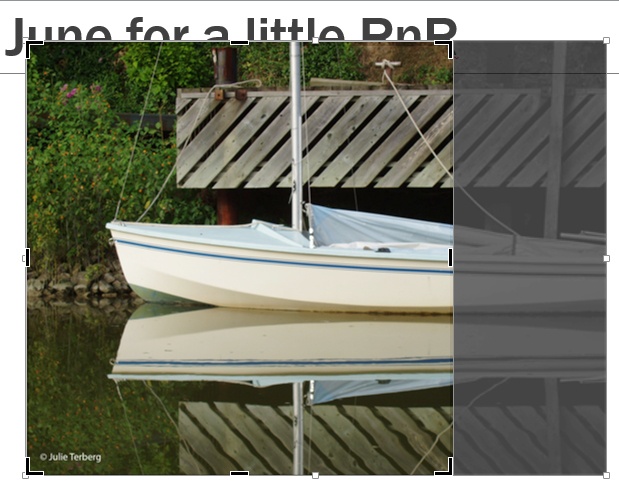
Press and hold Ctrl+Shift and drag a corner of the picture toward the center. (Shift keeps the image aspect ratio intact, and Ctrl sizes it from the center.)
On the Picture Tools Format tool tab, click the top of the Crop button. Move your pointer toward the crop handle on the right edge of the picture until it turns into a black T-bar. Click the right edge of the picture and drag it left to crop. Click away from the picture to apply the crop.
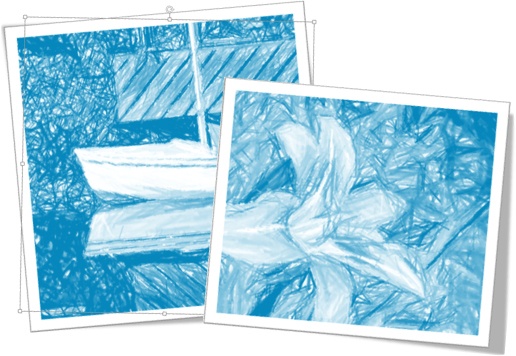
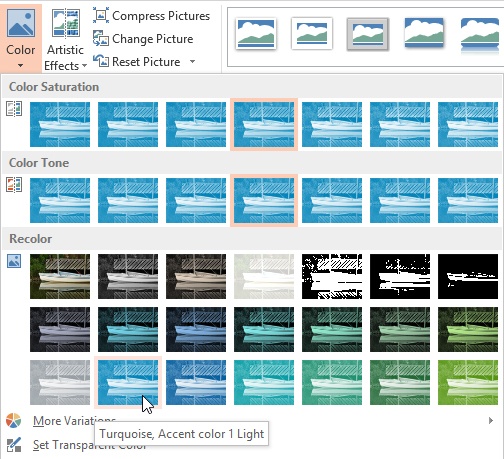
On the Picture Tools Format tool tab, click Color to open the Recolor gallery. Select Turquoise, Accent color 1 Light to apply a duotone look to the image.
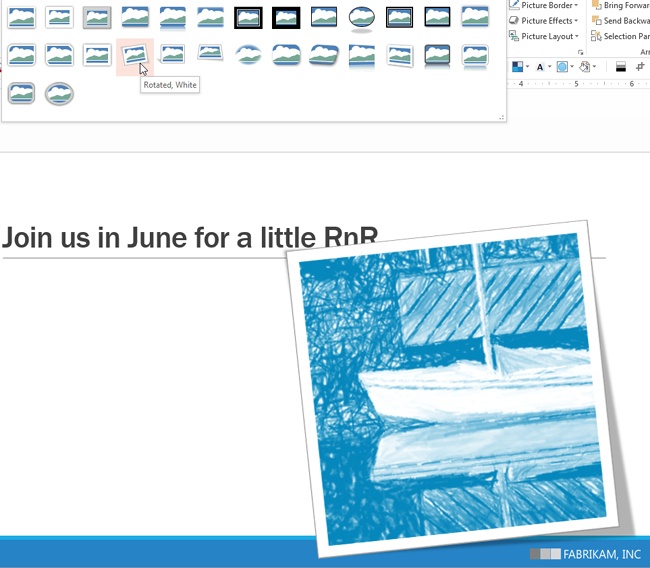
To give the image a more abstract look, click the Artistic Effects button. Select Pencil Grayscale.
Picture tools are right at your fingertips
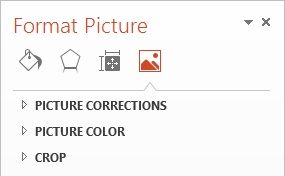
You can access the PowerPoint picture formatting tools in a couple of different places. Throughout this picture exercise, we’ve been using the tools on the Picture Tools Format tool tab that appears when you select a picture. You can also right-click a picture and choose Format Picture to access formatting options in a task pane. Artistic Effects settings are accessed from the Effects button, and settings for Picture Corrections (sharpen/soften, brightness/contrast), Picture Color, and Crop are accessed from the Picture button.
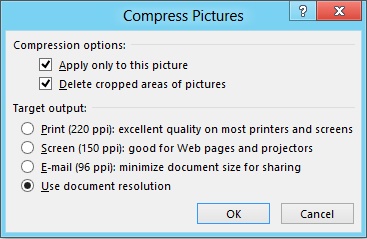
If your pictures are very large, you may want to use Compress Pictures to help keep your PowerPoint file size manageable. Select this tool from the Picture Tools Format tool tab that appears when you select a picture. It gives you options to permanently delete the cropped parts of pictures, and you can choose from four compression options.
To add a frame to the image and make it look like a snapshot, click the Picture Tools Format tool tab, then click the More button to expand the Picture Styles gallery. In the gallery, select Rotated, White.
Move and size the picture so it overlaps the title a bit.
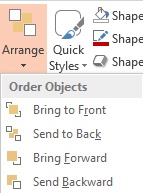
Click inside the Title placeholder. On the Home tab, click Arrange and then Bring to Front so the text is in front of the image.
Tip
The Order Objects tools (Bring to Front, Send to Back, and so on) can be used on all images and objects, including shapes, SmartArt graphics, tables, charts, videos, placeholders, and text boxes. They are located on the Home tab in the Drawing Group, from the Arrange button. They can also be accessed from the formatting tabs. The Selection pane is an extension of these tools. It can be accessed from the Editing group on the Home tab. Click the arrow next to the Select button, and then choose Selection Pane from the list.

Removing the background from a picture
PowerPoint has a couple of tools you can use to remove backgrounds from pictures. These can be especially handy, for example, when you are working on a dark slide and your logo or other image has a white background.
To use the Remove Background tool, insert a picture, then click the Remove Background button on the Picture Tools Format tool tab.
PowerPoint will add a selection area to the part of the picture it thinks you want to keep.
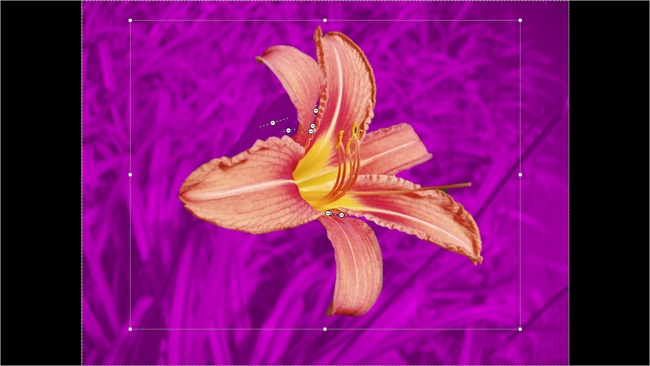
Expand or contract the selected area by dragging the selection handles, and use the tools on the Background Removal tool tab to mark additional areas to keep or remove.
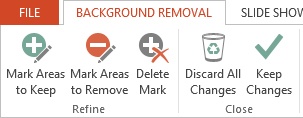
When you apply the changes, PowerPoint will remove parts of the image that are colored magenta. Click Keep Changes (or simply click away from the picture to deselect it) to apply the changes.

The other tool you can use to remove some backgrounds is the Transparent Wand tool. It’s located on the Picture Tools Format tool tab, under the Color button, as the Set Transparent Color tool.
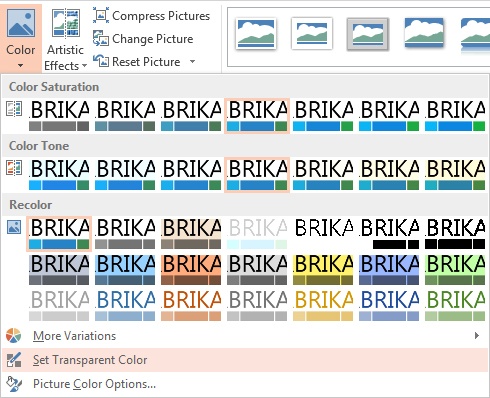
Click it, then click the color you want to remove on your image. The transparent wand tool removes pixels of color with the exact RGB values as the pixel you click.
Using the styles galleries can save you time and provide consistency for your presentation.
PowerPoint lets you apply and tweak settings for special effects such as shadows, reflections, glows, soft edges, and 3-D.
Formatting tools can be found on the tabs that appear when you select an object.
Most of the same formatting tools can be found by right-clicking an object and selecting Format Shape, Format Picture, or Format Text.
You can create your own shapes by using the Merge Shapes tools.