
Chapter at a glance
Select
Selecting text by using the keyboard and mouse

Use
Using formatting marks during document composition

Insert
Inserting symbols, international characters, and other special characters
Compose
Composing documents faster by using building blocks

IN THIS CHAPTER, YOU WILL LEARN HOW TO
Move the cursor by using keyboard shortcuts.
Select text by using the keyboard and mouse.
Use formatting marks during document composition.
Insert symbols, international characters, and other special characters.
Use AutoCorrect.
Compose documents faster by using building blocks.
In this chapter, you’ll learn basic editing techniques, such as using the keyboard to quickly move between sentences or paragraphs, along with text selection methods. You’ll also learn document composition essentials and how to insert symbols, international characters, and other special characters. At the end of this chapter, you’ll learn how to compose documents by using building blocks to insert frequently used information and save valuable time.
Practice Files
To complete the exercises in this chapter, you need the practice files contained in the Chapter07 practice file folder. For more information, see Download the practice files in this book’s Introduction.
The first step in editing a document is to move the cursor to the location where you want to make a change. If you’re using the mouse, click the left (primary) mouse button to position the cursor.
If you’re using the keyboard, use the keyboard shortcuts listed in the following table.
Navigation | Keyboard shortcut |
|---|---|
Next or previous character | Right Arrow key or Left Arrow key |
One line up or down | Up Arrow key or Down Arrow key |
Word to the right | Ctrl+Right Arrow |
Word to the left | Ctrl+Left Arrow |
Beginning of the line | Home |
End of the line | End |
One paragraph up | Ctrl+Up Arrow |
One paragraph down | Ctrl+Down Arrow |
One screen up | Page Up |
One screen down | Page Down |
Top of the document | Ctrl+Home |
End of the document | Ctrl+End |
After you’ve moved the cursor, you can begin entering text or editing. To remove characters or words, use one of the keyboard shortcuts listed in the following table.
Delete | Keyboard shortcut |
|---|---|
Character after the cursor | Delete |
Character before the cursor | Backspace |
Word after the cursor | Ctrl+Delete |
Word before the cursor | Ctrl+Backspace |
For larger edits, such as deleting a paragraph or making formatting changes, you highlight, or select, the text you want to change. When you make a selection, you’re identifying what you want to work with. After it’s selected, you then specify how you want to work with it by using your mouse or keyboard to issue a command.

Tip
Although this chapter talks about working with text, the selection methods can be applied to almost all of your document’s content, such as pictures, SmartArt graphics, or charts.
You can use a variety of methods to select text. The most common is the click-and-drag method. That is, you move the mouse pointer to where you want to begin your selection, click and hold the left (primary) mouse button, and then drag through the text you want to select. Additional methods include using the keyboard and other mouse actions, which are discussed in the following sections.
Important
When using the mouse to select text, don’t drag text that’s already selected, because that action will move the selected text to a different location. If you accidently move text, you can reverse your action by clicking the Undo button on the Quick Access Toolbar or by pressing Ctrl+Z. If you want to make sure you don’t accidentally move text by dragging, click the File tab to display the Backstage view, and then click Options. On the Advanced page, below the Editing options heading, clear the check box for Allow Text To Be Dragged And Dropped.
You can use the keyboard to select text by pressing the Shift key in combination with a navigation keyboard shortcut. Your selection starts from the location of the cursor. For example, if your cursor is positioned at the beginning of a paragraph, you can press Shift+Ctrl+Down Arrow to select the entire paragraph. But if your cursor is positioned in the middle of the paragraph when you press Shift+Ctrl+Down Arrow, you’ll select all the text from the location of the cursor to the end of the paragraph.
The following table provides the most frequently used methods for selecting text by using the keyboard. Keep in mind that these are the navigation shortcuts combined with the Shift key, and that you can also use the Shift key in combination with any of the navigation keyboard shortcuts provided in the previous section.
To make a selection from the cursor through the... | Keyboard shortcut |
|---|---|
Next character | Shift+Right Arrow |
Previous character | Shift+Left Arrow |
Word to the right | Shift+Ctrl+Right Arrow |
Word to the left | Shift+Ctrl+Left Arrow |
End of the paragraph | Shift+Ctrl+Down Arrow |
Beginning of the paragraph | Shift+Ctrl+Up Arrow |
Beginning of the document | Shift+Ctrl+Home |
End of the document | Shift+Ctrl+End |
Important
If the cursor is in the middle of a word, the keyboard shortcut to select the word to the left or right will select a portion of the current word instead. Additionally, if the cursor is already at the beginning of a paragraph, by pressing Shift+Ctrl+Up Arrow, you’ll select the previous paragraph.
Another method for selecting text by using the keyboard is to use selection mode, which is turned on by pressing the F8 key. When selection mode is activated, it’s similar to holding the Shift key, and you can use any of the navigation shortcuts to select text without pressing and holding the Shift key. You can also press F8 consecutively to select specific amounts of text. For example, pressing F8 two times will select the current word; three times will select the current sentence; four times will select the current paragraph; and five times will select the entire document. To turn off selection mode, press the Esc key or perform an action on your selection, such as editing or formatting.
When using the mouse to select text, you can place your mouse pointer in the document and use the text select arrow, also called an I-beam pointer. Or, you can point to the area to the left of the document margin. This area is called the selection bar. It isn’t labeled, but you know you’re in the selection bar when your mouse pointer changes from the text select arrow to an arrow that points up and to the right. Each time you click in the selection bar you select text.

The following table lists mouse actions for both the text select arrow and the selection bar.
Selection | Mouse action |
|---|---|
One word | Double-click |
One line | Click the selection bar next to the line |
Multiple lines | Click next to the first line in the selection bar and then drag up or down |
One sentence | Press the Ctrl key and click the sentence |
One paragraph | Triple-click in the paragraph or double-click next to the paragraph in the selection bar |
Entire document | Press Ctrl and click in the selection bar or triple-click in the selection bar |
You can also use a combination of the mouse, keyboard, and Shift key to select text. For example, if you didn’t select enough text, simply press the Shift key and then click where you want your selection to end, or use the keyboard to modify your selection.
Microsoft Word also has selection methods for selecting multiple words, phrases, sentences, and columns of text anywhere in a document.
To make text selections that are not next to each other, after you make your first text selection, press the Ctrl key and use a mouse action to select additional text.

To select a vertical column of text, press and hold the Alt key and use the mouse to drag through the text you want to select.

Important
Holding down the Alt key and clicking a word or selected phrase will display the Research pane. When using the Alt key to select a column of text, make sure you click and drag. If the Research pane is displayed, close it, and then press the Alt key while selecting the column of text again.
Tip
You can also use the Navigation pane to select a heading and its related content. On the Navigation pane, right-click the heading you want to select, and then click Select Heading And Content. For more information about using the Navigation pane, see Chapter 6.
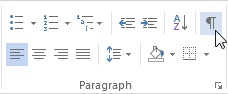
Each time you press the Tab, Spacebar, or Enter key, characters called formatting marks are inserted into the document. Normally these formatting marks are not shown on the screen, but you can toggle their display by clicking the Show/Hide ¶ button, located on the Home tab in the Paragraph group.
When you press Enter, a paragraph mark (¶), also called a pilcrow sign, is inserted into your document. Each press of the Tab key adds a right-pointing arrow (→), and a dot in the middle of the line (·) indicates that the Spacebar was pressed.

Tip
To always view specific formatting marks on the screen without using the Show/Hide ¶ button, click the File tab to display the Backstage view, click Options, and then on the Display page, select the formatting marks you want to make visible.
If you use multiple spaces and tabs for horizontal alignment, or press the Enter key several times to change vertical alignment or to create blank lines, it can complicate the editing and formatting processes, because each character uses a specific amount of space.
The best practices for document composition include using formatting methods rather than pressing the Tab, Spacebar, and Enter key multiple times:
To add space between information on the same line, add formatted spacing by setting a manual tab.
To add space between paragraphs, add formatted spacing before or after paragraphs.
Tip
The blank lines that are created by pressing the Enter key multiple times are called empty paragraphs.
See Also
For information about setting manual tabs, see Chapter 9. For information about adding paragraph spacing, see Chapter 8.
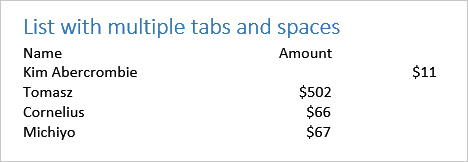
In this exercise, you’ll examine how document composition can have an impact on editing. You’ll edit two lists of information. One list uses tabs and spaces for alignment, and the other uses a manual tab to achieve the same result. You’ll also use formatted space to change the position of a paragraph.
Set Up
You need the List Example document located in the Chapter07 practice file folder to complete this exercise. Open the List Example document and then follow the steps.
Below the List with multiple tabs and spaces heading, move the cursor to the right of Kim.
Press the Spacebar key, enter Abercrombie, and note how the $11 amount for Kim moved to the right when you added her last name.
To realign $11 to the other amounts, with the cursor still positioned after Abercrombie, press the Delete key two times.
To add a new item to the List with multiple tabs and spaces list, move the cursor to the end of the last line, after the $67 amount.
Press Enter.
On the newly added line, enter Kate, and then press the Tab key or Spacebar as needed to move the cursor to the Amount column.
Enter $400.
Add tabs or spaces if needed to align the amount you entered to the other amounts in the list.
Below the List without multiple tabs and spaces heading, move the cursor to the right of Kim and enter Abercrombie. The amount didn’t move and additional edits aren’t needed.
Tip
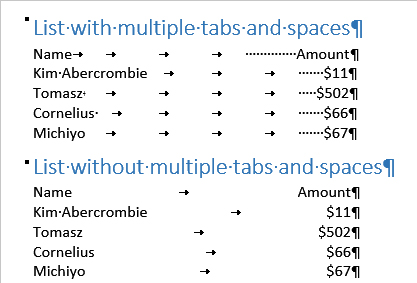
If you want more insight into the underlying differences between the lists, on the Home tab, in the Paragraph group, click the Show/Hide ¶ button to display the formatting marks.
Examine the number of tabs and spaces in the first list. Because Kim’s last name takes about as much space as two default tabs, you’ll need to remove two tabs to correct the alignment. For the second list, a manual tab was used to add formatted space. This enables you to enter text up to the amount while maintaining the alignment.
Below the last list item, enter your name, press the Tab key, and then enter an amount, which will be aligned with the other amounts.
Make other edits to both lists. For example, change $11 to $110 and notice that additional edits aren’t needed to align the amounts in the second list.
To demonstrate the advantage of using formatted space to modify the position of a paragraph, place the cursor in the List without multiple tabs and spaces paragraph.
On the Page Layout tab, in the Paragraph group, next to Spacing Before, click the Up Arrow to increase the space from 6 pts to 18 pts.


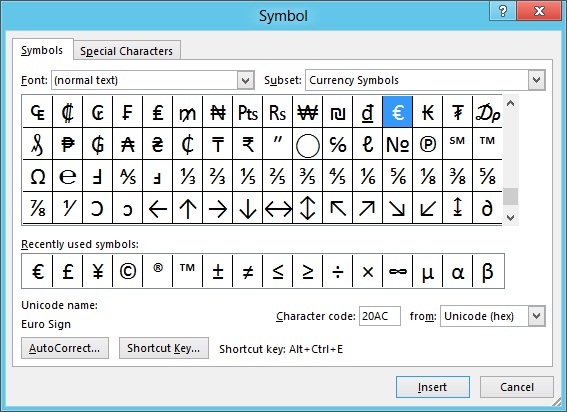
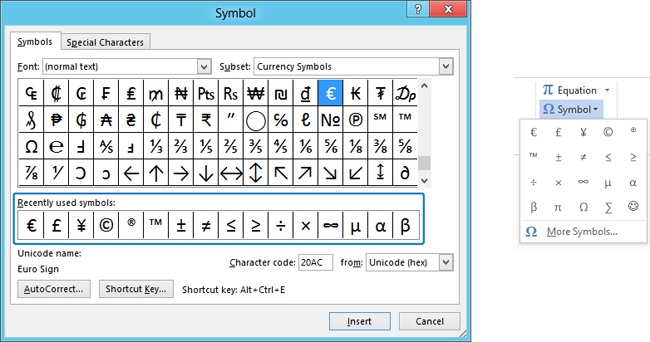
To insert symbols, such as the ohm sign (Ω), or international characters, such as the letter “a” with an acute accent (á), you can use the Symbol dialog box or a keyboard shortcut.
To display the Symbol dialog box, on the Insert tab, in the Symbols group, click the Symbol button, and then click More Symbols.

From the list of symbols, double-click the symbol you want to insert, or click the symbol once to select it and then click the Insert button.
Tip
You don’t need to close the Symbol dialog box to insert multiple symbols. After your first insertion, click in your document to activate it, and then move the cursor to a new location. Then, click the Symbol dialog box to activate it and insert another symbol. If the dialog box is in your way, drag its title bar to move it to another location on your screen.
Here are a few tips for using the Symbol dialog box:
When (normal text) is selected in the Font drop-down list, symbols will be inserted by using the current font. If you select a different font, the insertion will be the same as the font you selected from the Font list.
After you insert a symbol, it will be added to the Recently used symbols list near the bottom of the Symbol dialog box and on the Symbol drop-down list in the ribbon.
As you scroll through the available symbols, the Subset area to the right of the font will change. You can jump to a specific group of symbols by selecting an item from the Subset drop-down list, such as Mathematical Operators.
To insert glyph characters, select Webdings or any of the three Wingdings fonts from the Font drop-down list.
If a selected symbol has an associated keyboard shortcut, it will be listed near the bottom of the dialog box next to the Shortcut Key button. There are four basic keyboard shortcut methods that you can use to insert symbols.
The following table provides an example of each method and a description of how to enter the keyboard shortcut.
Symbol | Keyboard shortcut | How to enter it |
|---|---|---|
¿ | Alt+Ctrl+? | Press the Alt, Ctrl, and ? keys simultaneously. You may also need to hold the Shift key in order to enter a question mark. |
¥ | Alt+0165 | Make sure Num Lock is turned on, hold the Alt key, and then press the numbers on the numeric keypad. The character will be inserted after you release the Alt key. The numbers on the main keyboard can’t be used for this keyboard shortcut. |
ø | Ctrl+/, Shift+O | Press Ctrl and / simultaneously and release the keys. Then press Shift and O simultaneously. |
≤ | 2264, Alt+X | Enter 2264 and then immediately press Alt and X simultaneously. The numbers will be replaced with the character after you press Alt+X. |
Tip
You can also use AutoCorrect to enter frequently used symbols. Select the symbol and then click the AutoCorrect button near the bottom of the dialog box. For information about how to create a custom AutoCorrect entry, see the Using AutoCorrect section later in this chapter.
If you use international characters that have accents, such as á or ÿ, you don’t need to memorize each individual keyboard shortcut for them. You can use the built-in keyboard shortcuts for the accent character instead, which are listed in the following table.
To insert an accent, first press the keyboard shortcut, release the keys, and then enter the character.
Accent | Keyboard shortcut | Character | Example |
|---|---|---|---|
acute | Ctrl+’ | a, e, i, o, u, y, d | ý |
cedilla | Ctrl+, | c | ç |
circumflex | Ctrl+^ | a, e, i, o, u | î |
grave | Ctrl+` | a, e, i, o, u | ò |
tilde | Ctrl+~ | a, n, o | ñ |
umlaut | Ctrl+: | a, e, i, o, u, y | ë |
Important
On most standard keyboards, to enter the caret (^), tilde (~), or colon (:) you also need to hold down the Shift key. For example, a tilde is entered by pressing Shift and the single left quotation mark, which is typically the key to the left of the number 1. Another example is the caret, which is entered by pressing Shift+6. To help you remember the shortcuts, the keyboard shortcuts provided deliberately use keys for characters that are similar to the accent character.
Assigning a custom keyboard shortcut to a character or symbol
If you frequently use the same character or symbol that has a complex keyboard shortcut, you can define your own custom keyboard shortcut instead of memorizing the built-in one. In the Symbol dialog box, select a character or symbol, and then click Shortcut Key. In the Customize Keyboard dialog box that appears, in the Press New Shortcut Key text box, press the keys for your preferred keyboard shortcut. For example, press Ctrl+Shift+Y.
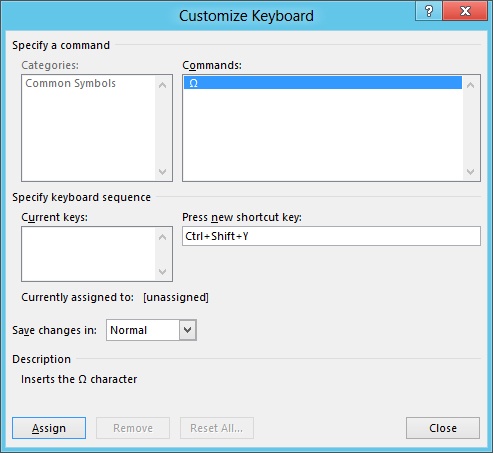
It’s important to note that prior to assigning your new keyboard shortcut, you should first check whether the keyboard shortcut you want to use is assigned to another command. After you enter your keyboard shortcut, the existing keyboard shortcut assignment will be listed below the Current Keys list box.
If the shortcut is already assigned, and it’s one you don’t use, you can override the built-in assignment with your custom keyboard shortcut by clicking the Assign button. If you later decide you want to use the originally assigned keyboard shortcut, you can redisplay the Customize Keyboard dialog box for your symbol, select your custom keyboard shortcut from the list of current keys, and then click Remove. To reset all custom keyboard shortcuts, click Reset All.
The Special Characters page of the Symbol dialog box has a collection of special punctuation symbols, such as an em dash (—), and formatting characters, such as a nonbreaking space, that aren’t available on most keyboards. You can insert them exactly like you insert symbols or international characters, by using the Symbol dialog box or the corresponding keyboard shortcut.
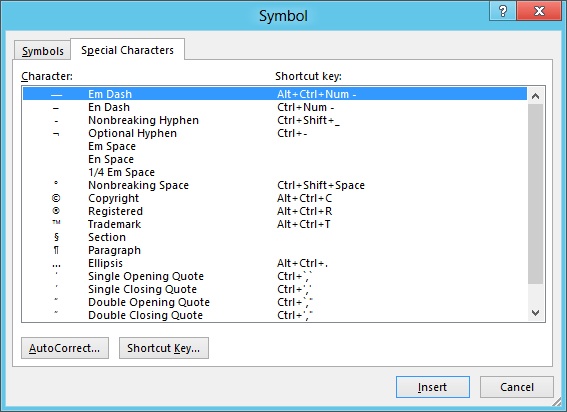
Of the available special characters, there are a few that are especially useful for specifying how words or phrases should wrap between lines of text if they fall at the end of a line. The following table describes each of these and provides a description of the formatting mark that’s displayed for each when you click the Show/Hide ¶ button on the Home tab.
Character | Description | Formatting mark |
|---|---|---|
Optional Hyphen | An optional hyphen is displayed only when part of the text wraps to the next line. If the text remains on the same line, the hyphen doesn’t appear. | hooked hyphen (¬) |
Nonbreaking Hyphen | Keeps text before and after the nonbreaking hyphen together on the same line. | long hyphen(–) |
Nonbreaking Space | Keeps text before and after the nonbreaking space together on the same line. | small raised circle (°) |
Tip
The formatting marks for an em space and en space are also displayed as a small raised circle, but extra space is added to the left of the symbol for an en space and extra space is added to the left and right for an em space. A 1/4-em space is shown as a vertical bar (|).
A manual line break, which isn’t in the Symbol dialog box, is another special formatting character for controlling line wrapping. This type of break is used to force text to start on a new line without starting a new paragraph. For example, you may have several short lines that you want to treat as a single paragraph, such as an address. To enter a manual line break, press Shift+Enter. The formatting mark that represents a manual line break is a rightangle arrow pointing to the left.
In this exercise, you’ll use the Symbol dialog box to insert a nonbreaking space to prevent a telephone number from wrapping across multiple lines.
Set Up
You need the Newsletter_C document located in the Chapter07 practice file folder to complete this exercise. Open the Newsletter_C document and then follow the steps.
On the View tab, in the Show group, select the Navigation Pane check box.
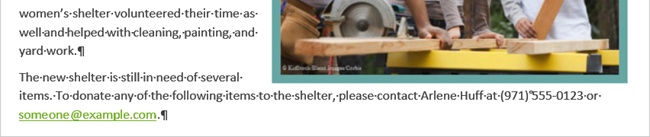
In the Navigation pane, click New Women’s Shelter. If necessary, scroll to view the text below the picture.
On the Home tab, in the Paragraph group, click the Show/Hide ¶ button.
Select the space after (971).
On the Insert tab, in the Symbols group, click Symbol, and then click More Symbols.
On the Special Characters page, double-click Nonbreaking space.
Close the Symbol dialog box and note that the entire phone number wrapped to the next line.
Edit the first part of the sentence with the phone number to read To donate instead of If you wish to donate and note that the phone number moves to the previous line.

As you enter text into a document, various typing mistakes and misspellings are corrected for you by a feature called AutoCorrect. If you’re familiar with using AutoCorrect on a smartphone, the feature in Word is similar, but it does more than correct commonly misspelled words. Other corrections range from capitalizing the first letter of sentences and days of the week to toggling the case of characters if you accidently enter them with Caps Lock on. For example, if you enter the word “teh” as the first word of a sentence, AutoCorrect will both capitalize the first letter and change the word to “the” after you press the Spacebar.
You also have the ability to reverse the action if it isn’t correct and remove words that you don’t want corrected automatically. When a correction is made, point to the word to display the AutoCorrect Options button, and then click the button to display a menu of choices.
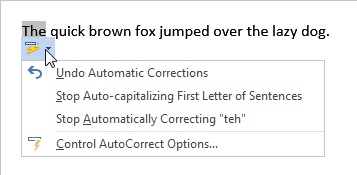
To reverse the correction, click the first option, which will start with either Change back or Undo. For the example previously provided, when the word “teh” as been entered at the beginning of a sentence, the first option is Undo Automatic Corrections, because two corrections were made. Clicking the option will reverse both the spelling of the word “the” and the capitalization.
If you never want the correction to be made again, click a Stop option, such as Stop Automatically Correcting “teh”. Keep in mind that this will delete the entry and will take effect for all documents. After an entry is deleted, you’ll need to manually add the entry in the AutoCorrect dialog box in order for Word to start correcting it again.
To view all of the AutoCorrect options, click Control AutoCorrect Options at the bottom of the menu to display the AutoCorrect dialog box.

Tip
To display the AutoCorrect dialog box, you can also click the File tab to display the Backstage view, and click Options. Then on the Proofing tab, click the AutoCorrect Options button. Alternatively, you can press Alt, T, A. That is, press and release the Alt key, press and release T, and then press A.
In the AutoCorrect dialog box, you can choose to turn the options on or off, delete words that are automatically corrected, or add your own entries to the AutoCorrect list.
To add custom entries, enter the characters you want to replace in the Replace text box. In the With text box, enter your replacement text, and then click the Add button.
Here are a few tips for using the AutoCorrect dialog box:
Don’t use a word for your Replace text. If you do, each time you enter that word in a document, it will be corrected. It’s best to use abbreviations or a group of characters you wouldn’t normally use as a word in your documents.
Enter your text in the Replace text box in lowercase characters in order to make your entry case insensitive. That is, if you enter your Replace text in lowercase characters, you can use uppercase or lowercase characters in your document to trigger a correction. If you enter your Replace text in all uppercase or mixed case, you must enter it exactly as it’s displayed in the AutoCorrect dialog box in order to have AutoCorrect correct your entry.
Enter your text in the With text box exactly as you want it to be entered in your document, including punctuation and uppercase, lowercase, or mixed case characters.
To quickly find an entry in the AutoCorrect list, enter it in the Replace text box. As you enter the text, the list will scroll to matching characters.
Custom entries aren’t only for words you frequently misspell. You can also use the AutoCorrect feature for frequently used phrases or your company name. For example, you can create an entry such as Replace: finc With: Fabrikam, Inc. Then to add your company name in a document, you would enter finc, and after you press the Spacebar, Fabrikam, Inc. will be inserted.
You can add exceptions to prevent corrections from being made that change the case of words. To add exceptions, click the Exceptions button in the AutoCorrect dialog box.
Following are the types of exceptions you can add:
First Letter. A list of abbreviations that end with a period. If exceptions for these aren’t specified, the first letter of the word after the abbreviation will automatically be capitalized.
Initial Caps. A list of words that have mixed uppercase and lowercase letters that should not be corrected.
You can also use AutoCorrect to insert formatted text, like a symbol. Select your formatted text in a document. When you display the AutoCorrect dialog box, your selection will be added in the With text box. Then, add your Replace characters and select the Formatted Text option before clicking the Add button.

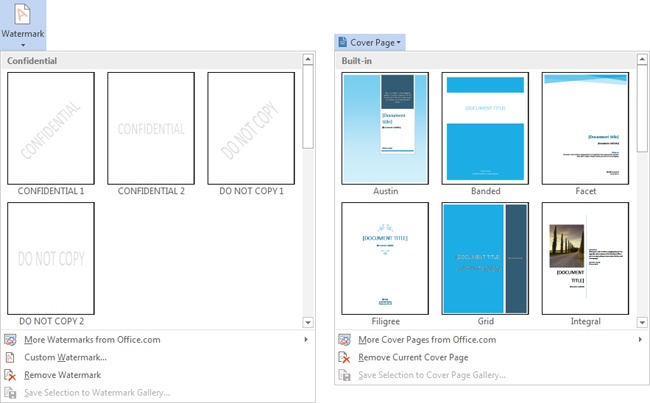
Building blocks, formerly known as AutoText in previous versions of Word, are pieces of information that you can quickly insert into your documents. You can insert built-in building blocks, such as watermarks and cover pages, or your own custom entries.
Tip
The built-in building blocks are theme enabled, which means that the fonts and colors will match your document’s current theme. Also, if you change the theme, the thumbnails in the galleries will reflect the theme change. For more information about using themes, see Chapter 2.
Following is a list of the primary building block galleries and their locations on the ribbon:
Cover Page. On the Insert tab, in the Pages group.
Quick Tables. On the Insert tab, in the Tables group. (Click Table and then point to Quick Tables.)
Headers, Footers, and Page Numbers. On the Insert tab, in the Header & Footer group.
Text Box and Quick Parts. On the Insert tab, in the Text group.
Watermark. On the Design tab, in the Page Background group.
Tables of Contents. On the References tab, in the Table of Contents group.
Tip
The Automatic Table 1 and Automatic Table 2 built-in building blocks in the Tables Of Contents gallery use heading styles in your document to generate a table of contents. For more information on using heading styles, see Chapter 8.
To insert a building block, simply click the building block you want to insert in your document. Some of the building block galleries, like the Cover Page gallery, have additional commands for inserting building blocks. To display these commands, right-click a building block in the gallery.

The Quick Parts gallery doesn’t have built-in building blocks and can be used for your custom entries. Custom building blocks can range from frequently used text, such as a signature block or boilerplate text for a letter or other document, to pictures and other graphics. Additionally, unlike built-in building blocks, custom building blocks can be inserted by using the keyboard. Just enter the name of the building block and watch for the AutoComplete ScreenTip. When the ScreenTip is displayed, press Enter to insert the building block. Typically, you only need to enter the first few characters of the name and the AutoComplete ScreenTip will be displayed.

In this exercise, you’ll create a custom building block for the Fabrikam company logo and address and then insert it by using the ribbon and keyboard.
Set Up
You need the Sample Logo and Address document located in the Chapter07 practice file folder to complete this exercise. Open the Sample Logo And Address document and then follow the steps.
Point to the left of the logo and address in the selection bar and click once to select it.
On the Insert tab, in the Text group, click Quick Parts, and then click Save Selection to Quick Part gallery.
In the Create New Building Block dialog box, in the Name text box, enter Company Logo and Address.
In the Save-in list, click Normal.
To test your newly created building block, create a blank document.
On the Insert tab, click Quick Parts, and then click Company Logo and Address.
To insert the logo by using the keyboard, add a new paragraph below the previously inserted logo and begin entering Company. When the AutoComplete ScreenTip is displayed, press Enter to insert the logo.


Here are some important tips to remember when you are creating custom building blocks:
To use the keyboard to insert your building block by using the AutoComplete ScreenTip, you must save your entry in the Normal template or a custom template.
When you are creating more than one custom building block, if the first few characters of the building block name aren’t unique, you’ll need to enter the first nonunique character before the AutoComplete ScreenTip will be displayed.
The AutoComplete ScreenTip will not be displayed for building blocks containing pictures or other objects unless text is also included.
To revise a building block, recreate the entry by using the same name and other properties, such as category, gallery, and save location. When you save the building block, you’ll be prompted to redefine the entry.
You can edit building block properties or delete a building block in the Building Blocks Organizer. To display it, on the Insert tab, in the Text group, click Quick Parts, and then click Building Blocks Organizer.

To select text by using the keyboard, you can use navigation keyboard shortcuts combined with the Shift key.
The selection bar is the area to the left of your document’s left margin, rather than to the left of your text. If your pointer does not point up and to the right, try moving the pointer further to the left.
To select pieces of text that are not next to each other, press the Ctrl key between selections and use a mouse action to add to your selection. If you use a keyboard action, your previous selection will be removed.
When you are composing a document, avoid pressing the Spacebar, Tab, and Enter keys multiple times to move the cursor or add extra space.
AutoCorrect actions are triggered when you press the Spacebar.
You can press Ctrl+Z to undo an AutoCorrect action immediately after the correction has been made.
To display the AutoComplete ScreenTip for a building block, you must save the entry in the Normal template, and the first few characters of the name must be unique.