
Games have long been a part of the Internet, from the first Flash and Shockwave games to the online games of today. Of course, not all of these games run directly within a web browser; in fact, these games have always required plug-ins to operate. The biggest problem with this approach is that a fair number of people may not have the required plug-in installed, or they do not download ActiveX or Java controls from companies or individuals they do not know.
The good news is that Ajax has leveraged technologies to offer a new approach to web-based game play that requires no plug-ins or third-party software. Users can forget Flash, Shockwave, Silverlight, and anything else, and can feel comfortable knowing that nothing “extra” is running on their computers.
Sure, there are downsides to using Ajax to program a web-based game. For instance, there may be limitations in the graphics, difficulties in implementing complicated algorithms (that would be simplified using plug-ins), and possibly a more arcane feel to the game. However, because the programmer can decide who his intended audience is, he can determine how complex the game’s design needs to be, and therefore, can control the impact these limitations have on the game as a whole.
Games come in different shapes and sizes, so to speak, depending on genre and platform. Some games work well on the Web, whereas others do not. Here is a list of the different web game genres:
First-person shooter (FPS) games
Strategy games
Adventure games
Role-playing games (RPGs)
Puzzle games
Arcade games
A more detailed look at these games should explain which ones are easier to build for the Web and which are not.
First-person shooter (FPS) games are characterized by a point of view that is the same as the main character in the game. This genre emerged when PCs had the graphics capabilities to render the game’s action in real time. Doom, introduced in 1993, is sometimes considered to be the breakthrough FPS game that helped to make this genre as popular as it is today. Long before the advent of Doom, and of computers that were fast enough to render real-time graphics, were other FPS games that could be played on less powerful machines. What I consider to be the game that truly introduced the FPS genre, though definitely not in its current state, is Sir-Tech’s Wizardry: Proving Grounds of the Mad Overlord, released in 1981. I admit I am partial to this game because it was the first FPS game I ever played, but it had a level of sophistication (relatively speaking) that other FPS games at the time did not have. Figure 21-1 shows a scene from this game.

Another characteristic of FPS games is that the main character, armed with a weapon, moves through “levels” in the game, with the objective of navigating all of the levels and killing all opponents. Another objective is to collect treasure or find upgrades to the weapons being used. These games, which comprised flat and uninspiring graphics in the early 1990s, now sport ultra-realistic-looking terrain and opponents. The quest among today’s developers is to continue to improve graphics quality so that the player will be better immersed in the game. Games such as Crysis (http://www.incrysis.com/), shown in Figure 21-2, will continue to push this genre into new territory and more realistic game play, as it is set to be one of the first games to use DirectX 10 when it is released.
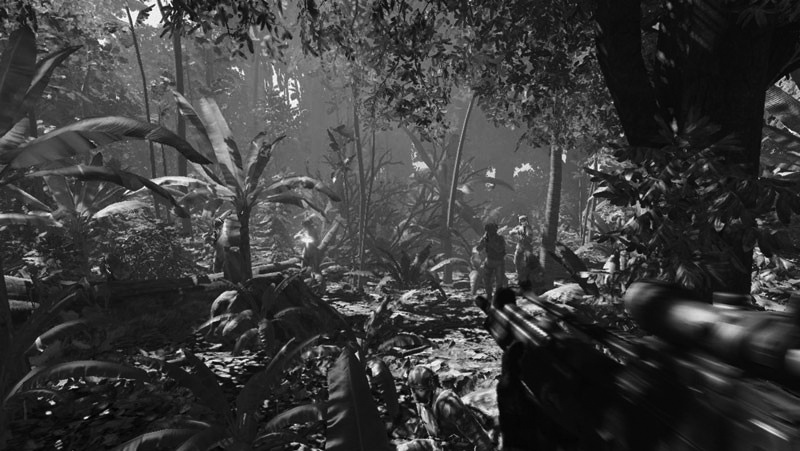
Figure 21-2. A scene from Crysis, which will take the FPS genre to a new level of realism with its graphics and reactions to the physical environment
What Ajax developers need to know about FPS games is that they are graphics-intensive. This makes them difficult to port without the support of a plug-in for the browser. I would say that unless you are itching for some major programming problems to solve, it’s best to leave this genre to the desktop and plug-ins—unless, of course, you want a game that closely resembles one of the first few Wizardry games.
If the FPS you intend to build is not going to be terribly graphics-intensive, several areas of game play can be aided by Ajax in the browser. Ajax will definitely come in handy with encounters with computer characters and monsters, as it can send the encounter information from a server that makes all the decisions down to the clients. In this same way, treasure and combat decisions can be made on the server and passed along to the client as they are ready. This can allow for multiplayer FPS games in which the server makes master decisions that are passed down to all the clients.
Strategy games rely on the players’ decision-making ability to determine the game’s outcome. Strategy games are different from all other genres in that little to no chance is involved in influencing the game play. No physical skills are needed for the interaction, and every player starts on an equal footing by knowing how each element of the game works.
Of course, strategy games are not restricted to computers, having origins in traditional games such as chess and checkers. These types of games aside, you can divide computer strategy games into the following subcategories:
Abstract
Real-time
Turn-based
Economic
God-like
Abstract games are meant to pit players against one another using logic to solve the problems of the game. Typical games of this type include chess, checkers, Mastermind, and Chinese checkers, among others. The difficulty of implementing graphics aside, the logic on which these games are based can easily be simulated in a browser so that two human players can compete against each other using Ajax to facilitate communication. However, the developer must be careful when trying to program artificial intelligence (AI) into an abstract game. If the AI is not built well enough, players may lose interest. Unfortunately, building a robust AI is a time-consuming and often processor-intensive process that could be out of the scope of the developer’s intent.
Abstract games that are implemented for player versus player, where both players are human, are good candidates for implementation in a browser platform utilizing Ajax. They require less intense graphics than most other genres, making them more ideal for the browser as well.
In real-time strategy games, the players must make decisions within a constantly changing game state. This genre is composed almost entirely of computer games, as few noncomputer strategy games are real-time. Computers allow for the kind of play needed for these types of games to keep them entertaining and challenging. The early real-time strategy games were popular and included the likes of Westwood Studios’ Command & Conquer (1995), Cavedog’s Total Annihilation (1997), and Blizzard’s Warcraft (1994). The genre has many titles, and has spawned games in different genres as well. Figure 21-3 shows a scene from Total Annihilation.

Real-time strategy games require a good amount of memory and processing power to be effective (i.e., not frustrating) for a user. Because of this, Ajax may not be the optimal choice for this genre. Certainly, if most of the decision making can be implemented on the server, Ajax is a possibility—but it would require a lot of coding to run smoothly.
I am lumping together turn-based, economic, and God-like strategy games because they have the same basic rules of play and interaction. Call them what you want, but these games are similar in terms of the player’s perspective and how the pieces of the game interact. God-like games are perhaps different from the other two genres in that these games are more likely to have no goal that will allow a player to win the game. Economic games, following a similar vein, have a goal, but perhaps not a defined end. Turn-based games pit players against one another, with the objective of defeating opponents by defeating all of the other pieces in the game.
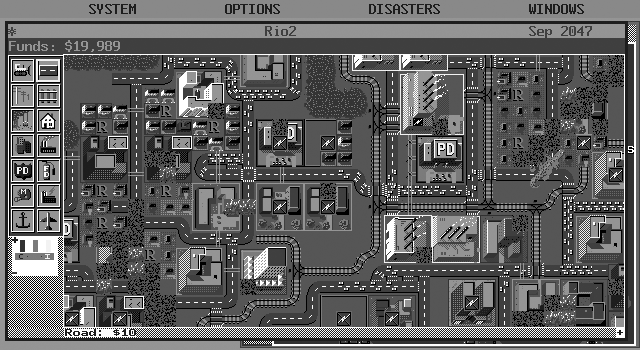
Some examples of turn-based games are Sid Meier’s Civilization (1991) from MicroProse, Heroes of Might and Magic (1995) from MobyGames, and Shattered Union (2005) by 2K Games. Economic genre games include titles such as SimCity (1989) from Maxis, Railroad Tycoon (1990) from MicroProse, and Capitalism (1995) by Interactive Magic. Meanwhile, SimEarth (1990) by Maxis, Black and White (2001) from EA Games, and Dungeon Keeper (1997) from Electronic Arts are a few examples of God-like games. As one of the first turn-based games of its kind, SimCity, shown in Figure 21-4, helped to pave the way for a popular genre that is still strong today.
Turn-based strategy games are graphics-intensive in that many things are going on at once. This type of game is also more processor-intensive, as the logic required to create a good turn-based game takes a huge amount of code. Though using Ajax for turn-based games is doable, I recommend avoiding this genre—unless you are very ambitious—when developing an Ajax-implemented browser game.
Today, adventure games come in a variety of interfaces, subjects, and graphics formats. However, the first adventure games differed only in subject, as they were all text-based games. The first of these games was Colossal Cave Adventure (later simply called Adventure), written by William Crowther in the early 1970s. In this game, the player navigated through a series of rooms, each with its own description, to complete a series of puzzles. This premise was the key to all of the early text-based adventure games: puzzles, objects, swords and magic, and vast realms to explore and navigate.
Many future developers of adventure games got their start by playing Adventure. However, Zork (1977–1979), written by Marc Blank and David Lebling, is the game that won over so many users when it was released, and eventually was made available as a sellable product. Other games belonged to the text-based genre, but it wasn’t until Ken and Roberta Williams created Mystery House (1980) (shown in Figure 21-5) that graphical adventure games were born.

The Williamses formed Sierra On-Line soon after the release of Mystery House, and the company played a major role in shaping adventure games through the 1980s and early 1990s. Its adventure games improved graphically as new technologies became available, and today Sierra is known for its series of adventure games: King’s Quest (1984–1998), Space Quest (1986–1995), Police Quest (1987–1993), Quest for Glory (1989–1998), and Leisure Suit Larry (1987–2004).
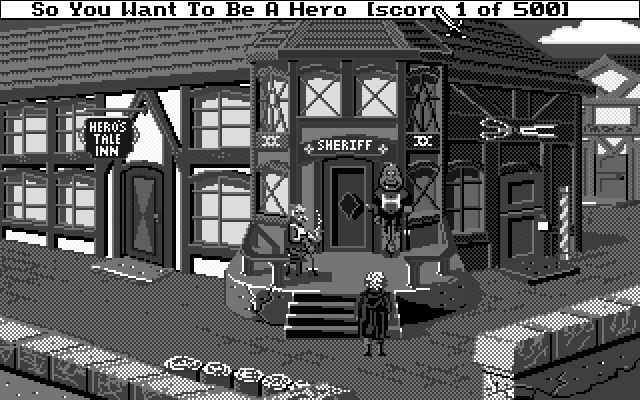
Adventure games kept the model that Colossal Cave Adventure started—puzzles, objects, areas to explore, combat—and added interaction with nonplayer characters (NPCs) that began to blur the boundaries between adventure games and RPGs. This was especially true of the Quest for Glory series (originally Hero’s Quest), as it offered a good combination of adventure and role playing. Figure 21-6 shows what this crossover game looked like.
As a genre, adventure games can be simple games with simple graphics, or they can be more complex. Regardless of looks, the logic behind the scenes is what makes or breaks an adventure game. If you can divide the code in such a way that the client does not have to download too much data at once, you can certainly build adventure games using Ajax for the browser. If the game becomes too complex, however, an alternative method would be better for programming.
Role-playing games (RPGs) were inspired from early Dungeons & Dragons games and provided a similar user experience. The typical game experience followed these general steps:
A group of characters (known as a party) got together to meet an objective (quest).
Along the way, they faced challenges before completing the quest.
These challenges allowed the party to improve attributes about themselves (level, hit points, etc.).
Players interacted with NPCs along the way.
Usually, a combat would ensue, in which the party had to defeat monsters and other evil to finish the game.
This genre includes a wide range of games, from text-based multiuser dungeon/dimension (MUD) games to graphical 2D and 3D games. All of them follow the steps of an RPG to some degree.
MUD games and RPGs go hand in hand. All MUD games are multiplayer, text-based games played over Telnet, and most heavily follow steps 3 and 5. Built mainly by programmers as hobbies, most MUD games are free to play, and in one way they represent the beginning of social networks.
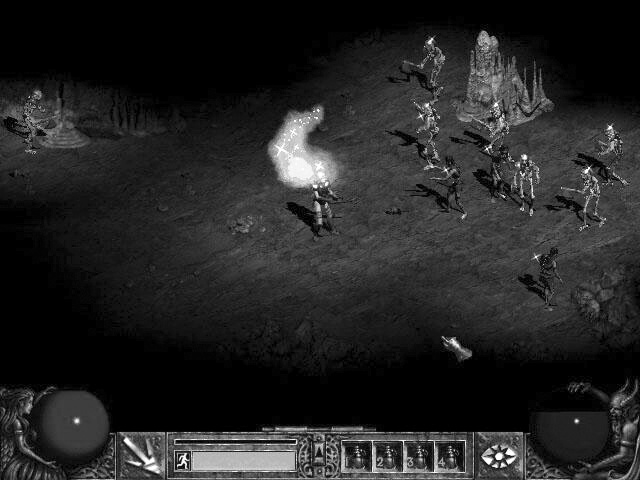
As computers grew in sophistication, text-based games were replaced with graphical ones, though they were not multiplayer for some time. In the late 1980s and early 1990s, hundreds of games with similar game interaction were sold, different from one another only in their storylines. A large developer of these games was Strategic Simulations, Inc. (SSI), which created games from 1979–2001. Some popular titles were Advanced Dungeons and Dragons: Heroes of the Lance (1988), Pool of Radiance (1988), Hillsfar (1989), the Eye of the Beholder series (1990–1993), Champions of Krynn (1990), Neverwinter Nights (1991), and Dark Sun: Shattered Lands (1992). SSI has developed more than 100 titles, and other development companies produced popular games as well. One good example is the Ultima series of games (1980–1999) from Origin Systems, and Blizzard North’s Diablo series (1996–2001), shown in Figure 21-7. These two were multiplayer games, and although they were more hack-and-slash than true RPGs, they nevertheless led to a new genre: massive multiplayer online role-playing games (MMORPGs).
You can build an RPG title with Ajax as long as it is not too complicated and the client does not need constant communication with the server.
As graphics, and more important, Internet connection speeds, improved, game developers were able to make games more exciting and interesting by allowing more players to connect to them simultaneously. Neverwinter Nights (2002) paved the way for this new genre of games, but it really started with Ultima Online (1997) and Everquest (1999). In truth, MMORPGs are nothing more than graphical MUD games. More games of this genre are being introduced all the time, making this an extremely popular genre.
Newer MMORPGs that are shaping this genre are Star Wars Galaxies (2003), the popular World of Warcraft (2004), shown in Figure 21-8, and The Lord of the Rings Online (2007).

MMORPGs would be a difficult genre to implement with Ajax because of the enormous amount of information required to pass between the client and server. These games would also be processor-intensive, as they must render, animate, and move hundreds, if not thousands, of characters and NPCs at the same time. For this reason, Ajax is not well suited to developing MMORPGs.
Puzzle games are a popular genre for the browser, and they are implemented mostly with the Shockwave or Flash plug-in. You can find puzzle games on web sites such as Shockwave (http://www.shockwave.com/puzzlegames.jsp), ezone.com (http://www.ezone.com/games/all.php?type=puzzle), MSN Games (http://zone.msn.com/en/root/gamebrowser.htm?playmode=0&genre=1), and Yahoo! Games (http://games.yahoo.com/puzzle-games), to name a few. These games would be even more desirable if they did not require a plug-in to play.
It is only a matter of time before Ajax puzzle games appear more frequently on the Web. They are a good genre of game for Ajax, as they do not require a lot of communication between client and server, and they generally have less logic behind them. For this reason, puzzle games could be a good fit for Ajax programming.
The biggest problem with puzzle games is that they are usually single-player games that have no real need for Ajax. Sure, you can pass player scores back and forth between the client and the server, but other than that it might be difficult to build a case for Ajax in a puzzle game. Indeed, you could write a puzzle game in JavaScript for the browser. Ajax simply does not give any extra functionality for these games.
Atari brought the first console games to homes with the paddle game Pong (1975). Not long after that, Intellivision started a competition with Atari that many other companies would join. By 1983, so many bad console games were being produced, all because companies were trying to get a foothold on the market, that users became disenchanted with them. This started the rise of the PC and educational games. It took several years, but game designers soon began to port console games to the more powerful PCs. Original games such as Space Invaders (1978), Pac-Man (1982), Pitfall (1982), Pole Position (1982), and Spy Hunter (1983) joined the post-video-game-crash arcade games such as Castlevania (1986), Mortal Kombat (1993), Tomb Raider (1996), and Grand Theft Auto (1998), which became the model for the arcade genre also known at this point as platform games.
Arcade games have a basic style of game play, in which a player’s only interaction is typically to avoid or kill all opponents and navigate through levels without falling prey to traps and other pitfalls. Figure 21-9 shows a scene from Castlevania, a typical arcade game.

Arcade games usually are not difficult in terms of game logic, though graphics may or may not cause problems for a developer. The need to scroll levels would be the most difficult part of graphics development, especially when programming for the browser in JavaScript. Games such as Pac-Man, Donkey Kong (1981), and Lode Runner (1983) that do not need to scroll would be easier to develop for the browser. The need for Ajax would come into play if the game being developed was to be a two-player game instead of a single-player game. Arcade games may not be ideal for Ajax depending on the style of the game, but multiplayer games that are not too graphics-intensive certainly fit the bill.
I probably missed many game genres with the way I categorized them; this will happen regardless of who sorts them. It is almost impossible for everyone to agree that the categories of genre are correct or that the games are in the correct genre. More important, you could categorize a game into several different genres at the same time. So, in the interest of not missing any obvious games, let’s cover the rest of them now.
I did not break out obvious genres such as sports or children’s games because there is no need. When creating a game that will use Ajax under the hood, no matter what the genre, you must decide how feasible it is to implement. Will the game require a lot of data to be sent back and forth between the client and the server? Will the game need a lot of graphics, and will the graphics be 2D and vector-based or 3D with meshes and other, more sophisticated graphics technologies? Will the game require complex logic?
How you answer these questions will determine whether your game is right for Ajax. Do not try to create a game that is not suited for JavaScript and Ajax. Either you or your players will not be happy with the results of that decision. Ajax is not right for everything, so make sure it is going to be right for you when building your next browser-based game.
There are a couple of important requirements when supporting a web-based game from within the browser. The first is the Internet communication. Will your game require broadband-type speeds to function correctly, or will any Internet connection speeds suffice? Only you can answer this question. However, there is a factor that could narrow down the answer. The genre of game can dictate the types of communication required: strategy-based games would require much less bandwidth back and forth between client and server than an FPS game would. So, look at the type of game you plan to build, and think about the connection requirements you think you will need based on the amount of client/server communication necessary.
The more important Internet requirement is what the game’s platform will be. This requirement boils down to two choices: one of an assortment of plug-ins, or JavaScript with Ajax.
There are few choices when it comes to plug-ins for browsers, and I am going to throw applets into this definition as well. Each type of plug-in has its advantages, of course, and the biggest disadvantage with all plug-ins is that they require a user to download software for them to work. The plug-ins that I will focus on are:
Perhaps the most popular plug-in for browsers today is Flash. This could be because its interoperability within a browser has become nearly seamless. Whole sites are built using Flash to create all functionality and content. Media sites, especially those for movies, use Flash to allow more user interactivity.
Macromedia released Flash in 1996, after acquiring the technology from FutureWave Software. Adobe acquired Macromedia and its software in December 2005, and the current version of Flash is Flash CS3. Originally developed as a multimedia platform for the World Wide Web, Flash has grown and become a tool for user interaction, as well as a platform for games and complicated presentation that is much more difficult to produce using XHTML, CSS, and JavaScript. Flash uses the ActionScript programming language, which has the same syntax as JavaScript, as it is an implementation of ECMAScript. ActionScript allows a developer to interact with all of the objects created within Flash, as well as communicate with a server.
Flash is a small browser download, and according to Adobe’s web site, it’s available on nearly 99 percent of Internet-enabled desktops.[8] This makes it a good candidate for game development, and an alternative for web developers who have JavaScript experience. In fact, Ajax can be implemented within a Flash platform, as Flash uses ActionScript behind the scenes. ActionScript is a close cousin to JavaScript, and it follows ECMAScript more closely. Flash can be a good alternative for more complicated games in which you still wish to implement Ajax for communication between the client and the server.
Macromedia Director was introduced before Flash. It was followed shortly after by Shockwave, which Macromedia introduced around the same time as Flash, and although both are from the same company, Shockwave was a direct competitor to Flash. Shockwave was geared more toward game development from the start, having a more powerful graphics engine. This made it a larger plug-in, however, and its size kept it from enjoying the same widespread adoption as Flash. Shockwave’s other limitation is that it is not compatible with all operating systems—in particular, Linux.
As noted earlier, Adobe bought Macromedia and all its products in 2005. The current version of Shockwave is 10.2.
Today’s Shockwave is well suited to games, as it renders faster, includes hardware-accelerated 3D images, and offers blend modes for layered display of graphical assets. This allows it to build much more graphically rich games, something Flash cannot do. The trade-off is its lack of support for operating systems other than Windows and Mac OS X, its larger initial download size, and its slower startup time in browsers.
Java applets are specialized Java programs intended to run within browsers as plug-ins. The browser’s operating system must have a compatible version of the Java Runtime Environment (JRE) for applets to function correctly. The most recent version of the JRE at the time of this writing is JRE 6 Update 2.
You create an applet by extending a new class for the
program with the Applet class.
Any other classes supported by the JRE on the client can be used
in the applet. The advantage is that you can build a pretty robust
gaming application to run in the browser. Just remember that the
larger and more complex the application, the larger the size of
the file that the browser must download.
Java applets can be well suited for games, as they have Java’s graphing capabilities and the ability to handle network connections not available using Ajax. The only thing to remember is that the user must have the JRE associated with your build of the applet. This download may take a very long time, though, if the user doesn’t have a compatible version of the JRE already installed. This may turn people away from using your gaming applet.
Ajax solutions to browser-based game programming have the advantage of complete browser reliance without the need for any additional software. This can improve startup times and give a completely seamless look within the browser. The real advantage over plug-ins for game programming is that there is nothing else new to learn.
An Ajax solution for game development must rely on XHTML, CSS, JavaScript, and XML/JavaScript Object Notation (JSON). Do these skills sound familiar? They ought to, as they are the skills that every developer should possess. What’s more, they are the skills that you either knew before reading this book, or hopefully have gained by now. This can be appealing to a developer who has always wanted to program a game, but has lacked the skills to create one on a traditional platform (i.e., the desktop).
So that you can better understand the parts of a typical game, I will break them down in a modular manner, as each component of the game will need its own Ajax functionality. The parts that we will be interested in are:
Character animation
Collisions
Input
Putting all of this together will result in a rough game client that can communicate with a server and handle the basic functionality most games need.
Our first task is to get a character or game piece to move on the screen. This will involve technologies I described in Chapter 13, in the section “Building Animation with the PNG Format.” Three steps are involved in animating a character on the screen. The first step is to make the character appear to move with a walking loop. Next is to physically move the character based on some commands. Finally, you must track the movements so that they can be sent to other users with Ajax.
The walking loop involves nothing more than animating a sprite to give the illusion of movement. We will accomplish this by using the same technique I showed for how to animate a PNG in Chapter 13. The only difference is that this will be more complex; the animation may require that the sprite move in more than one way or direction based on the commands given to the character.
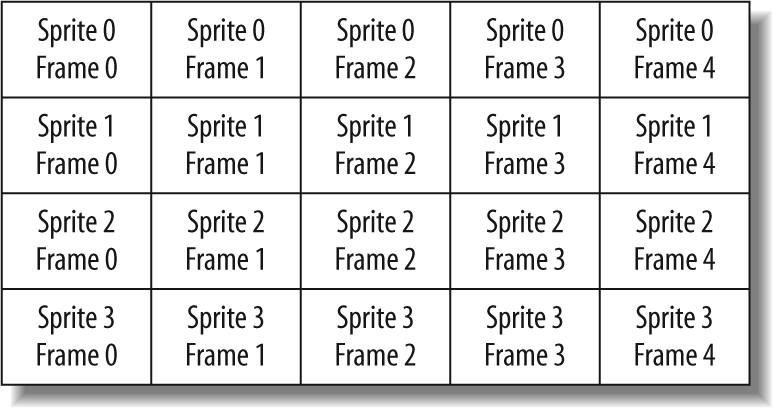
For us, this means that instead of having one sprite in an image, we may have many animation sequences all controlled with a second offset. A good example of this is a character walking; at a minimum, this would require sprites moving left, right, forward, and backward. The PNG image would then be broken down as shown in Figure 21-10.
Our animation loop will need to be contained within an object to track each character’s animation. Refer back to Example 13-2 in Chapter 13. It contains the functionality we need, with only some basic changes to compensate for the multiple animation sequences, as shown in Example 21-1.
Example 21-1. A modified animation object that becomes the basis for our character object
/**
 * @fileoverview This file, character.js, encapsulates all of the logic and code
 * needed to create a character in the game.
 *
 * This code requires the Prototype library.
 */

/**
 * This class, character, will store all of the functionality needed by a
 * character in the game, including animation, movement, and statistics.
 */
var character = Class.create( );
character.prototype = {
    /**
     * This member, _handle, stores the <div> element (presumably) that stands in
     * for the image.
     * @private
     */
     _handle: null,
    /**
     * This member, animation, holds all of the methods for creating the illusion
     * of animation for the character and allows the control of that animation
     * in the browser.
     *
     * @member character
     */
    animation: {
        /**
         * This member, _options, holds all of the developer-definable options
         * for the animation portion of the character class.
         * @private
         */
        _options: {
            /**
             * This member, frameSize, stores the width of an individual "frame"
             * in the image.
             */
            frameSize: 0,
            /**
             * This member, frameCount, stores the number of frames contained in
             * the image for a single sprite.
             */
            frameCount: 0,
            /**
             * This member, spriteSize, stores the height of an individual "sprite"
             * in the image.
             */
            spriteSize: 0,
            /**
             * This member, spriteCount, stores the number of sprites contained in
             * the image for the character.
             */
            spriteCount: 0,
            /**
             * This member, pauseTime, stores the length of time that the
             * animation should pause between "frames" in milliseconds.
             */
            pauseTime: 0
        },
        /**
         * This member, _currentFrame, stores the "frame" currently being viewed
         * in the browser.
         * @private
         */
        _currentFrame: 0,
        /**
         * This member, _spriteCount, stores the "sprite" currently being viewed
         * in the browser.
         * @private
         */
        _spriteFrame: 0,
        /**
         * This member, _internalTimer, stores the switching time for the object.
         * @private
         */
        _internalTimer: null,
        /**
         * This method, advanceFrame, changes the position of the background
         * image of the /_handle/ based on the /_currentFrame/, /frameSize/,
         * /spriteSize/, /_spriteCount/, and /_spriteFrame/.
         *
         * @member animation
         */
        advanceFrame: function( ) {
            /* Has the animation reached the last image? */
            if (this._currentFrame == this._options.frameCount)
                this._currentFrame = 0;
            this._handle.setStyle({
                backgroundPosition: (-1 * this._options.frameSize *
                    this._currentFrame) + 'px ' + (-1 * this._options.spriteSize *
                    this._spriteFrame) + 'px'
            });
            this._currentFrame++;
        },
        /**
         * This method, startAnimation, calls the DOM function /setInterval/ to
         * start the timer for the animation and will report its success.
         *
         * @member animation
         * @param {Integer} p_direction The offset for the necessary sprite
         *     of the character.
         * @return Whether or not the animation was started.
         * @type Boolean
         */
        startAnimation(p_direction) {
            if (p_direction > this._options.spriteCount)
                return (false);
            this._spriteFrame = p_direction;
            this._internalTimer = setInterval(this.advanceFrame.bind(this),
                this._options.pauseTime);
            return (this._intervalTimer);
        },
        /**
         * This method, pauseAnimation, calls the DOM function /clearInterval/
         * to clear the timer for the animation and stop it in its current frame.
         *
         * @member animation
         * @return Whether or not the animation was correctly paused.
         * @type Boolean
         */
        pauseAnimation: function( ) {
            clearInterval(this._internalTimer.bind(this));
            /* Has the timer been cleared? */
            if (!this._internalTimer) {
                this._internalTimer = null;
                return (true);
            }
            return (false);
        },
        /**
         * This method, stopAnimation, calls the DOM function /clearInterval/
         * to clear the timer for the animation, then the /_currentFrame/ is
         * reset to 0 and the image reset to its first "frame".
         *
         * @member animation
         * @return Whether or not the animation was correctly stopped.
         * @type Boolean
         */
        stopAnimation: function( ) {
            clearInterval(this._internalTimer.bind(this));
            /* Has the timer been cleared? */
            if (!this._internalTimer) {
                this._internalTimer = null;
                this._spriteFrame = 0;
                this._currentFrame = 0;
                this._handle.setStyle({
                    backgroundPosition: '0 0'
                });
                return (true);
            }
            return (false);
        }
    },
    /**
     * This method, initialize, is the constructor for the class and sets all
     * of the necessary private members.
     *
     * @member character
     * @constructor
     * @param {String | Object} p_handle The id or object that represents the
     *     character.
     * @param {Object} p_options The options to set for the animation.
     */
    initialize: function (p_handle, p_options) {
        this._handle = $(p_handle);
        Object.extend(this.animation._options, p_options || {});
    },
    /**
     * This method, startAnimation, is the public way of starting the animation
     * of the character, by calling the /animation.startAnimation/ method.
     *
     * @member character
     * @param {Integer} p_direction The offset for the necessary sprite of
     *     the character.
     * @return Whether or not the character began being animated.
     * @type Boolean
     */
    startAnimation: function(p_direction) {
        return (this.animation.startAnimation(p_direction));
    },
    /**
     * This method, pauseAnimation, is the public way of pausing the animation
     * of the character, by calling the /animation.pauseAnimation/ method.
     *
     * @member character
     * @return Whether or not the character paused its animation.
     * @type Boolean
     */
    pauseAnimation: function( ) {
        return (this.animation.pauseAnimation( ));
    },
    /**
     * This method, stopAnimation, is the public way of stopping the animation
     * of the character, by calling the /animation.stopAnimation/ method.
     *
     * @member character
     * @return Whether or not the character stopped being animated.
     * @type Boolean
     */
    stopAnimation: function( ) {
        return (this.animation.stopAnimation( ));
    }
};
This works well when the client needs to animate only one image. But what happens if more than one character needs to be animated? The answer is not as simple as passing to the function the image to animate, because different characters may have different looping effects.
Let’s think of a quick example. We want to build a chess game, but instead of just sliding the pieces around on the board, we want all the pieces to have cool animations as they move. The different pieces on the board have different levels of importance, so why not programmatically give the more important pieces more movements?
With this model in mind, a queen would require more movement
sequences than a pawn. To compensate for these differences, let’s
modify the character object so
that it can handle this new functionality. Example 21-2 shows what these
modifications would look like.
Example 21-2. The revisions made to the character object, with functionality for different characters and animation sequences
/**
 * This class, character, will store all of the functionality needed by a
 * character in the game, including animation, movement, and statistics.
 */
var character = Class.create( );
character.prototype = {
.
.
.
    animation: {
        /**
         * This member, _options, holds all of the developer-definable options
         * for the animation portion of the character class.
         * @private
         */
        _options: {
            /**
             * This member, sprite, is an array of objects that contains the
             * number of frames per sprite, the size of a frame, and the size
             * of a sprite.
             */
            sprite: null,
            /**
             * This member, pauseTime, stores the length of time that the
             * animation should pause between "frames" in milliseconds.
             */
            pauseTime: 0
        },
.
.
.
        /**
         * This method, advanceFrame, changes the position of the background
         * image of the /_handle/ based on the /_currentFrame/, /frameSize/,
         * /spriteSize/, /_spriteCount/, and /_spriteFrame/.
         *
         * @member animation
         */
        advanceFrame: function( ) {
            /* Has the animation reached the last image? */
            if (this._currentFrame == this._options.
sprite[this._spriteFrame].frames)
                this._currentFrame = 0;
            this._handle.setStyle({
                backgroundPosition: (-1 *
                    this._options.sprite[this._spriteFrame].frameSize *
                    this._currentFrame) + 'px ' + (-1 *
                    this._options.[this._spriteFrame].spriteSize *
                    this._spriteFrame) + 'px'
            });
            this._currentFrame++;
        },
        /**
         * This method, startAnimation, calls the DOM function /setInterval/ to
         * start the timer for the animation and will report its success.
         *
         * @member animation
         * @param {Integer} p_direction The offset for the necessary sprite
         *     of the character.
         * @return Whether or not the animation was started.
         * @type Boolean
         */
        startAnimation(p_direction) {
            if (p_direction > this._options.sprite.length)
                return (false);
            this._spriteFrame = p_direction;
            this._internalTimer = setInterval(this.advanceFrame.bind(this),
                this._options.pauseTime);
            return (this._intervalTimer);
        },
.
.
.
Now, we must keep track of what sprite is being used (based on offset), how many images are in the loop, the offset per image, and what image in the loop this piece is currently on in an array of objects. This makes the creation of the object a bit more complicated, but it increases the flexibility of the character immensely. Here is an example of creating the object:
var blackRook_1 = new character('black_rook_1', {
    pauseTime: 250,
    sprite: [
        { frames: 5, frameSize: 20, spriteSize: 35 },
        { frames: 5, frameSize: 20, spriteSize: 35 },
        { frames: 4, frameSize: 16, spriteSize: 36 },
        { frames: 4, frameSize: 16, spriteSize: 36 }
    ]
});
Just like that, we have a way to animate pieces on the screen. As I will show later, these animation objects will be managed by a main controller for the game.
Now that we have the illusion of our character moving on the screen, we need to actually create the movement. First we need to determine whether the character has fixed movement or dynamic movement. Games such as chess and checkers have fixed places where the pieces can move; in other games, the characters can move wherever the player moves them, as long as it is within the playing area’s constraints. Such dynamic movement is more complicated and logic-intensive to create than fixed movement (especially in terms of collision detection), although fixed movement must follow its own set of logic (and it’s not necessarily simple).
A player can move a character within the game using two different methods: the keyboard and the mouse. Whether you provide one or both methods is up to you.
When the game accepts input for movement from a group of keys such as the arrow keys, the directions in which the character can move are fixed or static directions. Most commonly, these directions are referred to in the game as left, right, backward, and forward, or they are referred to via the cardinal directions of north, south, east, and west. Knowing that the keyboard is going to give us a static direction, we can create constant variables for the character movement. For example:
var _  _MOVE_BACKWARD   = 0;
var _  _MOVE_RIGHT_  _    = 1;
var _  _MOVE_FORWARD_  _  = 2;
var _  _MOVE_LEFT_  _     = 3;
Tip
You define the variables for static movement with the
JavaScript keyword var.
Because of this, the variables can be changed during program
execution, which isn’t necessarily what you want. The JavaScript
keyword const would make the
variable a constant that cannot be changed. However, not all
browsers recognize this keyword, introduced in JavaScript 1.6,
so the var keyword is the
best option for cross-browser compatibility.
We will use these constants within our movement methods of the character class. Example 21-3 shows the
character class with our new
movement functionality. This example removes the animation
functionality for now for simplicity, though I will add it back
shortly.
Example 21-3. Movement functionality added to the character class
/**
 * @fileoverview This file, character.js, encapsulates all of the logic and
 * code needed to create a character in the game.
 *
 * This code requires the Prototype library.
 */

/**
 * This variable, _  _PULSE_MOVEMENT_  _, is intended as a constant for
movement timing.
 */
var _  _PULSE_MOVEMENT_  _ = 10;

/**
 * This variable, _  _MOVE_BACKWARD_  _, is intended as a constant for static movement
 * attached to the KEY_UP key.
 */
var _  _MOVE_BACKWARD_  _ = 0;
/**
 * This variable, _  _MOVE_RIGHT_  _, is intended as a constant for static movement
 * attached to the KEY_RIGHT key.
 */
var _  _MOVE_RIGHT_  _ = 1;
/**
 * This variable, _  _MOVE_FORWARD_  _, is intended as a constant for static movement
 * attached to the KEY_DOWN key.
 */
var _  _MOVE_FORWARD_  _ = 2;
/**
 * This variable, _  _MOVE_LEFT_  _, is intended as a constant for static movement
 * attached to the KEY_LEFT key.
 */
var _  _MOVE_LEFT_  _ = 3;

/**
 * This class, character, will store all of the functionality needed by a character
 * in the game, including animation, movement, and statistics.
 */
var character = Class.create( );
character.prototype = {
    /**
     * This member, _handle, stores the <div> element (presumably) that stands in
     * for the image.
     * @private
     */
    _handle: null,
    /**
     * This member, movement, holds all of the methods for making the character move
     * around within the constraints of the game in the browser.
     *
     * @member character
     */
    movement: {
        /**
         * This member, _direction, holds the value of the current direction
         * the character is traveling in.
         * @private
         */
        _direction: -1,
        /**
         * This member, _moving, lets methods within the movement functionality
         * know whether the character is currently moving or not.
         * @private
         */
        _moving: false,
        /**
         * This member, _position, holds the current x, y coordinates of the
         * character on the screen.
         * @private
         */
        _position: [0, 0],
        /**
         * This member, _internalTimer, stores the movement time for the object.
         * @private
         */
        _internalTimer: null,
        /**
         * This method, changeDirection, controls the movement of the character
         * in any given direction, and controls starting and stopping the movement.
         *
   * @member movement
         * @param {Integer} p_direction The direction the character should move in.
         * @return Whether or not the character changed directions.
         * @type Boolean
         */
        changeDirection: function(p_direction) {
            /* Should the character be stopped? */
            if (this._moving && this._direction == p_direction) {
                this.stop( );
                return (false);
            }
            this._direction = p_direction;
            /* Do we need to start the character? */
            if (!this._moving)
                this.start( );
            return (true);
        },
        /**
         * This method, start, starts the character moving in a given direction.
         *
         * @member movement
         * @return Whether or not the character started moving.
         * @type Boolean
         */
        start: function( ) {
            this._internalTimer = setInterval(this.move.bind(this),
                _  _PULSE_MOVEMENT_  _);
            this._moving = true;
            return (this._intervalTimer);
        },
        /**
         * This method, stop, stops the character's movement.
         *
         * @member movement
         * @return Whether or not the character stopped moving.
         * @type Boolean
         */
        stop: function( ) {
            clearInterval(this._internalTimer.bind(this));
            /* Has the timer been cleared? */
            if (!this._internalTimer) {
                this._internalTimer = null;
                this._moving = false;
                return (true);
            }
            return (false);
        },
        /**
         * This method, move, changes the coordinates of the character in the
         * set direction.
         *
         * @member movement
         */
        move: function( ) {
            switch (this._direction) {
                case _  _MOVE_BACKWARD_  _:
                    this._position[1] −= 2;
                    break;
                case _  _MOVE_RIGHT_  _:
                    this._position[0] += 2;
                    break;
                case _  _MOVE_FORWARD_  _:
                    this._position[1] += 2;
                    break;
                case _  _MOVE_LEFT_  _:
                    this._position[0] −= 2;
                    break;
            }
            this.position( );
        },
        /**
         * This method, position, does the actual moving of the character by
         * changing the CSS to meet the new coordinates set.
         *
         * @member movement
         */
        position: function( ) {
            this._handle.setStyle({
                left: this._position[0] + 'px',
                top: this._position[1] + 'px'
            });
        }
    },
    /**
     * This method, moveCharacter, is the public method by which the character
     * class should move an object in the game.
     *
     * @member character
     * @param {Integer} p_direction The direction the character should move in.
     */
    moveCharacter: function(p_direction) {
        try {
            this.movement.changeDirection(p_direction);
        } catch (ex) {
            alert('Illegal argument sent to method character.moveCharacter( ):',
                ex.description);
        }
    }
}
Moving the character is as simple as:
var ego = new character('mainCharacter', {
    pauseTime: 250,
    sprite: [
        { frames: 5, frameSize: 20, spriteSize: 35 },
        { frames: 5, frameSize: 20, spriteSize: 35 },
        { frames: 4, frameSize: 16, spriteSize: 36 },
        { frames: 4, frameSize: 16, spriteSize: 36 }
    ]
});

ego.moveCharacter(_  _MOVE_FORWARD_  _);
Moving a character on the screen in a static way is straightforward and requires the simplest of logic to execute. In contrast, when dynamic movement is introduced, the logic becomes more cumbersome and much less straightforward.
There are two techniques for moving a character based on the click of a mouse event. These events are dynamic in that we must create a path for the character to take from the current point to the clicked point. The idea behind both of these methods is that for every iteration of the walking loop, the character gets one step closer to its destination (the mouse click point). You can achieve this in multiple ways, though I am going to concentrate on two fairly simple methods. The first method is a simple path movement, and the second method is a line-of-sight path movement.
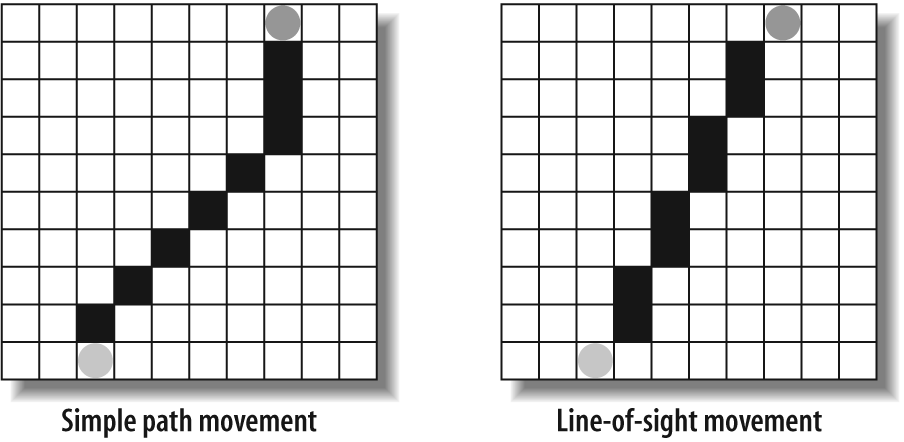
To create a path using a simple path movement, every time the movement code is executed, the x and y coordinates are either increased or decreased depending on the path of the line taken. The downside to this method is that it will produce an unrealistic path to the destination. The character will move diagonally in a direction until it is parallel or perpendicular to the destination point, at which time it will then move in a straight line to reach its final position, as shown in Figure 21-11. A code snippet of this logic would look like this:
/* Is character's x-coordinate greater than the mouse event's x-coordinate? */
if (this._position[0] > mouseX)
    this._position[0]—;
/* Is character's x-coordinate less than the mouse event's x-coordinate? */
else if (this._position[0] < mouseX)
    this._position[0]++;
/* Is character's y-coordinate greater than the mouse event's y-coordinate? */
if (this._position[1] > mouseY)
    this._position[1]--;
/* Is character's y-coordinate less than the mouse event's y-coordinate? */
else if (this._position[1] < mouseY)
    this._position[1]++;
this.position( );
By comparison, the line-of-sight path movement closely approximates the actual line between the points using the Bresenham line algorithm. Figure 21-11 shows the difference between these two methods.
Example 21-4 shows the code for a Bresenham line calculated between two points, with the list of coordinates returned as an array of points.
Example 21-4. logic.js: The JavaScript needed for building a path between two points that closely approximates a straight line
/**
 * This object, Logic, is the container for all mathematical logic functionality
 * for the game.
 */
var Logic = {
    /**
     * This method, Bresenham, creates a list of points that draw an
     * approximation of the mathematically correct line, which is described in
     * the form of a linear function, as defined with the Bresenham line
     * algorithm.
     *
     * @member Logic
     * @param {Integer} p_x1 The starting x-coordinate for the line.
     * @param {Integer} p_y1 The starting y-coordinate for the line.
     * @param {Integer} p_x2 The ending x-coordinate for the line.
     * @param {Integer} p_y2 The ending y-coordinate for the line.
     * @return An array containing the list of points that creates the
     *     Bresenham line.
     * @type Array
     */
    Bresenham: function(p_x1, p_y1, p_x2, p_y2) {
        var deltaX = Math.abs(p_x2 - p_x1) << 1;
        var deltaY = Math.abs(p_y2 - p_y1) << 1;
        /*
         * If p_x1 == p_x2 or p_y1 == p_y2, then it makes no difference what
         * is set here
         */
        var ix = ((p_x2 > p_x1) ? 1 : −1);
        var iy = ((p_y2 > p_y1) ? 1 : −1);
        var path = [];
        var i = 0;

        /* Which way is the line going to slope? */
        if (deltaX >= deltaY) {
            /* Error may go below zero */
            var error = deltaY - (deltaX >> 1);

            /* Loop until the points are connected */
            while (p_x1 != p_x2) {
                /* Is there a chance the line must shift? */
                if (error >= 0)
                    /* Do we need to slide over? */
                    if (error || (ix > 0)) {
                        p_y1 += iy;
                        error −= deltaX;
                    }
                p_x1 += ix;
                error += deltaY;
                path[i++] = [p_x1, p_y1];
            }
        } else {
            /* Error may go below zero */
            var error = deltaX - (deltaY >> 1);

            /* Loop until the points are connected */
            while (p_y1 != p_y2) {
                /* Is there a chance the line must shift? */
                if (error >= 0)
                    /* Do we need to slide over? */
                    if (error || (iy > 0)) {
                        p_x1 += ix;
                        error −= deltaY;
                    }
                p_y1 += iy;
                error += deltaX;
                path[i++] = [p_x1, p_y1];
            }
        }
        return (path);
    }
};Now we add the necessary code to our character.movement object to handle
mouse click points, and the corresponding public method to do
this. Every iteration of the mouseMove(
) method will take another point off the queue of points
and move the character to this coordinate. Example 21-5 shows these
additions to our character
class.
Example 21-5. The additions to the character class to handle mouse click events
/**
 * @fileoverview This file, character.js, encapsulates all of the logic and code
 * needed to create a character in the game.
 *
 * This code requires the Prototype library.
 */

/**
 * This class, character, will store all of the functionality needed by a
 * character in the game, including animation, movement, and statistics.
 */
var character = Class.create( );
character.prototype = {
    /**
     * This member, _handle, stores the <div> element (presumably) that stands in
     * for the image.
     * @private
     */
    _handle: null,
    /**
     * This member, movement, holds all of the methods for making the character
     * move around within the constraints of the game in the browser.
     *
     * @member character
     */
    movement: {
        /**
         * This member, _moving, lets methods within the movement functionality
         * know whether the character is currently moving or not.
         * @private
         */
        _moving: false,
        /**
         * This member, _position, holds the current x, y coordinates of the
         * character on the screen.
         * @private
         */
        _position: [0, 0],
        /**
         * This member, _path, is a queue of points set by the Bresenham line
         * algorithm between the current character position and the mouse
         * event's coordinates.
         * @private
         */
        _path: [],
        /**
         * This member, _internalTimer, stores the movement time for the object.
         * @private
         */
        _internalTimer: null,
        /**
         * This method, changeDirectionMouse, controls the movement of the
         * character for a mouse click, and controls starting and stopping the
         * movement.
         *
         * @member movement
         * @param {Integer} p_x The x-coordinate the character should move to.
         * @param {Integer} p_y The y-coordinate the character should move to.
         * @return Whether or not the character changed directions.
         * @type Boolean
         */
        changeDirectionMouse: function(p_x, p_y) {
            /* Should the character be stopped? */
            if (this._moving)
                this.stop( );
            this._direction = -1;
            this._path = Logic.Bresenham(this._position[0], this._position[1],
                p_x, p_y);
            this.startMouse( );
            return (true);
        },
        /**
         * This method, startMouse, starts the character moving in a given direction.
         *
         * @member movement
         * @return Whether or not the character started moving.
         * @type Boolean
         */
        startMouse: function( ) {
            this._internalTimer = setInterval(this.moveMouse.bind(this),
                _  _PULSE_MOVEMENT_  _);
            this._moving = true;
            return (this._intervalTimer);
        },
        /**
         * This method, stop, stops the character's movement.
         *
         * @member movement
         * @return Whether or not the character stopped moving.
         * @type Boolean
         */
        stop: function( ) {
            clearInterval(this._internalTimer.bind(this));
            /* Has the timer been cleared? */
            if (!this._internalTimer) {
                this._internalTimer = null;
                this._moving = false;
                return (true);
            }
            return (false);
        },
        /**
         * This method, moveMouse, changes the coordinates of the character with
         * the point in the path queue.
         *
         * @member movement
         */
        moveMouse: function( ) {
            var point = this._path.shift( );
            this._position[0] = point[0];
            this._position[1] = point[1];
            this.position( );
        },
        /**
         * This method, position, does the actual moving of the character by
         * changing the CSS to meet the new coordinates set.
         *
         * @member movement
         */
        position: function( ) {
            this._handle.setStyle({
                left: this._position[0] + 'px',
                top: this._position[1] + 'px'
            });
        }
    },
    /**
     * This method, moveCharacterMouse, is the public method by which the
     * character class should move an object in the game when a mouse event
     * happens.
     *
     * @member character
     * @param {Integer} p_x The x-coordinate the character should move to.
     * @param {Integer} p_y The y-coordinate the character should move to.
     */
    moveCharacterMouse: function(p_x, p_y) {
        try {
            this.movement.changeDirectionMouse(p_x, p_y);
        } catch (ex) {
            alert('Illegal argument sent to method character.moveCharacterMouse( ):',
                ex.description);
        }
    }
}
We are starting to hit the basics of mathematics used in game programming, and a good knowledge of trigonometry and linear algebra is very helpful when doing more complex calculations within the logic of your game.
Now that our character can move around in the game, we must take care of what happens when the character hits a barrier, another character, an enemy, or a projectile.
Detecting when objects collide with one another is an important aspect of game programming. A collision could take place between a character and a barrier in the game, between two characters, between a character and a computer enemy, or between characters and projectiles. The way to detect these collision types can be simple and can result in an approximation, or it can be a much more complicated, yet precise, detection.
Warning
There is a danger when performing collision detection on the client using a collision object and storing the state of the character on it. By prototyping a new collision object, a malicious hacker could create a character that could never get hit. For simplicity, though, this detection will be done on the client.
The simplest of these detection techniques is rectangular collision detection. The level of precision in rectangular collision detection depends on the accuracy of the bounding boxes being tested. Next, there is circular collision detection, which can approximate large projectiles better than a rectangle can. Finally, there is linear collision detection, which accurately detects a collision based on two lines intersecting. Of course, there are other techniques, but they become more complex and require a lot more mathematics and computer computation (requiring more computer hardware speed), and frankly, they are beyond the scope of this book. You can find more information on collision detection in AI for Game Developers by David M. Bourg and Glenn Seeman (O’Reilly).
For good collision detection, all of the objects and barriers in
the game will have to have bounding boxes, circles, or lines to detect
collision properly. To this end, our character must have collision
bounding constraints to test against. This requires a simple addition
to the character class:
var character = Class.create( );
character.prototype = {
    collision: {
        _boundings: [],
        .
        .
        .
Objects and barriers would have something similar so that they too could be tested for collisions.
Now that we know the basics of collision detection, it’s time to decide which method of collision detection we want to use in our game.
Rectangular collision detection determines whether there is an intersection between two boxes. This is actually a simple process. Each object to be tested will have a bounding box with an (x1, y1) coordinate that represents the upper-left corner of the box and an (x2, y2) coordinate that represents the lower-right corner of the box. You can also express this second coordinate as (x1 + width, y1 + height). You perform two tests on the boxes to see whether they have collided. First you check whether one box’s right x coordinate is greater than the other box’s left x coordinate and then whether one box’s left x coordinate is less than the second box’s right x coordinate. This determines whether they are intersected vertically, and you can express it as follows:
if ((ego.GetBoundX(1) < char[0].GetBoundX(2)) &&
    (ego.GetBoundX(2) > char[0].GetBoundX(1)))
Tip
Rectangular collision detection is also known as square collision detection. Rectangular collision detection is the more common name, as a square is only a specialized rectangle in the first place.
Once you have found that the two bounding boxes have intersected vertically, you would run these tests on the two boxes’ y coordinates to determine whether the boxes have intersected horizontally as well. You would express this as follows:
if ((ego.GetBoundY(1) < char[0].GetBoundY(2)) &&
    (ego.GetBoundY(2) > char[0].GetBoundY(1)))
When both statements are found to be true, the two bounding boxes have collided. Unfortunately, as you will notice in Figure 21-12, though the boxes have collided with each other, they are not accurately describing a true collision between the two characters (Tux is not really colliding with the BSD daemon).
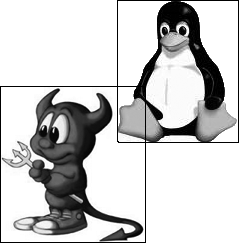
Figure 21-12. An example of two bounding boxes colliding, yet not accurately describing an actual collision
Tightening the bounding boxes will provide more accurate
collision detection, though this can be only so accurate, as a
rectangle cannot describe most sprites to a high degree of accuracy.
Example 21-6 shows
what the addition to the Logic
class would entail for this test.
Example 21-6. Additions to the Logic class for testing rectangular collisions
/**
 * This object, Logic, is the container for all mathematical logic functionality
 * for the game.
 */
var Logic = {
    //.
    //.
    //.
    /**
     * This method, RectangularCollisionDetect, tests for a collision between the
     * two rectangles that are passed to it.
     *
     * @member Logic
     * @param {Array} p_box1 The points for the first bounding box.
     * @param {Array} p_box2 The points for the second bounding box.
     * @return Whether the two boxes have collided or not.
     * @type Boolean
     */
    RectangularCollisionDetect: function(p_box1, p_box2) {
        /* Is there a vertical collision between the boxes? */
        if ((p_box1[0][0] < p_box2[1][0]) && (p_box1[1][0] > p_box2[0][0]))
            /* Is there a horizontal collision between the boxes? */
            if ((p_box1[0][1] < p_box2[1][1]) && (p_box1[1][1] > p_box2[0][1]))
                return (true);
        return (false);
    }
};
Once this is in place, the tests can happen within the
character class, as shown in
Example 21-7.
Example 21-7. The character class with collision detection and other necessary functionality added
/**
 * This class, character, will store all of the functionality needed by a
 * character in the game, including animation, movement, and statistics.
 */
var character = Class.create( );
character.prototype = {
    //.
    //.
    //.
    /**
     * This member, collision, holds all of the methods for testing collisions
     * between this character and other objects in the game.
     *
     * @member character
     */
    collision: {
        /**
         * This member, _boundings, holds the bounding box coordinates for
         * the character.
         * @private
         */
        _boundings: [],
        /**
         * This method, SetBounding, sets the new bounding box coordinates of
         * the character with the passed points.
         *
         * @member collision
         * @param {Array} p_points An array containing the new bounding box
         *     points of the character.
         */
        SetBounding: function(p_points) {
            try {
                this._bounding[0] = [p_points[0][0], p_points[0][1]];
                this._bounding[1] = [p_points[1][0], p_points[1][1]];
            } catch (ex) {
                this._bounding = null;
            }
        },
        /**
         *  This method, GetBoundX, gets one of the current x-coordinates of
         *  the character.
         *
         * @member collision
         * @param {Integer} p_corner The coordinate to return (1 or 2 for x1 and x2).
         * @return The x-coordinate.
         * @type Integer
         */
        GetBoundX: function(p_corner) {
            /* Does the character have a bounding box? */
            if (this._bounding)
                return (this._bounding[p_corner - 1][0]);
            return (null);
        },
        /**
         *  This method, GetBoundY, gets one of the current y-coordinates of
         *  the character.
         *
         * @member collision
         * @param {Integer} p_corner The coordinate to return (1 or 2 for y1 and y2).
         * @return The y-coordinate.
         * @type Integer
         */
        GetBoundY: function(p_corner) {
            /* Does the character have a bounding box? */
            if (this._bounding)
                return (this._bounding[p_corner - 1][1]);
            return (null);
        },
        /**
         * This method, GetBoundingBox, gets the current bounding box coordinates
         * of the character.
         *
         * @member collision
         * @return The current bounding box coordinates of the character.
         * @type Array
         */
        GetBoundingBox( ) {
            /* Does the character have a bounding box? */
            if (this._bounding)
                return ([[this._bounding[0]], this._bounding[1]]);
            return (null);
        }
    },
    /**
     * This method, GetBoundX, is the public way of getting one of the current
     * x-coordinates of the character.
     *
     * @member character
     * @param {Integer} p_corner The coordinate to return (1 or 2 for x1 and x2).
     * @return The x-coordinate.
     * @type Integer
     */
    GetBoundX: function(p_corner) {
        return (this.collision.GetBoundX(p_corner));
    },
    /**
     * This method, GetBoundY, is the public way of getting one of the current
     * y-coordinates of the character.
     *
     * @member character
     * @param {Integer} p_corner The coordinate to return (1 or 2 for y1 and y2).
     * @return The y-coordinate.
     * @type Integer
     */
    GetBoundY: function(p_corner) {
        return (this.collision.GetBoundY(p_corner));
    },
    /**
     * This method, GetBoundingBox, is the public way of getting the current
     * bounding box coordinates of the character.
     *
     * @member character
     * @return The current bounding box coordinates of the character.
     * @type Array
     */
    GetBoundingBox: function( ) {
        return (this.collision.GetBoundingBox( ));
    },
    /**
     * This method, TestCollision, tests for a collision between the character's
     * bounding box and the box that was passed using rectangular collision
     * detection.
     *
     * @member character
     * @param {Array} p_box The bounding box to test against.
     * @return Whether or not the passed bounding box collided with the
     *     character's bounding box.
     * @type Boolean
     */
    TestCollision: function(p_box) {
        return (Logic.RectangularCollisionDetect(this.GetBoundingBox( ), p_box));
    }
}
Tip
If you need to test a character with a small projectile, it would be better to represent the projectile as a single point instead of a bounding box. It takes two comparisons to detect a collision, one vertical and one horizontal:
if ((obj.GetBoundX( ) > ego.GetBoundX(1)) && (obj.GetBoundX( )
 < ego.GetBoundX(2)))
    if ((obj.GetBoundY( ) > ego.GetBoundY(1)) &&
 (objGetBoundY( ) < ego.GetBoundY(2)))
        return (true);
return (false);
This varies only slightly from the original rectangular collision detection.
This is simple collision detection with easy and fast calculations. Sometimes, however, to get more accurate results, a different bounding technique may be required.
Circular collision detection requires more calculations than rectangular collision detection does; therefore, you should use it only when you have a larger object that would benefit from collision detection with a circle as its bounding area. The object must have a radius and a center coordinate so that it can be tested correctly. For example:
var object = Class.create( );
object.prototype = {
    collision: {
        _boundingRadius: 0,
        _boundingCenter: [0, 0],
        //.
        //.
        //.
    }
};
We will consider anything within the object’s radius as something with which we have collided. To calculate this, we will use the Pythagorean theorem (http://en.wikipedia.org/wiki/Pythagorean_theorem) to determine a point’s distance to the center of the object.
The Pythagorean theorem says that for a right triangle, the square of the hypotenuse is equal to the sum of the squares of the other two sides. That is, x2 + y2 = r2. To solve for r (the radius) we take √(x2 + y2). Testing a point (x, y) to see whether it is within a certain number of pixels from our center, we calculate the following: √ ((x - centerX)2 + (y - centerY)2).
Tip
It does not matter whether you calculate (x - centerX) or (centerX - x); both will give you the same result once the difference is found and squared. For example (6 - 3)2 and (3 – 6)2 both yield 9.
Now that we have this distance, we check it against the object’s radius and see whether this value is less than the calculated radius. When the calculated radius is less than the object’s radius, the objects have collided.
The bad thing about this method of testing is that it can be a bit slow because of the square root function, which takes some time to calculate. This can be bad if several detections must be checked at every interval. To overcome this speed issue, the radius of the object squared can also be stored in the object for the sole purpose of testing against collisions. Then, the test is checking the object’s radius squared against the calculation, ((x - centerX)2 + (y - centerY)2). This speeds up the calculation, but it is still slower than rectangular collision detection.
Example 21-8
shows this collision testing as part of the Logic object. As an alternative, you could
use a lookup table, or LUT (http://en.wikipedia.org/wiki/Lookup_table), of square
root values to calculate more quickly than you can with the sqrt( ) function.
Example 21-8. The circular collision test added to the Logic object
/**
 * This object, Logic, is the container for all mathematical logic functionality
 * for the game.
 */
var Logic = {
    //.
    //.
    //.
    /**
     * This method, CircularCollisionDetect, tests for a collision between a
     * passed point and the passed circle (through its important values).
     *
     * @member Logic
     * @param {Array} p_point The point to test.
     * @param {Array} p_center The center point of the circle to test.
     * @param {Integer} p_r2 The radius squared from the circle to test.
     * @return Whether or not the point and the circle have collided.
     * @type Boolean
     */
    CircularCollisionDetect: function(p_point, p_center, p_r2) {
        var r2 = Math.pow((p_point[0] - p_center[0]), 2) +
            Math.pow((p_point[1] - p_center[1]), 2);

        /* Is there a collision between the circle and point? */
        if (r2 < p_r2)
            return (true);
        return (false);
    }
};
Keep in mind that this only tests a point and a circle for collision. What if we want to test the circle with another circle? Such a test would be only slightly more complicated than our circle-point test. To test two circles for collision, you calculate the distance between their center points, and if this is less than the sum of their radii, the two circles have collided. For example:
var r2 = Math.pow((obj1.GetCenterX( ) - obj2.GetCenterX( )), 2) +
Math.pow((obj1.GetCenterY( ) - obj2.GetCenterY( )), 2);
/* Is there a collision between the two circles? */
if (r2 < Math.pow((obj1.GetRadius( ) + obj2.GetRadius( )), 2))
return (true);
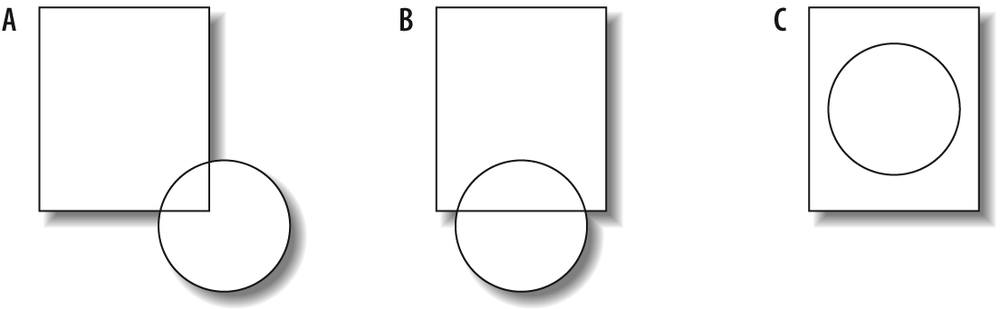
return (false);Our final test is a test for a circle and a rectangle. This will require a few more calculations: the circle must be tested for a collision against all four of the rectangle’s corners, all four of the rectangle’s sides, and the rectangle’s inside area. Figure 21-13 gives an example of each case.
The following test will need to be checked against all four corners of the rectangle for collision against a corner of the rectangle:
var r2 = Math.pow((obj.GetCenterX( ) - ego.GetBoundX(1)), 2) +
    Math.pow((obj.GetCenterX( ) - ego.GetBoundY(1)), 2);

/* Is there a collision between the corner and the circle? */
if (r2 < obj.GetRadiusSquared( ))
    return (true);
return (false);
Once the corners have been checked—(x1, y1), (x1, y2), (x2, y1), and (x2, y2)—we must test all four sides for a collision with the circle:
/* Does the circle's center collide vertically with the bounding box? */
if ((obj.GetCenterX( ) > ego.GetBoundX(1)) && obj.GetCenterX( ) < ego.GetBoundX(2))
    /*
     * Does the circle's center collide horizontally with the bottom side of the
     * bounding box?
     */
    if (Math.abs((ego.GetBoundY(2) - obj.GetCenterY( ))) < obj.GetRadius( ))
        return (true);
    /*
     * Does the circle's center collide horizontally with the top side of the
     * bounding box?
     */
    else if (Math.abs((ego.GetBoundY(1) - obj.GetCenterY( ))) < obj.GetRadius( ))
        return (true);
return (false);
This tests the top and bottom sides of the bounding box, and the right and left sides would have similar calculations. The easiest part of this test is to check whether the circle collided somewhere inside the rectangle. The center of the circle must be tested against the rectangle. This is the point against a bounding box check I discussed in the preceding section.
That is all there is to circular collision detection. It is not too complicated, and certainly not too processor-intensive. However, if you will be conducting hundreds or thousands of these checks, you will have a problem. If this is the case, bounding all objects with bounding rectangles will result in much faster (albeit less accurate) testing for collisions.
When you need a higher degree of accuracy for collision detection, a good solution is to test for the intersection of two lines (or line segments for our purposes). More computations are involved with this sort of test, unfortunately, so if you can get by without this accuracy, do.
OK, kids, break out your math books, because this is some fun algebra! For our algorithm, we will assume that we have two line segments, L1 and L2, where L1 goes from P1 to P2 and L2 goes from P3 to P4. The equations of these lines are:
Pa = P1 + ua(P2 - P1)
Pb = P3 + ub(P4 - P3)
Solving for the point where Pa = Pb will give us the following two equations in two unknowns (ua and ub):
x1 + ua(x2 - x1) = x3 + ub(x4 - x3)
y1 + ua(y2 - y1) = y3 + ub(y4 - y3)
The next step is to solve these two equations, which gives us expressions for ua and ub:
ua = ((x4 - x3)(y1 - y3) - (y4 - y3)(x1 - x3)) /
    ((y4 - y3)(x2 - x1) - (x4 - x3)(y2 - y1))
ub = ((x2 - x1)(y1 - y3) - (y2 - y1)(x1 - x3)) /
    ((y4 - y3)(x2 - x1) - (x4 - x3)(y2 - y1))
Substituting either of these expressions into the
corresponding equation for the line gives the intersection point.
Example 21-9 shows this
algorithm as an addition to the Logic object.
Example 21-9. The Logic object with the linear collision detection added to it
/**
 * This object, Logic, is the container for all mathematical logic functionality
 * for the game.
 */
var Logic = {
    //.
    //.
    //.
    /**
     * This method, LinearCollisionDetect, tests for a collision (intersection)
     * between the two passed line segments.
     *
     * @member Logic
     * @param {Array} p_line1 The first line segment for the test.
     * @param {Array} p_line2 The second line segment for the test.
     * @return Whether or not the two line segments intersect, or collide.
     * @type Boolean
     */
    LinearCollisionDetect(p_line1, p_line2) {
        var denom = ((p_line2[1][1] - p_line2[0][1]) * (p_line1[1][0] -
            p_line1[0][0])) - ((p_line2[1][0] - p_line2[0][0]) * (p_line1[1][1] -
            p_line1[0][1]));
        var numA = ((p_line2[1][0] - p_line2[0][0]) * (p_line1[0][1] -
            p_line2[0][1])) - ((p_line2[1][1] - p_line2[0][1]) * (p_line1[0][0] -
            p_line2[0][0]));
        var numB = ((p_line1[1][0] - p_line1[0][0]) * (p_line1[0][1] -
            p_line2[0][1])) - ((p_line1[1][1] - p_line1[0][1]) * (p_line1[0][0] -
            p_line2[0][0]));

        /* Are the lines parallel? */
        if (!denom) {
            /* Are the lines on top of each other? */
            if (!numA && !numB)
                return (true);
            return (false);
        }

        var uA = numA / denom;
        var uB = numB / denom;

        /* Is there an intersection? */
        if (uA >= 0 && uA <= 1 && uB >= 0 && uB <= 1)
            return (true);
        return (false);
    }
};
There are a few things to note about this algorithm. When the denominator for the expressions ua and ub is 0, the two lines are parallel. When the denominator and numerator for the expressions ua and ub are 0, the two lines are coincident (they lie on top of each other). When both ua and ub lie between 0 and 1, the intersection point is within both line segments.
Tip
In case you’re curious, you calculate the point of intersection between the two line segments as follows:
x = x1 + ua(x2-x1)
y = y1 + ua(y2 -y1)
That is linear collision detection at its finest. It involves quite a few calculations, so it would be a bad idea to use this technique if you had to execute several collision tests. However, it does result in more accurate collision detection, as characters and objects can have bounding polygons, and each line segment of the polygon can be tested (but then you are talking a lot of calculations!).
A game is not a game if it can’t receive input from a player. Without this capability, a game is nothing more than a simulation for a computer to execute.
The input a game receives from a user can take several forms; however, for browser-based games there are really only two: the keyboard and the mouse. Keyboard input can be via any key combinations available to the player, though it is best for keyboard commands to remain as simple as possible. After all, would you want to have to recall, while in the heat of battle, the 18-key combination for ducking when you are under fire from an enemy? One key, such as the d key or the Space bar, is usually best for keyboard input.
Mouse input can be via mouse movement, left and right mouse button clicks, and with some modern browsers, a mouse wheel. The right mouse button is the tricky one in browsers, because although the Document Object Model (DOM) will trap the mouse event, it is difficult to override the default browser action of opening the context menu.
How you handle user input and what to trap is up to you. There is a standard way that the DOM is supposed to handle keyboard and mouse events. Of course, this is not the case, or it would be simple for developers to capture input. Instead, you are stuck with cross-browser scripting issues when trying to capture the input; refer back to Chapter 5 for more information on this.
Fortunately, frameworks such as Prototype provide event handling methods and constants that take the hassle out of trapping user events.
The first events we want to capture from the user are all
keyboard events, represented by a keypress event. To listen for key presses
from the user, we must set a global event listener to trap events
before they can be parsed. For example:
Event.observe(window, 'load', function( ) {
    Event.observe(document, 'keypress', ParseKeypress);
});
Now, whenever there is a key press, the function ParseKeypress( ) is called. This function
can parse out all key combinations it is not interested in so that
only those key commands relevant to our game are handled. This, in
essence, is the command parser for the game.
For our example, we want to trap the pressing of any of the
arrow keys, as those control character movement. Therefore, our
parser will be listening specifically for those keys and will be
calling the appropriate methods within the character class when this
occurs. Example 21-10 shows
what the ParseKeypress( )
function looks like when listening for these particular keys.
Example 21-10. The ParseKeypress( ) function, which allows the character to move on the screen
/*
 * Listen for all /keypress/ events and call ParseKeypress to handle it.
 */
Event.observe(window, 'load', function( ) {
    Event.observe(document, 'keypress', ParseKeypress);
});

/**
 * This function, ParseKeypress, traps every /keypress/ by the user and moves the
 * character on the screen when the arrow keys are pressed.
 *
 * @param {Object} e The event that caused this call to happen.
 */
function ParseKeypress(e) {
    switch (e.keyCode) {
        case Event.KEY_UP:
            ego.moveCharacter(_  _MOVE_BACKWARD_  _);
            break;
        case Event.KEY_RIGHT:
            ego.moveCharacter(_  _MOVE_RIGHT_  _);
            break;
        case Event.KEY_DOWN:
            ego.moveCharacter(_  _MOVE_FORWARD_  _);
            break;
        case Event.KEY_LEFT:
            ego.moveCharacter(_  _MOVE_LEFT_  _);
            break;
    }
}
You will notice that Prototype has constants defined for these
keys. In fact, it has most of the special function keys defined with
constants for ease of use: KEY_BACKSPACE,
KEY_TAB, KEY_RETURN, KEY_ESC, KEY_LEFT, KEY_UP, KEY_RIGHT, KEY_DOWN,
KEY_DELETE, KEY_HOME, KEY_END, KEY_PAGEUP, and KEY_PAGEDOWN. When the arrow keys are
pressed, the character will start and stop moving on the
screen.
The user’s mouse activity is handled in a similar way to key press listening. The first thing we must do is set a global event listener to pay attention to mouse activity. For example, the following code will track all left clicks that the user performs and call a function in response:
Event.observe(window, 'load', function( ) {
    Event.observe(document, 'click', ParseMouseClicks);
});
Our function, ParseMouseClicks(
), is trapping mouse clicks so that the character can be
moved according to where the click occurred. It will get the
x and y coordinates where
the click event occurred, and it will send them to the character to
move. Example 21-11 shows
what our function will look like.
Example 21-11. The ParseMouseClicks( ) function, which moves the character to the desired point in the game
/*
 * Listen for all /click/ events and call ParseMouseClicks to handle it.
 */
Event.observe(window, 'load', function( ) {
    Event.observe(document, 'click', ParseMouseClicks);
});

/**
 * This function, ParseMouseClicks, traps every /click/ by the user and moves the
 * character on the screen to the clicked point.
 *
 * @param {Object} e The event that caused this call to happen.
 */
function ParseMouseClicks(e) {
    try {
        ego.moveCharacterMouse(Event.pointerX(e), Event.pointerY(e));
    } catch (ex) {
        alert('Fatal error while moving character by mouse click: ', ex.description);
    }
}
Prototype helps out again with the Event.pointerX( ) and Event.pointerY( ) methods so that we do
not have to worry about cross-browser scripting issues that come up.
When the mouse is clicked, the character will start to move in that
direction on the screen.
We have constructed all of the basic components for a game, but I have yet to talk about a very important feature, and how Ajax can best be used in a JavaScript-based browser game: how and when to handle events in the game. Events need to be handled and a message sent to a central server in several places so that they can be sent to other clients connected to the game.
I am using a push methodology, as I did in Chapter 20, where the client pushes information and polls the server for anything it might need. The server is merely the conduit for the clients to communicate with each other. That is, unless computer players are part of the game. When this is the situation, the server must also handle the AI of the computer players, which is beyond the scope of this book.
So, when do we handle events? The following are some of the places where event handling should take place:
Your game may need to communicate with the server whenever
there is user input. That means that every key press that has
meaning to the game and every mouse click that is registered within
the game has the potential for an event to fire beyond the keypress or mouseclick event. Some uses for this would
be when a user is interacting with the client’s Heads-Up Display
(HUD). The HUD may need to request information from the server or
report a character’s stats to the server. There is an unlimited
number of reasons why an event may need to be sent to the server. It
is up to you to decide where events are needed in your game.
An important event to send to the server is when the character
starts or stops moving. Other players in the same area as the
character need to know this so that the movement on their screens
matches what is on yours. We need to set up a class to handle calls
to the server that can be called from within the character class. Example 21-12 shows what the
new class looks like.
Example 21-12. An events class to handle communication with the server
/**
 * This variable, _  _INFORM_START_  _, is intended as a constant for event start
 * information.
 */
var _  _INFORM_START_  _ = 0;
/**
 * This variable, _  _INFORM_STOP_  _, is intended as a constant for event stop
 * information.
 */
var _  _INFORM_STOP_  _ = 1;
/**
 * This variable, _  _INFORM_MOVE_CHANGE_  _, is intended as a constant for event
 * movement change
 * information.
 */
var _  _INFORM_MOVE_CHANGE_  _ = 2;
/**
 * This variable, _  _INFORM_COLLISION_  _, is intended as a constant for event
 * collision information.
 */
var _  _INFORM_COLLISION_  _ = 3;

/**
 * This object, Events, is the container for all events that should be sent to the
 * server and received from the server for the game.
 */
var Events = {
    /**
     * This member, _URL, is the URL for sending events to the server, and
     * receiving data from the server.
     * @private
     */
    _URL: 'handleEvents.php',
    /**
     * This method, InformStart, sends information to the server about the start
     * event for the character.
     *
     * @member Events
     * @param {Integer} p_egoId The id that the server gives to the player when
     *     starting.
     * @param {Integer} p_dir The direction the character will be moving in.
     * @param {Array} p_coords The coordinates the character started from.
     */
    InformStart: function(p_egoId, p_dir, p_coords) {
        new Ajax.Request(_URL, {
            method: 'post',
            parameters: {
                type: _  _INFORM_START_  _,
                id: p_egoId,
                mouse: false,
                dir: p_dir,
                x: p_coords[0],
                y: p_coords[1]
            }
        });
    },
    /**
     * This method, InformStartMouse, sends information to the server about the
     * start event for the character.
     *
     * @member Events
     * @param {Integer} p_egoId The id that the server gives to the player when
     *     starting.
     * @param {Array} p_coordsFrom The x,y coordinates the character started from.
     * @param {Array} p_coordsTo The x,y coordinates the character is moving to.
     */
    InformStartMouse: function(p_egoId, p_coordsFrom, p_coordsTo) {
        new Ajax.Request(_URL, {
            method: 'post',
            parameters: {
                type: _  _INFORM_START_  _,
                id: p_egoId,
                mouse: true,
                xF: p_coordsFrom[0],
                yF: p_coordsFrom[1],
                xT: p_coordsTo[0],
                yT: p_coordsTo[1]
            }
        });
    },
    /**
     * This method, InformStop, sends information to the server about the stop
     * event for the character.
     *
     * @member Events
     * @param {Integer} p_egoId The id that the server gives to the player when
     *     starting.
     * @param {Array} p_coords The coordinates the character stopped at.
     */
    InformStop: function(p_egoId, p_coords) {
        new Ajax.Request(_URL, {
            method: 'post',
            parameters: {
                type: _  _INFORM_STOP_  _,
                id: p_egoId,
                x: p_coords[0],
                y: p_coords[1]
            }
        });
    }
};
Now, from within the character.movement object, events can be
called as they occur so that the server stays informed immediately.
For example:
//.
//.
//.
/**
 * This method, start, starts the character moving in a given direction.
 *
 * @member movement
 * @return Whether or not the character started moving.
 * @type Boolean
 */
start: function( ) {
    this._internalTimer = setInterval(this.move.bind(this), _  _PULSE_MOVEMENT_  _);
    this._moving = true;
    Event.InformStart(character.prototype.getId.call(this),
        this._direction, this._position);
    return (this._intervalTimer);
},
/**
 * This method, stop, stops the character's movement.
 *
 * @member movement
 * @return Whether or not the character stopped moving.
 * @type Boolean
 */
stop: function( ) {
    clearInterval(this._internalTimer.bind(this));
    /* Has the timer been cleared? */
    if (!this._internalTimer) {
        this._internalTimer = null;
        this._moving = false;
        Event.InformStop(character.prototype.getId.call(this), this._position);
        return (true);
    }
    return (false);
},
//.
//.
//.
Here, we have added calls to the Events object when the character starts
moving and stops moving. These calls notify the server, which stores
this information in the MySQL server for the other clients to
download.
Changing direction requires the same sort of addition to the
Events class, and the change
method from within the character.movement object. The addition
for the Events object would look
something like this:
/**
 * This object, Events, is the container for all events that should be sent to
 * the server and received from the server for the game.
 */
var Events = {
    /**
     * This member, _URL, is the URL for sending events to the server, and receiving
     * data from the server.
     * @private
     */
    _URL: 'handleEvents.php',
    //.
    //.
    //.
    /**
     * This method, InformMovementChange, sends information to the server about
     * the movement change event for the character.
     *
     * @member Events
     * @param {Integer} p_egoId The id that the server gives to the player when
     *     starting.
     * @param {Integer} p_dir The direction the character will be moving in.
     * @param {Array} p_coords The coordinates the character changed direction from.
     */
    InformMovementChange: function(p_egoId, p_dir, p_coords) {
        new Ajax.Request(_URL, {
            method: 'post',
            parameters: {
               type: _  _INFORM_MOVE_CHANGE_  _,
               id: p_egoId,
               mouse: false,
               dir: p_dir,
               x: p_coords[0],
               y: p_coords[1]
            }
        });
    },
    /**
     * This method, InformMovementChangeMouse, sends information to the server
     * about the movement change event for the character.
     *
     * @member Events
     * @param {Integer} p_egoId The id that the server gives to the player
     *     when starting.
     * @param {Array} p_coordsFrom The x,y coordinates the character changed
     *     direction from.
     * @param {Array} p_coordsTo The x,y coordinates the character is moving to.
     */
     InformMovementChangeMouse: function(p_egoId, p_coordsFrom, p_coordsTo) {
        new Ajax.Request(_URL, {
            method: 'post',
            parameters: {
                type: _  _INFORM_MOVE_CHANGE_  _,
                id: p_egoId,
                mouse: true,
                xF: p_coordsFrom[0],
                yF: p_coordsFrom[1],
                xT: p_coordsTo[0],
                yT: p_coordsTo[1] }
        });
    }
};
With this is place, the same addition as in the previous section will notify the server of any change in movement. For example:
/**
 * This method, changeDirection, controls the movement of the character in any
 * given direction, and controls starting and stopping the movement.
 *
 * @member movement
 * @param {Integer} p_direction The direction the character should move in.
 * @return Whether or not the character changed directions.
 * @type Boolean
 */
changeDirection: function(p_direction) {
    /* Should the character be stopped? */
    if (this._moving && this._direction == p_direction) {
        this.stop( );
        return (false);
    }
    this._direction = p_direction;
    /* Do we need to start the character? */
    if (!this._moving)
        this.start( );
    Event.InformMovementChange(character.prototype.getId.call(this),
        this._direction, this._position);
    return (true);
},
Notifying the server when there is a change in direction from a mouse click would follow the same basic idea. How this will work for all clients being notified will depend on how quickly the client can poll the server for information and parse through it. We will look into this shortly.
Whenever there is a collision between the character and another object in a game, a collision event needs to be sent to the server so that any game logic can be sent back to the client. Depending on the type of game, the reaction a character will have with a collision will vary greatly. For example, it could be as simple as stopping the character or it could mean sending the client instructions to animate the character falling down. Anything can happen with collisions.
Despite this variety, you send the event to the server in the
same way. Here is the addition for the Events object:
/**
 * This object, Events, is the container for all events that should be sent to
 * the server and received from the server for the game.
 */
var Events = {
    /**
     * This member, _URL, is the URL for sending events to the server, and
     * receiving data from the server.
     * @private
     */
    _URL: 'handleEvents.php',
    //.
    //.
    //.
    /**
     * This method, InformCollision, sends information to the server about the
     * collision event for the character.
     *
     *
     * @member Events
     * @param {Integer} p_egoId The id that the server gives to the player
     *     when starting.
     * @param {Integer} p_objId The id of the object/player collided with.
     * @param {Array} p_coords The coordinates the character started from.
     */
    InformCollision: function(p_egoId, p_objId, p_coords) {
        new Ajax.Request(_URL, {
            method: 'post',
            parameters: {
                type: _  _INFORM_COLLISION_  _,
                id: p_egoId,
                objId: p_objId,
                x: p_coords[0],
                y: p_coords[1]
            }
        });
    }
};
The collision event is then called whenever the client collision logic detects such an event, as in this example:
/**
 * This method, TestCollision, tests for a collision between the character's
 * bounding box and the box that was passed using rectangular collision detection.
 *
 * @member character
 * @param {Array} p_box The bounding box to test against.
 * @return Whether or not the passed bounding box collided with the character's
 *     bounding box.
 * @type Boolean
 */
TestCollision(p_box) {
    if (Logic.RectangularCollisionDetect(this.GetBoundingBox( ), p_box.box)) {
        Event.InformCollision(character.prototype.getId.call(this), p_box.id,
            this._position);
        return (true);
    }
    return (false);
}
With this event set, as well as events for movement, it is time to turn our attention to getting data from the server, and how to react to this.
The data that the server sends to the client is important. It
tells the client what is happening to other objects and characters
in the game, and it controls the environment around the character.
This could mean controlling such things as the current state of the
weather, the movement of other characters, and any fights that may
occur among enemies. The client must be aware of all possible events
so that it can handle what the server sends. The server also could
send a JSON response that is eval‘d by the client to make something
unexpected happen.
The server could send an endless variety of events back to the
client. Before worrying about what the server is going to send,
however, we need to ask it for some data. Adding another method to
our Events object will do the
trick, and this method must be set to call at certain intervals to
keep a constant dialog going with the server. The interval should be
set when the client is loaded, like this:
var eventTimer = null;

Event.observe(window, 'load', function( ) {
    eventTimer = setInterval(PollServer, 50);
});
Now the event will be called every 50 milliseconds. The time between requests in your game is up to you, but you must take into consideration the speed of the Internet connection each client may have, as well as the speed of the processor of each client and the amount of RAM that may be used. The quicker all of this is the smaller the time interval can be.
Besides making a request to the server for information, we
have to make sure our Events
object is ready to parse a response and handle it accordingly. Example 21-13 shows these additions to
the Events object so that our
client can now handle changing the movement of characters on the
screen other than the player’s character.
Example 21-13. The Events object with added functionality for making requests and parsing commands from the server
/**
 * This object, Events, is the container for all events that should be sent to
 * the server and received from the server for the game.
 */
var Events = {
    //.
    //.
    //.
    /**
     * This method, PollServer, sends a request to the server for data the
     * client needs to receive to update itself.
     *
     * @member Events
     */
    PollServer: function( ) {
        new Ajax.Request('pollServer.php', {
            method: 'post',
            parameters: { id: ego.getId( ) },
            onSuccess: Events.ParseServerData
        });
    },
    /**
     * This method, ParseServerData, parses the commands that the server
     * responds with for each request the server makes.
     *
     * @member Events
     * @param {Object} p_xhrResponse The server response to the Ajax request.
     */
    ParseServerData: function(p_xhrResponse) {
        var response = p_xhrResponse.responseXML;
        var players = response.getElementsByTagName('players'),

        /* Loop through the player data needed for updating */
        for (var i = 0, il = players.childNodes.length; i < il; i++) {
            var id = players.childNodes[i].getAttribute('id'),
            var pos = players.childNodes[i].getAttribute('pos'),
            var mouse = players.childNodes[i].getAttribute('mouse'),
            var to = null;
            var dir = null;
            /* Is this a mouse movement? */
            if (mouse)
                to = players.childNodes[i].getAttribute('coordsTo'),
            else
                dir = players.childNodes[i].getAttribute('dir'),

            pos = pos.split(,);
            /* Are there two coordinates? */
            if (to)
                to = to.split(,);
            Events.UpdatePosition(id, pos, to, dir);
        }
    },
    /**
     * This method, UpdatePosition, updates the position of a player from the
     * player array with the new information passed to it.
     *
     * @member Events
     * @param {Integer} p_id The index for the player array.
     * @param {Array} p_pos The current position of the player.
     * @param {Array} p_to The position to move the player toward.
     * @param {Integer} p_dir The direction to move the player in.
     */
    UpdatePosition: function(p_id, p_pos, p_to, p_dir) {
        player[p_id].setPosition(p_pos[0], p_pos[1]);
        /* Are there two coordinates? */
        if (p_to)
            player[p_id].moveCharacterMouse(p_to[0], p_to[1]);
        else
            player[p_id].moveCharacter(p_dir);
    }
};
This shows just one of the commands a client may handle from the server. You should develop additional commands to handle other logic sent by the server that adds to the game’s functionality. I’ll leave that up to you, but this should give you a good idea of how to program such events for your game.
I have shown some of the major components of a game with Ajax on the browser. Of course, you need to add some additional wiring between the modules so that everything functions smoothly. This section presents the files I have been working on, combined and wired as they should be.
The logic.js file contains all of the game logic we have built in this chapter, including Bresenham lines and collision detection. Example 21-14 shows this complete file.
Example 21-14. The complete logic.js file for our Ajax game
var Logic = {
    Bresenham: function(p_x1, p_y1, p_x2, p_y2) {
        var deltaX = Math.abs(p_x2 - p_x1) << 1;
        var deltaY = Math.abs(p_y2 - p_y1) << 1;
        /*
         * If p_x1 == p_x2 or p_y1 == p_y2, then it makes no difference what
         * is set here
         */
        var ix = ((p_x2 > p_x1) ? 1 : -1);
        var iy = ((p_y2 > p_y1) ? 1 : -1);
        var path = [];
        var i = 0;

        /* Which way is the line going to slope? */
        if (deltaX >= deltaY) {
            /* Error may go below zero */
            var error = deltaY - (deltaX >> 1);

            /* Loop until the points are connected */
            while (p_x1 != p_x2) {
                /* Is there a chance the line must shift? */
                if (error >= 0)
                    /* Do we need to slide over? */
                    if (error || (ix > 0)) {
                        p_y1 += iy;
                        error -= deltaX;
                    }
                p_x1 += ix;
                error += deltaY;
                path[i++] = [p_x1, p_y1];
            }
        } else {
            /* Error may go below zero */
            var error = deltaX - (deltaY >> 1);

            /* Loop until the points are connected */
            while (p_y1 != p_y2) {
                /* Is there a chance the line must shift? */
                if (error >= 0)
                    /* Do we need to slide over? */
                    if (error || (iy > 0)) {
                        p_x1 += ix;
                        error -= deltaY;
                    }
                p_y1 += iy;
                error += deltaX;
                path[i++] = [p_x1, p_y1];
            }
        }
        return (path);
    },
    RectangularCollisionDetect: function(p_box1, p_box2) {
        /* Is there a vertical collision between the boxes? */
        if ((p_box1[0][0] < p_box2[1][0]) && (p_box1[1][0] > p_box2[0][0]))
            /* Is there a horizontal collision between the boxes? */
            if ((p_box1[0][1] < p_box2[1][1]) && (p_box1[1][1] > p_box2[0][1]))
                return (true);
        return (false);
    },
    CircularCollisionDetect: function(p_point, p_center, p_r2) {
        var r2 = Math.pow((p_point[0] - p_center[0]), 2) +
            Math.pow((p_point[1] - p_center[1]), 2);

        /* Is there a collision between the circle and point? */
        if (r2 < p_r2)
            return (true);
        return (false);
    },
    LinearCollisionDetect(p_line1, p_line2) {
        var denom = ((p_line2[1][1] - p_line2[0][1]) * (p_line1[1][0] -
            p_line1[0][0])) - ((p_line2[1][0] - p_line2[0][0]) * (p_line1[1][1] -
            p_line1[0][1]));
        var numA = ((p_line2[1][0] - p_line2[0][0]) * (p_line1[0][1] -
            p_line2[0][1])) - ((p_line2[1][1] - p_line2[0][1]) * (p_line1[0][0] -
            p_line2[0][0]));
        var numB = ((p_line1[1][0] - p_line1[0][0]) * (p_line1[0][1] -
            p_line2[0][1])) - ((p_line1[1][1] - p_line1[0][1]) * (p_line1[0][0] -
            p_line2[0][0]));

        /* Are the lines parallel? */
        if (!denom) {
            /* Are the lines on top of each other? */
            if (!numA && !numB)
                return (true);
            return (false);
        }

        var uA = numA / denom;
        var uB = numB / denom;

        /* Is there an intersection? */
        if (uA >= 0 && uA <= 1 && uB >= 0 && uB <= 1)
            return (true);
        return (false);
    }
};
The second file is the character.js file that contains all the functionality our character needs to move and to interact with other characters and objects, as well as other data the game system requires. Example 21-15 shows the complete character.js file.
Example 21-15. The complete character.js file for our Ajax game
var _  _PULSE_MOVEMENT_  _ = 10;

var _  _MOVE_BACKWARD_  _ = 0;
var _  _MOVE_RIGHT_  _ = 1;
var _  _MOVE_FORWARD_  _ = 2;
var _  _MOVE_LEFT_  _ = 3;

var character = Class.create( );
character.prototype = {
     _handle: null,
    animation: {
        _options: {
            sprite: null,
            pauseTime: 0
        },
        _currentFrame: 0,
        _spriteFrame: 0,
        _internalTimer: null,
        advanceFrame: function( ) {
            /* Has the animation reached the last image? */
            if (this._currentFrame == this._options.sprite[this._spriteFrame].frames)
                this._currentFrame = 0;
            this._handle.setStyle({
                backgroundPosition: (-1 *
                    this._options.sprite[this._spriteFrame].frameSize *
                    this._currentFrame) + 'px ' + (-1 *
                    this._options.[this._spriteFrame].spriteSize *
                    this._spriteFrame) + 'px'
            });
            this._currentFrame++;
        },
        startAnimation(p_direction) {
            if (p_direction > this._options.sprite.length)
                return (false);
            this._spriteFrame = p_direction;
            this._internalTimer = setInterval(this.advanceFrame.bind(this),
                this._options.pauseTime);
            return (this._intervalTimer);
        },
        pauseAnimation: function( ) {
            clearInterval(this._internalTimer.bind(this));
            /* Has the timer been cleared? */
            if (!this._internalTimer) {
                this._internalTimer = null;
                return (true);
            }
            return (false);
        },
        stopAnimation: function( ) {
            clearInterval(this._internalTimer.bind(this));
            /* Has the timer been cleared? */
            if (!this._internalTimer) {
                this._internalTimer = null;
                this._spriteFrame = 0;
                this._currentFrame = 0;
                this._handle.setStyle({
                    backgroundPosition: '0 0'
                });
                return (true);
            }
            return (false);
        }
    },
    initialize: function (p_handle, p_options) {
        this._handle = $(p_handle);
        Object.extend(this.animation._options, p_options || {});
    },
    startAnimation: function(p_direction) {
        return (this.animation.startAnimation(p_direction));
    },
    pauseAnimation: function( ) {
        return (this.animation.pauseAnimation( ));
    },
    stopAnimation: function( ) {
        return (this.animation.stopAnimation( ));
    },
    movement: {
        _direction: -1,
        _moving: false,
        _position: [0, 0],
        _path: [],
        _internalTimer: null,
        changeDirection: function(p_direction) {
            /* Should the character be stopped? */
            if (this._moving && this._direction == p_direction) {
                this.stop( );
                return (false);
            }
            this._direction = p_direction;
            /* Do we need to start the character? */
            if (!this._moving)
                this.start( );
            Event.InformMovementChange(character.prototype.getId.call(this),
                this._direction, this._position);
            return (true);
        },
        start: function( ) {
            this._internalTimer = setInterval(this.move.bind(this),
                _  _PULSE_MOVEMENT_  _);
            this._moving = true;
            character.prototype.startAnimation.call(this);
            Event.InformStart(character.prototype.getId.call(this),
                this._direction, this._position);
            return (this._intervalTimer);
        },
        changeDirectionMouse: function(p_x, p_y) {
            /* Should the character be stopped? */
            if (this._moving)
                this.stop( );
            this._direction = -1;
      this._path = Logic.Bresenham(this._position[0], this._position[1],
                p_x, p_y);
            this.startMouse(p_x, p_y);
            Event.InformMovementChangeMouse(character.prototype.getId.call(this),
                this._position, [p_x, p_y]);
            return (true);
        },
        startMouse: function(p_x, p_y) {
            this._internalTimer = setInterval(this.moveMouse.bind(this),
                _  _PULSE_MOVEMENT_  _);
            this._moving = true;
            Event.InformStartMouse(character.prototype.getId.call(this),
                this._position, [p_x, p_y]);
            return (this._intervalTimer);
        },
        stop: function( ) {
            clearInterval(this._internalTimer.bind(this));
            /* Has the timer been cleared? */
            if (!this._internalTimer) {
                this._internalTimer = null;
                this._moving = false;
                character.prototype.stopAnimation.call(this);
                Event.InformStop(character.prototype.getId.call(this),
                    this._position);
                return (true);
            }
            return (false);
        },
        move: function( ) {
            switch (this._direction) {
                case _  _MOVE_BACKWARD_  _:
                    this._position[1] -= 2;
                    break;
                case _  _MOVE_RIGHT_  _:
                    this._position[0] += 2;
                    break;
                case _  _MOVE_FORWARD_  _:
                    this._position[1] += 2;
                    break;
                case _  _MOVE_LEFT_  _:
                    this._position[0] -= 2;
                    break;
            }
            this.position( );
        },
        moveMouse: function( ) {
            var point = this._path.shift( );
            this._position[0] = point[0];
            this._position[1] = point[1];
            this.position( );
        },
        position: function( ) {
            this._handle.setStyle({
                left: this._position[0] + 'px',
                top: this._position[1] + 'px'
            });
        },
        setPosition: function(p_x, p_y) {
            this._position[0] = p_x;
            this._position[1] = p_x;
            this.position( );
        }
    },
    moveCharacter: function(p_direction) {
        try {
            this.movement.changeDirection(p_direction);
        } catch (ex) {
            alert('Illegal argument sent to method character.moveCharacter( ):',
                ex.description);
        }
    },
    moveCharacterMouse: function(p_x, p_y) {
        try {
            this.movement.changeDirectionMouse(p_x, p_y);
        } catch (ex) {
            alert('Illegal argument sent to method character.moveCharacterMouse( ):',
                ex.description);
        }
    },
    setPosition: function(p_x, p_y) {
        this.movement.setPosition(p_x, p_y);
    },
    collision: {
        _boundings: [],
        SetBounding: function(p_points) {
            try {
                this._bounding[0] = [p_points[0][0], p_points[0][1]];
                this._bounding[1] = [p_points[1][0], p_points[1][1]];
            } catch (ex) {
                this._bounding = null;
            }
        },
        GetBoundX: function(p_corner) {
            /* Does the character have a bounding box? */
            if (this._bounding)
                return (this._bounding[p_corner - 1][0]);
            return (null);
        },
        GetBoundY: function(p_corner) {
            /* Does the character have a bounding box? */
            if (this._bounding)
                return (this._bounding[p_corner - 1][1]);
            return (null);
        },
        GetBoundingBox( ) {
            /* Does the character have a bounding box? */
            if (this._bounding)
                return ([[this._bounding[0]], this._bounding[1]]);
            return (null);
        }
    },
    GetBoundX: function(p_corner) {
        return (this.collision.GetBoundX(p_corner));
    },
    GetBoundY: function(p_corner) {
        return (this.collision.GetBoundY(p_corner));
    },
    GetBoundingBox: function( ) {
        return (this.collision.GetBoundingBox( ));
    },
    TestCollision: function(p_box) {
        if (Logic.RectangularCollisionDetect(this.GetBoundingBox( ), p_box.box)) {
            Event.InformCollision(character.prototype.getId.call(this), p_box.id,
                this._position);
            return (true);
        }
        return (false);
    },
    stats: {
        _id: -1,
        setId: function(p_id) {
            this._id = p_id;
        },
        getId: function( ) {
            return(this._id);
        }
    },
    setId: function(p_id) {
        this.stats.setId(p_id);
    },
    getId: function( ) {
        return (this.stats.getId( ));
    }
};
Now, we need the file that contains all of the Ajax for our game. This is the events.js file that contains the code for making requests to the server to send information, and to receive game data that must be reacted to. Example 21-16 shows the complete events.js file.
Example 21-16. The complete events.js file for our Ajax game
var _  _INFORM_START_  _ = 0;
var _  _INFORM_STOP_  _ = 1;
var _  _INFORM_MOVE_CHANGE_  _ = 2;
var _  _INFORM_COLLISION_  _ = 3;

var Events = {
    _URL: 'handleEvents.php',
    InformStart: function(p_egoId, p_dir, p_coords) {
        new Ajax.Request(_URL, {
            method: 'post',
            parameters: {
                type: _  _INFORM_START_  _,
                id: p_egoId,
                mouse: false,
                dir: p_dir,
                x: p_coords[0],
                y: p_coords[1]
            }
        });
    },
    InformStartMouse: function(p_egoId, p_coordsFrom, p_coordsTo) {
        new Ajax.Request(_URL, {
            method: 'post',
            parameters: {
                type: _  _INFORM_START_  _,
                id: p_egoId,
                mouse: true,
                xF: p_coordsFrom[0],
                yF: p_coordsFrom[1],
                xT: p_coordsTo[0],
                yT: p_coordsTo[1]
            }
        });
    },
    InformStop: function(p_egoId, p_coords) {
        new Ajax.Request(_URL, {
            method: 'post',
            parameters: {
                type: _  _INFORM_STOP_  _,
                id: p_egoId,
                x: p_coords[0],
                y: p_coords[1]
            }
        });
    },
    InformMovementChange: function(p_egoId, p_dir, p_coords) {
        new Ajax.Request(_URL, {
            method: 'post',
            parameters: {
                type: _  _INFORM_MOVE_CHANGE_  _,
                id: p_egoId,
                mouse: false,
                dir: p_dir,
                x: p_coords[0],
                y: p_coords[1] }
        });
    },
     InformMovementChangeMouse: function(p_egoId, p_coordsFrom, p_coordsTo) {
        new Ajax.Request(_URL, {
            method: 'post',
            parameters: {
                type: _  _INFORM_MOVE_CHANGE_  _,
                id: p_egoId,
                mouse: true,
                xF: p_coordsFrom[0],
                yF: p_coordsFrom[1],
                xT: p_coordsTo[0],
                yT: p_coordsTo[1]
            }
        });
    },
    InformCollision: function(p_egoId, p_objId, p_coords) {
        new Ajax.Request(_URL, {
            method: 'post',
            parameters: {
                type: _  _INFORM_COLLISION_  _,
                id: p_egoId,
                objId: p_objId,
                x: p_coords[0],
                y: p_coords[1]
            }
        });
    },
    PollServer: function( ) {
        new Ajax.Request('pollServer.php', {
            method: 'post',
            parameters: { id: ego.getId( ) },
            onSuccess: Events.ParseServerData
        });
    },
    ParseServerData: function(p_xhrResponse) {
        var response = p_xhrResponse.responseXML;
        var players = response.getElementsByTagName('players'),

        /* Loop through the player data needed for updating */
        for (var i = 0, il = players.childNodes.length; i < il; i++) {
            var id = players.childNodes[i].getAttribute('id'),
            var pos = players.childNodes[i].getAttribute('pos'),
            var mouse = players.childNodes[i].getAttribute('mouse'),
            var to = null;
            var dir = null;
            /* Is this a mouse movement? */
            if (mouse)
                to = players.childNodes[i].getAttribute('coordsTo'),
      else
                dir = players.childNodes[i].getAttribute('dir'),

            pos = pos.split(,);
            /* Are there two coordinates? */
            if (to)
                to = to.split(,);
            Events.UpdatePosition(id, pos, to, dir);
        }
    },
    UpdatePosition: function(p_id, p_pos, p_to, p_dir) {
        player[p_id].setPosition(p_pos[0], p_pos[1]);
        /* Are there two coordinates? */
        if (p_to)
            player[p_id].moveCharacterMouse(p_to[0], p_to[1]);
        else
            player[p_id].moveCharacter(p_dir);
    }
};
There you have it: the necessary, basic components for our Ajax game. You must also build the HUD for the game, a way to log in, a way to create a new character, and a way to select the game to play (if applicable). A lot goes into building a game, and it is way beyond the scope of this book to go into all of these details. For more information in that regard, I recommend AI for Game Developers by David M. Bourg and Glenn Seeman (O’Reilly) and Killer Game Programming in Java by Andrew Davison (O’Reilly).
[8] * Flash Player Statistics from Adobe Systems (http://www.adobe.com/products/player_census/flashplayer/)