
Having an efficient method to send a request to the server and
pull back its response without having to refresh the whole page is very
important. It is only a small part of Ajax development, though. What is
more important to any Ajax web application is what is done with the data
the client receives. There’s a lot more work to do than just grabbing
the data, formatting it, and setting it equal to the innerHTML of an element. Understanding how the
HTML Document Object Model (DOM) works and how to manipulate it is of
utmost importance. I like to think that this—manipulating the DOM—is
where the magic of Ajax actually happens. This is what gives Ajax life
and allows application development on the Web.
The first key to understanding how the DOM works is to examine the structure of a DOM object. Then it will become clearer how the methods allow you to manipulate the DOM.
The structure of any DOM object is its document tree. The document tree is made up of branches and leaves. Let’s look at a simple XHTML document, shown in Example 5-1, to clarify.
Example 5-1. A simple XHTML document
<!DOCTYPE html PUBLIC "-//W3C//DTD XHTML 1.1//EN"
    "http://www.w3.org/TR/xhtml11/DTD/xhtml11.dtd">
<html xmlns="http://www.w3.org/1999/xhtml" xml:lang="en">
    <head>
        <title>A Document tree example</title>
    </head>
    <body>
        <div id="body_content">
            <h1>A Document tree example</h1>
            <p>
                This is just a <em>very</em> simple example.
            </p>
        </div>
        <div id="body_footer">
            This is a simple <strong>footer</strong>.
        </div>
    </body>
</html>
Figure 5-1 shows this file as a simple document tree, with an emphasis on simple.
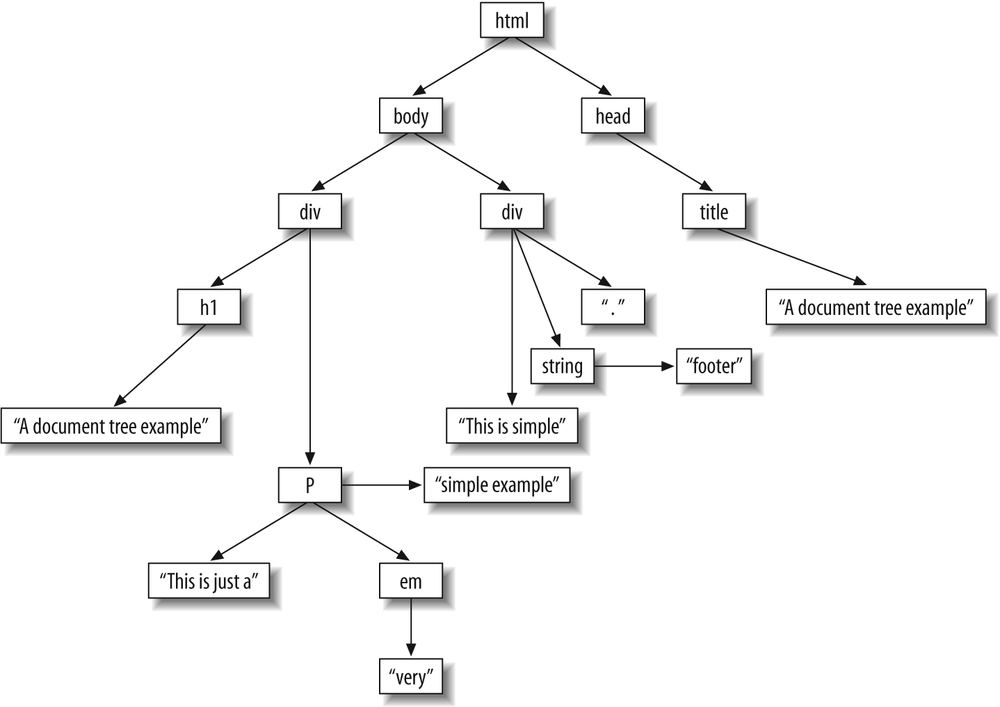
I ignored the attributes where they would have been in the
document tree to keep this example simpler. The first thing to notice
is that the DOCTYPE declaration is
not part of the document tree—DOCTYPEs and XML prologs are never part of
the tree.
The first element of the tree, <html>, is known as the tree’s
root element or root node. All other elements of the tree
branch off from this first element. Any elements that branch from the
root element are known as the element’s children. These children can be either
branches themselves or simply leaves, meaning that they have no
children of their own. The <title> element is a child of the
<head> element, and is itself
a branch to the content contained within the element. This content
would be a leaf on the tree.
As I just said, the content contained within the <title> element is also an element.
Specifically, it is a text
element or text node.
The World Wide Web Consortium (W3C) has standardized the list of node
types that any element of a document tree can be, as shown in Table 5-1.
Table 5-1. W3C node types
Numeric type value | Description | |
|---|---|---|
Element | 1 | Represents an element. |
Attribute | 2 | Represents an attribute. |
Text | 3 | Represents character data in an element or attribute. |
CDATA section | 4 | Represents text that may contain characters that would otherwise be considered markup. |
Entity reference | 5 | Represents an entity reference. |
Entity | 6 | Represents an entity. |
Processing instruction | 7 | Represents a processing instruction. |
Comment | 8 | Represents a comment. |
Document | 9 | Represents the document (this is the root node of the tree). |
Document type | 10 | Represents a list of entities that are defined for this document. |
Document fragment | 11 | Represents a document that is “lighter” than a true document node, as it contains only a part of a document. |
Notation | 12 | Represents a notation declared in the document type definition (DTD). |
That is a simple introduction to the structure of a DOM object. Now we need to learn how to traverse the branches of a document tree so that we can manipulate all of the different elements it contains.
The methods that most greatly facilitate DOM Document object traversal might seem a
little familiar, as you already met them in Chapter 4. These are getElementById( ) and getElementsByTagName( ). Add to these the
Prototype library’s helper functions, and we have a good foundation
for accessing specific elements on a document tree.
Just to refresh, here are some common ways to access specific elements:
/* Use Prototype's $( ) function to get an element by its id */
var myElement = $('myElement'),

/* Get an array of elements based on their tag name */
var myElements = exampleDoc.getElementsByTagName('myTag'),

/* Get an array of elements based on their class name */
var myElements = document.getElementsByClassName('myClass'),

/* Get an array of link elements based on their class name */
var myElements = $$('a.myClass'),
These methods and functions make Ajax development easy when we
know the id, the class name, and so
forth that we are looking for. But what if our Ajax web application is
more complicated than that and it requires more sophisticated
manipulation? It turns out that a host of methods are available for
any kind of DOM manipulation you require.
Elements are the containers of all the data to be dynamically altered in an Ajax application. They can contain other elements, which contain still others, or they can simply hold a text node with data for the client. When we talk about these elements, we also want to discuss groups of them represented in document fragment objects. To round out this discussion on elements and objects, we will also consider text elements, since the value of these elements is the data in the application.
Our discussion cannot center on just XHTML, either. You could
need to alter XML received from a server response just as often as you
need to alter the client’s page DOM. We will follow the W3C’s DOM
Level 2 Recommendation (the standard methods that are available to a
developer from the browser) when discussing methods available to a DOM
Document object unless I specify
otherwise. This allows you to write more robust code utilizing the
power of the DOM, instead of writing workarounds for functionality
that may be needed in only a particular area.
An important benefit of dynamic content is the ability to create new content from freshly received data. This is necessary in dynamic menu creation, navigation, breadcrumbs, and web services, among other applications. Ajax relies on content changing within the page without having to reload the entire page. To accomplish this, we need to create new parts of the DOM.
The first method we will concentrate on is createElement( ), which is used to create
a new Element node. An example of
this method is:
var element = document.createElement('div'),

alert(element.nodeName); /* Alerts 'DIV' */
createElement( ) takes as a
parameter the name of the element type to instantiate, and creates
an element of that specified type. It returns an instance of an
Element interface. This is useful
as it allows attributes to be directly specified on the returned
element node. In this case, we created a new <div> element and used the variable
element to store that
interface.
You didn’t think creating elements would be any more
complicated than that, did you? Now, what if you need to add text
data to the DOM Document object?
The method createTextNode( ) will
do the trick. To create a Text
node, you do the following:
var element = document.createTextNode('Text to create.'),

alert(element.nodeValue); /* Alerts 'Text to create.' */
The parameter that createTextNode(
) takes is the data string that you want the node to
represent. It then returns a new text node stored in element.
Creating a new attribute for a node may be something your
application requires. The createAttribute(
) method takes the name of the attribute as a string
parameter, and then creates an Attr node of the passed name, as shown in
the following:
var element = $('elem'),
var attribute = document.createAttribute('special'),
attribute.value = 'temp';
element.setAttributeNode(attribute);
alert(element.getAttribute('special')); /* Alerts 'temp' */The Attr instance that is
created can then be set on an Element using the setAttributeNode( ) method. We will
discuss this method in the next section, “Modifying and Removing
Elements, Attributes, and Objects.”
Adding new elements to a DOM document tree that’s smaller than the page’s document tree can greatly speed up a script if the page is particularly large or complicated. This is where creating a document fragment can come in handy. Creating a new document fragment is as simple as:
var fragment = document.createDocumentFragment( );
var titleText = $('title').firstChild;
fragment.appendChild(document.createtextNode(titleText);
alert(fragment.firstChild.nodeValue); /* alerts /titleText/ */The createDocumentFragment(
) method does not take any parameters, and it creates an
empty DocumentFragment object to
which new elements may be added.
Many other methods operate in a fashion similar to the methods
I just illustrated. Table 5-2 lists all
the DOM Document object methods
used to create nodes in a document tree.
Table 5-2. Creation methods
Method | Description | W3C standard |
|---|---|---|
| Creates a new
| Yes |
| Creates a new
| Yes |
| Creates a new
| Yes |
| Creates a | Yes |
| Creates a new empty
| Yes |
| Creates a new
| Yes |
| Creates a new
| Yes |
| Creates a new
| Yes |
| Creates a new node of
the passed | No |
| Creates a new
| Yes |
| Creates a new
| Yes |
Being able to create new elements and objects does not do us
much good if we have no way to get these new nodes into part of a
larger DOM document tree, whether it is a DocumentFragment or a Document. So, in this section we will
discuss some methods for appending, removing, and modifying
elements, attributes, and objects in a DOM document tree.
One of the most common methods used is appendChild( ). It takes a passed node or
object, and adds it to the end of the list of children for the node
for which the method was called. For example:
$('title').appendChild(document.createTextNode('This is an appended text node'));If the passed node is already part of the tree, it is first
removed from the tree and then appended to the end of the list. Also
remember that if the passed object is a DocumentFragment object, the entire
contents of the fragment are appended to the end of the list of
children.
If the node that needs to be appended to the calling node
should not go to the end of the list of children, you use the
insertBefore( ) method to specify
a location. For example:
var element = document.createElement('div'),
element.appendChild(document.createTextNode('Some text here.'));
$('subHeading').insertBefore(element, $('bodyText'));As with the method appendChild(
), if the passed node is already part of the tree, it is
first removed and then inserted before the reference node. Figure 5-2 shows what this
would look like before the call to insertBefore( ), and Figure 5-3 shows what it would
look like after. Also like appendChild(
), when the passed object is a DocumentFragment object, its children are
inserted in the order in which they appear in the fragment and
before the reference node. When no reference node is supplied, the
passed node is inserted at the end of the list of child
nodes.


Sometimes nodes need to be removed from the document tree.
These cases call for the removeChild(
) method. Here’s an example:
document.removeChild($('loading'));removeChild( ) takes the
node to be removed from the tree as the parameter, and the method
returns the removed node after it has been removed from the
tree.
At times, you will have built a DocumentFragment that contains a formatted
structure from an Ajax feed, and you will need to insert the
fragment into the DOM document. The method importNode( ) handles these situations.
For example:
var response = results.responseXML;
response = document.importNode(response.documentElement, true);
$('responseDiv').appendChild(response);When it comes to appending, removing, or modifying data, many methods are available. It would be impractical to demonstrate each of them. So instead, I list and describe them in Table 5-3.
Table 5-3. Manipulation methods
Method | Description | Available interfaces |
|---|---|---|
| Appends the node
| All |
| Appends the | CDATASection, Comment, Text |
| Returns a clone of
this node with the exception being that the cloned node has
no | All |
| Deletes data from the
node in 16-bit
increments, starting at the | CDATASection, Comment, Text |
| Imports a node from
another |
|
| Inserts | All |
| Inserts | CDATASection, Comment, Text |
| Pulls all | All |
| Removes the attribute
with the name equal to
the passed parameter |
|
| Removes the |
|
| Removes the attribute
with the namespace URI
equal to the passed parameter |
|
| Removes the child
node with the name
equal to the passed parameter | All |
| Replaces the child
node | All |
| Replaces the data
starting at the 16-bit
| CDATASection, Comment, Text |
| Creates or alters the
attribute with the passed |
|
| Adds the |
|
| Adds the |
|
| Creates or alters the
attribute with the namespace
URI equal to the passed |
|
| Splits the node into
two nodes at the passed |
|
Tip
You will notice all of the references to 16-bit units when talking about character data. This is because XML supports Unicode characters, which are two bytes (16 bits) per character.
Now that it is clear how to create elements, attributes, and objects and how to modify and remove them in the DOM document tree, you need to know how to access the data. And you have probably already seen some, if not most, of the methods that get information from the elements, attributes, and objects within the document tree.
These methods are often used together to get information from elements, and they sometimes aid in traversing the DOM. For example:
var root = $('bodyContent'),
/* Does the root node have childNodes? */
if (root.hasChildNodes( )) {
var temp = root.firstChild.nodeType;
/* Find the /nodeType/ */
switch (temp) {
case 1:
/* Does the /firstChild/ have an /id/ attribute? */
if (root.firstChild.hasAttribute('id'))
alert(root.firstChild.getAttribute('id'),
break;
case 3:
case 4:
alert(root.firstChild.data);
break;
}
}I know this code doesn’t really do anything useful; it is here
to show the use of several new methods and properties. The first new
method in this code is hasChildNodes(
), which returns a Boolean value that is determined by the
node having any child nodes. Next is the property nodeType, which returns a numeric value
representing the type of the node. I introduced these numeric values
to you in Table 5-1.
The first case statement in the code:
case 1:
/* Does the /firstChild/ have an /id/ attribute? */
if (root.firstChild.hasAttribute('id'))
alert(root.firstChild.getAttribute('id'),
break;introduces the hasAttribute(
) and getAttribute( )
methods. Just as you probably guessed, hasAttribute( ) returns a Boolean value
based on whether the method finds an instance of the attribute being
checked against. Likewise, getAttribute(
) returns the value of the attribute being asked for, and
if no attribute exists, it returns an empty string. Given the
following XHTML snippet, alerting $('myDiv').childNodes[2].getAttribute('id')
would yield Figure 5-4:
<div id="myDiv">
<p id="para_1">First paragraph</p>
<p id="para_2">Second paragraph</p>
<p id="para_3">Third paragraph</p>
<p id="para_4">Fourth paragraph</p>
</div>
Finally, there is the data
property, which contains the character data value of the node. The
data property is valid only when
checking on CDATASection,
Comment, and Text node
types.
Table 5-4 lists the methods available for gathering information about elements, attributes, and objects. In many cases, these methods get the values of the nodes they are part of, whereas in others they are testing values against conditions. Again, this table also lists which DOM interfaces are available to utilize the listed methods.
Table 5-4. Informational methods
Method | Description | Available interfaces |
|---|---|---|
| Gets the value of the
attribute with a name
equal to the passed |
|
| Gets the value of the
attribute with a namespace
URI equal to the passed |
|
| Returns whether an
attribute with a name
equal to the passed |
|
| Returns whether an
attribute with a namespace
URI equal to the passed |
|
| Returns whether the node has any attributes. | All |
| Returns whether the node has any child nodes. | All |
| Returns whether the
passed | All |
| Returns a substring
|
|
Table 5-5 lists the properties associated with nodes that you can use for informational purposes. You will recognize that most of these properties were used as either the returned value or the subject of a conditional test with the methods in Table 5-4.
Table 5-5. Informational properties
Property | Description | Available interfaces |
|---|---|---|
| The data set for the node. |
|
| The number of nodes
in the list, ranging from 0 to or The number of characters (16-bit per character) available in the data attribute. |
or
|
| The local part of the qualified name of the node. | All |
| The name of the attribute. |
|
| The namespace URI of the node. | All |
| The name of the node. | All |
| Numeric code representing the type of the node. (See Table 5-1.) | All |
| The value of the node. | All |
| The namespace prefix of the node. | All |
| A value of The
A value of The The
|
|
| The name of the element. |
|
| The value of the attribute. |
|
The methods and properties used to walk the DOM document tree
are also the most-used and most-recognized of any of the methods and
attributes we will see. This is simply a case of the most common
tasks related to the DOM using these methods and properties to
accomplish them (which is why they are so prevalent). We have
already seen some of them in the examples in this chapter—methods
such as getElementById( ) and
getElementsByTagName(
).
The methods used to traverse the DOM are as simple as any of the other methods we have seen. For example:
var elements = getElementsByTagName('a'),
var array = new Array( );
/* Loop through the <a> elements */
for (i = 0, il = elements.length; i < il; i++)
array[i] = elements.item(i).getAttributeNode('href').value;We saw getElementsByTagName(
) already, so we will skip right to the getAttributeNode( ) method. This method
returns the Attr node with a
corresponding nodeName of the
parameter that is passed. If there is no such node, the method
returns null.
Table 5-6 lists the methods you can use to traverse a DOM document tree and which DOM interfaces can use them.
Table 5-6. Traversal methods
Method | Description | Available interfaces |
|---|---|---|
| Gets the |
|
| Gets the |
|
| Gets the |
|
| Gets a | Document, Element |
| Gets a | Document, Element |
| Returns the node in
the list with an index
equal to the passed |
|
Properties are also available to each node for stepping through a DOM document tree element by element. Consider this snippet from an XHTML page:
<div id="desserts">
<ul id="cakes">
<li id="cake1">Chocolate</li>
<li id="cake2">Lemon</li>
<li id="cake3">Cheesecake</li>
<li id="cake4">Angelfood</li>
</ul>
</div>You could reference the third list element by using any of the following
examples:
$('cakes').childNodes[2];
$('cake2').nextSibling;
$('cake4').previousSibling;
$('cakes').lastChild.previousSibling;
$('cake1').parentNode.childNodes[2];
$('cakes').firstChild.nextSibling.nextSibling;These are just some of the many ways you can get to that third element. Table 5-7 lists the properties you can use to traverse the DOM document tree and the DOM interfaces to which each of them belongs.
Table 5-7. Traversal properties
Property | Description | Available interfaces |
|---|---|---|
| A | All |
| The root element of the document. |
|
| The first child of
this node or | All |
| The last child of
this node or | All |
| The node immediately
after this node or | All |
| The | All |
| The |
|
| The parent of this node. This
attribute may be | All |
| The node preceding
this node or | All |
Just as methods and properties are available to developers to manipulate elements, attributes, and objects, so too are methods and properties available to manipulate the styles on a page programmatically. The methods and properties I describe here are part of the W3C’s Recommendation for the DOM. Note that Internet Explorer does not follow the W3C Recommendation for stylesheets in the DOM. I will cover this later in the chapter, in the section “What About Internet Explorer?”
When stylesheets are loaded into the DOM, whether it is by a
<link> or a <style> element on the page, each rule
that is imported has a rule type associated with it (see Table 5-8). The DOM can then access all of the
imported rules and manipulate them according to the developer’s
designs.
As you will see in the upcoming “Style Information” section, you can check these values before attempting code that may otherwise fail:
var rule = document.styleSheets[0].cssRules[0];
var URI = null;
/* Is the type equal to 3? */
if (rule.type == 3)
URI = rule.href;Modifying stylesheets that are already in the DOM makes up a
large part of what was coined DHTML (Dynamic
HTML) back in 1998. You can use simple methods such as setProperty( ) and removeProperty( ) to do this, as in the
following:
var styles = document.styleSheets[0].cssRules[0].style;
styles.setProperty('color', '#ff0000'),
styles.setProperty('font-size', '2em', 'important'),
styles.removeProperty('font-size'),
styles.removeProperty('color'),The preceding code gets a particular style from the DOM’s
stylesheet (in this example, it is arbitrary), and creates rules for
the style using setProperty( )
while removing rules with removeProperty(
). The setProperty( )
method takes the name of the style, the value, and an optional
priority for the style. To remove a style, whether it was loaded
from a CSS file or was set programmatically, simply call the
removeProperty( ) method and pass
it the name of the style to remove. Table 5-9 lists all the W3C
standard style methods.
Table 5-9. DOM stylesheet manipulation methods
Description | |
|---|---|
| Appends the passed
|
| Deletes the passed
|
| Deletes the CSS rule
at the passed |
| Inserts the passed
|
| Deletes the CSS rule
at the passed |
| Inserts the passed
|
| Removes the style
from the rule where the style equals the passed |
| Creates or replaces
the style within the rule to the passed |
Of course, using these methods is not the only way to
manipulate the style on an element. The CSS2Properties object was made for just
this purpose. For example:
$('subTitle').style.fontWeight = 'bold';The CSS2Properties object
is a convenient way to retrieve or set properties on an element.
Setting an attribute using this method is just like calling the
setProperty( ) method. The
properties available (fontWeight,
in this example) correspond to properties specified in the CSS 2.1
Recommendation. Table 5-10 lists all of these
properties, along with the JavaScript-equivalent property and
possible values.
Table 5-10. CSS2 properties and their JavaScript equivalents
CSS2.1 property name | JavaScript property name | Values |
|---|---|---|
|
|
|
|
|
|
|
|
|
|
|
|
|
|
|
|
|
|
|
|
|
|
|
|
|
|
|
|
|
|
|
|
|
|
|
|
|
|
|
|
|
|
|
|
|
|
|
|
|
|
|
|
|
|
|
|
|
|
|
|
|
|
|
|
|
|
|
|
|
|
|
|
|
|
|
|
|
|
|
|
|
|
|
|
|
|
|
|
|
|
|
|
|
|
|
|
|
|
|
|
|
|
|
|
|
|
|
|
|
|
|
|
|
|
|
|
|
|
|
|
|
|
|
|
|
|
|
|
|
|
|
|
|
|
|
|
|
|
|
|
|
|
|
|
|
|
|
|
|
|
|
|
|
|
|
|
|
|
|
|
|
|
|
|
|
|
|
|
|
|
|
|
|
|
|
|
|
|
|
|
|
|
|
|
|
|
|
|
|
|
|
|
|
|
|
|
|
|
|
|
|
|
|
|
|
|
|
|
|
|
|
|
|
|
|
|
|
|
|
|
|
|
|
|
|
|
|
|
|
|
|
|
|
|
|
|
|
|
|
|
|
|
|
|
|
|
|
|
|
|
|
|
|
|
|
|
|
|
|
|
|
|
|
|
|
|
|
|
|
|
|
|
|
|
|
|
|
|
|
|
|
|
|
|
|
|
|
|
|
|
|
|
|
|
|
|
|
|
|
|
|
|
|
|
|
|
|
|
|
|
|
|
|
|
|
|
|
|
|
|
|
|
|
|
|
|
|
|
|
|
|
|
|
|
|
|
|
|
|
|
|
|
|
|
|
|
|
|
|
|
|
|
|
|
|
|
|
|
|
|
|
|
|
|
|
|
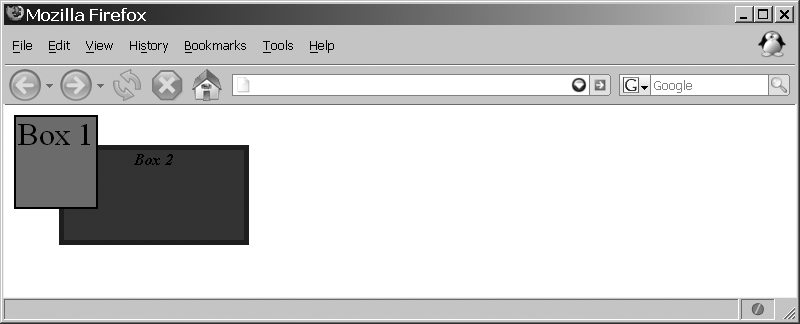
Suppose we have the following code:
var styles = document.styleSheets[0].cssRules[0].style;
styles.setProperty('border', '2px solid #000000'),
styles.setProperty('background-color', '#ff0000'),
styles.setProperty('font-size', '2em'),
styles.setProperty('z-index', 10);
styles = document.styleSheets[0].cssRules[1].style;
styles.setProperty('background-color', '#0000ff'),
styles.setProperty('font-style', 'italic'),This gives us something like Figure 5-5.
Implementing the following code will change the page to something like Figure 5-6:
var styles = document.styleSheets[0].cssRules[0].style;
styles.removeProperty('z-index'),
styles.addProperty('top', '5px'),
styles.addProperty('border-style', 'dashed'),
styles = document.styleSheets[0].cssRules[1].style;
styles.removeProperty('font-style'),
styles.addProperty('background-color', '#00ff00'),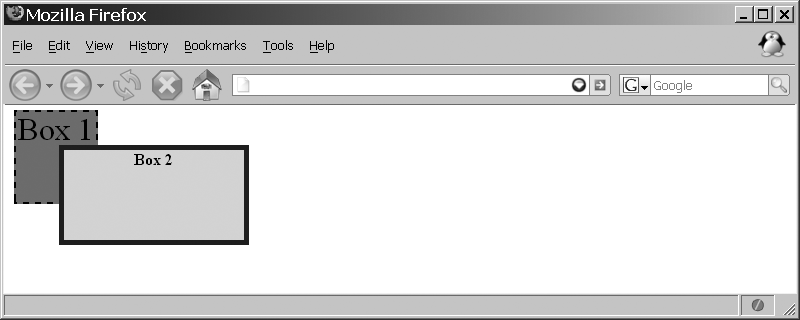
When you’re using the CSS shorthand properties, you should break down the shorthand into the component longhand when appropriate. When getting the values, the shortest form equivalent to the declarations made in the ruleset should be returned. If no shorthand can be added, it should contain an empty string.
For example, this should not be returned:
bold normal normal 12pt "Courier New", monospace
when this will do:
bold 12pt "Courier New", monospace
The normals are default values, and they are implied in the longhand properties should they be queried.
Only a few methods are available for getting to the information in a stylesheet or rule. These methods function in basically the same way. Take the following, for example:
var styles = document.styleSheets[0].cssRules[0].style;
/* Does the style sheet have a color property priority? */
if (styles.getPropertyPriority('color'))
alert(styles.cssText);
else
styles.setProperty('color', styles.getPropertyValue('color'), 'important'),This example checks whether the color style name has been
given a priority using the getPropertyPriority( ) method. If it has,
it alerts the cssText of the
style; otherwise, it sets the property to have a priority of
'important', using its existing
value (retrieved using the getPropertyValue( ) method) in the
setProperty( ) method. Table 5-11 describes all the
methods used to gather information using the CSS DOM.
Table 5-11. Informational DOM stylesheet methods
Method | Description |
|---|---|
| Gets the priority of
the style with a name equal to the passed |
| Gets the value of the
style with a name equal to the passed |
| Returns the name of
the media type at the index equal to the passed |
| Returns the style at
the index equal to the passed |
Along with the methods listed in Table 5-11 are properties you can use in both a read and a write manner (see Table 5-12). Reading these properties gives you the information on a stylesheet or rule, while utilizing the property to modify a stylesheet or rule can offer the benefit of direct access that methods do not give.
Table 5-12. Informational DOM stylesheet properties
Property | Description |
|---|---|
| The text that represents the given rule, including the selector and styles. |
| The text that represents the style part of the rule. |
| The Boolean value indicating whether the associated stylesheet is disabled. |
| The encoding for the
rule, if the rule is an |
| The URL for the rule,
if the rule is an |
| The URL of the stylesheet. |
| The browser’s interpretation of the number of media types to which the associated stylesheet applies. |
| The browser’s interpretation of the number of styles inside the associated rule. |
| The textual representation of the media types to which the stylesheet applies. |
| The textual representation of the named style value. |
| The textual
representation of the selector part of the rule, but only if
it is a normal rule or an |
| The textual representation of the selector part of the rule. |
| The title attribute of the style or link element that creates the associated stylesheet. |
| The numerical representation of the rule type (see Table 5-8, earlier in this chapter). |
| The type attribute of the style or link element that creates the associated stylesheet. |
An example of using a property for writing follows:
document.styleSheets[0].cssRules[5].style.cssText = 'color: #ff0000; ' +
'font-size: 2em !important;';The preceding line of code takes the place of these lines:
var styles = document.styleSheets[0].cssRules[5].style;
styles.setProperty('color', '#ff0000'),
styles.setProperty('font-size', '2em', 'important'),As I said at the beginning of this section, these methods and properties are part of the W3C Recommendation. So, how do things differ with Internet Explorer?
Internet Explorer 6.0 and earlier do not support many of the DOM 2 stylesheet methods or properties. Their alternatives are not as complete, but they do handle basic manipulation of stylesheet rules. The stylesheet collection itself is the same as all the other standards-compliant browsers, and it works in basically the same way.
The first difference is in referencing the stylesheet’s
creator. For standards-compliant browsers the property is ownerNode, but in Internet Explorer the
property is owningElement, as in
this example:
var sheet = document.styleSheets[0]; var element = ((sheet.ownerNode) ? sheet.ownerNode : sheet.owningElement);
Internet Explorer does have the same collection as with
standards-compliant browsers—the disabled,
href, title, and type
properties all work in the same manner—but the media property is different. With
standards-compliant browsers the property is an object, but Internet
Explorer treats it as a string. For this reason, if you wish to
alter it, you must alter the string. Internet Explorer has no
methods to add, remove, or list media types because it is not an
object:
var sheet = document.styleSheets[0];
/* Does the media type have a type of /string/? */
if (typeof sheet.media == 'string')
sheet.media = 'screen';
else
sheet.media.mediaText = 'screen';The preceding code checks to see what browser is being used so
that it knows what property to set. If, however, you are coding for
Internet Explorer for the Mac, trying to set the media property to a string will throw an
error. Therefore, the code will need to have an additional check to
work properly:
var sheet = document.styleSheets[0];
/* Does the media type have a type of /string/? */
if (typeof sheet.media == 'string')
try { sheet.media = 'screen' } catch(ex) {};
else
sheet.media.mediaText = 'screen';You must do this for Internet Explorer for the Mac because the
media property is read-only in
this browser.
The styleSheet property in
Internet Explorer for Windows works in the same way as the sheet property for standards-compliant
browsers. This property, however, is not available in Internet
Explorer for the Mac.
As standards-compliant browsers have the cssRules collection, so too does Internet
Explorer provide the rules
collection. The methods and properties available to Internet
Explorer are not compatible with those of the standards-compliant
browsers. It is not possible to index the same rule in each
collection, as @charset, @import, @media,
@font-face, and @page
rules are not included in the rules collection. @media blocks are included in the rules collection of the stylesheet in
Internet Explorer for Windows, but in Internet Explorer for the Mac
they are ignored, as they are not available to the DOM. For Internet
Explorer in Windows, you cannot add new rules into @media blocks.
Tip
A cssText property in
Internet Explorer is available directly in the stylesheet. This
includes any @media blocks in a
Windows environment; however, this property can create editing
difficulties because some sort of pattern-matching is
required.
Internet Explorer for the Mac has both the rules and the cssRules collections available in the DOM,
but they are both treated the Internet Explorer way. Because of
this, you should check the rules
collection first, and if it’s available, you should use it before
you consider the cssRules
collection:
var sheet = document.styleSheet[0]; var rule = ((sheet.rules) ? Sheet.rules[4] : sheet.cssRules[5]);
Internet Explorer provides a removeRule( ) method that functions
exactly as the deleteRule( )
method does, and it provides an addRule(
) method. But this method does not function like the
insertRule( ) method does:
/* Is there an insertRule( ) method available? */
if (sheet.insertRule)
sheet.insertRule('div#special { font-size: 1.5em; color: #f00; }',
sheet.cssRules.length);
/* Is there an addRule( ) method available? */
else if (sheet.addRule)
sheet.addRule('div#special', 'font-size: 1.5em; color: #f00;'),This section just scratched the surface regarding the differences between Internet Explorer and standards-compliant browsers. However, it is beyond the scope of this book to discuss all of the differences. You can find more information on how Internet Explorer handles stylesheets on MSDN, at http://msdn.microsoft.com/workshop/author/css/css_node_entry.asp.
The ability to manipulate events on the client is central to Web
2.0 and Ajax web applications. Whether it is a user moving the mouse
over an object on the application, or typing some text, or clicking on
a button, the events that fire from these actions are paramount to
having any client-application interaction. All client events are
broken out by Event modules. These
modules are as follows:
HTMLEventmoduleabort, blur, change, error, focus, load, reset, resize, scroll, select, submit, unloadUIEventmoduleDOMActivate, DOMFocusIn, DOMFocusOut, keydown, keypress, keyupMouseEventmoduleclick, mousedown, mousemove, mouseout, mouseover, mouseupMutationEventmoduleDOMAttrModified, DOMNodeInserted, DOMNodeRemoved, DOMCharacterDataModified, DOMNodeInsertedIntoDocument, DOMNodeRemovedFromDocument, DOMSubtreeModified- Nonstandard
Eventmodule Nonstandard events that do not really fit in the other modules
Before you can use any of these events, you must create and initialize them. The DOM enables developers to fully manipulate an event, no matter what it is. We will look at this next.
You can create most events by simply attaching the function or JavaScript action you want to fire directly to the event. Consider these examples:
<a href="/favorites/" onclick="close_all( );">My Favorites</a>
<input id="username" name="nptUsername" type="text" value=""
onblur="check_user(this);" />
<body onload="initialize( );">If, however, you need to synthesize an event from within the
application code itself, the DOM provides the createEvent( ) method. For example:
var evt = document.createEvent('MouseEvents'),If the browser supports an eventType parameter that is passed to the
method, the method will return a new Event of the type passed. After the event
is created, you must call the specific Event initiation method to complete the
creation. When the browser does not recognize the eventType passed, you can still dispatch
it within the client if you implement your own Event initialization method.
Once a new event has been created, it is ready to be
initialized and dispatched to the client application. Four methods
are available for initializing an Event, each for a specific eventType, as shown in Table 5-13.
Table 5-13. Event initialization methods
Method | Description |
|---|---|
| Initializes the event as a generic event, without defining additional properties. |
| Initializes a
|
| Initializes a
|
| Initializes the event
as a generic UI event, without defining additional
properties, and is available for |
This example shows the creation and initialization of a
MouseEvent event:
var evt = document.createEvent('MouseEvents'),
evt.initMouseEvent('click', true, true, window, 20, 200, 26, 208, false,
false, true, false, 0, null);
$('nptSpecial').dispatchEvent(evt);You will notice that after the initMouseEvent( ) method, a call to the
dispatchEvent( ) method is
required to actually set the new Event within the client. The dispatchEvent( ) method takes the form
dispatchEvent(eventObject).
The title of this section may be a bit misleading. The adding
and removing actually do not pertain to the event itself; they
pertain to event listeners.
Adding an event listener to an element is fairly simple. You use the
addEventListener( ) method to add
a listener to a particular event type. For example:
var myElement = $('myDiv'),
myElement.addEventListener('click', function(e) { // do something }, true);The addEventListener( )
method takes for parameters the event to listen to, the function to fire when the event occurs,
and a phase which can be true for capture and false for bubble.
Similarly, to remove an event listener for an object, a
developer would use the removeEventListener( ) method. This method
takes for parameters the event to
stop listening to and a phase
that can be true for capture and false for bubble, as follows:
myElement.removeEventListener('click', arguments.callee, false);All Event objects contain a
number of methods and properties that you can use to obtain
information about the event. For example:
var link = $('firstLink'),
link.addEventListener('click', function(e) {
/* Is the event cancelable? */
if (e.cancelable)
e.preventDefault( );
launchWindow( );
}, false);This event listener checks whether the event can be canceled,
and if it can, it calls the method preventDefault( ), which prevents the
cancellation of the event. Then a function that launches a window is
called. Table 5-14 lists the methods contained
in the Event, EventCapturer, and
EventListener objects, along with
descriptions and the object to which each belongs.
Table 5-14. Event methods
Method | Description | Object |
|---|---|---|
| Captures the
particular type of event that is passed in |
|
| Handles the |
|
| Prevents any default
action from firing as long as the |
|
| Stops capturing the
particular type of event that is passed in |
|
| Continues the event’s flow to additional event handlers, and if none is present, to the target of the event. |
|
| Stops any further propagation of an event during any phase of the event. |
|
Table 5-15 lists the properties
contained in an Event object,
along with a description and the eventType to which each belongs.
Table 5-15. Event properties
Property | Description | Event type |
|---|---|---|
| The Boolean indicator as to whether the Alt key was pressed when the event was fired. |
|
| The indicator of what
type of change was triggered with a
|
|
| The string of the
changed |
|
| The Boolean indicator as to whether the event is a bubbling event. | All |
| The button that was pressed or released when the mouse button changed state. The values for the button can be:
For left-handed mice, the values are reversed. |
|
| The Boolean indicator as to whether the event can have its default action prevented. | All |
| The horizontal coordinate at which the event happened, relative to the client area. |
|
| The vertical coordinate at which the event happened, relative to the client area. |
|
| The Boolean indicator as to whether the Ctrl key was pressed when the event was fired. |
|
| The reference to the element currently processing the event. | All |
| The detail
information about the |
|
| The phase of the event currently being processed. Phases are:
| All |
| The Boolean indicator as to whether the Meta key was pressed when the event was fired. This is the Windows key for Windows and the Apple/Command key for Macs. |
|
| The new value of the node after a mutation event. |
|
| The previous value of the node before a mutation event. |
|
| The secondary node related to the mutation event. |
|
| The secondary event target related to the mouse event. |
|
| The horizontal coordinate at which the event happened, relative to the origin of the screen coordinate system. |
|
| The vertical coordinate at which the event happened, relative to the origin of the screen coordinate system. |
|
| The Boolean indicator as to whether the Shift key was pressed when the event was fired. |
|
| The target to which the event was originally dispatched. | All |
| The time in
milliseconds at which the | All |
| The XML name of the event. | All |
| The view from which the event was generated. |
|
What About Internet Explorer? Part II
Internet Explorer simply does not provide any of the DOM 2
Events methods, and there are
only a couple of the same properties of the Event object. Versions starting at 5
provide an event system that is
similar in nature, but is more limited in functionality.
You will recall that for standards-compliant browsers, you use
the methods createEvent( ), init*Event(
), and dispatchEvent( )
to successfully create, initialize, and dispatch an event to an
element, respectively. In Internet Explorer, similar methods are
available, but initializing an Event object is a little cruder, as shown
in Example 5-2.
Example 5-2. Initializing an Event object for Internet Explorer
var special = $('nptSpecial'),
/* Does the document have a /createEvent( )/ method? */
if (document.createEvent) {
var evt = document.createEvent('MouseEvents'),
evt.initMouseEvent('click', true, true, window, 0, 20, 200, 26, 208,
false, false, true, false, 0, null);
special.dispatchEvent(evt);
/* Does the document have a /createEventObject( )/ method? */
} else if (document.createEventObject) {
var evt = document.createEventObject( );
evt.detail = 0;
evt.screenX = 20;
evt.screenY = 200;
evt.clientX = 26;
evt.clientY = 208;
evt.ctrlKey = false;
evt.altKey = false;
evt.shiftKey = true;
evt.metaKey = false;
evt.button = 0;
evt.relatedTarget = null;
special.fireEvent('onclick', evt);'
}The createEventObject( )
method creates an empty Event
object, unless an existing Event
object is passed to it. In this case, the passed object is used as a
template when creating the new object. Instead of calling an
init*Event( ) method, you must
set each property of the Event
object individually. Finally, instead of calling the dispatchEvent( ) method, you call the
Internet Explorer fireEvent( )
method. This method takes the event type and the event object
itself.
You cannot find in Internet Explorer the addEventListener( ) and removeEventListener( ) methods that are
used in standards-compliant browsers. Instead, you use the attachEvent( ) and removeEvent( ) methods. They function in
almost the same way, as shown here:
function handleMyEvent(e) {
// do something here
}
var special = $('nptSpecial'),
/* Is there an /addEventListener( )/ method? */
if (special.addEventListener)
special.addEventListener('click', handleMyEvent, false);
/* Is there an /attachEvent( )/ method? */
else if (special.attachEvent)
special.attachEvent('onclick', handleEvent);Internet Explorer does not support canceling of an event; it
supports only bubbling. Therefore, you cannot call the stopPropagation( ) method. Instead, the
cancelBubble property is
provided:
/* Is there a /stopPropagation( )/ method? */
if (e.stopPropagation)
e.stopPropagation( );
else
e.cancelBubble = true;Internet Explorer also does not support stopping default
actions, so the preventDefault( )
method will not work. Internet Explorer instead provides the
returnValue property:
/* Is there a /preventDefault( )/ method? */
if (e.preventDefault)
e.preventDefault( );
else
e.returnValue = false;XHTML tables have methods and properties that the other XHTML
elements do not have. These special methods and properties are
specifically designed for manipulating parts of the table in a more
precise manner. To use these methods and properties, however, you must
think of a table in the full XHTML specification. An XHTML table
contains a <caption>, a
<thead>, a <tfoot>, and any number of tbodies:
captionReferences the
<caption>of a tabletheadReferences the
<thead>of a table, if there is onetfootReferences the
<tfoot>of a table, if there is onetbodiesReference a collection with one entry for every
<tbody>that exists for the table (there is usually just one<tbody>, table.tbodies[0])
A rows collection corresponds
to all the rows in each <thead>,
<tfoot>, and <tbody> node. Each row has a cells collection, which contains every
<td> or <th> element in that given row. Every
cell contains all of the normal DOM methods and properties associated
with an XHTML element. Consider the following table, which is
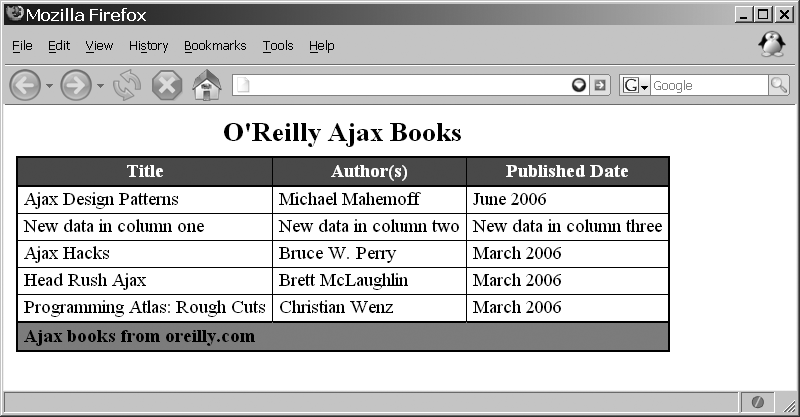
displayed in Figure 5-7:
<table id="oreillyBooks" summary="Some O'Reilly books on Ajax">
<caption>O'Reilly Ajax Books</caption>
<thead>
<tr>
<th>Title</th>
<th>Author(s)</th>
<th>Published Date</th>
</tr>
</thead>
<tfoot>
<tr>
<td colspan="3">Ajax books from oreilly.com</td>
</tr>
</tfoot>
<tbody>
<tr>
<td>Ajax Design Patterns</td>
<td>Michael Mahemoff</td>
<td>June 2006</td>
</tr>
<tr>
<td>Ajax Hacks</td>
<td>Bruce W. Perry</td>
<td>March 2006</td>
</tr>
<tr>
<td>Head Rush Ajax</td>
<td>Brett McLaughlin</td>
<td>March 2006</td>
</tr>
<tr>
<td>Programming Atlas: Rough Cuts</td>
<td>Christian Wenz</td>
<td>March 2006</td>
</tr>
</tbody>
</table>
Using the DOM properties to reference elements in the table, here are some examples of how to reference table nodes:
var table = $('oreillyBooks'),
x = table.tBodies[0].rows[0].cells[1].firstChild.value; // Michael Mahemoff
x = table.tHead.rows[0].cells[2].firstChild.value; // Published Date
x = table.tBodies[0].rows[2].cells[0].firstChild.value; // Ajax Design Patterns
x = table.tFoot.rows[0].cells[0].firstChild.value; // Ajax books from oreilly.comTables, along with their child elements, have methods that you can use for creating, inserting, and deleting, as shown in Table 5-16.
Table 5-16. DOM table methods
Description | Element | |
|---|---|---|
| Creates a new table caption object, or returns an existing one. |
|
| Creates a table footer row, or returns an existing one. |
|
| Creates a table header row, or returns an existing one. |
|
| Deletes the table caption, if one exists. |
|
| Deletes a cell from the
current row at the passed |
|
| Deletes a table row
found at the passed |
|
| Deletes the footer from the table, if one exists. |
|
| Deletes the header from the table, if one exists. |
|
| Inserts an empty cell
into this row at the passed |
|
| Inserts a table row
found at the passed |
|
The methods are easy to use, as the descriptions in the table of
methods show. The following is an example of the createCaption( ) method:
var x = $('myTable').createCaption( );
x.appendChild(document.createTextNode('This is my table caption'));Likewise, it’s easy to use methods such as insertRow( ) and insertCell( ), as the following
illustrates:
var x = $('myTable').insertRow(2);
var a = x.insertCell(0);
var b = x.insertCell(1);
var c = x.insertCell(2);
a.appendChild(document.createTextNode('New data in column one'));
b.appendChild(document.createTextNode('New data in column two'));
c.appendChild(document.createTextNode('New data in column three'));Using the table of O’Reilly books that produced Figure 5-7, this code would produce Figure 5-8. That’s all there really is to manipulating tables using DOM methods and properties. Of course, most of the normal DOM properties and methods could accomplish the same things, but the DOM table methods and properties make things simpler.
The innerHTML property has
caused much debate since Microsoft introduced it for Internet Explorer
all those years ago. There are usually only two camps on this issue:
those that support it wholeheartedly and those that believe it is
evil. So, the question that needs to be answered is “Is innerHTML evil?”
First, a little bit about innerHTML.
innerHTML allows a developer to create a string of XHTML and
set the innerHTML property equal to
that string. The browser is then tasked with translating all of the
XHTML elements to create a DOM document tree out of the string. For
example:
var string = '<div id="myDiv"><p>Paragraph One</p><p>Paragraph <b>Two</b></p></div>';
$('contentBody').innerHTML = string;Now, consider the DOM methods required to create the same string using only W3C standards. Here is an example:
/* Create some new elements? */
var outerDiv = document.createElement('div'),
var para1 = document.createElement('p'),
var para2 = document.createElement('p'),
var bold = document.createElement('b'),
/* Create the attributes and nodes */
outerDiv.setAttribute('id', 'myDiv'),
para1.appendChild(document.createTextNode('Paragraph One'));
para2.appendChild(document.createTextNode('Paragraph '));
bold.appendChild(document.createTextNode('Two'));
para2.appendChild(bold);
outerDiv.appendChild(para1);
outerDiv.appendChild(para2);
/* Append the new <div> element to the /contentBody/ element */
$('contentBody').appendChild(outerDiv);Look at how many more lines it took to build this same bit of
code as XML! So, why doesn’t everyone just switch to innerHTML and forget about all of those DOM
methods? Let’s examine some of the pros and cons of innerHTML.
innerHTML does not require
nearly as many lines to create a large string of XHTML as the W3C
standards do. This can be an advantage when a developer is trying to
keep the size of her JavaScript files as small as possible. Also,
innerHTML is well supported by all
of the major browser makers. It is kind of amusing that innerHTML is, in fact, better supported than
some of the W3C standard methods and properties.
When it comes to creating Ajax pages, innerHTML can come in very handy. It is
extremely easy to take the responseText from an XMLHttpRequest object and set some element’s
innerHTML to this response. Isn’t
the whole point of Ajax to refresh the content of part of the page as
quickly as possible? This is yet another advantage of using innerHTML—it is faster than building the
content using the DOM methods and properties.
On the other hand, innerHTML
is a proprietary property. It may be widely supported now, but that
does not mean it will be in the future. Unless innerHTML becomes a W3C standard, there is
no way anyone can know whether future browsers will support it. With
that aside, using a proprietary property is not so bad. The XMLHttpRequest object that I introduced in
Chapter 4 is also
proprietary.
Another problem with innerHTML is that whether the string passed
to the innerHTML property contains
valid and well-formed markup or not, it is still shoved into the
property. It may be more time-consuming, but it is safer to use
methods such as createElement( ),
createTextNode( ), and appendChild(
).
Plus, MSDN’s definition of innerHTML is that the property is read-only
for the following elements: <col>,
<colgroup>, <frameset>, <html>, <style>,
<table>, <tbody>, <tfoot>, <thead>,
<title>, and <tr>. The problem becomes readily
apparent. The innerHTML property
does not work when you’re trying to add content from within any of
these elements. This makes creating dynamic content within tables an
impossible task using innerHTML.
Furthermore, innerHTML continues to
have problems that are documented in the editorial “innerHTML
Gotchas,” which you can find at http://www.ajaxian.com/archives/innerhtml-gotchas.
It will always be up to the developer whether to use innerHTML or W3C standard methods and
properties. For my money, I say why not both? Sometimes it makes sense
to use innerHTML—when speed is a
factor, for example. Other times—such as when data needs to be
dynamically appended to a table—using DOM methods and properties is
better. So, to answer the question of whether innerHTML is evil: sometimes it is and
sometimes it is not.