
I remember the first time I saw something moving on a web site. Of course, it was an animated GIF. The “wow factor” associated with animated GIFs got many web designers at the time to add them to their web sites. Corporations adopted the technology more slowly than personal sites, but as animation progressed into Java applets and Flash plug-ins, companies around the world saw the usefulness of this eye-catching way to advertise.
Animation next evolved into DHTML, which opens menus, shows and hides objects, and supports the ideas required of a rich client. DHTML allows for more advanced application design, which eventually leads us to Ajax in animation.
Animation on the Web today takes many shapes and forms. We still see animated GIFs, Flash animation, Java applets and servlets, Shockwave, VRML, 3D metafiles, QuickTime VR files, video files (QuickTime, MPEG, AVI, etc.), and streaming video which can be live or recorded. Collectively, these comprise most multimedia on the Internet, notwithstanding music and images. Some of these types can be complicated to create, but others—especially with the right tools—are simple.
Not to gloss over most of these media forms, but the vast majority of them are not really related to the topic of this book. However, it is worth noting the role these media types have played in shaping the Web into what it is today. For instance, in 1997, I never imagined being able to watch live news feeds or play the sophisticated Shockwave games we have today.
Because our focus is Ajax, in this chapter we will discuss animating images and XHTML elements within an Ajax application. These animations give Ajax applications the extra sparkle that allows them to compete with both plug-in-type web pages and desktop applications.
CompuServe introduced the GIF format in 1987 as a way to provide color images on the Web. The original version of GIF was called 87a. What made it so popular at the time was its use of LZW data compression, which was a more efficient algorithm than those used by PCX and MacPaint, which used a run-length encoding format. This allowed for fairly large (at the time) images to be downloaded across even very slow modems in a reasonable amount of time.
In 1989, CompuServe released an enhanced version of the GIF format, labeled 89a, which added support for multiple images in a stream of data, application-specific metadata storage, and interlacing. GIF became one of the two image formats that were used on the Web; the other format was the black-and-white XBM format. Not until the Mosaic browser was developed was the JPEG image format introduced.
Tip
The simplest way to tell the difference between the two versions of a GIF image is to look at the first six bytes of the image file. Both begin at file offset 0x00, with the first four bytes being the same—0x47 0x49 0x46 0x38—and differ only in the next two bytes:
Version 87a GIFs, 0x37 0x61
Version 89a GIFs, 0x39 0x61
Also known as the “magic bytes,” in ASCII, these character sequences are “GIF87a” and “GIF89a,” respectively. It is that simple!
The GIF89a feature that allows storage of multiple images in one file, along with extension blocks, produces the animated GIF image used on the Web. This capability makes the GIF89a feature popular among web site developers. Adding to its popularity is its optional interlacing feature, which stores image scan lines out of order in such a way that even a partially downloaded image can be somewhat recognizable. This was considered a cool feature because now the user did not have to wait for an entire image to load to determine whether she wanted to see it.
It is important to understand the basics of how GIF images work so that later, when I introduce alternative formats, you will better understand what I am talking about. This will make it easier to create and implement the alternatives presented in this book, and will enable you to come up with your own version if you want.
A GIF image basically comprises two separate parts, called descriptors. The screen descriptor defines the image’s resolution and color depth, and can optionally define the global color palette. The image descriptor contains the GIF file’s actual image data.
GIF version 89a introduced extension blocks to the image’s file structure. These extension blocks separate image descriptors and are how multiple frames (or images) can be stored in one file. The extension blocks store text comments or other additional information (metadata) about the image. You create animations in a GIF image by telling image decoder software to delay the decoding of some subsequent image descriptors for a set amount of time, thus creating the animation.
Warning
The textual comments support provided in GIF version 89a comes with a caveat. Each character of text is stored as one byte, but nowhere does it define what character set should be used for this text data. To be safe, you should use only ASCII characters in extension blocks.
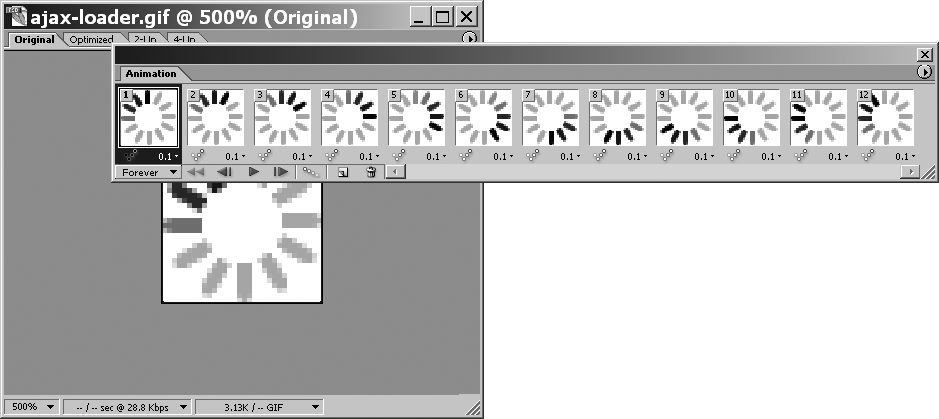
Figure 13-1 depicts a GIF image with all of its frames as shown in Adobe ImageReady CS2. The 12 frames, plus all of their extension blocks, combine to animate the image. This image, ajax-loader.gif, was created at ajaxload.info (http://www.ajaxload.info/), a Web 2.0 service.
GIF images are palette-based, with each frame in the image containing a maximum number of 256 colors. Each color is a 24-bit RGB value stored in a table that associates each palette selection with the specific RGB value. The maximum of 256 colors seemed reasonable when the GIF format was created, simply because few people could afford the hardware required to display more than that. In those early days, graphics cards might have had only 8-bit buffers (which allowed only 256 hues).
The transparency that can be attached to GIF images is another reason the format became so popular with web developers. You create transparency in the image when you set one of the selections in the palette as transparent. This allows for simple binary transparency.
Nothing is really wrong with the GIF image format, but it does have some limitations. The first is its 256-color-palette limit. The GIF format is good for charts, graphs, simple line drawings, and similar imagery. But you would never use it for a photograph, because the image would lose a lot of clarity and color. The other limitation is that it is capable of only binary transparency. This is not strictly a limitation, but it does hinder the development of more artistically superior web application design.
On the other hand, the GIF format is still perfect for small images, such as those in Figure 13-1, that indicate to users when something is happening with Ajax. These types of images do not need to be complicated or photorealistic, so GIF is perfect for these cases. After all, one of the problems with using Ajax is that the user does not know whether the client is doing anything unless the developer gives him some sort of indicator.
Color depth can be an issue with images as site design becomes more sophisticated. The JPEG format replaced the GIF format in many situations, particularly for photographic-quality image requirements. JPEGs allow for more than 16 million different hues in an image file (compared to GIF’s 256 hues per frame). As such, JPEG was a draw to many developers who needed more color options for their site designs.
Despite this advantage, the JPEG format did not replace the GIF format entirely, for three reasons: JPEG cannot compress a flat, single-hued area with the sharpness and clarity that GIF does; JPEG does not support transparency; and JPEG does not support animations natively.
The PNG format was introduced in 1995 and was designed to replace the GIF format following the decision by Unisys to collect royalties for use of its patented LZW format. (I will not go into the details of this; if you’re interested, you can read Michael C. Battilana’s article, “The GIF Controversy: A Software Developer’s Perspective,” at http://www.cloanto.com/users/mcb/19950127giflzw.html.) One of the benefits the PNG format had over the GIF format was that PNG images can support 24-bit color.
Tip
The PNG format was the result of several programmers’ attempts to bypass the Unisys patent issue. CompuServe decided to develop a 24-bit GIF format, and this project merged with the Graphics Exchange Format (GEF) project. Thus, Portable Network Graphics (PNG) was born.
An image file uses four channels to define its color. Three of these are the primary color channels (red, green, and blue), and the fourth, which is known as the alpha channel, stores information about the image’s transparency—it specifies how foreground colors should be merged with background colors when they overlap. The alpha channel stores a weighting factor that is used to calculate the opacity of the pixel. The weighting factor can take a value from 0 to 1, where 0 sets the foreground color as completely transparent and 1 sets the foreground color as completely opaque. Any value in between will create a mixture of the two.
Tip
The alpha blending equation is:
alpha blending, foreground, and background are [r,g,b] values, where:
alpha blending = α(foreground) + (1 - α)(background)
or:
[r,g,b] = α([r,g,b]) + (1 − α)([r,g,b])
As I mentioned, GIF images support binary transparency—the alpha channel is either 0 or 1, and it cannot be one of the blended states in between. The PNG format, however, supports full alpha channel transparency. In fact, the PNG format supports all the features of the GIF format except for animation.
The difference in visual appeal of an image with true alpha transparency versus an image with only binary transparency is obvious. Whereas an image that uses alpha transparency is smooth with its levels of transparency, an image that uses binary transparency must either use solid colors to portray the subtle differences, or diffuse the area that is to have the transparency to provide the illusion of alpha transparency. Sometimes this will not be obvious in the image unless the user zooms in, but other times it will be noticeable. Figure 13-2 shows the difference between an image with an alpha channel transparency and one that supports only binary transparency.

Figure 13-2. An image with alpha transparency (top) and an image with only binary transparency (bottom)
The one downside to using PNG images is that not all browsers support alpha transparency. All modern browsers, except for Internet Explorer 6 and earlier (without using Microsoft-specific extensions and hacks), support PNG images and alpha transparency. Internet Explorer 7 natively supports alpha channel transparency in the browser. As more users switch to Internet Explorer 7 or one of the alternatives, the use of PNG images will continue to rise.
With the PNG format’s advantages of true colors and transparency, all it would need to replace the GIF format is the ability to handle animation. This has not happened yet, though it may be only a matter of time before it does. The creators of the PNG format have been working on an animated version of PNG, called MNG. The biggest hurdle with the MNG format to date is that it does not have widespread support among browsers. Until MNG is supported in all modern browsers, the development community will have to settle for “hacks.”
To create animations with the PNG format, the developer must create an image that has fake “frames,” that is, multiple images in one file that represent the animation for the image. Refer back to Figure 7-8 in Chapter 7, which showed the different states of a button in one image; this is basically the same thing. The difference with the animation technique is that I prefer to orient the different frames horizontally in the image, such as those in Figure 13-1. To accomplish this, you must determine the size of the overall image animation and the number of frames you will need to make up the complete animation. Figure 13-3 gives an example of a possible PNG image that you could use for animations.

The difference between this technique and the one I discussed in Chapter 7 for tabs is that the Document Object Model (DOM) and JavaScript will switch the frames instead of CSS rules.
As we already discussed, the PNG format supports true color whereas the GIF format supports only a 256-color palette. PNGs also support alpha channel transparency, whereas GIFs support only binary transparency. Are there any other differences?
In general, there really are no other differences between the two. PNG images can be larger than GIF images if the starting image is a larger, true-color image. This is simply because PNG images can store more color information, and that information takes up more space. When the starting image has an 8-bit base, however, PNG and GIF images are generally of a similar size.
As you will soon see, there is no good reason not to use a PNG image instead of a GIF. Animations will soon be taken care of, and even if this hack does not suit you, MNG is right around the corner. True color and alpha transparency are hard to pass up, though, if you ask me.
Tip
The World Wide Web Consortium (W3C) endorses the PNG specification as a W3C Recommendation for use in Internet applications.
Figure 13-3 shows the example image we will use as the basis for our animation and its related CSS rules.
The CSS must hide all the frames except one in the PNG image, but unlike with the tab example in Chapter 7, all changing of frames will be controlled by JavaScript once the initial image has rules. You could even do this in JavaScript, but it is better to keep this in a CSS file instead—the user should not catch a glimpse of the whole PNG image and all of its frames, which is something that could happen if JavaScript was the means of all CSS rules. The CSS would look like the following for our image:
#walkingManWrapper {
    background: transparent url('walkingMan.png') no-repeat top left;
    height: 92px;
    overflow: hidden;
    width: 43px;
}
This CSS assumes that the image will be for a <div> element that is positioned
somewhere on the screen. The background of the <div> element is set to the framed
PNG image, and then the height
and width of a single frame are
specified. With the CSS rule overflow:
hidden, the developer can ensure that only one frame is
seen at any time.
The easiest way to fire off the animation is to call a
function to start it when the document is loaded through the
onload event. This way, the
developer can be sure that the whole image is loaded before starting
the animation. Even better is to create an object that is
instantiated on the page load. This way, the developer has a handle
on the animation and can manipulate it later in the application
execution if necessary.
Tip
Instead of adding the onload event to the <body> element, which is the
traditional course of action, it would be nice to separate the
JavaScript out of the structure of the page (Chapter 22 explains why). Fortunately, Prototype
makes it easy to accomplish this with the Event.observe( ) method. For
example:
Event.observe(window, 'load', loadAnimation);
When our object is initialized it will need a handle to the image, the size of the frame, the number of frames, and the pause time (in milliseconds) between frame switching. The object will then call an internal method each time the switching pauses and move the frame accordingly. Example 13-1 shows an example of this object.
Example 13-1. The animation object
/**
 * @fileoverview This file, pngAnimation.js, encapsulates all of the logic and code
 * needed to take a PNG image that has "frames" and animate it according to the
 * developer's designs.  To allow for the greatest flexibility, the /animation/
 * class contains an internal timer so that multiple instances of the object will
 * each have their own timing mechanism.
 */

/**
 * This class, animation, creates the illusion of animation with a PNG image while
 * allowing the developer the ability to control certain aspects of the animation.
 * It contains the following methods:
 *    - initialize(p_id, p_frameSize, p_frameCount, p_pauseTime)
 *    - advanceFrame( )
 */
var animation = Class.create( );
animation.prototype = {
    /**
     * This member, _handle, stores the <div> element (presumably) that stands in
     * for the image.
     * @private
     */
    _handle: null,
    /**
     * This member, _frameSize, stores the width of an individual "frame" in the
     * image.
     * @private
     */
    _frameSize: 0,
    /**
     * This member, _frameCount, stores the number of "frames" contained in the
     * image.
     * @private
     */
    _frameCount: 0,
    /**
     * This member, _pauseTime, stores the length of time that the animation
     * should pause between "frames" kept in milliseconds.
     * @private
     */
    _pauseTime: 0,
    /**
     * This member, _currentFrame, stores the "frame" currently being viewed in
     * the browser.
     * @private
     */
    _currentFrame: 0,
    /**
     * This member, _internalTimer, stores the switching time for the object.
     * @private
     */
    _internalTimer: null,
    /**
     * This method, initialize, is the constructor for the class and sets all of
     * the necessary private members before starting the animation.
     *
     * @member animation
     * @constructor
     * @param {String | Object} p_id The id or object used for the animation.
     * @param {Integer} p_frameSize The width of an individual "frame" in the image.
     * @param {Integer} p_frameCount The number of "frames" in the image.
     * @param {Integer} p_pauseTime The time (in milliseconds) the animation
     *     should pause between "frames".
     */
    initialize: function(p_id, p_frameSize, p_frameCount, p_pauseTime) {
        /* Set all of the private members  */
        this._handle = $(p_id);
        this._frameSize = p_frameSize;
        this._frameCount = p_frameCount;
        this._pauseTime = p_pauseTime;
        /*
         * Start the animation.  By using the prototype bind method, each instance
         * of this object can have its own timer--a very useful feature.
         */
        this._internalTimer = setInterval(this.advanceFrame.bind(this),
this._pauseTime);
    },
    /**
     * This member, advanceFrame, changes the position of the background image of
     * the /_handle/ based on the /_currentFrame/ and /_frameSize/.
     *
     * @member animation
     */
    advanceFrame: function( ) {
        /* Should the animation start over at the beginning? */
        if (this._currentFrame == this._frameCount)
            this._currentFrame = 0;
        /*
         * Move the background image to advance the "frame", then change the
         * /_currentFrame/
         */
        this._handle.style.backgroundPosition = (this._frameSize *
            this._currentFrame * −1) + 'px 0';
        this._currentFrame++;
    }
};On the load of the document, the developer instantiates the
new animation object like
this:
var walkingMan = new animation('walkingManWrapper', 43, 6, 150);Because we have a handle on the object, we should be able to
start, pause, and stop the animation of the object programmatically.
These commands would look something like this for the animation object:
walkingMan.startAnimation( );

walkingMan.pauseAnimation( );

walkingMan.stopAnimation( )
Example 13-2
shows what our object would look like with these methods added to
it. Our initialize( ) method no
longer starts the animation
object, instead relying on the developer to call the startAnimation( ) method the first time to
get the animation going. Pausing the object with the pauseAnimation( ) method stops the
animation object from switching
the PNG image’s frames, but gives the developer the option of
restarting the animation from the point at which it left off.
Stopping the animation object
with the stopAnimation( ) method,
however, causes the object to reset itself to its initial frame
(which is always the first frame).
Example 13-2. A more robust version of the animation object
/**
 * @fileoverview This file, pngAnimation.js, encapsulates all of the logic and code
 * needed to take a PNG image that has "frames" and animate it according to the
 * developer's designs.  To allow for the greatest flexibility, the /animation/
 * class contains an internal timer so that multiple instances of the object will
 * each have their own timing mechanism.
 *
 * This code requires the Prototype library.
 */

/**
 * This class, animation, creates the illusion of animation with a PNG image while
 * allowing the developer the ability to control certain aspects of the animation.
 * It contains the following methods:
 *    - initialize(p_id, p_frameSize, p_frameCount, p_pauseTime)
 *    - advanceFrame( )
 *    - startAnimation( )
 *    - pauseAnimation( )
 *    - stopAnimation( )
 */
var animation = Class.create( );
animation.prototype = {
    /**
     * This member, _handle, stores the <div> element (presumably) that stands in
     * for the image.
     * @private
     */
    _handle: null,
    /**
     * This member, _frameSize, stores the width of an individual "frame" in the
     * image.
     * @private
     */
    _frameSize: 0,
    /**
     * This member, _frameCount, stores the number of "frames" contained in the
     * image.
     * @private
     */
    _frameCount: 0,
    /**
     * This member, _pauseTime, stores the length of time that the animation
     * should pause between "frames" kept in milliseconds.
     * @private
     */
    _pauseTime: 0,
    /**
     * This member, _currentFrame, stores the "frame" currently being viewed in
     * the browser.
     * @private
     */
    _currentFrame: 0,
    /**
     * This member, _internalTimer, stores the switching time for the object.
     * @private
     */
    _internalTimer: null,
    /**
     * This method, initialize, is the constructor for the class and sets all of
     * the necessary private members.
     *
     * @member animation
     * @constructor
     * @param {String | Object} p_id The id or object used for the animation.
     * @param {Integer} p_frameSize The width of an individual "frame" in the image.
     * @param {Integer} p_frameCount The number of "frames" in the image.
     * @param {Integer} p_pauseTime The time (in milliseconds) the animation
     *     should pause between "frames".
     */
    initialize: function(p_id, p_frameSize, p_frameCount, p_pauseTime) {
        /* Set all of the private members  */
        this._handle = $(p_id);
        this._frameSize = p_frameSize;
        this._frameCount = p_frameCount;
        this._pauseTime = p_pauseTime;
    },
    /**
     * This member, advanceFrame, changes the position of the background image of
     * the /_handle/ based on the /_currentFrame/ and /_frameSize/.
     *
     * @member animation
     */
    advanceFrame: function( ) {
        /* Should the animation start over at the beginning? */
        if (this._currentFrame == this._frameCount)
            this._currentFrame = 0;
        /*
         * Move the background image to advance the "frame", then change the
         * /_currentFrame/
         */
        this._handle.style.backgroundPosition = (this._frameSize *
            this._currentFrame * −1) + 'px 0';
        this._currentFrame++;
    },
    /**
     * This member, startAnimation, calls the DOM function /setInterval/ to start
     * the timer for the animation and will report its success.
     *
     * @member animation
     * @return Whether or not the animation was started.
     * @type Boolean
     * @see advanceFrame
     */
    startAnimation: function( ) {
        /*
         * Start the animation.  By using the Prototype bind method, the
         * /setInterval/ function will be pointed to the object's /_internalTimer/
         * allowing each instance of this object to have its own timer-a very
         * useful feature.
         */
        this._internalTimer = setInterval(this.advanceFrame.bind(this),
            this._pauseTime);
        /* Was the timer set? */
        if (this._intervalTimer)
            return (true);
        return (false);
    },
    /**
     * This member, pauseAnimation, calls the DOM function /clearInterval/ to clear
     * the timer for the animation and stop it in its current frame.
     *
     * @member animation
     * @return Whether or not the animation was correctly paused.
     * @type Boolean
     */
    pauseAnimation: function( ) {
        /*
         * By using the Prototype bind method, the /clearInterval/ function will
         * clear the appropriate timer value, namely /this/ one.
         */
        clearInterval(this._internalTimer.bind(this));
        /* Was the timer cleared? */
        if (!this._internalTimer) {
            this._internalTimer = null;
            return (true);
        }
        return (false);
    },
    /**
     * This member, stopAnimation, calls the DOM function /clearInterval/ to clear
     * the timer for the animation, then the /_currentFrame/ is reset to 0 and the
     * image reset to its first "frame".
     *
     * @member animation
     * @return Whether or not the animation was correctly stopped.
     * @type Boolean
     */
    stopAnimation: function( ) {
        /*
         * By using the Prototype bind method the /clearInterval/ function will
         * clear the appropriate timer value, namely /this/ one.
         */
        clearInterval(this._internalTimer.bind(this));
        /* Was the timer cleared? */
        if (!this._internalTimer) {
            this._currentFrame = 0;
            this._internalTimer = null;
            /* Move the background image to the first "frame" */
            this._handle.style.backgroundPosition = '0 0';
            return (true);
        }
        return (false);
    }
};It is fine to show a way to create animations using a PNG image instead of a GIF image, but you may be wondering, so what? What does this have to do with Ajax application development? In and of itself, animating a PNG has no more to do with Ajax than does having an animated GIF in your application. But we can use Ajax to manipulate the animation, and that is exactly what we are going to do next.
Imagine that you have developed an animation to entertain the user while the application processes in the background. What if you wanted to speed up or slow down the animation based on what your process is doing? Better yet, what if an Ajax call to the server polled the server side of the application to get the speed it should use? This scenario may be a little far-fetched, but if you were trying to convey to the user something that was completely in the hands of the server, this might not be a bad solution.
First we need to modify our animation object so that it can accept new
values from the server. We can modify the object to poll the
application at every loop through the animation process. This keeps
everything self-contained within the object, resulting in cleaner
code. This code will need to add another parameter to the initialize( ) method to ask whether a poll
event needs to occur. This should be passed as an object; we need to
pass to the object whether it needs to make a poll, what page to
call, any parameters that should be sent to the server, and how
often the object should poll the server. Table 13-1 shows these
parameters.
Table 13-1. The options to pass to the modified animation object
Option | Description |
|---|---|
| This option indicates
whether polling to the server should occur. Possible values
are |
| This option indicates the page on the server to which to send the poll. |
| This option indicates any parameters that should be passed to the polling page when it is called. |
| This option indicates how often, in cycles through the animation, the server should be polled. (Polling too often could slow down the application if many clients are using it at the same time.) |
Example 13-3 shows
the modified object. The animation object will now poll the server
based on what it receives and provide a way to update itself when
the request for information returns from the server.
Example 13-3. Ajax added to our animation object
/**
 * @fileoverview This file, pngAnimation.js, encapsulates all of the logic and code
 * needed to take a PNG image that has "frames" and animate it according to the
 * developer's designs.  To allow for the greatest flexibility, the /animation/
 * class contains an internal timer so that multiple instances of the object will
 * each have their own timing mechanism.
 *
 * This code requires the Prototype library.
 */

/**
 * This class, animation, creates the illusion of animation with a PNG image while
 * allowing the developer the ability to control certain aspects of the animation.
 * It contains the following methods:
 *    - initialize(p_id, p_frameSize, p_frameCount, p_pauseTime)
 *    - advanceFrame( )
 *    - startAnimation( )
 *    - pauseAnimation( )
 *    - stopAnimation( )
 */
var animation = Class.create( );
animation.prototype = {
    /**
     * This member, _handle, stores the <div> element (presumably) that stands in
     * for the image.
     * @private
     */
    _handle: null,
    /**
     * This member, _frameSize, stores the width of an individual "frame" in the
     * image.
     * @private
     */
    _frameSize: 0,
    /**
     * This member, _frameCount, stores the number of "frames" contained in the
     * image.
     * @private
     */
    _frameCount: 0,
    /**
     * This member, _pauseTime, stores the length of time that the animation should
     * pause between "frames" kept in milliseconds.
     * @private
     */
    _pauseTime: 0,
    /**
     * This member, _currentFrame, stores the "frame" currently being viewed in the
     * browser.
     * @private
     */
    _currentFrame: 0,
    /**
     * This member, _internalTimer, stores the switching time for the object.
     * @private
     */
    _internalTimer: null,
    /**
     * This member, _poll, stores the object parameter that is passed on
     * /initialize/.
     * @private
     */
    _poll: null,
    /**
     * This method, initialize, is the constructor for the class and sets all of
     * the necessary private members.
     *
     * @member animation
     * @constructor
     * @param {String | Object} p_id The id or object used for the animation.
     * @param {Integer} p_frameSize The width of an individual "frame" in the image.
     * @param {Integer} p_frameCount The number of "frames" in the image.
     * @param {Integer} p_pauseTime The time (in milliseconds) the animation
     *     should pause between "frames".
     */
    initialize: function(p_id, p_frameSize, p_frameCount, p_pauseTime, p_object) {
        /* Set all of the private members  */
        this._handle = $(p_id);
        this._frameSize = p_frameSize;
        this._frameCount = p_frameCount;
        this._pauseTime = p_pauseTime;
        /* Was an object parameter passed? */
        if (p_object) {
            this._poll = p_object;
            /* Is there a /polling/ property? */
            if (!this._poll.polling)
                this._poll.polling = false;
            /* Is there a /callingPage/ property? */
            if (!this._poll.callingPage)
                this._poll.callingPage = false;
            /* Is there a /parameters/ property? */
            if (!this._poll.parameters)
                this._poll.parameters = '';
            /* Is there a /pollTime/ property? */
            if (!this._poll.pollTime)
                this._poll.pollTime = 5;
            this._poll.animationIteration = 0;
        }
    },
    /**
     * This member, advanceFrame, changes the position of the background image of
     * the /_handle/ based on the /_currentFrame/ and /_frameSize/.  If polling is
     * required, this member will make an Ajax call to the server that will
     * retrieve more information.
     *
     * @member animation
     */
    advanceFrame: function( ) {
        /* Should the animation start over at the beginning? */
        if (this._currentFrame == this._frameCount) {
            this._currentFrame = 0;
            /* Is polling requested? */
            if (this._poll.polling) {
                /* Is it time to make a poll to the server? */
                if ((this._poll.animationIteration % this._poll.pollTime) == 0) {
                    new Ajax.Request(this._poll.callingPage, {
                        method: 'post',
                        parameters: this._poll.parameters,
                        onSuccess: function(xhrResponse) {
                            this._pauseTime.bind(this) = xhrResponse.responseText;
                        }
                    });
                }
                this._poll.animationIteration++;
            }
        }
        /*
         * Move the background image to advance the "frame", then change the
         * /_currentFrame/
         */
        this._handle.style.backgroundPosition = (this._frameSize *
            this._currentFrame * −1) + 'px 0';
        this._currentFrame++;
    },
    /**
     * This member, startAnimation, calls the DOM function /setInterval/ to start
     * the timer for the animation and will report its success.
     *
     * @member animation
     * @return Whether or not the animation was started.
     * @type Boolean
     * @see advanceFrame
     */
    startAnimation: function( ) {
        /*
         * Start the animation.  By using the Prototype bind method, the
         * /setInterval/ function will be pointed to the object's /_internalTimer/
         * allowing each instance of this object to have its own timer-a very
         * useful feature.
         */
        this._internalTimer = setInterval(this.advanceFrame.bind(this),
            this._pauseTime);
        /* Was the timer set? */
        if (this._intervalTimer)
            return (true);
        return (false);
    },
    /**
     * This member, pauseAnimation, calls the DOM function /clearInterval/ to clear
     * the timer for the animation and stop it in its current frame.
     *
     * @member animation
     * @return Whether or not the animation was correctly paused.
     * @type Boolean
     */
    pauseAnimation: function( ) {
        /*
         * By using the Prototype bind method the /clearInterval/ function will
         * clear the appropriate timer value, namely /this/ one.
         */
        clearInterval(this._internalTimer.bind(this));
        /* Was the timer cleared? */
        if (!this._internalTimer) {
            this._internalTimer = null;
            return (true);
        }
        return (false);
    },
    /**
     * This member, stopAnimation, calls the DOM function /clearInterval/ to clear
     * the timer for the animation, then the /_currentFrame/ is reset to 0 and the
     * image reset to its first "frame".
     *
     * @member animation
     * @return Whether or not the animation was correctly stopped.
     * @type Boolean
     */
    stopAnimation: function( ) {
        /*
         * By using the Prototype bind method, the /clearInterval/ function will
         * clear the appropriate timer value, namely /this/ one.
         */
        clearInterval(this._internalTimer.bind(this));
        /* Was the timer cleared? */
        if (!this._internalTimer) {
            this._currentFrame = 0;
            this._internalTimer = null;
            /* Move the background image to the first "frame" */
            this._handle.style.backgroundPosition = '0 0';
            return (true);
        }
        return (false);
    }
};
The code for calling the new object would look something like this:
var myAnimation = new animation('myWrapper', 50, 8, 150, {
    polling: true,
    callingpage: 'myServerPage.php',
    parameters: 'myParam=someData',
    pollTime: 4
});An animated PNG image is only one of the embellishments you see in web applications today. Most animations are created by manipulating elements on a page. Part of developing an application on the Web with Ajax is making it a Web 2.0 application. This means enabling the user to interact with the application and create changes within it. The ability to manipulate objects on a web page has been available for as long as DHTML has. However, in our case, Ajax will notify the server that a change has occurred in the application on the callbacks of our objects manipulating the elements. We can then apply these changes anywhere the user logs in to the application for a customization of the client, just as we discussed in Chapter 11.
In this section, we will discuss the following forms of animation:
Dragging and dropping
Sliding
Fading and appearing
Other element manipulations
Drawing in an application
We are concerned with the application’s action once the animation finishes. How it performs this action isn’t as important at this point. True, as the application developer, you are concerned with this aspect of development, but as an Ajax developer your primary focus at the moment is to make calls to the server and do something with the results.
Using a framework can really speed up the application building process so that you can focus primarily on the Ajax aspect of it. As I said earlier, many JavaScript frameworks, libraries, and toolkits are available on the Web today. Each developer should choose one based on the needs of his application. “One-size-fits-all” frameworks are not available even today, and when it comes to animations in an application, there are so many to choose from. We will stick with the major ones at this point—primarily the frameworks, libraries, and toolkits we’ve already discussed in this book:
script.aculo.us (Prototype)
The Dojo Toolkit
Rico
Zapatec
Walter Zorn’s JavaScript Vector Graphics Library
Any other libraries that we’ve used in this book do not include suitable animation, so we will not discuss them here. Even those in the preceding list do not have modules for all of the different animation types. As such, it is important to remember that different libraries are suited for different applications.
Dragging and dropping is an animation technique that should be familiar to anyone who has used any kind of Windows-like desktop. Dragging and dropping is the act of clicking on an object (or its handle) and, with the mouse button pressed, dragging the mouse to move the object to a new location, as shown in Figure 13-4.

In a web application, the technique is the same, but there are differences in how the frameworks, libraries, and toolkits implement it and how callbacks (which we are really interested in) are handled.
In Chapter 8, I
introduced you to the script.aculo.us Sortable object. The Sortable object automatically took care
of the Draggables and Droppables that were its basis. Draggables is really a helper object,
whereas the Draggable object
does all the heavy lifting.
Dragging an object using script.aculo.us is easy—all you do is create the container element that you want to have dragged around the page, and then add the JavaScript to make it draggable. Assume that we have the following container:
<div id="myContainer">
    <p>This is a draggable object.</p>
</div>
To make this <div>
element draggable, you would use the following JavaScript:
<script type="text/javascript">
    new Draggable('myContainer', {revert: true});
</script>
Table 13-2
shows the additional options that are available to the Draggable object to further define our
draggable container.
Table 13-2. Optional parameters that may be passed to the Draggable object
Description | Default value | |
|---|---|---|
| This option sets
whether the object being dragged should be constrained in
the horizontal or vertical direction. Possible values are
| None |
| This option defines the effect that should be used when the draggable object stops being dragged. |
|
| This option clones
the draggable object and drags this clone, leaving the
original in place until the clone is dropped, then moving
it to the dropped position. Possible values are |
|
| This option sets
whether the element should be dragged by a handle, and the
value should be a reference to the element or the
element’s | None |
| This option sets
whether the draggable element should return to its
original position when the dragging ends, or is a function
reference to be called when the dragging ends. Possible
values are |
|
| This option defines the effect that should be used when the draggable object reverts to its starting position. |
|
| This option sets whether the draggable object should snap to certain positions while being dragged. Possible values can take the following forms:
|
|
| This option defines the effect that should be used when the draggable object begins to be dragged. |
|
| This option sets
the CSS |
|
As you can see, there are many ways to create a Draggable. Most often, the container to
be dragged will have a handle to use as the dragging point. It’s
easy to create this using the following:
<script type="text/javascript">
    //<![CDATA[
    new Draggable('myContainer', {
        handle: 'myHandle',
        ghosting: true,
        snap: [5, 10],
        zindex: 500
    });
    //]]>
</script>
This assumes that the container myContainer contains the handle myHandle to use as the dragging
point.
For adding Ajax to this animation, the Draggable object provides a callback
function, change, which is
fired whenever the position of the Draggable is changed by the act of
dragging with the mouse. The change callback function takes the
Draggable instance as its
parameter. But this does not necessarily define the “drop” part of
dragging and dropping in a web application. For this,
script.aculo.us provides the Droppables object, which is used to
react when a Draggable is
dropped onto it. Adding Droppables to the page is as simple as
the following code:
<script type="text/javascript">
    //<![CDATA[
    Droppables.add('myDropContainer', {greedy: false});
    //]]>
</script>
This JavaScript assumes that a container is defined as an
element onto which something can be dropped. The Droppables.add( ) method also takes
optional parameters to further define the element, as shown in
Table 13-3.
Table 13-3. Optional parameters for the Droppables object
Description | Default value | |
|---|---|---|
| This option sets
the CSS | None |
| This option sets
the containment element | None |
| This option sets
whether the |
|
| This option sets an
additional CSS | None |
| This option sets
whether the | None |
The Droppables element
also has two callback functions, onDrop and onHover, that you can use for additional
Ajax usage with the drag-and-drop animation. This is shown in the
following:
<script type="text/javascript">
    //<![CDATA[
    Droppables.add('myDropContainer', {
        greedy: false,
        onDrop: function(p_el) {
            $('myDropContainerText').innerHTML = 'Added ' + p_el.alt +
                ' to the container.';
        }
    });
    //]]>
</script>
Dragging and dropping with script.aculo.us is that simple, as shown in Figure 13-5.

The Dojo Toolkit differs greatly in its approach to writing
drag-and-drop functionality for the developer. Dragging and
dropping with Dojo is provided through the dojo.dnd library. This library provides
the methods necessary to make an element draggable, and to make
other elements droppable targets. However, the Dojo Toolkit does
not provide the same flexibility when creating its objects as the
script.aculo.us library does, at least as far as options are
concerned. With Dojo, CSS plays a bigger role in
development.
The following script is necessary to allow dragging and dropping:
<script type="text/javascript" src="dojo.js"> </script>
<script type="text/javascript">
    //<![CDATA[
    dojo.require('dojo.html'),
    dojo.require('dojo.dnd.*'),
    dojo.require('dojo.event.*'),
    //]]>
</script>
The dojo.event library is
used to set up the draggable elements and droppable targets once
the page has loaded. The HtmlDragSource(
) method is used to create a new draggable object and
the setDragTarget( ) method is
used to create the droppable object:
<script type="text/javascript">
    //<![CDATA[
    function bodyOnload( ) {
        var drag = new dojo.dnd.HtmlDragSource(dojo.byId('myDraggable'));
        var drop = new dojo.dnd.HtmlDragSource(dojo.byId('myDroppable'));

        drop.setDragTarget(dojo.byId('myDropPlace'));
    }

    dojo.event.connect(dojo, 'loaded', 'bodyOnload'),
    //]]>
</script>
As you can see, creating draggable and droppable objects with Dojo is very straightforward. Adding a handle to the draggable object is no more difficult, as the following code demonstrates:
<script type="text/javascript">
    //<![CDATA[
    function bodyOnload( ) {
        dojo.html.disableSelection(dojo.byId('myDragHandle'));

        var drag = new dojo.dnd.HtmlDragSource(dojo.byId('myDraggable'));
        var drop = new dojo.dnd.HtmlDragSource(dojo.byId('myDroppable'));

        drag.setDragHandle(dojo.byId('myDragHandle'));
        drop.setDragTarget(dojo.byId('myDropPlace'));
    }

    dojo.event.connect(dojo, 'loaded', 'bodyOnload'),
    //]]>
</script>
Though the Dojo drag-and-drop library may not be as robust as the script.aculo.us library, Dojo still provides methods that you can use as callbacks for your Ajax calls to the server. Table 13-4 and Table 13-5 show these methods.
Table 13-4. The methods available to the HtmlDragSource object
Description | |
|---|---|
| This method is
called when the dragging of the current element ends. The
|
| This method is
called when the dragging of the current element begins.
This method returns a |
| This method adds
the current |
| This method removes
the current |
Table 13-5. The methods available to the HtmlDropTarget object
Description | |
|---|---|
| This method is
called repeatedly after a drag operation hovers over the
defined drop zone, indicating cursor movement by the user.
The |
| This method is
called when the drag operation begins to hover over the
defined drop zone. The |
| This method is
called when the element being dragged is no longer
hovering over the defined drop zone. The |
| This method is
called when compatible elements are dropped on the defined
drop area. The |
In addition to these methods, the HtmlDragSource object also accepts the
type property, which defines
the compatibility that will be used to determine which drag
sources and drop targets can work together. To set the HtmlDropTarget object as a corresponding
type, you use the acceptedTypes
property to link to the type
property of the HtmlDragSource.
Other frameworks also provide dragging and dropping
capabilities in an Ajax application. The Rico library functions
similarly to the script.aculo.us library due in large part to the
fact that both libraries used the Prototype Framework as a base.
With Rico, though, the Rico.Draggable and Rico.Dropzone objects are used to
provide drag-and-drop capabilities:
<script type="text/javascript">
    //<![CDATA[
    dndMgr.registerDraggable(new Rico.Draggable('rico-dnd', 'myDraggable'));
    dndMgr.registerDropZone(new Rico.Dropzone('myDropPlace'));
    //]]>
</script>
This is a simple example of creating dragging and dropping with Rico. A library that takes yet another approach to providing drag-and-drop capabilities to the developer is Walter Zorn’s wz_dragdrop.js library. Creating a draggable object with this library is as simple as the following:
<script type="text/javascript" src="wz_dragdrop.js"> </script>
<script type="text/javascript">
    //<![CDATA[
    SET_DHTML('myDraggable', 'myDraggable2'),
    //]]>
</script>
The SET_DHTML( ) method
can take an endless string of element ids that can be draggable. Setting
options with them is as simple as adding optional commands to the
element id, as shown
here:
<script type="text/javascript" src="wz_dragdrop.js"> </script>
<script type="text/javascript">
    //<![CDATA[
    SET_DHTML('myDraggable' + NO_ALT + TRANSPARENT, 'myDraggable2' + HORIZONTAL);
    //]]>
</script>
Table 13-6 is a list of the optional commands available with the wz_dragdrop.js library.
Table 13-6. The optional commands available with Walter Zorn’s wz_dragdrop.js library
The Zapatec library, which I introduced in Chapter 7, also has a Drag and Drop module, although this
module is available only for download as part of the Zapatec
Suite. To add drag-and-drop capabilities to the application, you
must load the module using the following:
<script type="text/javascript" src="zapatec/zapatec.js"> </script>
<script type="text/javascript" src="zapatec/dndmodule.js"> </script>
Then you must attach dragging to the element to be dragged:
<div id="myDragElement" class="drag">Drag Me</div>
<script type="text/javascript">
    //<![CDATA[
    new Zapatec.Utils.Draggable('myDragElement', {
        dragCSS: 'dragging'
    });
    //]]>
</script>
You can make any XHTML element draggable with the Zapatec
Drag and Drop module.
Typically, however, the draggable elements are <div or <img> elements. The Zapatec.Utils.Draggable( ) method takes
the id of the element to be
dragged as the first parameter, and a collection of optional
properties to define the draggable element. Table 13-7 lists these
options.
Table 13-7. The optional properties that can be passed to the Zapatec.Utils.Draggable( ) method
Option | Description | Default |
|---|---|---|
| This option configures the bottom edge, in pixels, of the draggable element in relation to the bottom edge of its container. |
|
| This option
restricts dragging to only a certain direction. Possible
values are |
|
| This option sets
the |
|
| This option sets the reference to the containing element inside of which the element is being dragged. |
|
| This option sets
the name of the |
|
| This option controls the extent that the element can be dragged toward the right and the bottom of its containing element. |
|
| This option defines the element contained within the draggable element that is to be used as the handle with which to drag its container. |
|
| This option configures the left edge, in pixels, of the draggable element in relation to the left edge of its container. |
|
| This option defines a method that will be provided for the draggable element. It can be used to copy, cut, or slide the element. |
|
| This option configures the right edge, in pixels, of the draggable element in relation to the right edge of its container. |
|
| This option configures the top edge, in pixels, of the draggable element in relation to the top edge of its container. |
|
No matter the library, providing drag-and-drop functionality in an Ajax application is straightforward and relatively simple. Even adding Ajax to this functionality is not difficult thanks to callback functions that these libraries provide. In these functions, any information that needs to be traded back and forth between the client and the server can occur. The dragging and dropping that facilitate Ajax calls can be as simple as tracking where the user places objects, and as complicated as building a dynamic shopping list that stores the user’s cart based on what is dragged into it. script.aculo.us has a drag-and-drop demo that shows just such a case (http://demo.script.aculo.us/shop), as I showed in Figure 13-5.
Moving objects—isn’t that what we were just talking about in the preceding section? Not really; here I’m talking about dynamically animating the position of an object without any direct user interaction other than perhaps starting the animation. This involves more than simply moving an object from point A to point B. Rather, this takes an object at point A and transitions it to the position at point B by sliding it there, if you will.
Frameworks may vary in how they move an object on the page,
and honestly, few frameworks, libraries, or toolkits even go to
the trouble of implementing this type of feature. The Dojo Toolkit
provides the ability to slide an element around on the page as
part of its dojo.lfx module.
Rico also provides what it calls object
positioning through its Rico.Effect object. Other sliding
JavaScript utilities are also available, but it is hard to find
libraries and toolkits that have them.
To set up moving an object with Dojo, you must include the correct JavaScript files in the page:
<script type="text/javascript" src="dojo.js"> </script>
<script type="text/javascript" src="src/html.js"> </script>
<script type="text/javascript">
    //<![CDATA[
    dojo.require('dojo.lfx.*'),
    //]]>
</script>
It is then a matter of using two methods that are part of
the dojo.lfx.html object:
slideBy( ) and slideTo( ). The following simple
function can handle moving an object in response to a button
click. This function fires when a button is clicked and moves the
designated element on the page from its current position to the
coordinates (300, 500):
<script type="text/javascript">
    //<![CDATA[
    /**
     * This function, button_onclick, moves the designated element to the
     * designated coordinates in the designated duration.
     *
     * @return Returns false so that no other events will fire because of the
     *     /onclick/ of the button.
     * @type Boolean
     */
    function button_onclick( ) {
        var element = document.getElementById('myMovingElement'),
        var coordinates = [300, 500];
        var duration = 300; /* This is in milliseconds */

        dojo.lfx.html.slideTo(element, coordinates, duration).play( );
        return (false);
    }
    //]]>
</script>
To move an element by an arbitrary amount, and not
necessarily to a fixed position, you use the slideBy( ) method. Our modified function
now moves the element 20 pixels by 20 pixels every time the button
is clicked:
<script type="text/javascript">
    //<![CDATA[
    /**
     * This function, button_onclick, moves the designated element to the
     * designated coordinates in the designated duration.
     *
     * @return Returns false so that no other events will fire because of the
     *     /onclick/ of the button.
     * @type Boolean
     */
    function button_onclick( ) {
        var element = document.getElementById('myMovingElement'),
        var coordinates = [20, 20];
        var duration = 300; /* This is in milliseconds */

        dojo.lfx.html.slideBy(element, coordinates, duration).play( );
        return (false);
    }
    //]]>
</script>
Both of these methods take the same parameters:
The element to be moved
The coordinates to move the element to or by
The duration of the movement
They are then activated by the play( ) method, which is part of the
Dojo animation module.
Rico, on the other hand, uses a single method for animating
an element on the page: Rico.Effect.Position( ). Rico uses the
Prototype Framework, so the necessary <script> elements to add to a page
to use Rico are:
<script type="text/javascript" src="prototype.js"> </script>
<script type="text/javascript" src="rico.js"> </script>
Using our same button technique to get our element to move, the following function will move the element from its current position to (300, 500) over a duration of 300 milliseconds in 20 steps. The added bonus with the Rico method is the availability of a callback function when the sliding completes:
<script type="text/javascript">
    //<![CDATA[
    /**
     * This function, button_onclick, moves the designated element to the
     * designated coordinates in the designated duration using the designated
     * number of steps.
     *
     * @return Returns false so that no other events will fire because of the
     *     /onclick/ of the button.
     * @type Boolean
     */
    function button_onclick( ) {
        var element = 'myMovingElement';
        var coordinates = [300, 500];
        var duration = 300; /* This is in milliseconds */
        var steps = 20;

        new Rico.Effect.Position(
            element,
            coordinates[0],
            coordinates[1],
            duration,
            steps,
            {
                complete: function( ) {
                    alert('The object has finished moving'),
                }
            }
        );
        return (false);
    }
    //]]>
</script>
The syntax for the Rico.Effect.Position( ) method
is:
new Rico.Effect.Position(element, x, y, duration, steps, [options]);
There is still a lot of room for improvement when it comes to moving an element on the page in an Ajax application. The best practice may be to code your own object to handle this functionality for you. Just remember the addition of callback functions, or else it will be difficult to add Ajax capabilities to the animation.
The other types of animation that exist within the available frameworks, libraries, and toolkits deal with manipulating objects and drawing objects on the page. Effects on objects consist of everything from fades and wipes to shading, blinking, and highlighting.
Drawing in an Ajax application can involve simply placing objects either within the page or as an SVG palette in the application. Our focus is on the straightforward method of drawing on the screen, although Ajax does have a place in SVG as well. You can find a more thorough discussion on SVG in SVG Essentials by J. David Eisenberg (O’Reilly).
Tip
The downside to using SVG for drawing in an Ajax application is that it is not a well-supported technology, even in all modern browsers that are currently available. It is especially difficult to build in any backward compatibility where this is used, as older browsers would require plug-ins to view the SVG, or they would not support it at all.
The frameworks, libraries, and toolkits featured in this book generally support the manipulation of objects to some extent. To look at the different ways that they accomplish this, our focus will be on script.aculo.us, Dojo, and Zapatec. These libraries offer different methods of doing the same kinds of effects; you will get the best diversity in implementations with these libraries and toolkits.
The script.aculo.us library implements a few object effects, as shown in Table 13-8. These effects are built with callbacks, making them ideal candidates for integration with Ajax.
Table 13-8. Available effects in the script.aculo.us library
Description | |
|---|---|
| This effect makes an element appear. |
| This effect makes
an element fade away, and takes it out of the document
flow at the end of the effect by setting the CSS |
| This effect gives
the illusion of the element puffing away like in a cloud
of smoke, and takes it out of the document flow at the end
of the effect by setting the CSS |
| This effect makes
the element both drop and fade at the same time, and takes
it out of the document flow at the end of the effect by
setting the CSS |
| This effect moves the element slightly to the left and then to the right repeatedly. |
| This effect flashes a color as the background of the element to draw the user’s attention to the object. |
| This effect gives
the illusion of a television-style off switch (found in
older TV sets), and takes it out of the document flow at
the end of the effect by setting the CSS |
| This effect simulates a window blind whereby the contents of the affected element stay in place but appear as the blind descends. |
| This effect simulates a window blind whereby the contents of the affected element stay in place but disappear as the blind ascends. |
| This effect simulates a window blind whereby the contents of the affected element scroll down as the blind descends. |
| This effect simulates a window blind whereby the contents of the affected element scroll up as the blind ascends. |
| This effect pulsates the element by looping in a sequence of fading out and in five times. |
| This effect reduces
the element to its top-left corner, and takes it out of
the document flow at the end of the effect by setting the
CSS |
| This effect reduces
the element to its top and then to its left to make it
disappear, and takes it out of the document flow at the
end of the effect by setting the CSS |
| This effect makes the element grow from a specified spot to its full dimensions while the contents of the affected element grow out with the element. |
| This effect reduces
the element to the bottom middle of its full dimensions
until it disappears while the contents of the affected
element shrink with the element. It then takes it out of
the document flow at the end of the effect by setting the
CSS |
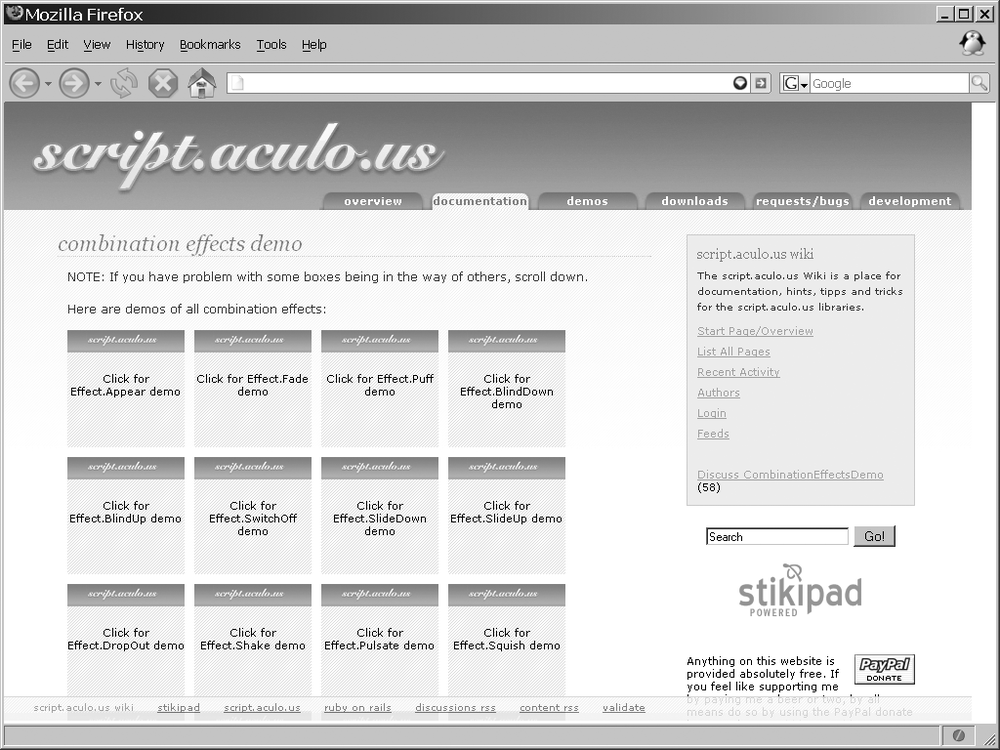
For an online demonstration of the script.aculo.us effects library, go to http://wiki.script.aculo.us/scriptaculous/show/CombinationEffectsDemo, as shown in Figure 13-6.
The Dojo Toolkit also implements several object effects, though not as many as script.aculo.us (see Table 13-9). These effects are also built with callbacks, making them ideal candidates for integration with Ajax.
Table 13-9. Available effects in the Dojo Toolkit
Effect | Description |
|---|---|
| This effect makes the element fade in to the page as it regains full opacity. |
| This effect makes the element fade out on the page until it disappears, but the element maintains its place on the page. |
| This effect makes the element fade in to the page and shows it as it regains full opacity. |
| This effect makes
the element fade out on the page until it disappears, and
takes it out of the document flow at the end of the effect
by setting the CSS |
| This effect makes the element wipe in to the screen with the element appearing with the wipe. |
| This effect makes
the element wipe out from the screen, and takes it out of
the document flow at the end of the effect by setting the
CSS |
| This effect makes an element explode from a point of origin until it attains its full dimensions, with the contents of the element exploding in size along with the element. |
| This effect makes an element implode, with the contents of the element imploding with the element until it disappears. |
| This effect makes a transition from the original background color to a highlighting background color for the element. |
| This effect makes a transition from its current background color to the original background color of the element. |
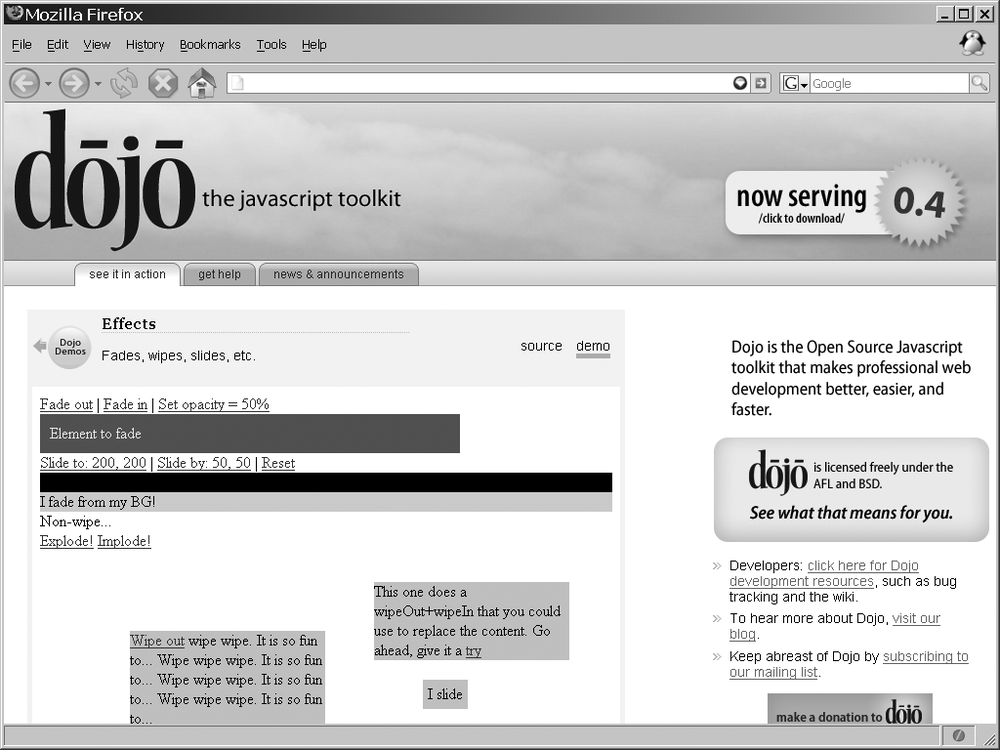
The Dojo Toolkit also has a demo page for its effects, which you can find by visiting http://dojotoolkit.org/ and clicking the “see it in action” button at the top right of the page (see Figure 13-7).
Being a commercial product, the Zapatec Effects library has better documentation than most open source libraries; you can find it at http://www.zapatec.com/website/ajax/zpeffects/doc/docs.html. This library is capable of several effects. Table 13-10 highlights the available methods.
Table 13-10. Available methods in the Zapatec Effects library for manipulating elements
Effect | Description |
|---|---|
| This method hides the given element with the passed effects. |
| This method shows the given element with the passed effects. |
| This method applies effects to the given element that is already displayed. This method is for effects that do not have show/hide toggling capabilities. |
These methods are applied to properties that control what effect is done to the element; Table 13-11 lists these properties.
Table 13-11. The properties available to manipulate elements with the Zapatec Effects library
The Zapatec Effects library demo page is at http://www.zapatec.com/website/ajax/zpeffects/doc/demo.html#effects.html, and is shown in Figure 13-8.

Effects add a great deal of “wow factor” to an application, but you should use them judiciously. In the past, animated GIF images were plastered all over web pages, and all they did was distract the user. Used thoughtfully, however, element effects can add a great deal to the feel of an application, and can enhance the overall appeal of using web-based software.
The best drawing library (and perhaps the only drawing library) available free on the Web is the High Performance JavaScript Vector Graphics Library, developed by Walter Zorn (http://www.walterzorn.com/jsgraphics/jsgraphics_e.htm). This JavaScript library allows dynamic shapes (circles, ellipses, polylines, and polygons) to be “drawn” directly into a web page.
The Vector Graphics Library consists of different methods for drawing the different shapes on the screen, along with several utility methods that set aspects of the shapes, such as color and line thickness. Before you can use this library, you must include the library in the page:
<script type="text/javascript" src="wz_jsgraphics.js"> </script>
The simplest example that I can give is to draw several shapes directly into the document, as shown in Example 13-4. After this, we will look at how to draw shapes onto designated canvasses that the user has a little more control over.
Example 13-4. A simple demonstration of using the JavaScript Vector Graphics Library
<!DOCTYPE html PUBLIC "-//W3C//DTD XHTML 1.1//EN"
    "http://www.w3.org/TR/xhtml11/DTD/xhtml11.dtd">
<html xmlns="http://www.w3.org/1999/xhtml" xml:lang="en">
    <head>
        <title>
            Example 13-4. A simple demonstration of using the JavaScript Vector
            Graphics Library
        </title>
        <script type="text/javascript" src="../js/wz_jsgraphics.js"> </script>
        <script type="text/javascript">
            //<![CDATA[
            /*
             * This creates an instance of the object that will draw directly
             * to the document
             */
            var vgDoc = new jsGraphics( );

            vgDoc.setColor('#00ff00'),
            vgDoc.fillEllipse(100, 200, 100, 180);
            vgDoc.setColor('#cc0000'),
            vgDoc.setStroke(3);
            vgDoc.drawPolyline([50, 10, 120], [10, 50, 70]);
            /* Do the actual drawing of the shapes to the screen */
            vgDoc.paint( );
            //]]>
        </script>
    </head>
    <body>
        <h1>Vector Graphics JavaScript Library</h1>
    </body>
</html>
As I said, this example shows how to draw shapes directly
into the document. A more flexible solution is to draw onto a
given canvas. You can do this by giving the jsGraphics object the name of the canvas
to be drawn on, like this:
var vgDoc = new jsGraphics('myCanvas'),Example 13-4 gave
us a brief introduction to a couple of the methods available to
the jsGraphics object. Table 13-12 lists all of
the methods available to the object.
Table 13-12. Methods available to the vector graphics library
This truly is a phenomenal library that has a lot of potential in many web applications, including Ajax applications. Ajax cannot do much with the library itself, but its potential lies in the ability to get data from the server from which shapes can then be drawn dynamically for the user. You could use this for graphing charts based on user-submitted data without the web application having to rely on third-party software to draw the graphs.
The easiest example to demonstrate Ajax is to build a bar graph based on user-submitted data. Example 13-5 lays out the web page to request the data and display the results.
Example 13-5. The page to request data to dynamically build a bar graph
<!DOCTYPE html PUBLIC "-//W3C//DTD XHTML 1.1//EN"
    "http://www.w3.org/TR/xhtml11/DTD/xhtml11.dtd">
<html xmlns="http://www.w3.org/1999/xhtml" xml:lang="en">
    <head>
        <title>
            Example 13-5. The page to request data to dynamically build a bar
            graph
        </title>
        <script type="text/javascript" src="../js/prototype.js"> </script>
        <!-- Load the Vector Graphics JavaScript Library -->
        <script type="text/javascript" src="../js/wz_jsgraphics.js"> </script>
        <!-- Load the functions needed to make this page 'go' -->
        <script type="text/javascript" src="fa_stats.js"> </script>
        <!-- Make the page look nice for everyone to see -->
        <link type="text/css" rel="stylesheet" media="all" href="fa_stats.css" />
    </head>
    <body onload="body_onload( );">
        <div id="bodyContainer">
            <h1>FA Barclay Premiership 2005-2006 Statistics</h1>
            <div>
                <form id="premierForm" action="self" method="post">
                    <label for="stat">Choose Statistic: </label>
                    <select id="stat">
                        <option value="totWins">Total Wins</option>
                        <option value="awayWins">Away Wins</option>
                        <option value="homeWins">Home Wins</option>
                        <option value="totLosses">Total Losses</option>
                        <option value="awayLosses">Away Losses</option>
                        <option value="homeLosses">Home Losses</option>
                        <option value="totGoals">Total Goals For</option>
                        <option value="awayGoals">Away Goals For</option>
                        <option value="homeGoals">Home Goals For</option>
                        <option value="totAgainst">Total Goals Against</option>
                        <option value="awayAgainst">Away Goals Against</option>
                        <option value="homeAgainst">Home Goals Against</option>
                    </select>
                    <input type="button" value="Get Top 10 Chart" onclick="return
                    getChart( );" />
                </form>
            </div>
            <!-- This is the global canvas for drawing bar graphs on -->
            <div id="chartCanvas"></div>
        </div>
    </body>
</html>
Example 13-6 shows the server getting the request and sending back the data that the client needs. Example 13-7 shows the JavaScript that is needed to request the data, receive a response, and draw the bar graph.
Example 13-6. fa_stats.php: The server-side script to handle our dynamic bar graph request
<?php
/**
 * Example 13-6, fa_stats.php: The server-side script to handle our dynamic bar
 * graph request.
 */

/**
 * The Zend Framework Db.php library is required for this example.
 */
require_once('Zend/Db.php'),
/**
 * The generic db.inc library, containing database connection information such as
 * username, password, server, etc., is required for this example.
 */
require('db.inc'),

/* Variable to hold the output XML string */
$xml = '';

/* Was the /stat/ sent to me? */
if (isset($_REQUEST['stat'])) {
    /* Create an array of colors for each of the ten results that will be returned */
    $colors = array('#00ff00',
                    '#00cc00',
                    '#009900',
                    '#006600',
                    '#003300',
                    '#0000ff',
                    '#0000cc',
                    '#000099',
                    '#000066',
                    '#000033'),
    /* Set up the parameters to connect to the database */
    $params = array ('host' => $host,
                     'username' => $username,
                     'password' => $password,
                     'dbname' => $db);

    try {
        /* Connect to the database */
        $db = Zend_Db::factory('PDO_MYSQL', $params);
        /* Create a SQL string */
        $sql = 'SELECT * FROM (SELECT team_abbr, '.$_REQUEST['stat']
              .' FROM fa_stats ORDER BY '.$_REQUEST['stat'];
        /* Which direction should the sort go? */
        if (false !== strpos($_REQUEST['stat'], 'Wins') ||
                false !== strpos($_REQUEST['stat'], 'Goals'))
            $sql .= ' DESC';
        $sql .= ' LIMIT 0, 10) a ORDER BY a.team_abbr;';
        /* Get the results of the query */
        $result = $db->query($sql);
        /* Are there results? */
        if ($rows = $result->fetchAll( )) {
            /* Create the response XML string */
            $xml .= '<stats>';
            $i = 0;
            foreach ($rows as $row)
                $xml .= "<stat id="{$row['team_abbr']}" color="{$colors[$i++]}""
                       ."height="".$row[strtolower($_REQUEST['stat'])]."" />";
            $xml .= '</stats>';
        } else
            $xml .= '<stats><error>-1</error></stats>';
    } catch (Exception $e) {
        $xml .= '<stats><error>'.Zend::dump($e).'</error></stats>';
    }
} else
    $xml .= '<stats><error>-1</error></stats>';

/*
 * Change the header to text/xml so that the client can use the return string as
 * XML
 */
header('Content-Type: text/xml'),
print($xml);
?>
Example 13-7. The JavaScript needed to handle response, request, and drawing
/**
 * @fileoverview This file, fa_stats.js, requests statistical data from the server-
 * based on the choice of the user as to what data to view.  Once returned, the
 * callback function to the Ajax request creates a chart using Walter Zorn's Vector
 * Graphics JavaScript Library and displays it to the user.
 */

/*
 * This variable will hold the drawing object for the global canvas that will
 * be used
 */
var barDoc = null;

/**
 * This function, body_onload, instantiates the /jsGraphics/ object to the global
 * /barDoc/ variable.
 */
function body_onload( ) {
    /* Define the global canvas to draw the bar graphs on */
    barDoc = new jsGraphics('chartCanvas'),
}

/**
 * This function, getChart, takes the user's drop-down choice and makes a request
 * to the server for the resulting data from that choice.  It then draws a bar
 * graph for the user to view based on the XML results that are returned to the
 * client.
 *
 * @return Returns false so that the element that had the event click stops any
 *     default events.
 * @type Boolean
 * @see Ajax#Request
 */
function getChart( ) {
    /* Get the user's choice */
    var statChoice = $F('stat'),

    /* Clear any bar graph that may exist from a previous call */
    barDoc.clear( );

    /* Call fa_stats.php with the user's choice */
    new Ajax.Request('fa_stats.php', {
        method: 'post',
        postBody: 'stat=' + statChoice,
        /**
         * This method, onSuccess, is the callback method for the Ajax object when
         * a request to the server returns successfully.  Once the response is
         * received from the server, the client draws the corresponding bar graph
         * to the data that is returned in an XML document.
         *
         * @param {Object} xhrResponse The response object from the server.
         */
        onSuccess: function(xhrResponse) {
            /* Get the XML document */
            var response = xhrResponse.responseXML;

            /* Was there an error on the server side? */
            if (response.getElementsByTagName('error').length) {
                barDoc.setColor('#000000'),
                barDoc.drawString('There was a problem retrieving the data.',
                    100, 220);
            } else {
                /* Draw the x and y axes first */
                barDoc.setColor('#000000'),
                barDoc.setStroke(2);
                barDoc.drawPolyline([30, 30, 800], [20, 400, 400])
                barDoc.paint( );

                /* Get the list of stats */
                var stats = response.getElementsByTagName('stat'),
                barDoc.setStroke(1);
                /*
                 * Loop through the stats and build the corresponding bars of
                 * the graph
                 */
                for (var i = 0, il = stats.length; i < il; i++) {
                    /*
                     * Each bar should be 70 pixels wide and have 5 pixels of space
                     * between each
                     */
                    var x = 40 + (i * 70) + (i * 5);
                    /*
                     * Make the height of each bar 5 times bigger so it is easier
                     * to see
                     */
                    var height = stats[i].getAttribute('height') * 5;
                    /* Set the starting spot for the rectangle */
                    var y = 400 - height;

                    /* Draw the bar and label the axis and value for each */
                    barDoc.setColor(stats[i].getAttribute('color'));
                    barDoc.fillRect(x, y, 70, height);
                    barDoc.setFont('Arial', '14px', Font.BOLD);
                    barDoc.setColor('#000000'),
                    barDoc.drawString(stats[i].getAttribute('id'), x + 15, 410);
                    barDoc.drawString(stats[i].getAttribute('height'), x + 25,
                        y - 20);
                }
            }
            /* Paint to the canvas whatever was drawn */
            barDoc.paint( );
            /* Display the canvas to the user */
            $('chartCanvas').style.display = 'block';
        },
        /**
         * This method, onFailure, is the callback method for the Ajax object when
         * a request to the server returns unsuccessfully.  Once the response is
         * received from the server, the client notifies the user of the problem.
         *
         * @param {Object} xhrResponse The response object from the server.
         */
        onFailure: function(xhrResponse) {
            /* Let the user know there was a problem */
            barDoc.setColor('#000000'),
            barDoc.drawString('There was a problem connecting to the server.',
                100, 220);
            barDoc.paint( );
            $('chartCanvas').style.display = 'block';
        }
    });
    /* Return false so that the links do not try to actually go somewhere */
    return (false);
}
This is a simple example, the results of which you can see in Figure 13-9. This shows the completed page with the bar graph built from the data that was requested.
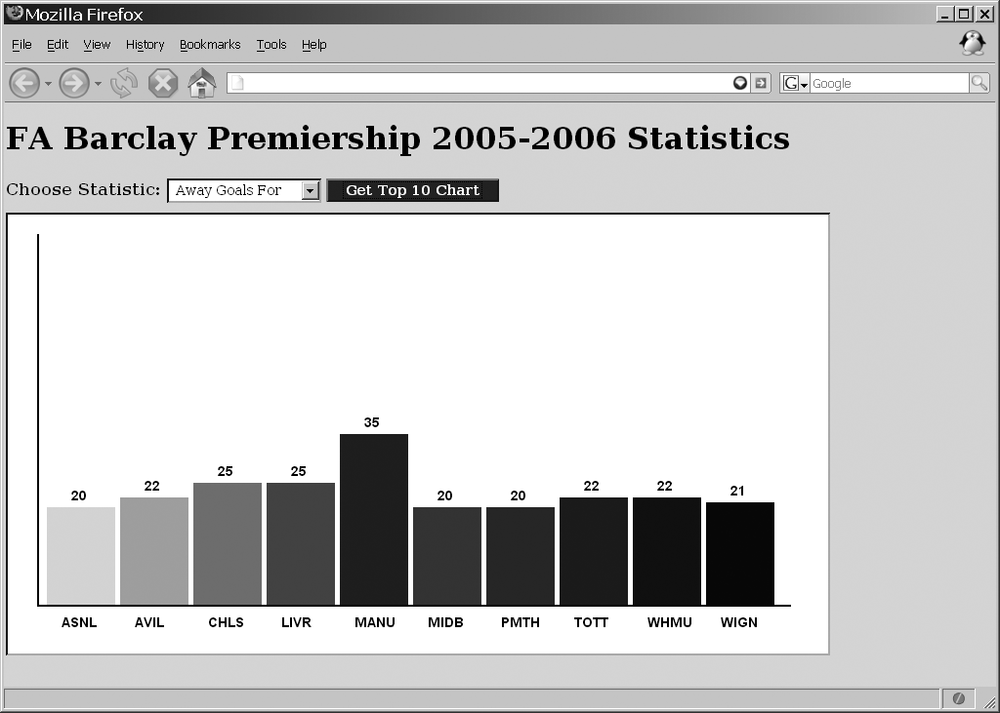
This barely scratches the surface of the capability of the JavaScript Vector Graphics Library. It provides drawing capabilities that an application might need without having to rely on third-party software.
SVG could certainly handle this kind of application better, except for the fact that support for SVG is limited because the browser must actually support the technology. For a cross-browser, backward-compatible solution, the JavaScript Vector Graphics Library is the better choice.
No matter what the application, today’s user expects some kind of animation, not just to allow her more functionality, but also to enhance the application and improve its usability. For this reason, it is important to choose a framework, library, or toolkit that gives you access to callback functions that support Ajax calls to the server in reaction to the animations.
Animation has come a long way on the Web in a short period of time. As support for other technologies becomes common in all browsers, some of what we’ve seen in this chapter will become obsolete. Until then, animate your application with what is available to provide your users with a rich application experience.