
The Internet facilitated video conferencing, the display of interactive presentation, and multichannel communication for even inexperienced users. Businesses rely on communication more today than ever before, and the methods of communication have become easier as well. Chat has proved to be an invaluable tool for the IT industry—not just simple chat, but chat with extras, such as file sharing, whiteboards, and so on. Beyond chat applications, the Web is also a good place for message alert systems, system monitoring, and other network administration activities.
Of course, software packages are available that do all of these things for you out of the box. What would lead a company or individual to build this type of application from scratch when the software is available and easy to purchase? The desire for new innovations within the program, or the need to customize it. The browser can act as a suitable platform for this type of application, as long as the developer is not concerned with accessibility or supporting older browsers.
Warning
Up to this point, I have provided coding solutions that are both
accessible and supportive of older browser clients. There comes a
time, however, when this is no longer a possibility, and that happens
once you commit to building an application on the Web that requires
more sophisticated techniques. This type of Web 2.0 application simply
will not function in anything but the most modern, graphical browsers.
Standards face similar challenges—the XHTML 1.1 DOCTYPE may not be a great option for these
types of applications.
Businesses and Ajax can have a happy, healthy relationship when applications are implemented correctly and with customers in mind. Think of the innovations coming from businesses such as Amazon and eBay. The services provided with Ajax do not distract from or hinder customers in any way, and usually end up making business transactions smoother for them. These are good examples of Ajax working well in a business setting, but they do not address the realities facing many businesses today.
The examples here will specifically address communication needs within a company, though many other applications exist for Ajax within a company setting. The models I will introduce before getting into the details of communication can be applied to any internal applications within a company.
One of the advantages of developing web applications with Ajax is that doing so can cut the costs associated with those applications. Figure 20-1 shows the normal cost flow associated with a company’s purchase of a software program.

Figure 20-1. A basic diagram illustrating the costs associated with purchasing software for a company
As you can see from Figure 20-1, each computer needs a license for a typical desktop application, whereas an application deployed on the Web requires no such licensing fees. Now, there are cases where the web application may allow only a certain number of connections at one time due to licensing restrictions, but even in these cases, the cost is significantly less than that of a desktop deployment.
For example, we will pretend that company Alpha Corp. has 200 employees working in its Customer Service division. It must get a new application to each employee’s computer. The application is structured so that each application requires a separate license to be legally covered, with that license costing $50. IT support employee Bill Smith is in charge of installing the software onto each computer. Bill makes $24.64 an hour, no matter what his task is. After careful testing, Bill has determined that it will take roughly 15 minutes to complete one installation. The math is easy. It will cost $11,232 for this software installation.
In comparison, company Beta Corp. also has 200 employees in its Customer Service division. This company, however, decided to go with a web application that does the same thing as Alpha Corp.’s application—it may look different, but all of the functionality is there. Meanwhile, Bill’s sister Jane Jones (she’s married) makes the same money as her brother. She was able to convince the software makers of the web product to reduce their fees to a flat rate of $8,000 for all users to have the ability to connect simultaneously. It took Jane 10 minutes to have the software installed on Beta Corp.’s intranet server. It cost only $8,002.46 for this software installation.
The numbers are silly, I know, but I am trying to illustrate the cost savings a web application can give a company. The difference here is only $3,229.54, but this could grow much larger for a bigger company. The savings increases as you increase license fees or installation time—that cannot be all bad. Of course, there will be some of the same costs as with traditional application programming: network environment maintenance, bandwidth, versioning, testing, code maintenance, backups, and so on. All of these tasks go to an application’s bottom line, regardless of the environment on which it is developed.
Having an Ajax application rolled out in a business department will also lessen the burden faced by most IT departments because of the nature of the Web. Using the example from the preceding section, you can also understand the time savings that goes along with a web application. Bill spent at least 50 hours installing the software onto each person’s computer. This does not factor in any other time that may have accompanied the installation process, such as glitches in the installation, possible system reboots, and so on. That is 50 hours during which Bill could not support anything else in the company, or be available for questions. Jane took only 10 minutes in my scenario, but even if she took two hours, she would still save so much time. The ease of web application installation makes a big difference in the cost of support.
Any application that is to be useful for a business must have communication that happens in as close to real time as possible. This means that the instant the communication server receives a message, that message must be sent to all connected devices. To build this type of application with Ajax, the client must poll for data from the server in quick intervals to make the “illusion” of real-time communication. In reality, there will be about 500 milliseconds of delay from the actual communication.
If the communication must be real-time, the client will need a constant connection to the server to get and retrieve data. When this is the case, using Flash or Java applets may be a better choice for writing the software. In Ajax, “almost real-time” will have to suffice.
The model for our application will be a push-pull architecture, in which the client pushes a request to the server and then pulls the results back to the client. Figure 20-2 demonstrates what this architecture looks like.
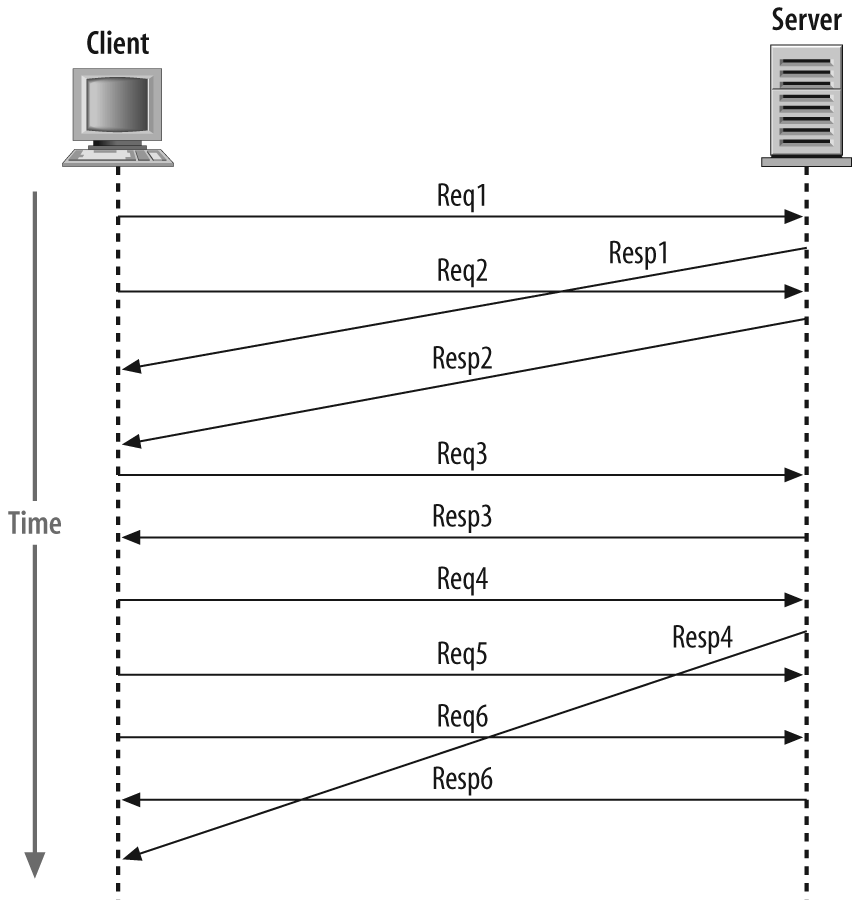
The real question is what does the client need to request?
Users currently chatting
Messages for the chat room
The client needs to know only those two important pieces of information. I am glossing over many details, but for purely foundational purposes, this is it. Once you are logged in, the client must continuously cycle and ask what it needs to request over and over again. The client may need to do other things at the same time, but its main focus is users and messages.
Chatting among users (employees in this case) is the main focus of the application in this chapter. This type of chatting is what you see in some commercially available products, such as WebEx, found at http://www.webex.com/. Chatting allows people to communicate with one another without the need for a phone. This can slightly reduce a company’s costs, as fewer phone calls will be placed to remote locations. The real savings, of course, depends on the phone system being used.
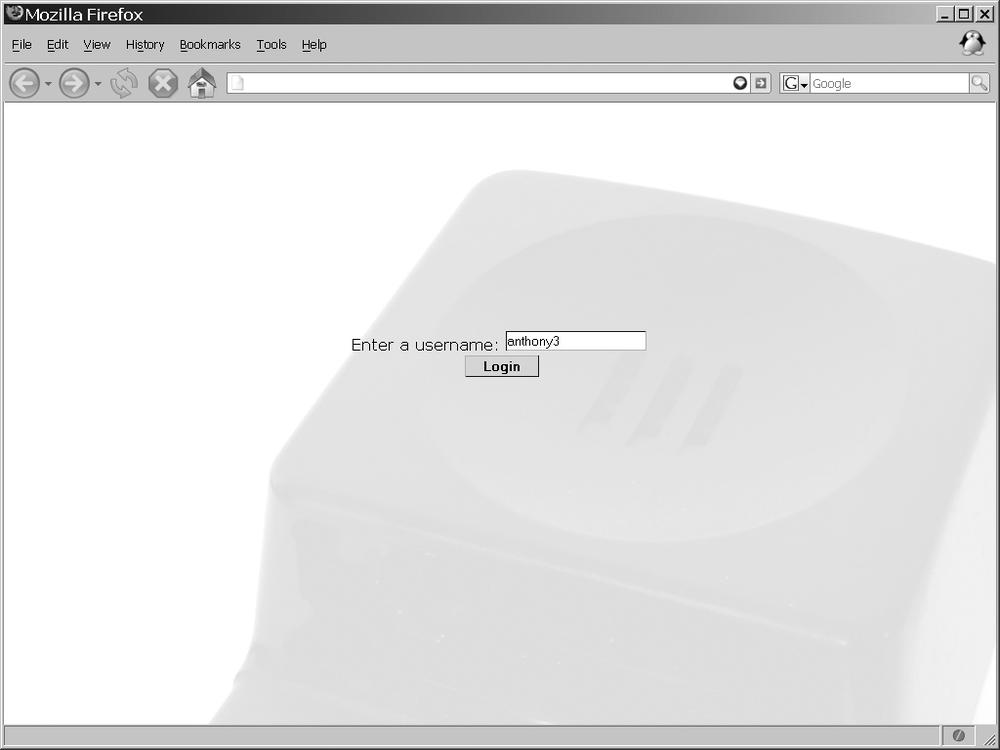
Before doing anything else, the new user to the chat application must log in. This could require some lengthy login application for new users, but for our purposes, we just want a name to use in the chat session. We want to make our application slightly robust, so we will first check the username against who is already in the chat room. To make it even better, we will also make sure the name does not contain anything profane. Example 20-1 shows the entry point to our chat client.
Example 20-1. The entry point to the Ajax chat client
<!DOCTYPE html PUBLIC "-//W3C//DTD XHTML 1.1//EN"
    "http://www.w3.org/TR/xhtml11/DTD/xhtml11.dtd">
<html xmlns="http://www.w3.org/1999/xhtml" xml:lang="en">
    <head>
        <title>Ajax Chat</title>
        <meta http-equiv="content-type" content="text/html; charset=utf-8" />
        <meta http-equiv="imagetoolbar" content="no" />
        <link rel="stylesheet" type="text/css" media="screen"
            href="include/css/chat.css" />
        <script type="text/javascript" src="include/js/prototype.js"> </script>
        <script type="text/javascript" src="include/js/chat.js"> </script>
    </head>
    <body>
        <div id="backgroundSheet"></div>
        <div id="contentWrapper">
            <form id="loginForm" action="self" method="post">
                <div id="formWrapper">
                    <label for="nptUsername">Enter a username: </label>
                    <input type="text" class="textbox" id="nptUsername"
                        name="nptUserName" value="" />
                    <br />
                    <input type="button" class="button" value="Login"
                        onclick="return CheckUsername( );" />
                </div>
            </form>
        </div>
    <body>
</html>
The CSS file being referenced is really unimportant to us here; you can design it however you want. Of interest to us is the JavaScript file chat.js that is referenced. Example 20-2 shows the JavaScript behind the scenes on the login page.
Example 20-2. The JavaScript needed to check the validity of the username entered by the user
/*
 * Example 20-2. The JavaScript needed to check the validity of the username
 * entered by the user.
 */

/**
 * This function, CheckUsername, makes an Ajax request to the server to check on
 * the validity of the entered username against those usernames already currently
 * in use, and against a list of words that are considered vulgar or obscene.
 * @return Returns false so that all wired events to the 'click' are not fired.
 * @type Boolean
 */
function CheckUsername( ) {
    /* Should we even bother requesting anything? */
    if ($F('nptUsername') != '') {
        new Ajax.Request('login.php', {
            method: 'post',
            parameters: { username: $F('nptUsername') },
            onSuccess: function(p_xhrResponse) {
                switch (p_xhrResponse.responseText) {
                    /* The username requested is valid */
                    case '1':
                        alert('Welcome ' + $F('nptUsername') + '.'),
                        window.location = 'chat.php';
                        break;
                    /* The username requested is already being used */
                    case '2':
                        alert('This username is in use.  Please try another one.'),
                        $('nptUsername').focus( );
                        break;
                    /* The username requested had vulgarity in it */
                    case '3':
                        alert('Refrain from vulgarity in the username.  Thank you.'),
                        $('nptUsername').focus( );
                        break;
                    /* Something unexpected happened */
                    case '4':
                    default:
                        alert('Something unexpected happened while logging ' +
                            'you in.  Please try again later.'),
                        $('nptUsername').focus( );
                        break;
                }
                return (false);
            },
            onFailure: function(p_xhrResponse) {
                alert('There was an error while logging you in:

' +
                    p_xhrResponse.statusText);
                $('nptUsername').focus( );
                return (false);
            }
        });
    } else {
        alert('Enter in a valid username before clicking the button.'),
        return (false);
    }
}
The Ajax request is to the login.php file. This file would do all of the checking against existing users already logged in, and presumably against a list of profane or vulgar words. Figure 20-3 shows what our entry screen might look like.
One important thing that the login.php page does need to do is put the
new username into a table for querying against later. This is a
simple example of a chat application, so we really need only two
tables to get everything to function: the users table and the messages table. When the user logs in, the
username is checked and then inserted into the users table. The client page is then
changed to chat.php by the
JavaScript line window.location =
'chat.php';.
The chat client needs to have three distinct areas to function correctly: a user area to display users in the chat, an input area for a user to communicate with everyone else, and a message area where all messages from the server are displayed. Figure 20-4 shows what the chat client looks like as I implemented it with CSS. You can configure the client in many different ways, and I will leave it up to you to decide how your chat client will look.

Example 20-3 shows the XHTML that goes into creating the Ajax chat client produced from the chat.php file. All of the code that will interest us on the client side resides in the JavaScript file chatting.js.
Example 20-3. chat.php: The PHP file that creates the structure for the client
<?php
/*
* This file, chat.php, is the PHP file that creates the structure for the client.
*/
/* make sure that we capture the session variables passed to us */
session_start( );
/* was a username passed to the file? */
if (isset($_SESSION['username'])) {
?>
<!DOCTYPE html PUBLIC "-//W3C//DTD XHTML 1.1//EN"
"http://www.w3.org/TR/xhtml11/DTD/xhtml11.dtd">
<html xmlns="http://www.w3.org/1999/xhtml" xml:lang="en">
<head>
<title>Ajax Chat</title>
<meta http-equiv="content-type" content="text/html; charset=utf-8" />
<meta http-equiv="imagetoolbar" content="no" />
<link rel="stylesheet" type="text/css" media="screen"
href="include/css/chat.css" />
<script type="text/javascript" src="include/js/prototype.js"> </script>
<script type="text/javascript" src="include/js/chatting.js"> </script>
</head>
<body>
<div id="backgroundSheet"></div>
<div id="contentWrapper">
<form id="loginForm" action="self" method="post">
<div id="chatClient">
<div id="chatHeader">Ajax Chat Client v1.0</div>
<div id="usernameContainer"></div>
<div id="chatTextbox">
<input id="text2Chat" name="text2Chat"
class="textbox" type="text" maxlength="255"
size="118" value="" />
</div>
<div id="messageCenter"></div>
<div id="chatControls">
<input id="submitButton" type="button" class="button"
value="Send"/>
<input id="quitButton" type="button" class="button"
value="Quit" />
</div>
</div>
<input type="hidden" id="username" name="username" value="
<?php print($_SESSION['username']); ?>" />
</form>
</div>
<body>
</html>
<?php
} else {
print('You must log in to participate in chat.'),
}
?>The first thing we must do is add events to our input controls so that they actually do something. We must capture two functions: sending text to the server and quitting the chat client. Here is an example of wiring up the controls:
/* call this when the page is done loading */
Event.observe(window, 'load', StartClient);

/**
 * This function, StartClient, adds events to controls on the page.
 */
function StartClient( ) {
    /* has the username been passed? */
    if ($F('username') != '') {
        Event.observe('loginForm', 'submit', SendMessage);
        Event.observe('submitButton', 'click', SendMessage);
        Event.observe('quitButton', 'click', QuitChat);
    }
}
As you may have noticed in the preceding code, we must create
two functions to handle the onsubmit and onclick events that will occur on the
client. These functions are SendMessage(
) and QuitChat(
):
/**
 * This function, SendMessage, sends the text taken from the text box to the
 * server to be inserted in the messages queue.
 *
 * @param {Object} e The event object that triggered this event.
 */
function SendMessage(e) {
    /* do not let the event continue beyond this point */
    Event.stop(e);
    var d = new Date( );
    /* make an Ajax request to the server with the new message */
    new Ajax.Request('put_message.php', {
        method: 'post',
        parameters: {
            username: $F('username'),
            message: $F('text2Chat'),
            lasttime: d.getTime( )
        },
        onSuccess: function(p_xhrResponse) {
            $('text2Chat').value = '';
            /* was the send unsuccessful? */
            if (p_xhrResponse.responseText != 1)
                new Insertion.Bottom('messageCenter',
                    '<p class="errorMessage">ERROR: Could not send message.</p>'),
        },
        onFailure: function( ) {
            $('text2Chat').value = '';
            new Insertion.Bottom('messageCenter',
                '<p class="errorMessage">ERROR: Could not send message.</p>'),
        }
    });
}

/**
 * This function, QuitChat, logs the passed /username/ off of the chat client.
 *
 * @param {object} e The event object that triggered this event */
 */
function QuitChat(e) {
    Event.stop(e);
    /*
     * Make an Ajax request to log the user out and take the user back to
     * the login page
     */
    new Ajax.Request('logout.php', {
        method: 'post',
        parameters: { username: $F('username') },
        onSuccess: function( ) {
            window.location = 'index.html';
        },
        onFailure: function( ) {
            window.location = 'index.html';
        }
    });
}
Now that we can send new messages to the server, we need to be
able to monitor the messages queue on the server and display new
messages as they arrive. Adding a couple of lines of JavaScript to
the StartClient( ) function will
start the listener:
/*
 * This variable, g_message, will control the interval for getting messages
 * from the server
 */
var g_message = 0;

/**
 * This function, StartClient, adds events to controls on the page.
 */
function StartClient( ) {
    /* has the username been passed? */
    if ($F('username') != '') {
        Event.observe('loginForm', 'submit', SendMessage);
        Event.observe('submitButton', 'click', SendMessage);
        Event.observe('quitButton', 'click', QuitChat);
        g_message = setInterval(AjaxDisplayMessages, 500);
    }
}
So far, we have the ability for a user to log in and see the main page of the chat client. On this page, the user may quit the application or send a message to the server so that other users can see it. What comes next is actually querying the server for messages based on the last message the client received. That way, users will only see new messages each time the Ajax request is made. The interval between calls is fast (half a second), and we certainly do not want the client stepping on its own toes, so making sure that only one request at a time happens is important as well. The code would look like this:
/* This variable, g_lastTime, keeps track of the last request for new messages */
var g_lastTime = 0;
/* This variable, g_onCall, tracks whether there already is a request going or not */
var g_onCall = false;

/**
 * This function, AjaxDisplayMessages, checks the server for messages it has
 * in queue since the last time it was queried and adds new messages to the top
 * of the message container.
 */
function AjaxDisplayMessages( ) {
    /* is there already a request going? */
    if (!g_onCall) {
        g_onCall = true;
        /* make a new request to the server for messages it has in its queue */
        new Ajax.Request('get_messages.php', {
            method: 'post',
            parameters: { username: $F('username'), lasttime: g_lastTime },
            onSuccess: function (p_xhrResponse) {
                /* put the new messages on top */
                new Insertion.Bottom('messageCenter', p_xhrResponse.responseText);
                var d = new Date( );
                /* change the time of the last request */
                g_lastTime = d.getTime( );
                g_onCall = false;
            },
            onFailure: function( ) {
                new Insertion.Bottom('messageCenter',
                    '<p class="errorMessage">ERROR: Could not retrieve messages.' +
                    '</p>'),
                g_onCall = false;

            }
        });
    }
}
Adding the following lines to the StartClient( ) function will allow the
client to track the current users:
new Ajax.PeriodicalUpdater('usernameContainer', 'get_users.php', {
    method: 'post',
    parameters: { username: $F('username') },
    frequency: .5
});
This should take care of everything for a simple chat client to work. Example 20-4 shows the chatting.js JavaScript file with everything in it.
Example 20-4. chatting.js: All of the JavaScript code necessary to run a simple Ajax chat client
/*
 * Example 20-4.  chatting.js: All of the JavaScript code necessary to run a
 * simple Ajax chat client
 */

/* call this when the page is done loading */
Event.observe(window, 'load', StartClient);

/*
 * This variable, g_message, will control the interval for getting messages
 * from the server
 */
var g_message = 0;

/**
 * This function, StartClient, adds events to controls on the page.
 */
function StartClient( ) {
    /* has the username been passed? */
    if ($F('username') != '') {
        Event.observe('loginForm', 'submit', SendMessage);
        Event.observe('submitButton', 'click', SendMessage);
        Event.observe('quitButton', 'click', QuitChat);
        new Ajax.PeriodicalUpdater('usernameContainer', 'get_users.php', {
            method: 'post',
            parameters: { username: $F('username') },
            frequency: .5
        });
        g_message = setInterval(AjaxDisplayMessages, 500);
    }
}

/* This variable, g_lastTime, keeps track of the last request for new messages */
var g_lastTime = 0;
/* This variable, g_onCall, tracks whether there already is a request going or not */
var g_onCall = false;

/**
 * This function, AjaxDisplayMessages, checks the server for messages it has
 * in queue since the last time it was queried and adds new messages to the top
 * of the message container.
 */
function AjaxDisplayMessages( ) {
    /* is there already a request going? */
    if (!g_onCall) {
        g_onCall = true;
        /* make a new request to the server for messages it has in its queue */
        new Ajax.Request('get_messages.php', {
            method: 'post',
            parameters: { username: $F('username'), lasttime: g_lastTime },
            onSuccess: function (p_xhrResponse) {
                /* put the new messages on top */
                new Insertion.Bottom('messageCenter', p_xhrResponse.responseText);
                var d = new Date( );
                /* change the time of the last request */
                g_lastTime = d.getTime( );
                g_onCall = false;
            },
            onFailure: function( ) {
                new Insertion.Bottom('messageCenter',
                    '<p class="errorMessage">ERROR: Could not retrieve messages.' +
                    '</p>'),
                g_onCall = false;
            }
        });
    }
}

/**
 * This function, SendMessage, sends the text taken from the text box to
 * the server to be inserted in the messages queue.
 *
 * @param {Object} e The event object that triggered this event.
 */
function SendMessage(e) {
    /* do not let the event continue beyond this point */
    Event.stop(e);
    var d = new Date( );
    /* make an Ajax request to the server with the new message */
    new Ajax.Request('put_message.php', {
        method: 'post',
        parameters: {
            username: $F('username'),
            message: $F('text2Chat'),
            lasttime: d.getTime( )
        },
        onSuccess: function(p_xhrResponse) {
            $('text2Chat').value = '';
            /* was the send unsuccessful? */
            if (p_xhrResponse.responseText != 1)
                new Insertion.Bottom('messageCenter',
                    '<p class="errorMessage">ERROR: Could not send message.' +
                    '</p>'),
        },
        onFailure: function( ) {
            $('text2Chat').value = '';
            new Insertion.Bottom('messageCenter',
                '<p class="errorMessage">ERROR: Could not send message.</p>'),
        }
    });
}

/**
 * This function, QuitChat, logs the passed /username/ off of the chat client.
 *
 * @param {Object} e The event object that triggered this event */
 */
function QuitChat(e) {
    Event.stop(e);
    /*
     * Make an Ajax request to log the user out and take the user back to
     * the login page
     */
    new Ajax.Request('logout.php', {
        method: 'post',
        parameters: { username: $F('username') },
        onSuccess: function( ) {
            window.location = 'index.html';
        },
        onFailure: function( ) {
            window.location = 'index.html';
        }
    });
}We have defined what the client needs to do and send, and now we must code the server side of the Ajax chat server to respond to the client’s requests. I already discussed the server’s login duties, so I think the first duty to discuss now is that of logging out of the chat client. An Ajax request to the page logout.php is written for when the user clicks the Quit button. Example 20-5 shows what this page looks like.
Example 20-5. logout.php: The file that is called when the user wishes to log off the chat client
<?php
/*
 * Example 20-5. logout.php: The file that is called when the user wishes to
 * log off the chat client.
 */

/* Make sure that we capture the session variables passed to us */
session_start( );

require_once('db.inc'),

/* Was a username passed to the file? */
if (isset($_REQUEST['username'])) {
    /* Can we connect to the MySQL server? */
    if ($conn = @mysql_connect(DB_SERVER, DB_USER, DB_PASS)) {
        /* Can we connect to the correct database? */
        if (@mysql_select_db(DB_NAME, $conn)) {
            /* Delete the username from the database */
            $sql = sprintf('DELETE FROM users WHERE username = %s;',
                quote_smart($_REQUEST['username']));
            @mysql_query($sql);
            /* Clear the session */
            unset($_REQUEST['username']));
            print(1);
        } else
            print(0);
        /* Close the server connection */
        @mysql_close($conn);
    } else
        print(0);
} else
    print('0'),
?>
This code is pretty self-explanatory, though I am introducing
a little function to take care of quote issues with SQL injection
attacks with the function quote_smart(
). The function looks like this:
<?php
/**
 * This function, quote_smart, tries to ensure that a SQL injection attack
 * cannot occur.
 *
 * @param {string} $p_value The string to quote correctly.
 * @return string The properly quoted string.
 */
function quote_smart($p_value) {
    /* Are magic quotes on? */
    if (get_magic_quotes_gpc( ))
        $p_value = stripslashes($p_value);
    /* Is the value a string to quote? */
    if (!is_numeric($p_value) || $p_value[0] == '0')
        $p_value = "'".mysql_real_escape_string($p_value)."'";
    return ($p_value);
}
?>
The quote_smart( ) function
I am using is one of many variants available on the Web from which
you can choose. Just remember to protect your SQL from
attacks.
The next bit of functionality that the server must be able to handle is receiving new text to place in the messages queue on the server. As you will remember, the Ajax request is to the PHP file put_message.php, and it passes the username, the message to be queued, and the time the message is made. Example 20-6 shows the code that handles a request to add a message to the server queue.
Example 20-6. put_message.php: The PHP file that handles a request from the client and puts it in the server queue
<?php
/*
 * Example 20-6. put_message.php: The PHP file that handles a request from the
 * client and puts it in the server queue.
 */

/* Make sure that we capture the session variables passed to us */
session_start( );

require_once('db.inc'),

/* Did we get everything that we expected? */
if (isset($_REQUEST['username']) && isset($_REQUEST['message']) &&
        isset($_REQUEST['lasttime']))
    /* Can we connect to the MySQL server? */
    if ($conn = @mysql_connect(DB_SERVER, DB_USER, DB_PASS)) {
        /* Can we connect to the correct database? */
        if (@mysql_select_db(DB_NAME, $conn)) {
            $sql = sprintf('SELECT user_id FROM users WHERE username = %s;',
                quote_smart($_REQUEST['username']));
            $user_id = -1;
            /* Did we get a result? */
            if ($result = @mysql_query($sql)) {
                /* Did we successfully get a row? */
                if ($row = @mysql_fetch_assoc($result))
                    $user_id = $row['user_id'];
                @mysql_free_result($result);
            }
            /* Did we get a real /user_id/? */
            if ($user_id != -1) {
                $sql = sprintf('INSERT INTO messages (message, user_id, msg_dte) '
                    .'VALUES (%s, %s, %s);', quote_smart($_REQUEST['message']),
                    $user_id, $_REQUEST['lasttime']);
                @mysql_query($sql);
                print(1);
            } else
                print(0);
        } else
            print(0);
        /* Close the server connection */
        @mysql_close($conn);
    } else
        print(0);
else
    print(0);
?>
Getting messages queued and ready to be viewed should now be
behind us, on both the client and server sides of the application.
Our next job is to handle client requests for what is in the server
queue. Looking back at the client function AjaxDisplayMessages( ), you will see that
it makes a request to the PHP file get_messages.php. This file, shown in
Example 20-7, sends
the client anything in the queue after the date of the last request
by that client.
Example 20-7. get_messages.php: The PHP file that sends formatted data back to the client from the messages queue
<?php
/*
 * Example 20-7. get_messages.php: The PHP file that sends formatted data back
 * to the client from the messages queue.
 */

/* Make sure that we capture the session variables passed to us */
session_start( );

require_once('db.inc'),

/* Did we get everything we expected? */
if (isset($_REQUEST['username']) && isset($_REQUEST['lasttime']))
    /* Can we connect to the MySQL server? */
    if ($conn = @mysql_connect(DB_SERVER, DB_USER, DB_PASS)) {
        /* Can we connect to the correct database? */
        if (@mysql_select_db(DB_NAME, $conn)) {
            /* Get rid of anything too old in the queue */
            $sql = sprintf('DELETE FROM messages WHERE msg_dte < %s',
                ($_REQUEST['lasttime'] - 60000));
            @mysql_query($sql);
            $sql = sprintf('SELECT msg_dte, username, message FROM messages m '
                .'INNER JOIN users u ON m.user_id = u.user_id WHERE msg_dte >= '
                .'%s ORDER BY msg_dte DESC;', $_REQUEST['lasttime']);
            /* Are there any results? */
            if ($result = @mysql_query($sql)) {
                /* While there is data, loop... */
                while ($row = @mysql_fetch_assoc($result))
                    printf("<p%s>[%s] %s: %s</p>
", (($row['username'] ==
                        $_REQUEST['username']) ? ' class="usernameMe"' : ''),
                        $row['msg_dte'], $row['username'], $row['message']);
                @mysql_free_result($result);
            } else
                print(''),
        } else
            print(''),
        /* Close the server connection */
        @mysql_close($conn);
    } else
        print(''),
else
    print(''),
?>
The data coming back is formatted as valid XHTML so that all you need to do is insert it into the message container on the client, without any additional parsing. This is done to speed up the application in any little way possible.
The server must be able to handle one additional task, and
that is to give the client a list of current users logged on to the
Ajax chat application. I used the Prototype Ajax.PeriodicalUpdater( ) object for this
task on the client, which expects formatted data to be sent back to
it, ready to be inserted directly into a client container element.
Example 20-8 shows the
file get_users.php that the
object calls in the StartClient(
) function.
Example 20-8. get_users.php: The PHP file that gets a list of current users to send back to the client
<?php
/*
 * Example 20-8. get_users.php: The PHP file that gets a list of current users
 * to send back to the client.
 */

/* Make sure that we capture the session variables passed to us */
session_start( );

require_once('db.inc'),

/* Did a user request this information? */
if (isset($_REQUEST['username'])) {
    /* Can we connect to the MySQL server? */
    if ($conn = @mysql_connect(DB_SERVER, DB_USER, DB_PASS)) {
        /* Can we connect to the correct database? */
        if (@mysql_select_db(DB_NAME, $conn)) {
            $sql = 'SELECT username FROM users ORDER BY username ASC;';
            /* Are there any results? */
            if ($result = @mysql_query($sql)) {
                print('<ul>'),
                /* While there is data, loop... */
                while ($row = @mysql_fetch_assoc($result))
                    printf('<li%s>%s</li>', (($row['username'] ==
                        $_REQUEST['username']) ? ' class="usernameMe"' : ''),
                        $row['username']);
                print('</ul>'),
                /* Free the results */
                @mysql_free_result($result);
            } else
                print(''),
        } else
            print(''),
        /* Close the server connection */
        @mysql_close($conn);
    } else
        print(''),
} else
    print(''),
?>
That is all there is to a simple chat application. The resulting application looks something like Figure 20-5. I should warn you that this is by no means the most robust of applications, and you can do a lot to make it better. However, it does give you an idea of how to use Ajax to build a web application that is functional and portable.

An important method of communication between two remote locations is that of file sharing. A program is more valuable when it enables users to share files while in an existing web application. All other chatting platforms provide this, whether it is instant messaging (IM) through programs such as AOL or Yahoo!, or while using a GUI-based Internet relay chat (IRC) client. You can achieve something similar by using Ajax and a web browser.
Normally, the steps to send a file between users are as follows:
Select a file to share.
Alert the remote user to your intentions.
Wait for the remote user to accept.
Save the file through a direct connection between users.
That may be grossly simplified, but you get the general idea. To take the same actions in a browser is impossible. Steps 1-3 would be no different, but there is absolutely no way to directly connect two stateless browsers without the aid of a plug-in. Instead, we must take the file from the sender, store it somewhere temporarily, and then offer the link to the file as part of the acceptance step whereby the receiving user can download it. Simple enough, right?
As far as the client is concerned, sending a file is as simple
as using the <input> form
element with its attribute type
set to file. Because of security
issues, there is no way to programmatically send a file in the
background or asynchronously with Ajax. There must be a form
POST to the server. Because of
this, I recommend that the functionality for file sending happen in
a new window so that the existing application is not affected. Figure 20-6 shows an
example.
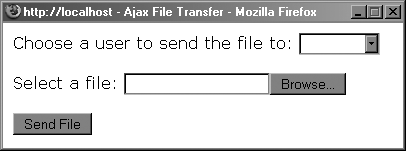
The user to whom the file should be sent needs to be passed with the form, as does the user doing the sending (even if this is hidden). The client will have more to do, but we will come back to that a little later. Example 20-9 shows the form needed for file transfer.
Example 20-9. send_form.php: The PHP file that creates the form needed to send a file to another user
<?php
/*
* Example 20-9. send_form.php: The PHP file that creates the form needed to
* send a file to another user.
*/
/* Make sure that we capture the session variables passed to us */
session_start( );
require_once('db.inc'),
?>
<!DOCTYPE html PUBLIC "-//W3C//DTD XHTML 1.1//EN"
"http://www.w3.org/TR/xhtml11/DTD/xhtml11.dtd">
<html xmlns="http://www.w3.org/1999/xhtml" xml:lang="en">
<head>
<title>Ajax File Transfer</title>
<meta http-equiv="content-type" content="text/html; charset=utf-8" />
</head>
<body>
<div id="contentWrapper">
<form id="transferForm" action="send_file.php" method="post">
<div id="formWrapper">
<label for="nptRecvname">
Choose a user to send the file to:
</label>
<select id="nptRecvname" name="nptRecvname">
<option value=""> </option>
<?php
/* Can we connect to the MySQL server? */
if ($conn = @mysql_connect(DB_SERVER, DB_USER, DB_PASS)) {
/* Can we connect to the correct database? */
if (@mysql_select_db(DB_NAME, $conn)) {
$sql = sprintf('SELECT * FROM users WHERE username <> %s',
quote_smart($_SESSION['username']));
/* Are there any results? */
if ($result = @mysql_query($sql)) {
/* While there is data, loop... */
while ($row = @mysql_fetch_assoc($result))
printf("<option value="%s">%s</option>
", $row['user_id'],
$row['username']);
@mysql_free_result($result);
} else
print(''),
} else
print(''),
/* Close the server connection */
@mysql_close($conn);
} else
print(''),
?>
</select>
<br /><br />
Select a file:
<input type="file" id="nptFile" name="nptFile" />
<br /><br />
<input type="hidden" id="nptUsername" name="nptUsername"
value="<?php print($_SESSION['username']); ?>" />
<script type="text/javascript">
//<![CDATA[
var d = new Date( );
document.writeln('<input type="hidden" id="nptLasttime"
name="nptLasttime" value="' + d.getTime( ) + '" />'),
//]]>
</script>
<input type="submit" class="button" value="Send File" />
</div>
</form>
</div>
<body>
</html>Turning our attention to the server and the page receiving the
form POST, our next step is to
save the file stream and alert the receiving user that there is
something to download. As with the basic chat application, it’s
easiest to do this by utilizing a MySQL database. Example 20-10 shows how to do
this with PHP. The who, what, and when should be saved for the
receiving client to read.
Example 20-10. send_file.php: The PHP file that will save the file to alert the receiving user
<?php
/*
 * Example 20-10. send_file.php: The PHP file that will save the file to alert
 * the receiving user.
 */

/* Make sure that we capture the session variables passed to us */
session_start( );

require_once('db.inc'),
?>
<!DOCTYPE html PUBLIC "-//W3C//DTD XHTML 1.1//EN"
    "http://www.w3.org/TR/xhtml11/DTD/xhtml11.dtd">
<html xmlns="http://www.w3.org/1999/xhtml" xml:lang="en">
    <head>
        <title>Ajax File Transfer</title>
        <meta http-equiv="content-type" content="text/html; charset=utf-8" />
    </head>
    <body>
        <div id="contentWrapper">
<?php
/* Did we get everything that we expected? */
if (isset($_REQUEST['nptUsername']) && isset($_REQUEST['nptRecvname'])
&& isset($_REQUEST['nptLasttime']) && is_uploaded_file($_FILES[
'nptFile']['tmp_name']))
    /* Can we connect to the MySQL server? */
    if ($conn = @mysql_connect(DB_SERVER, DB_USER, DB_PASS)) {
        /* Can we connect to the correct database? */
        if (@mysql_select_db(DB_NAME, $conn)) {
            $sql = sprintf('SELECT username FROM users WHERE username = %s;',
                $_REQUEST['nptRecvname']);
            $username = '';
            /* Did we get a result? */
            if ($result = @mysql_query($sql)) {
                /* Did we successfully get a row? */
                if ($row = @mysql_fetch_assoc($result))
                    $username = $row['username'];
                @mysql_free_result($result);
            }
            /* Did we get a real /user_id/? */
            if ($username != '') {
                $fileData = file_get_contents($_FILES['nptFile']['tmp_name']);
                $sql = sprintf('INSERT INTO messages (filename, file_data, '
                    .'user_id, file_dte, from_user) VALUES (%s, %s, %s, %s);',
                    quote_smart($_FILES['nptFile']['name']),
                    quote_smart($fileData), $_REQUEST['nptRecvname'],
                    $_REQUEST['nptLasttime'],
                    quote_smart($_REQUEST['nptUsername']));
                @mysql_query($sql);
                print('Contacting '.$username.'...'),
            } else
                print('There was a problem communicating with the user '
                    .$username.'.'),
        } else
            print('There was a problem communicating with the server.'),
        /* Close the server connection */
        @mysql_close($conn);
    } else
        print('There was a problem communicating with the server.'),
else
    print('There was a problem communicating with the server.'),
?>
        </div>
    <body>
</html>
There will be more to the sending client, but at this point, I will leave the file like this.
The receiving client has to be doing a check against the server to see whether anything is there to download. However, the priority for this need not be that great—anywhere from 5 to 10 seconds per check should suffice. The following code will make that check on the client side in the existing application:
/*
 * This variable, g_file, will control the interval for getting files from
 * the server
 */
var g_file = 0;

g_file = setInterval(AjaxDisplayFiles, 5000);

/* This variable, g_lastFileTime, keeps track of the last request for new files */
var g_lastFileTime = 0;
/*
 * This variable, g_onFileCall, tracks whether there already is a request going
 * or not
 */
var g_onFileCall = false;

/**
 * This function, AjaxDisplayFiles, checks the server for file notices it has in
 * queue since the last time it was queried and allows the user to download the
 * file if so desired.
 */
function AjaxDisplayFiles( ) {
    /* is there already a request going? */
    if (!g_onFileCall) {
        g_onFileCall = true;
        /* make a new request to the server for messages it has in its queue */
        new Ajax.Request('get_file_notices.php', {
            method: 'post',
            parameters: { username: $F('username'), lasttime: g_lastFileTime },
            onSuccess: function (p_xhrResponse, p_xhrJSON) {
                /* Was there a JSON response? */
                if (p_xhrJSON) {
                    var json = Object.inspect(p_xhrJSON);
                    var d = new Date( );

                    /* Should the file be downloaded? */
                    if (prompt(json[0] + ' wishes to send you file ' +
                            json[2] + '.  Receive file?')) {
                        var w_hnd = window.open('get_file.php?file_id=' +
                            json[1], '_blank'),
                    } else
                        new Ajax.Request('delete_file.php', {
                            method: 'post',
                            parameters: { file_id: json[1] }
                        });
                }
                /* change the time of the last request */
                g_lastFileTime = d.getTime( );
                g_onFileCall = false;
            },
            onFailure: function( ) {
                g_onFileCall = false;
            }
        });
    }
}
The JavaScript Object Notation (JSON) that is expected from the server is in the following format:
[
    '<user name>',
    file_id,
    '<file name>'
]
The user is prompted as to whether the file should be received when a JSON response is sent back to the client. Example 20-11 shows what the server code to handle the file queue looks like.
Example 20-11. get_file_notices.php: The PHP file that checks the file queue based on user and time and sends a JSON response when a file is being sent
<?php
/*
 * Example 20-11. get_file_notices.php: The PHP file that checks the file queue
 * based on user and time and sends a JSON response when a file is being sent.
 */

/* Make sure that we capture the session variables passed to us */
session_start( );

require_once('db.inc'),

/* Did we get everything we expected? */
if (isset($_REQUEST['username']) && isset($_REQUEST['lasttime']))
    /* Can we connect to the MySQL server? */
    if ($conn = @mysql_connect(DB_SERVER, DB_USER, DB_PASS)) {
        /* Can we connect to the correct database? */
        if (@mysql_select_db(DB_NAME, $conn)) {
            /* Get rid of anything too old in the queue */
            $sql = sprintf('DELETE FROM files WHERE file_dte < %s AND user_id = ',
                ($_REQUEST['lasttime'] - 60000), quote_smart($_REQUEST['username']));
            @mysql_query($sql);
            $sql = sprintf('SELECT from_user, file_id, filename FROM files f '
                .'INNER JOIN users u ON f.user_id = u.user_id WHERE msg_dte >= '
                .'%s AND f.user_id = %s ORDER BY msg_dte DESC;',
                $_REQUEST['lasttime'], quote_smart($_REQUEST['username']));
            /* Are there any results? */
            if ($result = @mysql_query($sql)) {
                /* Do we have a first result to send? */
                if ($row = @mysql_fetch_assoc($result))
                    printf("['%s', %s, '%s']", $row['from_user'], $row['file_id'],
                        $row['filename']);
                @mysql_free_result($result);
            } else
                print(''),
        } else
            print(''),
        /* Close the server connection */
        @mysql_close($conn);
    } else
        print(''),
else
    print(''),
?>Two things happen when the user elects to receive the file that is in the queue: the file is downloaded from the server, and the sending user is notified of what the receiving user elected to do. This is handled in one of two files: get_file.php or delete_file.php. The former file gives the sending user a positive response, whereas the latter file will alert the sending user of the rejection by the receiving user.
Example 20-12 shows how the server handles the get_file.php request. The server will recognize the request and stream the file to the browser after changing the headers of the response so that the browser is forced to save it to disk. Before it does this, though, it deletes the record from the queue. This will indicate to the sending user’s client that the file was transmitted.
Example 20-12. get_file.php: The PHP file that will send the transmitted file to the receiving user
<?php
/*
 * Example 20-12. get_file.php: The PHP file that will send the transmitted file
 * to the receiving user.
 */

/* Make sure that we capture the session variables passed to us */
session_start( );

require_once('db.inc'),

$filename = 'empty_file.txt';
$file = '';

/* Did we get everything we expected? */
if (isset($_REQUEST['file_id']))
    /* Can we connect to the MySQL server? */
    if ($conn = @mysql_connect(DB_SERVER, DB_USER, DB_PASS)) {
        /* Can we connect to the correct database? */
        if (@mysql_select_db(DB_NAME, $conn)) {
            $sql = 'SELECT filename, file_data FROM files WHERE file_id = '
                .'mysql_real_escape_string($_REQUEST['file_id']).';';
            /* Are there any results? */
            if ($result = @mysql_query($sql)) {
                /* Did we get a file? */
                if ($row = @mysql_fetch_assoc($result)) {
                    $filename = $row['filename'];
                    $file = $row['file_data'];
                }
                @mysql_free_result($result);
                /* Delete the record as the indicator */
                $sql = 'DELETE FROM files WHERE file_id = '
                    .$_REQUEST['file_id'].';';
                @mysql_query($sql);
            }
        }
        /* Close the server connection */
        @mysql_close($conn);
    }
header('Content-Type: application/octet-stream'),
header('Content-Length: '.strlen($file));
header('Content-Disposition: attachment; filename="'.$filename.'"'),
header('Content-Transfer-Encoding: binary'),
/* The following two lines are for IE bug fixes over SSL */
header('Pragma: public'),
header('Cache-Control: public, must-revalidate'),
print($file);
?>
On the other hand, if the user rejects the file transmission,
an Ajax call to delete_file.php
is placed. Example 20-13 shows what this
code looks like. Basically, delete_file.php must wipe out all the
data in the file except for the file_id itself. This will indicate to the
sending user’s client that the file was rejected.
Example 20-13. delete_file.php: The PHP file that will delete the data from the transmitted file record
<?php
/*
 * Example 20-13. delete_file.php: The PHP file that will delete the data from
 * the transmitted file record.
 */

/* Make sure that we capture the session variables passed to us */
session_start( );

require_once('db.inc'),

/* Did we get everything we expected? */
if (isset($_REQUEST['file_id']))
    /* Can we connect to the MySQL server? */
    if ($conn = @mysql_connect(DB_SERVER, DB_USER, DB_PASS)) {
        /* Can we connect to the correct database? */
        if (@mysql_select_db(DB_NAME, $conn)) {
                /* Set everything to NULL as the indicator */
                $sql = 'UPDATE files SET filename = NULL, file_data = NULL, '
                    .'user_id = NULL, file_dte = NULL, from_user = NULL WHERE'
                    .' file_id = '.$_REQUEST['file_id'].';';
                @mysql_query($sql);
            }
        }
        /* Close the server connection */
        @mysql_close($conn);
    }
?>
A small change to the code from Example 20-10 will allow the sending user’s client to monitor for the receiving indicator:
            /* Did we get a real /user_id/? */
            if ($username != '') {
                $fileData = file_get_contents($_FILES['nptFile']['tmp_name']);
                $sql = sprintf('INSERT INTO messages (filename, file, user_id, '
                    .'file_dte, from) VALUES (%s, %s, %s, %s);',
                    quote_smart($_FILES['nptFile']['name']),
                    quote_smart($fileData), $_REQUEST['nptRecvname'],
                    $_REQUEST['nptLasttime'],
                    quote_smart($_REQUEST['nptUsername']));
                @mysql_query($sql);
                $sql = sprintf('SELECT file_id FROM files WHERE filename = %s '
                    .'AND user_id = %s AND file_dte = %s AND from = %s;',
                    quote_smart($_FILES['nptFile']['name']),
                    $_REQUEST['nptRecvname'], $_REQUEST['nptLasttime'],
                    quote_smart($_REQUEST['nptUsername']));
                $file_id = -1;
                /* Did we get a result? */
                if ($result = @mysql_query($sql)) {
                    /* Did we successfully get a row? */
                    if ($row = @mysql_fetch_assoc($result))
                        $file_id = $row['file_id'];
                    @mysql_free_result($result);
                }
                print('[' + $file_id + ', "Contacting '.$username.'..."]'),
            } else
                print('There was a problem communicating with the user '.
                    $username.'.'),
This edit requires that the sending user’s client set the
passed file_id to a variable to
be used in monitoring the receiving user’s response. Finally, the
sending user’s client needs to have the Ajax that will monitor for
the indicator. The following shows what this could look like:
/*
 * This variable, g_check_file, will control the interval for checking files
 * from the server
 */
var g_check_file = 0;

g_check_file = setInterval(AjaxCheckFiles, 5000);

/*
 * This variable, g_onCheckFileCall, tracks whether there already is a request
 * going or not
 */
var g_onCheckFileCall = false;
/*
 * This variable, g_fileID, is the file_id of the file trying to be sent, and is
 * set elsewhere
 */
var g_fileID = -1;

/**
 * This function, AjaxCheckFiles, checks the server for the file associated
 * with the passed /file_id/ since the last time it was queried and alerts the
 * sending user of the results.
 */
function AjaxCheckFiles( ) {
    /* Is there already a request going? */
    if (!g_onCheckFileCall) {
        g_onCheckFileCall = true;
        /* Make a new request to the server for messages it has in its queue */
        new Ajax.Request('check_file.php', {
            method: 'post',
            parameters: { file_id: g_fileID },
            onSuccess: function (p_xhrResponse) {
                    /* Is the data still waiting to be downloaded? */
                    if (p_xhrResponse == '1')
                        $('contentWrapper').innerHTML = 'Waiting for a response.';
                    /* Is the data all NULLed out? */
                    else if (p_xhrResponse == '0')
                        $('contentWrapper').innerHTML = 'The request was rejected.';
                    /* Is the data gone, or did the connection flop? */
                    else if (p_xhrResponse == '-1')
                        $('contentWrapper').innerHTML = 'Transfer complete.';
                }
                g_onCheckFileCall = false;
            },
            onFailure: function( ) {
                g_onCheckFileCall = false;
            }
        });
    }
}
The file that is sent an Ajax request, check_file.php, checks to see whether the record is there and what it looks like. A simple response is all that is needed to notify the client of the receiving user’s choice. Example 20-14 shows what is necessary to complete this task.
Example 20-14. check-file.php: The PHP file that checks the indicator for the sending user and gives the response
<?php
/*
 * Example 20-14. check-file.php: The PHP file that checks the indicator for
 * the sending user and gives the response.
 */

/* Make sure that we capture the session variables passed to us */
session_start( );

require_once('db.inc'),

/* Did we get everything we expected? */
if (isset($_REQUEST['file_id']))
    /* Can we connect to the MySQL server? */
    if ($conn = @mysql_connect(DB_SERVER, DB_USER, DB_PASS)) {
        /* Can we connect to the correct database? */
        if (@mysql_select_db(DB_NAME, $conn)) {
            $sql = 'SELECT * FROM files WHERE file_id = '.$_REQUEST['file_id'].';';
            /* Are there any results? */
            if ($result = @mysql_query($sql)) {
                /* Did we get a file? */
                if ($row = @mysql_fetch_assoc($result)) {
                    $filename = $row['filename'];
                    $file = $row['file_data'];
                    $user_id = $row['user_id'];
                    $file_dte = $row['file_dte'];
                    $from = $row['from_user'];
                    /* Is there data in the record? */
                    if ($filename == null && $file == null &&
                            $user_id == null && $file_dte == null && $from == null)
                        print(0);
                    else
                        print(1);
                } else
                    print(0);
                @mysql_free_result($result);
            } else
                print(-1);
        } else
            print(-1);
        /* Close the server connection */
        @mysql_close($conn);
    } else
        print(-1);
else
    print(-1);
?>
It’s as “simple” as that; now an existing application can do file sharing using Ajax, with minimal modifications. Keeping the components more modular allows for easier adoption of these new functionalities in existing web applications.
A popular meeting room device is a whiteboard, a surface on which markings can be made and then erased. Ideas can be written down, diagrams can be drawn, and good communication can be had by all parties involved. This is harder to achieve with online meetings that lack this sort of device. Fortunately, you can build a whiteboard with a little work and a whole lot of Ajax. OK, maybe no more Ajax than is required with the chat or file transfer application, as the basic principle behind the whiteboard is the same.
The objective is to mimic, for everyone in the meeting, whatever the current board user is doing. In the most basic scenario, this entails capturing all of the user’s mouse movements by their x/y pairs, and sending them to all users when it is convenient (i.e., whenever the user stops drawing for a moment).
We need to start with the board, which is nothing more than a
container <div> element
that has its width and height defined, and is topmost in regard
to all other elements with which it can interact. What does this
mean? Simply:
<body>
    <div id="bodyWrapper">
        <!-- All content goes here -->
        .
        .
        .
        <div id="whiteBoard"></div>
    </div>
</body>
Here, the canvas <div> element with an id of whiteBoard is the last element within the
bodyWrapper for the page. This
ensures that it will be topmost with regard to every other element
on the page.
Now, I could take the time to write an object to draw onto this board (or canvas). However, I never want to reinvent the wheel if I do not have to, and in this case I doubt I could build a better object than what is already out there.
Walter Zorn’s jsGraphics
library is the best JavaScript library available for drawing
vector-based graphics in a browser. Sure, you could build the same
thing with plug-ins, and it could run more smoothly, but doing so
defeats the purpose of this book. So, we will use Walter Zorn’s
library for adding all the drawing functionality to the screen.
You include this library in an application with the following line
of code:
<script type="text/javascript" src="include/js/wz_jsgraphics.js"> </script>
The Prototype Framework provides a simple way to trap mouse
coordinates in a trapped event by using the methods pointerX( ) and pointerY( ) in the Event object. First, however, we must
trap the event, like so:
Event.observe(window, 'load', function( ) {
    /* Set up events to trap mouse events that occur on the /whiteBoard/ */
    Event.observe('whiteBoard', 'mousedown', StartDrawing);
    Event.observe('whiteBoard', 'mouseup', StopDrawing);
});
We need to trap three events for drawing on the canvas:
mousedown to begin drawing,
mousemove to continue drawing,
and mouseup to stop drawing. We
should trap the start and stop events at the same time, as the
previous code shows; we need to capture and then not capture the
continue drawing event based on the start and stop of the draw
event. Example 20-15
should give you a better idea of what I mean.
Example 20-15. whiteboard.js: Constructing the necessary code to build a whiteboard with JavaScript
/**
 * This variable, POINT_SIZE, is the size of the pen drawing on the canvas.
 */
var POINT_SIZE = 1;
/**
 * This variable, POINT_COLOR, is the color of the pen drawing on the canvas.
 */
var POINT_COLOR = '#f00';

/**
 * This variable, whiteBoard, will be the instantiation of the jsGraphics class.
 */
var whiteBoard = null;

/* Do all this when the page is done loading... */
Event.observe(window, 'load', function( ) {
    /* Create a new canvas to use for the whiteboard */
    whiteBoard = new jsGraphics('whiteBoard'),
    /* Set the initial color of the pen */
    whiteBoard.setColor(POINT_COLOR);
    /* Set the initial size of the pen */
    whiteBoard.setStroke(POINT_SIZE);
    /* Set up events to trap mouse events that occur on the /whiteBoard/ */
    Event.observe('whiteBoard', 'mousedown', StartDrawing);
    Event.observe('whiteBoard', 'mouseup', StopDrawing);
});

/**
 * This function, StartDrawing, is called whenever there is a /mousedown/
 * event on the whiteboard, and starts drawing on the canvas.
 *
 * @param {Object} e The current trapped event.
 */
function StartDrawing(e) {
    /* Did the event actually happen on the whiteboard? */
    if (Event.element(e).id == 'whiteBoard')
        DrawPoint(Event.pointerX(e), Event.pointerY(e));
    Event.observe('whiteBoard', 'mousemove', ContinueDrawing);
}

/**
 * This function, StopDrawing, is called whenever there is a /mouseup/
 * event on the whiteboard, and stops all drawing on the canvas.
 *
 * @param {Object} e The current trapped event.
 */
function StopDrawing(e) {
    /* Stop observing /mousemove/ on the board and reset the last coordinates */
    Event.stopObserving('whiteBoard', 'mousemove', ContinueDrawing);
    lastPointX = -1;
    lastPointY = -1;
}

/**
 * This function, ContinueDrawing, is called as long as there is a
 * /mousemove/ event on the whiteboard, and draws on the canvas.
 *
 * @param {Object} e The current trapped event.
 */
function ContinueDrawing(e) {
    /* Did the event actually happen on the whiteboard? */
    if (Event.element(e).id == 'whiteBoard')
        DrawPoint(Event.pointerX(e), Event.pointerY(e));
}
The only function that I left off is the one for actually drawing on the canvas, which I want to explore in more detail now.
A couple of steps are involved with drawing on the canvas:
the first is drawing the line between the coordinates, and the
second is actually rendering, or painting, the line. The jsGraphics library uses the method
drawLine( ) to set the line on
the canvas. It then uses the paint(
) method to render the line so that it is visible on the
canvas. Using these steps, the DrawPoint(
) method referenced in Example 20-15 looks like the
following:
/**
 * This variable, X_OFFSET, is to act as the constant x-offset value of the
 * whiteboard.
 */
var X_OFFSET = 10;
/**
 * This variable, Y_OFFSET, is to act as the constant y-offset value of the
 * whiteboard.
 */
var Y_OFFSET = 10;

/**
 * This variable, lastPointX, holds the last mouse event X-coordinate on the
 * whiteboard.
 */
var lastPointX = -1;
/**
 * This variable, lastPointY, holds the last mouse event Y-coordinate on the
 * whiteboard.
 */
var lastPointY = -1;

/**
 * This function, DrawPoint, draws the lines on the whiteboard as the mouse
 * interacts with it.  It takes into consideration all offsets for canvas
 * position, and sets the last coordinates for the next line.
 *
 * @param {Integer} p_x The x-coordinate of the mouse event.
 * @param {Integer} p_y The y-coordinate of the mouse event.
 */
function DrawPoint(p_x, p_y) {
    /* Take offsets into consideration */
    p_x = p_x - (X_OFFSET + POINT_SIZE);
    p_y = p_y - (Y_OFFSET + POINT_SIZE);
    /* Is this the beginning of a new drawing sequence? */
    if (lastPointX == -1 || lastPointY == -1) {
        lastPointX = p_x;
        lastPointY = p_y;
    }
    /* Draw the line */
    whiteBoard.drawLine(p_x, p_y, lastPointX, lastPointY);
    /* Display the line */
    whiteBoard.paint( );
    /* Set the last coordinates to the current coordinates */
    lastPointX = p_x;
    lastPointY = p_y;
}
You will notice that the points are shifted so that they are
rendered on the coordinates that are really wanted. The jsGraphics library renders points
relative to the designated canvas, so the shift is necessary for
the coordinates to be placed where they are expected to be. This
is because mouse events are trapped absolutely on the page, not
relative to a particular object.
Warning
The two easiest mistakes developers can make while using
Walter Zorn’s library are to forget to call the paint( ) method to render the
graphics, and not to shift trapped coordinates relative to the
position of the canvas.
We now have a working version of the whiteboard, as you can
see in Figure 20-7, but
until we can have what is rendered on one user’s screen replicated
on all other users’ screens, this still is not very useful. Points
need to be collected as they are drawn so that every chance the
application has, the points can be asynchronously sent to a server
to wait for other users to download them. The easiest time to send
coordinates is every time the drawing user lifts her pen (every
mouseup event).

We need to create a new function, SavePoints( ), and call it whenever the
drawing user creates a new point. The following shows the necessary
additions to Example 20-15
to collect points so that they are ready to be sent to the
server:
/**
 * This variable, savedPoints, holds the collected points until they are
 * sent to the server, whereby the variable is set back to null.
 */
var savedPoints = null;

    .
    .
    .

/**
 * This function, DrawPoint, draws the lines on the whiteboard as the mouse
 * interacts with it.  It takes into consideration all offsets for canvas
 * position, and sets the last coordinates for the next line.
 *
 * @param {Integer} p_x The x-coordinate of the mouse event.
 * @param {Integer} p_y The y-coordinate of the mouse event.
 */
function DrawPoint(p_x, p_y) {
    /* Take offsets into consideration */
    p_x = p_x - (X_OFFSET + POINT_SIZE);
    p_y = p_y - (Y_OFFSET + POINT_SIZE);
    SavePoints(p_x, p_y);
    /* Is this the beginning of a new drawing sequence? */
    if (lastPointX == -1 || lastPointY == -1) {
        lastPointX = p_x;
        lastPointY = p_y;
    }
    /* Draw the line */
    whiteBoard.drawLine(p_x, p_y, lastPointX, lastPointY);
    /* Display the line */
    whiteBoard.paint( );
    /* Set the last coordinates to the current coordinates */
    lastPointX = p_x;
    lastPointY = p_y;
}

/**
 * This function, SavePoints, saves the points that are drawn on into a
 * string that will become a JSON response for the other clients.
 *
 * @param {Integer} p_x The x-coordinate to save.
 * @param {Integer} p_y The y-coordinate to save.
 */
function SavePoints(p_x, p_y) {
    /* Is this a new save string? */
    if (savedPoints != null)
        savedPoints += ';';
    /* Save them as an x-y pair in an array */
    savedPoints += p_x + ',' + p_y;
}
As I said previously, when the drawing user stops drawing,
the points should be sent to the server for storage until the
other users request them. A call to a new function, SendPoints( ), will handle this
functionality. It must be called in the StopDrawing( ) function:
/**
 * This function, StopDrawing, is called whenever there is a /mouseup/ event on
 * the whiteboard, and stops all drawing on the canvas.
 *
 * @param {Object} e The current trapped event.
 */
function StopDrawing(e) {
    /* Stop observing /mousemove/ on the board and reset the last coordinates */
    Event.stopObserving('whiteBoard', 'mousemove', ContinueDrawing);
    lastPointX = -1;
    lastPointY = -1;
    savedPoints += ']';
    SendPoints( );
}

    .
    .
    .

/**
 * This function, SendPoints, makes an Ajax request to the server so that the
 * string of points can be saved for the other clients to download.  The color
 * and size of the pen are also sent along.
 *
 * @param {String} p_points The string of points that is to be saved. (Optional)
 */
function SendPoints(p_points) {
    /*
     * Were any points sent to the function? If not, use the /savedPoints/
     * from now on
     */
    if (!p_points) {
        p_points = savedPoints;
        savedPoints = null;
    }

    var d = new Date( );

    /* Send off the points for others to download */
    new Ajax.Request('record_points.php', {
        method: 'post',
        parameters: {
            username: $F('username'),
            color: POINT_COLOR,
            size: POINT_SIZE,
            points: p_points,
            lasttime: d.getTime( ) },
        onFailure: function(p_xhrResponse) {
            /* Send the points again if they did not go through */
            SendPoints(p_points);
        }
    });
}
Like the chat and file sharing applications, the whiteboard will save the coordinates and other necessary information, along with a timestamp to be used by the clients. The record_points.php file will store the data in a SQL database, shown in Example 20-16.
Example 20-16. record_points.php: The PHP file that will handle recording coordinates into the database for use by other clients
<?php
/*
 * Example 20-16. record_points.php: The PHP file that will handle recording
 * coordinates into the database for use by other clients.
 */

/* Make sure that we capture the session variables passed to us */
session_start( );

require_once('db.inc'),

/* Did we get everything that we expected? */
if (isset($_REQUEST['username']) && isset($_REQUEST['color']) &&
        isset($_REQUEST['size']) && isset($_REQUEST['points']) &&
        isset($_REQUEST['lasttime']))
    /* Can we connect to the MySQL server? */
    if ($conn = @mysql_connect(DB_SERVER, DB_USER, DB_PASS)) {
        /* Can we connect to the correct database? */
        if (@mysql_select_db(DB_NAME, $conn)) {
            $sql = sprintf('SELECT user_id FROM users WHERE username = %s;',
                quote_smart($_REQUEST['username']));
            $user_id = -1;
            /* Did we get a result? */
            if ($result = @mysql_query($sql)) {
                /* Did we successfully get a row? */
                if ($row = @mysql_fetch_assoc($result))
                    $user_id = $row['user_id'];
                @mysql_free_result($result);
            }
            /* Did we get a real /user_id/? */
            if ($user_id != -1) {
                $sql = sprintf('INSERT INTO points (points, color, size, '
                    .'user_id, pts_dte) VALUES (%s, %s, %s, %s, %s);',
                    quote_smart($_REQUEST['points']),
                    quote_smart($_REQUEST['color']),
                    quote_smart($_REQUEST['size']), $user_id,
                    $_REQUEST['lasttime']);
                @mysql_query($sql);
            }
        }
        /* Close the server connection */
        @mysql_close($conn);
    }
?>All of the whiteboard clients must check the database to see
whether there is anything to draw onto the individual canvases. On
the loading of the client page, a timer should be set to check
with the server, and update as necessary. A function called
UpdateCanvas( ) will do this
job, as shown in the following code:
/*
 * This variable, g_points, will control the interval for getting points
 * from the server
 */
var g_points = 0;

Event.observe(window, 'load', function( ) {
    g_points = setInterval(UpdateCanvas, 1000);
});

/* This variable, g_lastPointsTime, keeps track of the last request for new points */
var g_lastPointsTime = 0;
/*
 * This variable, g_onPointsCall, tracks whether there already is a request
 * going or not
 */
var g_onPointsCall = false;

/**
 * This function, UpdateCanvas, makes a request for new points, and sends the
 * results to be drawn onto the client's canvas.
 */
function UpdateCanvas( ) {
    /* is there already a request going? */
    if (!g_onPointsCall) {
        g_onPointsCall = true;
        /* make a new request to the server for points it has in its queue */
        new Ajax.Request('get_points.php', {
            method: 'post',
            parameters: { username: $F('username'), lasttime: g_lastTime },
            onSuccess: function (p_xhrResponse) {
                var JSON = eval(p_xhrResponse.responseText);

                /* did we get a JSON response from the server? */
                if (JSON)
                    /* draw what is necessary on the canvas */
                    DrawCanvasUpdate(JSON);
                var d = new Date( );
                /* change the time of the last request */
                g_lastPointsTime = d.getTime( );
                g_onPointsCall = false;
            },
            onFailure: function( ) {
                g_onPointsCall = false;

            }
        });
    }
}
This code will get a JSON response from the server
containing either points or nothing at all. These points will be
drawn in the function DrawCanvasUpdate(
), which will draw all of the points in the specified
color, and then return the canvas to a ready state for the user to
use it. The following shows how this function will be
built:
/**
 * This function, DrawCanvasUpdate, takes the passed /p_xhrJSON/ and uses it
 * to draw all of the necessary lines on the canvas.
 *
 * @param {Object} p_xhrJSON The object that has all of the information
 *     needed to draw.
 */
function DrawCanvasUpdate(p_JSON) {
    for (var i = 0, il = p_JSON.length; i < il; i++) {
        /* was a color set? */
        if (p_JSON[i].color)
            whiteBoard.setColor(p_JSON[i].color);
        /* was a size set? */
        if (p_JSON[i].size)
            whiteBoard.setStroke(p_JSON[i].size);
        /* loop through any points sent */
        for (var j = 0, jl = p_JSON[i].points.length; j < jl; j++)
            /* is this the first point? */
            if (!j)
                whiteBoard.drawLine(p_JSON[i].points[j][0],
                    p_JSON[i].points[j][1], p_JSON[i].points[j][0],
                    p_JSON[i].points[j][1]);
            else
                whiteBoard.drawLine(p_JSON[i].points[j - 1][0],
                    p_JSON[i].points[j - 1][1], p_JSON[i].points[j][0],
                    p_JSON[i].points[j][1]);
    }
    whiteBoard.paint( );
}
On the server side, the PHP file, get_points.php, sends the necessary information to the clients, and cleans up after itself once data has been in the database for too long. Example 20-17 gives you an idea of how to send the JSON to the client so that it is more easily consumed.
Example 20-17. get_points.php: The PHP file that creates the JSON to send to the clients upon request
<?php
/*
 * Example 20-17. get_points.php: The PHP file that creates the JSON to send
 * to the clients upon request.
 */

/* Make sure that we capture the session variables passed to us */
session_start( );

require_once('db.inc'),

$output = '';

/* Did we get everything we expected? */
if (isset($_REQUEST['username']) && isset($_REQUEST['lasttime']))
    /* Can we connect to the MySQL server? */
    if ($conn = @mysql_connect(DB_SERVER, DB_USER, DB_PASS)) {
        /* Can we connect to the correct database? */
        if (@mysql_select_db(DB_NAME, $conn)) {
            /* Get rid of anything too old in the queue */
            $sql = sprintf('DELETE FROM points WHERE pts_dte < %s',
                ($_REQUEST['lasttime'] - 60000));
            @mysql_query($sql);
            $sql = sprintf('SELECT pts_dte, color, size, points FROM points p '
                .'INNER JOIN users u ON p.user_id = u.user_id WHERE pts_dte >= '
                .'%s AND u.username <> %s ORDER BY msg_dte DESC;',
                $_REQUEST['lasttime'], quote_smart($_REQUEST['username']));
            /* Are there any results? */
            if ($result = @mysql_query($sql)) {
                $output = '[';
                /* While there is data, loop... */
                while ($row = @mysql_fetch_assoc($result)) {
                    $output .= sprintf("{ color: '%s', size: %s, points: {",
                        $row['color'], $row['size']);
                    $points = split(';', $row['points']);
                    /* Loop through the individual points */
                    for ($i = 0, $il = count($points); $i < $il; $i++) {
                        /* Is this not the first point */
                        if ($i)
                            $output .= ',';
                        $output .= '['.$points[$i].']';
                    }
                    $output .= '}';
                    $output .= '}';
                }
                @mysql_free_result($result);
            }
        }
        /* Close the server connection */
        @mysql_close($conn);
    }
print($output);
?>
Once this is running on the client, we can add further enhancements to make the board more functional, but the basics are there. One good idea might be to set it so that only one user at a time can actually draw on the board, while the other clients merely update what is drawn.
I did not go into any detail regarding enhancements to the chat client and the file transfer, and instead left it up to you to decide how best to improve them. However, there are a couple of easy additions you can make to the whiteboard clients to enhance their functionality without much work. These are:
Choice of pen color
Stamps and shapes
Enabling the user to change the pen color is a quick and easy enhancement to implement on the client. After all, the pen color is already being recorded and sent with every server update, so adding the ability to change this at will creates no extra work for us—well, except for presenting the choices to the user. It is up to you how to go about this, whether fixed choices are hardcoded onto the client and presented as buttons, as shown in Figure 20-8, or whether they are presented as a color wheel, as shown in Figure 20-9.

The XHTML to create the option in Figure 20-8 follows.
<div id="stamp">
    <form id="stampForm" action="self" method="post">
        <input type="button" class="button black" value="Black"
            onclick="SetColor('#000'), return false;" />
        <input type="button" class="button blue" value="Blue"
            onclick="SetColor('#00a'), return false;" />
        <input type="button" class="button green" value="Green"
            onclick="SetColor('#0a0'), return false;" />
        <input type="button" class="button cyan" value="Cyan"
            onclick="SetColor('#0aa'), return false;" />
        <input type="button" class="button red" value="Red"
            onclick="SetColor('#a00'), return false;" />
        <input type="button" class="button magenta" value="Magenta"
            onclick="SetColor('#a0a'), return false;" />
        <input type="button" class="button brown" value="Brown"
            onclick="SetColor('#a50'), return false;" />
        <input type="button" class="button lightGrey" value="LightGrey"
            onclick="SetColor('#aaa'), return false;" />
        <br /><br />
        <input type="button" class="button darkGrey" value="DarkGrey"
            onclick="SetColor('#555'), return false;" />
        <input type="button" class="button brightBlue" value="BrightBlue"
            onclick="SetColor('#55f'), return false;" />
        <input type="button" class="button brightGreen" value="BrightGreen"
            onclick="SetColor('#5f5'), return false;" />
        <input type="button" class="button brightCyan" value="BrightCyan"
            onclick="SetColor('#5ff'), return false;" />
        <input type="button" class="button brightRed" value="BrightRed"
            onclick="SetColor('#f55'), return false;" />
        <input type="button" class="button brightMagenta" value="BrightMagenta"
            onclick="SetColor('#f5f'), return false;" />
        <input type="button" class="button yellow" value="Yellow"
            onclick="SetColor('#ff5'), return false;" />
        <input type="button" class="button white" value="White"
            onclick="SetColor('#fff'), return false;" />
    </form>
</div>
The CSS to change the color of each button is as follows:
br {
    line-height: .25em;
}

.button {
    font-family: Arial, Helvetica, sans-serif;
    font-size: 12px;
    font-weight: bold;
    width: 120px;
}

.black {
    background-color: #000; color: #fff;
}

.blue {
    background-color: #00a; color: #fff;
}

.green {
    background-color: #0a0; color: #fff;
}

.cyan {
    background-color: #0aa; color: #fff;
}

.red {
    background-color: #a00; color: #fff;
}

.magenta {
    background-color: #a0a; color: #fff;
}

.brown {
    background-color: #a50; color: #fff;
}

.lightGrey {
    background-color: #aaa; color: #000;
}

.darkGrey {
    background-color: #555; color: #fff;
}

.brightBlue {
    background-color: #55f; color: #fff;
}

.brightGreen {
    background-color: #5f5; color: #000;
}

.brightCyan {
    background-color: #5ff; color: #000;
}

.brightRed {
    background-color: #f55; color: #000;
}

.brightMagenta {
    background-color: #f5f; color: #000;
}

.yellow {
    background-color: #ff5; color: #000;
}

.white {
    background-color: #fff; color: #000;
}
For producing a color wheel, I recommend something like Jemima Chevron’s 4096 Color Wheel, information for which you can find at http://www.ficml.org/jemimap/style/color/index.php. Figure 20-9 shows what the wheel looks like on this site.

No matter which approach you take to present color choices
to the user, it is as simple as setting the new color with the
setColor( ) jsGraphics
method:
/**
 * This function, SetColor, sets the color of the /pen/ on the whiteboard to
 * the passed /p_color/.
 *
 * @param {String} p_color The color to set the /pen/ to.
 */
function SetColor(p_color) {
    /* Does a whiteBoard exist? */
    if (whiteBoard)
        whiteBoard.setColor(p_color);
}Creating stamps and shapes that are predefined for the
whiteboard is a little more complex, because now we must store
additional information in the server, telling all of the clients
what to draw. jsGraphics has
some prebuilt methods for drawing vector shapes that will make
this much easier. It is then up to the client to send the correct
drawing type to the server (something like LINES, CIRCLE,
etc.).
Some of the easiest methods are as follows:
drawRect( )orfillRect( )drawPolygon( )orfillPolygon( )drawEllipse( )orfillEllipse( )
With these methods, you can predefine stamps fairly easily. For example:
/**
 * This function, StampStar, creates a star-shaped polygon that will be
 * filled with the current active color at the clicked coordinates.
 *
 * @param {Integer} p_x The x-coordinate to start the stamp at.
 * @param {Integer} p_y The y-coordinate to start the stamp at.
 */
function StampStar(p_x, p_y) {
    /* Take offsets into consideration */
    var x = p_x - (X_OFFSET + POINT_SIZE);
    var y = p_y - (Y_OFFSET + POINT_SIZE);

    /* Draw the star */
    var arrX = new Array(x, (x + 10), (x + 44), (x + 17), (x + 28), x,
        (x - 28), (x - 17), (x - 44), (x - 10));
    var arrY = new Array(y, (y + 30), (y + 30), (y + 51), (y + 82), (y + 63),
        (y + 82), (y + 51), (y + 30), (y + 30));
    whiteBoard.fillPolygon(arrX, arrY);
    /* Display the star */
    whiteBoard.paint( );
}
Now there is a stamp for creating a filled star with its top point wherever the user clicks the mouse on the canvas. It’s easy to see how you can use this to create more complex stamps to place on the canvas, giving the whiteboard better functionality without a lot of effort.
Thus far, I have demonstrated three separate applications that you can build for business needs utilizing Ajax. Combining these individual applications into one complete application would make all of the individual functionalities that much better and ultimately give the user a better application.
There is no reason not to combine these applications—I built the code so that this is possible. All you’d need to change to make this work is the application’s structure. To give you an idea, Figure 20-10 demonstrates what it might look like having all of these applications combined.

Together or separate, these applications give business environments some of the functionality that’s needed when offices are separated by any distance (even floors). Instead of only phone conferencing, why not have the meeting online as well? Everyone would be able to participate through chat, share necessary files, and demonstrate abstract ideas through the use of a whiteboard. It would not take much to make this a business-class application with a Web 2.0 feel without the costs of a traditional desktop application.