In previous versions of Office, you could move toolbars, rearrange buttons, and even scramble the order of items in the main menu. Reckless customizers could transform Office applications so completely that no one else would be able to use their computers, and the instructions in books like this one would be useless.
Office 2007 clamps down on customization. Unless you’re willing to get your hands dirty with a serious programming language, the ribbon is off limits. Instead, Office lets you customize one tiny portion of screen real estate—the Quick Access toolbar. This appendix teaches you how to modify the Quick Access toolbar in all of the programs covered in this book: Word, Excel, PowerPoint, and Access.
This limitation might sound like a major one, but it’s actually a reasonable compromise. People who love to tweak and refine their workplaces (you know who you are) get to add all the timesaving shortcuts they need. Everyone else can relax. No matter what computer you’re working on, the ribbon is always there, with its comforting sameness and carefully organized tabs.
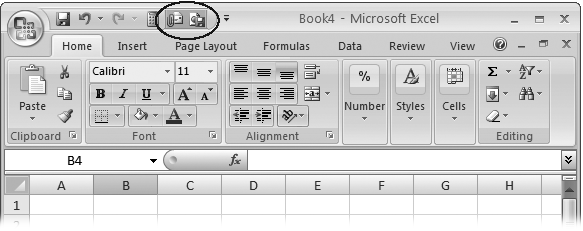
You’ve already seen the Quick Access toolbar (known to Office nerds as the QAT). It’s the micro-size toolbar that sits above the ribbon. The Quick Access toolbar has only icons, but you can hover over a button to get the full command text.
When you first start out with Office, the Quick Access toolbar is a lonely place, with buttons for quickly saving your file and undoing or redoing the last action. However, Microsoft gives you complete control over this space, including the ability to add new buttons. You can most quickly add stuff by clicking the downpointing arrow at the far right side. Figure A-1 shows how it works.
Note
If you don’t like Quick Access toolbar’s placement, Office gives you one other option. Click the drop-down arrow, and then choose “Show Below the Ribbon” to move your toolbar under the ribbon so your mouse has less distance to travel.
You might add buttons to the Quick Access toolbar for two reasons:
To make it easier to get to a command you use frequently. If it’s in the Quick Access toolbar, you don’t need to memorize a keyboard shortcut or change the current ribbon tab.
To get to a command that the ribbon doesn’t provide. Office has a small set of unpopular commands that it lets you use, but that it doesn’t keep in the ribbon. Many of these commands are holdovers from previous versions of Office. If you have a long-lost favorite feature that’s missing, it just might be available via the Quick Access toolbar’s extra buttons.
Keyboard lovers can also trigger the commands in the Quick Access toolbar with lightning speed thanks to Office’s keytips feature ( Using the Ribbon with the Keyboard). When you press the Alt key, Office displays a number superimposed over every command in the Quick Access toolbar (starting at 1 and going up from there). You can then press the number to trigger the command. So in the Quick Access toolbar shown in Figure A-1, Alt+1 saves the workbook, Alt+2 opens the Undo list, and so on.

Figure A-1. When you click the drop-down arrow on the Quick Access toolbar, Office shows a list of often-used commands that you can add just by clicking them, as you can see in this example from Excel. But to see all your possibilities, you need to choose More Commands.
Tip
If you want to add a command that duplicates something that’s already in the ribbon, here’s a shortcut. Find the command in the ribbon, right-click it, and then choose Add to Quick Access Toolbar.
To add a button to the Quick Access toolbar, follow these steps:
Click the drop-down arrow on the Quick Access toolbar, and then choose More Commands.
The [Word/Excel/PowerPoint/Access] Options dialog box opens, and positions you at the Customize section where you need to be (Figure A-2).
Choose a category from the “Choose commands from” list.
The library of commands that you can add to the Quick Access toolbar is enormous. To make it easier to find what you want, it makes sense to choose a specific category. Many of the categories overlap—Office simply provides them to make finding what you want easier. Here are the top choices:
Popular Commands gives you a short list of commands that Office jockeys love. If you’re trying to get quick access to a commonly used feature, you just might find it here.
Commands Not in the Ribbon provides all the leftovers—commands that Microsoft didn’t consider useful enough to include in the ribbon. This list holds some commands that are superseded or partially duplicated by other commands, commands that are included in other dialog boxes, and commands that were used in previous versions of Office and put out to pasture in this release.
All Commands includes the full list of choices. As with the other categories, it’s ordered alphabetically.
Under these categories are several additional categories that correspond to the Office menu and various tabs in the ribbon. For example, you can choose the Insert tab to see all the commands that appear in the ribbon’s Insert tab.
Once you’ve chosen the category you want, pick the command from the list below, and then click Add.
The command moves from the list on the left to the list on the right, placing it on the Quick Access toolbar (Figure A-3).
You can repeat this process (starting at step 2) to add more commands.
Optionally, you can rearrange the order of items in the Quick Access toolbar. Just pick a command, and then use the up and down arrow buttons to move it. The topmost commands in the list are displayed to the left on the Quick Access toolbar.
When you’re finished, click OK to return to the program you’re using so you can see the revamped Quick Access toolbar.
Adding a Quick Access toolbar isn’t a lifetime commitment. To get rid of a command you don’t want anymore, right-click it, and then choose “Remove from Quick Access Toolbar”.


Do you have a button or two that you’re using incessantly, but just for a specific file? For example, say you frequently print a particular Word document—like a fax cover letter—so you want the Quick Print button handy every time you open that document. In this situation, it may not make sense to customize the Quick Access toolbar in the normal way. If you do, you’ll get your extra button in every Word document you use, including those in which the extra button isn’t useful.
Office has a great feature to help you out in this situation. You can customize the Quick Access toolbar for an individual Word document, Excel workbook, Power-Point presentation, or Access database. That way, whenever you open that particular file, the buttons you need appear in the Quick Access toolbar. When you close it (or open another file in a separate window), the buttons disappear.
Note
Customizing individual files has advantages and disadvantages. The disadvantage is that you need to perform this task separately for every file, which can take a lot of time. The advantage is that your customizations are recorded right in your file, so they stick around even if you open the file on someone else’s computer.
To customize the toolbar for a single file, follow the same steps that you used in the previous section. Start by clicking the Quick Access toolbar’s drop-down arrow, and then choosing More Commands. However, before you add any commands, change the selection in the “Customize Quick Access Toolbar” list, which appears just above the list of commands in the Quick Access toolbar. Instead of using “For all documents (default)”, choose your files’s name (as in “FaxCover Letter.docx”). This list starts off empty. Then, follow the normal steps to add buttons.
When Office displays the Quick Access toolbar, it combines the standard buttons (as configured in the previous section) with any buttons you’ve defined for the current file (Figure A-4).