If your teachers kept hammering you about how important outlining is and made you do elaborate outlines before you tackled writing assignments, forgive them. They were right. Nothing beats an outline for the planning stages of a document. When you’re facing writer’s block, you can start listing your main topics in a Word document, and then break your topics into smaller pieces with some subtopics underneath. Before your know it, you’re filling out your ideas with some essential bits of body text. You’ve broken through the block.
Word’s Outline view is a fabulous outlining tool. It lets you move large blocks of headings and text from one part of your document to another, and rank headings and their accompanied text higher or lower in relative importance. In Outline view, you can even show or hide different parts of your document, to focus your attention on what’s important at the moment. Best of all, Outline view is just another document view, so you don’t have to outline in a separate document.
Outline view is another way of looking at your document, like Draft view or Print Layout view. In other words, in Outline view, you’re just looking at your document in outline form. When you switch into Outline view, your heading text (Heading 1, Heading 2, Heading 3, and so on) simply appears as different outline levels (Figure 8-1). Similarly, you can start a document as an outline—even do all your writing in outline form—and then switch to Print Layout view and have a perfectly normal looking document.

Figure 8-1. Outline view gives you a dramatically different look at your document. In back is A Tale of Two Cities in Print Layout view. In front is the same document in Outline view. The body text is collapsed and hidden, but you get a clear view of the major and minor headings. When you click one of the plus (+) buttons, the headings and text expand beneath.
Tip
Jumping back and forth between Outline view and the other views can be very conducive to brain-storming. If you’re working with your document in Print Layout view or Draft view and need to get a feeling for the way one topic flows into another, then pop into Outline view, collapse the body text, and examine your headings.
To switch views in Word, go to View → Document Views and click the button you want, or use the keyboard shortcuts in the following list:
Use Outline view (Alt+W, U) to develop headings, establish a sequence for presenting topics, establish a hierarchy between topics, and jump from one section to another in long documents.
Use Draft view (Alt+W, E) for writing rapidly when you don’t want to worry about anything except getting ideas down on the page. In Draft view you aren’t hindered by too many formatting niceties.
Use Print Layout view (Alt+W, P) when you’re putting the finishing touches on your document. In this view, you get a feel for the way your document looks to your readers.
When you switch to Outline view, a new Outlining tab appears on the ribbon. The Outlining Tools group at left has two parts, separated by a vertical bar. You use the controls to move paragraphs around and change their outline levels for (more on that shortly). The tools on the right side don’t actually affect the outline—they just control the way it looks.
When it comes to outlining, Word divides your document into two distinctly different elements:
Headings or topics. You can tell headings are the most important element in outlines by the big + or - button at their left. With headings, it’s all about rank. Every heading has a level, from 1 to 9. More important headings have lower-level numbers and are positioned closer to the left margin. Level 1 starts at far left, Level 2 comes below it and is indented slightly to the right, followed by Level 3, 4, and so on.
Each heading is called a subhead of the one that came before. For example, Level 2 is a subhead of Level 1, Level 3 is a subhead of Level 2, and so on.
Body text. For outlining, body text takes the back seat. It just gets that little dot, and if it’s in the way, you can hide it entirely, or you can view only the first line—just enough to give you a hint of what’s beneath. Body text doesn’t really get assigned to a level; it stays glued to the heading above it.
Planning a document is a little bit like putting a puzzle together. You try a piece here and then over there. A topic you thought was minor suddenly looms larger in importance. When you’re brainstorming and plotting, it’s important to keep an open mind. Word’s helpful because it’s so easy to try things out, and you can Ctrl+Z to undo whenever you need to.
When you promote a topic, you move it toward the left margin. At the same time, it moves up a rank in the headings hierarchy; so, a Level 3 header becomes a Level 2 header, and so forth. For most documents that means the formatting changes too. Higher-level headers typically have larger or bolder type—something that distinguishes them from their less impressive brethren. To demote a heading is the opposite; you move a heading toward the right, usually making it a subordinate of another topic.
For you, these promotions and demotions are easy. In fact, you encounter a lot less complaining here than you’d find in promoting and demoting employees in your company. The easiest way to promote and demote is to click a header and move it to the left or to the right. When you move it a little bit, a vertical line appears, providing a marker to show you the change in rank, as shown in Figure 8-2.
Note
When you promote or demote a heading, the body text goes with it, but you have a choice whether or not the subheads move below it (Controlling Subheads During Promotion or Demotion).
When you’re brainstorming and pushing ideas around in your document, you don’t want to get distracted by the mechanics. When it comes to outlines, you may be grateful that Word provides so many different ways to do the same thing. You get to choose the method that works best for you, and keep your focus on shaping your document.
Word gives you three ways to manipulate the pieces of your outline:
Dragging. For outlining, nothing’s more intuitive and fun than clicking and dragging. You can put some words in a heading, and then just drag them to another location. As you drag topics and text, Word provides great visual clues to let you know the end result (Figure 8-2).
Figure 8-2. Dragging works well when you’re brainstorming. It’s satisfying to push, pull, and drag your document into shape as if it were clay and you’re the sculptor. As you drag, your cursor changes to a double arrow. The long vertical line indicates the outline level you’re currently dragging through.
Ribbon. The buttons on the Outlining → Outline Tools group give you quick, visual access to the commands for promoting and demoting headings and for showing and hiding the bits and pieces of your document. It’s a bit more mechanical than just clicking and dragging the pieces where you want them (Figure 8-3).
One potentially confusing thing about the Outlining tab are those two drop-down menus showing levels. They look almost identical and both give you a choice among the nine topic levels that Outline has to offer. Here’s the key: The menu on the left promotes or demotes the current item, while the menu on the right shows or hides levels.
Keyboard shortcuts. Keyboard shortcuts are ideal when your hands are already on the keys and you’re typing away. During the planning stages, speed isn’t as much of an issue, but if you took your teachers’ advice to heart and do lots of outlining, keyboard shortcuts can really streamline your work. Just remember that all these commands use Alt+Shift plus another key, as shown in the following table.
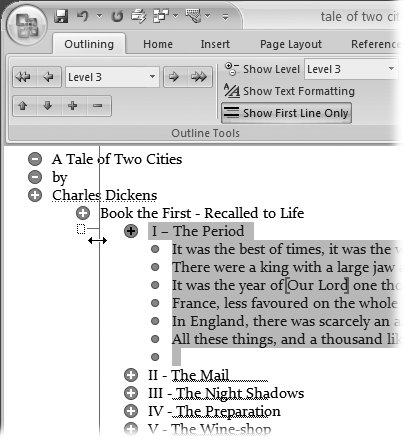
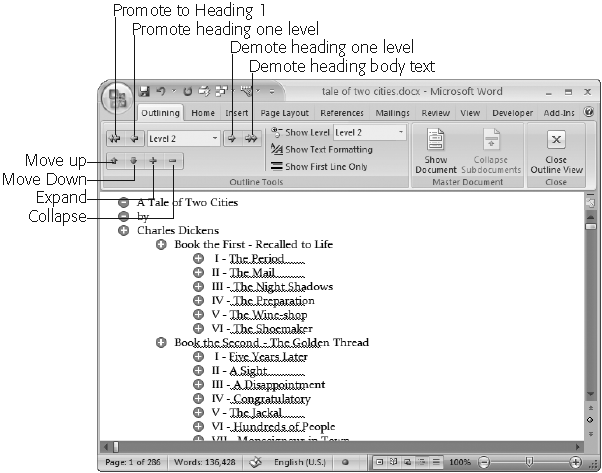
Figure 8-3. The buttons on the Outlining tab provide a command central for promoting and demoting topics and showing just the right part of your document. The up and down buttons move topics forward and backward in the document, providing a great way to move big chunks of text.
Tip
Another keyboard shortcut helps with outlining: the / key on the number pad. That one little key conceals any fancy character formatting you’ve applied so you can focus on your outline. See Showing and Hiding Text for more on the Show/Hide Text Formatting command.
When you promote or demote an outline item, any subheads and subtopics below it move with that item, but only if you collapse the items below, so that they’re hidden. In other words, when you move the header above, the subheads keep their relationships even though you can’t see them. When you drag topics, the subheads go along, because when you select a topic, you automatically select the subtopics, too.
Word gives you a number of ways to move the header but leave everything else where it is. Here’s a step-by-step description of the ways you can promote or demote a heading all by its lonesome:
Click anywhere in the text of the header.
Don’t select the entire header; just place the insertion point somewhere in the text.
Change the header level using one of the ribbon buttons or by pressing a keyboard shortcut.
Use the shortcut keys Alt+Shift+Left arrow or Alt+Shift+Right arrow to promote or demote the header. As long as the subtopics below aren’t highlighted, they won’t move when you do the header promoting or demoting.
You can use any of the ribbon controls that promote and demote headers in the same way. As long as the subtopics aren’t selected, they won’t change (Figure 8-4). The buttons that you can use include: Promote to Heading 1, Promote, Outline Level (drop-down menu), Demote to Body Text.
Figure 8-4. Use the various promotion and demotion buttons and the Level drop-down menu on the Outlining tab to organize your outline. If subheads are collapsed under a topic or they’re selected, they maintain their relationships when you demote or promote the header. Otherwise, if only the header is selected, it moves and the subtopics stay put.
Note
Working with outlines is actually a lot simpler to do than it sounds. Want to test drive Word’s out-line features? To check out the screencast—an online, animated tutorial—of the examples in this chapter, head over to the “Missing CD” page at www.missingmanuals.com.

Part of organizing your thoughts means moving them to an earlier or later position in the document, without changing their outline level. Say you decide a section you’ve typed in the middle of your document would make a great introduction. You can move it to the beginning of the document, without promoting or demoting it. Moving topics and items up and down in your document is very similar to moving them left and right. (Figure 8-5). If you want to take sub-topics along with an item when you move it, make sure that they’re selected (or collapsed) under the item that you’re moving.
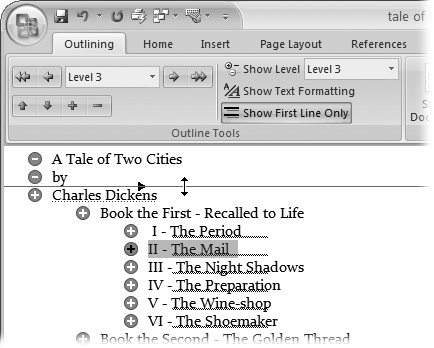
Figure 8-5. When you drag a header up and down, you see a horizontal line that acts as a marker to show you exactly where the heading (and connected text) will appear when you let go of the mouse button.
In addition to dragging, Word gives you two other ways to move topics up and down in your outline. Select the heading you want to move, and then click the Move Up or Move Down buttons on the Outlining tab (Figure 8-6). You can also use the shortcut keys Alt+Shift+up arrow or Alt+Shift+down arrow.

Outline view doesn’t just let you see and organize the structure of your prose; it also helps you zero in on what’s important while you make decisions about the shape and flow of your work. If you want, you can show your headings only so you can focus on their wording with all the other text out of the way. When you want to read inside a certain section, you can expand it while leaving everything else collapsed. (Or, if you’re having trouble with a passage, you can collapse it so you don’t have to look at it for a while.)
You know that old saying about not being able to see the forest for the trees. On the Outlining tab, the Expand and Collapse buttons help you put things in perspective (Figure 8-6). Collapse a topic, and you can read through the major headers and get a feel for the way your document flows from one topic to another. When you need to explore the detail within a topic to make sure you’ve covered all the bases, expand the topic and dig in.
When you’re mousing around, the easiest way to expand or collapse a topic is to double-click the + sign next to the words. It works as a toggle—a double-click expands it, and another double-click closes it. The topics with a minus sign next to them have no subtopics, so you can’t expand or collapse them.
If you’re interested in making grander, more global kinds of changes, turn to the Outlining → Outline Tools → Show Level menu; it’s the drop-down menu on the right (Figure 8-7). Just choose a level, and your outline expands or collapses accordingly.

Text takes a subordinate position when it comes to outlining and planning, so it’s not surprising that Word provides a couple different ways for you to hide the body text (Figure 8-8). You can double-click the headings above the body text to expand and collapse the topic, just as you would with subheads. The + and - buttons on the Outlining tab work the same way. You can also use the keyboard shortcuts Alt++ to expand and Alt+_ to collapse body text under a heading.

Because each paragraph of body text is like a sub-subtopic, Word’s outline view lets you work with them as such. Click the Show First Line Only button, and all you see is the first line of each paragraph. That should be enough to get a sense of the topic that’s covered. It’s just another way that Outline lets you drill down into your document while you’re in a planning and plotting phase.
Your document’s character formatting—different fonts, font colors, and sizes that may bear no relation to the Level 1, Level 2 hierarchy—can be distracting in Outline view. The easiest thing is to turn the formatting off. You can click the Show Formatting button on the Outlining ribbon (Figure 8-9) to toggle formatting on or off, or you can use the shortcut key, which is the / (forward slash) on the number pad.
