Chapter 2. Anatomy of the Rebel XS
LEARNING TO HOLD AND CONTROL YOUR CAMERA
In the previous chapter you saw how you can use the Rebel XS’s automatic features for easy snapshot shooting. Before we go on to learn about its more advanced shooting features, we’re going to take a tour of the camera and learn its parts. The XS is a complex tool, and the better you know its workings, the more easily and effectively you’ll be able to make it do what you want.
What Is an SLR Anyway?
The Rebel XS is an SLR camera, a term you may have come across when you were shopping. SLR stands for single lens reflex, and those words tell you some important things about how the camera operates.
As the name implies, a single lens reflex camera has only one lens on it. If you’re wondering why a camera might have two lenses, consider a point-and-shoot camera. If you look at the front of a lot of point-and-shoot cameras, you’ll see two lenses, one that is used to expose the image sensor and a separate lens that serves as a viewfinder. The advantage of this type of arrangement is that it’s very simple to engineer, and it doesn’t take up much space, so a point-and-shoot camera can be made very small.
The downside to this setup is that when you look through the viewfinder, you’re not necessarily seeing the same thing the camera’s image sensor sees. First of all, you’re not seeing the effects of any filters or lens attachments you might be using, and because you’re looking at your scene from a slightly different vantage point, the cropping you see in your viewfinder might be slightly different from what the camera actually shoots (this problem is referred to as parallax).
With an SLR, when you look through the viewfinder, you’re actually looking through the same lens that is used to expose the image sensor. As in a film camera, the image sensor in a digital camera sits on the focal plane, a flat area directly behind the lens. In front of the sensor is the shutter, a mechanical curtain that opens and closes very quickly when you press the shutter button. The shutter lets you control how long the sensor gets exposed to light. Obviously, because there’s an image sensor and a shutter sitting directly behind the lens, you can’t easily get a clear view through the lens without some work, because the shutter and image sensor are in the way.
DEFINITION: Parallax
The easiest way to understand parallax is simply to hold your index finger in front of your face and close one eye. Now close the other eye, and you’ll perceive that your finger has jumped sideways. As you can see, at close distances, even a change of view as small as the distance between your eyes can create a very different perspective on your subject. A camera that uses one lens for framing and another for shooting faces the same problems. Parallax is not a problem at longer ranges because the parallax shift is imperceptible.
Take a look at the profile of your camera and note that the lens is actually sitting much lower than the viewfinder. If you could take a cross section of your camera, you would see that the image sensor and shutter are directly behind the lens. In front of the shutter sits a mirror set at a 45° angle. This mirror bounces the light from the lens up into a complex optical arrangement called a pentamirror, a complex array of mirrors that bounces the light back out through the viewfinder. Thanks to this system of mirrors, you can see out the lens that’s mounted on the camera.
Of course, since the mirror sits between the lens and the focal plane, there’s no way that the image sensor can see out the lens. This is where the reflex part of “SLR” comes to play.
When you press the camera’s shutter button, the camera flips the mirror up so that it’s completely out of the way of the focal plane. Then the shutter is opened, the sensor is exposed, the shutter closes, and then the mirror comes back down. Part of the distinctive sound of shooting with an SLR is the sound of the mirror going up and down.
You can actually see the mirror itself any time you take the lens off your camera. It sits inside the mirror chamber. If you look toward the top of the mirror chamber, you can see where the light gets bounced up into the pentamirror.
SLRs have many advantages over point-and-shoot cameras, and the fact that you and the sensor look through a single lens is a very big one. It means that what you see through the viewfinder is much more accurate than what you typically find with a point-and-shoot camera. Also, because they’re larger than point-and-shoot viewfinders, SLR viewfinders are usually much brighter, clearer, and easier to see.
In addition to the brighter, clearer view of the scene, many photographers choose SLRs because they like to block out the rest of the world with the camera so that they can fully concentrate on the image in the viewfinder. This is much harder to do with the inferior viewfinder or LCD viewfinder on a point-and-shoot camera.
Watch the Mirror Move
With the lens off and the power on, you can press the shutter button and actually see the mirror flip up and, if you’re quick, see the shutter open behind it. However, before you do this, know that shooting the camera with the mirror off will expose your sensor to dust. Don’t do this outside or in a dusty room (or at all, if you don’t want to take chances). Better still, if you have a friend with an SLR, try it with their camera when they’re not looking.
Cleaning and Maintenance
At a fundamental level, all cameras are the same: A lens focuses light onto a recording medium. Because the recording medium is light-sensitive, it must be kept in a lightproof box. A shutter in front of the recording medium allows for control of when the sensor is exposed and how long the exposure will last. Cameras have worked this way since the beginning of photography in the 1850s, and while all sorts of new technologies have come along—everything from light meters to stabilized lenses to self-timers, color film, and autofocus—the basic principles of a lens that focuses light onto a light-sensitive medium held in a lightproof box have remained the same.
Of course, the significant change in a digital camera is the recording medium that’s being exposed. Rather than a piece of celluloid covered with light-sensitive chemicals, a digital camera employs a silicon chip covered with light-sensitive bits of metal. And, where a film camera needs a bunch of mechanics to move the film in and out of the roll, a digital camera needs an onboard computer and storage device to process and store the images that it captures.
Other than this change, though, your Rebel XS is similar in design to a traditional 35mm SLR. The camera body is the lightproof box that houses the image sensor, shutter, and viewfinder. Of course, it also has lots of other things, like the shutter button, controls, LCD screen, battery, media card, tripod mount, pop-up flash, and more.
The Rebel XS is not weatherproof, meaning that Canon has not engineered it for handling harsh environments. The various openings on the camera—the lens mount and assorted doors—are not sealed against sand and moisture. So, if you’re planning an extended stay in the Sahara or a float trip down the Amazon, you may want to think about taking a sturdier camera. That said, there’s no reason you can’t go shooting with the camera in drizzle or light rain. A little water on the body won’t hurt anything; just wipe off the camera and keep shooting.
The XS Battery
Your camera requires a battery to power its onboard computer, light meter, image sensor, and other components. If you were following along in the previous chapter, then you’ve already charged and used the battery, so we’re going to cover some battery tips here:
With a new battery, you should find that you can get about 500 shots off of a single charge. As the battery ages, this number will go down, but the included battery should be good for a couple of years of shooting before you need to replace it.
Note that, in general, you do not need to worry about completely draining the battery before recharging it. You can “top it off” at any time without harming the battery itself.
However, for the first few charges, drain the battery completely and then give it a full charge. After that, you can “top it off” any time you like.
If you plan on an extended trip away from power or if you tend to shoot a lot then you might want to invest in another battery. For less than $100, you can get a second battery and charge it up before you leave. You can easily swap out the battery as you need.
You might also consider some alternate chargers, such as a charger that can work off a car cigarette lighter or a small, inexpensive solar charger that will provide you with a way to charge your camera battery (as well as a cell phone or iPod) any time you have access to sunlight. See www.completedigitalphotography.com/cameracharging for more details.
International Charging
The battery charger that comes with the XS can adapt to voltages around the world, so you don’t have to worry about finding a different charger for international travel. However, you will need a plug adapter to make it fit into foreign outlets. You can get these at Radio Shack or in many airports.
The Media Card
As you already know, your Rebel XS uses a Secure Digital card. The XS is also compatible with SDHC, a newer format that has the same form factor as SD but that comes in higher capacities and offers speedier transfer. Note that you’ll need an SDHC reader for SDHC cards. Fortunately, an SDHC reader will read normal SD cards, so you need only one reader to read both formats.
When shopping for media cards, you’ll find a wide range of capacities and vendors and a correspondingly wide range of prices. What’s the difference between a 2 GB card that costs $19 and one that costs $49? Nothing at all, in terms of the number of images it will hold. However, that $49 card is probably much faster, which means your camera will be able to more quickly dump images to it.
As you already learned, the number on the right side of the viewfinder status display shows how many images the camera can currently fit in its internal buffer. As you shoot, the buffer fills, and the number goes down. It takes time for the camera to dump these images to the card, and while the camera is performing this transfer, you may not be able to shoot at all or to shoot a full burst of images.
So, with a speedier card, the camera will be able to dump its images more quickly, freeing up buffer space for more shots. How much this will matter to you depends on the type of shooting you do. If you plan on shooting sports or other action shots, where you’ll typically be shooting bursts, then you will want a speedier card.
Another way to look at it is that if you want to ensure the best chance that the camera will always be able to shoot, then get a speedier card. A 133x card (or faster) will deliver a very good level of performance in the XS. If you find that those cards cost more than you’d like to spend, then go for something less expensive, but understand that sometimes the camera might be tied up with storing images and so won’t be able to shoot.
Know Your Speed Class
SDHC is a newer derivative of SD cards. Offering higher capacities and speedier transfer than regular SD, SDHC cards will work fine in your Rebel XS. However, while SD cards use a multiplier rating—133x, for example—SDHC uses a speed class rating. The multiplier used on regular SD cards indicates how much faster the card is when compared to a standard speed CD-ROM drive. SDHC cards come in three classes, Class 2, 4, or 6. Class 2 cards can transfer 2 MB per second, while Class 4 or 6 can transfer 4 or 6 MB per second, respectively.
Body Parts
As you work through the rest of this book, you will become well-versed in all of the XS’s controls. Let’s take a quick look at the different interface elements on the XS so that you understand what controls I’m referring to as you work through the rest of the book.
Camera Top
You should already be familiar with the power switch and Mode dial on the top of the camera. We’ll be exploring all of the mode options throughout the rest of the book.
If you’ve been shooting, then you also already know where the shutter button is and understand that it has two positions, a half-press position for focusing and a full press for taking a shot.
Just behind the shutter button is a Control Wheel. You’ll use this for changing parameters such as aperture and shutter speed.
Behind the Control Wheel is the ISO button, which is used for setting the ISO speed of the camera. You’ll learn about this in Chapter 6.
Finally, just above the viewfinder is a hotshoe for mounting an external flash unit.
Camera Front
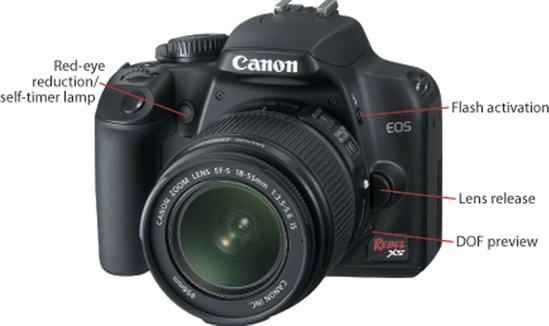
The front of the XS has minimal controls, but the few buttons that are there are ones you’ll use often.
The Flash button pops up the camera’s internal flash. In Full Auto mode, the flash pops up automatically whenever the camera thinks you need it. In most other modes, youdecide when to use the flash and press this button to activate it.
You’ll press the lens release button any time you want to remove the lens from your camera. Press and hold the button while twisting the lens counter-clockwise.
The depth-of-field preview button is used to get an idea of how much of your image will be in focus. We’ll explore it in Chapter 7.
The red-eye reduction/self-timer lamp serves two purposes. When shooting with the flash in red-eye reduction mode, this lamp flashes to try to reduce red eye. When shooting with the self-timer, the lamp flashes to indicate that the camera is counting down to firing.
Camera Sides
The left side of the camera (if you’re looking at it from behind) holds a rubber door that covers three ports.
These ports are used for connecting your camera to a TV to play back images, for connecting a wired remote, and for attaching your camera to a computer. We’ll look at all of these options in more detail later.
The port cover doesn’t snap closed; instead, you kind of have to mash it into its receptacle until it stays.
On the right side of the camera is the media slot cover, which you should already have used when inserting your media card.
Note that just below the media slot cover, on the rear of the camera, there’s a small light. Any time the camera is reading or writing data, this light will illuminate. If you open the door when an image is being written, the camera will beep and post a warning on the screen.
Do Not Remove Card When the Light Is Lit
Wait until the camera is completely finished writing before removing the card. If you remove the card before the write is completed, you not only will lose the images that are being written, but you might also corrupt images that have already been stored on the card.
Camera Back
Obviously, it is the back of the camera where the bulk of the controls are housed, alongside the LCD screen.
Above the LCD screen are the Menu and Display buttons, which are used to control what is shown on the camera’s LCD screen.
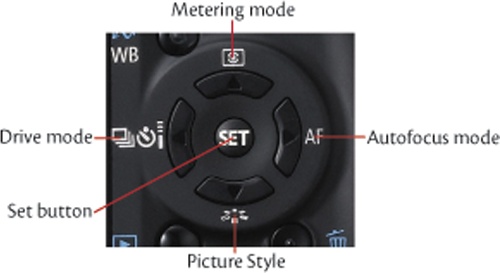
To the right of the screen is a circular array of controls, along with White Balance and Exposure Compensation buttons. These are the controls you’ll use in everyday shooting to change shooting parameters.
Earlier, we covered the diopter control, which allows you to adjust the viewfinder to compensate for your glasses prescription.
On the upper-right side of the camera are two additional buttons, which are used to change focus point selection and to control exposure lock.
These controls also have blue magnifying glasses beneath them. Blue icons indicate playback mode functionality. So, when reviewing your images, these two buttons turn into zoom in and zoom out controls. (Similarly, the White Balance button does double duty as a Print button.)
Finally, at the bottom of the camera, you’ll find the Play button, which you should already have used, and the Delete button, which we’ll cover in Chapter 3.
The Rebel XS Menu System
Many of the Rebel XS’s features and parameters are accessed through the camera’s menu system. When shooting in a rapidly changing environment, such as a sporting event, busy street, or birthday party, you’ll want to be able to quickly change camera settings, so it’s important to be able to use the camera’s menus speedy and efficiently. Fortunately, the XS has a very good menu layout, so with just a little practice, you should find that you can get to any that you want very quickly.
The contents of the menus change depending on what mode you’re in. In Full Auto mode, the menus contain a smaller subset of the camera’s full menuing options. In the other modes, you’ll find a complete selection of items.
In this section, we’re going to look at menu navigation so that you’ll know how to go to a particular menu item—something you’ll be doing a lot of throughout the rest of the book.
For the sake of this example, change the camera’s mode to P so that you can see the full assortment of XS menus.
To activate the menu, press the Menu button on the back of the camera. You can do this whether you’re currently shooting or viewing images.
In Program mode, the XS displays seven different menus, and the most recently visited menu is always the one that is currently active when you enter the menu system.
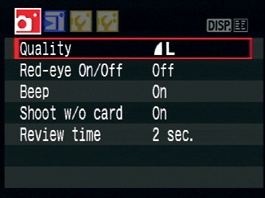
Each menu is represented by a tab at the top of the screen. The current menu is brightly lit, and bounded by a white box, while the others are slightly faded. Each menu contains a different set of options, but no menu contains more options than can fit on one screen, so you don’t ever have to worry about scrolling up and down to find a menu item.
When the menu is activated, the four semicircular buttons on the back of the camera function as arrow keys.
To change from one menu to another, use the left and right arrow keys. To select an item in the menu, use the up and down arrow keys.
The menus are grouped by function. The first two menus contain shooting functions and so sport camera icons on their tabs. The next menu contains playback functions.
The next three menus are tool menus. They contain various utility functions, such as setting date and time, formatting your media card, and other options. I’ll be referring to these menus as “tool menu 1,” “tool menu 2,” or “tool menu 3.”
Finally, there is a custom menu where you can define your own custom set of options. We’ll be exploring this menu in Chapter 12.
Once you’ve selected the menu item that you want to access, press the Set button. What happens next will depend on the feature you’ve chosen, which we’ll be covering throughout the book.
So, if I tell you to access the Auto rotate feature in tool menu 1, you’d press the Menu button to activate the menu, then use the left or right arrow key to navigate to the first tool menu, use the down arrow key to select Auto rotate, and then press the Set button to execute the feature. In the case of Auto rotate, a submenu will appear, which offers three different options.
Visible Menus Are Context Sensitive
If you press the Menu button and don’t see any tool menus, it’s because you’re in a mode that doesn’t support these menus. Change to Program, Tv, Av, or M mode and try again.
Camera Status
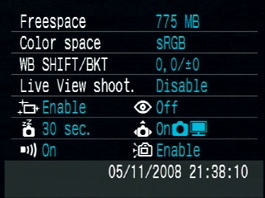
With the menu active, you can press the Disp button on the back of the camera to get a view of some important camera statistics.
There’s nothing on this screen that you can’t learn by going and looking at the settings of the individual parameters, but it can be a nice way to quickly get a look at some vital settings. You’ll learn more about each of these settings later.
Holding the Camera
Holding the XS might seem like a fairly obvious procedure, but good photographic “form” can mean the difference between a sharp image and one that’s blurred from camera shake. Observing a few simple guidelines about camera grip and posture will improve your chances of getting stable, sharp images.
The Grip
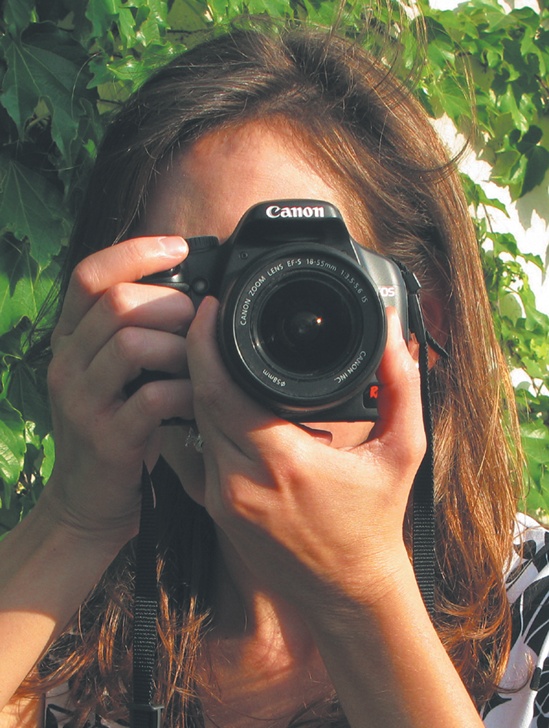
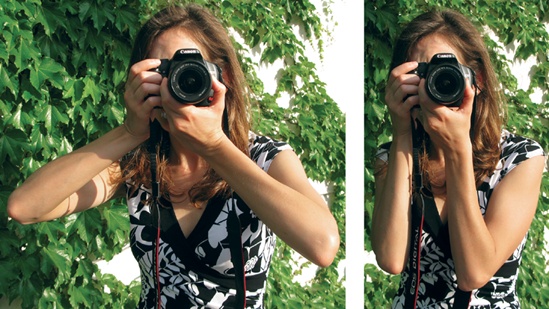
Obviously, your right hand goes around the camera’s grip, with your forefinger positioned on the shutter button. To guarantee the most stable hold, your left hand should go underneath the lens barrel, where it connects to the camera.
Cradling the camera this way makes it easier to hold the camera for long periods of time and will help you hold the camera steady. With your forefinger on the shutter release, you should be able to easily reach the control buttons on the back of the camera with your thumb.
Feet, Elbows, and Neck
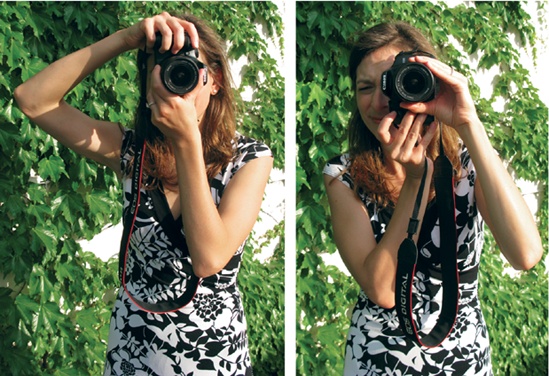
When standing, your most solid, secure stance is to have both feet firmly planted on the ground, about shoulder-width apart. Obviously, depending on the terrain, this may or may not be possible. The best way to ensure a stable hold is to always remember to keep your elbows touching your sides.
“Elbows in” gives you a very sturdy platform for holding the camera. If you get in the habit of keeping your elbows against your side, eventually it will simply feel wrong to not have them pressed against you when shooting. In most cases, even if you’re on uneven terrain and having to change your foot position, you can still keep your elbows at your side. Elbows in also holds true when you’re seated.
When switching from landscape to portrait orientation, you still want to keep your elbows at your side to ensure a more stable position.
Finally, lift the camera all the way to your face. This may sound strange because you probably think you are, but many people lift the camera partway to their face and then push their neck forward to close the gap. In addition to giving you bad posture (and probably contributing as much to back pain after a day’s shooting as that heavy camera bag on your shoulder), it’s a much less stable position.
QUESTION: Does Stability Really Matter?
When your camera is shooting at 1/1000th of a second (or faster), you may think stability doesn’t really matter. If you’re a stickler for sharpness, though, even a tiny bit of motion can make a difference. If you blow things up a lot or if you’re shooting with a long telephoto lens, trying to shoot in a more stable position is very important. Besides, there’s nothing difficult about these techniques, so there’s no reason not to learn them.
The Lens
One of the great things about an SLR like the Rebel XS is that you can remove the lens and replace it with another. Interchangeable lenses allow you to build a lens collection tailored to the way you like to shoot. For example, if you’re a nature shooter who likes a long reach, you can invest in telephoto lenses; if you’re a landscape shooter, you might want to weight your collection toward wide-angle lenses. Because you can remove the lens, you can choose to upgrade lenses later and improve the quality of your images without having to replace the entire camera. Removable lenses also give you the option to add specialty lenses such as fish-eye lenses for creating stylized pictures, or tilt/shift lenses for architectural work.
Depending on the configuration you purchased, your Rebel XS may or may not have come with a lens. If you bought the Rebel XS kit, then you probably have an 18–55mm zoom lens. You should already be practiced at mounting and unmounting a lens, as detailed on pages 33–34 of your Rebel XS manual.
Ideally, you want to leave the camera body open for as little time as possible. As you learned in the previous section, just inside the body is the mirror that reflects light up into the viewfinder, and behind that is the shutter and image sensor. You don’t want to get dust or dirt on the image sensor, because any type of debris on the sensor will show up on your images as dark splotches. The less time you leave the camera body open, the less chance dust will get inside.
If you have more than one lens, you’ll find that, over time, you will work out a coordination that allows you to remove one lens, hold it, and get the other lens on with minimal exposure of the camera body. Obviously, you have to be careful not to drop anything. Keeping the camera around your neck with the included strap will free up your hands enough to manage a lens change.
Manage Those Body Caps
Every lens has a body cap that covers the end of the lens that attaches to the camera. Unfortunately, a lot of people stick these caps in their pocket, where they get covered with lint, and then put the cap directly onto the lens when they’re changing lenses. This is a great way to get dust and lint on your lens, and that debris can get transferred directly to your image sensor when you mount the lens on your camera. So, clean those body caps before you put them back on your lens!
Understanding Focal Length
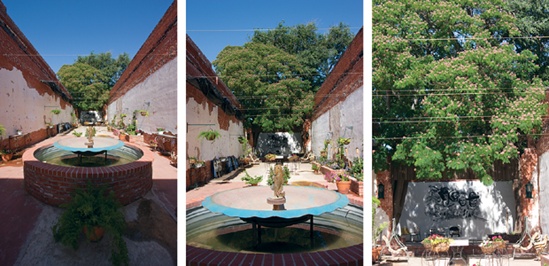
If you wear glasses, you are probably already familiar with the idea that a thicker lens provides more magnification. The same is true for your camera lenses—a longer lens provides more magnification.
Another way of thinking about magnification is to pay attention to the field of view. In the figure on the previous page, the center image has a much narrower field of view than the left image. As focal length increases, the field of view captured—that is, the distance from left to right—gets narrower.
On lenses, the “thickness,” or length of a lens, is measured in millimeters and is referred to as the lens focal length. A longer focal length means a more telephoto lens, which means more magnification and less field of view. So, a 300mm lens will be more telephoto than an 80mm lens. We’ll be speaking about focal length a lot throughout the rest of this book.
Types of Lenses
In general, lenses fall into two categories: prime lenses and zoom lenses. A prime lens has a single, fixed focus length. A zoom lens lets you change the focal length so that the lens can go from wide-angle to telephoto.
The advantage of prime lenses is that they’re sometimes sharper than the same focal length in a zoom lens. The advantage of a zoom lens is that a single lens can provide the focal lengths of a bunch of prime lenses. As you’ll see, choice of focal length is one of your most important decisions when composing a shot.
Twenty years ago, it was safe to say that zoom lenses were of markedly inferior quality to prime lenses. Nowadays, the difference is not nearly so great, and a good zoom lens can yield excellent image quality, especially when paired with a camera as good as the XS.
Lens Controls
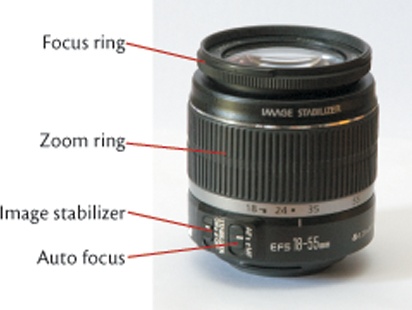
On most zoom lenses you’ll find three controls: a zoom ring, which lets you zoom in and out (which is the same thing as choosing a different focal length); a small switch for changing between autofocus and manual focus; and a focus ring, which lets you manually focus the lens.
On a prime lens you’ll have only a focus ring and an AF switch. You might have an image stabilization control. We’ll be covering all of these controls later in this book.
Lens Care
Obviously, with a big expensive piece of glass like a camera lens, dropping it is not a good idea. Your other concern with a lens, though, is keeping it clean and scratch-free. In the previous section, I mentioned the possibility of dust getting in the mirror chamber of the camera. If the dust alights on the sensor, then you’ll see visible smudges and smears in your image. Most sensor dust is actually delivered to the inside of the camera by the end of the lens, so one of the best things you can do for your camera and lens is to keep the lens clean.
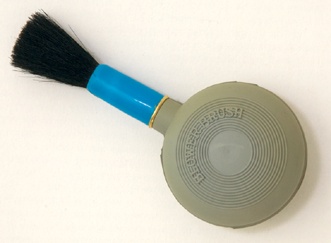
Don’t put a lens in a pocket or bag without an end cap. The end of the lens will trap a lot of dirt, and when you next mount the lens on the camera, you’ll transfer a lot of this dirt and debris to the inside of your camera. To keep the ends of your lens clean, use a blower brush to blow any visible dust off of the glass at either end. You can get a blower brush at any camera store.
If there’s something on either end of the lens that you can’t get off with a blower brush, then you can resort to lens paper of some kind. Lens paper is also available at a camera store. Don’t ever try to clean your lens with your shirt or a piece of “found” cloth. While the cloth may look clean, you never know whether there’s some small abrasive particle that could scratch your lens.
One of the best things you can do to ensure the long-term health of a lens is to put a protective filter on the end. A skylight or UV filter will not alter the light that passes through the lens but will provide a significant amount of protection. If the filter gets scratched, you can simply replace it. Even in the event of a drop, a filter can absorb a lot of the impact that would normally smash up the front of the lens.
When shopping for a filter, spend a little more money and buy a multicoatedfilter. Multicoated filters have special chemicals on them that reduce flare and other reflections and other image-damaging phenomena. If you’ve spent a lot of money on a lens, don’t hobble it with a cheap, low-quality filter.
Sensor Cleaning
Because you can remove the lens on the XS, the sensor chamber is exposed to the outside world in a way that it never is on a point-and-shoot camera. This means it’s possible for dust and other fine debris to get on the image sensor. And, because you don’t ever remove the sensor and replace it with another one—as you do with the film in a film camera—once there’s dust on the sensor, it’s there to stay unless you take action.
Pixels on your sensor are very, very tiny. Remember, 10 million of them are crammed into a space that’s smaller than a piece of 35mm film. Because they’re so small, it doesn’t take a very large piece of dust to obscure thousands of them. Sensor dust will appear in your images as dark spots or smudges.
Fortunately, the XS has a built-in sensor cleaning mechanism that can greatly reduce the chance of sensor dust problems.
Sitting in front of the image sensor is a clear filter. So, “sensor dust” is actually dust that’s accumulated on this filter. By default, any time you turn the camera on or off, it vibrates this filter to shake any dust off. A piece of sticky material just below the filter traps the dust so that it doesn’t float around the sensor chamber.
While the built-in sensor cleaning is very good, you should still take precautions to keep your sensor clean. Try to avoid changing lenses in windy locations, especially if there’s sand or dirt nearby. Keep the camera end of your lenses clean—most sensor dust is delivered to the sensor by the camera lens. When you change lenses, have both lenses in hand before you start the change so that you can swap them as quickly as possible.
If you get some dust on the sensor that the built-in cleaning can’t handle, then you can take your XS to a Canon service center for cleaning or attempt it yourself using special cleaning products, such as those made by VisibleDust. The VisibleDust website, at www.visibledust.com, includes a full selection of sensor cleaning products and accessories.
Sensor Cleaning
Never spray compressed air into the sensor chamber! Compressed air uses a liquid propellant that can sometimes come out of the nozzle. If this gets on your sensor, you’ll have a much worse sensor problem. Use only cleaning materials designed for sensor cleaning, or have your camera professionally cleaned.
More Full Auto Practice
In this chapter, we’ve covered a lot of technical and practical details that are essential to understand if you want to be able to use your camera quickly and effectively. Often, quick use of the camera is what makes the difference between capturing a “decisive moment” and getting a boring shot.
In the next chapter, we’re going to start getting more technical about basic photographic theory, but before we go there, you might want to take some time to do a little more practice in Full Auto mode. Shooting in Full Auto does not mean you’re a photo wimp. The Rebel XS in Full Auto mode is a very powerful instrument, and having the camera decide technical details for you can free you up to focus on composition and content. While we’ll be discussing composition in more detail in Chapter 8, here are some exercises to try right now, before moving on to the next chapter.
Work with Fixed Focal Length
Zoom lenses can make you lazy. They tend to encourage you to stay in one place and compose from there. As we’ll see later, there can be a great difference in images shot from different locations. But zoom lenses also keep you from having to visualize a scene for a particular framing. Here are three quick exercises that will get you seeing and thinking in a different way:
- Full wide
Zoom your lens out to full wide and leave it there! Spend a few hours shooting with it at full wide. Don’t zoom the lens. Instead, re-position yourself if you need to frame the shot differently. Be aware that you may not be able to visualize or recognize potential scenes when limited to this one focal length. So, if you think you see something even remotely interesting, look at it through the camera. You don’t have to shoot it, but often when you look through the camera, you’ll see a potential shot that you didn’t recognize when you were looking with the naked eye.
- Full tele
Now do the same thing as the previous exercise, but this time zoom your lens to its longest focal length. In other words, zoom in all the way. Spend some time shooting as before. No zooming!
- 30mm
On the Rebel XS, a 30mm lens has the same field of view as a 50mm lens on a 35mm camera. This also happens to be roughly the same field of view as your eye. Consequently, a 50mm equivalent lens is considered a “normal” lens. Some of the most famous, celebrated photos of all time have been shot with a 50mm lens. The great French photographer Henri Cartier-Bresson worked exclusively with a 50. If it’s good enough for him, the rest of us should be able to manage.
Set your camera on 30mm and spend a few hours shooting. Again, don’t zoom! Some Canon lenses show a dot on the zoom ring to indicate where normal is.
Obviously, with prime lenses—that is, lenses that don’t zoom—you get this type of shooting experience all the time. These exercises are a way for you to learn some of the advantages (and disadvantages) of shooting with a fixed focal length lens.


