
Chapter 8. Finding and Composing a Photo
EXPLORING THE ART OF PHOTOGRAPHY

As with most creative endeavors, you can divide your photographic study into two areas: craft and artistry. Craft encompasses your technical understanding of photographic process—how different parameters affect your image and how you use the controls on your camera to set those parameters. Artistry is the process of using your craft skill to represent a scene, person, or moment as a photographic image—ideally an image that evokes something of the “truth” of your subject that you felt when shooting. In this chapter, we’re going to focus on the artistry side of things and explore how you visualize and compose an image.
Learning to See Again
If you’re like most people, you’ve probably experienced something like this: You can’t find your keys (or your sunglasses, your favorite pen, your wallet, or whatever), so you look on your desk, in your pockets, in your coat, and on the kitchen table. You try to retrace your steps to determine where you might have been when you last had your keys. You look and look and then, finally, an hour later, you see them sitting out in the open in the middle of your desk—right there in the first place you looked.
This type of maddening situation happens because, while it’s very easy to look at something, it can be far more complicated to actually see it. We tend to use the words look and see synonymously, but for a photographer, there are very important differences between the two terms.
Let’s return to the lost key scenario. How is it that you can look at the desk, specifically trying to find your keys, and not see them? The answer has to do with the fact that your eyes are far more than a simple optical instrument. It’s very easy to draw a parallel between a digital camera and your eye—they both have lenses with irises, and they both have separate receptors for red, green, and blue light. But the optical system in your head has a very important additional component attached to it, in the form of a human brain. While we like to think of our eyes as cameralike devices that capture whatever scene is in front of us, our brains dramatically alter our perception of what we’re seeing. Not seeing the keys on the desk in front of you is a prime example of this phenomenon, and there’s a good reason your brain has evolved to work this way.
Think about crossing a busy street while running an errand. You know there are cars bearing down on you, and you know how far each car is, how fast it’s going, and how to navigate across the street without getting hit; and most likely you know all of this while also thinking about your errand and how it will go and what you’ll do afterward. However, despite this huge amount of information, when you get to the other side of the street, if someone were to ask you the color, make, and model of each car you passed, you probably wouldn’t be able to recall. If you’re a car freak, you might be able to, but if pressed to go further and tell the gender of each driver, you’d probably be out of luck. Even though your eyes were taking in all of this information—just as a camera would—your brain was editing it away.
Processing visual input requires an incredible amount of your neural bandwidth —bandwidth that you need for other things such as keeping track of errands, and so forth. So that you aren’t overwhelmed with visual information, your brain tends to edit or “abbreviate” your visual experience. So, when crossing the street, rather than seeing a “large metal vehicle resting on four wheels, with a clear glass window on top, six dead grasshoppers stuck to the front grill, a license plate that reads ‘ILUVNY’ and a middle-aged woman in curlers behind the wheel,” you very often just register “car.” By reducing the complexity of a large vehicle down to a simple concept, and a simple iconic image, you don’t have to spend so much time registering all of the details that you end up getting run over. Instead, your brain takes a shortcut that allows you to get on with your day, albeit in a way that makes the world possibly less visually rich.
When looking for your keys, you will look at the desk, and your brain will decide that it already knows what it looks like, not bothering to register details that it feels it already knows. There normally aren’t keys sitting there, so you don’t see them. This is why someone who’s not so familiar with your desk might walk in the room and spot the keys immediately.
Little kids are different. Because the world is a new place for them, they notice every detail of the objects around them. They have to because they haven’t yet learned to abbreviate the visual complexity of the world down to simple symbols like “car” or “desk.” But for a photographer, the “visual complexity” that makes up the world is also the raw material for your photographs. So, you don’t want your brain to be abbreviating your experience; you want to see every detail. In other words, you want to learn to see again as you did when you were a kid.
Unfortunately, the older you get, the more knowledge of the world you have, so the more your brain can fill in a lot of blanks for you, relieving you from the hassle of seeing. So is it possible to make it stop doing this? Recent research has shown that the longer you look at a scene, the less contrast you are able to perceive in that scene. An image or scene will increasingly go flatter, contrast-wise, as your brain devotes fewer resources to it. The theory is that if you’re looking at something for a while and it hasn’t killed you, your brain decides that there’s no need to devote precious resources to higher-quality visual processing of that scene.
So, to a degree, your brain stands in the way of you seeing accurately. However, you can still do many things to try to open up your senses and learn to better spot the interesting visual matter around you. The more you do this, the more you will discover raw material that can be transformed into photos.
Another way to see how much your brain is involved in the visual process is to look at optical illusions, even something as simple as this line rendering of a transparent cube:

Your eyes are properly registering a series of lines on a flat piece of paper, but your brain is stepping into the process. It notices that the arrangement of these lines usually represents a particular 3D object—cube—as if they were truly a three-dimensional shape. Because it isn’t actually a cube, your brain gets confused, and the orientation of the cube appears to flip around. This is a prime example of how your brain manipulates your visual experience after your eyes have already gathered up raw visual data.
Seeing Exercises
Just as a musician can train their ear to recognize pitch, intervals, and chords, a photographer can train their eyes to be more open and receptive to the world. In other words, you can practice and improve your ability to see.
One of the most important aspects of learning how to see is knowing what seeing feels like. However, if it’s been a long time since your visual sense was really open, then it may be difficult to know what the difference is between seeing and not seeing. One of the easiest ways to get your eyes going is to go somewhere new. Perhaps you’ve noticed this when you travel or go on vacation. When you first get to some place very foreign, or new, you often notice lots of little details. This is partly a survival mechanism—you’re a little more wary than usual, a little more alert, so all of your senses are going. It’s also because you have lots of new stuff to see.
This is one reason that a lot of people think “I want to do some photography. I need to go somewhere.” They’ve recognized before that when they travel, they really see stuff. While it’s sometimes simply because you’re in an especially scenic place, I think it has as much to do with your visual sense being more charged and effective. Paying attention to what this feels like next time it happens to you is a good way to learn what it feels like to really see. Once you know the feeling, it can be a little easier to find it again.
Here are some ways to get your sense of seeing going, without having to travel.
Warm Up
Don’t assume you can work at your job all day and then dash out the door and suddenly be a photographer. You wouldn’t expect to play a musical instrument without warming up and certainly wouldn’t expect to do well at any kind of athletic event without warming up. While not tiring, the act of seeing is physical. It’s not physically straining, but it’s something you have to feel. It can take some time to calm down from the everyday stresses of your life and open yourself up to your visual sense.
When you first step out the door, take a picture. It doesn’t matter what it is—take a picture of your foot, the light pole across the street, a manhole cover, a water meter in the sidewalk, anything at all. Taking that first shot will put you into the physicality of shooting. You’ll see through the XS viewfinder and be reminded of the frame shape and size you’ll feel with the camera in your hands. All of this will help get you out of the distractions of your everyday life and into seeing and thinking about images.
Give Yourself an Assignment
I hear a lot of people say, “I’m going on vacation this summer, and that’s when I’ll take a lot of pictures.” As discussed earlier, it’s definitely easier to find images when you’re somewhere new, especially if it’s somewhere really photogenic. But photography takes practice, and you need to do it regularly. What’s more, good pictures can happen anywhere, but only if you’re open to them. If you can’t work on your own block, around your own house, then there’s no guarantee you’ll be able to do good work in an exotic location.
One way to get yourself to practice and to breathe new life into familiar locations is to give yourself an assignment. Perhaps it’s a subject—“old cars,” “fire hydrants,” “doorways”—or maybe it’s a phrase or a word—“beauty and the beast,” “contentment,” “no pain, no gain.” The subject matter or word doesn’t have to mean anything to anyone else, and you can interpret it any way you want. The idea is to give yourself some way to frame your view of your location. This will often make you see familiar ground in a new way.
I keep three ongoing projects: “My street,” “My neighborhood,” and “San Francisco.” Sometimes, when I have a moment to spare, I’ll pick one of these things and go shooting. Confining myself to just my street is the hardest, while the neighborhood is easier, and having the whole city to work with is even easier. But trying to work on just my street is interesting, because it makes me look for unusual lighting or compositions amongst very familiar locales.

As with any creative endeavor, practice is the key. It’s not just about memorizing what shutter speed and aperture do, and how to control them, but practicing composition, seeing, and interpretation.
Look at Other Photos
Photography is a strange form because, while aspiring writers will all be able to easily name their favorite writers and books, I encounter very few aspiring photographers who know much about the history of their chosen form. Few can name a favorite photographer or pick up on references to famous, important works of photography. Familiarity with great works, though, is an easy way to improve your own shots.
Go to the library or bookstore, or do some Google searches, and find work by some of the great masters—Ansel Adams, Henri Cartier-Bresson, Paul Strand, Elliot Erwitt, and Alfred Stieglitz. Spend some time looking at their images with an eye toward both simply seeing how they make you feel but and figuring out what was done technically to create the image. Pay attention to how the images are composed, and try to think about what the photographer might have done, exposure-wise, to achieve a given effect. By reverse-engineering their solutions, you’ll learn a lot about how they saw a scene and what choices and decisions they made to turn that scene into a finished image.
Practice
I already mentioned practice, but it’s important, so I’m gonna mention it again: Practice. Practice a lot. Not only will you learn your camera better, but you’ll get better at seeing and recognizing images. If you want to take it to the extreme, you can do like photographer Joe Buissink who, if he doesn’t have a camera but sees an image that he would like to shoot, says “click” or snaps his fingers. This “shooting without a camera” keeps him in the habit of seeing photographically, acknowledging when there’s a shot he wants to take, and taking a moment to think about how he might compose it.
How to Make a Photo
Every so often my grandmother decides to go to a portrait studio. As with many people of her generation, she’s always said that she’s off to “have her picture made.”
Nowadays, of course, we would say that we’re going to have our picture “taken,” but this is something of a misnomer, because a good picture is made. To “take” a picture implies that the subject is just there, as is, and that your camera records a perfect representation of it. But that’s not actually how a good photograph happens. The process of taking a good picture, whether it’s a portrait, a still life, a landscape, a street shoot, or anything else, involves making a lot of decisions and solving a lot of problems. It also often requires you to shoot a lot of pictures as you experiment and try different ideas. Good images are not taken; they are made from the raw material of the scene you’ve decided to shoot.
In the rest of this chapter, we’re going to talk about the process that you go through to make a picture, from recognizing a scene to composing a shot to making exposure decisions.
Recognizing a Potential Photo
The photographic process begins, of course, by finding something that you want to take a picture of. While sometimes a subject is obvious—“Look! Godzilla is attacking the Eiffel Tower, I’d better get my camera!”—more often, interesting photos are hidden from those who aren’t necessarily looking for a picture.
From beginning shooters, I often hear questions like “How do you find stuff to shoot?” They think that you must go find interesting objects, stunning vistas, or beautiful landmarks. But good pictures usually begin with nothing more than a simple impulse based on something you’ve seen—a play of light, a beautiful color, an interesting piece of geometry. You might be walking down the street in the late afternoon and find a weathered door that the setting sun is throwing into deep, textured relief. Or perhaps you come across an otherwise mundane object that’s being brightly lit by the sunset. Or maybe you fine a curious piece of repeating geometry or some kids engaged in a very serious game of tag.
Sometimes, you’ll find scenes that you simply think are beautiful or interesting, and at other times you might see something in the corner of your eye that captures your attention but when you look directly at it find yourself unsure as to what it was that initially intrigued you.
In all of these, that initial impulse—whether it’s strong and obvious or fleeting and difficult to interpret—is “how you find stuff to shoot.” Often, after that impulse, you’ll immediately have an idea of the finished image in your head and can begin to work. At other times, you’ll have no idea how to shoot the scene. In these instances, it’s very easy to decide that your idea wasn’t any good and not even try to take a picture. But don’t give in to this self-doubt. Trust those initial impulses, and if you have even the foggiest notion that a picture might be possible, then start to work.
Watch the Light
All photos begin with light, and different types of light have different qualities. Excepting portraits, just about any subject looks better when it’s struck by light that’s coming from a lower angle. The angled light will reveal more detail and texture on the image. This means morning and afternoon are the best times for shooting. The midday sun produces a very flat light and rarely yields a good picture. Pay attention to the light! If you look out the window and see lots of beautiful contrast in the late afternoon, get outside with your camera! If you see a fascinating subject but find your pictures of it to be a little boring, try returning to that subject in the morning or afternoon. You may find that under better light, your subject really comes alive. Good photography often requires getting up very early, but this is how it is when your medium is light-based.
Look Through That Camera
Sometimes, on outings with a class, I’ll have students who say they aren’t getting any images. But when I watch them, I realize they aren’t actually shooting very much, if at all. What they mean is that they’re walking around looking but aren’t seeing anything they think will make a good image. Unfortunately, what they’re not understanding is that learning to view the world as a camera sees it takes a lot of practice.
If you find you’ve been walking around for a while in good light and you aren’t seeing anything you want to shoot, you might simply be in a location that isn’t providing any good material. However, it might also be that your eyes and brain just aren’t seeing things photographically. Sometimes you have to look through your camera before you begin to see potential photographs. If you find yourself stuck, lift the camera up to your eye and start looking through it. The frame of your viewfinder often crops the world in ways that you can’t visualize when you’re walking around, and these crops often reveal interesting images. You may have to shoot your way through some unusable, outright bad images before your photographic senses get working. If you suffer through this process, though, you may find yourself seeing more things to shoot.
If you try this and still aren’t finding things, then either there really isn’t anything you’re interested in shooting or your photographic juices just aren’t flowing. Don’t let this discourage you. Relax, give it a rest, and come back another day.
Photography as Abstraction
While it’s easy to believe that a photograph is a realistic representation of a scene, it’s really not, for very obvious reasons. Photos are flat, two-dimensional objects, possessed of far less color or contrast than a scene in the real world; they convey nothing of the sound, smell, or feel of a scene, and they force a very cropped view.
Your job as a photographer is to try to figure out how to capture the feel of a moment or a scene with that flat image. Obviously, this is no small feat, but that’s why great artistry is difficult to achieve.
Working Your Subject
Occasionally, very occasionally, you’ll take a shot, and it will be exactly right. But don’t expect this kind of good fortune very often. More often than not, you’ll have to do some work to turn the scene you’re shooting into a good image. You’ll have to try different compositions, shooting from a variety of locations, and trying different exposure ideas, different focal lengths, and different vantage points. In the simplest terms, working a shot means trying as many different things as you can think of.
Even if you have a very clear vision of what the image should be, you should still try lots of different things because once you’re looking through the lens, you might start to see things very differently and get new ideas.
Many people think if they can’t get the image in one shot, then they must not be a good photographer. But this isn’t how photography—or any artistic endeavor—works. Artistic expression is a process of experimentation and discovery, and as a photographer, the way you experiment and discover is to shoot lots of different compositions that explore many different ideas.
There are no rules to working a shot, other than to try anything and everything you can think of. However, it’s almost always true that as you get in closer, your shot will improve. We’ll discuss this more when we discuss composition later in this chapter.
Take Your Time
It can take time to make a good image: Time to find the right angle and composition, time to thoroughly work your shot, time to figure out what it is about the scene that you’re trying to capture. When possible, try to take your time and work through your options, and think about your exposure and composition strategies. Obviously, fleeting moments like the big play at a sporting event or a street shot involving moving people don’t allow for repeated shooting. However, if you’re shooting these types of moments for a while in the same location, then you’ll have time to adjust your exposure strategy to the current lighting and to experiment with different angles on the action.
Choosing a Camera Position and Focal Length
Once you’ve spotted a subject and decided to start working it, you’re ready to begin composing your shot. All composition begins with a choice about where to stand.
“But why do I need to think about where to stand?” you may be saying. After all, you’ve spotted the image; shouldn’t you just take the picture? Not necessarily. The odds that you happen to have recognized a shot from the absolute best position in the world for shooting it are pretty small, and camera position can have a huge bearing on what your final image looks like.
Obviously, standing closer or farther, or off to one side or the other, can make a big difference in your shot. But camera position also affects your choice of focal length, and focal length can have a huge impact on the sense of space in your scene.
Understanding How Focal Length Choice Affects Your Image
While a zoom lens is a great convenience that keeps you from having to move around so much when you’re shooting—rather than walk across the street, for example, you can just zoom in—it also tends to make for lazy photographers and to keep shooters from thinking about the right focal length for their scene.
Zooming a lens does much more than simply make a far subject appear closer. When you change focal lengths, a lot of things in your image change. Consequently, it’s important to understand what a longer or shorter focal length does to your image.

My goal in both shots was to have my subject as large as possible. In the left image, I was standing farther away and so had to zoom in to get her to fill the frame. In the second image, I moved very close and so had to zoom out to a shorter focal length. While both strategies fill the frame with my subject, look at the huge differences in the background of the image.
In the left image, the background is filled with plants; in the right image, we can see some architecture and a fair amount of sky. Note, too, the difference in the sense of space in the image. In the left image, the plants in the background appear closer, while in the right image they look farther away and shorter.
When you zoom in (or, if you’re using prime lenses, when you choose a lens with a longer focal length), the sense of depth in your scene gets compressed. Objects in the background will appear closer, and the overall composition of shapes, as well as sense of space, can be very different.
So, rather than standing in one place and zooming around to get your shot, it’s important to pay attention to how different focal lengths affect the sense of space in your image. By choosing a different camera position and focal length, you can choose to make a space seem more spacious or more intimate (or, depending on the subject matter, more desolate or cramped).
Note that the compositional differences shown in those two images are all visible through the viewfinder, so you don’t even need to take a shot to experiment with focal length changes.
Focal Length and Portraits
When shooting a portrait, it’s also very important to pay attention to focal length because, just as the sense of space in a large scene changes dramatically depending on your focal length choice, people’s faces can be similarly distorted.
Again, here are two images framed with the subject taking up the same amount of space:

The left image was shot with a slightly telephoto lens. For the image on the right, I switched to a wide-angle lens and moved in closer. Obviously, the wide-angle lens has greatly distorted the man’s face. Note, too, the change in background. In the left image, the oven in the background looks very close, while in the right image it appears farther away. The wide angle lens has stretched the distance between his nose and ear and between his head and the background.
Portrait photographers typically use a focal length that’s a little longer than a normal lens. On the XS, 50mm is just about perfect for flattering portraiture. When combined with a large aperture, you’ll get nice portraits with a soft background.
Composing Your Shot
Composition is the process of arranging the elements in your scene—the shapes and objects that comprise your foreground and background—to create a pleasing image.
Earlier we looked at some simple composition rules—fill the frame, lead your subject, don’t be afraid to get in tight. These guidelines can greatly improve your snapshots and are relevant to all kinds of shooting. For more complex subjects and to produce more compelling images, though, you’ll want to think about some additional compositional ideas.
There’s no right or wrong to composition, but some compositions are definitely better than others. Rules are made to be broken, of course, and many compositions won’t ascribe to any particular compositional theory or rules. However, when trying to make a photo—that is, when you’ve found an interesting subject and you’re trying to figure out how to shoot it—remembering these compositional ideas will help you explore and experiment and will probably lead you to better results.
Balance
One of the simplest compositional ideas is balance. Balance in a photo works just like balance in the real world. Different elements in your photo have compositional “weight,” and you need to balance those against each other.

Compositional balance is a tricky thing because you don’t need elements of equal size to create balance. Just as a small piece of lead on a scale can balance a tremendous number of marshmallows, some small graphic elements can balance elements that are much larger. This is almost always true with people. We put a lot of import on people, and a single person in a frame can balance a huge amount of other compositional elements.

You won’t always balance shapes in a composition. Sometimes you will find balance by putting tones—light and dark—against each other.

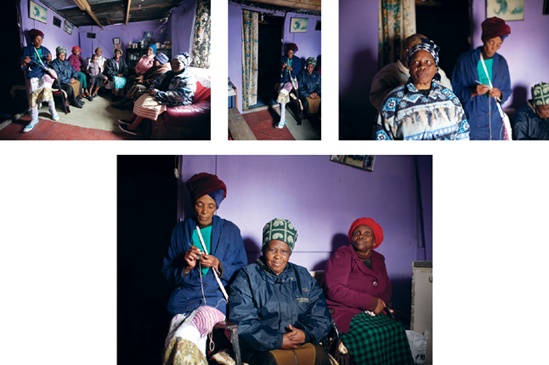
Sometimes, even empty space can create a balance. Consider this image:

This image is a good example of breaking a rule, because we’re plainly breaking the “lead your subject” rule. In this image, though, it works. The woman’s pensive, reflective expression makes the empty space behind her more powerful. That space is evocative of emotional weight that is bearing down on her, or of her past. Graphically, the mostly empty space on the left balances out her presence on the right.
Geometry
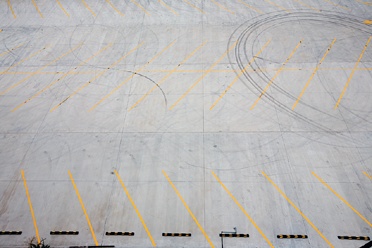
Geometric shapes make great compositional elements and almost always make an image more interesting. Geometry can be anything from a strong line to a repeating pattern. You can see examples of geometry in some of the balance images we already looked at. The strong line of the airplane contrail makes for compelling compositions and packs a lot of compositional weight.

Sometimes, pure geometry itself can be interesting.
Repetition
Roughly akin to geometry is repetition. Repeating geometric or tonal patterns in an image are another powerful compositional device.

The Rule of Thirds
If you imagine a grid laid over your image that divides the picture into thirds, both horizontally and vertically, then the intersections of those grid lines make good places to put compositional elements. This is known as the rule of thirds, and it will often lead you to good compositions.


Foreground/Background
If you’ve ever had someone stand you in front of a statue or a landmark, then you’ve experienced this rule: A photo needs a foreground and a background. Another way of thinking about this is as a subject and a background. What’s more, the relationship between those two things is very important.
Earlier you learned about the idea of using the entire frame, or filling the frame. Choosing what to fill the frame with is an important part of good composition.
For example, here’s a person standing in front of the Golden Gate Bridge:

While we’ve filled the entire frame and though we can see the entire bridge and the man’s whole body, the image doesn’t really have a strong subject. In fact, the bridge is as much the subject as the guy, who serves little purpose other than to indicate scale.
If we want this to be a picture of a person in front of the Golden Gate Bridge, we’re better off framing tighter.

By filling the frame with more of the person, we know they are now definitely the subject of the image. Yes, we’ve had to crop the bridge, but the image still plainly conveys the person in their environment. If you want a picture of the bridge, that’s a different subject, and a different photo, and you probably don’t need a person in there at all.
Sometimes you’ll come across a beautiful or compelling vista and it will be enough to serve as a subject all its own. You’ll still want to think about framing and composition and consider some of the rules that we’ve discussed, but you won’t have a definite foreground and background.

At other times you might come across a compelling vista but not be able to find a composition that feels right. This might be because the scene lacks a subject, so your eye doesn’t really know how to “read” the image. If you can find something to use as a subject, you’ll often find it’s easier to compose.

Sometimes, patience is the most important photographic tool at your disposal. If you find a nice background, wait and see whether someone walks into it to complete the composition or to serve as a subject.
Composing with Light and Dark
Earlier, you saw an example of a light airplane contrail balancing a dark horizon. Very often, you’ll build composition out of light and dark, not just out of geometry.
Light is the raw material of photography, so don’t forget to pay attention to light and dark elements within an image—they can make great compositional elements.
Also, don’t worry if you can’t find an exposure that reveals all the detail in a dark area. Often, a completely black shadow is just what an image needs. We don’t need to see detail everywhere in an image, and choosing what to show and what to hide is part of the process of making a compelling image.

Less Is More
The world can be annoying in many ways, but for photographers, one of the biggest annoyances (after running out of media cards in the middle of a shoot) is that there’s just too much stuff in the world.
Painters have it easy; they start with nothing and add only the things that they want in their scene. Photographers, though, have to contend with power lines, street signs, people who walk into their compositions, and trees that have one branch that’s pointing in the wrong direction, and so on and so forth.
One of your most important jobs as a photographer is to find compositions that reduce the clutter in a scene so that the viewer is not confused about what to look at and so that their eye finds its way through the image.
If you work to fill the frame, as discussed in Chapter 1, you’ll go a long way toward reducing extraneous clutter in your scene. When you’re working a subject and trying to find different ways of shooting, one of the easiest variations is simply to get closer.

Closer usually yields a less-cluttered, cleaner image. When shooting people, getting in closer can be intimidating because you must move closer to your subject. Obviously, you don’t want to make them uncomfortable, but don’t be afraid to entertain the idea of moving a little closer when the situation feels right.
When shooting in public, closer often means separating yourself from the crowd and moving toward a scene. This can often leave you feeling like everyone is looking at you. In reality, they probably aren’t (everyone is used to seeing people with cameras these days), but more importantly, so what? They notice you for a few moments and then go on about their day, while you return home with an interesting photo.
Some, All, or None
If you look back over the images I’ve used as examples, you’ll find a lot of overlap of compositional ideas. For example, in the funicular picture, note that the funicular is positioned according to the rule of thirds.
You’ll find that you can easily mix and match these compositional ideas to build up a good image, and as we’ve already seen, you might occasionally throw these ideas out altogether. Sometimes you’ll be conscious of these rules; sometimes you’ll simply go by feeling. If you practice these techniques, you’ll soon come to find that even when you review images that you shot by feel, they still conform to many of these concepts. Studying the work of other photographers is also a great way to learn how they put these ideas to use, and sometimes such study makes it easier to understand another shooter’s thought process and the choices they made.
Where these rules can be especially helpful is when you come across a scene that you want to capture but you don’t know where to begin. Start by thinking about camera position and focal length, and look through the lens to see how the sense of depth and space in the scene changes as you adjust position and focal length. Then start thinking about subject and background, and about geometry and pattern, repetition, and the rule of thirds. These can all serve as guidelines as you explore the scene through your camera lens.
Art and Craft
Throughout this whole process of working a shot and trying to make a composition, you will be constantly employing the technical concepts you’ve learned so far.
For example, you might be working a scene, moving around, getting in close, and then you find a focal length and camera position that creates a wonderful sense of space and that allows a composition that is balanced, with a nice subject/background relationship. But then you realize that what would make it perfect is to soften the background. So, you choose to go to a wider aperture using Program Shift, by turning the Main dial until an exposure set comes up that has a smaller F-stop number.
But then maybe you realize that your subject is very dark and so needs to be underexposed. So, you use exposure compensation to dial in a 2/3rd stop underexposure.
You shoot the shot and then review the image to check both your composition and the histogram, which will tell you how well your exposure has worked. In this way, your technical knowledge and handling of the camera combines with your artistic decisions.
Practice
While it’s possible to contrive guidelines for specific photographic situations—get down low while shooting kids, fill the frame when shooting portraits, etc.—as you’ve seen, the process of making a good photo requires a lot of decision making and a lot of choice and experimentation. Rather than learning specific rules for specific situations, it’s better to learn what it feels like to see, what makes a good composition, and how your exposure settings affect your image. With these basic building blocks, you’ll be able to go far beyond simple formulas for different situations. You’ll be able to find your own solutions that better convey what you feel about a particular scene.
We can discuss all of these ideas and rules for hours, and the discussion can be very enjoyable and enlightening, but more than any lesson, more than any new piece of gear, more than any piece of postproduction software, the single thing that will do the most to improve your photography is practice.
You must practice seeing; practice composing; practice your understanding of the effects of exposure, camera position, and focal length; and practice with the controls of your XS so that you can quickly adjust and adapt to any situation without having to think too much about the camera. You want your focus to be on composition. Practice will make all of these things possible. So, get out and shoot as much as you can, and pay attention to what works and what doesn’t.
Because your camera records your exposure and focal length parameters for each shot you take, it’s easy to review images and understand exactly what exposure you used for every shot. Paying attention to the effects of these choices will help you learn.