
Chapter 3. Playing Back Images
REVIEWING AND ANALYZING IMAGES ON YOUR REBEL XS

One of the great advantages of a digital camera is the ability to see your images right away. While thes compositional advantage of instant review is obvious, you can also perform many types of analysis using your camera’s LCD screen. However, it’s important to understand what the screen does and does not tell you about your shots. In this chapter, we’ll look at all of the Rebel XS’s playback features and learn how they can help you take better pictures and help improve your chances of getting the shots you need.
Image Review
By default, any time you take a picture with the XS, it automatically shows the image on the camera’s LCD screen. By default, this image review lasts two seconds, which is usually enough time to tell whether you’ve composed properly or not.
If you want to delete the image while it’s being shown during image review, follow these steps:
Press the Erase button, located just below the screen.
The camera will ask you to confirm the delete. Select Delete by pressing the right arrow button on the back of the camera.
With Erase highlighted, press the Set button to delete the image.
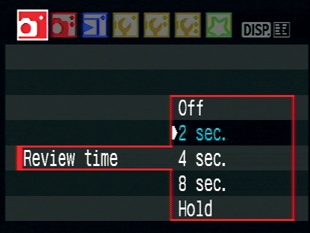
You can easily change the length of the image review time:
REMINDER: All Reviewing in Moderation
Immediate image review is one of the great advantages of digital photography. However, the instant image review can also be a distraction if you obsessively look at every image after you shoot it. When you’re out shooting, you want to be concentrating on the world around you, not on the back of your camera. Image review is great when you want to review a composition you’ve just shot, and it can be essential when you’re in a tricky exposure situation and need to double-check your exposure decisions. We’ll discuss exposure evaluation in more detail later.
You can choose between Off, 2, 4, or 8 seconds, or select Hold. When you choose Hold, the image will stay on the camera’s screen until you use any control on the camera. For shots where you need to carefully assess a lighting setup or composition, Hold can be very handy. However, lengthy LCD usage will drain your battery faster, so it’s best to use this feature only when you need it.
You can also turn the image review off completely. If you’re in a situation where you don’t need or have time to use the image review—a fast-moving sporting event, for example—then you might as well turn image review off to conserve battery.
Turn Off Preview as a Courtesy
You might also want to turn off the image review if you’re shooting in a low-light situation like a concert. Because the screen can cast an obtrusive light, you’ll have a lower profile if you deactivate the image review.
Some additional features are available during image review. We’ll look at these when we explore the DISP button later in this chapter.
Image Playback
While the image review is a great way to quickly assess a shot you’ve just taken, playback mode is what you’ll want to use when you’re ready to review a whole batch of shots:
To enter playback mode, press the Play button.
The last image you shot will be shown on the screen. By default, the XS will superimpose some data about the image.
At the top of the screen, it will show shutter speed, aperture, and exposure compensation, along with the filename and the folder name. Like your computer, the Rebel XS creates folders on its media card, each with a separate number, and stores the images you shoot in those folders. You’ll learn more about folder and filename options later.
To scroll through the images stored on the card, press the left and right arrow keys.
Note that the images “wrap around.” If you go past the last image, the camera will show you the first, and vice versa.

Navigating Images with the Main Dial
When you’re in playback mode, turn the Main dial. By default, the camera will jump forward or backward 10 images at a time. A scroll bar will appear to show you where you are in within the current selection.
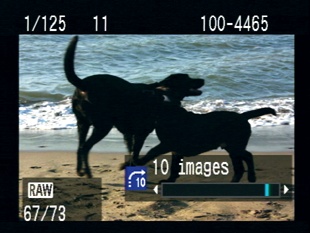
You can change how many intervals the Main dial jumps by pressing the up arrow key. The jump interval indicator next to the scroll bar will become editable. Use the up and down arrow keys to change the interval to 1, 10, or 100 images, or to Date. When set to Date, the Main dial will jump to the next image shot on a different day.

Playback Zoom
When reviewing an image, you can zoom in to view fine details and assess focus. To zoom in to an image during image playback, press the Zoom In button. The XS can zoom in up to 10 times. As you zoom in, notice the navigation panel that appears superimposed over your image.
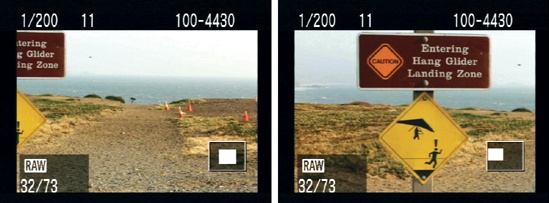
This shows a relative illustration of which part of the image you’re viewing. The white box shows you which part of your image is currently being displayed.
To scroll around an image that you’ve zoomed into, use the four arrow keys.
To change to another image but maintain your current zoom level, use the Main dial. This is a great way of comparing focus between two images.
To zoom out of an image, use the Zoom Out button.
Don’t Judge Sharpness on the XS LCD
When you’ve zoomed in to an image to check focus, be aware that the LCD screen on the XS is a little soft. So, you can’t always use the screen as a measure of actual sharpness. If your image looks wildly out of focus, then it probably is, but if it looks a little soft, there’s a good chance that it’s actually OK.
You can easily perform a quick experiment to learn more about how sharpness on the XS’s LCD screen relates to the sharpness in your final image:
Shoot an image with some fine detail and then copy the image to your computer (see Chapter 4 for details on image transfer). Don’t delete the image after transfer.
Put the card back in your camera and compare what you see on the camera’s screen to what you see on your computer. This should give you a better idea of what on-camera sharpness really means.
Exiting Playback
The easiest way to exit playback mode is to give the shutter button a half-press, just as if you were autofocusing. You can also exit playback by pressing the Play button.
If you’re in bright sunlight, it may be hard to see the camera’s LCD screen clearly when viewing images. You can change the brightness of the screen by using the LCD brightness command in the tool menu 2.
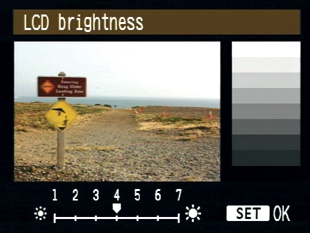
The LCD brightness command gives you seven levels of brightness to choose from. Using the LCD brightness command is very straightforward, but if you need help, refer to Switching to Program Mode of the XS user manual.
If you’re shooting in a dark location, you might want to turn the brightness of the screen down, since a very bright screen can be hard on your eyes if they’re already adjusted to low light.
Viewing Image Thumbnails
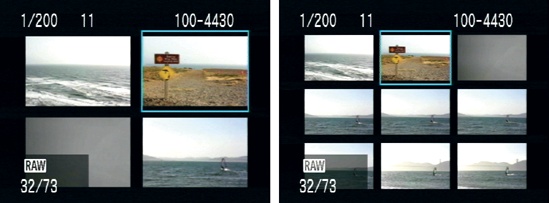
In addition to zooming in to an image to view fine detail, you can also zoom out from an image to view more than one image on the screen at a time. Canon calls this index display, but I prefer to refer to it as thumbnail view. Whatever you choose to call it, viewing multiple images at once makes it easier to navigate quickly to a specific image on the card.
To zoom out to a thumbnail display of all the images on the card, follow these steps:
Press the Zoom Out button.
Note that if you were zoomed in to an image, you’ll have to zoom back out first so that the image fills the entire screen. An additional press of the Zoom Out button will take you to thumbnail view.
A single press of the Zoom Out button will take you to a four-up view of thumbnails. An additional press will take you to a nine-up view.
When viewing thumbnails, you can navigate from one image to another using the four arrow buttons, or you can use the Main dial to jump one screenful at a time. As each image is highlighted, the camera’s data overlay is updated to show the data for that image.
To zoom in to the selected image, press the Zoom In button.
Using these two simple controls, Zoom In and Zoom Out, you can easily move from up-close views of your images to thumbnail views that provide speedier navigation.
Persistent Playback Display
The XS remembers the last view you used in playback mode. So, if you were viewing individual images, the next time you enter playback mode, the camera will show you individual images. If you were viewing thumbnails, then you will see thumbnail view the next time you enter playback mode.
Viewing Image Info
Like most digital cameras, the XS automatically stores a fair amount of information with every image you shoot. This information, commonly referred to as metadata, is embedded in the image file, so it travels with the image as you copy and move files around.
In addition to the date and time you take an image, the XS stores all essential exposure information—aperture, shutter speed, ISO, white balance setting, exposure compensation, and much more. Because this metadata conforms to an accepted standard called EXIF, most any image editor can read the data. Having access to your shooting parameters while editing can make certain corrections much easier and help you learn what you did right or wrong while shooting.
You can also view EXIF metadata data on the camera itself, and you’ve already seen a small example of it when viewing your images. The shutter speed and aperture displays that have appeared in your image playback are two bits of EXIF metadata.
To change the image metadata that’s displayed, follow these steps:
Go into playback mode by pressing the Play button. The last image display mode you used will still be active. If you’re viewing a thumbnail display, zoom in to view a single image.
Click the DISP button to change to a different info display. The XS provides four different info displays.
You’ve seen the first one already, which is a large image with basic info.
The second display shows the image as a small thumbnail but provides a larger assortment of exposure parameters.
The second info display also contains a histogram display, and as you’ll learn, these histogram displays can be essential shooting tools that can help you choose an exposure. Many of these other items are self-explanatory; the rest you’ll learn about in other parts of this book.
The third display shows a few exposure parameters and a three-channel histogram, which can give you a little more insight into overexposure and white balance problems.
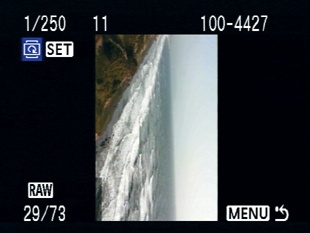
Finally, the fourth display gives you the clearest view of your image. It shows shutter speed, aperture, folder, and image number, but it doesn’t superimpose anything over the thumbnail.

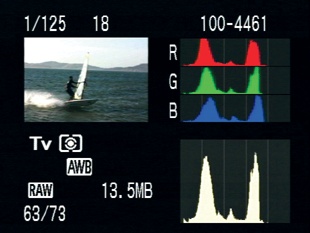

Image Info in Image Review
The XS always remembers the last info display you used and presents that display next time you go into playback mode. However, it also uses that screen during the image review that happens after you shoot. Also, note that you can change the info display during image review, just as you do in playback mode.
The metadata that the XS displays can be an invaluable aid in difficult shooting situations. However, you don’t have to look at it all the time. When you’re out in the field shooting, you want the bulk of your attention focused on shooting, not on reviewing your images. In later chapters we’ll revisit these modes, and you’ll gain a better understanding of what they’re for and when to use them.
Image Rotation
Your camera contains an orientation sensor that it uses to determine whether you’re shooting in portrait or landscape orientation (that is, vertically or horizontally). The orientation you use is automatically stored in the metadata of each image. Your image editor can most likely read this data and will automatically rotate the image appropriately.
You can also tell the camera to automatically rotate the images so that they always display at the largest size possible. By default, this feature is turned on, but if you want to turn it off (perhaps because you’re working with the camera mounted on a tripod or because you have the camera connected to a TV), then go to the tools menu 1 and select Auto rotate.
You’ll see three options in the Auto rotate menu:
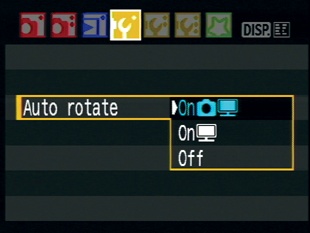
The first option turns Auto rotate on for both camera display and TV display.
The second option turns Auto rotate on for only the camera. This means images will be rotated to display as large as possible on the camera’s LCD, but will still display in portrait mode on a TV.
Off deactivates all Auto rotate options.
Manual Image Rotation
Sometimes autorotation gets confused and images don’t get properly rotated. This can be because you were holding the camera at an odd angle or possibly because you changed orientation and shot very quickly. Whatever the reason, if you need to manually rotate an image, you can do so using the Rotate menu command.
To manually rotate an image, follow these steps:
Press Menu and go to the Playback page.
Choose the Rotate option.
Navigate to the image you want to rotate.
Press the Set button to rotate the image 90° clockwise. Each press will rotate the image 90°.
You can use the Main dial or the left and right arrow buttons to navigate to other images and rotate them. When you’re done rotating, press the shutter button halfway to exit playback mode. Your image editor may or may not show these images with your chosen rotation.
Slideshows in the Field
The XS can automatically play a slideshow of the images on its card.
To start a slideshow, follow these steps:
Go to the Playback menu.
Choose Auto Play and press the Set button to start the slideshow.
The camera will automatically display each image for about four seconds. You can pause and restart the slideshow at any time by pressing the Set button. Auto Play works when connected to a TV, so it’s easy to show a slideshow to a group of people.
To stop the slideshow, press the Menu button.
Erasing Images
You can erase images from the XS’s card using some simple menu commands. Erasing images gives you a way to free up space on your card, if you find that you need more room for shooting. Deleting extraneous shots can also help speed up your post-production workflow. If you know a shot was bad—your finger was in front of the lens, you accidentally took a shot of the lens cap, your model sneezed right when you pressed the shutter button—it’s not a bad idea to just delete the image so that you don’t have it cluttering up your postproduction sorting and editing. Obviously, if you’re in a situation that demands speedy shooting, you shouldn’t waste time sorting and deleting images, but if you have the time, excising those images that aren’t keepers can speed up the later parts of your photographic process.
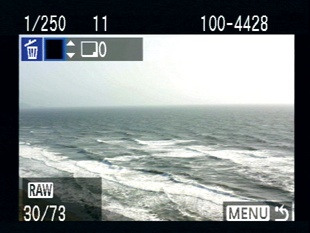
Deleting an Image During Image Review
If your camera is set to show an image review (a quick view of your image immediately after you shoot), you can delete the image when it appears on your screen.
To delete an image during image review, follow these steps:
When the image appears onscreen, press the Delete button.
Use the right arrow button to select Erase.
Press the Set button to erase the image.
Deleting an Image During Image Playback
When in playback mode, you can delete an image simply by pressing the Delete button, just as you do during image review. As in Image Review, the camera will give you one chance to cancel the operation. If you choose Erase, it will delete the image.
If you want to erase lots of images, follow these steps:
Choose Erase images from the Playback menu.
From the Erase images menu, choose Select and Erase images.
Navigate to an image you want to erase and press the up or down button. A checkmark will be displayed in the upper-left corner of the image. If you want to uncheck the box, press either button again.
Navigate to any other images you want to erase and press the up button on each.
When you’ve selected all of the images you want to erase, press the Delete button.

The camera will give you a chance to cancel. Select and press OK to delete the checked images.
Deleting All of the Images on the Card
Normally, you’ll erase a card only after you’ve transferred its contents to your computer. However, sometimes you might need to erase an entire card in the field. Perhaps you realize you’ve been shooting for the last hour with manual settings that have grossly overexposed all your images. Or maybe you forgot to erase the card when you last transferred images to it and it’s full of old pictures.
In the Erase images menu that you saw in the previous section, there was an option to called Erase All Images. While this works, it’s not the best way to erase the card. A much better option is to choose Format from the tools menu 1.
If Your Computer Can’t Read the Card
Erase All Images can sometimes result in directory problems on the card that can confuse some operating systems. If you find that you’re consistently having trouble reading a card in your computer, even after formatting, then you might want to consider doing a low-level format. Choose the Format command as normal and then press the Erase button to check the Low Level Format checkbox. Select OK to start the low-level format.
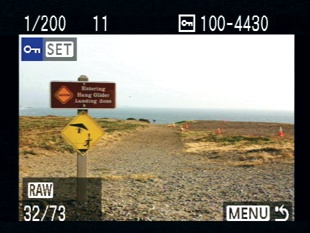
Protecting Images
If you’ve shot a once-in-a-lifetime, keeper image that you absolutely don’t want to lose, then you might consider protecting the image. This locks the file on the card so that it can’t be deleted. If you’re on a long trip and won’t have the time or opportunity to clear off your media cards, protecting images provides a way of guaranteeing that an image won’t be deleted by most normal erase options.
To protect images, follow these steps:
In the Playback menu, choose Protect Images.
Navigate to the image you want to protect and press Set. A key icon will appear on the image.
Navigate to the next image you want to protect and press the Set button again.
To stop protecting images, press the Menu button.
A protected image cannot be deleted using the Delete button or using the Erase All Images command. However, formatting the card will erase protected images. Now, if you choose Erase All Images, only unprotected images will be deleted. Your protected images will remain untouched.
In addition to keeping you from accidentally deleting images, protecting images provides an easy way to bulk delete some of the images on your card.
For example, say you stick a card in your camera and shoot a dozen or so images before you realize you hadn’t erased the card first. Because you hadn’t erased the card, a bunch of images that you’d already transferred to your computer are still there. You don’t want to choose Format, because you want to keep the 12 images you’ve already shot, but going through and deleting the 100 or so images that are also on the card would take forever.
Instead, you can protect the few new images that you’ve shot and then use the Erase All Images command. This will erase all the other images, leaving your new images intact. You can then shoot as normal, transfer the images to your computer, and then format the card, which will erase even the protected images.