
Chapter 7. Advanced Exposure
LEARNING MORE ABOUT THE XS LIGHT METER AND EXPOSURE CONTROLS

There’s more to exposure than what we’ve seen so far. In addition to motion and depth of field control, exposure control also lets you control tonality in your image. Your exposure control is very dependent on your light meter, though, so to really understand exposure, you have to learn about some of the workings of the XS’s light meter. In this chapter, we’ll go deeper into metering and exposure and explore some of the XS’s image-processing options.
The Light Meter Revisited
In Chapter 1, we looked at the XS’s light meter, which analyzes the light in your scene to determine an exposure that will yield an image that’s neither too light nor too dark.
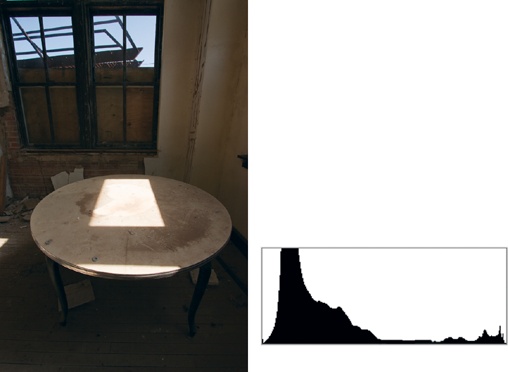
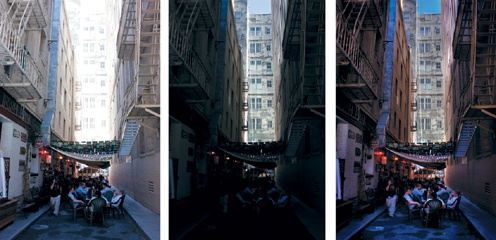
The light meter is activated every time you half-press the shutter button, and while the automatic metering in the XS is very good, it can be confused and won’t always calculate the best exposure for every scene. For example, consider this image:

We’ve looked at a bad backlighting problem before. Because of the bright background, the camera is biasing its metering toward the brighter portion of the image, and the resulting exposure leaves the person underexposed. But you’ll find that other problems can also crop up from mismetering, most notably, an inability to render black tones as real black. We’ll look at both of these problems and see how they can be easily addressed using a few simple tricks and controls. Let’s start with the backlighting problem.
Metering Modes
By default, the XS uses an evaluative meter system for its light metering. The XS’s evaluative meter divides your scene into a grid of 35 zones. The brightness of each zone is measured, as well as the contrast between zones, the size of your subject, the brightness of your subject, the contrast between your subject and the other zones in the grid, and more. (It determines what is “your subject” by looking at which focus points were selected when the camera autofocused.) It then analyzes all of this data and tries to come up with exposure settings that will properly expose your subject, without blowing out the highlights in the image and while preserving as much shadow detail as possible.
For most scenes, evaluative metering works very well, and it’s the most consistently accurate meter on the camera. This is why Full Auto mode uses evaluative metering. If you just want to point the camera and shoot, evaluative metering stands the best chance of giving a good result.
However, evaluative metering can be confused, as shown in the previous examples. So, while evaluative metering will probably work well for most shots, the XS provides a few other metering modes that you can employ in tricky situations.
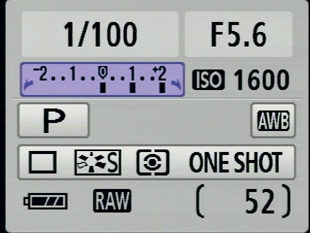
The metering mode you have currently selected is shown on the status display on the back of the camera.

Partial Metering
While evaluative metering is almost always the right choice, if you’re shooting a scene that has a background that is significantly brighter than the foreground, then the evaluative meter could get confused, resulting in your foreground being overexposed.
Partial metering analyzes only a small area of zones in the center of the image and ignores the metering zones in the rest of the frame.

In the description of partial metering that appears on Transferring Images to a Macintosh Computer of the Rebel XS manual, Canon says, “The gray area is where the metering is weighted to obtain the standard exposure.” While this implies that other zones in the image are considered when using partial metering, in practice you’ll find that areas outside the partial metering circle have no bearing on the final metering. (If you’re curious, this circle covers about 9.5 percent of your scene.)
Partial metering provides an easy fix for the backlighting problem we showed earlier. Because the partial metering circle meters only our subject, the bright backlight is ignored, and we get a good exposure for our model.
To change to partial metering, press the up arrow button on the back of the camera, the one that has a metering icon above it. The XS will present the Metering mode menu, which displays icons for the camera’s three metering modes.

Press the down arrow to select partial metering. The Metering mode screen displays the name of each mode as you select it, so you don’t have to memorize the somewhat arcane metering icons. Press the Set button to execute the change.

Partial metering is a good solution to this problem. The face is better exposed, and while the background is blown out, there’s really no way around that without using flash. For times when flash is not appropriate or your subject is too far away, switching to a better metering system can be your only option.
Center-Weight Average Metering
Center-weight average is a lot like partial metering. But, where partial pays strict attention to the center circle of zones, center-weight average analyzes the whole scene, just like Evaluative, but gives more weight to the center. In the case of this image, it yields about the same results as partial. In a less extreme backlit situation, it might very well yield the best results.
Metering and Auto ISO
If you set the XS’s ISO setting to Auto, then the camera will adjust the ISO as well as the shutter speed and aperture when it meters. Because there’s little difference in noise from ISO 100 to 400, Auto ISO helps ensure that you have a shutter speed that’s suited to handholding and an aperture that will yield good focus.
Don’t Use Evaluative Metering When Focusing and Reframing
Earlier, you saw the technique of using a single, center focus spot to focus on an object and then reframing your scene. When using this technique, you might find that you get better results if you don’t use evaluative metering. If you’re using evaluative metering, then areas of the frame that won’t be in your shot will be factored into the camera’s final metering. Most of the time, this won’t matter, but in a scene with high dynamic range—a dark foreground and bright sky, for example—it could get you into trouble. Instead, if you want to use evaluative metering, after focusing, set your lens to Manual focus to lock focus, and then frame your shot as desired and meter.
No matter which metering mode you’ve chosen, the light meter still works the same way. Press the shutter button halfway down, and the camera will autofocus and meter (assuming you have your lens set to autofocus). Once it has determined focus and metering, it will beep and display a green dot in the viewfinder. This is your cue you can press the shutter the rest of the way to take the shot. In general, evaluative metering will be your best choice for almost every situation.
What Your Light Meter Actually Meters
Has this ever happened to you? It’s a nice snowy day, you take a picture, and when you look at the image, the snow seems much dingier than you remember. This can also happen on a beach with really white sand.
Surprisingly, this is not the camera doing something wrong. It’s actually metering exactly the way it was designed. To understand what it’s up to and how to fix it, you need to understand a little more about how a light meter works.
Your light meter doesn’t know anything about color; it measures only luminance, or brightness. Perhaps the strangest thing about your light meter is that it always assumes that everything you’re pointing it at is 18 percent gray. That is, it’s assuming that everything you’re pointing it at is reflecting 18 percent of the light that’s striking it. What’s even stranger, though, is that most of the time, what you’re pointing at is reflecting 18 percent of the light that hits it.
Consider these alternating black and white bars:

There are an equal number of these bars, 10 each. Because half are black and half are white, you might assume that this pattern is reflecting 50 percent of the light that’s striking it—half reflected by the white and half absorbed by the black. But, because of the physics of light, this pattern is actually reflecting only about 18 percent.
In fact, it turns out that the majority of the scenes in the world reflect 18 percent of the light that strikes them. Therefore, if your camera assumes that it’s pointed at a scene that is reflecting 18 percent of the light that strikes it (photographers refer to this as a scene that is 18 percent gray) and it calculates a metering that is correct for 18 percent gray, then the odds are that its calculated metering will be correct for your scene.
Most of the time this works. But, sometimes 18 percent gray assumption is incorrect. The field of white snow is a great example. Since the camera is assuming that it’s pointed at something that’s 18 percent gray, it calculates an exposure that will represent the field of snow as gray rather than white. Fortunately, the XS’s meter is so sophisticated that it will usually recognize a strong white object as white and calculate an appropriate exposure.
Nevertheless, when subjects are bright white, you want to carefully review your images to make sure the white doesn’t appear gray. If it does, then you’ll need to overexpose your shot to render white objects as true white. We’ll look at how to do this in just a bit.
Exposing So That Black Looks Black
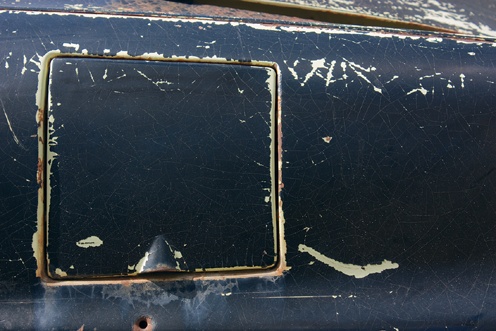
Black objects are more likely to trip up the XS’s meter than are white objects. Again, if you point the camera at a black object, it will assume that the object is actually 18 percent gray and so will concoct exposure settings that will properly render that object as gray. Consequently, black objects can sometimes appear ashen-looking.

In the shot of the black car, the blacks are not as black as they could be, because the meter assumed that the car was actually gray and so chose exposure settings that yielded an image that looked more gray than black.
By underexposing we can accurately represent the black tones in the image as black.
As I mentioned earlier, the XS’s meter is sophisticated enough that it often figures out these problems on its own. However, it’s important that you don’t become too dependent on the camera’s ability to get it right. Learn to recognize when a scene might need to be over- or underexposed. If you’re not sure, then review the image and reshoot if you need.
Using Exposure Compensation to Over- or Underexpose
Now that you’ve seen some of the occasions when you might want to over- or underexpose, we’ll look at one of the ways that you can tell the camera to make such an exposure adjustment. There are many ways of controlling exposure on the XS, but the easiest method is to use exposure compensation.
These days, almost all cameras have an Exposure Compensation control, which simply lets you make a relative exposure change. That is, you can tell the camera, “I don’t care how you metered the scene; I just want you to go up from there by 1 stop.” Try using exposure compensation now:
Frame a shot.
Press the shutter button down halfway to meter your scene (the camera will also autofocus and take a white balance reading).
After the camera beeps, the viewfinder and status LCD will show you the shutter speed and aperture settings that it has calculated.
Take the shot.
Now frame the same shot, and again press the shutter button halfway down to meter the scene.
Using your thumb, press the Exposure Compensation button on the back of the camera.
Rotating the Main dial Exposure Compensation display in the viewfinder indicates a one-stop overexposure. (If you haven’t changed the camera’s defaults, then this will be three clicks on the dial.)
Take the shot.


Now go into playback mode and look at the two images. The second one should be much brighter than the first one. This is the image that was overexposed. Note that you didn’t tell the camera a specific shutter speed or aperture. Instead, you simply told it to go up one stop from whatever it thought was the correct exposure. The XS has an exposure compensation range of −2 stops to +2 stops. By default, the control moves in 1/3-stop increments.
When you use exposure compensation, you don’t actually know exactly how the camera will achieve its over- or underexposure, but the camera does follow a predictable method. It will always try to achieve its change in a way that doesn’t involve a shutter speed that might be too slow for handheld use.
Remember, a slower shutter speed means that the shutter is open longer, which means that your images are more susceptible to the blurring and softening caused by shakiness in your hand. If you have the ISO set to Auto, the XS will often effect the change by altering the ISO setting, but it will never do this to the point of introducing noise into your image. Because there’s no visible difference between ISO 100 and 400, the XS has two stops of ISO latitude to play with, meaning it will often keep the shutter speed and aperture the same as you change exposure compensation.
The black car example that you saw earlier is a prime example of using exposure compensation. I knew that the black probably wouldn’t render properly, so I set exposure compensation to underexpose by one stop to get an image that had a more accurate black tone.
Changing the Exposure Compensation Interval
By default, the XS auto bracketing command goes in 1/3-stop increments. That is, each notch on the readout represents one-third of a stop.
Exposure Compensation and Program Shift
In Chapter 6 you learned about Program Shift, which lets you automatically switch between reciprocal exposure settings after the camera has metered. Program Shift makes it easy to quickly switch to a different shutter speed or aperture while maintaining a good exposure.
However, because Program Shift always changes to a reciprocal exposure, it never gives you an over- or underexposure, but you can dial in an exposure compensation for that, and you can easily use these two features in concert.
For example, you might meter and then use Program Shift to switch to a faster shutter speed. But maybe you’re shooting something white and want a little bit of overexposure. If you dial in +1/3 of a stop, you’ll still get both your faster shutter speed and your overexposure. In many cases, these two controls will provide all the manual power you need, and the fact that you can drive them both while looking through the viewfinder is one of the things that makes the XS’s interface so powerful.
Controlling Color Tone with Exposure Compensation
It should make sense that a slight underexposure will make black tones appear more black than gray (and vice versa for white tones). You’ve seen already that an underexposed image is darker than a regular exposure, so a bit of underexposure can be just what you need to restore a dark object to its true tone.
Like black and white, color has a tone also. Some reds are darker than others, for example. Consequently, it’s possible to adjust the saturation of a color in your image by over- or underexposing.
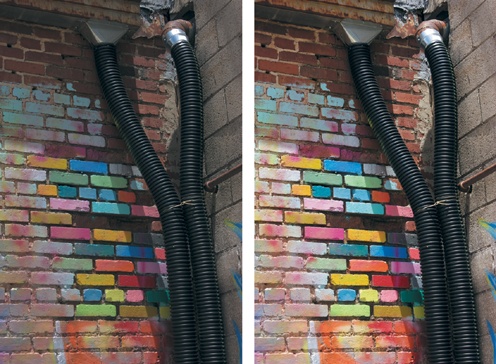
For example, consider this image, which I shot using the camera’s recommended metering and with a 1/3-stop underexposure:

Notice that the colors are a little bit more saturated and generally richer. This is because they have a slightly darker tone that needs to be underexposed to appear correct.
In general, when shooting in bright daylight, you might find that leaving your exposure compensation set to −1/3 gives you better saturation and deeper color. However, be aware that you’ll run the risk of losing detail in the very darkest parts of your image, and lighter tones may render a little gray.
Using the Histogram
One of the great things about digital photography is that you can see your images onscreen right away. In fact, we’re now well into a generation of kids who’ve never known cameras to work any other way and for whom the idea of waiting to see an image makes about as much sense as having a guy deliver blocks of ice to the house.
And while the image on the XS’s LCD does provide a great way to check your composition, it offers very little help when it comes to assessing your exposure choices. It’s very important to understand that the color and contrast shown on the back of the XS screen is not very accurate. This is not due to any ineptitude on Canon’s part. Just the opposite, actually. The XS screen needs to be visible in many different situations, including bright sunlight. To make this possible, the XS intentionally pumps up the brightness and saturation on the image that are shown on the camera’s screen. While this makes the image easier to see in bright light, it also means you won’t have an accurate view of color and contrast.
Fortunately, the camera includes an additional feature that provides a tremendous amount of information about exposure and that will repeatedly save you from returning home with poorly exposed shots.
You have already caught a glimpse of the histogram when we explored the XS’s different display modes. Go into playback mode on your camera, and press the DISP button until you see a display that looks like this:
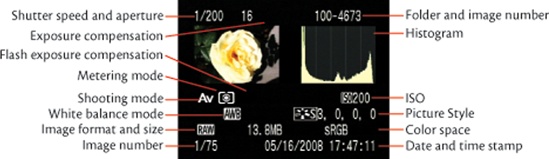
This is one of two screens designed to help you better assess the exposure of an image. Scattered around the screen is a lot of status information, including shutter speed, aperture, and ISO. The camera also shows the date and time the image was shot, as well as your balance setting, shooting mode, metering mode, picture style, image format, size of the final image, and color space of the image, but it’s the shutter speed, aperture, ISO, and histogram display that are going to ease your exposure headaches in the field.
The histogram is that graph-looking thing in the upper-right corner. While it may look complex and scientific, it’s actually quite simple.
A histogram is nothing more than a bar chart that shows the distribution of tones in your image, with black on the left and white on the right. If there’s a lot of black in your image, then there will be a lot of bars on the left side of the image. If there’s a lot of white, then there will be a lot of bars on the right side of the image. If there’s a broad range of tones, then there will be data across the histogram.
The height of each bar in the histogram simply tells you how much of a particular tone there is.
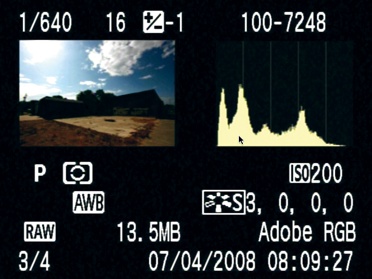
So, in the image shown earlier you can see that the image has a good range of tones from black to white, with most of the tones in the shadow and highlight areas and a smattering of tones spread across the middle.
This next part is very important: The shape of the histogram is irrelevant! You are not trying to get a particular shape—the histogram is simply showing you what’s in your image, and two masterfully exposed images might have very different histograms, because they might contain very different subject matter.
What the histogram is good for is showing you when you’ve over- or underexposed and how much contrast you’ve captured.
Recognizing Over- and Underexposure in the Histogram
When an image is overexposed, there will be a big spike on the right side of the histogram, as in this image:
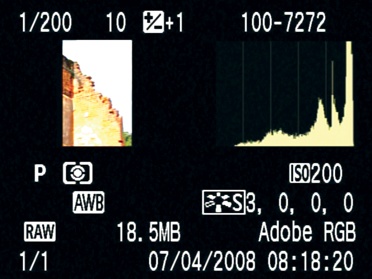
Here, we’ve overexposed the shot, and the highlights in the image have gone to complete white. That overexposure appears in the histogram as a big spike on the right side. In addition, the XS will flash overexposed pixels in the image thumbnail, making it easy to tell which parts of the image are overexposed.

Underexposure shows in the histogram in just the opposite way, with a big spike on the left side of the image. Underexposed pixels do not flash in the thumbnail display.
With this simple tool you can immediately determine whether you need to dial in an exposure compensation or change your exposure strategy. If you see a big spike on the right side, consider underexposing.
Recognizing Contrast in the Histogram
An image with more contrast has a broader range from the darkest tone to the lightest tone. As such, it will have a histogram with data that covers a broader range.
Some images will have more contrast simply because your subject is more contrasty. A penguin, for example, is more contrasty than an emu that’s a single shade of brown. At other times, though, your image will have low contrast because of your exposure choice.
For example, I shot this image with the camera’s suggested metering and then looked at the histogram. (For the sake of clarity, I’m showing a histogram from Photoshop, but you’ll see the same information on the XS histogram.)

It appeared to me that the image should have a little more contrast, so I tried overexposing by one stop and shot again, and I got this histogram:
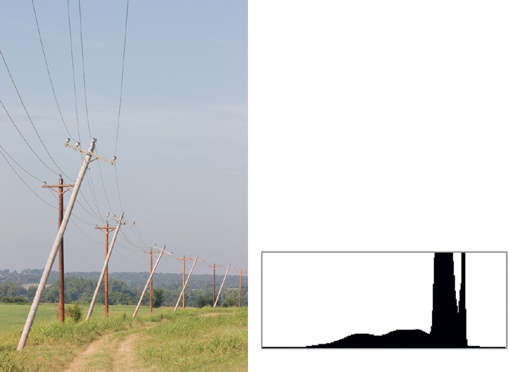
Again, there are no right or wrong histogram shapes. Nor are there right or wrong distributions across the histogram. However, the histogram can be a very useful tool for spotting over- or underexposure, as well as contrast range. An image with more contrast has more tones across the histogram that I can brighten or darken in my editing program, and that means I’ll have more latitude to make changes later.
The Three-Channel Histogram
If you press the DISP button one more time after seeing the first histogram, you’ll get to the second histogram page.

This page shows the same histogram you saw before, along with an additional three-channel histogram. In Chapter 5 you learned that an image is made up of three separate channels of color information: one red, one green, and one blue. The three-channel histogram lets you see a separate histogram for each of these channels.
This can sometimes be useful for spotting white balance troubles that could otherwise be difficult to see on the camera’s LCD screen. In an image with good white balance, all three channels are usually fairly “registered.” That is, they’re often very similar. Obviously, if you’re shooting a still life of separate red, green, and blue Christmas ornaments, then the histograms for each channel will be very different. But in a typical image, the highlights in a three-channel histogram should fall mostly in the same place. If they don’t, you’ll want to consider switching to a white balance preset, switching to a custom white balance, or using the white balance shift to correct the image.

Using Priority Modes to Control Exposure
While the Exposure Compensation and Program Shift controls are both great ways to control exposure, there will be times when you’ll want more direct control. Shutter and Aperture Priority let you select specific shutter speeds or apertures and leave the camera on those settings. So, for example, if you’re shooting landscapes and know that you’re going to want a deep depth of field all day long, you can set the camera on Aperture Priority, dial in f/11, and be assured that every shot will be taken with that aperture.
Or, if you’re shooting a sporting event and know that you want lots of motion-stopping power, you can select Shutter Priority and set the shutter speed to something quick, like 1/1000th of a second.
Aperture Priority
To use Aperture Priority, set the XS’s Mode dial to Av. In Aperture Priority mode, you select the aperture you want, and the camera automatically chooses an appropriate shutter speed, based on its metering.
In Aperture Priority mode, the rear LCD will display the current aperture setting in a gray box, with arrows on both sides to indicate that you can change this parameter. Turn the Main dial to change the aperture. When you half-press the shutter to meter, the camera will display the shutter speed that it has chosen.
Different lenses have different aperture ranges, and with a zoom lens, the wide end of the aperture range is often variable. For example, on the 18–55mm lens that Canon bundles with the XS, the wide end of the aperture range varies from 3.5 to 5.6. That is, when you’re zoomed out all the way to 18mm, the lens has a maximum aperture of 3.5. When you zoom in all the way to 55, the maximum aperture is a slightly smaller 5.6 aperture.

The maximum aperture varies in between these extremes. So, if you find that you sometimes can select a wider aperture than at other times, this is because you’re probably shooting at different focal lengths.
Depth of Field Preview
To ensure a viewfinder that’s as bright as possible, the XS keeps its aperture open as wide as possible all the time. Even if you or the camera have chosen a very small aperture, the aperture stays open all the way until you actually take the picture. Then the aperture closes down to the specified setting, and the sensor is exposed.
In addition to letting as much light into the viewfinder as possible, the fact that the aperture is always wide open means you’re possibly seeing less depth of field in the viewfinder than what your final picture will actually have. Trying to shoot with a very deep depth of field can be tricky because, as we learned earlier, depth of field is centered around the point of focus, and there’s more depth of field behind that point than in front.
If you want to see what the depth of field in your scene will actually look like, you can use the Depth of Field Preview button.

Unfortunately, as the viewfinder gets darker, it can be harder to see fine focus details. However, if you let your eyes adjust to the darker scene, you’ll probably be able to get a good idea of what is in focus and what isn’t. Depth of field preview will work in any mode on the XS and is a great way to determine whether you’ve chosen an aperture and focus point that yield the depth of field you want.
Note that, depending on your lighting situation, you can’t always pick any aperture that you want. In a low-light situation, if you pick a very small aperture, the XS may not have a shutter speed that’s fast enough to yield a good exposure. In these circumstances, the camera will flash the shutter speed readout to indicate that your image will be underexposed. You’ll need to choose a wider aperture or increase the ISO until the camera indicates that it can get a good exposure.
Pay Attention to Shutter Speed
Just because you now have complete control of aperture, and just because the camera is choosing a shutter speed for you, doesn’t mean that you don’t have to think about shutter speed at all. You still need to pay attention to the handheld shutter speed rule. If you pick an aperture that yields a shutter speed that’s too slow for handholding or motion stopping, then you may end up with an annoyingly blurry image. The XS will display its selected shutter speed any time you meter.
Shutter Priority
Select Shutter Priority mode by turning the Mode dial to Tv (and no, this isn’t the most intuitive abbreviation—think Shutter Priority). In Shutter Priority mode, you select the shutter speed you want, and the XS will automatically choose an appropriate aperture.
In Shutter Priority mode, the XS will display the shutter speed in a box on the LCD screen, with arrows to indicate you can change it. Turn the Main dial to select the speed you want.

As you may have already discovered, you can choose slower and slower shutter speeds, until eventually shutter speed is measured in whole seconds.

Priority Modes and Exposure Compensation
You can use Exposure Compensation with either shutter or aperture priority mode. The camera will never alter the parameter you’ve selected, but will instead change the other exposure parameter, as well as ISO, to achieve the compensation you want. If it can’t get a proper exposure, it will flash the non-priority value to indicate that your shot will be misexposed.
Manual Mode
For the ultimate in control, you’ll want to use Manual mode, which lets you adjust both aperture and shutter speed. To activate Manual mode, move the Mode dial to M. The LCD screen will show both the shutter speed and aperture, with a box around the shutter speed.
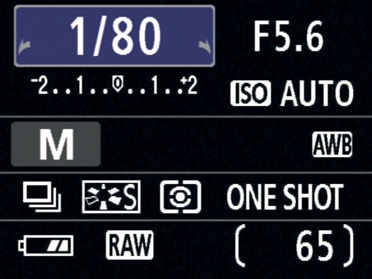
You can change shutter speed by turning the Main dial. If you want to change aperture, press and hold the Exposure Compensation button while turning the Main dial.

If the exposure settings you choose are over- or underexposed, the camera will indicate the misexposure by flashing a bar under the Exposure Compensation meter. So, if you’re one stop underexposed, for example, it will flash a bar under the −1 stop notch on the Exposure Compensation readout. If you’re 2 or more stops over- or underexposed, it will flash beneath +2 or −2, respectively.
Manual mode can be handy for times when you want to ensure very specific results. Perhaps you’re shooting a still life and so want a deep depth of field. You might switch to Aperture Priority to select a smaller aperture. But say it’s dim lighting and the camera doesn’t yield a shutter speed that’s appropriate for handheld shooting. You can switch to Manual mode and dial in both the shutter speed and aperture you want. The results might be underexposed, but you might be able to brighten the image in your image editor later.
Exposure Bracketing
Now that I’ve thrown all this exposure theory at you and loaded up your head with all these things to remember, it’s time to learn the easy solution to the whole exposure thing: Rather than worry about trying to nail the exposure with one shot, just shoot the same shot a few times with different exposure settings. This process is called bracketing.
Bracketing is very simple. You shoot one shot at the camera’s recommended metering, then another shot underexposed, and another shot overexposed. How much to over- or underexpose depends on how tricky the scene is and how cautious you are.
For example, if you’re in a situation where you’re not sure of the exposure—maybe there’s a big mix of bright and dark tones—then you might want to bracket your shots. Or, if you’re shooting a very bright or very dark object and aren’t sure how to expose to properly render the tones, then bracketing can be the answer.
With exposure compensation, it’s very easy to bracket. Shoot a shot, set exposure compensation down, shoot another, and then dial it up and shoot a third.
Bracketing does not make you a wimpy photographer! It does not mean you don’t know what you’re doing or that you’re not serious. Some of the best photographers in history bracketed very heavily.
Obviously, bracketing is not viable when you’re shooting action shots or any sort of fleeting moment. But for landscapes, still lifes, portraits, and other static scenes, it can mean the difference between a usable shot and one with exposure troubles.
Auto Bracketing
The XS includes an auto bracketing feature that will perform an automatic exposure change for you, making it simple to take a bracketed set of shots.
To activate auto bracketing, choose AEB from the second shooting menu (AEB stands for Auto Exposure Bracketing).
When you select AEB, the rest of the shooting menu will temporarily disappear. The AEB control looks just like the exposure compensation control, with each number representing one stop. Use the left and right arrows to define the size of the bracket.
When you’ve selected the bracket that you want, press Set. Note that a half-press of the shutter button will not confirm your selection. You must press Set.
Now take a picture. That shot will be exposed as the meter recommends, and the camera will automatically be adjusted to underexpose by the amount indicated in the AEB setting.
Notice after you take the first shot, the bracketing indicator on the XS status displays begins flashing. This indicates that you’re currently in the middle of a bracketed set. When these indicators are flashing, you know that your next shot will either be over- or underexposed, depending on where you are in the bracket.
Take another picture. That shot will use your underexposed setting, and the camera will automatically be adjusted to overexpose by the AEB amount.
Shoot a third and final shot. This will end your bracketed set.

Your next shot will be fired as metered, because now you’re into a new bracketed set. In this way, you can easily fire off three shots and have a fully bracketed set.
Deactivating Auto Bracketing
To deactivate auto bracketing, just go back to the AEB page and press the left arrow button until the bracket is gone. If you decide in the middle of a bracketed set that you don’t want auto bracketing, just turn it off in the AEB menu.
Auto Bracketing and Drive Mode
An even easier way to shoot a bracketed set is to turn on AEB and then activate Drive mode. Now press and hold the shutter button until it takes three shots. Because AEB was activated, those three shots will be bracketed.
Auto Bracketing and Exposure Compensation
You can still use exposure compensation when you have auto bracketing turned on. When you dial in an exposure compensation, the entire bracket will be shifted up or down.
Note that when bracketing is turned on, the exposure compensation range expands to −4 to +4. However, the largest bracket you can define is still −2 to +2 stops. The expanded exposure range gives you more room to place that 4-stop bracket range.
Scene Modes Revisited
We will be returning to some exposure discussion when we get to Chapter 6 and a discussion of the XS’s priority and manual modes. For now, though, you have all of the tools and understanding you need to shoot just about any situation, all from within Program mode.
In Chapter 1 you learned about the XS’s scene modes, those special automatic modes that are designed for shooting in specific circumstances. Let’s take another quick look at those with your new understanding of exposure.
- Portrait mode
tries to choose an exposure that will blur out the background. So, you now know that what it’s up to is trying to choose an exposure with a wide aperture (lower f-number), since a wider aperture produces a shallower depth of field. And, you also now know that if it’s using a wider aperture, then it must use a faster shutter speed to compensate (a wider aperture lets in more light, so you need a shorter exposure time).
- Landscape mode
does the exact opposite from Portrait mode. It uses a smaller aperture (bigger number) to increase depth of field. This will usually result in a slower shutter speed. When the shutter speed drops below what the camera thinks is appropriate for handholding the camera at your current focal length, then it will flash the shutter speed readout as a warning.
- Close-up mode
opts for a shallower depth of field, just like Portrait mode. So, this means wider aperture.
- Sports mode
aims for motion stopping power, which you now know means faster shutter speed. It also activates Drive mode and Servo focus.
- Night Portrait mode
activates the flash but also sets a shutter speed that’s appropriate for exposing the scene without the flash. So, the flash fires to expose your subject in the foreground, but the long exposure properly exposes the background.
Scene modes offer no manual overrides. You cannot use exposure compensation or change the ISO, white balance, metering mode, drive mode, focus point, or image format in any scene mode. If you do, the camera will display a warning.
Scene modes are great when you’re starting out or if you’re really in a hurry, but as your skill grows, you’ll probably find yourself using these modes less and less as you learn to accomplish the same shots, with more customization, using manual overrides.

Picture Styles
You’ve now seen how changes in exposure can affect the tones in your image, as well as the saturation. But the XS has some other ways to alter the contrast, saturation, and color in your image.
Picture styles allow you to change the way the camera processes its images, with direct control from the camera of sharpness, contrast, saturation, and color tone in your image. These processes are very different from what happens when you change exposure, and to understand how they work, you need to know a little more about how the camera makes an image.
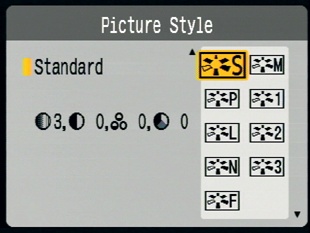
Selecting a Picture Style
A Rebel XS picture style is a collection of image-editing directives. A picture style can contain detailed color correction instructions that affect specific hues, as well as global corrections to contrast, saturation, color tone, and sharpness settings. By default, the XS uses the Standard picture style, which is a general-purpose style that delivers nicely balanced saturation and accuracy to deliver attractive color that’s still realistic. To change picture styles, press the down arrow button on the back of the camera. Notice that it has a Picture Style icon next to it.
Earlier, you learned the basics of how the image sensor in your Rebel XS works. You learned that the image sensor can measure the light that strikes each pixel on its surface and that to calculate color, a complex interpolation process is employed. In fact, though, there’s actually a lot more that goes on in the camera when you shoot in JPEG mode (which is the only type of shooting we’ve done so far).
After reading the data off the sensor, amplifying it, and interpolating the color values, the XS must do a lot of additional processing before a usable image is produced. After performing its initial color computations (which involves demosaicing and then performing colorimetric interpolation, for those of you who want some fancy terms to throw around at your next cocktail party), it then maps the data into a color space.
Here’s the trouble with color: It’s very subjective. If you’ve ever gotten into an argument with someone over a color—one of those “How can you say that’s mauve when it’s plainly maroon"-type arguments—then you’ve experienced firsthand how different people can see colors in very different ways. Things are further compounded because different types of devices can record and interpret different ranges of colors. For example, your eyes can perceive a much larger range of tones and colors than the Rebel XS can, but the XS can capture and store far more colors than any printing technology can print.
So, the XS image sensor may analyze its data and discover that one pixel is 100 percent maroon, but what does “100 percent maroon” mean? Is it a really dark maroon or a lighter maroon or a maroon that leans toward the red side? Or the magenta side?
To address this issue, scientists use something called a color space. You can think of a color space as simply being an agreed-upon scale that is used when measuring color.
So, for example, in the sRGB color space that the XS defaults to, “100 percent red” is defined as being a very specific shade of red. Photo nerds will argue the merits of one color space over another, saying that some are too small—meaning that the full range of colors a camera can capture aren’t represented—while others are too large—meaning that your image might suffer from some strange color problems. So, after your camera calculates color, it maps those colors into the specified color space.(Later, we’ll look at how to change the color space.)
With the color stored, the camera turns to an issue of contrast. Your senses are nonlinear in the way that they respond to stimuli. For example, if you double the amount of light in the room, your eyes don’t register a 200 percent increase in brightness. Instead, the brightness increase is attenuated, or rolled off. This effectively makes your eyes more sensitive to changes at the extreme bright and dark ends of their range.
The image sensor in the XS, though, is linear in its response to light. A double of brightness results in the sensor registering twice as much light. The practical upshot of all this is that your eyes see much more contrast than does your Rebel. For example, here’s the same scene as your eye would see it and as the XS’s image sensor sees it:
While the difference isn’t huge, the linear image is definitely a little duller and lacks some of the punch of the nonlinear image.
To make the linear image more like what our eyes are used to seeing, the camera applies a mathematical curve to the values in your image to make them nonlinear. This process is called gamma correction.
After gamma correction, the camera corrects the color according to the white balance settings on the camera. At this point, you have a very good-looking image that is recognizable as a quality color photo (assuming you exposed well). But the camera still does more.
Using the equivalent of an in-camera image-editing program, the XS adjusts the contrast, color saturation, and color tone in your image and then finally applies sharpening. These adjustments have nothing to do with any exposure parameters you’ve chosen; they’re simply image-editing operations of the same kind you would apply using an image editor like Photoshop.
Earlier, you learned about pixels, and we discussed how you can represent a greater number of colors if you dedicate more bits of memory to each pixel. Basically, with more bits you can count higher, which means you can represent a greater number of colors. The Rebel XS stores 14 bits of data per pixel, which represents a lot of colors. Unfortunately, the JPEG format supports only 8 bits per pixel, so after all of this image processing, the next thing the camera must do is discard a bunch of its color data. The images is converted from a 14-bitimage down to an 8-bit image.
Finally, the image is JPEG compressed and stored on the media card.
While most of this process is out of your control—it’s simply a few billion calculations that the camera performs automatically in the split second after you shoot a picture—the amount of contrast, color saturation, and color tone adjustment that the camera applies is something you can alter.
Select the picture style you want, and then press Set. The camera displays the current picture style on the rear LCD status page.

Each picture style affects your image as follows:
- Portrait
lowers the sharpness that’s applied to the image in an attempt to smooth skin tones. Also boosts certain tones to make skin tones more realistic. This is similar to the way that Kodak Gold film used to make skin tones more golden to give them a “healthy glow.” Obviously, this feature is biased toward Caucasian and lighter skin tones. Bear in mind that Portrait picture style has no impact on the camera’s exposure choice. Unlike the Portrait shooting mode, the Portrait picture style does not impact the camera’s aperture choice. However, this picture style is automatically selected when you choose Portrait shooting mode.
- Landscape
increases the sharpness that’s applied to the image so as to bring finer detail to landscape scenery. Landscape style also boosts green and blue tones to create richer skies and more vivid foliage. This style is automatically selected when you choose Landscape shooting mode.
- Neutral
deactivates sharpening and most in-camera color correction altogether. If you prefer to process your images yourself, then Neutral is a good way to go. It’s possible to edit an image too much, resulting in visible artifacts in your image. So, if you’re serious about editing, you might not want the camera to “use up” too much of your editability. Images shot with Neutral will appear more subdued.
- Faithful
is what you’ll want to use if you’re a stickler for color accuracy, assuming you’re shooting in daylight. With this style, images are adjusted with an eye toward more accurate color reproduction. Like Neutral, images shot with Faithful appear to be a little dull.
- Monochrome
converts your images to grayscale (or, black and white, if you prefer the more traditional term). Grayscale conversion is a very subjective process, so while this picture style is handy, if you’re serious about black-and-white photography, you’ll be better served by shooting in color and performing your conversion by hand in an image editor.
Adjusting Predefined Picture Styles
You can tweak the six predefined picture styles by adjusting saturation, color tone, and contrast within the camera. Each of these parameters has a range from −4 to +4, while Sharpness has a range from 0 to 7. While you can’t edit all of the effects of a picture style, these four parameters give you a fair amount of adjustment latitude.
To edit a picture style, select Picture Style from the second shooting menu.
Navigate to the picture style you want to edit, then press the DISP button.
From the Detail set page, you can dial in Sharpness, Contrast, Saturation, or Color Tone. Simply select the parameter you want to edit, and press the Set button. You can then use the arrow keys to move the slider for that value. Press Set again when finished.

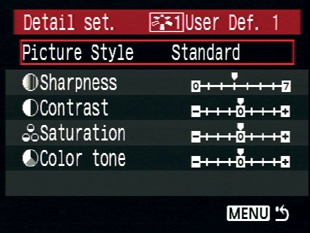
The XS supports up to three user-defined styles. You edit these just like you would any other style. From the Picture Style menu, select User Def. 1, 2, or 3, and hit the DISP button. You can now edit the same four parameters for each setting. These user-defined picture styles appear on the Picture Style menu when you press the down arrow key, just like any other picture style.
If you’re really serious about picture styles, then you’ll want to look at the Picture Style Editor application that’s included on the EOS Digital Solution Disk. The Picture Style Editor gives you far more control than what you can get from the four in-camera sliders. Working from any example image you choose, you can select colors and then adjust their hue, saturation, and lightness. You can edit dozens of colors and, when you’re done, export the resulting picture style to your camera.

Before you dive into learning the application, think a little bit about your workflow. Picture styles are very handy if you want to be able to quickly crank out images without doing any post production editing. For wedding and event shooters, this is a great feature. But for most of us who are willing to spend some time editing individual images, it makes more sense to work over our image in an image editor, rather than trying to definesome sort of “global” editing adjustment that will be applied to every image we shoot.
Creating a Better Exposure with Fill Flash
I want to take a quick moment to introduce you to the simplest—and most-often used—form of flash photography. While most people think that a flash is for shooting in low light, flash can be just as important when shooting in direct sunlight. In fact, since the built-in flash on the Rebel XS is not especially powerful and can’t be pointed in specific directions, you may find you use it more in bright daylight than you do in low-light situations.
For example, if you’re shooting someone standing under a tree, the tree will shade their face, while full sunlight brightens up the scenery behind them. This is just like the earlier example of shooting someone in front of a window. The camera will most likely meter for the background, rendering the foreground underexposed. In the window scenario, we used different metering modes to properly expose the foreground at the expense of overexposing the background. If you don’t want to blow out the background, and if your subject is within range of the flash, you can use the pop-up flash to fill in the foreground to create an even exposure.

Similarly, someone wearing a hat can have a face cast in shadow. Fill flash can easily open up these shadows to produce a better exposure.

In fact, fill flash would have been a fine alternative to the bright window scene that we struggled with earlier. To shoot with fill flash in Program mode, simply press the flash button to pop up the flash, and shoot as normal.
A Word About Dynamic Range
There is a range from very dark to very bright wherein your eyes can see detail. Below this range, things are too dark, and above this range, things are painfully bright. This is called dynamic range, and in humans, it’s about 18 stops wide. That is, there are about 18 doublings of light from darkest to lightest.
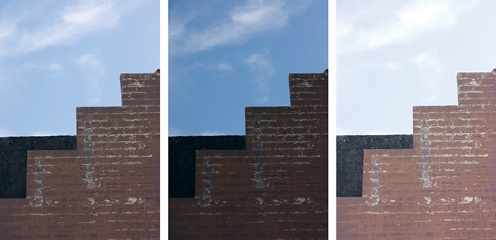
Unfortunately, like all cameras, the Rebel XS has a much smaller dynamic range than what the human eye can perceive. About half the range, actually. This means that, with a single shot, you cannot capture some scenes in the way your eye sees them. For example:
This image has a very large dynamic range. There are details in the shadows and details in the highlights. It was not actually possible to capture this in one shot. Instead, I had to take two shots, one exposed for shadows and the other exposed for highlights, and then combine them in an image editor. Unfortunately, performing this kind of combining is not always possible, either because your subject is moving, you didn’t think to take multiple shots, or the postproduction work is too hard. Most of the time, when shooting a scene like this, you simply have to decide whether you want to shoot for highlights or shadows.
As discussed earlier, it’s usually better to preserve details in highlights, because areas of solid white are distracting. Areas of solid black just look like dark shadows that we can’t see into.