
Chapter 5. Photography 101
THE FUNDAMENTAL THEORY OF EXPOSURE
In this chapter, we’ll take a break from cameras and computers and focus on basic photo theory. In the old days of manual cameras, you couldn’t learn to shoot without certain fundamental knowledge. With today’s automatic cameras it’s possible to take great photos without having the slightest notion of how different parameters affect your image. However, you’ll most likely find that shooters who do understand the basics have a broader creative palette to work with and can push their photography further. We’ll be using the concepts covered in this chapter through the rest of the book.
In Chapter 2 we took a quick look at the anatomy of your Rebel XS, and you learned something about the architecture of an SLR camera. In that discussion I mentioned the image sensor in your camera. As you already know, in a digital camera, the image sensor takes the place of a piece of film and is the mechanism by which the camera can “see” an image.
The image sensor is a chip that is mounted parallel to the back of the camera so that the light focused by the lens hits it head-on. In the Rebel XS, the image sensor is the same size as a piece of APS film.
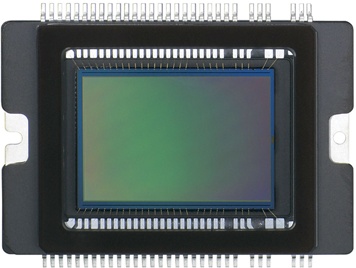
The Rebel XS image sensor is based on a technology called complementary metal-oxide semiconductor, or CMOS. All Canon SLRs use CMOS image sensors, while many other SLRs and most point-and-shoots use Charge Coupled Device, or CCD, image sensors. You will often see people praise the merits of one sensor over another, and while these can be interesting engineering discussions, as a photographer, the only thing you need to worry about is final image quality. If your image sensor delivers excellent images in a range of lighting situations— which the Rebel XS does—then the relative merits of sensor technology are fairly moot.
Whether CMOS or CCD, most image sensors employ the same basic design. A rectangular area on the sensor is sensitive to light. This area is divided into a grid with one cell for each pixel that the sensor can capture. So, the Rebel XS’s 10- megapixel sensor is divided into a grid with 10 million cells (for those of you who are sticklers for accuracy, it’s actually closer to 10.10 million cells).
So you can understand what happens in each cell, we have to talk about a major figure in digital photography. While photographers will often throw important names around—Elliott Erwitt, Ansel Adams, Henri Cartier-Bresson—they don’t often mention Albert Einstein. Albert Einstein might have fundamentally changed our idea of space and time, ushered in the nuclear age, and laid the groundwork for some of the most important, radical thinking in the entire history of the human species, but he also did some important work that turned out to be essential for digital cameras.
While everyone associates Einstein with relativity, it was his investigation of the photoelectric effect that won him his one and only Nobel Prize, and the photoelectric effect is what makes a digital image sensor work.
In simplest terms (which is probably about as far as us non-Einsteinian, non–computer engineers can understand), the photoelectric effect causes certain types of metal to emit a number of electrons when struck by light. The number of electrons is directly proportional to the amount of light.
Each cell on your image sensor contains a piece of metal that is sensitive to the photoelectric effect. After the exposure, the sensor measures the voltage at each location and thus understands how much light struck each pixel.
Since it knows how bright each pixel should be and since it has so many pixels on its sensor, the image sensor can build up a very detailed image.
Obviously, all of this happens in a fraction of a second, and in practice, you don’t have to worry about what the image sensor is doing at the individual pixel level. However, you do have to think about the amount of light that you expose the sensor to, because if there’s too much or too little, your shot will be ruined. What’s more, you can change the method by which the sensor is exposed and achieve very different results.
Over- and Underexposure
At its most basic level, exposure is pretty easy to understand. If you turn out the light in your room at midnight, your eye won’t be able to gather enough light for you to be able to see anything. In other words, your room is underexposed.
Conversely, if someone shines a bright light in your eyes, you may not be able to see because the sensors in your eyes will get overdriven. In other words, your field of view will be overexposed.
The image sensor in your camera (or a piece of film in a film camera) works the same way. If you underexpose a scene—either because there’s simply not enough light or because you use bad exposure settings—then the scene will be too dark. If you overexpose a scene, then the image will be too bright.

Even within an individual shot, some areas can be overexposed, and some areas can be underexposed.

So, one of your primary concerns as a photographer is to make sure that you’re choosing settings that expose the camera’s sensor to an amount of light that will render a scene that is neither too bright nor too dark.
Exposure Mechanisms
Your camera gives you two mechanisms for controlling the amount of light that hits the image sensor. Using these mechanisms, you can ensure that you don’t end up with images that are too bright or too dark.
In Chapter 2, you learned about the shutter, a curtain that opens and closes in front of the shutter to expose it to the light that is focused through the lens. By using a faster shutter speed, the shutter will open for less time and thus expose the sensor to less light.
The second mechanism that the camera uses to control light is the iris, or aperture. This concept should be somewhat familiar because your eyes have irises in them, and if you’ve ever walked out of a dark movie theater in the middle of the afternoon, you know what it’s like to wait for your pupils to close down so that your field of view ceases to be overexposed.
The iris in your camera is built from a series of interlocking leaves that, when rotated, create an expanding or shrinking opening, or aperture. The wider the aperture, the more light that gets let through to the sensor.
The aperture is positioned at the very end of the lens, just before the mount that attaches the lens to the camera body. As mentioned in Chapter 2, the shutter is positioned just in front of the image sensor.
DEFINITION: It’s Curtains!
The shutter in your camera is composed of two curtains that pass in front of the lens. As the first one passes, the sensor is exposed. The second one then passes to close off the sensor. At a high shutter speed, there’s a good chance that there will be very little time between when the two curtains start moving. This means that the actual opening created by the shutter is just a thin slit that passes in front of the sensor.
ISO: The Third Exposure Parameter
In a digital camera, you have one additional parameter that you can change to control exposure.
As you just learned, your image sensor measures voltages on the sensor’s surface to determine how much light struck each pixel. These voltages must be amplified before they can be measured. If you amplify the voltages more, then the sensor will effectively be more light-sensitive, because dimmer light levels will be boosted.
ISO is a standard for measuring the sensitivity of film. Digital vendors have adopted the standard for specifying the sensitivity of a digital image sensor. When you increase the ISO setting on the Rebel XS, you’re essentially making the sensor more light-sensitive. As the sensor becomes more sensitive, it will require shorter exposures to be able to “see” a scene. We’ll discuss ISO in more detail later.
DEFINITION: Stops
To a photographer, a stop is a measure of light. More specifically, a stop represents a doubling of light. So, any time there’s a doubling of light—whether we’re talking about the light in a scene or the light hitting your sensor—we say that the amount of light has increased by one stop. Conversely, a halving of light means that the light has decreased by one stop. We will be using this term extensively throughout the rest of the book. Experienced photographers are often able to recognize one or two stops of light by eye. While that can take years of practice, it’s not a necessary skill to use your camera well. However, you will need to understand the term and how it applies to the different exposure settings.
Shutter Speed
As you’ve learned, the shutter sits just in front of the image sensor and opens and closes to expose the sensor to light. The shutter speed that you (or the camera) chooses determines how long the shutter will stay open.
Shutter speeds are measured in seconds, and a longer shutter speed exposes the sensor to light for a longer period of time than a shorter shutter speed. The XS has a shutter speed range of 1/4000th of a second on the fast end to 30 seconds on the slow end. The XS also provides a Bulb mode, which lets you keep the shutter open indefinitely.
In the Full Auto shooting that you’ve been doing, the camera has been calculating an appropriate shutter speed for you automatically, and you can see its decision in the camera viewfinder status display.

On the status display shown on the back of the camera, shutter speed is the number in the upper-left corner.

In later chapters, you’ll learn how to control shutter speed manually.
Aperture
Like shutter speed, the size of the aperture (which we discussed earlier) can be controlled automatically by the camera or manually by you. Aperture size is measured in f-stops, and an f-stop number is often fractional, so you’ll see f-stops with values such as f5.6, f8, or f11.
QUESTION: What Do Those Numbers Mean?
An f-stop is a measure of the ratio of the focal length of the lens to the size of the aperture. Many of the numbers are fractional because you’re dealing with the area of a circle, and the math quickly gets complex. Don’t worry about trying to understand that ratio; you don’t have to understand the math to effectively use f-stop values.
Unfortunately, f-stops can be a little unintuitive because the way they’re measured can seem backward. A larger f-stop number, say 16, indicates a smaller opening.
Let’s try a little experiment that will make all of this a little clearer.
Take your Rebel XS and set the Mode switch to M, for manual. We’ll be looking at Manual mode in detail in Chapter 9, but for now we’re going to use it so that you can see your lens’s actual aperture.
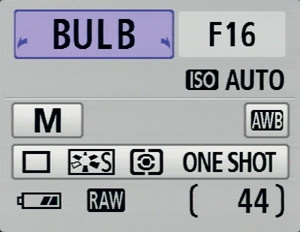
Turn the Main dial to the left until the Shutter Speed readout on the rear LCD says BULB.
Now press and hold the Exposure Compensation button on the back of the camera while you turn the Main dial. This allows you to change the aperture. Turn the wheel until the Aperture readout says F16. The status display should look something like this:
With the shutter speed set to BULB, the shutter will stay open for as long as you hold down the shutter button.
Set the camera lens to manual focus by changing the focus switch on the lens from AF to MF.
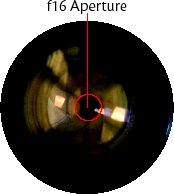
Orient the camera so that you can see the front of the lens and watch what happens when you press and hold the shutter button. You should see the iris close.
Take a closer look, and you’ll be able to see the interlocking metal leaves that make up the iris.
Now release the shutter button, and the iris will open again.
It’s pretty easy to see that when the aperture is smaller, it blocks (or stops) a lot of light. For this reason, when the shutter button is not pressed, the aperture opens as wide as it can go to ensure that as much light as possible makes it to the viewfinder so that you can more easily see and frame your shot. When you press the shutter button, the camera closes the aperture down to your chosen aperture setting, opens the shutter to make the exposure, closes the shutter, and then opens the aperture back up all the way so that you have a clear view out the viewfinder.
Now press and hold the Exposure Compensation button and dial the aperture to f8. Again, look at the front of the camera and press and hold the shutter button. The iris will close, but it should be obvious that it’s not closing as far as it did when the aperture was set to 16.

Dial up some other apertures and take a look at them. When you’re finished, be sure to set your lens back to autofocus by moving the focus switch to AF.
What you should have seen is that when you choose a higher f-stop number, you’re electing to stop more light with the aperture. That is, you’re selecting a smaller opening.

In this book, we’ll use a few aperture-related terms that you’ll regularly hear photographers employ. When we speak of stopping down a lens, we mean choosing a smaller aperture (larger f-number). Opening up the lens means choosing a larger aperture (smaller f-number). Shooting full wide means choosing the largest possible aperture (the one with the smallest number).
This last term can be a little tricky because, on a zoom lens, the largest possible aperture can vary depending on your current focal length. For example, if you’re using the 18–55mm lens that Canon bundles with the XS, then you have a large aperture of f3.5 when shooting with the lens at full wide but a large aperture of f5.6 when shooting with the camera at full telephoto. In other words, the aperture can’t open as wide when you zoom the lens in all the way. This is simply because of the nature of engineering a lens. (If you look at the front of the lens, you’ll see that it says “1:3.5–5.6.” This tells you the aperture range, from full wide to full telephoto.)
Why There Are Two Ways to Control Light
So, you can limit the amount of light that hits the sensor by changing the amount of time that the shutter is open, and you can limit the amount of light that hits the sensor by changing the size of the aperture in the lens. But why do you need two mechanisms for controlling light? If your concern is just to ensure that the image is neither too bright nor too dark, wouldn’t one mechanism be enough?
If brightness were your only concern, then yes, one mechanism would be enough, but because of the way the physics of light works, there can be a big difference in your final image depending on whether you try to control exposure using shutter speed or aperture. In fact, after compositional choices, the bulk of your creative power as a photographer comes from how you choose to manipulate these two controls.
How Shutter Speed Choice Affects Your Image
This next bit should be pretty intuitive. As you choose a faster shutter speed, you will have more ability to freeze motion in a scene. That is, when the shutter is open for a very short time, a moving subject will be frozen. When the shutter is open for a longer time, a moving subject will be blurry and smeared.

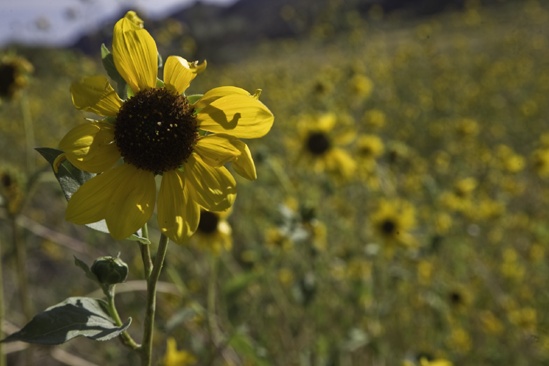
You may think that blurry and smeared is inherently bad and that you would always want your images sharp and clear. But consider the following two images:
If we shoot this scene with a fast shutter speed so that it is completely frozen, then we no longer see this as a moving Ferris wheel. In fact, it looks stopped. Blurred motion is often a way to introduce a dynamic feel to your images. When shooting a dynamic scene, you’ll want to think about what best conveys the sense of dynamism that you feel there. Is it a perfectly frozen, fast shutter speed choice? Or a blurred, slow shutter speed choice?
There’s another concern with shutter speed, which is the fact that your hands and body aren’t always steady. You don’t want to choose a shutter speed that’s so slow that the natural shakiness of your hands will cause the image to be soft or blurry. In Chapter 6, we’ll discuss how to calculate the slowest possible shutter speed for handholding in any given situation.
How Aperture Choice Affects Your Image
As you saw when you looked at the front of your lens with the shutter button held down, when you choose a higher f-number, the aperture in your lens is closed off more and blocks more light. Obviously, this will make your final exposure darker. But changing aperture has another effect on your image.
As you go to a smaller aperture, the depth of field in your image gets deeper. Depth of field is simply a measure of how much of your image is in focus.
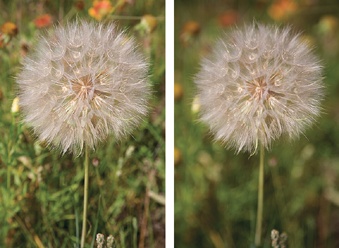
Here, the figure on the right has a very shallow depth of field. Notice that the background is out of focus, and even some parts on the front and back of the dandelion are slightly out of focus. The image on the left has very deep depth of field, with everything in the image in focus.
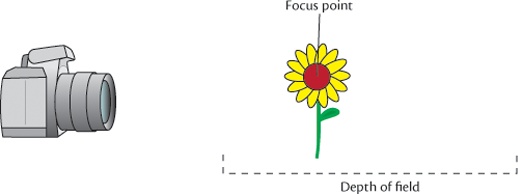
Depth of field is measured around your point of focus. So, if you’ve chosen an aperture that gives you, say, 10 feet of depth of field, then an area 10-feet deep will be in focus centered around the distance you focused at. What’s more, about a third of that depth will be in front of the point of focus, and the other two-thirds will be behind.
Isn’t it usually best to have everything in your image in focus? Not necessarily. Sometimes, having a sharply focused background can distract the viewer from your foreground subject. Portraits are the most common example of a shallow depth of field application. If you choose a larger aperture for a portrait, you’ll create a softer background that will bring more attention to the subject of your portrait.
Just as you’ll make shutter speed choices to control motion stopping, sometimes you’ll need to consider how depth of field can be used to better express the subject or scene you’re shooting.
Also, be aware that every lens has an aperture “sweet spot.” On most lenses, if you stop down too far, you might suffer a sharpness penalty. Depending on how big you intend to print your final image, this penalty may be irrelevant.
Shutter Speed/Aperture Balance
So, you can control how sharp or blurry a subject is by choosing a slower or faster shutter speed, and you can control how deep the focus is by choosing a larger or smaller aperture.
However, each of these choices will also render your scene brighter or darker. For example, if you decide you want to use a very fast shutter speed to stop a fast- moving object, then your scene might end up underexposed. The faster speed will allow less light to hit the image sensor, and your final image might end up dark.
You can compensate for a faster shutter speed, though, by using a wider aperture. A wider aperture will allow more light to pass through the lens and will restore a good level of brightness to your scene. Of course, a wider aperture might mean less depth of field. So, if you want to stop motion and have a deep depth of field and a scene that is properly bright, you might have a problem. Balancing all of these factors is one of the tricky things about photography.
To better understand this balance, you need to learn a new term.
Reciprocity
Let’s go back to the subject of stops for a moment. As discussed earlier, a stop is a measure of light. When you double the amount of light that hits the sensor, we say that you have increased the amount of light exposure by one stop. Conversely, if you halve the light, you decrease the exposure by one stop.
Consider these shutter speeds:
| 1/60 1/120 1/250 1/500 1/1000 1/2000 1/4000 |
Each one is double the previous shutter speed. In other words, there is a one-stop difference in the amount of light exposure generated by each of these speeds.
Now consider these apertures:
| f4 f5.6 f8 f11 f16 f32 |
This one is not so obvious because most of us aren’t too familiar with calculations of circular area. But, trust me when I say that each one of these apertures represents an opening that’s twice as big as the previous aperture. In other words, there’s a difference of one stop of light exposure between each of these apertures.
When it comes time to balance motion stopping power with depth of field with overall illumination, you can take advantage of the fact that both shutter speed and aperture can be adjusted by the same amount in opposite directions. In other words, the two values have a reciprocal relationship.
For example, let’s say your light meter recommends an exposure of 1/500th of a second at f8. It doesn’t know how much motion stopping you might want, or how much depth of field, so it’s simply trying to recommend a shutter speed and aperture that will give you a good level of illumination.
But if you decide that you want more motion stopping power and so increase shutter speed from 1/500 to 1/1000 (one stop), you’ll run the risk of darkening your image. But, you can open your aperture from f8 to f5.6 (one stop) to compensate for that one stop of darkening that you introduced with the shutter speed change.
Because of this reciprocal relationship, many different shutter speed/aperture combinations yield the same overall exposure. That is, many combinations produce an image of equal brightness. However, some of those combinations might produce an image with more depth of field than others, or some might produce an image that has blurrier motion than others.

For the moment, don’t worry about how you manage all of this on your camera. In this chapter, the goal is to understand the concepts. We’ll get to the application and the actual controls in the next chapter.
Reading Shutter Speed
On the status display on the back of the camera, the XS displays shutter speed as a full fraction. So, you might see 1/60. In the viewfinder status display, the XS displays only the denominator—60, in this case. When you get to shutter speeds that are longer than a second, the XS will use a quote mark to denote seconds. So, 1 ⅓″ denotes one-and-one-third seconds, while 2″ would be two seconds.
ISO
Earlier in this chapter, you learned about ISO. The Rebel XS offers these ISO settings:
| 100 200 400 800 1600 3200 |
You can probably already see where this is going. Each ISO setting is double the previous, meaning there’s a one-stop difference between each ISO. So, if you end up in a situation where your shutter speed and aperture choices have left your scene underexposed by a stop, you can increase your ISO setting by one stop to compensate.
Fractional Stops
In the days of manual cameras, shutter speed and aperture controls used the progression of settings that we’ve looked at here, with one stop of exposure difference between each setting (however, they provided a wider range than what I’ve shown).
However, it’s possible to adjust shutter speed and aperture by intervals that are smaller than a whole stop, and by default the XS will use values that are fractions of stops. So, as you adjust the shutter speed control on the XS, you might see a progression that goes like this:
| 1/15 1/20 1/25 1/30 1/40 1/50 1/60 1/80 1/100 1/125 1/160 1/200 |
I’ve put the traditional one-stop increments in bold. The other values are increases of a third of a stop. All the same reciprocal rules apply when dealing with fractional stops. These fractional stops simply give you a more granular, finer-level of aperture control.
You need to learn an additional bit of theory if you want to get the most of out your image-editing software. Just as good film shooters needed to have a certain understanding of film and paper chemistry, as a digital shooter you need to know something about how a digital image is constructed.
Pixel is a pretty common term these days, and I’ve been using it off and on already, but just in case there’s any confusion about it, here’s a definition: Pixel stands for picture element and is used to refer to any individual unit of information in a raster image. A raster image is simply an image that’s made up of colored dots. So, the image on your computer screen is a raster image made up of pixels.
Similarly, your digital camera produces a raster image of different-colored pixels.
A pixel’s color is simply a numerical value, with a different number representing each color that the pixel can be. The range of color that any individual pixel can be is limited only by the amount of memory that your imaging device devotes to that pixel. For example, your computer monitor probably uses 24 bits of data for each pixel. With 24 bits you can count from 0 to roughly 16 million, which means that any pixel on your screen can be one of roughly 16 million colors. Your Rebel XS uses 14-bit pixels, which means it can record a huge variation of color.
When you were a kid, you probably learned about the color wheel and learned you can mix the primary colors of ink together to create other colors. You probably also learned that as you mix colors together, they get darker until they eventually turn black.
Light works mostly the same way. The primary colors of light—red, green, and blue—can be mixed together to form every other color of light. But, as you mix the primaries of light, they get brighter until they eventually turn white.
A digital image is actually composed of three separate channels. One contains all of the red information in the image, the second contains all of the blue, and the third contains all of the green.
We’ll be referring to this three-channel color process at various places in this book.

Thinking Again About Full Auto Mode
Now that we’ve identified all the mechanisms that go into making an exposure, let’s look again at the Full Auto mode that you’ve been shooting with. As you learned in Chapter 1, when you press the XS shutter button halfway down, the camera focuses and calculates an exposure. That exposure is a shutter speed setting, aperture setting, and ISO choice. The camera has determined that these settings will yield an image that is neither too bright nor too dark.
When the camera has calculated these values and autofocused, it displays its choices in both the viewfinder and rear LCD status displays. These numbers should make a little more sense to you know.
As you just learned, many combinations of shutter speed and aperture settings yield the same overall exposure. So, how does the camera choose? Its algorithms are designed to take the “safest” possible combination, that is, a shutter speed and aperture that will yield a good overall exposure, without risking handheld shake from a slow shutter speed, or image softness from an extreme aperture.
Summing Up
I’ve thrown a lot of theory at you in this chapter, and it’s worth spending a little time studying it. However, the rest of this book will reinforce these theories with actual practice.
To sum up, it takes a certain amount of light to yield an image that is neither too bright nor too dark. Your camera offers two ways to control this light: shutter speed and aperture. Shutter speed allows you to control how still or blurry a subject is, while aperture lets you control how deep the depth of field in your image is. In addition, ISO lets you control how light sensitive the sensor is.
All these controls are measured in stops, with a change of one stop representing a doubling or halving of light. These three parameters have a reciprocal relationship, which means that if you change one, you can alter one of the others to make up for that change and ensure that your overall exposure remains the same.