
Chapter 9. Specialty Shooting
USING SPECIAL FEATURES FOR SHOOTING IN SPECIFIC CONDITIONS

As you’ve already seen, different photographic conditions require different approaches. In this chapter, we’re going to look at special features and techniques you can use for shooting concerts, panoramas, low-light shots, and more. The XS provides all of the features you need for just about any type of shooting, even complex shots involving multiple exposures and special processing.
Live View
Though not a feature you’ll use every day, Live View can be a lifesaver in certain tricky situations such as concerts, macro shots, or occasions when you need an angle that you can’t get by holding the camera normally.
By this point in the book, you should be the type of person who can bandy about terms like SLR and reciprocity with ease. With your understanding of SLR mechanics, you should now be able to see why digital SLRs traditionally have not let you use the LCD screen as a viewfinder, the way you can do with a point-and-shoot camera.
To create an image to show on the LCD screen, the image sensor needs to be able to see out the lens. But in an SLR, there’s a shutter and mirror between the sensor and lens, so the sensor is, effectively, blind. This means there’s no way for it to see to be able to show you an image on the LCD screen. The XS, though, provides a special feature called Live View that does let you use the LCD screen as a viewfinder.
Of course, one of the great advantages of an SLR is the high-quality, through-the-lens viewfinder that shows a bright, clear image and allows you to block out the rest of the world while you compose your shot. However, Live View can be useful in a few situations where a normal SLR viewfinder is difficult to use. Live View is ideal for:
- Product and still-life shooting
When you have your XS mounted on a tripod and are trying to shoot a static composition, Live View can be a great boon. With it, you can easily arrange and adjust your camera position, subject, and lighting and see the resulting shot on the LCD screen. If the camera is mounted at a difficult angle, this can be much easier than trying to see through the viewfinder.
- Macro shooting
Shooting up close often requires you to hold the camera in strange positions—way down low or squeezed into tight, difficult-to-access locations. With Live View, you can line up your shot while keeping an eye on the LCD screen to see exactly what your final composition will be.
- Concert and event shooting
When shooting a crowded concert or event, it’s often hard to get a good vantage point since crowded events tend to be full of people. With Live View, you can hold the camera over your head and see your framing on the camera’s rear LCD.

Enabling Live View
Before you can activate Live View, you have to enable the feature. By default, the camera does not come configured with Live View ready to use. To enable Live View, follow these steps:

Activating Live View
Once you’ve enabled Live View, you can activate it at any time by pressing the Set button on the back of the camera. You’ll hear a clunk as the mirror flips up, and then the viewfinder will light up with your current scene. (Note that Live View does not work in Full Auto mode.)
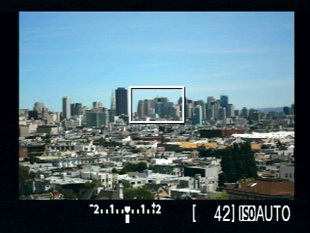
The camera shows a fair amount of status information, including your current ISO, number of shots remaining on the card, exposure compensation, shutter speed, and aperture. Just like in playback mode, you can press the DISP button to see additional status information.

As with normal shooting, a half-press of the shutter button will meter your scene and display a shutter speed and aperture. However, note that it doesn’t focus.
Focusing in Live View
Focusing in Live View is a little complicated, and you can use several focus methods with Live View. The problem with focusing in Live View is that the camera’s autofocus sensors are located in the top of the camera, where the pentamirror is. In Live View mode, since the main mirror is flipped up, the autofocus sensors can’t “see” out the lens. Therefore, to focus, you have several options.
Manual Focus
If you switch your lens over to manual focus, you can manually focus the camera in Live View, just as you would if you were looking through the viewfinder. However, the LCD screen is not quite as clear and bright as the optical viewfinder, which can make it difficult to see if you’re in focus, so Canon has built a focusing aid into the system. When in Live View, you can press the Zoom In button (the same one you use in playback mode) to see a magnified view of the center of the image. Press it again and magnification will increase. Press it a third time and you’ll go back to the normal view. With the magnified view, manual focus becomes much easier.

However, if you’re shooting in low light, even a highly magnified view can be difficult to see. Fortunately, the XS also offers some autofocus options when working in Live View.
Autofocusing in Advance
One way to use autofocus in Live View is to focus before you activate it. Look through the viewfinder and half-press the shutter just as you always would. The camera will autofocus and lock. Then press Set to activate Live View. As long as the distance to your subject doesn’t change, your image should be in focus.
Using Autofocus to Focus in Live Mode
The XS actually can use autofocus, using two different schemes to work around the fact that its autofocus sensors can’t actually see when in Live View mode. To use autofocus in Live View, you must first enable it. (By default, Live View expects you to use manual focus.)
DEFINITION: Custom Functions
Custom functions are special commands that allow you to tweak and configure other commands on the camera. We’ll look at custom functions in detail in Chapter 12.
To enable autofocus in Live View, you will use a custom function:
Choose Custom Functions from the third tools menu.
Press the right arrow button until you get to Take the Shot, Auto focus/Drive AF during Live View shooting; then press Set.
Press the down arrow key to select Quick mode and press the Set button.
Then press the Menu button to exit the custom function page.
Finally, make sure your lens is set to autofocus, not manual focus.
Your Live View screen should now show the XS’s standard autofocus points, just like you see in the normal viewfinder.
You can select an autofocus point by pressing the AF Focus Point Selector button, just as you do when using the normal viewfinder.
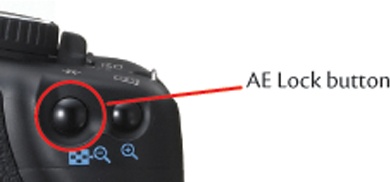
To autofocus in Live View, press and hold the AE Lock button. You’ll hear the mirror flip down, and your screen will go black. The camera will then begin autofocusing, as normal. Keep holding down the AE Lock button until the camera beeps to confirm focus; then release the button.
The mirror will flip back up and your image will return, now focused. You’re now ready to shoot.


Obviously, autofocusing can take a while when you do it this way, but if your subject isn’t moving, you’ll probably need to focus only once. For most of the things that you use Live View for, this mechanism should work fine.
The XS offers an additional Live View option. Return to the Auto focus/Drive AF during Live View shooting custom function and change from Quick mode to Live mode. Again, use the AE Lock button to autofocus the camera. In Live mode, though, the mirror will not flip up. Instead, the XS’s onboard computer will analyze the image’s contrast and refocus the lens accordingly. This can take a while but should eventually work. So, if you’re not in a hurry to focus, this can be a way to achieve focus without having your view interrupted.
What You Don’t See in Live View
While Live View is very handy for the circumstances mentioned earlier, there’s one thing to bear in mind when using an LCD screen as a viewfinder. As we’ve discussed, your eyes can see a much wider range of tones than your camera can capture, and good photography is often about how you choose to represent these different tones. When you look through a normal viewfinder, you can see the whole scene, just as your eye really sees it.
With Live View, though, your view of the scene is inherently limited to the dynamic range of the camera. For the image shown in Live View, the XS will try to preserve the highlights so that they don’t blow out to complete white. This usually means that shadow areas in your image will go very dark and show very little detail.
Also, bear in mind that Live View is more like a video camera than a still camera. The XS must keep 30 frames per second delivered to the screen, which means it’s not possible for it to take long exposure shots that might reveal brighter shadows. So, while your image may have a very different exposure than what you see in Live View, the camera will have time to do a longer exposure when it actually shoots the shot (of course, this is also true when looking through the normal viewfinder).
Live View’s limited dynamic range can make composition a little trickier because some compositional elements that you see with your eye may be obscured in Live View. With practice, you can learn to work around this, and at first you may not even notice it, simply because you don’t miss what you can’t see. But ultimately, composing with a real viewfinder almost always allows a better view of your scene —and therefore more creative options—than a view on an LCD viewfinder. This is not a deficiency of the XS; you’ll find this problem in any camera that uses an LCD screen as a viewfinder.
Shooting Panoramas
No matter how wide your lens might go, there will still be times when you face a vista that just can’t be captured in one frame. In the old days, your only choice would have been to shoot a series of images and layer them together to create a collage.

Nothing is wrong with this technique, and it can actually be quite evocative, but thanks to digital image processing, we have another option. Now you can take those same images, and, rather than layering them together as a collage, you can digitally merge them into a single seamless image.

Shooting this type of panoramic image requires a combination of shooting technique and special software. You must shoot your images in a particular way to ensure that they contain the information you need to construct a good panorama and then use special stitching software to create the seamless merge. Your EOS Digital Solutions Disk includes a panoramic stitching program called PhotoStitch.
Choosing a Focal Length for Panoramas
Making a successful panoramic shot begins by shooting usable images. A lot can go wrong when you’re shooting a panorama, so you have to take care to shoot your source images carefully to ensure the best result.
First you must choose a focal length. If you choose a shorter (wider angle) focal length, then you won’t need as many shots to cover the width of your panorama. However, as we’ve already seen, a shorter focal length will have a deep depth, which will render many objects in your scene very small. Also, a super-wide angle might confuse some stitching programs.
If you choose a longer focal length, distant objects will appear larger, but you’ll have to shoot more frames, which will increase your chances of making an error and ending up with unusable source material.

Consequently, your best option is to aim somewhere in the middle and choose a moderate focal length that reveals the details you want to see but is still wide enough that you don’t have to shoot a lot of frames to cover your scene. Once you’ve selected a focal length, it’s time to think about exposure.
Panoramic Exposure
From a panoramic photography standpoint, one of the things that’s really annoying about the world is that it’s not lit perfectly evenly. This problem is much more pronounced when shooting a panorama than when shooting a single frame.
If you look at most any panoramic scene in the real world, you’ll probably find that one end is brighter than the other. The reason this is a drag for panoramic shooting is that the area that’s brighter will expose differently than the area that’s darker, and when you try to stitch your images together, you could very well end up with weird color bands in the sky.

To compensate for this, you’ll want to use the same exposure for all your shots. This will ensure that all the components of your panorama have the same overall brightness and tone and will stitch together smoothly. On the XS, this is easy to achieve, thanks to the AE Lock button located on the back of the camera.
Using AE Lock
Try this: Point your camera in a predominantly bright direction and half-press the shutter to take a meter reading. Note the shutter speed and aperture that are chosen. Now point the camera in a darker direction and take a reading. The camera chooses different exposure settings, which makes sense since you’re looking into an area that’s darker. Now return to your initial bright scene and half-press the shutter again to meter. After you meter, press the AE Lock button. An asterisk should appear in the viewfinder status display to indicate that your exposure is now locked.
Release the shutter button and point the camera at the dark area you looked at earlier. Half-press the shutter button and the camera will focus, but notice that the exposure has not changed. Since the exposure is locked, the XS will use the same exposure settings you used when you metered the bright area. (Obviously, these settings are not ideal, and your final image will probably be dark and underexposed.) Thanks to exposure lock, it’s possible to shoot a whole panorama of images, all with the same exposure.
Exposure Lock Timeout
When you meter with the XS, if you release the shutter button, the camera will remember that metering for about four seconds. Even if you’ve locked exposure, the reading will eventually time out, and the viewfinder status will go dark. So, once you’ve locked exposure, it’s a good idea to keep the button half-pressed or press the button halfway down every second or so to preserve the locked exposure. You might need some time to compose your panorama after you’ve locked exposure, so you don’t want the lock to time out.
Choosing an Exposure
While it’s easy enough to use the AE Lock button to lock your exposure across an entire panorama, you still have to choose which exposure to lock on to. Should you lock on the brighter end, which will cause the camera to stop down and use a fast shutter speed, thus possibly underexposing the darker end of the panorama? Or should you meter off the darker end and risk blowing out the bright side of the panorama? Obviously, the easiest way to balance these two problems is to split the difference and meter off of some place in the middle. To do this, pick a mid-range point in your panorama, frame it with your chosen focal length, and press the shutter button halfway down to meter. Then press the exposure lock button to lock your exposure. Now you can swivel to the starting end of your panorama and start shooting.
As mentioned, the AE Lock setting can time out. If you find you don’t have enough time to get your entire panorama shot, then take note of the shutter speed and aperture you’re using and then switch to Manual mode and dial them in by hand. With the camera now locked on those settings, you can take all the time you need to shoot your panorama.
Shooting Panoramic Frames
In theory, shooting a panorama is very simple. You work from one side to the other, panning the camera and shooting frames that overlap by at least a third on each end. In practice, it’s a bit trickier than this because, to get usable frames, you need to be sure that you’re not tilting the camera when you turn to the next frame. Also, it’s essential that you pan the camera and not your body.
Panning Tips
Personally, I find it easiest to work from left to right, but sometimes you might want or need to go the other direction. So, after you’ve assessed your exposure needs and locked exposure (if necessary), choose the end you want to start on and frame your shot. After taking the shot, rotate the camera and shoot the next frame. Again, aim for about one third of the frame to overlap the previous shot. To achieve this overlap, just pick something in the frame to use as a reference point.
Try to hold the camera level—parallel to the ground—as you rotate. Most importantly, though, be sure to rotate the camera! The camera needs to be rotated around its focal plane, but if you simply rotate at the waist, then you’re rotating the camera around the middle of your head. This can cause troubles later when you try to stitch. So, instead of just pivoting your body, hold the camera where it is and rotate it independently of your body. You may have to move your feet to rotate yourself around the camera while you do this.
It can take practice to get good at shooting straight, usable panoramas, so you’ll want to shoot multiple tries to improve your chances of getting something useful. Also, before you start shooting, it’s a good idea to rotate through the whole panorama to ensure that your focal length choice fits everything in the scene.
Also, panoramic shooting will get easier after you’ve stitched a few panoramas and seen the effects of different problems. So, it’s a good idea to practice shooting at home, where you can stitch right away, before you head off to an exotic panoramic location.
Panoramic Tripod Heads
If you’re really serious about panoramic shooting, then you might want to invest in a special panoramic tripod head. In addition to holding the camera level throughout its rotation, a panoramic head will provide ratcheted stops that ensure proper overlap. Check out www.kaidan.com for more info.
Stitching a Panorama
Once you’ve shot your panoramic frames, you’ll be ready to stitch. Copy the pano frames to your computer using your method of choice. If you haven’t already installed Canon PhotoStitch from the EOS Digital Solutions Disk, do so now and then launch the program.
Click the Open button on the left side of the PhotoStitch toolbar. In the Open dialog box that appears, select the file you want to stitch. Hold down the Shift key to select multiple files. PhotoStitch will display your chosen images side by side. You can use the Arrange, Switch, Clear, and Rotate buttons to get the images in the right order, with the right orientation, and use the Enlarge and Reduce buttons to zoom in and out.

Next, click the Merge tab and press the Start button. PhotoStitch might prompt you to enter the focal length you used when you were shooting. The program expects 35mm equivalency, so multiply the focal length you used by 1.6. For landscape panoramas, where you’re panning and shooting, the Panning technique is the best option. Click the OK button, and PhotoStitch will stitch your image. When it’s done, click the Save tab to view the crop of your final image. Stitching always requires cropping, and you can easily adjust the crop by dragging the cropping handles.

When you have the crop that you like, click the Save button to save your image as a TIFF, JPEG, BMP, or PICT. TIFF files are best if you want to edit your image further somewhere else.
Low-Light Shooting
A lot of new shooters think that low light means shooting with the flash. And while the flash can often yield good pictures in low light, with your Rebel XS, you have far more low-light options, thanks to its excellent high ISO capability. You must use care when shooting in low light, but with a little practice you’ll probably find that there’s a whole world of subject matter that reveals itself when light levels dim.
When to Use Flash in Low Light
Your flash works well when you have a subject that’s close to the camera and you want it lit up very brightly, using a light source positioned where you’re standing. But flash photos can often look weird or even outright bad. If you’re not careful with your exposure, then your subject can look harshly lit, while your background may not be lit at all. We’ll discuss flash exposure in detail in the next chapter.
Another problem with flash shooting with the camera’s built-in flash is that it washes out the natural light in your scene. Very often, when you’re out at night, what might strike you about a particular scene are the unique colors that are created under street lights or other lighting sources that appear only at night.
Finally, many times shooting a flash is inappropriate or simply not allowed. Concerts and performances, art galleries, or any situation where you don’t want to be intrusive all rule out flash shooting as a way to get a shot in a low-light situation. For all of these situations—and simply to have more tools in your creative arsenal —you’ll want to learn about other low-light shooting techniques.
Shooting in Low Light at High ISO
You’ve seen how you can increase the XS’s ISO setting to buy yourself more exposure latitude when choosing a shutter speed or aperture, but you’ll most often increase ISO when you want to shoot in lower light. Very often, this won’t be extreme dark but rather just a small change to compensate for lower light indoors. For example, if you move indoors in the late afternoon, even into a room with windows, you might need to increase your ISO to 200 or 400.
On the XS, you can easily shoot at up to ISO 400 without suffering a noticeable noise penalty in your final image. So, if you’re shooting indoors and notice that your shutter speed is staying very low, crank up the ISO to 200 or 400 and see whether that improves things.
In extreme low light—outside at night, in a concert, or in a performance—you might need to go to a higher ISO, such as 800 or 1600. While these settings will yield a little more noise in your image, it’s an attractive noise that looks very much like film grain.

Depending on your final output, you may not even be able to see the noise. For example, if you’re printing at 4 × 6″, a lot of the noise will be sampled away as the image is downsized.
By default, the XS shoots high ISO images with very low levels of noise, but you can reduce this further by changing Custom Function 4, High ISO Speed Noise Reduction to On. This will apply additional noise reduction processing to images shot at higher ISOs. However, because this extra processing takes time, the maximum number of shots you can shoot in a burst will greatly decrease. So, if you’re planning on burst shooting, you’ll want to leave this feature off. Note, too, that this feature disables white balance bracketing.
How do you know when to go to ISO 800 or 1600? The same way that you choose to go to 200 or 400. If you can’t get a shutter speed that’s fast enough to shoot handheld in low light or fast enough to suit your creative goals, then increase the ISO to 800 or 1600.
Don’t Forget to Change Back!
If you spend an evening shooting in low light at ISO 1600, be sure to set your ISO back to Auto or something less noisy like 100–400. While shooting in bright daylight at ISO 1600 won’t hurt anything, your images will have slightly more noise, and your camera will bias toward faster shutter speeds.
Low-Light Techniques
Unfortunately, shooting in low light is a little more complicated than just choosing a high ISO and shooting away. Your main concern is to be aware of shutter speed. Remember the handheld shooting rule (shutter speed should never go below 1/effective focal length), and keep an eye on the shutter speed in the viewfinder status display. Note too that you can usually hear a slow shutter speed, if you’re paying attention. If the “click” of the camera takes a bit longer than you’re used to, you might want to check in and see what your shutter speed is set to.
Shooting with a Long Shutter Speed
Sometimes the light is so low that you have no choice but to use a slow shutter speed. While this may not make for ideal shooting, a slow shutter speed image is usually better than getting no image at all. When shooting at longer shutter speeds, remember the following:
You’ll want to take extra pains to shoot a stable shot. Remember your posture, find something to lean on, find a place to set the camera, or carry a tripod.
Remember that while you might do a great job of holding still, if your subject is moving, it might come out blurry.
Sometimes, intentionally blurring your subject can be evocative, but if you’re trying to document an event, such as a dance performance, then long shutter speeds won’t be appropriate.
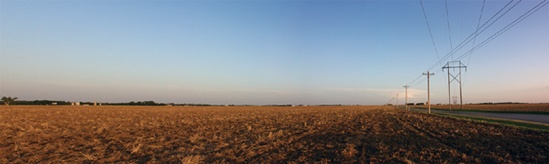
If you’re shooting a landscape or other nonmoving subject, then you can choose an extremely long shutter speed. The XS lets you select up to 30 seconds for a shutter speed, or you can use Bulb mode to keep the shutter open for as long as you want.

For this image, I used a 90-second exposure. Obviously, the camera must be mounted on a tripod when you’re shooting such a long exposure. Bulb mode was required to get the long exposure, and because I didn’t want to stand there with my finger on the shutter (both because it’s uncomfortable and because it risks introducing camera shake), I used a remote control to trip the shutter. Canon makes both wired and wireless remote controls that are ideal for this type of shooting.
Long Exposure Noise
When you shoot with very long exposures, you run the risk of introducing an additional type of noise to your images. When the shutter is left open for a long time, some pixels on the image sensor can get “stuck.” These pixels will appear in your final image as bright white specks. Fortunately, the camera has a built-in mechanism for handling this situation.
If you go to custom functions, you’ll find that Custom Function 3 is called long exposure noise reduction. Set this function to Auto, and the camera will automatically employ a special noise removal algorithm any time you shoot with a shutter speed more than one second.
One caveat about long exposure noise reduction: On an extremely long exposure, the noise reduction processing time might take as long as the actual exposure. You will not be able to use the camera while it processes. So, a 30-second exposure might require an additional 30 seconds of noise reduction processing. With a nonmoving subject, this may not be an issue, because you can just wait out the processing.
Use Mirror Lockup for Long Exposures
When shooting a very long exposure, you’ll want to be especially careful of camera shake. Be sure to use a tripod, use a remote control to trip the shutter, and activate the camera’s mirror lockup feature. As you know, when you press the shutter button, the XS must raise its mirror out of the way before it opens the shutter and then lower it again. This process can actually vibrate the camera enough to induce softness in a long exposure image. Using Custom Function 8, you can enable mirror lockup.
When Mirror Lockup is turned on, pressing the shutter button will raise the mirror but won’t take a picture. It takes an additional shutter press to take a picture, after which the mirror will come back down. Half-pressing the shutter before the initial press will autofocus and meter, as normal.
Beware of Heat
Noise levels in your high ISO images will increase as the camera gets warmer. It takes a fair amount of heat to create a noticeable change in noise, and the most significant source of heat is usually the camera itself. Try to avoid Live View and extensive use of the LCD screen when shooting high ISO images, because the LCD screen can heat up the camera significantly. Also, don’t try to cool the camera by putting it in a refrigerator. The sudden change in temperature can damage internal components.
Aperture Control for Low Light Conditions
Low-light shooting almost always precludes any kind of aperture control, because the only way to get a shot at all is to have the lens wide open. So, don’t expect to shoot a lot deep depth of field shots unless you have a tripod and are shooting a nonmoving subject. In these instances, you can stop the lens down and shoot a very long exposure.
Shooting Sports or Stage Performances
While sporting events are often held at night and while stage performances are often in dark auditoriums, these events are not necessarily “low-light” events. A football field, for example, is usually well lit. However, even with all the floodlighting, you still probably won’t be able to get away with shooting at ISO 100 or even 400. Also, for a sporting event you’ll probably want some motion-stopping power in your exposure and so will be using a longer shutter speed. This means you’ll most likely be shooting at ISO 800 or 1600.
While the XS’s Sports shooting mode is very good, if you want more power, you’ll want to switch to Shutter Priority, crank the ISO up, and set a shutter speed that’s fast enough to freeze the action. Ideally, you’ll have a long telephoto lens with image stabilization. Good sports shots are often the result of anticipation. If you know when the big play is about to transpire and know who the key players are, then you’ll want to get focused on them early so that you can get the shot when the action unfolds. To improve your chances of getting the precise moment of interest, switch to Drive mode, and put the focus mode on AI Servo.
Press the shutter button just before you think the key moment will transpire and burst through. Remember, the camera’s shooting buffer can fill up if you shoot for a long time, so try to keep the length of your bursts low.
If you’re shooting in an auditorium, your lighting challenge will be a little more difficult, because a stage usually alternates between very bright areas and very dark areas. As with sports shooting, your main concern will be to try to freeze action, so set the camera to a high ISO, use Shutter Priority, and choose a shutter speed that’s fast enough to freeze motion—at least a 30th of a second for normal speed motions, faster if performers are moving quickly. In extreme low light, this shutter speed may result in your images being severely underexposed. Don’t worry about this, because you can always brighten the images later using an image editor. This will result in noisier pictures, but the only alternative is to shoot with a longer shutter speed and risk blurring motion.
Both of these situations are well-served by a “fast” lens, meaning a lens with an aperture that can open extremely wide. An f2.0 telephoto, or a super-fast prime, such as the Canon 50mm 1.2, 1.4, or 1.8, makes an ideal low-light event lens.
Low-Light White Balance
Low-light situations can play havoc with color, both in your eyes and in your camera. Your eyes, of course, see very limited color in low light. As the light dims, the color receptors in your eyes cease working, and your vision shifts over to black and white only. While your vision won’t actually look like a black-and-white photo, you will have markedly lower color sensitivity than you would in brighter light. Color reproduction is difficult for your camera in low light because low-light situations are usually lit by an odd assortment of lighting types (for instance, the intentionally colored lights in a stage performance), the combination of which plays havoc with your camera’s white balance.
If you’re shooting in JPEG mode, the best thing to do is carry a white card and manually white balance. If this isn’t possible, then plan on having images that will have a very reddish-orange cast. This is not necessarily a bad thing, because it’s close to how our eyes see in low light. Your best white balance choice when shooting in low light is to shoot in raw format, which you’ll learn about in Chapter 10.
Another option is to consider converting your low-light images to grayscale. Since low-light shooting is largely about luminance, rather than color, black-and-white photography is well-suited to low-light subject matter. As you’re out shooting, try to visualize your scenes as grayscale scenes. You can convert your images to grayscale later or switch to the Monochrome picture style you learned about in Chapter 7.