
Chapter 12. Customizing the XS
CONFIGURING CUSTOM SETTINGS AND ADDING LENSES AND ACCESORIES
Personally, I find that the XS interface makes a lot of sense. I like that I can drive the camera with one hand and that I can access critical exposure features without taking my eyes from the viewfinder. Nevertheless, everyone has different needs and different ways of thinking, so the XS allows you to customize many of its features. And, of course, you can further refine the XS as a photographic tool by adding different lenses. In this chapter, we’ll look at a number of ways to customize and tweak your camera.
My Menu
The XS has a number of features spread across its six menus, but you’ll probably regularly use only a few of them, and it can be a hassle to navigate to the exact feature you want. For this reason, the XS provides a single customizable menu, called My Menu, that you can populate with only the commands you want. Depending on how many you use, you might be able to create a single My Menu page that contains all the functions you need.
Building My Menu
To add an item to the My Menu page, navigate to My Menu and then select My Menu settings.
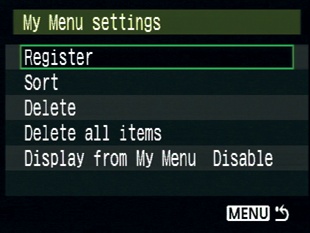
Choosing to register allows you to select commands that you want to include on the menu. Press Set to execute the Register command, and you’ll be shown a complete list of commands.

These are listed in the order they appear in the menu system, starting with the first shooting menu. Select an item you want to add, and hit the Set button. The XS will ask you to verify that you want to add that item to the page:

After you’ve added an item, it will return you to the list so that you can select another. You can add up to six items to My Menu. Like the other menus, My Menu doesn’t scroll, so you can always see the entire contents of the menu. Note that after you’ve added six items, the My Menu settings option is still at the bottom. This is to ensure you always have a way to edit and adjust the menu.
What should you put in the menu? Here’s what I usually include:
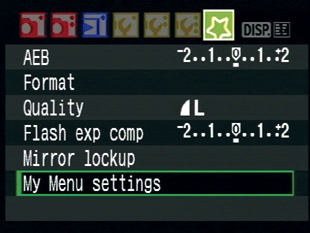
I use auto exposure bracketing a lot, so I want that in there. I also want to be able to quickly format the card, and I like having flash exposure compensation when using the onboard flash. Because I do a lot of low-light landscape photography from a tripod, I like having mirror lockup easily accessible. Finally, though I shoot raw 99 percent of the time, for the few times when I want JPEG, it’s nice to have easy access to the Quality menu.
If you’re a flash shooter, you might want to consider adding Red-eye On/Off, while if you regularly shoot tethered, you might want quick access to Shoot w/o card. If you often shoot events in locations where you need to keep a low profile—concerts and weddings, for example—then Beep might be a good addition to your menu.
Organizing My Menu
Once you’ve populated My Menu with items, you can use the Sort command to put them in the order you like. Select Sort, and press Set. Navigate to an item whose position you want to change, and then press Set. Arrows will appear next to the item to indicate you can now move it using the up and down arrow buttons.

Move it into position, and then press Set again to accept the new position. When you’re done, press the Menu button to back out of the My Menu editing screen. Because the menu “wraps around,” it’s best to put your least-used items in the middle of the menu. You can quickly get to the top or bottom of the menu to access those items.
After pressing My Menu settings, you can use the Delete command to delete individual My Menu items or use Delete All Items to clear the whole menu.
Make My Menu the Default
Finally, if you want My Menu to appear whenever you press the Menu button (rather than the last menu you selected), set Display from My Menu to Enable.
Changing Screen Color
You’ve seen the XS’s default status screen color, but by using the Screen color command on the first tools page, you can select a different color scheme—one that might be easier to read in your current lighting conditions.

Some screen colors will be easier to read in bright light, while some will be easier in low light or dark conditions. Experiment with each until you find something that’s right for your current lighting conditions.
Custom Functions
In Chapter 10, you got a glimpse of the XS’s custom functions when I discussed mirror lockup. Custom functions are special commands that you access through the Custom Functions command on the third tool menu. While there are a few commands, such as Mirror lockup, that seem more like primary commands that should be in the normal menu system, the bulk of the custom functions are commands that let you tweak and alter the behavior of other commands.
To alter a custom function, choose custom function (C. Fn) from the third tool menu. Use the left and right arrows to select the function you want to edit; then click Set. You can then use the up and down arrows to change the value of that function. Press Set when you’ve configured it as you want it. Here’s what they do:
- 01 Exposure Level Increments
This lets you change the increment used by exposure compensation, flash exposure compensation, and auto exposure bracketing. You can choose between a 1/3-stop (the default) or a 1/2-stop. Obviously, a 1/3-stop gives you a finer degree of exposure control, but a 1/2-stop is easier for some people to conceptualize.
- 02 Flash Sync Speed in Av (Aperture-priority AE) mode
The shutter in the Rebel XS is composed of two curtains. One opens to expose the sensor, while the other closes to obscure the sensor. On very fast shutter speeds, the second shutter starts moving to close off the sensor before the first shutter has completely opened. In other words, the sensor is never fully uncovered. Instead, the shutter creates a moving slit that passes very quickly in front of the image sensor. If you fire a flash while this slit is moving across, you’ll get a single vertical streak of flash exposure. In other words, you want to use the flash only with a shutter speed that completely uncovers the sensor. In addition, you want the flash in sync with the shutter so that it fires when the shutter is completely open.
By default, when shooting in Aperture Priority mode, the camera will choose any shutter speed from 30 seconds to 1/200th of a second. These are all speeds that will work with the flash, because they all allow the sensor to be completely revealed. However, these longer speeds also mean you run the risk of camera shake. If you want, you can change this custom function to fix the shutter speed at 1/200th when shooting with flash in Aperture Priority mode. This will help prevent camera shake.
- 03 Long Exposure Noise Reduction
We looked at this function in our discussion of night shooting in Chapter 10.
- 04 High ISO Speed Noise Reduction
We also looked at this function in our night shooting discussion.
- 05 Auto Lighting Optimizer
When shooting in JPEG in any mode except Manual, activating this feature will cause the camera to automatically correct brightness and contrast if your image is too dark or is low contrast. This feature is automatically turned on any time you activate a scene mode.
- 06 AF/Drive AF-assist beam firing
This allows you to tell the camera to not use its built-in pop-up flash for autofocus assist. You can independently toggle the use of both the built-in flash and external flashes.
- 07 AF During Live View Shooting
We explored this setting in the discussion of Live View in Chapter 10.
- 08 Mirror Lockup
We discussed mirror lockup in our discussion of night shooting in Chapter 10.
- 09 Shutter/AE Lock button
This function offers four choices, which let you change the functionality of the Exposure Lock button. AF/AE Lock is the normal behavior that we’ve seen throughout this book. AE Lock/AF lets you lock exposure and focus separately, rather than having them both happen when you half-press the shutter button. With this option activated, pressing the Exposure Lock button causes the camera to autofocus, while half-pressing the shutter causes the camera to meter and lock exposure. The other two options affect the function of the AI Servo feature. See Recognizing Contrast in the Histogram of the XS owner’s manual for details.
- Set button when shooting
If you have Live View enabled, then pressing the Set button activates and deactivates Live View. If you don’t have Live View enabled, you can configure the Set button to perform one of four functions using this custom function. If you select Normal, the Set button won’t do anything. Change Quality brings up the Quality menu; Flash Exposure Compensation invokes the Flash Exposure Compensation menu, and LCD Monitor On/Off and Menu Display provide the same functionality as the DISP and Menu buttons.
- 11 LCD Display When Power On
By default, the camera always activates the rear-panel LCD display when the camera is powered up. If you prefer, you can choose Retain Power Off Status so the camera remembers the state of the LCD screen when you power it off. If you’re trying to conserve battery power or if you’re shooting in a location where the bright light of the LCD screen is inappropriate, then this can be a great feature.
- 12 Add Original Decision Data
Image forensics is the science of trying to determine whether an image has been altered. For photographs used in legal cases, knowing whether an image has been altered can be critical. If you activate this custom function, then the camera will embed special information in your image. When used in conjunction with the optional Original Data Security Kit, it can be possible to determine whether an image has been altered.
Lenses
One of the great joys of working with an SLR is having the option to change lenses. If you’re stepping up to the XS from a point-and-shoot camera, then there’s a whole world of new shooting possibilities for you to explore (and a whole new way to drain your wallet).
By changing the lens on your camera, you can:
Shoot with different focal lengths, from super-wide to extremely telephoto.
Get higher-quality images. A better lens can improve contrast, color, sharpness, and other less definable characteristics of an image.
Shoot in lower light. A faster lens—that is, one that can open to a wider aperture—will give you the option to shoot in much lower light. An f1.2 lens, for example, can make it possible to shoot at handheld shutter speeds in outright dark situations.
Shoot with different effects. Fish-eye lenses, the Lensbaby, and other specialized lenses let you create effects that would be unattainable with other lenses and very difficult to produce with editing software.

Choosing a Lens
Your first decision when choosing a lens is to determine what type of shooting you think you want to be able to do. The 18–55mm lens that ships with the XS is a great, general-purpose, “walk-around” lens. It delivers good quality and is stabilized for easier low-light shooting. It also has a focal length range that’s suitable for most everyday situations. So, what might you want in addition to this lens? Think about these questions:
Do you often find you want to be able to zoom in closer than you can with the 18–55mm lens or that you’re regularly cropping your images to focus on a specific detail? If so, you should probably opt for a telephoto lens of some kind.
Conversely, are you regularly frustrated by the 18mm end of things because you don’t feel it’s wide enough? Then you might be better served by a wide-angle.
Do you shoot a lot in low light and find yourself unable to get sharp images because your shutter speeds are too slow? If so, you need a faster lens, one with a very wide maximum aperture (f2.8, 2, 1.8, 1.4, or 1.2).
Do you find yourself frustrated with a lack of sharpness in your image or strange color fringes around certain high-contrast areas?

If you have this type of problem a lot, then you need a higher-quality lens. In addition to opting for better quality (which, yes, means more expensive), you’ll still need to identify your focal length and speed needs.
Once you’ve identified the type of lens you’re looking for, you’ll be ready to start comparison shopping to find the specific model that’s right for you.
EF, EF-S, and L
Canon makes three lines of lenses:
EF lenses are the most common and offer very good quality and a huge selection of focal length and speed options. They work on any EOS digital or film SLR.
EF-S lenses are lenses engineered specifically for EOS digital cameras that use an APS-sized sensor (at the time of this writing, this means every EOS digital camera except for the 5D and the 1DS Mark III). Because they’re engineered specifically for the XS’s smaller sensor, EF-S lenses can deliver tremendously high quality in a very small, light, inexpensive (relatively) package. EF-S lenses can’t be used on EOS film cameras or cameras with a full-frame sensor.
L lenses are Canon’s high-end line of lenses. These lenses use superior optics that often deliver better color and superior contrast (and occasionally better sharpness) while minimizing flares and other optical artifacts. L lenses are often very fast and are generally built to sturdier specifications than EF lenses. Some L lenses are white, some are black, but they all have a red ring around the end of the lens.
Now, here’s the tricky part: There are some exceptional EF lenses that deliver quality as good as some L lenses. There are also some EF-S lenses that are actually L-quality glass but not labeled as such. And finally, some L lenses are unequivocally better than any of the competition. So, before you buy, you need to do a little research online. Check out some reviews, look at samples, and try to get your hands on the lenses in question.
Prime vs. Zoom
Prime lenses have a fixed focal length. So, a 50mm prime lens can shoot only at a 50mm focal length (which is effectively an 80mm focal length on the XS). Zoom lenses, as you have you’ve seen, have variable focal length. It used to be that prime lenses always offered better image quality than zoom lenses, but that’s not always the case now. However, as you saw earlier, having a fixed focal length can be a very interesting way to shoot because it makes you compose and frame in a very specific way. So, you may find that you like not having the zooming options, especially if you’re hungry for a fast lens. The fastest lenses available are all primes. But in general, as far as image quality goes, you don’t have to feel like you’re giving up quality if you buy only zoom lenses.
Some Lens Suggestions
Here are my recommendations for currently available Canon lenses that fill the different lens categories we mentioned earlier.
Telephoto Zoom
- Canon EF-S 55-250 f4-5.6 IS
Offering a direct extension of the focal length range provided by the 18–55, this lens extends your shooting range to the equivalent of a 400mm lens. Because it’s an EF-S lens, the 55–250 is smaller than full-frame lenses that offer the same range. However, because it’s only about $300, the 55–250 is definitely less sturdy than some alternatives. It has a plastic lens mount, which is easier to break, and a generally fragile feel. However, if you’re careful with it, this lens will last you for the life of your camera. With a maximum aperture of f4, it’s not super speedy, but the four stops of stabilization will help in low light.
- Canon EF 70-300 f4-5.6 IS
If you can afford about $650, this is a great midrange telephoto that offers excellent image quality and a very sturdy build. With an equivalent focal length range of 112 to 480mm, this lens gives you a lot of reach. However, if your only other lens is the Canon 18–55, then you’re going to be missing the range between 55 and 70.
Wide Angle
- Canon EF-S 10-22 f3.5-4.5
While the 18mm end of the XS kit lens is pretty wide, if you like ultrawide lenses, then you won’t do better than the Canon 10–22. While this lens is branded as an EF-S (because it’s engineered specifically for cropped sensor cameras), it’s actually L-quality glass. Razor sharp with great color and contrast and a sturdy build, this is a great lens for photographers who like to shoot wide.
Prime
- Canon EF 50mm 1.8 II
This is probably one of the best values in lenses for any camera in the world. Offering exceptional optics and a fast maximum aperture of 1.8, you can get this lens new for less than $100. Don’t expect much in the way of physical quality—it’s a cheap plastic lens, and it feels like it. But if you need to shoot in low light, this is a great lens. Remember, a 50mm on your XS is going to be equivalent to 80mm on a 35mm camera. So, this lens ends up being a great portrait lens with a flattering focal length and a wide, background-blurring aperture.
Specialty Lenses
- EF 50mm f2.5 Compact Macro
If you’re interested in macro photography, this is a great alternative that offers very great quality in a small package.
- EF 15mm f2.8 Fisheye
Fisheye lenses aren’t for everyday use, but if you’re looking for an unusual perspective, they can be a lot of fun, and this lens offers great quality in a solid package.
Third-Party Lenses
Canon is not the only company that makes lenses, of course. Sigma and Tamron, among others, make some very good lenses that are compatible with your Rebel XS, including models that compete with the lenses mentioned here. These lenses are worth considering, though do your research and see what other users are saying about their experiences with the particular models you’re interested in.
Evaluating a Lens
Once you’ve picked a lens (or lenses) you think you’re interested in, you’ll want to get your hands on them and take them for a test-drive. If you have a local camera store that stocks these lenses, they should be able to answer any questions you have and may even let you try the lens in the store. Take your camera with you and shoot some images. When you get home, you can examine the results up close to try to assess quality.
Presumably, by the time you’re ready to test a lens, you will already have determined that it has a focal length range and maximum aperture that suits your needs. Consider these additional issues when evaluating a lens:
- Sharpness
Look at the fine detail in your sample shots. Does it hold up? Is it clearly rendered? Does the camera stay sharp throughout its aperture range? Shoot at wide open; then shoot again at f16 or f22. Is there a sharpness drop-off? If there is, that’s not a deal breaker. Most cameras have an sharpness sweet spot that sits within a specific range of apertures. Ideally, you want this range to be as wide as possible.
- Chromatic aberrations
Are there weird purple, blue, or magenta fringes around high-contrast areas in your scene? This can be hard to test in a camera store, but if they’ll let you step outside, try shooting through some trees against a bright sky or along telephone wires. You’ll most likely find these issues on the edges of the frame. Also, try a range of apertures. Sometimes, these colored fringes show up only at the extremes of the aperture range.
- Distortion
Does the image bow inward or outward at the edges of the frame? Wide angles will almost always have a little distortion, and you can usually correct it in a good image editor. Still, it’s good to know whether the lens has these issues.
- Vignetting
This is a darkening of the corners that usually appears in wide-angle lenses and usually only with wider apertures. While it can be corrected, it’s something you’d rather avoid, so look carefully for any vignetting problems.


Rent Lenses for Evaluation
A number of online lens rental services will rent you lenses by mail for very reasonable prices. This can be the best way to make a decision about a lens because you can shoot with the lens for a few days, on your own terms. Check out www.rentglass.com or google lens rental.