
Chapter 10. Flash Shooting
USING A FLASH AND OTHER TOOLS FOR BETTER CONTROL OF THE LIGHTING IN YOUR SCENE

Using a flash is not hard, but it is something that sometimes requires a little bit of extra thought and planning. In fact, one of the most important things to learn about your camera’s flash is when not to use it. You’ve already learned some low-light shooting tricks that provide you with additional strategies for shooting in dark situations, but sometimes you simply need more illumination to get a good shot. The Rebel XS has a capable built-in flash, as well as support for Canon’s entire line of external flashes. In this chapter we’ll look at both built-in and external flash use, as well as some additional ways that you can control light, whether or not you choose to use a flash.
Controlling Existing Light
Before we get into a full discussion of flash shooting, let’s look at some simple non-flash-related strategies you can employ to control the light in your scene.
In Chapter 7, you learned about fill flash and saw how you can use the XS’s built-in flash to fill in some of the more shadowy areas in your scene to create a more even exposure. While the flash can work well for this situation, and is definitely easy to carry, sometimes a better alternative is to use a reflector.
Consider this image:

The direct sunlight is so bright that we’re getting deep shadows under her eyes, cheekbones, chin, and hair. In general, the image has too much contrast. We could use a fill flash to even out the exposure a little bit, but then we’d run the risk of the image looking a little flat. If we have the time, gear, and personnel to pull it off, we can choose a different solution. Using a diffuser, a piece of sheer white fabric, we can diffuse the sunlight to create a much softer look.
The diffuser serves the same function as a cloud. It diffuses the sunlight so that it’s not as harsh, and the result is an image with lighter shadows and highlights that are not as small and bright.
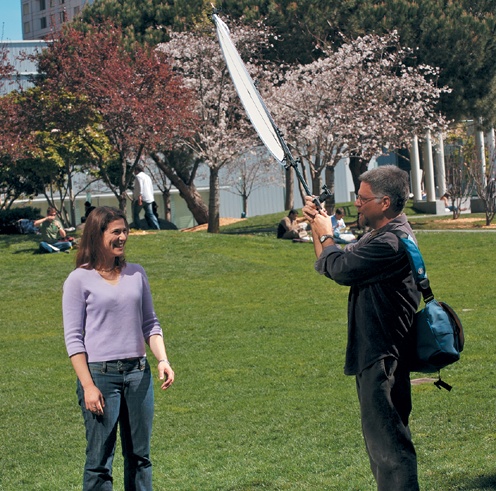

While this image is much better, we can still do more. The shadows under the eyes and chin are still a little prominent, so we’ll use a reflector to bounce some light up into them, rather like our fill flash would.

Using a reflector like this is not difficult. Just try to put it at a 45° angle to the light source—in this case, the sun. You’ll be able to see the difference in person as you move the reflector around. Just watch the shadows, and when you see them lighten, you know you’ve positioned the reflector properly. Expose and shoot normally.
If you don’t have a friend to help hold the reflector, then you can use a tripod and a remote control to trigger the shutter, or you can use the self-timer. You’ll need to get in place quickly, so you’ll probably want to experiment with the reflector position before you take the shot.
You can use any large piece of reflective material. While a large piece of white cardboard or foamcore isn’t the easiest thing in the world to carry, any photo store will carry collapsible reflectors that fold into a small circle, usually about a foot in diameter. These can pack easily into a backpack or suitcase. What’s more, these reflectors come in different colors, from white to silver to gold, allowing you to get more or less reflectance, or reflected light that has a color tint to it.
As mentioned earlier, you can sometimes use your camera’s flash to get the fill, instead of the reflector. However, if you’re standing farther away from your subject —perhaps so as to use a more flattering focal length—your flash might be out of range, especially on a very bright day. Because a reflector is close to your subject, it might actually provide more illumination than your flash can.
Using the XS’s On-Camera Flash
In Chapter 7, you saw how you can use the on-camera flash to even out an exposure by brightening a dark subject when your background is too bright. You’ve also seen how you can use fill flash to even out darker shadows in a scene.
But there will be times when you’re in a dimly lit room and simply need some extra light. In these snapshot-type situations, the XS’s onboard flash can do a good job of illuminating your scene, but you might need to take a little more control to get a good shot.
Flash Exposure
When you half-press the shutter button while the flash is popped up, the XS calculates an exposure, just as it does when the flash is down. However, with the flash up, it bases its exposure on its understanding of how much light the flash will be able to add to the scene. The camera will never pick a shutter speed slower than 60 to ensure handheld shooting. It will also never pick a shutter speed faster than 200, because it’s not possible for the entire sensor to be exposed to the flash if the shutter speed exceeds 200.
When you take a shot after metering, the camera will turn the flash on. When it sees that enough light has been added to the scene to properly expose it at the current settings, it then turns the flash off. In other words, while it might appear that the flash is always just a quick flash of light, the XS is actually carefully monitoring the situation and firing the flash for longer or shorter periods of time.
Waiting for Recharge
Before the flash can fire, it must charge up, a process that is usually very speedy. As your battery weakens, though, flash recycle time can worsen. The XS will display a busy indicator in the viewfinder while the flash is charging. When the busy indicator is displayed, you’ll still be able to shoot, but the flash will not fire.
Flash with Priority and Manual Modes
If you’re using the flash in Shutter Priority mode, then the camera will not let you select a shutter speed faster than 1/200th. As always, it will automatically calculate an aperture that’s appropriate for your speed.
In Aperture Priority mode, no matter what aperture you pick, the camera will never choose a shutter speed faster than 1/200th.
In both modes, though, you can have shutter speeds that are much slower than 1/60th. This allows you to achieve the same slow-sync shutter effect that the Night Portrait scene mode creates (you learned about this mode in Chapter 1). Slow-sync shuttermeans the camera combines a flash shot with a long exposure to create a scene that has good exposure in both the foreground and the background.
If you haven’t read the Understand Flash Range section in Chapter 1, you should do so now.
While the Night Portrait mode is an easy and effective way to get slow-sync effects, if you’re shooting raw or want more white balance or ISO control, then you’ll need to use Aperture Priority or Shutter Priority mode.
REMINDER: Tell Your Subject Not to Move
As with Night Portrait mode, when you shoot using a slow-sync shutter, it’s important to tell your subjects not to move until you say it’s okay. Most people will move as soon as the flash fires, but if the camera is set for a very long exposure, this can create blur.
In Manual mode you can select any combination of shutter speed and aperture, but as you would expect, you can’t choose a shutter speed faster than 1/200th of a second. As always in Manual mode, if you dial in exposure settings that would result in an over- or underexposure, the camera will warn you by flashing the Exposure Compensation display to indicate the amount of exposure error.
Flash Exposure Compensation
In addition to changing the shutter speed and aperture settings as you normally would, you can also tell the camera to add more or less flash to your scene. For example, consider the flash exposure compensation image at the top of the next page.

The flash has added a lot of brightness to the scene, but in the process, our subject has overblown highlights on him that make him look too harshly exposed. By using flash exposure compensation we can tell the camera to use less flash so that more of the natural light in our scene is used, and the harsh highlights are reduced. I shot the image on the right using a flash exposure compensation of −1 stop.
You’ll find Flash Exposure Compensation in the second shooting menu, just below Auto Exposure Bracketing. You specify flash exposure compensation in stops, just like you do normal exposure compensation.
The image on the right has much better exposure and lacks the overblown highlights. A quick check of the histograms of the images confirms that the second exposure is better (it lacks the overexposure spike on the right side).
I didn’t know ahead of time that 1/3rd of a stop would be enough, but because you can review your image and histogram, as soon as you take the shot, it’s easy to find the right exposure. So, if you go into a situation like a party in a dark room and plan on shooting flash, you might want to try a few tests right away to determine a proper flash exposure. Then you can shoot with those settings as long as the lighting doesn’t change significantly.
Don’t Forget the Histogram
Because the XS’s LCD screen isn’t a perfectly accurate representation of exposure, it’s important to check the histogram if you think there’s a chance of overexposure. If you see a white spike on the right side of the histogram, then you’ll need to adjust your flash exposure compensation and shoot again.
Improving Flash Range
Flash exposure compensation also lets you increase the amount of flash that gets added to a scene. However, this increase does not improve the range of your flash. Remember, all your camera can do is control how long the flash is on, but just as a desk lamp doesn’t light up a bigger area if you leave it on for longer, your XS’s flash doesn’t get a longer reach with an increased exposure setting.
However, you can effectively improve the range of the flash by increasing the camera’s ISO. Light intensity falls off as it travels farther from its source, and when the camera’s image sensor is dialed up to a higher level of light sensitivity, it will be able to pick up the fainter levels of light that have traveled farther away. Viewing Image Info of the Rebel XS instruction manual provides a chart that gives you an idea of how much of a range increase you can expect at different focal lengths.
In that chart, you’ll see that at ISO 1600, with an 18mm lens, you can expect a range of about 50 feet. But remember, that doesn’t mean objects 50 feet out will get the full flash exposure. You’ll still want to review your images carefully and consider using a slow-sync flash exposure.
Consistent Flash Overexposure
If the display consistently blinks when you try to shoot a flash exposure, try lowering the ISO. If you’ve left the ISO at a very high setting and then go into a bright situation and try to use fill flash, the camera will probably not be able to get a good exposure. Dialing down the ISO should help.
Red-Eye Reduction
If you’ve spent a lot of time shooting flash snapshots with a point-and-shoot camera, then you’ve probably seen red eye, that creepy phenomenon that causes your subject’s eyes to glow red. The red glow is nothing more than the reflection of the flash’s light off the back of the subject’s irises. (Dogs’ eyes, by comparison, reflect blue light.) While image-editing tools can remove this effect, it’s often better to try to solve the problem while shooting to save editing time later.
The closer the flash is to the lens of a camera, the more likely it is that you’ll get red eye, because the light from the flash can bounce straight off of your subject’s eyes and back into the camera. Because the XS has a flash that sits a ways from the lens, the chance of red eye is far less than it is with a point-and-shoot. However, it still can happen, which is why the Rebel XS has a built-in red-eye reduction feature that can very effectively eliminate the effect.
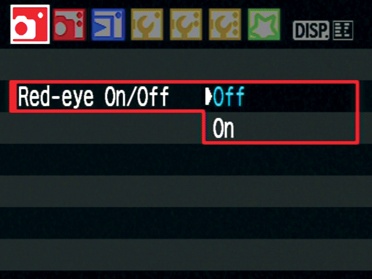
To activate red-eye reduction, select the feature in the first shooting menu, and turn it on.
When red-eye reduction is activated, every time you half-press the shutter, the camera will activate the red-eye reduction lamp, the one that flashes when you use the self-timer. The idea is that the lamp will cause the irises in your subject’s eyes to close down, thus reducing the chance of red eye. For this to work, you must be certain that your fingers don’t block the lamp.
Obviously, the lamp can be a bit distracting and in some venues might be very inappropriate, so you’ll most likely want to turn the feature off when you’re not using it.
Using an External Flash
On the top of the camera sits a hotshoe, a fairly standard camera interface that allows you to use a number of different accessories. It’s called a hotshoe because it’s an interface that provides electrical contacts through which the camera can communicate with an attached accessory (as opposed to a coldshoe, which has the same type of mount but provides no communication between the camera body and whatever is in the shoe).

You can use the hotshoe to attach special wireless or wired remotes, levels (for ensuring your camera isn’t tilted), umbrellas to keep your camera dry, and other specialized accessories. But hotshoes are most commonly used for external flash units.
Even though the XS has a built-in flash, there are a number of reasons to use an external flash. They’re more powerful, so they can cover a longer range and offer more latitude for exposure adjustment. Flash units all provide a specification called a guide number that indicates how powerful the flash unit is. For example, on Learning to See Again of the Rebel XS’s instruction manual, you’ll find a listing for Guide Number: 13/43 (ISO 100, in meters/feet). This number represents a constant that you can use to determine the range of the flash at a given aperture. For example, a guide number of 43 indicates that the flash can fully illuminate an object roughly 10 feet away when shooting at f4. (Ten feet multiplied by 4 is 40.)
These numbers used to be important for calculating manual exposures and for figuring out how to expose when using multiple flashes. If that last paragraph didn’t make sense to you, don’t worry, because you really don’t need to keep track of this stuff anymore, because the camera and flash will do it all for you.
Canon sells three different flash units that are compatible with the XS, as well as two special flash attachments for macro shooting. You can see these on Adjusting Predefined Picture Styles of the instruction manual. The Speedlight 430EX has a guide number of 43, while the Speedlight 580EX, Canon’s largest external flash unit, has a guide number of 58. So, if you’re willing to spend the money (and carry an extra component), you can pack a lot of illumination power into your camera bag.
Having the extra power doesn’t just mean you can light up a subject farther away. With a larger flash, you’ll be able to fill a larger area with more light.
External flashes also offer the advantage of being able to slavemultiple units together. With multiple flashes, you can create complex lighting solutions. You’ve seen how you can use a fill flash to improve images shot under direct sunlight. With multiple flashes you’re in control of several light sources, allowing for a tremendous amount of lighting creativity. The use of multiple flashes is far beyond the scope of this book and something that most shooters don’t need.
However, multiple flashes also give you the option to tilt and bounce the flash, rather than aiming it directly at your subject. This is probably the greatest advantage of an external flash, and when combined with the stronger power of these units, the tilt/swivel capability allows you to create very natural-looking lighting.
One of the biggest problems with flash pictures is that the flash is always located in the same location as your camera. In other words, the main source of illumination for your subject is located just a little above your head. This is very rarely how real-world light sources work, so flash pictures always look like, well, flash pictures.
In the real world, we’re used to light coming from overhead, and we’re also used to those light sources being larger than a single bulb the size of the XS’s flash head. Lighting that shines onto the front of a person, from a very small source, simply doesn’t look natural to us.
Bouncing a Flash
When we speak of bouncing a flash or a light source, it’s easy to think of that bouncing as being billiard-ball-like, or like bouncing a laser off a bunch of mirrors. With this analogy, then you might think you have to worry about lining up the flash just right so that the light bounces in a way that will strike your subject. Fortunately, this isn’t the case.
The flash on your XS, or an external flash unit, emits light in a conical pattern. So, as the light travels farther away, it spreads out. If you point the light at the ceiling to use it as a big reflector, then by the time the light hits the ceiling, it will be fairly widely dispersed. The ceiling will reflect that light back down and create a light that’s much more natural-looking, both because it will be coming from overhead and because it will be very diffuse, rather than the point light that your flash produces if you aim it directly at a subject.
Consequently, when you think about lighting, you shouldn’t just think of the source; you should think about the path of the light. If light is shining from a source directly onto your subject, then, yes, the light source is your source of illumination. But if the light is bouncing off something else, say, a reflector, then the reflector is your light source. This is an important distinction, because a reflector can change the characteristics of a light. It can alter its color or make it more diffuse.

With a Canon Speedlight like the 430EX or 580EX, you simply tilt the flash head up. The flash calculates the appropriate exposure for a good bounce and is usually very accurate in its calculations.
If you’re dealing with an especially high ceiling, then you may want to tilt the flash forward a little so that the bounce goes directly over your subject.
Just as you can use flash exposure compensation to increase or decrease the amount of flash power in the built-in flash, when an external flash is connected, this same control will increase or decrease the output of the external unit.
As with the internal flash, check the camera’s histogram to ensure you have a good exposure. If you see an overexposure, adjust flash exposure compensation and shoot again.