As you can see, using LINQ to SQL is a lot easier than the ADO.NET syntax you used in Chapter 20. That’s still not the easiest way of going about it, though. This is Visual Studio, isn’t it? So, why not put a little visual in your database access? That’s where the Object Relational Designer comes in. As with many visual components, it’s easier to show this than to explain it.
Create a new console application to start. Check the Database Explorer to make sure you still have access to the Northwind database. (If not, see Chapter 20 for instructions on how to connect to Northwind.) Switch back to the Solution Explorer, right-click the project name, and select Add → New Item. When the Add New Item dialog box opens, select LINQ to SQL Classes. The dialog will suggest a default name of DataClasses1.dbml; that’s fine for this exercise. Click Add.
Two things happen right away, which you can see in Figure 21-2. First, the IDE changes to show the Object Relational Designer (O/R Designer), which is empty at the moment. The second thing is that several files are added to your project: DataClasses1.dbml, and two associated files named DataClasses1.dbml.layout and DataClasses1.designer.cs. The .dbml part, as you may have guessed, indicates that this is a Database Markup Language file, which is really just in XML.

Figure 21-2. When you add the LINQ to SQL classes, the Object Relational Designer opens automatically.
To see how this works, you’ll have to add some tables to the O/R Designer. Switch to the Database Explorer, expand Northwind, and expand the Tables folder. Now drag the Orders table directly onto the O/R Designer. If you get a message asking whether you want to copy the data to this project, click Yes. It may take a minute, but you’ll see the Orders table represented visually, with icons for each of the columns in the table, and a key icon indicating the primary key for this table. Now drag on the Order Details and Products tables as well. These tables are also represented visually, and the connections between them are shown as well. You can drag them around to see them better if you like, but your IDE should look something like Figure 21-3 now.
Notice in Figure 21-3 that the arrows from both the Order and Product tables point toward the Order Details table. That’s because the primary key from each of those two tables is used as a foreign key in Order Details.
Switch back to the Solution Explorer and take a look at what’s happened here. Double-click DataClasses1.dbml.layout. You’ll be told the file is already open, and you’ll be asked whether you want to close it. Click Yes. When the file opens, you’ll see a lot of XML. This is the markup representation of what you just created visually. For the most part, you’ll never need to look at this file, but we wanted you to see what the O/R Designer does for you.
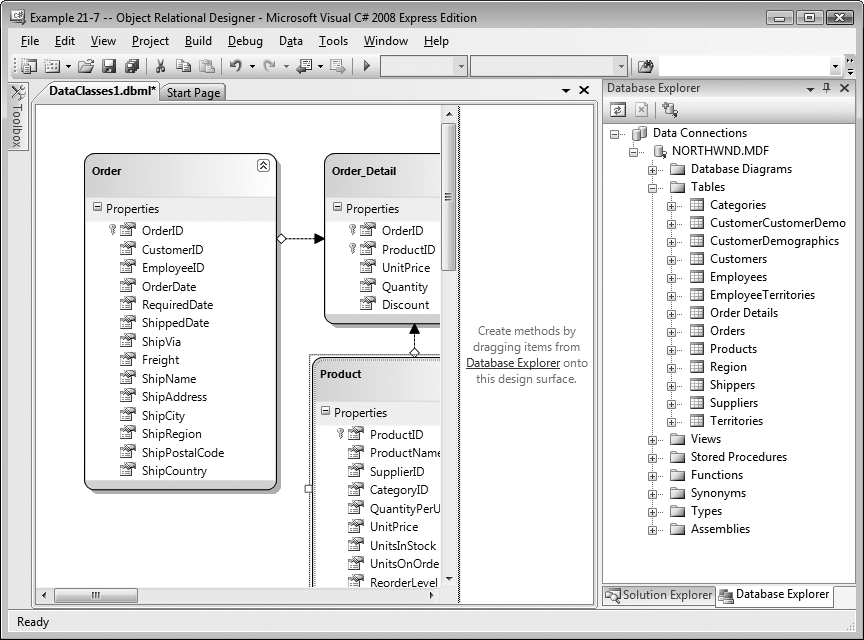
Figure 21-3. The Object Relational Designer gives you a visual representation of your data, and the connections between the tables.
Next open the DataClasses1.designer.cs file. This is a huge file, all automatically generated from the contents of the tables, and if you scroll through it, you’ll find properties for every column so that you can retrieve and set them. You shouldn’t ever need to edit this file either.
So, what does all this autogenerated code do for you? Perhaps not quite as much as you think, but it will save you from some of the larger headaches of dealing with databases. Switch to the Program.cs file now, and add the code shown in Example 21-7.
Example 21-7. When you use the Object Relational Designer, a lot of the database code is generated for you, letting you focus on your classes
using System;
using System.Collections.Generic;
using System.Linq;
using System.Text;

namespace Example_21_7_ _ _ _Object_Relational_Designer
{
    class Program
    {
        static void Main( )
        {
            DataClasses1DataContext myContext =
               new DataClasses1DataContext( );

            // find a single product record
            Product foundProduct = myContext.Products.Single(
                                      p => p.ProductID == 1);
            Console.WriteLine("Found product #{0}, {1}",
               foundProduct.ProductID, foundProduct.ProductName);

            // return a list of order records
            var orderList =
                from order in myContext.Order_Details
                where order.OrderID >= 10250 && order.OrderID <= 10255
                select order;

            Console.WriteLine("
Product Orders between 10250 and 10255");
            foreach (Order_Detail order in orderList)
            {
                Console.WriteLine("ID: {0}	Qty: {1}	Product: {2}",
                       order.OrderID, order.Quantity,
                       order.Product.ProductName);
            }
        }
    }
}Found product #1, Chai Product Orders between 10250 and 10255 ID: 10250 Qty: 10 Product: Jack's New England Clam Chowder ID: 10250 Qty: 35 Product: Manjimup Dried Apples ID: 10250 Qty: 15 Product: Louisiana Fiery Hot Pepper Sauce ID: 10251 Qty: 6 Product: Gustaf's Knäckebröd ID: 10251 Qty: 15 Product: Ravioli Angelo ID: 10251 Qty: 20 Product: Louisiana Fiery Hot Pepper Sauce ID: 10252 Qty: 40 Product: Sir Rodney's Marmalade ID: 10252 Qty: 25 Product: Geitost ID: 10252 Qty: 40 Product: Camembert Pierrot ID: 10253 Qty: 20 Product: Gorgonzola Telino ID: 10253 Qty: 42 Product: Chartreuse verte ID: 10253 Qty: 40 Product: Maxilaku ID: 10254 Qty: 15 Product: GuaranÁ FantÁstica ID: 10254 Qty: 21 Product: PÂté chinois ID: 10254 Qty: 21 Product: Longlife Tofu ID: 10255 Qty: 20 Product: Chang ID: 10255 Qty: 35 Product: Pavlova ID: 10255 Qty: 25 Product: Inlagd Sill ID: 10255 Qty: 30 Product: Raclette Courdavault
There are several differences to notice between this code and Example 21-6.
First, you didn’t need to add any using statements; those are taken care of for you, in the other classes. Next, DataClasses1DataContext is a pregenerated class that knows how to access Northwind already. All you had to do was call the default constructor—no more messing around with connection strings. That by itself is worth the trouble.
Also notice that you didn’t define any classes here. You don’t need to define a Table class, or classes to represent the fields in the database. All of that already exists in the DataClasses1.designer.cs file. That means you can treat the columns in the database as regular types:
Product foundProduct = myContext.Products.Single(
                          p => p.ProductID == 1);
You didn’t define Product anywhere; the O/R Designer did it for you, but you can use a Product object just like any other object. These classes even have their own methods defined for them, such as the Single( ) method, which is used to retrieve a single record. You can retrieve a collection using the same LINQ syntax you’re now used to:
var orderList =
    from order in myContext.Order_Details
    where order.OrderID >= 10250 && order.OrderID <= 10255
    select order;
orderList is an IEnumerable collection of anonymous types, based on the return value of the select statement.
Finally, notice one interesting thing in the WriteLine( ) statement:
Console.WriteLine("ID: {0}	Qty: {1}	Product: {2}",
       order.OrderID, order.Quantity,
       order.Product.ProductName);
You’ve retrieved the OrderID and Quantity values from the Order Details table, treating Order_Details as though it were an ordinary object. ProductName isn’t in the Order Details table, though. The Order Details table is related to the Product table by the foreign key (ProductID). That means you can access the Product class, and its ProductID field, from Order_Details. And that’s exactly how this works: order.Product.ProductName gets you the field you want.
Tip
The name of the table is “Order Details” with a space, but C# class names can’t include spaces, so the Object Relational Designer changes it to an underscore for you. You may also have noticed that when the O/R Designer displays the class name graphically, it’s singular. IntelliSense always provides the correct class name for you.
Now you’ve reached a point where interacting with the database is nearly invisible. The LINQ syntax made the querying easier, and the Object Relational Designer makes accessing the database easier yet.