The menus provide access to many of the commands and capabilities of C# Express 2008. The more commonly used menu commands are duplicated with toolbar buttons for ease of use.
The menus and toolbars are context-sensitive, meaning that the available selection depends on what part of the IDE is currently selected, and what activities are expected or allowed. For example, if the current active window is a code-editing window for a console application such as Hello World, the top-level menu commands are File, Edit, View, Refactor, Project, Build, Debug, Data, Tools, Test (only in the full Visual Studio), Window, and Help.
Many of the menu items have keyboard shortcuts, listed adjacent to the menu item itself. These are composed of one or more keys (referred to as a chord), pressed simultaneously. Shortcut keys can be a huge productivity boost because you can use them to perform common tasks quickly, without removing your hands from the keyboard, but it’s really a matter of personal preference.
The following sections describe some of the more important menu items and their submenus, focusing on those aspects that are interesting and different from common Windows commands.
The File menu provides access to a number of file-, project-, and solution-related commands. Many of these commands are context-sensitive.
As in most Windows applications, the New menu item creates new items to work on, the Open item opens existing items, and the Save item saves your work. One item you may not have seen before is Save All, which will save all the open files in an open solution. This can be very useful when you’re working with a large solution.
The Edit menu contains the text editing and searching commands that one would expect, but also includes commands useful in editing code. The most useful are discussed next.
The Clipboard Ring is like copy-and-paste on steroids. You can copy a number of different selections to the Windows clipboard, using the Edit → Cut (Ctrl-X) or Edit → Copy (Ctrl-C) command. Then use Ctrl-Shift-V to cycle through all the selections, and paste the correct one when it comes around.
Tip
You can change C# Express hot keys systematically or individually; the ones we refer to here and throughout this book are the “standard keys” used when programming in C#. Your mileage may vary.
This submenu item is context-sensitive and is visible only when editing a code window.
C# Express 2008 includes a number of advanced Find and Replace options that you’ll use frequently. The most common ones are discussed in this section.
Quick Find and Quick Replace. These are just slightly jazzed names for slightly jazzed versions of the typical Find and Replace. You can access Quick Find with Ctrl-F and Quick Replace with Ctrl-H. Both commands bring up essentially the same dialog boxes, switchable by a tab at the top of the dialog box, as shown in Figure 2-5.
The search string defaults to the text currently selected in the code window, or, if nothing is selected, to the text immediately after the current cursor location.
The “Look in” drop-down offers a choice of Current Document, All Open Documents, Current Project, Entire Solution, or Current Method.
You can expand or collapse the search options by clicking on the plus/minus button next to the “Find options” item. By default, “Search hidden text” is checked, which allows the search to include code sections currently collapsed in the code window. The Use checkbox allows the use of either regular expressions or wildcards.
Tip
Regular expressions are a language unto themselves, expressly designed for incredibly powerful and sophisticated searches. A full explanation of regular expressions is beyond the scope of this book, and isn’t really necessary for the sorts of searches you normally conduct when writing code. For a complete discussion of regular expressions, see the SDK documentation, or Mastering Regular Expressions, Third Edition, by Jeffrey E. F. Friedl (O’Reilly).

Figure 2-5. The Find and Replace features work mostly like they do in any Windows application, although in C# Express, you have the option of searching single files or the whole solution, and other advanced features such as regular expressions.
If the Use checkbox is checked, the Expression Builder button to the right of the “Find what” text box becomes enabled, providing a very handy way to insert valid regular expression or wildcard characters.
Once you’ve entered a search string in the “Find what” text box, the Find Next button becomes enabled. In Quick Find mode, there is also a Bookmark All button, which finds all occurrences of the search string and places a bookmark (described shortly) next to the code.
In Quick Replace mode, there is also a “Replace with” text box, and buttons for replacing either a single occurrence or all occurrences of the search string.
Find in Files. Find in Files (Ctrl-Shift-F) is a very powerful search utility that finds text strings anywhere in a directory or in subdirectories (subfolders). It presents the dialog box shown in Figure 2-6. Checkboxes present several self-explanatory options, including the ability to search using either wildcards or regular expressions. Depending on how many files you have in your solution, you may want to use this kind of search as your default first choice.
Find Symbol. Clicking the Find Symbol command (Alt-F12) will bring up the Find Symbol dialog box, which allows you to search for symbols (such as namespaces, classes, and interfaces) and their members (such as properties, methods, events, and variables). It also allows you to search in external components for which the source code is not available.
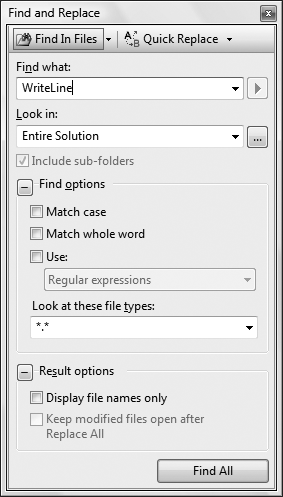
Figure 2-6. The Find and Replace in Files feature lets you search in files other than the one you’re working with right now.
The search results will be displayed in a window labeled Find Symbol Results. From there, you can move to each location in the code by double-clicking on each result.
The Go To command brings up the Go To Line dialog box, which allows you to enter a line number and immediately go to that line. It is context-sensitive and is visible only when editing a text window.
The Insert File As Text command allows you to insert the contents of any file into your source code, as though you had typed it in. It is context-sensitive and is visible only when editing a text window.
You’ll see a standard file-browsing dialog box to search for the file you want to insert. The default file extension will correspond to the project language, but you can search for any file with any extension.
The Advanced command is context-sensitive and is visible only when editing a code window. It has many submenu items. These include commands for:
The following three options are available only in Visual Studio, not C# Express:
Incremental search allows you to search an editing window by entering the search string character by character. As you enter each character the cursor moves to the first occurrence of matching text.
To use incremental search in a window, select the command on the Advanced submenu, or press Ctrl-I. The cursor icon will change to a pair of binoculars with an arrow indicating the direction of the search. Begin typing the text string to search for.
The case sensitivity of an incremental search will come from the previous Find, Replace, Find in Files, or Replace in Files search (described earlier).
The search will proceed downward and from left to right from the current location. To search backward, use Ctrl-Shift-I.
The key combinations listed in Table 2-1 apply to incremental searching.
Bookmarks are useful for marking spots in your code and easily navigating from marked spot to marked spot. There are several context-sensitive commands on the Bookmarks submenu (listed in Table 2-2). Note that, unless you add the item to the task list, bookmarks are lost when you close the file, although they are saved when you close the solution (as long as the file was still open).
Table 2-2. Bookmark commands
This menu item appears only when the current window is a code window.
C# Express 2008 allows you to outline, or collapse and expand, sections of your code to make it easier to view the overall structure. When a section is collapsed, it appears with a plus sign in a box along the left edge of the code window. Clicking on the plus sign expands the region.
You can nest the outlined regions so that one section can contain one or more other collapsed sections. Several commands are available to facilitate outlining (shown in Table 2-3).
Table 2-3. Outlining commands
Command | Description |
|---|---|
Toggle Outlining Expansion | Reverses the current outlining state of the innermost section in which the cursor lies. |
Toggle All Outlining | Sets all sections to the same outlining state. If some sections are expanded and some are collapsed, all will become collapsed. |
Stop Outlining | Expands all sections and removes the outlining symbols from view. |
Collapse to Definitions | Automatically creates sections for each procedure in the code window and collapses them all. |
You can set the default behavior of outlining using the Tools → Options menu item. Go to Text Editor, and then the specific language for which you want to set the options.
Microsoft IntelliSense technology makes your life much easier. It has real-time, context-sensitive help available, which appears right under your cursor. Code completion automatically completes your thoughts for you, drastically reducing your typing (and therefore, your typing errors). Drop-down lists provide all methods and properties possible in the current context, available at a keystroke or mouse click.
You can configure the default IntelliSense features by going to Tools → Options and then the language-specific pages under Text Editor.
Most of the IntelliSense features appear as you type inside a code window or allow the mouse to hover over a portion of the code. In addition, the Edit → IntelliSense menu item offers numerous commands, the most important of which are shown in Table 2-4.
Table 2-4. IntelliSense commands
Command | Description |
|---|---|
Displays a list of all possible members available for the current context. Keystrokes incrementally search the list. Press any key to insert the highlighted selection into your code; that key becomes the next character after the inserted name. Use the Tab key to select without entering any additional characters. This can also be accessed by right-clicking and selecting List Member from the context-sensitive menu. | |
Displays a list of numbers, names, and types of parameters required for a method, sub, function, or attribute. | |
Displays the complete declaration for any identifier (such as a variable name or class name) in your code. This is also enabled by hovering the mouse cursor over any identifier. | |
Automatically completes the typing of any identifier once you type in enough characters to uniquely identify it. This works only if the identifier is being entered in a valid location in the code. | |
Displays a selection of code snippets to insert, such as the complete syntax for a | |
Displays a selection of code snippets to surround a block of code, such as a class declaration. |
The member list presents itself when you type a dot operator following any class or member name.
Every member of the class is listed, and each member’s type is indicated by an icon. There are icons for methods, fields, properties, events, and so forth. In addition, each icon may have a second icon overlaid to indicate the accessibility of the member: public, private, protected, and so on. If there is no accessibility icon, the member is public.
Two of the subcommands under the IntelliSense menu item, Insert Snippet and Surround With, tap into a great feature to reduce typing and minimize errors: code snippets. A code snippet is a chunk of code that replaces an alias. A short alias is replaced with a much longer code snippet. For example, the alias switch would be replaced with:
switch ( switch_on )
{
   default:
}
with the expression switch_on highlighted in yellow and the cursor in place, ready to type in your own expression. In fact, all the editable fields will be highlighted, and you can use the Tab key to navigate through them, or Shift-Tab to go backward. Any changes made to the editable field are immediately propagated to all the instances of that field in the code snippet. Press Enter or Esc to end the field editing and return to normal editing.
To do a straight alias replacement, either select Insert Snippet from the menu, or more easily, press Ctrl-K, Ctrl-X. Or, just type an alias in the code window and an IntelliSense menu will pop up with a list of aliases, with the current one highlighted. Press Tab to insert the snippet.
Alternatively, a code snippet can surround highlighted lines of code—say, with a for construct. To surround lines of code with a code snippet construct, highlight the code and then either select Surround With from the menu or press Ctrl-K, Ctrl-S.
The View menu is a context-sensitive menu that provides access to the myriad windows available in the C# Express 2008 IDE. You will probably keep many of these windows open all the time; others you will use rarely, if at all.
The View menu is context-sensitive. For example, with an ASP.NET content file on the work surface, the first three menu items will be Code, Designer, and Markup; the Code and Designer menu items will be omitted if you’re looking at a code-behind file. You don’t need to worry about what these terms mean for now; you’ll see them in the closing chapters of the book.
When the application is running, a number of other windows, primarily used for debugging, become visible or available. You access these windows via the Debug → Windows menu item, not from the View menu item.
C# Express 2008 can store several different window layouts. In particular, it remembers a completely different set of open windows during debug sessions than it does during normal editing. These layouts are stored per-user, not per-project or per-solution.
The Class View window (Ctrl-Shift-C) shows all the classes in the solution in a hierarchical manner. A typical Class View window, somewhat expanded, is shown in Figure 2-7.
As with the Solution Explorer, you can right-click any item in the Class View window, which exposes a pop-up menu with a number of context-sensitive menu items. This can provide a convenient way to sort the display of classes in a project or solution, or to add a method, property, or field to a class.
The Code Definition window (Ctrl-W, D) is used in developing web pages, but is available only in the full version of Visual Studio.
The Error List window (Ctrl-W, Ctrl-E), which is available in all editor views, displays errors, warnings, and messages generated as you edit and compile your project. Syntax errors flagged by IntelliSense are displayed here, as well as deployment errors. Double-clicking on an error in this list will open the offending file and move the cursor to the error location.
The Output window (Ctrl-Alt-O) displays status messages from the IDE, such as build progress. You can set the Output window to display by default when a build starts by going to Tools → Options → Projects and Solutions → General and checking “Show Output window when build starts”.
This window is available in all editor views.

The Properties window (F4) displays all the properties for the currently selected item. Some of the properties (such as Font) may have subproperties, indicated by a plus sign next to their entries in the window. The property values on the right side of the window are editable.
One thing that can be confusing is that certain items have more than one set of properties. For example, a Form content file can show two different sets of properties, depending on whether you select the source file in the Solution Explorer or the form as shown in the Design view.
A typical Properties window is shown in Figure 2-8.

Figure 2-8. You won’t use the Properties window much with console applications, but when you design Windows Forms, you’ll use it a lot.
The name and type of the current object are displayed in the field at the top of the window. In Figure 2-8, it is an object named Form1, of type Form, contained in the System.Windows.Forms namespace.
You can edit most properties in place in the Properties window. The Font property has subproperties that you can set directly in the window by clicking on the plus sign to expand its subproperties, and then editing the subproperties in place.
The Properties window has several buttons just below the name and type of the object. The first two buttons on the left toggle the list by category or alphabetically. The next two buttons from the left toggle between displaying properties for the selected item and displaying events for the selected item. The rightmost button displays property pages for the object, if there are any.
Tip
Some objects have both a Properties window and property pages. The property pages display additional properties not shown in the Properties window.
The box below the list of properties displays a brief description of the selected property.
In large applications, keeping a to-do list can be quite helpful. C# Express 2008 provides this functionality with the Task List window.
The Toolbox command (Ctrl-Alt-X) displays the Toolbox if it is not currently displayed. If it is currently displayed, nothing happens—it does not toggle the display. To hide the Toolbox, click on the X in the Toolbox title bar.
Several other windows have been relegated to a submenu called Other Windows. These include:
- The Command window (Ctrl-Alt-A)
- The Object Test Bench window
This window lets you conduct tests on your classes as you write them, but only in Visual Studio.
- The Property Manager window
You use this window only for C++ projects; it isn’t available in C# Express.
- The Resource View window (Ctrl-Shift-E)
This window displays the resource files included in the project. Resources are nonexecutable data deployed with an application, such as icons and graphics, culture-specific text messages, and persisted data objects.
- The Macro Explorer window (Alt-F8)
Visual Studio 2008 offers the ability to automate repetitive chores with macros. A macro is a set of instructions written in VB.NET, either created manually or recorded by the IDE, saved in a file. The Macro Explorer is the one of the main tools for viewing, managing, and executing macros. It provides access into the Macro IDE.
- The Start Page
- The Web Browser
This item opens a web browser within the Visual Studio window.
Refactoring is the process of taking code duplicated in various parts of your program and extracting it out to a callable method. This is an advanced procedure, so you won’t see any refactoring in this book.
Tip
For details on refactoring, we highly recommend the book Refactoring: Improving the Design of Existing Code, by Martin Fowler et al. (Addison-Wesley Professional).
The Refactor menu item is available when you’re looking at a code window for a web page, user control, or language source code file. It is also available from context menus when you right-click on an identifier in a Class View, Object Browser, or Solution Explorer window.
The refactoring menu items will modify your code—for example, extracting common code to a method and then calling that method in the place from which it was extracted.
The Project menu provides functionality related to project management. It is visible only when the solution is selected in the Solution Explorer. All of the functionality exposed by the Project menu is also available in the Solution Explorer, by right-clicking on the solution.
The Build menu offers menu items for building the current project (highlighted in the Solution Explorer) or the solution. It also exposes the Configuration Manager for configuring the build process.
The Debug menu allows you to start an application with or without debugging, set breakpoints in the code, and control the debugging session.
The context-sensitive Data menu is visible only when in Design mode when creating, for example, web applications.
The Format menu is visible only in Design mode when creating, for example, web applications; further, the commands under it are context-sensitive to the control(s) currently selected.
The Tools menu presents commands accessing a wide variety of functionality, ranging from connecting to databases to accessing external tools to setting IDE options. Some of the more useful commands are described in the following sections.
The Connect to Device command (available only in Visual Studio) brings up a dialog box that allows you to connect to either a physical mobile device or an emulator.
The Device Emulator Manager command (also available only in Visual Studio) helps you keep track of the various settings for devices and their emulators for which you may be developing.
The Connect to Database command brings up the dialog box that allows you to select a server, log in to that server, and connect to the database on the server. Microsoft SQL Server is the default database (surprise!), but the Change button allows you to connect to any number of other databases, including any for which there are Oracle or ODBC providers.
The Connect to Server command (available only in Visual Studio) brings up a dialog box that lets you enter a remote server to connect to, either by name or by IP address.
The Code Snippets Manager command (Ctrl-K, Ctrl-B) brings up the Code Snippets Manager dialog box, which allows you to maintain the code snippets (described in “IntelliSense” earlier in this chapter). This dialog box allows you to add or remove code snippets for any of the supported languages. You can also import code snippets and search online for code snippets.
The Choose Toolbox Items command brings up the Choose Toolbox dialog box, allowing you to add COM components and custom controls. The details of doing so are beyond the scope of this book, but they are covered in full in Programming ASP.NET 3.5 by Jesse Liberty et al. (O’Reilly).
Depending on the options selected at the time C# Express 2008 was installed on your machine, you may have one or more external tools available on the Tools menu. These might include tools such as Create GUID and Dotfuscator Community Edition. (Use of these tools is beyond the scope of this book.)
The Tools → External Tools command allows you to add additional external tools to the Tools menu. When you select this command, you are presented with the External Tools dialog box. This dialog box has fields for the tool title, the command to execute the tool, any arguments and the initial directory, as well as several checkboxes for different behaviors.
The Window menu is the same as the Window menu you’ll find in most standard Windows applications. It displays a list of all the currently open windows, allowing you to bring any window to the foreground by clicking on it. Note that all the file windows currently displayed in the IDE also have tabs along the top edge of the work surface, below the toolbars (unless you have selected MDI mode in Tools → Options → Environment → General), and you can select windows by clicking on a tab.