Now you have a general idea of how Windows applications work, and it’s time to get more ambitious and employ what you’ve learned in the previous 17 chapters. You’ll build a utility named FileCopier that copies all the files from a group of directories selected by the user to a single target directory or device, such as a floppy, or a backup hard drive on the company network. Although you won’t implement every possible feature for this application, this example will provide a good introduction to what it is like to build meaningful Windows applications.
Tip
The example you’re about to create is much more complex than anything you’ve done in this book so far. However, if you walk through the code slowly, you’ll find that you’ve already learned everything you need in the previous chapters. The goal of creating Windows applications is to mix drag-and-drop design with rather straightforward C# blocks to handle the logic.
For the purposes of this example and to keep the code simple, you’ll focus on the user interface and the steps needed to wire up its various controls. The final application UI is shown in Figure 18-7.
The user interface for FileCopier consists of the following controls:
A text box displaying the path of the selected target directory.
TreeViewcontrols (source and target directories). You may not be familiar with the term TreeView, but you’ve almost certainly seen them before. Windows uses them to indicate hierarchical structures, such as the arrangement of files and directories in Windows Explorer.
All of these controls are available in the General section of the Toolbox, and you can simply drag them onto the form, as you’ll see in a minute.
The goal is to allow the user to check files (or entire directories) in the left TreeView (the source). If the user clicks the Copy button, the files checked on the left side will be copied to the target directory specified on the right-side TreeView control. If the user clicks Delete the checked files will be deleted.
The first task is to create a new project, by selecting File → New Project. In the New Project dialog box, select Windows Forms Application, and name the project “FileCopier”.
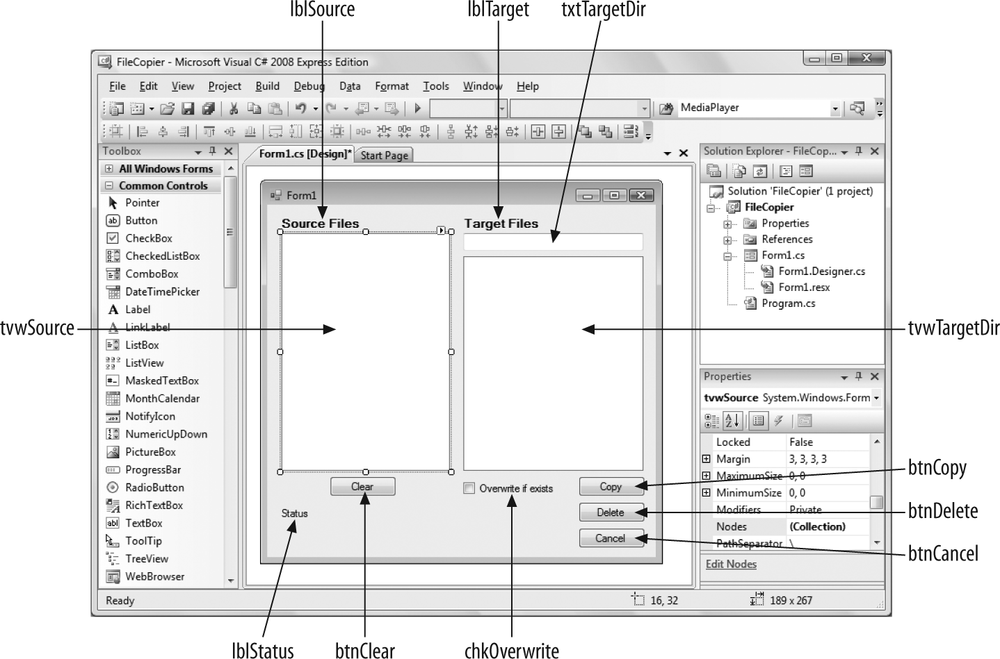
The IDE puts you into the designer, with Form1 showing, as before. This is where you’ll create the UI for your application. This form will need to be a bit bigger than the last one, so expand the form a bit by dragging one of the little boxes in the corners of the form until it’s somewhat larger (the exact size doesn’t really matter; you can always adjust it later). With the form itself selected, you can see the form properties in the Properties window. Change the (Name) property to FrmFileCopier and the Text property to File Copier.
Drag-and-drop a couple of Label controls onto the top of the form—these will go above the two TreeView controls. Set the Name property of the left Label to lblSource, and the Name property of the Label on the right to lblTarget. Set the Text properties of the two labels to “Source Files” and “Target files”, respectively. Adjust the font settings a bit so that the labels are easier to read—10pt bold should work fine.
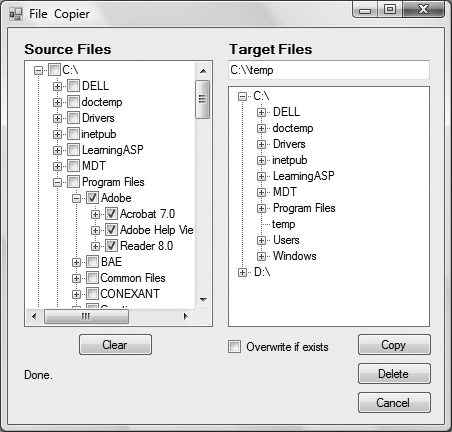
Figure 18-7. The FileCopier user interface has a range of different controls, but they all use a similar event handler mechanism.
Tip
You’ll notice that when we name the controls in this example, we’re giving each control a prefix that indicates what kind of control it is—txt for TextBox controls, lbl for Label controls, and so on. This practice is called Hungarian
notation. Microsoft’s official naming guidelines prohibit using Hungarian notation for public identifiers. The controls on a form, though, are private, so the issue is a bit muddier. We think that naming a control lblSource, rather than just Source, makes it easier to identify later when you’re editing the code. Therefore, we’ll use Hungarian notation for the control names in this example.
Next, add a TextBox control immediately under the “Target Files” label, and set its Name property to txtTargetDir. You’ll use this TextBox to display the full path of the directory where the user wants to copy the files. The Source side of the application doesn’t need such a Textbox, because the file location will be obvious from the TreeView, and because there may be multiple source directories.
Next, add the two TreeView controls that take up most of the space on the form. Select a TreeView and drag its corners to make it a bit larger, as shown in Figure 18-8. Notice that Visual Studio helps you line up the controls on the form neatly with each other. Name the TreeView on the left tvwSource, and the one on the right tvwTargetDir.
There’s another property you need to set on the TreeView controls. On the source TreeView, you want to display checkboxes next to the directories and files that will show in the window so that the user can select multiple directories. To accomplish that, set the CheckBoxes property on tvwSource to True—just click in the box next to CheckBoxes, and you’ll see a drop-down list from which you can select True or False. In the destination TreeView control, you want users to be able to select only a single destination directory, which means you don’t want the checkboxes. The default for the CheckBoxes property is False, so you shouldn’t need to make any changes to tvwTargetDir, but select it anyway and make sure it’s set properly. That takes care of the TreeView controls.
On the left side of the form, underneath tvwSource, add a button. Name it btnClear, and set its Text property to “Clear”. You’ll use this button to clear the left TreeView. Underneath that button, add another Label control. Name it lblStatus, and set its Text property to “Status”. You’ll use this label to report any status messages to the user. Don’t worry about its font properties.
On the right side of the form, underneath and aligned with the left edge of tvwTargetDir, add a Checkbox control. Name it chkOverwrite, and set its Text property to “Overwrite if exists”. If the user tries to copy a file to a target directory that already has a file with the same name, you want to give the user the option of overwriting the target file, or leaving it alone. This checkbox is where the user will make that choice.
Finally, add three buttons in a column, underneath and aligned with the right edge of tvwTargetDir. Name these buttons btnCopy, btnDelete, and btnCancel, in that order, and set their Text properties to Copy, Delete, and Cancel, respectively. These buttons will do pretty much what they say they will.
That’s it for the design of the form. Your form should look something like Figure 18-8 right now, although your dimensions may be slightly different. You can run your application now, if you want, to see what the form looks like on its own, although the controls won’t do anything yet, of course.
So much for the easy part. Visual Studio generates code to set up the form and initializes all the controls, but it doesn’t fill the TreeView controls, or provide event handlers for any of the buttons. That you must do by hand, starting with the TreeView controls in the next section. It’s some complicated code, but we’ll walk you through it.
The two TreeView controls work nearly identically, except that the left control, tvwSource, lists the directories and files, and the right control, tvwTargetDir, lists only directories. The CheckBoxes property on tvwSource is set to true, and on tvwTargetDir, it is set to false. Also, although tvwSource will allow the user to select multiple files, which is the default for TreeView controls, you will enforce single selection for tvwTargetDir.
Although there are differences, most of the code for these two controls is held in common. Instead of writing out all the code twice, you’ll use a technique called factoring—putting the common code in one convenient place for objects to access. In this case, you’ll factor the common code for both TreeView controls into a shared method, FillDirectoryTree. When you call this method, you’ll pass in the TreeView control (so the method knows which TreeView to fill) with a Boolean (also called a flag) indicating whether to get the files that are currently present (you’ll see how this works in a bit). You’ll call this method from the constructor for the Form itself, once for each of the two controls. Click on the Form1.cs tab at the top of the main window in Visual Studio to switch to the code for the form. If that tab isn’t there, click the View Code button at the top of the Solution Explorer to open Form1.cs. Locate the constructor for the form (public FrmFileCopier( )), and add these two method calls:
FillDirectoryTree(tvwSource, true);
FillDirectoryTree(tvwTargetDir, false);
The FillDirectoryTree implementation names the TreeView parameter tvw. This will represent the source TreeView and the destination TreeView in turn. You’ll need some classes from System.IO, so add a using System.IO statement at the top of Form1.cs.
Next, add the method declaration to Form1.cs:
private void FillDirectoryTree(TreeView tvw, bool isSource)
{
}
Right now, the code for Form1.cs should look like this:
using System;
using System.Collections.Generic;
using System.ComponentModel;
using System.Data;
using System.Drawing;
using System.Linq;
using System.Text;
using System.Windows.Forms;
using System.IO;

namespace FileCopier
{
    public partial class FrmFileCopier : Form
    {
        public FrmFileCopier( )
        {
            InitializeComponent( );
            FillDirectoryTree(tvwSource, true);
            FillDirectoryTree(tvwTargetDir, false);
        }
        private void FillDirectoryTree(TreeView tvw, bool isSource)
        {
        }
    }
}
You haven’t done anything with the TreeView controls, but you’ve set things up so that you’ll have a place to put your code.
You’re now going to fill in the code for the FillDirectoryTree( ) method you just created. The TreeView control has a property, Nodes, which gets a TreeNodeCollection object. (We discussed collections in Chapter 14.) The TreeNodeCollection is a collection of TreeNode objects, each of which represents a node in the tree. The first thing you need to do is empty that collection, so add this code to the method:
tvw.Nodes.Clear( );
Tip
The TreeView, the TreeNodeCollection, and the TreeNode class are all defined by the Framework Class Library (FCL). In fact, nearly all the classes used in this example are defined by the framework (as opposed to being defined by you) and can be fully explored in the help files.
There is, unfortunately, no accepted convention to distinguish between individually user-defined classes (such as FrmFileCopier) and framework-defined classes (such as Environment). On the other hand, if you come across a class that you haven’t defined explicitly, it is a safe bet that it is part of the framework, and you can confirm that with the help files documentation.
Next you need to fill the TreeView’s Nodes collection, but first you need to know about a programming concept called recursion. In a nutshell, recursion occurs when a method calls itself, or when method A calls method B, which calls method A, repeating until some condition is met. In this case, you want to get a list of all the directories on your drive. You’d start at the root—say, C:—and read in all the directories. Then you take the first directory, which might be C:Applications, and you get all the subdirectories there. If there are subdirectories in C:Applications—say, C:ApplicationsAdobe—you make that your new root and start over again. This process continues until you reach a directory that has no subdirectories, only files (which are called leaves in node terminology). Then the recursion backs up one level and gets the next directory in line, and starts the process again, until there are no more directories left to check. It’s complicated to explain, but it’s quite simple, even elegant, in code. Because you don’t know how many levels deep your file structure goes, you tell the method to keep calling itself until it runs out of directories. You’ll see how this works in a minute.
So, you’ll fill the Nodes collection by recursing through the directories of all the drives. First, you need to get all the logical drives on the local system. To do so, call a static method of the Environment object, GetLogicalDrives( ). The Environment class provides information about and access to the current platform environment—that’s your machine, and the operating system running on it; almost certainly Windows in this case. You can use the Environment object to get the machine name, OS version, system directory, and so forth from the computer on which you are running your program. Add the following line to your method:
string[] strDrives = Environment.GetLogicalDrives( );
GetLogicalDrives( ) returns an array of strings, each of which represents the root directory of one of the logical drives. You will iterate over that collection, adding nodes to the TreeView control as you go. Start the loop like this:
foreach (string rootDirectoryName in strDrives)
{
You process each drive within the foreach loop.
The very first thing you need to determine is whether the drive is available (that is, it is not a floppy drive without a floppy in it). Our hack for that is to get the list of top-level directories from the drive by calling GetDirectories( ) on a DirectoryInfo object created for the root directory:
DirectoryInfo dir = new DirectoryInfo(rootDirectoryName);
dir.GetDirectories( );
The DirectoryInfo class has instance methods for creating, moving, and enumerating through directories, their files, and their subdirectories.
The GetDirectories( ) method returns a list of directories, but you don’t actually need this list for anything. The only reason you’re calling it here is because it will generate an exception if the drive is not ready (if there’s no disk in the drive, or if a network drive is unavailable).
Wrap the call in a try block, and leave the catch block empty. The effect is that if an exception is thrown, the drive is skipped. You could catch more specific exceptions, but for the moment, you’ll just catch any exception. At this point, your foreach loop looks like this:
foreach (string rootDirectoryName in strDrives)
{
    try
    {
        DirectoryInfo dir = new DirectoryInfo(rootDirectoryName);
        dir.GetDirectories( );  // forces an exception if the drive isn't ready
    }
    catch
    {
    }
}
Once you know that the drive is ready, you’ll need to create a TreeNode to hold the root directory of the drive, and then add that node to the Nodes collection of the TreeView control (which is named tvw in this method). Add the following code inside the try block, after the check of GetDirectories( ):
TreeNode ndRoot = new TreeNode(rootDirectoryName);
tvw.Nodes.Add(ndRoot);
The TreeView control displays a + sign next to directories that have subdirectories within them, as you’ve seen in Windows Explorer. To get the + signs right in the TreeView, you must find at least two levels of directories. You don’t want to recurse through all the subdirectories on your machine, however, because that would be too slow. For now, you’ll get the first two levels, and later you’ll see how to get additional subdirectories only when the user asks for them.
The job of the GetSubDirectoryNodes( ) method is to recurse two levels deep, passing in the root node, the name of the root directory, a flag indicating whether you want files, and the current level (you always start at level 1):
if ( isSource )
{
   GetSubDirectoryNodes(ndRoot, ndRoot.Text, true, 1 );
}
else
{
   GetSubDirectoryNodes(ndRoot, ndRoot.Text, false, 1 );
}
This if/else looks a bit confusing, we admit. You may be wondering why you would want the files, and why you need to pass in ndRoot.Text if you’re already passing in ndRoot. You will see why these steps are needed when you recurse back into GetSubDirectoryNodes.
After the empty catch block, add the following line:
Application.DoEvents( );
This instructs your application to release its hold on the processor long enough to update the user interface. This keeps the user informed and happy, and avoids the problem of looking like your program has hung while performing a long procedure.
You are now finished with FillDirectoryTree( ), but you still need to write the method GetSubDirectoryNodes( ). Save your project now, but don’t bother trying to run it; you’ll just get an error.
Next, you need to create the method that gets the subdirectory nodes. Create a new method called GetSubDirectoryNodes( ) immediately following the method you just finished. The parameters passed to GetSubDirectoryNodes( ) include the node where the method was called, the full pathname of that node, the Boolean for retrieving the filenames, and the level, all of which you saw in FillDirectoryTree( ). Notice that the node passed in is named parentNode. The current level of nodes will be considered children to the node passed in. This is how you map the directory structure to the hierarchy of the tree view.
GetSubDirectoryNodes( ) begins by once again calling GetDirectories( ), this time stashing away the resulting array of DirectoryInfo objects in an array called dirSubs. Add this code to Form1.cs:
private void GetSubDirectoryNodes(
   TreeNode parentNode, string fullName, bool getFileNames, int level)
{
   DirectoryInfo dir = new DirectoryInfo(fullName);
   DirectoryInfo[] dirSubs = dir.GetDirectories( );
Now you’ve got your arrays, so you’re going to iterate over each one, and add each subdirectory as a subnode. You want to skip any subdirectories that are marked Hidden, though, because those are probably system directories, and you don’t want to mess with those. So, open the foreach loop and add the following if:
foreach (DirectoryInfo dirSub in dirSubs)
{
   if ( (dirSub.Attributes & FileAttributes.Hidden) != 0 )
   {
       continue;
   }
FileAttributes is an enum; other possible values include Archive, Compressed, Directory, Encrypted, Normal, ReadOnly, and a few others, but they are rarely used. The property dirSub.Attributes is what’s called a bit pattern—a series of zeros and ones; in this case, it’s a bit pattern of the current attributes of the directory. FileAttributes.Hidden is another bit pattern. You can combine these two patterns with the & operator, which is called a bitwise AND (notice that’s not the same as the logical AND operator, &&). You don’t need to know exactly how it works, but for a nonhidden directory, the result of the bitwise AND will be zero. If the result isn’t zero, the directory is hidden, and you want to skip it with the continue statement.
Tip
Although you can use the bitwise AND in this example without knowing anything more about it you may want to look up the details in another source, such as MSDN.
If you reach the next line of your foreach loop, you can be sure you’re looking at a nonhidden directory, so you want to create a new TreeNode object for it. Add the following code to create a TreeNode with the subdirectory name, and add it to the Nodes collection of the node passed in to the method (parentNode):
TreeNode subNode = new TreeNode(dirSub.Name);
parentNode.Nodes.Add(subNode);
Remember that 1 you passed into GetDirectorySubNodes( )? You passed a 1 because you want your recursion to go only two levels deep, and the 1 indicates that you’re at the top level of recursion. You need to check that value against a limit so that you’ll know when to stop recursing. You could just hardcode the 2, but it’s best to define it as a constant. By convention, member constants and variables are declared at the top of the class declaration, so add the following highlighted line just inside the class definition:
partial class FrmFileCopier : Form
{
    private const int MaxLevel = 2;
Later on, if you’re on an especially powerful machine, or if you’re willing to wait while the recursion happens, you can increase the value of that constant. There’s no need to do that, though, because you’ll see a little later that you’ll retrieve subdirectories only when the user selects them, which saves processor power.
Now move back to the foreach loop within GetSubDirectoryNodes. The next bit of code is where the recursion takes place. If the current level is less than the constant you just defined, you want to have the GetSubDirectoryNodes( ) method call itself, but with different parameters. You pass in the node you just added to the TreeView, along with its full path, the Boolean for the filenames, and the level, increased by 1. Add this code to GetSubDirectoryNodes( ):
if ( level < MaxLevel )
{
   GetSubDirectoryNodes(subNode, dirSub.FullName, getFileNames, level+1 );
}
The call to the TreeNode constructor uses the Name property of the DirectoryInfo object, and the call to GetSubDirectoryNodes( ) uses the FullName property. If your directory is C:WindowsMediaSounds, the FullName property returns the full path and the Name property returns just Sounds. You pass in just the name to the node constructor, because you want just the directory name displayed in the tree view. You pass in the full name with the path to the GetSubDirectoryNodes( ) method so that the method can locate all the subdirectories on the disk. This answers the question asked earlier as to why you need to pass in the root node’s name the first time you call this method. What is passed in isn’t the name of the node; it is the full path to the directory represented by the node!
Go ahead and run the program now. You should see that the TreeView controls populate themselves properly with the drives on your machine. You can expand those directories to two levels deep by clicking the + signs. Nothing else works yet, but this is a good start. If the application doesn’t run properly, check the error messages to see where you might be going wrong. Use the debugging techniques from Chapter 9 if you need to.
Once you’ve recursed through the subdirectories, it is time to get the files for the directory if the getFileNames flag is true. To do so, call the GetFiles( ) method on the DirectoryInfo object. An array of FileInfo objects is returned. Be sure to add a closing bracket to the foreach loop, and then add this code below it:
if (getFileNames)
{
   // Get any files for this node.
   FileInfo[] files = dir.GetFiles( );
The FileInfo class provides instance methods for manipulating files.
You can now iterate over this collection, accessing the Name property of the FileInfo object and passing that name to the constructor of a TreeNode, which you then add to the parent node’s Nodes collection (thus creating a child node). This whole process is similar to what you did with the directories, but there is no recursion this time because files don’t have subdirectories. Put the following code inside the if statement you just created, and remember to close the if afterward:
foreach (FileInfo file in files)
{
   TreeNode fileNode = new TreeNode(file.Name);
   parentNode.Nodes.Add(fileNode);
}
That’s all it takes to fill the two tree views. Run the application now, and you’ll see that the TreeView controls are populated with subdirectories and files.
If you’re confused about how this recursion works, try stepping through the code in the Visual Studio debugger. Pay particular attention to the recursion, watching as the TreeView builds its nodes.
You have the TreeView controls loaded now, but there are still a lot of events to handle in this example. First, the user might click Cancel, Copy, Clear, or Delete. Second, the user might fire events in either TreeView. We’ll consider the TreeView events first, as they are the more interesting, and potentially the more challenging.
There are two TreeView objects, each with its own event handler. Consider the source TreeView object first. The user checks the files and directories she wants to copy from. Each time the user clicks the checkbox indicating a file or directory, a number of events are raised, most of which you can safely ignore. The event you must handle, though, is called AfterCheck.
That means you’ll need to implement a custom event handler method, named tvwSource_AfterCheck( ). The implementation of AfterCheck( ) delegates the work to a recursive method named SetCheck( ) that you’ll also write. The SetCheck( ) method will recursively set the checkmark for all the contained folders.
To add the AfterCheck( ) event, select the tvwSource control, click the Events icon in the Properties window, and then double-click AfterCheck. This will add the event and place you in the code editor. All you’re doing here is adding a method call to the event handler, so add the highlighted code here:
private void tvwSource_AfterCheck (object sender, TreeViewEventArgs e)
{
   SetCheck(e.Node,e.Node.Checked);
}
If this event was raised, that means the user checked (or cleared) a checkbox somewhere in the TreeView, and what you need to do is find out which node just got checked, and check (or clear) the checkboxes of all of that node’s subdirectories and files. The event handler passes in the sender object and an object of type TreeViewEventArgs. You can get the node that raised the event from this TreeViewEventArgs object (e). The Node itself has a property called Checked, which indicates whether the checkbox for that node is checked or cleared. You then call SetCheck( ), passing in the node that raised the event, and of the Boolean indicating whether the node has been checked.
Each node has a Nodes property, which gets a TreeNodeCollection containing all the subnodes. SetCheck( ) recurses through the current node’s Nodes collection, setting each subnode’s checkmark to match that of the node that was checked.
For each TreeNode in the Nodes collection, you first want to set its Checked property to whatever was passed in as a parameter. Then you want to check to see whether the current node is a leaf (has no subdirectories). A node is a leaf if its own Nodes collection has a count of 0. If it is a leaf, you do nothing. If it is not a leaf, you call SetCheck( ) again, recursively, passing in the current node and the Checked property. To do all of this, add the following method to your code after the event handler:
private void SetCheck( TreeNode node, bool check )
{
   foreach ( TreeNode n in node.Nodes )
   {
      n.Checked = check;   // check the node
      if ( n.Nodes.Count != 0 )
      {
         SetCheck( n, check );
      }
   }
}
This propagates the checkmark (or clears the checkmark) down through the entire structure. Run your application again now and check it out. When you check a directory, all its files and child directories should be checked automatically. If it’s not working, put a breakpoint in SetCheck( ), and step through the method.
Each time you click a + sign next to a directory in the source TreeView (or in the target), you want to expand that directory. The TreeView control does that automatically, but as you’ve seen, it gets subdirectories only two levels deep, to save on processing. What you want, though, is to check for subdirectories only in the subdirectory the user selects, and only when he selects it. To do that, you’ll need an event handler for the TreeView control’s BeforeExpand event—as you might expect, this code runs after the user has clicked the + sign, but before the TreeView expands that directory. Because the event handlers will be identical for both the source and the target tree views, you’ll create a shared event handler (assigning the same event handler to both). Go back to the Design view, select the tvwSource control, double-click the BeforeExpand event, and add this code:
private void tvwSource_BeforeExpand(object sender, TreeViewCancelEventArgs e)
{
    tvwExpand(sender, e.Node);
}
The EventArgs object for the BeforeExpand event is TreeViewCancelEventArgs, which isn’t very intuitive, but that doesn’t really matter, because all you need from it is the node that the user clicked, which TreeViewCancelEventArgs does have. Pass the sender (you’ll see why in a minute) and the Node to the tvwExpand( ) method.
Now you need to add the tvwExpand( ) method. Add this code immediately after the event handler:
private void tvwExpand(object sender, TreeNode currentNode)
{
    TreeView tvw = (TreeView)sender;
    bool getFiles = (tvw == tvwSource);
    string fullName = currentNode.FullPath;
    currentNode.Nodes.Clear( );
    GetSubDirectoryNodes(currentNode, fullName, getFiles, 1);
}
You have the current node, passed in from the event arguments; you get its full pathname (which you will need as a parameter to GetSubDirectoryNodes), and then you must clear its collection of subnodes, because you are going to refill that collection by calling in to GetSubDirectoryNodes:
currentNode.Nodes.Clear( );
Why do you clear the subnodes and then refill them? Take a look at the call to GetSubDirectoryNodes( ):
GetSubDirectoryNodes( currentNode, fullName, getFiles, 1 );
When you make the call this time, the level parameter is 1, so when the user clicks a node, this code will get two levels of subnodes for the node the user clicked, and only that node. That saves processor power, because you’re digging deep into the directory structure only at the node the user selected. If the user continues to click the + for deeper directories, the code will continue to retrieve subdirectories, but only when they’re needed.
There’s an extra bit of code here, though. If this event came from the source TreeView, you want to display the files in the current node. If the event came from the destination TreeView, though, you don’t want to display the files (because a file isn’t a valid destination for a file-copy process). GetSubDirectoryNodes( ) knows how to account for that, with the getFiles Boolean parameter. Therefore, you cast the sender object to a TreeView called tvw, and check to see whether tvw is the source TreeView. If it is, you set getFiles to true; otherwise, it’s set to false:
TreeView tvw = (TreeView)sender;
bool getFiles = (tvw == tvwSource);
Then you can pass getFiles to GetSubDirectoryNodes( ), and expect it to retrieve the files or not, whichever is appropriate.
Now go back to the Design view, select the target TreeView, create its BeforeExpand event, and add the call to twvExpand( ):
private void tvwTargetDir_BeforeExpand(object sender, TreeViewCancelEventArgs e)
{
    tvwExpand(sender, e.Node);
}The second event handler for the target TreeView (in addition to BeforeExpand) is somewhat trickier. The event itself is AfterSelect. (Remember that the target TreeView doesn’t have checkboxes, so you need to handle AfterSelect, not AfterCheck.) The user can select only one directory at a time, and you want to take that one directory chosen and put its full path into the text box above the target TreeView. Click the Design View tab, select tvwTargetDir, and double-click next to its AfterSelect property to create the event hander. Add the following code to the event handler:
private void tvwTargetDir_AfterSelect(object sender, TreeViewEventArgs e)
{
    string theFullPath = e.Node.FullPath;
    if (theFullPath.EndsWith("\"))
    {
       theFullPath = theFullPath.Substring(0, theFullPath.Length - 1);
    }
    txtTargetDir.Text = theFullPath;
}
This is pretty simple code, but you need to adjust the string a bit. You can get the full pathname from the selected node easily:
string theFullPath = e.Node.FullPath;
However, if the selected node is a directory, the pathname will end with a backslash, and you don’t want to display that in the text box. Therefore, if the string ends in a backslash, you need to remove it (subtract 1 from the Length property):
if (theFullPath.EndsWith("\"))
{
    theFullPath = theFullPath.Substring(0, theFullPath.Length - 1);
}
Notice that you need to use EndsWith("\") for your test, not simply EndsWith(""). That’s because the is the escape character, so if you want to check for it, you need to escape it. (See Chapter 15 if you need a refresher on strings.)
Once you have the string the way you want it, you simply assign it to the Text property of the TextBox control:
txtTargetDir.Text = theFullPath;
That takes care of the events associated with the TreeView controls. Run the application now to make sure the two TreeView controls and the TextBox behave as you’d expect them to. This is all good stuff, but your file-copy application still doesn’t copy any files yet. That’s because you haven’t created the event handlers for the buttons.
The four buttons on the page (Clear, Copy, Delete, and Cancel) are the controls that will do the actual work of the application. In fact, only the Copy button is particularly challenging, but we’ll take each one in turn.
The purpose of the Clear button is to clear any checked boxes in the source TreeView. Given the SetCheck( ) method that you developed earlier, handling the Clear button’s Click event is trivial. In the Design tab, double-click on the Clear button to create its default event handler (Click). Then add this bit of code to the handler:
private void btnClear_Click( object sender, System.EventArgs e )
{
   foreach ( TreeNode node in tvwSource.Nodes )
   {
      SetCheck( node, false );
   }
}
All you’re doing here is calling the SetCheck( ) method on the root nodes and telling them to recursively uncheck all their contained nodes.
Now that you can check the files and pick the target directory, you’re ready to handle the Copy click event. The very first thing you need to do is to get a list of which files were selected. What you want is an array of FileInfo objects, but you have no idea how many objects will be in the list. This is a perfect job for a generic List. Double-click the Copy button to create the event handler. Then add the following code to call a method called GetFileList( ), which will take responsibility for filling the list:
private void btnCopy_Click( object sender, System.EventArgs e )
{
   List<FileInfo> fileList = GetFileList( );
Let’s pick that method apart before returning to the event handler. Create the new method below the btnCopy_Click handler.
Start by instantiating a new List object to hold the strings representing the names of all the files selected:
private List<FileInfo> GetFileList( )
{
   List<string> fileNames = new List<string>( );
To get the selected filenames, you can iterate through the source TreeView control:
foreach ( TreeNode theNode in tvwSource.Nodes )
{
   GetCheckedFiles( theNode, fileNames );
}
To see how this works, you’ll create the GetCheckedFiles( ) method before you go any further with GetFileList( ). Create this method now below GetFileList( ). This method is pretty simple: it examines the node it was handed. If that node has no children (node.Nodes.Count == 0), it is a leaf. If that leaf is checked, you get the full path and add it to the ArrayList passed in as a parameter. Add the following code to your new method:
private void GetCheckedFiles( TreeNode node,List<string> fileNames )
{
   // if this is a leaf...
   if ( node.Nodes.Count == 0 )
   {
        // if the node was checked...
      if ( node.Checked )
      {
         // add the full path to the arrayList
         fileNames.Add(node.FullPath);
     }
  }
If the node is not a leaf, you recurse down the tree, finding the child nodes. Add the following code to complete the method:
  else
  {
     foreach (TreeNode n in node.Nodes)
     {
        GetCheckedFiles(n,fileNames);
     }
  }
}
This returns the List filled with all the filenames. Back in GetFileList( ), you’ll use this List of filenames to create a second List, this time to hold the actual FileInfo objects—this will give you the actual files to copy, not just their names. You start by creating the new List<FileInfo>. Add this code to GetFileList( ):
List<FileInfo> fileList = new List<FileInfo>( );
You’re using type-safe List objects here so that the compiler will flag any objects added to the collection that aren’t of type FileInfo.
You can now iterate through the filenames in fileNames, picking out each name and instantiating a FileInfo object with it. You can detect whether a given name is a file or a directory by calling the Exists property, which will return false if the File object you created is actually a directory. If it is a File, you can add it to the fileList that you just created. Add the following code to GetFileList( ):
foreach ( string fileName in fileNames )
{
   FileInfo file = new FileInfo( fileName );
   if ( file.Exists )
   {
      fileList.Add( file );
   }
}
It would be a good idea to work your way through the list of selected files in order from largest to smallest so that you can pack the target disk as tightly as possible. You must therefore sort the List. You can call the Sort( ) method of the List, but how will it know how to sort FileInfo objects?
To solve this, you must pass in an IComparer<T> interface. You learned about using interfaces back in Chapter 13, and generics in Chapter 14. You’ll create a class called FileComparer that will implement this generic interface for FileInfo objects. Add the following code as a nested class inside the FrmFileCopier class, but outside any existing methods:
public class FileComparer : IComparer<FileInfo>
{
This class has only one method, Compare( ), which takes two FileInfo objects as arguments. Add the following method to the class:
public int Compare(FileInfo file1, FileInfo file2)
{
The normal approach is to return 1 if the first object (file1) is larger than the second (file2), to return –1 if the opposite is true, and to return 0 if they are equal. In this case, however, you want the list sorted from big to small, so you should reverse the return values.
Tip
Because this is the only use of the Compare method, it is reasonable to put this special knowledge (that the sort is from big to small) right into the Compare method itself. The alternative is to sort small to big, and have the calling method reverse the results.
The Length property of the FileInfo class makes it easy to compare the size of the two files. Add the following code to the Compare( ) method:
public int Compare(FileInfo file1, FileInfo file2)
{
    if ( file1.Length > file2.Length )
    {
       return -1;
    }
    if ( file1.Length < file2.Length )
    {
       return 1;
    }
    return 0;
}
Now you can use the IComparer interface. Return to GetFileList( ), and add the following code to instantiate the IComparer reference and pass it to the Sort( ) method of fileList:
IComparer<FileInfo> comparer = ( IComparer<FileInfo> ) new FileComparer( );
fileList.Sort( comparer );
With that done, you can return fileList to the calling method by adding this line:
return fileList;
The calling method was btnCopy_Click. Remember, you went off to GetFileList( ) in the first line of the event handler:
protected void btnCopy_Click (object sender, System.EventArgs e)
{
   List<FileInfo> fileList = GetFileList( );
At this point, you’ve returned with a sorted list of File objects, each representing a file selected in the source TreeView.
You can now iterate through the list, copying the files and updating the UI. Add the following foreach loop to btnCopy_Click to accomplish that:
foreach ( FileInfo file in fileList )
{
   try
   {
      lblStatus.Text = "Copying " + txtTargetDir.Text +
          "\" + file.Name + "...";
      Application.DoEvents( );
       // copy the file to its destination location
      file.CopyTo( txtTargetDir.Text + "\" +
          file.Name, chkOverwrite.Checked );
   }
    catch ( Exception ex )
   {
      MessageBox.Show( ex.Message );
   }
}
lblStatus.Text = "Done.";
The first thing this loop does is write the progress to the lblStatus label. You output a message, “Copying”, followed by whatever is currently showing in txtTargetDir, which must be the target directory the user selected. Then you add a backslash and the filename being copied. Next, the loop calls Application.DoEvents( ) to give the UI an opportunity to redraw; if you didn’t, your status message would never show up.
Then the loop calls CopyTo( ) on the file, passing in the target directory (again, obtained from the txtTargetDir), and a Boolean flag indicating whether the file should be overwritten if it already exists. CopyTo( ) is a method of the FileInfo class that takes a FileInfo object and a Boolean.
The copy is wrapped in a try block because you can anticipate any number of things going wrong when copying files—the file might be in use, the target directory might become unavailable, the target disk could be full, or many other things. In a commercial-grade application, you’d create custom exceptions to handle all of these possibilities. For now, though, if any exception is thrown, you’ll pop up a dialog box showing the error.
That’s it; you’ve implemented file copying! Not so hard, was it? The CopyTo( ) method does most of the work. You’re not done yet, though; there are still two more buttons to handle.
The code to handle the Delete event is simple, but it will give us an opportunity to show you how message boxes work. Double-click the Delete button to create the handler. The very first thing you do is ask the user whether she is sure she wants to delete the files. Copy this code to the btnDelete_Click handler:
private void btnDelete_Click( object sender, System.EventArgs e )
{
    // ask them if they are sure
    System.Windows.Forms.DialogResult result =
       MessageBox.Show(
       "Are you quite sure?",              // msg
       "Delete Files",                     // caption
       MessageBoxButtons.OKCancel,         // buttons
       MessageBoxIcon.Exclamation,         // icons
       MessageBoxDefaultButton.Button2 );  // default button
You can use the MessageBox class’s static Show( ) method, passing in five parameters: first, the message you want to display, as a string; second, the title for the message box as a string, which will be “Delete Files” in this case. The rest of the parameters are flags, as follows: MessageBox.OKCancel indicates that you want the message box to have two buttons: OK and Cancel. You don’t need to write any code for these buttons; they work automatically. The MessageBox.IconExclamation flag specifies the icon that you want to appear in the message box: an exclamation mark in this case. Finally, the MessageBox.DefaultButton.Button2 flag sets which of the buttons you asked for should be the default choice. In this case, you’re choosing the second button (Cancel).
Notice that you’re not just displaying the dialog box here; you’re capturing the user’s choice in a variable called result. When the user chooses OK or Cancel, the result is passed back as a System.Windows.Forms.DialogResult enumerated value. You can test this value to see whether the user selected OK; add this line to the event handler:
if ( result == System.Windows.Forms.DialogResult.OK )
{
If the condition is true, you can get the list of filenames with the GetFileList( ) method you created before. Then you iterate through the list, deleting each file as you go. The FileInfo class also has a Delete( ) method that you can use here. Add this code to your handler:
List<FileInfo> fileNames = GetFileList( );
foreach ( FileInfo file in fileNames )
{
    try
    {
        // update the label to show progress
        lblStatus.Text = "Deleting " +
            txtTargetDir.Text + "\" +
            file.Name + "...";
        Application.DoEvents( );
        file.Delete( );
    }
    catch ( Exception ex )
    {
        // you may want to do more than
        // just show the message
        MessageBox.Show( ex.Message );
    }
}
lblStatus.Text = "Done.";
Application.DoEvents( );
This code is very similar to the copy code, except that the method that is called on the file is Delete( ). Everything is enclosed in a try block, for the same reason as before, and the status label is updated accordingly.