Although one can certainly write an entire book on relational databases, and another on SQL, the essentials of these technologies aren’t hard to understand, and you’ll understand the chapter better if we spend a little time on the basics. A database is a repository of data. A relational database organizes your data into tables. In this chapter, we’ll use the Northwind database, which is available as a free download from Microsoft. It was originally intended for a much older version of SQL Server, but it works well for our examples in this chapter without requiring too much installation work on your part.
The Northwind database is a database file that’s intended for testing and practice purposes. To use the database, you’ll need to make sure that you have SQL Server Express edition. If you’re using Visual Studio, it was installed by default. If you’re using C# Express, installing SQL Server was optional, and if you followed the instructions in Chapter 1, you already have it installed. If not, head back to Chapter 1 and check out the installation instructions there.
If you’re using Windows Vista, you’re going to need to do a bit of extra work (if not, you can skip the next few paragraphs). Vista requires that only an administrator can install and access databases, but your default user isn’t automatically added to the SQL Server Administrators group. Fortunately, there’s an easy fix for this problem:
Go to C:Program FilesMicrosoft SQL Server90Shared (assuming you installed SQL Server to its default location).
Run the SqlProv.exe application.
You’ll see the usual Windows Vista confirmation window. Click Confirm.
This starts the User Provisioning Tool, shown in Figure 20-1. In the “User to provision” box, make sure the computer name and the username of the user you want to grant permissions to are entered; they should be there automatically. The “Available permissions” box looks like it should have a long list, but there’s really only one permission available, and it should be selected already.
Click the >> button to grant permission to that user, and then click OK to close the tool.
Next, download the Northwind database from this location:
http://www.microsoft.com/downloads/details.aspx?FamilyID=06616212-0356-46A0-8DA2-EEBC53A68034
You’ll download an .msi file, which you can then run to install the databases on your hard drive. By default, they install to c:SQL Server 2000 Sample Databases.
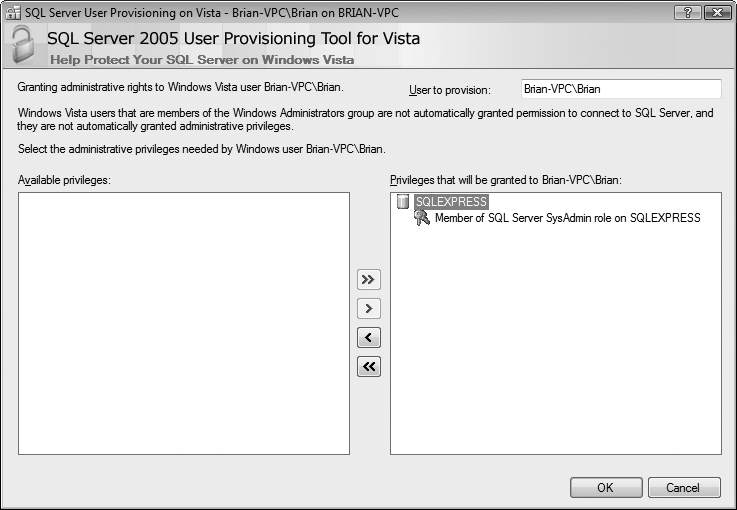
Figure 20-1. The User Provisioning Tool allows you to grant SQL Server administrative permissions to a Vista user account, which will save you a lot of headaches.
Warning
If you’re using Windows Vista Home Edition, use Windows Explorer to navigate to the folder where the files are installed. Right-click anywhere in the folder and select Properties. The Properties window will likely show you that this folder is read-only. Clear that checkbox, and when you’re asked, apply the setting to files and subfolders as well. If you don’t do this, you won’t be able to access the database.
Next, open a command-line window: on Windows XP and older versions, select Start → Run, and type “cmd” in the Run dialog box. On Vista, simply click Start, then type “cmd” and press Enter. A command window will open. Change to the directory where the databases are stored:
cd c:SQL Server 2000 Sample Databases
Then enter this command (all on one line):
sqlcmd -E -S.sqlexpress -i instnwnd.sql
If you’ve done it correctly, you should see the following messages:
Changed database context to 'master'.
Changed database context to 'northwind'.
If you see that, you’ve succeeded. If not, go back and check the permissions in the folder, or try typing the sqlcmd command again.
Once you have Northwind installed, you should check to make sure that you can make a data connection to it from your applications.
Start Visual Studio and create a new project; it doesn’t matter what kind.
There’s a special window in the IDE that shows your database connections, but it goes by two different names. In C# Express, it’s called Database Explorer; in Visual Studio, it’s Server Explorer. If the window isn’t open already, select View → Other Windows → Database Explorer (or Server Explorer in Visual Studio) to open it.
The Database Explorer will probably contain a single item, Data Connections. To add a connection to the Northwind database, right-click Data Connections and select Add Connection.
The Choose Data Source box opens, looking like Figure 20-2. Select Microsoft SQL Server Database File, and click Continue.
The Add Connection dialog box opens next, shown in Figure 20-3. Click the Browse button and navigate to the Northwind.mdf file. If you installed Northwind to the default directory, the file should be in C:SQL Server 2000 Sample Databases.
After you’ve selected the .mdf file, it should be listed in the “Database file name (new or existing)” field. If it isn’t, you may need to reinstall Northwind. Click the Test Connection button to make sure everything worked (this may take awhile to respond, so be patient).
Click OK. The Northwind.mdf database now appears in the Database Explorer, and you’re ready to go.


The Northwind database describes a fictional company buying and selling food products. The data for Northwind is divided into 13 tables, or broad sets of data, including Customers, Employees, Orders, Order Details, Products, and so forth.
Every table in a relational database is organized into rows, where each row represents a single record—say, the data for a single product order. The rows are organized into columns, which represent categories of data. All the rows in a table have the same column structure. For example, the Orders table has these columns: OrderID, CustomerID, EmployeeID, OrderDate, and so on.
For any given order, you need to know the customer’s name, address, contact name, and so forth. You could store that information with each order, but that would be very inefficient. Instead, you use a second table called Customers, in which each row represents a single customer. In the Customers table is a column for the CustomerID. Each customer has a unique ID, and that field is marked as the primary key for that table. A primary key is the column or combination of columns that uniquely identifies a record in a given table.
The Orders table uses the CustomerID as a foreign key. A foreign key is a column (or combination of columns) that is a primary (or otherwise unique) key from a different table. The Orders table uses the CustomerID (the primary key used in the Customers table) to identify which customer has placed the order. To determine the address for the order, you can use the CustomerID to look up the customer record in the Customers table.
This use of foreign keys is particularly helpful in representing one-to-many or many-to-one relationships among tables. By separating information into tables that are linked by foreign keys, you avoid having to repeat information in records. A single customer, for example, can have multiple orders, but it is inefficient to place the same customer information (name, phone number, credit limit, and so on) in every order record. The process of removing redundant information from your records and shifting it to separate tables is called normalization.
Normalization not only makes your use of the database more efficient, but it also reduces the likelihood of data corruption. If you kept the customer’s name in both the Customers table and the Orders table, you would run the risk that a change in one table might not be reflected in the other. Thus, if you changed the customer’s address in the Customers table, that change might not be reflected in every row in the Orders table (and a lot of work would be necessary to make sure that it was reflected). By keeping only the CustomerID in Orders, you are free to change the address in Customers, and the change is automatically reflected for each order.
Just as C# programmers want the compiler to catch bugs at compile time rather than at runtime, database programmers want the database to help them avoid data corruption. The compiler helps avoid bugs in C# by enforcing the rules of the language (for example, you can’t use a variable you haven’t defined yet). SQL Server and other modern relational databases avoid bugs by enforcing constraints that you define. For example, the Customers database marks the CustomerID as a primary key. This creates a primary key constraint in the database, which ensures that each CustomerID is unique. If you were to enter a customer named Liberty Associates, Inc., with the CustomerID of LIBE, and then tried to add Liberty Mutual Funds with a CustomerID of LIBE, the database would reject the second record because of the primary key constraint.
Relational databases use declarative referential integrity (DRI) to establish constraints on the relationships among the various tables. For example, you might declare a constraint on the Orders table that dictates that no order can have a CustomerID unless that CustomerID represents a valid record in Customers. This helps avoid two types of mistakes. First, you can’t enter a record with an invalid CustomerID. Second, you can’t delete a customer record if that CustomerID is used in any order. The integrity of your data and its relationships is thus protected.
The most popular language for querying and manipulating databases is Structured Query Language (SQL), usually pronounced “sequel.” SQL is a declarative language, as opposed to a procedural language, and it can take awhile to get used to working with a declarative language when you are used to languages such as C#.
The heart of SQL is the query. A query is a statement that returns a set of records from the database. The queries in Transact-SQL (the version used by SQL Server) are very similar to the queries used in LINQ (as you’ll see in the next chapter), though the actual syntax is slightly different.
For example, you might like to see all the CompanyNames and CustomerIDs of every record in the Customers table in which the customer’s address is in London. To do so, you’d write this query:
Select CustomerID, CompanyName from Customers where city = 'London'
This returns the following six records as output:
CustomerID CompanyName
---------- ----------------------------------------
AROUT      Around the Horn
BSBEV      B's Beverages
CONSH      Consolidated Holdings
EASTC      Eastern Connection
NORTS      North/South
SEVES      Seven Seas Imports
You can also sort the results based on a field:
Select CustomerID, CompanyName from Customers where city = 'London'
order by CompanyName
SQL is capable of much more powerful queries. For example, suppose the Northwind manager would like to know what products were purchased in July 1996 by the customer “Vins et alcools Chevalier.” This turns out to be somewhat complicated. The Order Details table knows the ProductID for all the products in any given order. The Orders table knows which CustomerIDs are associated with an order. The Customers table knows the CustomerID for a customer, and the Products table knows the product name for the ProductID. How do you tie all this together? Here’s the query:
select o.OrderID, productName
from [Order Details] od
join orders o on o.OrderID = od.OrderID
join products p on p.ProductID = od.ProductID
join customers c on o.CustomerID = c.CustomerID
where c.CompanyName = 'Vins et alcools Chevalier'
and orderDate >= '7/1/1996' and orderDate < '8/1/1996'
This asks the database to get the OrderID and the product name from the relevant tables. This line:
from [Order Details] od
creates an alias od for the Order Details table. The rest of the statement says that the database should look at od, and then join that with the Orders table (aliased to o) for every record in which the OrderID in the Order Details table (od.OrderID) is the same as the OrderID in the Orders table (o.OrderID).
When you join two tables, you can say, “Get every matching record that exists in either table” (this is called an outer join), or, as we’ve done here, “Get only those matching records that exist in both tables” (called an inner join). That is, an inner join states to get only the records in Orders that match the records in Order Details by having the same value in the OrderID field (on o.Orderid = od.Orderid).
Tip
SQL joins are inner joins by default. Writing join statements is the same as writing inner join statements.
The SQL statement then goes on to ask the database to create an inner join with Products (aliased to p), getting every row in which the ProductID in the Products table is the same as the ProductID in the Order Details table.
Then, create an inner join with customers for those rows where the CustomerID is the same in both the Orders table and the Customers table.
Finally, tell the database to constrain the results to only those rows in which the CompanyName is the one you want, and the dates are in July:
where c.CompanyName = 'Vins et alcools Chevalier'
and orderDate >= '7/1/1996' and orderDate <= '7/31/1996'
The collection of constraints finds only three records that match:
OrderID     ProductName
----------- ----------------------------------------
10248       Queso Cabrales
10248       Singaporean Hokkien Fried Mee
10248       Mozzarella di Giovanni
This output shows that there was only one order (10248) in which the customer had the right ID and in which the date of the order was July 1996. That order produced three records in the Order Details table, and using the product IDs in these three records, you got the product names from the Products table.
You can use SQL not only for searching for and retrieving data, but also for creating, updating, and deleting tables, and generally for managing and manipulating both the content and the structure of the database.