The first difference you’ll notice between the applications in this chapter and the ones you’ve written up to this point is that Windows applications have a visual component, called a form. The interface you see is the form, and the buttons, text boxes, and other widgets that make up the form are called controls. You build simply by dragging and dropping controls onto a work area. Some code goes into creating the appearance and default behavior of the controls, but all of that is created for you by Visual Studio, and you never have to see it.
And that’s the second thing you’ll notice: up until now, just about every bit of code that you worked with was written exclusively by you. You saw back in Chapter 2, though, that Visual Studio is capable of inserting prefabricated code snippets to save you time. This is a larger extension of the same idea. In fact, you won’t see Main( ) anymore, because Windows takes care of that part. Your functional code will be contained in event handlers, and the objects you create will be called from those event handlers.
In effect, moving from the command line to Windows programming entails an entirely different metaphor of programming—a visual metaphor, hence the name of Visual Studio.
Although you can build a Windows application using any text editor, there’s really no point. As you’ve already seen, Visual Studio increases your productivity, and integrates an editor, compiler, test environment, and debugger into a single work environment. Few serious .NET developers build commercial applications outside Visual Studio.
We’ll get to the full-blown example for this chapter very shortly, but first you’ll start off with a simple Windows application. Open Visual Studio and choose File → New Project, or select the Create: Project link on the Start page. In the New Project window, select Windows Forms Application (instead of the console application you’ve been using up until now). Create a new C# Windows application and name it Learning CSharp Windows Forms, as shown in Figure 18-1. You may name the project anything you like, and the name can include spaces, as shown, but no special characters other than the hyphen and underscore, which is why we’ve spelled out the # symbol.
Tip
We created the project in this chapter using Visual C# 2008 Express. If you’re using the full version of Visual Studio 2008, your screens will look different. Everything will still work, but Visual Studio has more options, so you may need to look around a bit to find the ones we use here.
Visual Studio responds by creating a Windows Forms application and, best of all, putting you into a design environment. This is the visual environment we were talking about earlier, and this is where you’ll create your application.
The Design window displays a blank Windows form (Form1). Select View → Toolbox or press the keyboard shortcut Ctrl-W, then X to display the Toolbox, because you’ll need it in a minute. Then select View → Properties Window (or press Ctrl-W, P) to bring up the Properties window as well. You may need to drag the Properties window to its traditional place on the lower right, docking it there as we showed you in Chapter 2.

Figure 18-1. You create a Windows Application project from the same dialog where you’ve been creating console applications.
Tip
Visual Studio allows a great deal of personalization. If you’re using a fresh installation of Visual Studio or Visual C#, you should find that all the default settings and keyboard shortcuts work as we’re describing them here. If your copy of Visual Studio has been customized, though, you may encounter different settings.
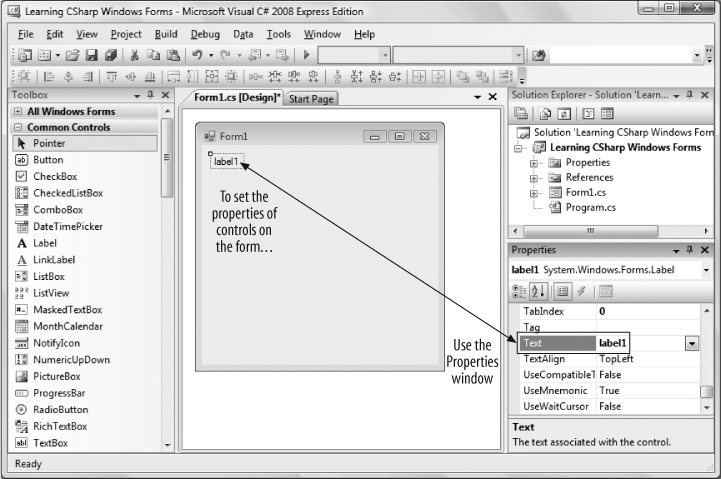
Before proceeding, take a look around your environment, as shown in Figure 18-2. The Toolbox, on the left side of the screen, is filled with controls that you can add to your Windows Forms application, simply by dragging and dropping them onto the form. In the upper-right corner, you should see the Solution Explorer, a window that displays all the files in your projects (if not, click View → Solution Explorer). From this point on, your applications will consist of multiple files. Already you can see the familiar Program.cs in the Solution Explorer, but you’re looking at Form1.cs right now. The Solution Explorer helps you switch from one file to another. In the lower-right corner is the Properties window. Each of your controls is actually a class, and like any class, there are a number of internal members, called properties. Instead of reading the code in an editor window, as you’re used to, you can view and set the properties straight from the Properties window.
Time to check that part out. Click on a label in the Toolbox, and then drag it onto the form. You’ll see some guide lines that indicate where on the form the label will go, but it doesn’t really matter where you put it for this example. Also notice that the label gives itself a name, label1. The purpose of this name is to distinguish this label from any other labels you add to the page, although you’re free to change it to a more meaningful name. In fact, meaningful names are good practice, and we’ll use them in the file-copier example later in the chapter, but label1 will do for this example. Click on the label, and its properties will appear in the Properties window, as shown in Figure 18-3.

Figure 18-2. The design environment has a lot of helpful tools that you’ll be using as you create your form.
You’ll notice that there are a lot of properties, most having to do with format and appearance. That makes sense; this is a label, after all. To add text to label1, you edit its Text property. Scroll up or down until you can see the Text property for label1. Then click in the space next to the word Text, and type in “Hello World”. As soon as you finish typing and click somewhere else, the text of label1 on the form changes to “Hello World”.
Now change the font for the lettering in the HelloWorld label. Scroll up or down until you find the Font property, then click the + sign next to the property to expand it. Then click on the ellipsis next to the Font property to open the Font editor, as shown in Figure 18-4. Play around with the formatting as much as you like, then click OK to accept your changes, or else Cancel.
A label is nice and visual, but it doesn’t do much by itself. From the Toolbox, drag a button control onto the form, somewhere near your label. Click on the button to access its properties in the Properties window, and change its Text property to Cancel. You can always tell which control’s properties you’re looking at by checking the drop-down box at the top of the Properties window.
Now run the application by clicking the Start Debugging button, or by pressing F5. Notice that with most console applications, you had to press Ctrl-F5 so that the console window wouldn’t vanish on you; that’s not the case here. That’s your new Windows application, running in a window by itself, separate from Visual Studio, as shown in Figure 18-5. You can see that it even has its own button on the Windows taskbar. You did all of that without writing any code at all; Visual Studio took care of all of it. You can drag the window around by its title bar, maximize or minimize it, or even close it…but don’t do that just yet.
Now click the Cancel button. Oops, nothing happens. The button highlights like a regular Windows button, and its appearance changes when you click it, but that’s it. That’s because when you click the button, the button raises the Click event, but that event doesn’t have a handler yet, so nothing happens. Click on the X to close your application and return to the Design view.
Click on the Cancel button so that its properties are shown in the Properties window. Notice at the top of the window a series of buttons, as shown in Figure 18-6. The first two simply reorder the properties in the window, either by category or alphabetically. The third button displays the properties for the control, which is the default. The lightning bolt button, however, displays the possible events for the control. As you hover the cursor over each button, a tool tip tells you what it is for.
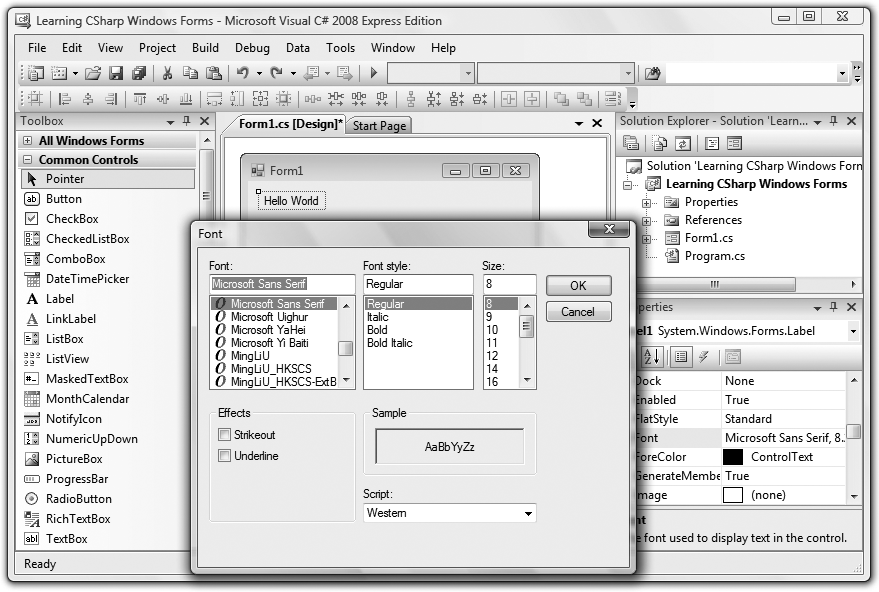
Figure 18-4. The Properties window provides access to lots of visual properties of your controls, such as editing the font.

Figure 18-5. Your first Windows application is running. It may not look like much, but all the window features you’d expect are present automatically.

Figure 18-6. Clicking the Events button switches the contents of the Properties window to display the events for a control.
Click on the lightning bolt to change the Properties window to show all the events for the button. To have the Cancel button do something, you’ll need to create a handler for the Click event. You can type a name for your handler into the space next to Click in the Properties window, but it’s easier to just double-click in the space and Visual Studio will create an event handler name for you. In either case, Visual Studio then places you in the editor for the event handler so that you can add the logic. Take a look at the tabs at the top of the code window. You’ll see that the page you’re currently looking at is Form1.cs, and there’s also a tab for Form1.cs [Design]. The Design view that you’ve seen so far is where you do the visual design of your form. The code page, which you’re looking at now, is where you keep the event handler code for your form. Notice, though, that this isn’t the complete code for your program; the line public partial class Form1 : Form indicates that this is a partial class, which means pretty much what it sounds like—Visual Studio is showing you only part of the class definition for Form1, and is taking care of the rest of the code out of your sight.
You also won’t find Main( ) here, which makes sense, because this is only the class file for Form1. If you look in the Solution Explorer in the upper-right corner of Visual Studio, you’ll see all the files in this project, including Program.cs. If you double-click that file to open it, you’ll see that it’s very brief. In fact, all it does is a bit of setup, and then it calls Application.Run(new Form1( ));, which runs the form.
Click the tab to get back to Form1.cs, if you’re not already there. When you double-clicked in the Properties window for the button on Form1, Visual Studio added the method for the event handler, but it’s empty at the moment. Visual Studio created the name for the method by concatenating the control name (button1) with the event (Click), separated by an underscore. When you add the event from Design mode, Visual Studio places the cursor inside the method body, so if it’s not there, click there now. Add a line to the event so that it looks like this:
private void button1_Click( object sender, EventArgs e )
{
   Application.Exit( );
}
This logic just says to exit the application when the button is clicked. Notice that as you try to enter the method call Application.Exit( ), IntelliSense tries to help you.
Tip
Every control has a default event—the event most commonly handled by that control. In the case of the Button control, the default event is Click. You can save time by double-clicking on the control (in the Design view) if you want Visual Studio to create and name an event handler for you. That is, rather than the steps mentioned previously (click on the button, click on the lightning bolt button, double-click on the space next to Click), you could have just double-clicked on the button; the effect would be the same because you are implementing the default event.
Now run your program again (by clicking the Start Debugging icon or by pressing F5). Your form shows up in its own window, the same as before. Now click the Cancel button. This time, the event handler you just wrote is called, and the application closes. Well done—you’ve written a simple Windows application with a functioning event handler. Now it’s time to move on to a more challenging application.