Using the Layers palette
Using layers in InDesign
Using layers in Illustrator
Using layers in Photoshop
Using layers in Flash
Using layers in Dreamweaver
Viewing layers in Acrobat
The real benefit of layers is their ability to organize a project into several easy-to-select sections. Previously, this was done with groups, but groups can be tricky to work with, requiring the Group Selection tool to work within a group. Layers are a much more convenient way to organize all the images and objects in a document.
Another benefit of layers is that you can quickly turn them on and off. If a project is sluggish because of its size and content, you could place these slow-to-refresh items on a layer and make them invisible so they don't slow down the rest of the project.
Layers also may be locked. You may want to lock parts of your completed project, so you don't accidentally select and move them.
You also can create several design ideas and keep them on several layers. Then you can quickly switch between the various designs using layers. This is a concept mastered by Photoshop with the Layer Comps feature.
Layers are available in Photoshop, Illustrator, InDesign, Flash, Dreamweaver, Fireworks, and Acrobat, but the ways layers are used in each of these applications are very different. Layers in each of these applications include some basic concepts that are common for all applications:
InDesign: Layers in InDesign use the most basic layer features, but even InDesign includes some specialized layer features.
Illustrator: Illustrator expands on the layer basics with many additional layer features, including support for sublayers, template layers, releasing items to layers, and clipping and opacity masks.
Photoshop: Photoshop takes layer functionality to a whole new level with support for layer sets, linked layers, transparency, adjustment and fill layers, layer effects, masks, and layer comps.
Acrobat: In Acrobat 9, you find support for Adobe PDF Layers. PDF documents containing layers must be authored in applications supporting layers and having the ability to export to the PDF 1.5 format. If you view a layered PDF document in earlier versions of Acrobat, the layers are flattened and viewed as a single layer document.
In this chapter, we present these layer basics first, starting with InDesign. We then move on to the specific layer features for each individual application. Finally, we show you how layered files exported to the PDF format can access layers in Acrobat.
Within Photoshop, Illustrator, and InDesign, layers for the current file and all the layer features are contained in the Layers palette, shown in Figure 23.1. Open this palette by choosing Window

All new projects created in Illustrator and InDesign include a default layer named Layer 1; a new layer added to the document is named Layer 2 by default. Double-clicking a layer opens a dialog box where you can rename the layer and set the layer's properties.
Within the Layers palette are several visual icons that determine whether the selected layer is visible, locked, selected, or targeted. The eye icon in the first column to the left of the layer name determines layer visibility. The lock icon in the second column to the left of the layer name is used to show whether a layer is locked.
Note
Atually, in Illustrator, it's a lock icon; in Photoshop, it's a lock icon at the top of the Layers palette; and in InDesign, it's a no-write icon. There are subtle differences among the CS5 applications.
Other icons appear to the right of the layer name and are used to denote the targeted layer and any selected objects on that layer. The targeted layer is highlighted.
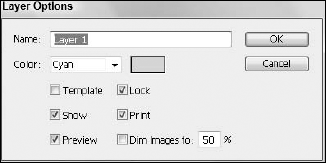
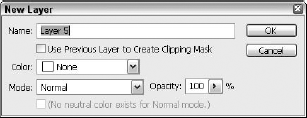
To create a new layer, select the New Layer palette menu command or click the Create New Layer button at the bottom of the Layers palette. If you select the menu command, the Layer Options dialog box appears, as shown in Figure 23.2. Here, you can name the new layer, select a layer color, and specify several layer properties. Clicking the Create New Layer button creates a new layer using default values without opening the Layer Options dialog box. To force the Layer Options dialog box to appear when you click Create New Layer, hold down the Option/Alt key when clicking.

The layer properties that appear in the Layer Options dialog box set options such as whether the layer is visible or locked. You can open the Layer Options dialog box for any existing layer by double-clicking the layer.
Note
Other than layer name and color, the specific layer properties found in the Layer Options dialog box are unique for each CS5 application. For example, InDesign includes options to show guides, lock guides, and suppress text wrap when the layer is hidden; Illustrator includes options to make the layer a template, print, preview, and dim images to a percentage; and Photoshop includes options to use the previous layer to create a clipping mask, select a blending mode, and set an opacity.
If you double-click a layer name or if you select a layer and choose the Layer Options palette menu command, the Layer Options dialog box reappears, letting you change the layer properties. Double-clicking the layer name in Photoshop selects the name and lets you rename it within the Layers palette.
In InDesign and Illustrator, new layers always appear at the top of the Layers palette, but if you hold down the
Clicking a layer name targets a layer. To select multiple layers, hold down the
The targeted layer in InDesign is marked with a Pen icon to the right of the layer name. Targeted layers in Illustrator are marked with a small triangle in the upper-right corner; the targeted layer in Photoshop is the selected layer. All new objects that you add to the project, including all newly created objects and any imported, pasted, or placed files, are placed on the active layer.
The first column in the Layers palette holds the Visibility icon. If the eye icon is present, the layer is visible, but if the eye icon isn't present, the layer is hidden. You can toggle the eye icon by clicking it. Hidden layers are not printed either, although you can print hidden layers in Illustrator and InDesign if you select the Print option in the Layers Options dialog box.
The second column is the Lock icon. If the lock icon is present, the layer is locked and cannot be selected or edited, but if the lock icon isn't present, the layer is editable. You also can toggle the lock icon by clicking it.
Note
Within InDesign, the lock icon looks like a pencil icon with a red line through it; in Illustrator, the lock icon looks like a lock. Photoshop uses the second column for other purposes and allows layers to be locked using the Lock properties at the top of the palette. Photoshop includes the option to lock specific attributes; the lock icon is displayed to the right of the layer name.
To hide or lock multiple layers at once, choose the Hide Others or Lock Others palette menu commands, and all layers that aren't selected are hidden or locked or you can hold down the Alt/ Option key while clicking several different layers. If at least one layer is hidden or locked, these menu commands change to Show All Layers or Unlock All Layers.
As a document becomes more and more crowded, it can be tough to work on a specific object, group, symbol, or Live Paint group without affecting the rest of the objects. The answer is to use Illustrator's Isolation mode. Isolation mode is activated when you click the Isolate Selected Group button located on the Option bar. You can also enter isolation mode by double-clicking a group with the Selection tool or selecting the Enter Isolation Mode palette menu command in the Layers palette.
When isolation mode is active, the selected object is displayed in full color and all other objects are dimmed and temporarily locked and a special border surrounds the document screen. You can exit isolation mode with the Exit Isolation Mode button displayed at the top of the window or by double-clicking outside of the isolated group. The current layer and sublayer are also displayed along the top edge of the document interface to remind you where these objects fit into the document.
The order in which the layers are listed in the Layers palette determines the stacking order of objects on the page, with the layer listed at the top of the Layers palette appearing in front of all other objects in the document.
You can rearrange layers by selecting and dragging one layer above or below another. A dark black line appears between the two layers where the dragged layer is positioned if dropped.
The Selection tool may be used to select any object on any layer that is not locked. A small square icon appears to the right of the layer name of each layer that includes a selected object in Illustrator and InDesign.
The bounding box of the selected object is colored using the layer color.
Tip
To select all objects on a single layer in InDesign and Illustrator, hold down the Option/Alt key while clicking the layer name in the Layers palette. If the layer doesn't contain any objects, then you can't select it with the Option/Alt key held down.
To move a selected object to another layer, click and drag the small square icon to the layer to which you want to move the object. If you hold down the Option/Alt key while dragging the small square icon, a copy of the selected object moves to the selected layer. If you hold down Ctrl/
You can choose Edit
You can use the Duplicate palette menu command to duplicate a layer and all the objects on that layer. The duplicated layer appears directly above the original layer. You also can duplicate a layer by dragging it to the Create New Layer button at the bottom of the palette. The duplicated layer appears with the same layer name with the word copy after it, so duplicating a layer named "Sword" results in a layer named "Sword copy." Duplicating this layer again results in a layer named "Sword copy 2."
You can use the Delete palette menu command to delete the selected layers, or you can click the Delete Selected Layers button at the bottom of the Layers palette. If the layer contains any objects, a warning dialog box appears confirming that you want to delete the objects on the layer.
To delete any empty layers in the current document, select the Delete Unused Layers palette menu command. This removes any layers that don't contain any objects.
You use the Merge Layers palette menu command to combine all objects on the selected layers. The objects all appear on the targeted layer, and the other selected layers are deleted. Selecting all layers and choosing this command offers a way to flatten all layers to a single layer.
STEPS: Creating a Layered Document
Create a new document. Within Photoshop, Illustrator, or InDesign, choose File

Open the Layers palette. Choose Window
Add content to the layer. Using the tools in the Toolbox, add some content to the existing layer.
Create a new layer. Before you begin to add a new type of content, click the Create New Layer button at the bottom of the Layers palette to create a new layer. In the New Layer dialog box that appears, name the layer appropriately.
Hide and lock the first layer. To hide the content on the first layer so it isn't accidentally edited, click the eye icon to the left of the first layer's name. This icon hides the layer. If you need to see the content in the first layer, but you don't want it edited, click the eye icon again to make the layer visible; then click the lock icon in the second column to lock the layer.
Rearrange the layers. The new layer appears in front of the first layer. To change this order, click and the drag the first layer above the new layer in the Layers palette. Placing the first layer above the other layer makes its content come to the front of the stacking order.
STEPS: Dividing an Existing Document into Layers
Open a document in InDesign. Within InDesign, select a document that you want to divide into layers for better organization.
Open the Layers palette. Choose Window
Create new layers. Click the Create New Layer button at the bottom of the Layers palette several times to create some new layers.
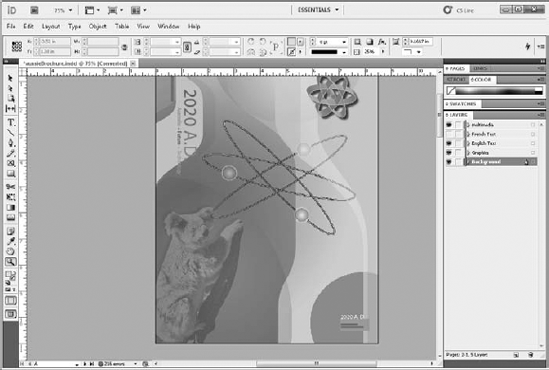
Rename the layers. Double-click each of the new layers, and in the Layer Options dialog box that appears, type a new descriptive name for the layer such as Background, images, text, guides, and so on.
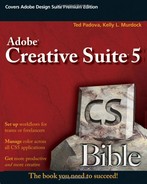
Move objects to their correct layer. Move through each page in the document, and select the objects on that page. Then drag the square selected icon in the Layers palette to the correct layer for that object. After an object is moved to its correct layer, its bounding box changes to the same color as its layer. Continue this step for all objects in the document. Figure 23.3 shows the layers created for this document.
In addition to the basic features found in the Layers palette, InDesign also includes a couple of layer features that are unique to the application, including the ability to condense the layers list in the Layers palette, show and lock layer guides, suppress text wrap, and features for dealing with objects on Master pages. InDesign also has a feature that lets you designate a layer as non-printing by disabling the Print Layer option in the Layer Options dialog box.
Within InDesign and Illustrator, the Layers palette may be condensed using the Small Panel Rows palette menu option. Figure 23.4 shows the Layers palette in InDesign with the Small Panel Rows option enabled.
Guides in InDesign are especially useful for aligning and positioning elements; each layer may have its own set of guides. Guides are created for the selected layer by clicking the Horizontal or Vertical rulers and dragging into the page. If the rulers aren't visible, you can choose View
Guides appear as straight lines in the document, and the selected guide has the same color as the selected layer.
The View
Suppressing text wrap on hidden layers
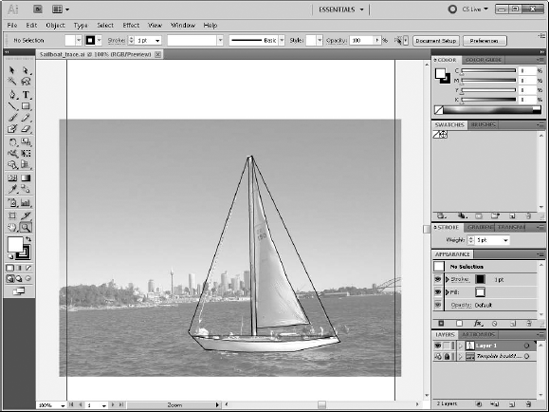
In an InDesign document, it's often helpful to separate text and graphics onto separate layers. By doing so, you can make the graphics hidden when you're proofreading the text, and you can hide the text when you're working on the graphics.
If the text object is set to wrap around a graphic, making either layer hidden affects the text wrapping. You can control whether the text is wrapped when the graphic layer is hidden using the Suppress Text Wrap When Hidden option in the Layer Options dialog box.
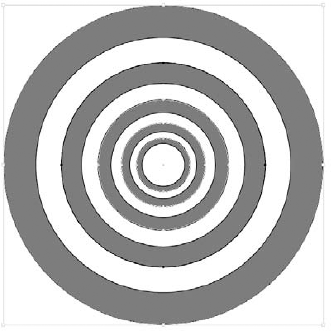
Figure 23.5 shows two similar documents that have separated the graphics and text onto two different layers. Although the text is set to wrap around the center graphic, the document on the left has the Suppress Text Wrap When Hidden option disabled in the Layer Options dialog box, so the text wrap is still visible; the document on the right has enabled this option, causing the text wrap to be suppressed.

Figure 23.5. The Suppress Text Wrap When Hidden option controls whether the text wraps when the graphic layer is hidden.
By default, Master objects placed on the same layer as page objects appear behind those page objects. To make the Master object, such as auto page numbers, appear in front of the page objects, place the Master objects on a layer that is above the page object's layer.
STEPS: Making Page Numbers Appear in Front of Other Elements
Open a document in InDesign. Within InDesign, open a document that includes Master pages and auto page numbers.
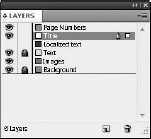
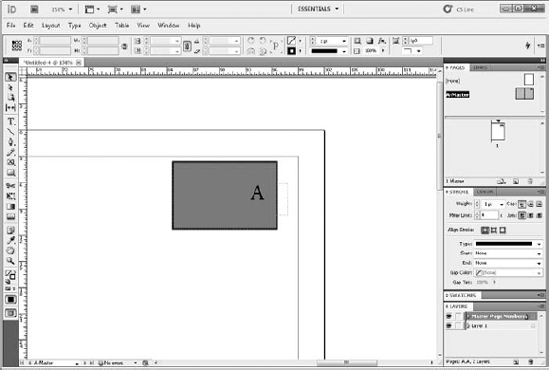
Add an element to the Master page. In the Layers palette, select the Background layer. Then in the Pages palette, double-click the master page you want to change to select them. Then click the Rectangle tool, and drag a rectangle over the top of the page number in the upper-right corner of the Master page. Change the rectangle's Fill color to blue and its Stroke color to black with a Weight of 2 pt, as shown in Figure 23.6.
Create a new layer for the Master page numbers. In the Layers palette, click the Create New Layer button at the bottom of the Layers palette. A new layer is added at the top of the Layers palette. Then double-click the new layer, name the layer Master Page Numbers, and click OK.
Move the Master Page Number element to the new layer. Click the Visibility icon for the background layer to temporarily hide the background layer so you can see the page number element hidden behind the rectangle. Then select the page number element. In the Layers palette, drag the small rectangle to the right of the Master Objects layer to the Master Page Numbers layer to move the selected object to the new layer that is higher than the layer with the rectangle on it.
Make all layers visible. As a final step, click the eye icon for the background layer to show all layers. The results are shown in Figure 23.7, where the page number is positioned in front of the blue rectangle.

When layered files such as Photoshop, Illustrator, PDF, and TIFF images are placed within InDesign by choosing File
If you need to edit the original file, you can select the file in the Links palette and choose the Edit Original palette menu command. This opens the image file in the application that was used to originally create the image, or if you double-click the file in the document with the Option/Alt key held down, the file is opened in its native app. Holding down the Option/Alt key and double-clicking the linked file in the Links palette goes to the link in the InDesign document.
Note
To learn more about working with the Links palette, see Chapter 22.
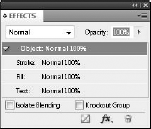
You use blending modes in Illustrator to define how the colors of two overlapping transparent objects are blended. Although InDesign doesn't include a way to apply transparency or blending mode to an InDesign document layer, you can quickly select all objects on a selected layer by holding down the Option/Alt key while clicking the layer in the Layers palette. With all objects on a layer selected, you can set the layer's Opacity value and blending mode using the Effects palette to set the opacity of all the individual selected objects, shown in Figure 23.8.
Note
Within InDesign, the layer is used to select all the objects on the layer, but the transparency is actually applied to every object individually.
Note
Illustrator allows you to apply an Opacity value and blending mode to an entire layer.
Note
Details on using transparency and the blending modes are found in Chapter 8.
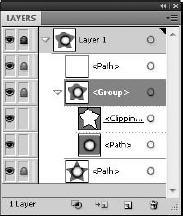
Layers in Illustrator have much more functionality than those found in InDesign, but the Layers palette still includes all the basic layer features already covered. One of the key benefits is that the Illustrator's Layers palette lets you drill down within layers to view and select the each individual item included in a layer.
The Layer options within Illustrator also are unique, offering options to specify whether the layer objects are shown in Preview or Outline mode.
Layers in Illustrator are capable of holding appearance attributes. You can select and move these attributes between different layers. You also can apply graphic styles directly to a targeted layer from the Graphic Styles palette. Illustrator's Layers palette also includes a simple way to create clipping masks.
Note
Using Graphic Styles and attributes is covered in Chapter 9.
Figure 23.9 shows the Layers palette in Illustrator. It includes additional palette buttons for creating sublayers and clipping masks.

Figure 23.9. The Layers palette in Illustrator offers some additional features. Appearance attributes
Illustrator offers several different ways to view the Layers palette, as specified in the Layers Palette Options dialog box, shown in Figure 23.10. This dialog box is accessed using the Palette Options palette menu command.
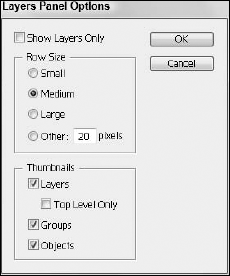
The Show Layers Only option hides all sublayers and displays only the top-level layer names.
The Row Size section lets you choose the size of the layer rows in the Layers palette from Small, Medium, Large, or Other, where you can set the row size in pixels. The Small option displays the layers without any thumbnails, similar to the Layers palette in InDesign when the Small Palette Rows option is enabled. The Medium option displays smaller thumbnails (refer to Figure 23.9); the Large option is shown in Figure 23.11.
The Thumbnails section lets you display the thumbnails for layers, the top level only, groups, and/ or objects. Selecting the Top Level Only option shows thumbnails only for the top level and hides the thumbnails for all sublayers.
All layers that contain objects have a small arrow to the left of the layer name. Clicking this arrow changes the arrow's direction and expands the layer to reveal all the layer's sublayers or objects. Clicking an expanded arrow icon collapses the layer again. If you hold down the Option/Alt key while clicking an arrow, all sublayers expand.
You can create new sublayers in Illustrator just as new layers by selecting the New Sublayer palette menu command or by clicking the Create New Sublayer button at the bottom of the Layers palette. Selecting this command or holding down the Option/Alt key while clicking the Create New Sublayer button causes the Layer Options dialog box to appear.
Note
If you select the Top Layer Only option in the Palette Options dialog box, then thumbnails don't display for any sublayers.
Because layers and/or sublayers are rearranged by dragging them in the Layers palette, if you drop a layer when a layer name is highlighted, the dropped layer becomes a sublayer under the selected layer.
With all the layers and sublayers, it can become difficult to find objects in the Layers palette. To locate an object's layer using the object, just select the object in the art board and choose the Locate Object palette menu command; the object's sublayer is revealed and selected in the Layers palette.
Object groups created by choosing Object
Note
Chapter 12 describes the concept of stacking order.
The Layer Options dialog box, shown in Figure 23.12, for layers in Illustrator includes Print and Preview options. These options determine whether the designated layer is printed and whether the layer is displayed in Preview or Outline mode.
Holding down the

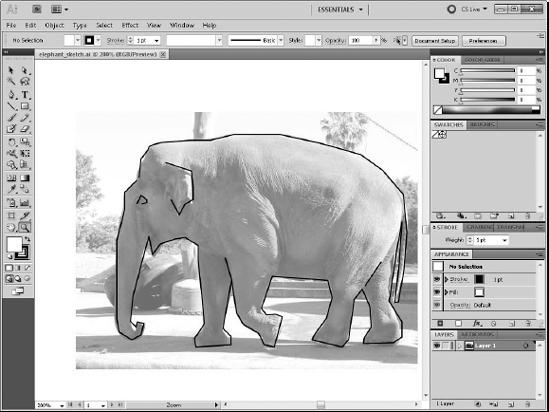
The Layer Options dialog box also includes an option to dim images by a specific percentage. This is helpful if you're tracing images, as shown in Figure 23.14.
Disabling the Print option prevents the layer from printing when you choose File
The Layer Options dialog box also includes an option to make a layer into a template layer. You also can make a layer a template by selecting the Template palette menu command. The Visibility icon for templates changes as shown in Figure 23.15.
Template layers are unique because you cannot print or export them. You also can hide them by choosing View
When you choose File

You may change template layers back to normal layers by disabling the Template option in the Layer Options dialog box.
STEPS: Tracing Layers in Illustrator
Open a new document in Illustrator. Within Illustrator, open a new document by choosing File
Open an image to trace from. Choose File
Trace the image. Select a layer above the template layer, and trace over the image with the Paintbrush tool, as shown in Figure 23.17.
Hide the template layer. After the sketch is complete, you can hide the template layer by clicking the Visibility icon.
Note
Another approach is to use Illustrator's Live Trace feature, which is covered in Chapter 8.

If a single layer has many different objects, you can use the Release to Layers palette menu commands to move (or copy) each successive object to its own layer.
Note
Illustrator's Release to Layers menu commands are useful in building animation sequences that you can then export to the SWF format. More information on this format and using the Release to Layers commands to create animations is covered in Chapter 23.
There are actually two different Release to Layers menu commands. The Release to Layers (Sequence) palette menu command moves each object to its own layer, but the Release to Layers (Build) menu command copies and accumulates the objects to new layers where the first object gets copied to a new layer, the second object along with the first gets copied to the second layer, and so on until the final layer has all objects.
When objects within a layer are released to layers, the objects are added to layers starting with the object farthest back in the stacking order and moving forward, so the frontmost object is placed on the highest layer.
With several layers selected, you can select to reverse their order in the Layers palette by using the Reverse Order palette menu command.
Illustrator includes palette menu commands for merging, collecting, and flattening layers. Merging layers places all objects from several layers into the topmost layer. Collecting layers is similar to merging layers, but instead it collects the objects on several layers and moves them to a new layer while making the layers sublayers under the new layer. The Collect in New Layer palette menu command moves all objects on the selected layers to a new layer and deletes the old layers.
Illustrator also includes a Merge Selected menu command that merges the objects on all selected layers into the targeted layer.
The Layers palette only lets you select multiple layers within the same hierarchical level, so you cannot merge or collect layers at different levels within one another.
To merge all layers together, you could select all layers and use the Merge Selected palette menu command, or you could use the Flatten Artwork palette menu command. This merges all layers into one layer that includes all the objects in the file.
Warning
The Flatten Artwork palette menu command cannot include layers that are hidden or locked. If you try to use the Flatten Artwork palette menu command with a hidden layer, a warning dialog box appears, asking if you want to discard the hidden art. Clicking the Yes button throws away all objects on the hidden layer and combines the rest of the objects into a single layer.
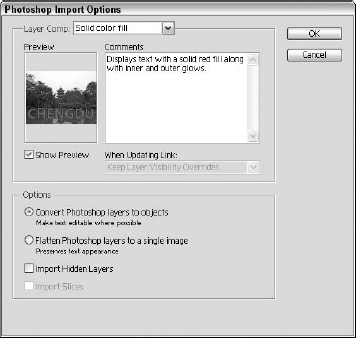
When you choose File
Note
The Photoshop Import Options dialog box also gives you the option to import image maps and/or slices if they exist in the Photoshop image.
If you select to convert the layers to objects, Illustrator imports the Photoshop layers, as best it can, into the current selected layer. It also does its best to make any text in the Photoshop file editable. However, if the Photoshop layer includes features not supported in Illustrator such as Layer Effects, Adjustment or Fill layers are merged during the conversion process.

Figure 23.18. When you place layered Photoshop images in Illustrator, you can convert the layers to objects or flatten all the layers.
You also can select to import any hidden layers included in the Photoshop image, but if the hidden layer includes a feature that isn't supported, the layer is simply ignored.
If the layered Photoshop image includes any layer comps, then you can select which comp to import after viewing them in the Preview pane. If the layer comp has any comments, they are shown in the Comments field. The When Updating Link option includes two options—Keep Layer Visibility Overrides and Use Photoshop's Layer Visibility. This setting determines how the visibility of the file is determined for images that are linked into Illustrator or InDesign.
When exporting Illustrator artwork to a Web-based format using the File
To export layers as CSS layers, select the Layers panel in the lower-right corner of the Save for Web & Devices dialog box, as shown in Figure 23.19, and enable the Export As CSS Layers option. The Layers panel also lets you select a specific layer and designate it as Visible, Hidden, or Do Not Export. If the Preview Only Selected Layer option is selected, only the layer selected in the Layer panel is visible in the Original panel.
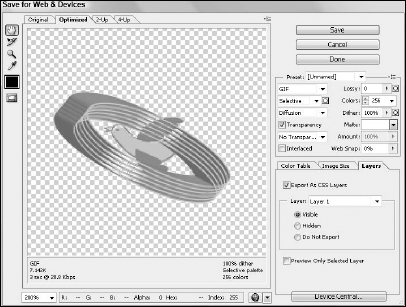
When you save the document, each layer is saved within a folder named images using the format designated in the Save for Web & Devices dialog box. The first layer is given the specified filename, and each additional layer has a sequential number following it. For example, if you save an Illustrator document with three layers as a GIF image with the name myFile, the first layer is named myFile.gif, the second layer becomes myFile-01.gif, and the third layer becomes myFile-02.gif.
If you select to have the Save for Web & Devices dialog box create an HTML page for you, then opening the HTML page in Dreamweaver displays all layers as CSS layers in their same positions that were found in the Illustrator artwork, as shown in Figure 23.20. The layers are separate files given a name based on the original filename within Dreamweaver.
Note
CSS Layers are specified in the HTML page, so if you don't select to create an HTML page along with the graphics, the exported image won't include any layers.
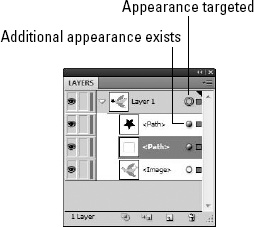
The column of circles to the right in the Layers palette allows appearance attributes to be set for all objects on the targeted layer or sublayer.
Clicking the circle once targets that layer to receive any appearance changes, such as fill or stroke color, an effect, or a style from the Graphic Styles palette. When a layer is targeted, an additional circle surrounds the existing circle, as shown in Figure 23.21. You can target multiple layers at the same time by holding down the Shift key while clicking the circle icon for several layers.

Figure 23.20. Opening the separated layers as images within a Web page (top) keeps all layer objects separate, but opening the HTML page places all layers in their original positions (bottom).
With a layer (or several layers) targeted, change an attribute setting such as the fill color, a stroke setting, or a style in the Graphic Styles palette, or apply an effect from the Effect menu, and all the objects on the targeted layers are changed. Individual objects may have a different value that affects how they look.
Note
If you move an object out of a layer that has certain appearance attributes applied, the moved object no longer has those attributes. Attributes that you assign to a layer stay with that layer, not with the objects.
When a layer includes any appearance attributes other than standard fill and stroke attributes, the appearance attribute circle in the Layers palette appears shaded solid.
You can move appearance attributes between layers by dragging the appearance attributes circle from one layer to another. Holding down the Option/Alt key while dragging an appearance attribute copies the attribute to the other layer. Dragging the appearance attribute circle to the Delete Selection icon button at the bottom of the Layers palette deletes the attributes from the layer, except for the fill and stroke colors, which remain.
Note
More on using effects and styles is covered in Chapter 12.
STEPS: Tracing Layers in Illustrator
Open a new document in Illustrator. Within Illustrator, open a new document by choosing File
Create a circle. Select the Ellipse tool, and drag in the center of the art board with the Option/Alt and Shift keys held down to create a perfect circle in the center of the art board. Set the Fill color to white and the Stroke color to black with a Stroke Width of 2.
Scale down the circle. Choose Object
Duplicate the scaling command. With the inner circle selected, choose Object
Release the objects to separate layers. With the layer that holds all these objects selected in the Layers palette, choose the Release to Layers (Sequence) palette menu command. This moves each object to its own layer. Although each object was selectable as a sublayer previously, releasing the objects to layers makes them easier to reference and work with.
Apply a fill color to every other circle. Within the Layers palette, hold down the Shift key and select the appearance attribute-targeting circle for every odd number layer starting with Layer 3. Then select a red color swatch from the Swatches palette or use the Appearance panel to change the fill color. Every other circle is filled with this color, as shown in Figure 23.23.
Change the stroke weight for all layers. In the Layers palette, click the appearance attribute target for the top layer named Layer 1 to select all objects. Then set the Weight value in the Strokes palette to 4 pt. This adds a darker ring to each object, as shown in Figure 23.24.
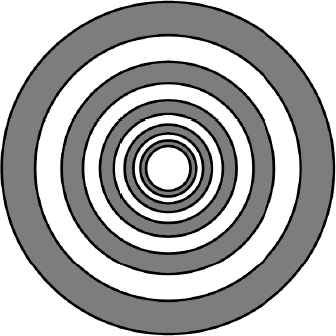
Apply an effect. With the top layer still targeted, choose Effect
Increase the Bloat effect. Just for fun, try reapplying the Bloat effect with a value of 200% by double-clicking the effect in the Appearance palette. This pushes the edges of the circles through each other to create an interesting pattern, shown in Figure 23.26.


Illustrator includes an Object
Note
Standard Illustrator clipping masks and opacity masks are covered in Chapter 23.
When creating a clipping mask using a layer or sublayer, the topmost object in the layer becomes the clipping mask and it masks all objects in the layer underneath it. To create a clipping mask from a layer, select the layer and choose the Make Clipping Mask palette menu command, or click the Make/Release Clipping Mask button at the bottom of the Layers palette. Figure 23.27 shows a sample clipping mask applied to a placed image.
Note
You can use vector objects as clipping masks only in Illustrator. If you want to use a raster image as a clipping mask, use Photoshop.
The object used as the clipping mask loses its appearance attributes, and its stroke is changed to none. If you want to use the stroke or effect outline as part of the clipping mask, choose Object
You can identify clipping masks in the Layers palette because they're separated from the objects that they mask by a dotted line. If you need to reposition the clipping mask or any of the objects that it masks, simply click the target circle in the Layers palette and then click and drag the object or the mask to its new location. You also can choose Select
If you select a layer with a clipping mask, the palette menu changes to Release Clipping Mask, allowing you to remove a clipping mask.
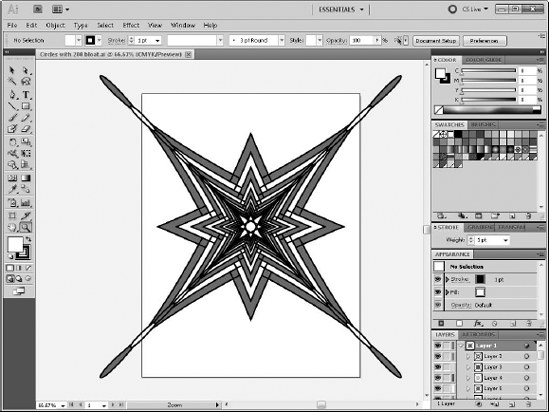

Figure 23.27. By placing an object above the placed image, you can use the Make Clipping Mask palette menu command in the Layers palette.
STEPS: Creating a Clipping Mask
Open a document in Illustrator. Within Illustrator, choose File
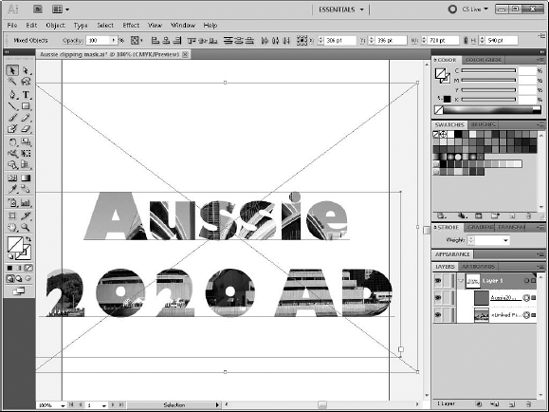
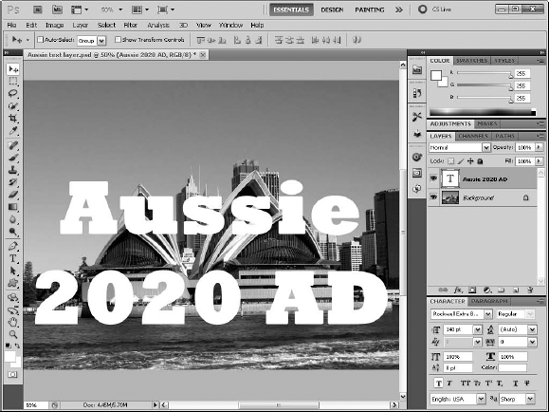
Add some text to the image. Select the Type tool and drag a text area on top of the image. Then type Aussie 2020 AD. In the Character palette, change the Font to Gil Sans Ultra Bold and the Size to 120 pt. The text, shown in Figure 23.29, covers most of the image.
Create a clipping mask. In the Layers palette, click the top layer and all other objects that you want to be affected by the mask, and select the Make Clipping Mask palette menu command. The area beneath the text object is clipped, as shown in Figure 23.30.


Layers in Photoshop are more advanced than any other CS5 applications, enabling many additional features including layer sets, linked layers, specialized type and shape layers, property-specific locking, an opacity setting, layer effects, adjustment and fill layers, layer masking, and layer comps. Figure 23.31 shows the Layers palette found in Photoshop.

Like Illustrator, Photoshop also includes a Layers Palette Options dialog box, shown in Figure 23.32, which lets you change the size of the thumbnails viewed in the Layers palette. You also can choose to have the layer thumbnail show the Layer Bounds or the Entire Document. You also have options to Use Default Masks on Fill Layers, expand any effects layers, and add the word "copy" to any copied layers.
When you create a new document in Photoshop, Photoshop creates a single layer named Background. You set the color of this background layer using the New dialog box. The choices are White, Background Color, or Transparent. If you select either the White or Background Color option, a background layer appears in the Layers palette. If Transparent is selected, then a gray and white checkerboard pattern appears denoting the transparent area and instead of a background layer, you get a layer named "Layer 1."
The background layer by default is locked and cannot be moved, but you can paint and draw on the background layer. You also cannot change its opacity or blending mode. It's always the lowest layer. By choosing Layer

Note
The lock status in Photoshop is different from that found in Illustrator and InDesign. In Illustrator and InDesign, you cannot add anything to a locked layer, but the background layer in Photoshop only has its position locked.
When you choose Layer
Tip
Double-clicking the background layer opens the New Layer dialog box, allowing you to turn the background layer into a normal layer.
Photoshop allows you to select multiple layers. To select multiple layers, simply hold down the Ctrl/
You also can select all layers using the Select
Warning
Many common tools won't work with multiple layers selected, including the various paint tools.
Photoshop allows you to select different layers with the Move tool. If the Auto Select Layer option in the Control panel is enabled, then clicking the document selects the topmost layer under the cursor. You also can select the Auto Select Group option to click and select a layer group. Another way to select layers is to right-click (Ctrl-click on the Mac) the document with the Move tool and all layers underneath the cursor's position are shown in a pop-up menu where they can be selected.
When two or more layers are selected, the layers can be aligned using the Layer
Selecting one of the distribute menu options moves the middle layers so that the space between the middle layer and the layers at either end are equal. For example, if you have five images that are horizontally aligned, you can equally space them by choosing to distribute them using their vertical centers.
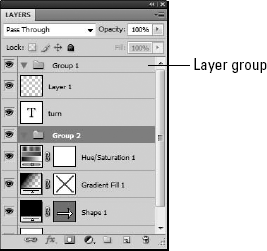
Photoshop lets you create new layers just like the other applications, but you also can create layer groups. A layer group is a folder that includes several layers, and like Illustrator's sublayers, it provides a way to bundle several layers together, as shown in Figure 23.34. Layer sets may be nested up to five levels deep and can contain any type of layer.
To create a layer group, select the New Group palette menu command or click the Create a New Group button at the bottom of the Layers palette. You also can create a new layer group from the selected layers using the New Group from Layers palette menu command or simply press
Tip
Holding down the

To add layers to a layer group, drag them in the Layers palette and drop them when the layer group is selected, or select the layer group folder before creating a new layer.
Selected layer groups can be deleted using the Delete Group palette menu command. This opens a dialog box that gives you the choice to delete the Group Only, the Group and Contents, or Cancel.
In addition to selecting multiple layers, you also can move the contents of multiple layers together by linking the layers together. To link a layer, select the layers that you want to link and choose the Link Layer palette menu command or click the small link icon at the bottom of the Layers palette. Linked layers have a bounding box in the canvas that surrounds all objects in both layers. A small link icon appears to the right of the layer name for all linked layers when one of the linked layers is selected.
Clicking the link icon a second time unlinks the layer, or you can choose the Unlink Layers palette menu command. Figure 23.36 shows both linked layers. To quickly select all linked layers, simply select one of the linked layers and choose Layer
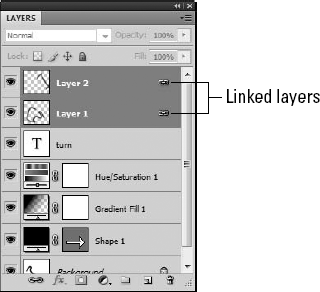
Figure 23.36. The link icon to the right of the layer name marks whether a layer is linked or unlinked.
When multiple Photoshop layers are selected at the same time, the palette menu includes some additional menu commands for working with them.
The Merge Layers (
Open a new document in Photoshop. Within Photoshop, open a new document by choosing File
Open several images. Choose File
Copy and paste the images. Select the first layer, and select an image. Choose Select
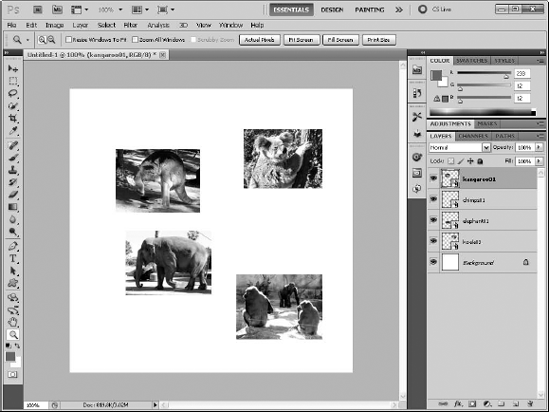
Figure 23.37. Placing each image on a separate layer makes aligning and distributing the images easy.
Note
Pasting into a document creates a new layer automatically.
Tip
These steps are accomplished quickly using keyboard shortcuts with

Position the aligning image. With the Move tool selected, move one of the images to its correct position.
Align the images. With the aligning image's layer selected, hold down the Ctrl/
Position the two end images. Before distributing the images, select the images that are to appear on either end of the row of images and place them in their correct positions.
Distribute the images. With the layers all still selected, choose Layer


You can lock each layer in Photoshop in a number of different ways using the Lock icon buttons at the top of the Layers palette, as shown in Figure 23.40. The Lock transparent pixels button prevents you from being able to paint on transparent areas. The Lock image pixels button won't let you paint on the image with any of the paint tools. The Lock position button prevents the selection from being moved. The Lock all button prevents any edits to the layer objects.

Figure 23.40. The Lock icon buttons are used to lock transparency, pixels, position, or all of these. Lock transparent pixels
If the Lock Image Pixels button is enabled, the Lock Transparent Pixels button becomes disabled. If the Lock All button is enabled, all other locks are disabled.
When the Lock All button is selected, a black lock icon appears to the right of the layer name; when any of the other locks are selected, a white lock appears to the right of the layer name.
If the selected layer is part of a layer group, then you can choose the Lock All Layers in Group palette menu command to lock the entire group. This command is used to open a dialog box, shown in Figure 23.41, where you select which locks to apply to the group layers.

Type and shape layers cannot be edited with any of the painting tools or filters because they hold vector-based data, but you can use the Layer
When the Type tool is used to add type to an image, a type layer is added to the Layers palette. Type layers are identified by a capital T in the thumbnail, as shown in Figure 23.42. Type layers automatically have both the Lock Transparent Pixels and Lock Image Pixels options disabled.
Note
Working with type is covered in detail in Part IV.

The key benefit of a type layer is that you can select the text with the Type tool and edit, delete, and add new text even after it has been manipulated. When a type layer is selected in the Layers palette, several menu commands are available in the Layer
Tip
If you double-click the type layer thumbnail, all the text is instantly selected.
By default, text entered into a text layer appears horizontally from left to right, but you can change the text orientation so it runs vertically from top to bottom using the Layer
Figure 23.43 shows two type layers—one with a horizontal orientation and one with a vertical orientation.

The Layer
If you click the canvas with the Type tool, you create point text. Point text doesn't have a bounding box—the cursor just appears and lets you type without constraining the text flow to a certain area. Point text is typically used for headings or single lines of text.
If you click and drag the canvas with the Type tool, you create Paragraph text. Paragraph text confines the text to the bounding box, so that any text that extends beyond the edge of the bounding box gets wrapped to the next line. This is useful for longer paragraphs of text, because the text is automatically wrapped to fit the designated area.
The Layer
When type layers are rasterized, you can distort and manipulate them using all the standard Photoshop tools, but doing so makes them uneditable as text objects. However, there are several distortions that you can do to text while keeping it editable, such as transforming and warping the text.
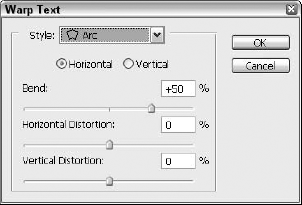
To warp a selected type layer, choose Layer
Note
These warp types are the same as those available within Illustrator and are covered in Chapter 13.
In addition to type layers created with the Type tool, Photoshop's Toolbox includes the Pen tool and several shape tools for creating rectangles, rounded rectangles, ellipses, polygons, straight lines, and custom shapes. When these tools are selected, the Options bar includes three different modes for applying these shapes as Shape Layers, Paths, and Fill Pixels.
The Shape Layers mode creates a shape layer in the Layers palette, as shown in Figure 23.45, the Paths mode creates a temporary work path that appears in the Paths palette, and the Fill Pixels mode lets you create a raster-based shape when a normal layer is selected.
Note
The Paths and Fill Pixels modes, along with the Pen and Shape tools, are covered in more detail in Chapter 12.
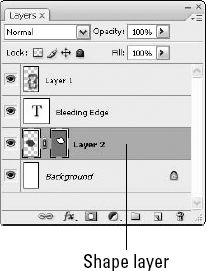
Figure 23.45. Shape layers show up in the Layers palette with two thumbnails—one for the fill and one for the layer mask.
Shape layers are displayed in the Layers palette with two thumbnails. The first thumbnail is the fill applied to the shape, and the second thumbnail shows the shape as a layer mask called a vector mask. When the Vector Mask thumbnail is selected, you can move the shape. The link icon between the fill and layer mask thumbnails binds the layer mask to the layer. If you click the link icon to unlink the layer mask, you can no longer reposition the layer mask.
Note
Layer masks are covered in more detail later in this chapter.
STEPS: Creating a Simple Logo
Open a new document in Photoshop. Within Photoshop, create a new document by choosing File
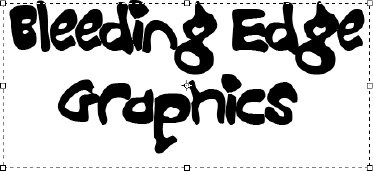
Create a type layer. Select the Type tool, click and drag in the center of the canvas, and type the text within the bounding box. The type layer appears in the Layers palette.
Change the text style and size. Choose Window
Warp the text. With the type layer selected, choose Layer
Add a background rectangle. Click the Rectangle tool, and select the Shape Layer button in the Options box. Change the foreground color to red, and drag to create a rectangle that covers the text. This adds a shape layer to the Shapes palette. With the shape layer selected, choose Layer
Rasterize the shape layer. To add some details to the background rectangle with a filter, you'll need to rasterize the rectangle. With the shape layer selected, choose Layer
Apply a filter to the background. With the rectangle layer still selected, chooseFilter


Although you can set the opacity and blending mode when a layer is first created in the New Layer dialog box, the options may be changed at any time using the controls at the top of the Layers palette. The Opacity value and blending mode are applied to the entire layer.
Note
You cannot change the opacity or blending mode for the Background layer or for any locked layer.
To change the blending options, select a different blending mode from the list at the top of the Layers palette, or choose Layer
Note
More on transparency and blending modes is covered in Chapter 9.

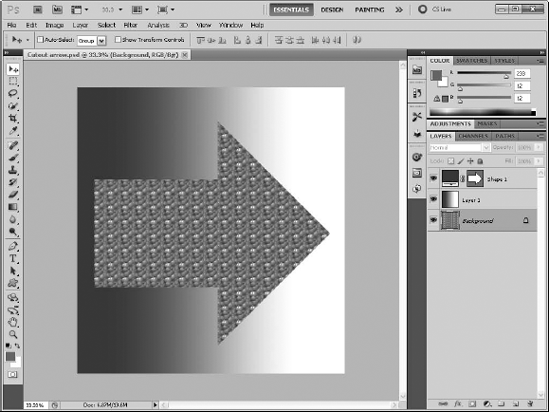
A knockout layer is used to remove, or knock out, a layer underneath it to reveal the Background layer or the bottom layer in a layer set. To create a knockout layer, simply place the knockout layer above the layer that you want to remove pixels from and choose one of the Knockout options in the Blending Options panel of the Layer Style dialog box.
The Knockout options include None, Shallow, and Deep. The Shallow option knocks out all layers to the bottom of the layer set that contains the knockout layer, but the Deep option knocks out all layers between the Knockout layer and the Background layer. If no Background layer exists, the knocked out area is made transparent.
You can control the amount of knockout using the Fill Opacity value. A Fill Opacity value of 0 knocks out all the in-between layers to reveal only the background, and a Fill Opacity of 100 doesn't knock out any of the in-between layers. Figure 23.51 shows an arrow shape used as a Knockout layer, revealing a pattern in the Background layer.
Directly beneath the Layer Opacity value is another value marked as Fill. This value is the Fill Opacity value. It is used to set the opacity for the layer pixels or shapes without affecting the opacity of any pixels added as layer effects, such as drop shadows or glows.
In the Advanced Blending section of the Blending Options panel of the Layer Style dialog box are several additional options besides Fill Opacity and Knockout. The Channels check boxes let you apply the selected blending mode and options to specific channels only. Deselecting a channel causes it not to be included in the blending process. The availability of the channels depends on the color mode for the given image:
The Blend Interior Effects as Group option treats any effects applied to the interior of the current layer as part of the layer and blends them with the layer pixels. Interior effects include Inner Glow, Satin, Color, and Gradient Overlay but not Inner Shadow.
The Select Blend Clipped Layers as Group option applies the blending mode to all layers that are part of a clipping mask. If this option is deselected, then each clipping mask retains its original blending mode and options. This option is enabled by default.
The Transparency Shapes Layers option prevents knockouts and layer effects from interfering with the layer's pixels. This option also is selected by default.
The Select Layer Mask Hides Effects and Select Vector Mask Hides Effects options are used to confine layer effects to the area defined by the Layer or Vector Mask.
You can use the sliders at the bottom of the Blending Options panel of the Layer Style dialog box to target only a certain range of pixels for blending. The Blend If field lets you choose which color channel to blend. Select Gray for all channels. The This Layer slider lets you specify the bright- and dark-colored pixels to blend for the current layer, and the Underlying Layer slider lets you specify the pixels to blend for a layer under the current one.
Tip
If you hold down the Option/Alt key while dragging the slider arrows, you can split the arrows in half to define a specific range of pixels.
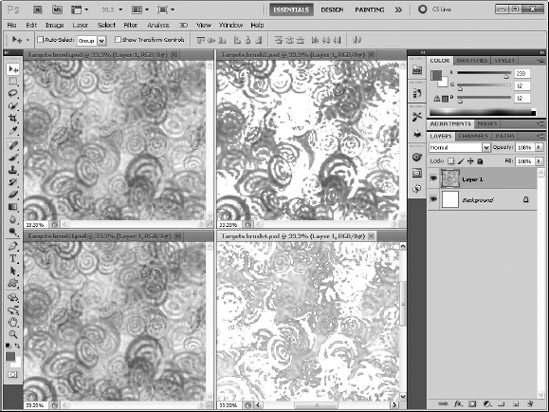
Figure 23.52 shows a simple layer (top left) created with a stylized brush. The pixel-blending slider to the right has been moved to include all the bright pixels in the blending process, and the lower image shows the same document with all the dark pixels blended.
STEPS: Creating a Knockout Border
Open a document in Photoshop. Within Photoshop, open a new image by choosing File
Convert the image to a Background layer. Select the Background layer, and choose the Delete Layer palette menu command to remove the existing background. Then, with the image layer selected, choose Layer
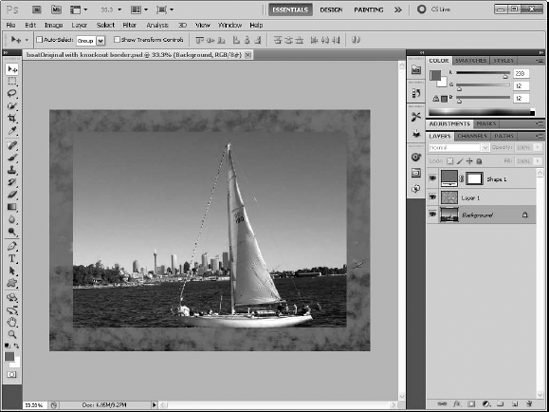
Create a new border layer. Click the Create a New Layer button at the bottom of the Layers palette. The new layer appears in the Layers palette. Change the Fill color to red, click the Paintbrush tool, and select the Scattered Maple Leaves brush tip from the Brushes palette. Then drag over the entire layer to create a layer to use as a border, as shown in Figure 23.53.
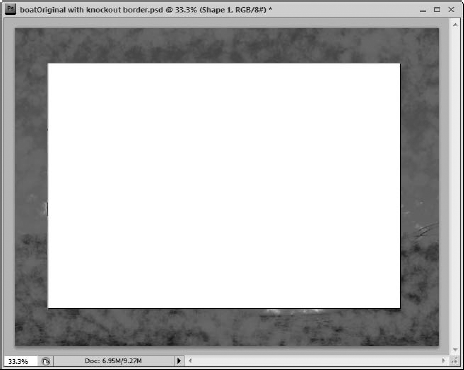
Create a shape layer. Select the Rectangle tool, and make sure the Shape Layer mode is selected in the Options bar. Then set the fill color to white and drag in the canvas to create a rectangle that leaves a border around the image, as shown in Figure 23.54. This creates a new shape layer in the Layers palette.
Make the shape layer a knockout. Double-click the shape layer mask thumbnail to open the Blending Options panel of the Layer Style dialog box. Select the Deep option in the Knockout field and set the Fill Opacity value to 0%. Then click OK. Figure 23.55 shows the resulting image.

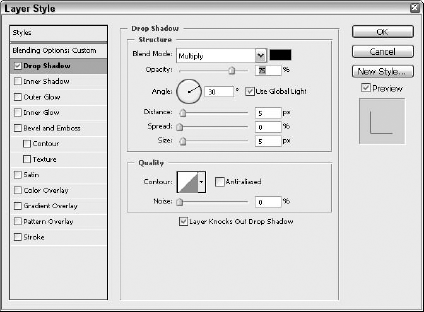
You can add layer effects to the current layer by enabling an effect in the Layer Style dialog box. This dialog box is opened by selecting the Blending Options palette menu command, by selecting one of the Layer Effects from the Add a Layer Style button at the bottom of the Layers palette, or by double-clicking the layer thumbnail. Figure 23.56 shows the Layer Style dialog box for the Drop Shadow effect.
Note
Layer effects may not be added to the Background layer or to a locked layer.
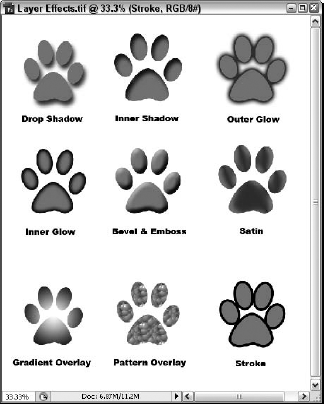
The available default Layer Effects include Drop Shadow, Inner Shadow, Outer Glow, Inner Glow, Bevel and Emboss, Satin, Color Overlay, Gradient Overlay, Pattern Overlay, and Stroke. Figure 23.57 shows each of these layer effects. Selecting any of these Layer Effects from the Add a Layer Style button opens the Layer Style dialog box and displays the settings for the selected effect.
Note
Each of these layer effects is covered in Chapter 12.
When a Layer Effect has been applied to a layer, the Layer Effect icon appears to the right of the layer title. Clicking the arrow that appears next to this icon expands and displays the list of effects. Double-clicking any of these listed effects opens the Layer Style dialog box again; here, you can edit the effect's settings.
To remove a layer effect, simply drag the effect to the Delete Selected button at the bottom of the Layers palette.
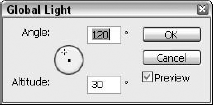
Several of the layer effects depend on a lighting effect to determine where the shadows are cast, including the Drop Shadow, Inner Shadow, and Bevel and Emboss layer effects. Although each of these effects has a setting that controls the light's Angle and Altitude, you can select the Use Global Light option. When this option is selected, the light settings are controlled using the Global Light settings.
To Access the Global Light settings, choose Layer
Layer effects may be saved as styles and reapplied to other layers, but an effect that looks great on one layer may be too small or too big when applied to another layer. Instead of reconfiguring the settings for the effect, you can simply change its scale by choosing Layer
Note
To learn more about working with styles and effects, see Chapter 9.
This command opens a simple dialog box with a slider for determining the scale of the effects applied to the current layer.
You can separate effects from a layer by choosing Layer
Open a document in Photoshop. Within Photoshop, open an image file by choosing File
Add a type layer. Click the Type tool, and click in the lower center of the image. Choose Window
Add an Inner Glow layer effect. With the type layer selected, click the Add a Layer Style button at the bottom of the Layers palette and select the Inner Glow effect. In the Layer Style dialog box, set the blend mode to normal, the color to black, and the size to 25 pixels. Click OK. The text should now look blurred, and the layer effect is added beneath the type layer in the Layers palette, as shown in Figure 23.60.
Add an Outer Glow layer effect. With the type layer still selected, click the Add a Layer Style button at the bottom of the Layers palette and select the Outer Glow effect. In the Layer Style dialog box, click the color swatch to open the Color Picker; then click the Eyedropper tool, and click in the image to select a light color from the image. Set the size to 25 pixels, and click OK. The layer effects offset the text so it isn't so harsh, as shown in Figure 23.61.


Within Photoshop, the Image
You also can use the Adjustments and Mask panels to apply adjustments in a non-destructive way.
Using the Layers palette, you can apply an Adjustment layer to the image that holds the adjustment changes in a separate layer, so you can edit or even remove the adjustment changes at any time without affecting the image.
Fill layers are similar to adjustment layers. They're used to fill the canvas with a solid color, a gradient, or a pattern, but fill layers don't change the layers underneath them.
Note
Another benefit of working with fill layers is that they do not increase the file size significantly, but adding a layer with a solid color can increase the file size significantly.
To add an adjustment layer, select one of the commands from the Layer

Note
You can learn more about these adjustment options in Chapter 8.
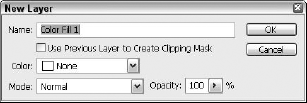
To add a fill layer, select one of the commands from the Layer
Selecting any of these layers opens the appropriate dialog box for the layer type that was selected. Figure 23.63 shows the New Layer dialog box for the Color Fill layer.
Masks are used in Photoshop to hide areas of a layer. Photoshop creates masks out of pixel selections or shapes. When a mask is applied to a layer, it appears as an additional thumbnail in the Layers palette positioned to the right of the main thumbnail. The mask thumbnail shows all hidden areas as black, all visible areas as white, and all semitransparent areas as gray.
To apply a mask to a layer, select the layer and choose Layer
If a pixel selection exists, that selection may be used as the basis for the mask. To make the interior of the selection a mask, choose Layer
The link icon that appears between the thumbnails in the Layers palette is used to make the layer move with its mask. Clicking the link icon unlinks the two and allows the mask to move independently of the layer.
To edit a mask, click its thumbnail in the Layers palette and use the paint tools to color the canvas using black, white, and grayscale colors. A mask thumbnail appears to the right in the Layers palette, as shown in Figure 23.64, when a mask is selected and the foreground and background colors change to black and white. Masks use shades of gray to depict the varying opacity in the layer, but this gray is visible in the final image.

To see the mask in black and white while editing it, hold down the Option/Alt key while clicking the mask thumbnail in the Layers palette. To get back to the normal editing mode, click the layer thumbnail.
If you click the Layer Mask thumbnail with the Shift key held down, or if you choose Layer
Vector objects such as paths, shapes, and text also may be used as masks. One benefit of vector masks is that you can move and edit them after they've been applied. This is true for all masks, not just vector masks. To create a vector mask, choose Layer
To use a vector object as a mask, select the layer that you want to mask and then select the Paths option (located between the Shapes and the Fill Pixels buttons) in the Options bar. This allows you to create a path without creating a new layer. Then choose Layer
Vector masks may be converted to a normal layer mask by choosing Layer
To remove a layer mask, simply drag its thumbnail down to the Delete Selected button at the bottom of the Layers palette, or select the mask that you want to remove and choose Layer
Beside layer groups, Photoshop offers another way to combine several layers together. Smart Objects are a special object type that embeds the content of several layers into a single container. Smart Objects can include both raster and vector data and can be edited in a separate application while maintaining its ties to Photoshop. For example, an Illustrator file can be placed within a Photoshop file to make it a Smart Object.
To create a Smart Object, select several layers and choose the Convert to Smart Object palette menu command. This creates a new layer that is identified as a Smart Object by the small icon in the lower-right corner of the thumbnail, as shown in Figure 23.66.
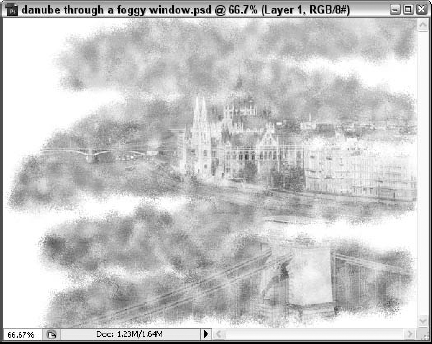
Figure 23.65. Painting on a layer mask with a spatter brush creates the effect of looking through a foggy window.
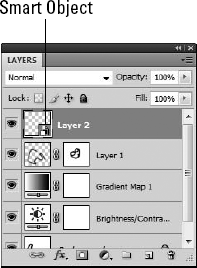
Figure 23.66. Smart Objects are identified by a small icon in the lower right of the thumbnail. Smart Object
You also can create a Smart Objects by placing Illustrator, PSD, or Camera RAW files in the current document using the File

Figure 23.67. Smart Objects also are created by pasting Illustrator objects into the Photoshop document.
Double-clicking a Smart Object layer or selecting the Edit Object palette menu command opens the Smart Object as a separate document in the original creator software, which may be Illustrator, Photoshop, or the Camera Raw dialog. When the command is first selected, a warning dialog box appears explaining that if you simply save the file being edited, then the changes are automatically updated in the Photoshop document.
Smart Objects can be exported independently of the document that contains them. To export a Smart Object layer, select the layer in the Layers palette and choose the Layer
To update an existing Smart Object with new content, choose the Layer
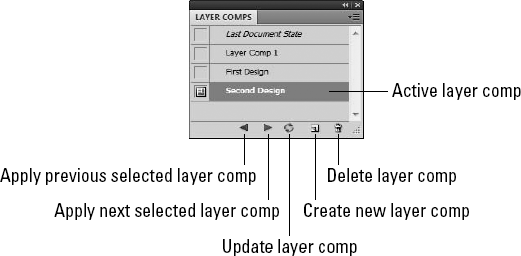
Layer compositions (or comps, for short) offer a way to display multiple renditions of a Photoshop file. Stored in the Layers Comps palette, shown in Figure 23.68, layer comps record a snapshot of the Layers palette by keeping track of each layer's Visibility, Position, and Appearance.
To create a new layer comp, click the Create New Layer Comp button at the bottom of the Layer Comp palette. This opens a dialog box, shown in Figure 23.69, where you can name the new layer comp, specify which properties to record, and add a comment.

Figure 23.69. The New Layer Comp dialog box lets you name the layer comp and select which layer attributes to record.
If changes are made to a layer comp, you may update the comp by clicking the Update Layer Comp button at the bottom of the Layer Comp palette.
The Apply Previous and Apply Next Layer Comp buttons at the bottom of the Layer Comps palette let you quickly cycle through the various layer comps.
To delete a layer comp, select it and click the Delete Layer Comp button at the bottom of the Layer Comps palette.
Note
Deleting a layer comp deletes the memory of the layer configuration, but it doesn't delete the related layers in the file.
STEPS: Creating Several Layer Comps
Open a document in Photoshop. Within Photoshop, open a new document, such as the image with text and layer effects applied, by choosing File
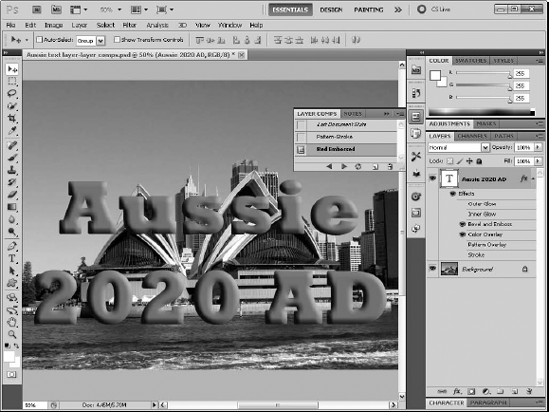
Apply multiple layer effects. Select the type layer, and apply each of the available layer effects to the type layer. Figure 23.70 shows the image with the Pattern Overlay and Stroke layer effects applied.
Creating new layer comps. Experiment with the applied layer effects by enabling and disabling certain combinations. When you come across a design that is appealing, choose Window
Preview the layer comps. When you've finished creating a number of layer comps, click the Apply Next Selected Layer Comp several times to cycle through the available layer comps.

When Photoshop files that include layer comps are placed within Illustrator or InDesign, the Options dialog box, shown in Figure 23.72, includes a drop-down list of the available layer comps. Using the Preview pane and comments, you can select the exact layer comp that you want to open and place in the current document.
Layers in Flash are integrated into the Timeline panel, so don't look for a layers palette because there isn't one. At the base of the Timeline panel are buttons for creating new layers, creating layer folders, and deleting layers.
Flash allows you to select more than one layer at a time, but only one layer is active at a time. The active layer is the one with the pencil icon next to it, and it is the layer where all new objects are added. Just like layers in Photoshop, Illustrator, and InDesign, Flash layers include icons for turning off the visibility of the layer and for locking the layer.
Flash also has several different special layers including layers that hold sound files, ActionScript layers, frame label, and comment layers. There are also guide layers that work like the guides in Illustrator and InDesign and mask layers for hiding objects.
Flash also has an option, next to the Lock column, to view the layer as outlines. This works like Illustrator and can quickly make all objects react quickly to work on the timing of the animation.
Layers can be reorganized by dragging and dropping them into a different order. Objects on layers at the top of the Timeline panel are stacked on top of objects on layers that are below them in the Timeline panel.
Layers in Dreamweaver in some ways are similar to layers used in the other CS5 applications, but Dreamweaver layers actually represent layers that are defined as part of the CSS specification, which makes them behave differently in many ways. CSS stands for Cascading Style Sheets, which is a specification for handling and defining styles for Web pages.
CSS layers work like the layers in the other CS5 applications in that they allow you to stack content on top of each other, but there are some differences that you need to be aware of, including the following:
CSS layers are always rectangular.
CSS layers are positioned relative to the Web page's upper-left corner or relative to the upper-left corner of other layers.
CSS layers may inherit attributes from a CSS.
CSS layers are contained within the HTML code inside a <DIV> tag.
CSS layers are not supported on all browsers and may not appear correctly if a user has disabled CSS features for his browser.
CSS layers may be connected to execute actions when certain mouse events occur.
CSS layers may be used to create simple animations by changing layers positioned in the same place.
Another huge difference is that CSS layers in Dreamweaver aren't called layers. They are called AP Elements. The AP stands for absolute position, and these objects are created using an <AP Div> tag.
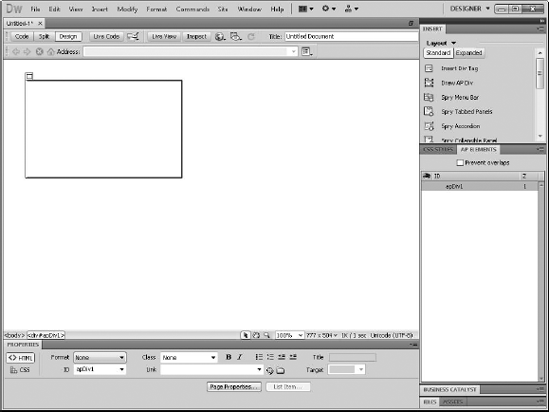
You add AP Divs to a Web page using the Insert
When an AP Div is created, its name appears in the AP Elements palette, as shown in Figure 23.73. Any layers that are imported from one of the other CS5 apps that support layers appear in the AP Elements palette as Unnamed. You can rename an AP element by simply double-clicking its name in the AP Elements palette. The AP Elements palette is opened by choosing Window

When an AP element is created, its dimensions appear in the CS Styles palette and also in the Properties panel, and each layer is given a number based on the order in which the layers were created. This number, called the Z-order value, is displayed in the right column of the AP Elements palette. These Z-order numbers also are used in the Timeline Editor to animate the layers.
AP elements are selected by clicking their edge or by clicking the position marker in the upper-left corner, by clicking the borders when the cursor changes to a hand icon, or by clicking its name in the AP Elements palette. When the hand icon appears when you click a layer's border, you can move the layer by dragging it to a new position. Dragging the layer handles lets you resize the layer.
Tip
When a layer is selected, you can move it by pressing the arrow keys. Holding down the Shift key while using the arrow keys lets you move a layer 10 times the normal nudge value or 10 pixels by default; holding down the
To delete a layer, just select the AP Element in the Design view and press the Delete button.
The AP Elements palette includes some of the same layer features found in the other CS5 applications, including the eye icon. Clicking the first column of the AP Elements palette, you can change the visibility of the selected layer.
To the right of the element's name is another column that lists the Z-Index value, which also is called the Z-order value. Clicking the Name or Z-Index column head lets you sort the layers by their name or Z-Index value.
Note
When an AP element is selected, it's automatically brought to the front of the stacking order so the layer is visible. But when the layer is unselected, it returns to its correct position in the stacking order.
When an AP element is selected, its attributes display in the Properties palette, shown in Figure 23.74.

The Properties palette includes the element's Name in an editable field, its positions and/or dimensions, a Z-Index value, and a Visibility menu. The layer's position values may be specified using the Top and Left position values along with the Width and Height values.
The Z-Index value determines the stacking order of the layers with the higher values appearing on top of the lower values, so a layer with a Z-Index of 10 appears in front of a layer with a Z-Index of 2.
The Properties panel also lets you select a background color for the layer or load an image to be displayed within the layer. To change the background color, click on the color swatch and a pop-up color picker appears with Web-safe color swatches.
The Image option lets you browse for an image. If the image is larger than the available size, only the portion of the image that fits in the layer is displayed. If the image is smaller than the layer, the image is placed in the upper-left corner of the layer.
STEPS: Creating Layers in Dreamweaver
Open a Web page in Dreamweaver. Within Dreamweaver, open a new Web page with the File
Click the Draw AP Div icon. In the Layout tab, click the Draw AP Div icon and drag in the blank Web page at the position where the new AP element is located. The element appears as a rectangle at the position where you drag, and the layer name appears in the AP Elements palette, as shown in Figure 23.75.
Resizing and positioning the layer. Drag the mouse over the element's edge, and click when the mouse icon changes to a hand icon. Resize the layer by dragging its corner handles, and drag the layer edges to reposition the layer.
Change the layer's background color. In the Properties palette, select the BG Color icon, where you can select a new background color.
Add an image to the layer. Click the Browse for File button in the Properties panel to load a background image. The loaded image is positioned within the AP Div element, as shown in Figure 23.76.
Add text to the layer. Click in the AP Div to have the text cursor appear. Enter the text, and use the Properties panel to change the text color, size, and position, as shown in Figure 23.77.


Layers provide a way to organize objects into easy-to-select groups. These layers include properties such as visibility and locking that are enabled with a single click in the Layers palette.
The Layers palette is used to create new layers, change the layer properties, move objects between layers, and manage layers.
Layers may be used in all the CS5 applications, but the features available in each application are slightly different.
Layers in Illustrator include the ability to work with sublayers, release layers, add styles to layers, and create clipping masks.
Layers in Photoshop include layer sets, linked layers, transparency and blending modes, multiple locking attributes, adjustment and fill layers, type and shape layers, layer effects, and masks.
The Layer Comps palette in Photoshop lets you take snapshots of different layer configurations and recall these snapshots quickly.
Layers in Dreamweaver enable you to place Web page content on top of other layers. The Dreamweaver layers follow the CSS specification.
Dreamweaver layers may be animated using the Timelines panel.
The visibility of Individual layers in Acrobat may be toggled on and off for a PDF file that includes layers within Acrobat using the Layers tab.