Understanding glyphs
Accessing special characters
Working with inline graphics
Both Illustrator and InDesign allow you to handle typography like a master, especially when working in conjunction with the OpenType fonts that offer you thousands of character selections. InDesign, in particular, with its abundant set of menu commands and palette options, is the most powerful typesetting tool developed to date for desktop computers. With it, you have the ability to set high-quality type that rivals the output from professional typesetting machines used before the computer revolution.
Older PostScript fonts give you a maximum of 256 different characters, or glyphs. With the OpenType fonts, however, you get as many as 65,000 glyphs per font. These additional characters offer you many more options for pairing characters in ligatures, customizing fractions, accessing foreign language characters, and working with a wide variety of symbols and special characters that can be used as type or graphic elements.
Both Illustrator and InDesign have a Glyphs palette that shows you, at a glance, the different characters available in any given font. It's much like the old Keycaps control panel available in earlier Mac operating systems. In addition to viewing glyphs in a scrollable palette, you can also create custom glyph sets in InDesign and you can view different special characters by selecting menu options in the palettes in both InDesign and Illustrator.
In Illustrator, choose Type
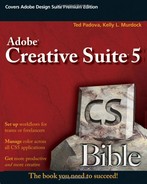
The default selection in the Show menu at the top is Entire Font. All characters in a given font are displayed in the scrollable palette. The Show menu lets you focus the information shown in the palette to show either all glyphs or only alternates of a selected glyph in your layout. Note in Figure 17.1 that when you press the mouse button on a particular character with a flag in the lower-right corner, a pop-up bar shows alternate characters. When you select the menu command, the alternate characters are displayed in the palette. Other options you have from the menu choices include many of the same options found in the Character palette.
Note
The Show pull-down menu offers different options depending on the type of font selected. More options are available with OpenType fonts than you find with TrueType fonts, and more options are available with OpenType Pro fonts than you find with OpenType fonts.
Note
For more information on using the Character palette, see Chapter 16.
To use glyphs, and particularly to use alternate characters in Illustrator, you can easily access the palette and select characters for insertion in text as you type. For character insertions you might use in both Illustrator and InDesign, follow these steps.
STEPS: Inserting Special Characters in Text Using the Glyphs Palette
Begin by typing a body of text. Add some area type to a page in Illustrator. Select an OpenType Pro font you want to use by choosing Type

Open the Glyphs palette. Choose Type
Locate the character you want to insert. The Glyphs palette opens with the current selected font displayed in the palette. Scroll the palette and find a character to insert. In our example, we use a ligature for combining the f, f and l characters into a single character.
Insert the character. When you find the character in the Glyphs palette, double-click on the character. The character is inserted at the cursor location. In Figure 17.2, the inserted character is highlighted.

In addition to the different displays in the palette for showing characters via the Show menu, you can make font selections from the pull-down menu at the bottom of the palette. If you're searching for a special character or want to view a specific font, use the menu to select fonts without disturbing your text editing. You can select a font family from the pull-down menu at the bottom-left side of the palette; you select the font style from the second pull-down menu at the bottom of the palette. In Figure 17.1, the selected font family is Times TT and the selected style is Regular.
To the right of the Style pull-down menu, zoom buttons offer different zoom views. Click on the smaller mountain symbols to zoom out, and click on the larger symbol to zoom in on the characters in the palette.
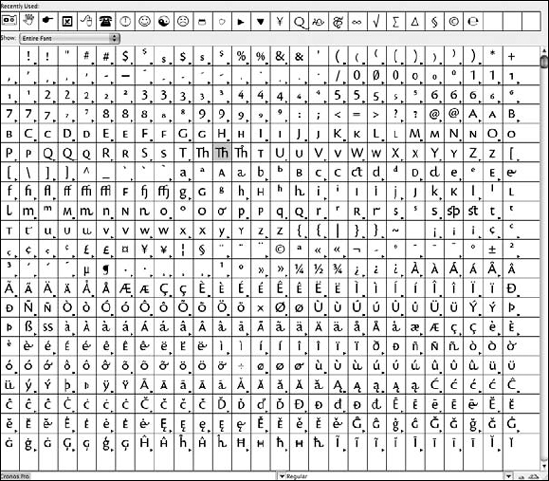
In InDesign, you have a few more style combinations that you can view in the Show menu, but the main distinction between Illustrator and InDesign exists with the flyout menu commands accessible via the arrow at the top right of the Glyphs palette. In Illustrator, the only option available here is resetting the palette to the default view. But in InDesign there are options for working with glyph sets. Click on the right-pointing arrow to open the flyout menu, and the options shown in Figure 17.3 appear.
In addition to flyout menu command differences, InDesign also offers you a display of recently used glyphs at the top of the panel, and additional information about a font when the cursor appears over a character such as Unicode values. These options are also available with Illustrator.
The menu commands available from the flyout menu enable you to create and edit custom glyph sets. This feature can be a time-saver when you need to access special characters or alternatives while typesetting in InDesign. To understand how custom sets are created and used, follow these steps.
STEPS: Working with Custom Glyph Sets in InDesign
Open the Glyphs palette in InDesign. Choose Type
Create a new glyph set. You can use the Glyphs palette with or without a document open in the InDesign application window. You can temporarily ignore the current font selected. When you create a new set and add characters to your custom set, you can add characters from different fonts. From the flyout menu, select New Glyph Set.
Name the new glyph set. The New Glyph Set dialog box opens. Type a name in the field box for the name you want to use for your custom set. In our example, we use myGlyphs for the set name. You can view your new glyph set by choosing it from the Show menu or via View Glyph Set in the flyout menu. Currently the palette includes no characters.
Select a font family and font style. Be sure the Show option is set to Entire Font. At this point, you can view all your installed fonts and available styles by making selections in the pull-down menus at the bottom of the Glyphs palette. Select a font family and the font style you want to view.
Add a character to the custom glyph set. When you find a character you want to add to the set, click on it to highlight it. Open the flyout menu, and choose Add to Glyph Set (alternately open a context menu and make a menu selection). A submenu opens where you should see your new custom set listed. If you create several sets, select the one you want to edit. In our case, we select myGlyphs from the submenu.
Add additional characters to the custom glyph set. Continue selecting and adding characters to the glyph set with the Add to Glyph Set command in the flyout menu. When you want to use the custom set, select it from the Show menu at the top of the Glyphs palette or by choosing View Glyph Set in the flyout menu. The characters you added to the set appear in the Glyphs palette, as shown in Figure 17.4. When you want to access a character from the set while you are typing in InDesign, simply open the set and double-click the desired character. It is automatically inserted at the cursor location.
Delete a character from your custom glyph set. If you want to delete a character from your glyph set, select the set in the Show menu. In the flyout menu, select Edit Glyph Set. The Edit Glyph Set dialog box opens, as shown in Figure 17.5. Select the character you want to delete, and click Delete from Set and click OK to close the dialog. In addition to deleting characters, the Edit Glyph Set dialog box also enables you to change the font and style of individual characters included in the set.


A number of advanced typographic features are available to you in InDesign. By using simple menu commands, you can easily achieve special effects that are popular with layout artists and typographers. In the Type menu, you will find several options for handling special characters. Three of these options provide an even wider selection of options in submenus. They include Insert Special Character, Insert White Space, and Insert Break Character.
When you choose Type

Tip
You also can make the same menu command choices for special character options by using a context menu. Create a text box, and Ctrl+click (Macintosh) or right-click (Windows) to open a context menu on the text frame. Select Insert Special Character
The submenu items available from the Markers submenu include the following:
Auto Page Number: The keyboard shortcut for automatic page numbering is Alt+Shift+ Ctrl+N (Windows) or Option+Shift+

Next Page Number: The Next Page Number and Previous Page Number (see Previous Page Number below) commands are helpful when you have blocks of text that start on one page and then continue on another page in your document (also known as "story jumps"). Where the text ends on one page, for example, you would want to inform the reader that it continues on another page with a "Continued on page X" notation (also known as a "jump line") To do this, create a separate text frame that overlaps the text frame of the story you are jumping. Be sure to group these two text frames together so if you move the story, the jump line stays with it. Type Continued on page (note a space is added preceding the text), and then choose Type
Previous Page Number: This option works like Next Page Number, but instead of using a "continued to" page number, you use a "continued from" page number. Again, create a separate text frame that overlaps the text frame of the jumped part of the story. Type Continued from page (note a space is added after the text), and then choose Type
Section Marker: You can divide documents into sections using the Layout
In earlier versions of InDesign, other special characters were included in the Insert Special Character submenu. This menu has been divided into several submenus, such as the Markers submenu mentioned above. The Symbols submenu contains additional special characters that include the following:
Bullet Character: The ability to insert special symbols with a menu command is particularly helpful to people who work in cross-platform environments and don't know the key combinations for certain characters. The bullet character inserts a bullet at the cursor insertion point.
Copyright Symbol (©): Inserts the copyright symbol.
Ellipsis (. . .): Inserts an ellipsis.
Paragraph Symbol (¶): Inserts a paragraph symbol.
Registered Trademark Symbol (®): Inserts a registered trademark symbol.
Section Symbol (§): Inserts a symbol representing a new section.
Trademark Symbol (™): Inserts a trademark symbol.
The Hyphens and Dashes submenu contains the following:
Em Dash (—): Inserts an em dash.
En Dash (–): Inserts an en dash.
Discretionary Hyphen: Add a hyphen as desired by using this option if a word needs to break a line.
Nonbreaking Hyphen: Select this option when you don't want a hyphenated word to break to the next line. Nonbreaking hyphens only prevent a line break at that hyphen. The compound text around the hyphen can break.
The Quotations submenu contains the following:
Double Left Quotation Mark ("): Inserts a double left quotation mark.
Double Right Quotation Mark ("): Inserts a double right quotation mark.
Single Left Quotation Mark ('): Inserts a single left quotation mark.
Single Right Quotation Mark ('): Inserts a single right quotation mark.
Straight Double Quotation Marks ("): Inserts straight double quotes instead of smart quotes.
Straight Single Quotation Mark (,): Inserts a single quote mark instead of a smart quote mark.
The last submenu for Insert Special Characters is the Other submenu. This menu contains the following options:
Tab: Has the same effect as pressing the Tab key.
Right Indent Tab: Adds a tab indented from the right side of the text line.
Indent to Here: Indents to the cursor position.
End Nested Style Here: Ends a nested style at the cursor position.
Non-joiner: Used for setting zero width non-joiner text.
The next set of typographic controls you find in the Type menu are the spacing options. When you choose Type
Em Space: Em spaces are equal in horizontal width to the vertical point size for a font. For example, in 18-point type, the em space is 18 points wide.
En Space: En spaces are exactly one-half the width of an em space.
Nonbreaking Space: This option adds space equal to that produced when you press the spacebar, but prevents the line from being broken at that point.
Nonbreaking Space (Fixed Width): This is a fixed width space that prevents the line of type from being broken at a space character.
Hair Space: This option adds the smallest space between characters. It's 1/24 the width of an em space.
Sixth Space: One-sixth the width of an em space.
Thin Space: One-eighth the width of an em space.
Quarter Space: One-fourth the width of an em space.
Third Space: One-third the width of an em space.
Punctuation Space: The same amount of space used for other punctuation marks such as commas, periods, colons, and exclamation marks.
Figure Space: The same space used for a numeric character in a font. This option is helpful when aligning numbers in columns.
Flush Space: You apply this option to fully justified paragraphs. A variable amount of space is added to the last line in a paragraph and justifies the last line of text.
Rounding out the options for using special typographic characters, you'll find a selection in the Type menu that controls line breaks. Choose Type
Column Break: When inserting a column break, text following the break flows to the next column in a multiple-column text frame. If text is set to a single-column frame, the text flows to the next frame in the thread.
Frame Break: Flows text to the next frame in the text thread. If text is set to multiple columns and you insert a frame break in column 1, the text is flowed to the next frame thread, ignoring columns 2 and 3.
Page Break: Flows text to the next page when text is threaded across pages.
Odd Page Break: Flows text to the next odd-numbered page when following a thread.
Even Page Break: Flows text to the next even-numbered page when following a thread.
Paragraph Return: Inserts a paragraph return (same as pressing Enter/Return).
Forced Line Break: Forces a line break (same as pressing Shift+Enter/Return).
Discretionary Line Break: Prevents problems with hyphenated words appearing in the middle of a line of type after text reflows.
You can automatically thread text to separate text frames. Graphics placed in your layout in image frames do not follow the threading behavior of the text. This is a problem if you reformat your text and you need the graphics to stay connected to specific parts of the copy. Normally, you would have to move the graphic elements separately each time your text reflowed. However, if you use inline graphics, the graphic is interpreted similarly to the way text is interpreted and maintains its respective position within a given line of text.
Creating an inline graphic is easy. You simply select an object or image, cut it from a page, and paste the graphic back into a text frame with the cursor blinking at the spot where you want the object to appear. To see an example of this process, look over the following steps.
STEPS: Creating an Inline Graphic
Place type within a frame. Either place a body of text from a file or type a few lines of text.
Cut a graphic from the document page. Use an object imported from Illustrator, use the Glyphs palette, select a character and convert the character to outlines, or draw an object in InDesign. Select the object, and choose Edit
Identify the insertion point in the text. Place the cursor at the point where you want to insert the inline graphic in the text frame. Use the Type tool, and wait for the blinking I-beam cursor to appear.
Paste the graphic. Choose Edit

OpenType fonts support more than 65,000 glyphs in a given font. Opening the Glyphs palette in Illustrator or InDesign displays examples of all the glyphs contained within a selected font.
InDesign allows you to create custom glyph sets where you can access frequently used characters in a single palette.
InDesign has numerous options for accessing special typographic characters and functions. These include symbols, punctuation, white space options, line breaks, automatic page numbering, tab settings, and more.
Inline graphics are inserted in text frames and scroll with the text as it is flowed through a frame or frame thread.