
IN THIS CHAPTER
Electronic documents are often created for one purpose and eventually modified to suit another purpose. You may initially create a design piece for print where images are optimized for high-resolution output and later want to modify the design piece for screen viewing, where imageresolution requirements are significantly less than for print. Taking a document designed for one purpose and modifying it for another purpose is known as document repurposing.
To prepare files for distribution electronically, via the Web, or on CD-ROM/ DVDs, you may need to resample files for image resolutions appropriate for viewing, set viewing attributes suited for on-screen viewing, and create search indexes for easy access to selected files. In this chapter, we discuss preparing files for a variety of output purposes and how to optimize files for viewing.
One of the more common needs for repurposing documents is taking a file originally designed for print and modifying it for downloading from a Web site. For high-resolution output, image files can be 300 ppi (pixels per inch) or more. For Web viewing and viewing documents on your computer monitor, you need file sizes of 72 ppi when viewing in a 100 percent view. Files with lower resolutions are smaller; when you are downloading documents from a Web server, smaller file sizes mean shorter download times.
Native files created in Illustrator, Photoshop and InDesign require much more work to modify documents originally designed for print to a file suited for Web hosting. Furthermore, you must convert files hosted on the Web to either PDF or HTML to make them easily accessible to other users.
Fortunately, if files are converted to PDF for any kind of output, you can easily repurpose a file for other types of output. There is one caveat in this notion: You can repurpose files for downward optimization only. In other words, you can take a document with high-resolution images designed for print and downsize the images to make it suitable for Web viewing, but you cannot upsize a Web-designed document and make it suitable for print.
The ideal file format for documents you want to repurpose is PDF. You can convert a page layout in InDesign to PDF while keeping all images at high resolution and send off the document to a commercial printer for high-end prepress and printing. You can then take the same PDF and downsample images (reduce the file sizes) for a piece to be hosted on a Web site or electronically exchanged with other users. When you're using PDFs for your output needs, you have several ways to repurpose files through Acrobat menus and commands.
Reduce File Size is a menu command found in the Document menu in both Acrobat Standard and Acrobat Professional. Choose Document
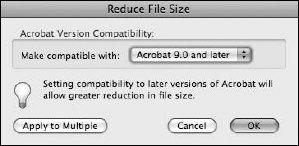
From the pull-down menu in the Reduce File Size dialog box, you have seven options for Acrobat PDF compatibility. The more recent the Acrobat compatibility, the more file-size reduction you can expect. Therefore, using Acrobat 8 or 9 compatibility reduces a PDF document size more than using either Acrobat 4 or Acrobat 5 compatibility.
The Reduce File Size command offers you a simple tool for reducing file size and offers no options choices for how much image sampling you can apply to the file-size reduction. If you're using Acrobat Standard, the Reduce File Size command is the only tool you have available in Acrobat to reduce file sizes. For Acrobat Pro and Pro Extended users you have another option using the PDF Optimizer. (See "Using PDF Optimizer," later in this chapter.)
After choosing Acrobat compatibility, click OK and the Save As dialog box opens. Find a folder location on your hard drive, supply a filename, and click Save. Acrobat uses an internal algorithm to downsample images and adds compression, thereby reducing file size.
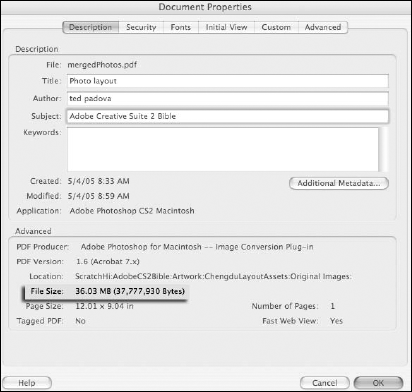
If you want to examine file size after exercising the command and saving a new file, choose File
A much more sophisticated approach to optimizing files and reducing their size is to use the PDF Optimizer, found only in Acrobat Pro and Pro Extended. The PDF Optimizer reduces file sizes through downsampling images according to user-specified amounts and a variety of other settings that offer options for eliminating unnecessary data. With the Reduce File Size command in the last section, you don't have user-definable settings to determine how file reduction affects data. With PDF Optimizer, you can choose different settings to determine what data is affected during optimization. The PDF Optimizer also offers you an option for analyzing a file so you can see what part of the PDF document occupies higher percentages of memory.
You analyze a document and use the PDF Optimizer (shown in Figure 31.3) by choosing Advanced

Click Audit space usage. Depending on the size and complexity of the document, the analysis can take a little time. When the analysis is complete, the Audit Space Usage dialog box appears, shown in Figure 31.4.
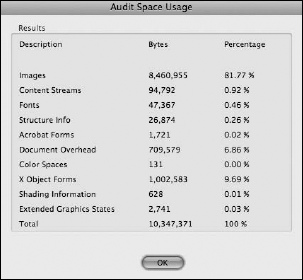
In the example shown in Figure 31.4, notice that over 80 percent of the document space is used for images. The analysis informs you that because images occupy such a large percentage of the space, you should be able to resample images at lower resolutions to reduce file size.
The file analyzed in Figure 31.4 was originally created for professional printing, and the images are all sampled at 300 ppi. To repurpose the document and reduce the file size for Web hosting, the images need to be resampled at 72 ppi. Using the PDF Optimizer, you can specify image-size reductions as well as perform cleanup of content that occupies space for unnecessary items like comments, bookmarks, destinations, or other items that add to overhead in the file.
Image settings
To reduce file size with the PDF Optimizer, use the first set of options that opens in the Images tab, as shown in Figure 31.3. You can make choices for downsampling color, grayscale, and bitmap images by typing values in the field boxes for the sampling amounts desired. In our example, we edited the field boxes for color and grayscale images and chose 72 ppi as the amount of downs-ampling. To the right of the downsampling amount, another field box is used to identify images that are downsampled. In this box, we added 100 ppi, which instructs Acrobat to look for any image above 100 ppi and downsample the file to the amount supplied in the first field box—in this example, to 72 ppi. Other options in the PDF Optimizer dialog box include the following:
Downsample pull-down menu: Offers choices for downsampling using JPEG or Zip compression. JPEG is a lossy compression scheme while Zip is lossless.
Compression: When JPEG is selected, different Quality options are available to control the amount of compression for the JPEG format.
Quality: Five options offer choices for image quality when using JPEG compression. Use Medium for repurposing files for Web hosting.
Monochrome images: Monochrome images are 1-bit line art images (black and white). Monochrome images are best sampled no lower than 300 ppi for better quality displays. Use Bicubic Downsampling to for the Downsample option and CCITT4 for the best quality.
Fonts settings
When you click the Fonts tab in the PDF Optimizer, only fonts available for unembedding are listed. On the left side of the dialog box, fonts are listed that can be unembedded. If no fonts appear in the list, you can move on to the next tab. If fonts are listed in the left window, select the fonts to unembed and click the Move button adjacent to the right chevron.
On the right side of the dialog box are fonts listed for unembedding. If you want to keep the font embedded, select it in the right window and click the Move button adjacent to left chevron. To select multiple fonts in either window, Shift-click to select a list in a contiguous group, or
Transparency settings
You can flatten transparency and save the file with the flattening adjustments made in this pane. This item is more applicable for files going to print rather than repurposing for Web hosting.
Note
For more information on transparency flattening, see Chapter 36.
Discard Objects settings
Items such as JavaScript, embedded thumbnails, hidden layers, and so on, are contained in this pane. Be careful to not select items that may render the PDF document nonfunctional. If there are JavaScript that execute actions, be certain to preserve the fields and scripts.
Discard User Data
Items such as comments, metadata, file attachments, hidden layers, and so on are discarded when you check the respective check boxes.
Clean Up settings
Click the Clean Up tab and you find a list of items checked by default that you can safely use without affecting the functionality of your document. You can enable all other items that appear unchecked, but you should have an idea of what will happen to the PDF, in terms of functionality, if you optimize the file with any additional items checked. If you check one or more of the items and return to the PDF Optimizer, the new checked items in the Clean Up section of the PDF Optimizer or any other pane become a new set of default settings. To restore the PDF Optimizer to original defaults, click Settings pull-down menu and change from Custom shown in Figure 31.5 to Standard.
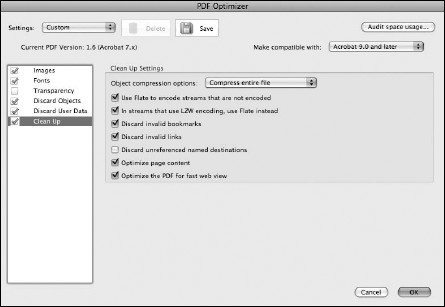
After you make your preferred settings in the PDF Optimizer, click OK and wait for the processing to finish. As a comparison between using Reduce File Size and the PDF Optimizer, using the same file with an original file size of 3.06MB, we reduced the file size with the Reduce File Size command and produced a PDF that was resampled to 454KB. The same file processed with PDF Optimizer was reduced to 285KB. The increased file reduction from PDF Optimizer was due to eliminating some document overhead and structural information.
Notice the Save button in the PDF Optimizer. Click this button and all settings you make to change the Standard options to a new Custom set can be saved. After saving the settings, the new set appears in the Settings pull-down menu. This option is particularly helpful when adjusting transparency and preparing files for print.
When users acquire your PDF documents from media disks, from Web downloads, from network servers, or from documents you send via e-mail, one double-click on the file opens the PDF in a user's default Acrobat viewer. The initial view of the PDF in the Document pane is the opening view. Depending on which user preferences are set up on a given computer, the initial view conforms to the preference settings, unless you specifically assign open view preferences and save them within a document.
To understand document viewing preferences, choose Acrobat

The preferences choices made here affect all PDF documents that you open in Acrobat on your computer where no initial view has been saved inside a PDF file. For example, you can view a PDF document at a 100% view as long as Default was selected for the initial view when the file was last saved. Typically, all PDF documents exported from the CS applications save PDFs with default selections unless you specifically assign an initial view when creating the PDF.
If you distribute a collection of PDF documents and use interactive buttons to open and close files for users to browse different documents, you may want to embed initial views in all your PDF documents. Because the Default view depends on settings assigned by each user, your files could conceivably be shown at different sizes depending on how a given user sets the Page Display preferences.
You can keep the viewing of your files consistent by embedding initial views in files. To set a view and save that opening view as part of the PDF, choose File
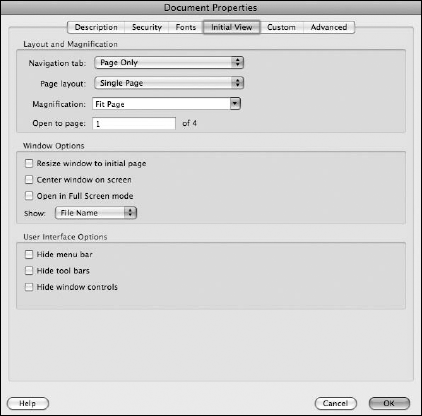
In this dialog box, you make choices for the opening view and viewing magnification. When no settings have been saved with a file, the individual user preferences prevail. Acrobat provides you with many different choices for controlling the initial view of a PDF when opened in any Acrobat viewer. Settings you make here can be saved with your document. When you establish settings other than defaults, the settings saved with the file override the end user's default settings. The options available to you for controlling the initial view include the following:
Layout and Magnification: The default opening page is the first page of a PDF document. You can change the opening page to another page, and you can control the page-layout views and magnification by selecting choices from the Document Options section. The choices include:
Navigation tab: Five choices are available from the pull-down menu. Select Page Only to open the page with the Navigation Pane collapsed. Use Bookmarks Panel and Page to open the Bookmarks tab when the file opens. Use Pages Panel and Page to open the Pages tab where the thumbnails of pages are viewed. Use Attachments panel and Page to show file attachments in the Attachments pane. Use Layers Panel and Page to open the Layers tab when the file opens.
Page Layout: The default for Page Layout is noted in the pull-down menu as Default. When you save a PDF file with the Default selection, the PDF opens according to the default setting a user has set for page viewing on the user's computer. To override the user's default, you can set a page layout in the opening view from one of seven choices. Choose Single Page to open the PDF in a single-page layout. Choose Single Page Continuous to open in a single page continuous page view. Choose Two-Up Facing to open with facing pages, Two-Up Continuous for facing pages in a continuous view, Two-Up (Cover) to show facing pages with a cover page, or use Two-Up Continuous (Cover Page) to open with a cover page and continuous facing pages.
Magnification: Choose from preset magnification views from the pull-down menu. If you want the PDF document to open in a fit-in-window view, select Fit Page. Choose from other magnification options in the pull-down menu or edit the field box for a custom zoom level.
Open to page: You can change the opening page to another page by entering a number in the field for Page Number. You might use this setting if you wanted a user to see a contents page instead of a title page. If Last-viewed page is selected you need to open the Startup preferences and change the "Reopen Documents to Last Viewed Page" option. Select Digital Editions only from the menu choices and you can select a page to open in the Document Properties. If you select the All Files option in the Startup Preferences, options for opening to specific pages is grayed out.
Window Options: The default window for Acrobat is a full screen where the viewing area is maximized to occupy your monitor surface area. You can change the window view to size down the window to the initial page size, center a smaller window on-screen, and open a file in Full Screen mode. If you enable all three check boxes, the Full Screen mode prevails.
Show: From the pull-down menu choose either File Name or Document Title. If File Name is selected, the title bar at the top of the Acrobat window shows the filename. If Document Title is used, the information you supply in the Document Properties dialog box for Document Title is shown in the title bar.
User Interface Options: The Interface Options in the Initial View Document Properties dialog box have to do with user-interface items in Acrobat viewers such as menu bars, toolbars, and scrollbars. You can elect to hide these items when the PDF document opens in any Acrobat viewer; however, in Acrobat 9 only two of the three check boxes can be enabled at one time. You can hide any one or a combination of the three items listed under the User Interface Options as long as you don't choose all three options. When the Hide menu bar and Hide tool bars options are chosen, the PDF is viewed as shown in Figure 31.8. If you elect to save files without the menu bar and toolbars in view, it's a good idea to create navigational buttons so users can move around in your document.

At the user level, individual users can hide the Navigation pane by opening a context menu in the pane and choosing Hide Navigation Panel Buttons. As a PDF author, however, you cannot force this view when the window controls for the menu bar and the toolbars are hidden. In Figure 31.9, the Navigation pane is in view on the left and hidden on the right.
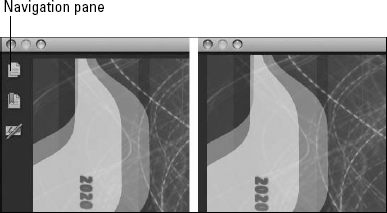
Figure 31.9. From a context menu, choose Hide Navigation Panel Buttons and the Navigation pane is hidden (right).
Warning
If you elect to eliminate the toolbars and menu bar from view and later want to go back and edit your file, you need to use shortcut keys to get the menu bars and toolbars back. Be certain to remember the F8 and F9 keys (Windows) —F8 shows/hides the toolbars and F9 shows/hides the menu bar. On the Mac, F8 shows/hides the toolbars and Shift+
When you decide which view attributes you want assigned to your document, you can choose between one of two save options. The first option updates the file. Click the Save tool in the Acrobat File toolbar or choose File
The second method for updating your file uses the Save As command. When you choose File
Regardless of whether you create PDF documents for clients for wide distribution or you use PDF documents to catalog your own files in your studio, searching through archives is a task you frequently repeat. Acrobat 9 does offer you the capability of searching collections of PDFs on CD/ DVDs, on network servers, and on local hard drives without the use of a search-index file. However, the internal search capabilities in Acrobat 9 are slower and more limiting compared to searching an index. As a matter of common practice, you'll want to create a search-index file when archiving or distributing large quantities of documents.
To search an index file, you must have one present on your computer, network server, or some media-storage device. Index files are files containing all the words among PDF documents that were catalogued with Catalog. You create index files by launching Catalog from within Acrobat. Note that in earlier versions of Acrobat, Catalog was a separate executable program. In Acrobat 6 through 9, Catalog is a plug-in and requires you to first launch Acrobat before you can access Catalog.
Note
Catalog is available only in Acrobat Pro and Pro Extended. All Acrobat viewers, including Adobe Reader, can use search indexes. A search index is not usable in Acrobat when hosted on Web sites.
To launch Catalog from within Acrobat Professional, choose Advanced
After your files are saved in final form, it's time to create the search index. Choose Advanced
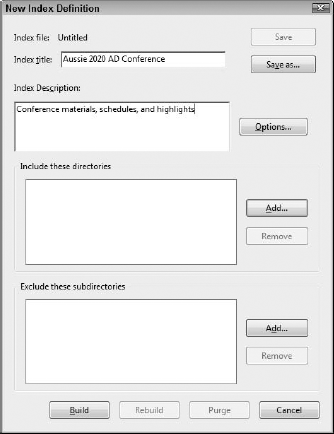
The New Index Definition dialog box, shown in Figure 31.11, opens where you set specific attributes for your index and determine what folder(s) are to be indexed.
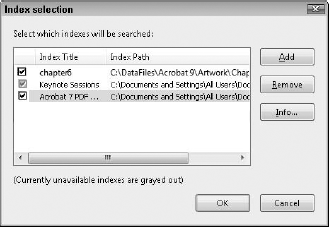
Index title: The title that you place in this field is a title for the index, but not necessarily the name of the file you ultimately save. The name you enter here does not need to conform to any naming conventions because in most cases it won't be the saved filename. When you open an index file, you search your hard drive, server, or external media for a filename that ends with a PDX extension. When you visit the Search Pane and select the menu option for Select Index, the Index Selection dialog box opens, as shown in Figure 31.12. The Index Selection dialog box lists indexes by their Index Title names. These names are derived from what you type in the Index Title field in Catalog.

Note
When you get ready to build a file, Acrobat prompts you for the index filename. By default, the text you type in the Index Title field is listed in the File Name field in the Save Index File dialog box. This dialog box opens when you click the Build button in the Catalog dialog box (see the section "Building the index," later in this chapter). In most cases where you supply a name as a description in the Index Title, you'll want to change the filename to a name consistent with standard DOS conventions (that is, an eight-character maximum with a three-character maximum extension). Make this change when you're prompted to save the file.
Index description: You can supply as many as 256 characters in the Index Description field. Descriptive names and keywords should be provided so that the end user knows what each index contains. Index descriptions should be thought of as adding more information to the items mentioned earlier in this chapter regarding document descriptions. Index descriptions can help users find the index file that addresses their needs.
When an index is loaded, the index title appears in the Select Indexes dialog box. To get more information about an index file, click Info (refer to Figure 31.12). The Index Information dialog box opens, as shown in Figure 31.13. The Index Information dialog box shows you the title from the Index Title field and the description added in Catalog in the Index Description field.
Include these directories: If you add nothing in this field, Catalog won't build an index because it won't know where to look for the PDF files to be included in the index. Adding the directory path(s) is essential before you begin to build the index. Notice the first Add button on the right side of the dialog box in Figure 31.14. After you click Add, a navigation dialog box opens, enabling you to identify the directory where the PDFs to be indexed are located. Many directories can be added to the Include These Directories list. These directories can be in different locations on your hard drive. When you select a given directory, all subfolders are also indexed for all directory locations unless you choose to exclude certain folders. When the directories have been identified, the directory path and folder name appear in the Include These Directories field.
Exclude these subdirectories: If you have files in a subdirectory within the directory you're indexing and want to exclude the subdirectory, you can do so in the Exclude These Subdirectories field. The folder names and directory paths of excluded directories appear in the Exclude These Subdirectories field (refer to Figure 31.11).
Remove: If you decide to remove a directory from either the Include These Directories or Exclude These Subdirectories lists, select an item in the list and click Remove. You can add or delete directories in either list prior to building an index or when modifying an index.

Two buttons appear at the top-right corner of the Catalog dialog box for saving a definition. If you begin to develop an index file and supply the index title and a description and want to come back to Catalog later, you can save what you type in the Index Definition dialog box using the Save As button. The Save button does not appear active until you've saved a file with the Save As option or you're working on a file that has been built. Saving the file only saves the definition for the index. It doesn't create an index file. The Save As option enables you to prepare files for indexing and interrupt your session if you need to return later. For example, suppose you add an index title and you write an index description. If you need to quit Acrobat at this point, click Save As and save the definition to disk. You can then return later and resume creating the index by adding the directories and building the index.
After you've saved a file, you can update the file with the Save button. After a definition is saved, when you return to Catalog, you can click Open in the Catalog dialog box and resume editing the definition file. When all the options for your search index have been determined, you click Build to actually create the index file.
Using Save As or Save is not required to create an index file. If you set all your attributes for the index and click Build, Catalog prompts you in the Save Index File dialog box to supply a name for the index and save the definition. Essentially, Catalog is invoking the Save As command for you.
If, at any time, you click Cancel in the lower-right corner of the Index Definition dialog box, all edits are lost for the current session. If you add definition items without saving, you'll need to start over when you open the Index Definition dialog box again. If you start to work on a saved file and click Cancel without saving new edits, your file reverts to the previously saved version.
To the right of the Index Description field in the New Index Definition dialog box (refer to Figure 31.11) is a button labeled Options. Click this button and the Options dialog box appears, allowing you to choose from a number of different attributes for your index file, as shown in Figure 31.14. Some of these options are similar to Preference settings for Catalog made in the Preferences dialog box. Any edits you make here supersede preference settings. The options in this box include the following:
Note
For information on setting catalog preferences, see the section "Setting preferences."
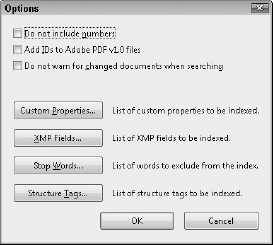
Do not include numbers: By selecting this option, you can reduce the file size, especially if data containing many numbers is part of the PDF file(s) to be indexed. Keep in mind, though, that if numbers are excluded, Search won't find numeric values.
Add IDs to Acrobat 1.0 PDF files: Because Acrobat is now in version 9.0, it may be rare to find old PDF 1.0 files that you need to updated with IDs for Acrobat 1.0 files. If you do have legacy files saved as PDF 1.0 format, it's best to batch-process the older PDFs by saving them out of Acrobat 6.0. As software changes, many previous formats may not be supported with recent updates. To avoid this, update older documents to newer file formats.
If you have legacy files that haven't been updated and you want to include them in your search index, check the box. If you're not certain whether the PDFs were created with Acrobat 1.0 compatibility, check it anyway just to be safe.
Do not warn for changed documents when searching: If you create an index file, then return to the index in Catalog and perform some maintenance functions, save the index, and start searching the index, Acrobat notifies you in a dialog box that changes have been made and asks whether you want to proceed. To sidestep the opening of the warning dialog box, check the Do not warn for changed documents when searching option.
Custom Properties: This button opens a dialog box, shown in Figure 31.15, which helps you customize Acrobat with the Acrobat Software Development Kit (SDK). This item is intended for programmers who want to add special features to Acrobat. To add a Custom Property to be indexed, you should have knowledge in programming and the PDF format.
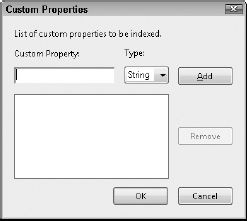
You add Custom Properties to the field box and select the type of property from the pulldown menu. You type the property values in the field box, identify the type, and click Add. The property is then listed in the window below the Custom Property field box. The types available from the pull-down menu include:
String: This is any text string. If numbers are included with this option, they are treated as text.
Integer: The integer field can accept values between 0 and 65,535.
Date: This is a date value.
Support for programmers writing extensions, plug-ins, and working with the SDK is provided by Adobe Systems. For developers who want to use the support program, you need to become a member of the Adobe Solutions Network (ASN) Developer Program. For more information about ASN and SDK, log on to the Adobe Web site at http://adobe.com/go/acrobat_developer.
XMP Fields: Click XMP Fields and another dialog box opens where you add to a list of XMP fields. The dialog box is virtually identical to the Stop Words dialog box shown in Figure 31.16. Type a name in the field box and click Add. All new XMP fields are added to the list window.
Stop Words: To optimize an index file that produces faster search results, you can add stop words. You may have words, such as the, a, an, of, and so on that you would typically not use in a search. You can exclude such words by typing the word in the Word field box and clicking Add in the Stop Words dialog box. Click Stop Words in the Options dialog box to open the Stop Words dialog box (Figure 31.16). To eliminate a word after it has been added, select the word and click Remove. Keep in mind that every time you add a word, you're actually adding it to a list of words to be excluded.
Tip
You can create an elaborate list of stop words and may want to apply the list to several index files, but Acrobat (as of this writing) does not include an ability to import or swap a list of words to be excluded from an index file. For a workaround, you can open any existing Index Definition field and change all attributes except the stop words. Add a new index title, a new index description, and select a new directory for indexing. Save the definition to a new filename and click the Build button. A new index is built using stop words created in another index. In workgroups, you can save an index definition file (using Save As and renaming the file) without adding directories and use it as a template so all index files have consistent settings for the stop words.
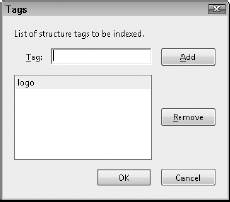
Structure Tags: If you have a Tagged PDF, you can search document tags when the tags are included in the search index. Click Tags in the Options dialog box to open the Tags dialog box, as shown in Figure 31.17. Tagged PDFs with a tagged root and elements can have any item in the tagged logical tree marked for searching. To observe the tags in a PDF file, open the Tags palette and expand the tree. All the tags nest like a bookmark list. To mark tags for searching, type the tag name in the Tags dialog box and click Add. You remove tags from the list window by selecting a tag and clicking Remove.

After you set all the attributes for the index definition, you're ready to create the index file. Clicking the Build button in the New Index Definition dialog box (refer to Figure 31.11) creates indexes. When you click this button, Catalog opens the Save Index File dialog box, where you supply a filename and target a destination on your hard drive. The default file extension is PDX. Don't modify the file extension name. Acrobat recognizes these files when loading search indexes.
The location where you instruct Catalog to save your index file can be any location on your hard drive regardless of where the files being indexed reside. You can save the index file inside or outside the folder that Catalog created during the indexing. Therefore, you have an index file and a folder containing index resources. The relationship between the index file and resource folder locations is critical to the usability of the index. If you move the index file to a different location without moving the supporting folder, the index is rendered unusable. To avoid problems, create a folder either when you're in the Save Index File dialog box or before you open Catalog and save your index file to your new folder. Make the name descriptive and keep the index file together in this folder. When you want to move the index to another directory, to another computer, or to an external media cartridge or CD/DVD-ROM, copy the folder containing the index and supporting files.
Click Save in the Save Index File dialog box and Catalog closes the Index Definition dialog box, returns you to the Catalog dialog box, and begins to process all the files in the target folder(s). Depending on how many files are indexed, the time to complete the build may be considerable. Don't interrupt the processing if you want to complete the index generation. When Catalog finishes, the progress bar stops and the last line of text in the Catalog dialog box reads "Index build successful." If the build is not successful, you can scroll the window in the Catalog dialog box and view errors reported in the list.
If you want to interrupt a build, you can click the Stop button while a build is in progress. When building an index, Catalog opens a file where all the words and markers to the PDF pages are written. When you click the Stop button, Catalog saves the open file to disk and closes it with the indexed items up to the point you stopped the build. Therefore, the index is usable after stopping a build and you can search for words in the partial index. When you want to resume, you can open the file in Catalog and click Rebuild in Catalog.
When files are deleted from indexed folders and new files are added to the indexed folders, you'll want to maintain the index file and update to reflect any changes. You can open an index file and click Build for a quick update. New files are scanned and added to the index, but the deleted files are marked for deletion without actually deleting the data. To delete data no longer valid, you need to use the Purge button. Purging can take a considerable amount of time even on small index files. Therefore, your routine maintenance might be to consistently build a file and only periodically purge data.
In all earlier versions of Acrobat, you could not create index files from secure PDFs encrypted with either Acrobat Standard Security or Acrobat Self-Sign Security. In versions 8.0 and 9.0 of Acrobat, you have complete access to secure files with Catalog. Any form of encrypted file using the Acrobat-supported security features can be included in your index files. Creating an index does not compromise your security and won't affect the permissions you set forth when the files were saved.
If you have legacy files that have been secured, you can index them like other files saved in earlier PDF format compatibilities. You can only use these files, or any other files you create with Acrobat Professional, with Acrobat viewers 6.0 and later.
Note
For more information on encryption and security, see Chapter 25.
Rebuilding index files completely re-creates a new index. You can open an Acrobat 6.0–compatible index file and click Rebuild. The file rewrites the file you opened much like you would use a Save As menu command to rewrite a PDF document. If a substantial number of PDF documents have been deleted and new files added to the indexed folders, rebuilding the index could take less time than purging data.
As indexes are maintained and rebuilt, you'll need to perform periodic maintenance and purge old data. A purge does not delete the index file, nor does it completely rewrite the file; it simply recovers the space used in the index for outdated information. Purging is particularly useful when you remove PDF files from a folder and the search items are no longer needed. If you've built a file several times, each build marks words for deletion. A purge eliminates the marked data and reduces the file size. With a significant number of words marked for deletion, a purge improves a search's speed. This operation might be scheduled routinely in environments where many changes occur within the indexed folders.
Tip
When changing options for eliminating words and numbers from indexes or adding tags and custom properties in the Options dialog box, first open the index.pdx file in Catalog and purge the data. Set your new criteria in the Options dialog box and rebuild the index. Any items purged will now be eliminated from the index.
Preference settings are contained in the Preferences dialog box. Choose Edit

Indexing: The four options found in the Indexing section of the Catalog preferences include:
Allow indexing on separate drives: When creating index files where you want to include folders on network servers and/or computers on your network, select this item. The indexing option only includes indexing files on local drives. Unfortunately, you can't index files on Web servers and use indexes from within Web browsers.
Force ISO 9660 compatibility on folders: This setting tells Catalog to look for any folders that aren't compliant with standard DOS conventions (eight-character maximum with three-character-maximum extensions) for folder/directory names. If Catalog encounters an unacceptable folder name, it stops the process and reports an error in the Catalog dialog box. Folder names and directory paths are listed for all incompatible names. You can review the list and manually rename folders. After changing folder names, try to create the index again.
Enable logging: A log file, created during an index build, describes the processing for each indexed file. You can open the file, which is ASCII text, in any text editor or word processor. Any errors are noted in the log file, along with all documents and directory paths. If you don't want to generate a log file at the time of indexing, deselect the check box, but realize that you're prevented from analyzing problems.
Allow Catalog batch files (.bpdf) files to be run: Permits you to run catalog files in a batch sequence.
Index Defaults: These options are identical to the options you have available in the New Index Definition Options dialog box (refer to Figure 31.14). These default/options settings exist in two locations for different reasons:
When you set the options in the Preferences dialog box, the options are used for all index files you create. When you elect to use the options from the New Index Selection Options dialog box, the settings are specific to the index file you create. When you create a new index file, the options return to defaults.
If you set a preference in the Catalog Preferences and disable the option in the New Index Selection Options dialog box, the latter supersedes the former. That is to say, the New Index Selection Options dialog box settings always prevail.
As stated earlier, the main reason you create index files is for speed. When you search hundreds or thousands of pages, the amount of time to return found instances for searched words is a matter of seconds compared to using the Search tool in the Search pane.
To search using an index file, you need to first load the index in the Search pane. Click the Search tool or press
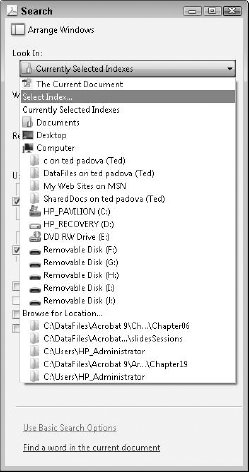
The Index Selection dialog box opens after making the menu selection. Click the Add button and the Index Selection dialog box opens, as shown in Figure 31.20. In this dialog box, navigate your hard drive to find the folder where your index file is located. Click the index filename, and click Open.
After selecting the index to load, you're returned to the Index Selection dialog box. A list of all loaded indexes appears in the dialog box. To the left of each filename is a check box. When a check mark is in view, the index file is active and can be searched. Disabled check boxes have the index file loaded, but the file remains inactive. Search will not return results from the inactive index files. If an index file is grayed out (refer to Figure 31.20), the file path has been disrupted and Acrobat can't find the index file or the support files associated with the index. If you see a filename grayed out, select the file in the list and click Remove. Click Add and relocate the index. If the support files aren't found, an error is reported in a dialog box, indicating the index file could not be opened.
If you can't open a file, you need to return to the Catalog dialog box by choosing Advanced

Note
If you load an index file from a CD-ROM and the CD is not inserted in your CD-ROM drive, the index-file name is grayed out in the Index Selection dialog box. After inserting the CD-ROM containing the index, the index-file name becomes active. If you know index files are loaded from CDs, don't delete them from the Index Selection dialog box. Doing so requires you to reload the index file each time you insert a CD.
If you want to eliminate an index from searches, you can deactivate the index by disabling its check box. In a later Acrobat session, you can go back and enable indexes listed in the Index Selection dialog box (open the Search pane as described in the previous section and choose Select Index from the Look In pull-down menu to open the Index Selection dialog box). You should always use this method rather than deleting an index if you intend to use it again in a later Acrobat session. However, at times, you may want to delete an index file. If you no longer intend to use the index, or you relocate your index to another drive or server, you may want to completely remove the old index. If this is the case, select the index file you want to delete and click Remove. You can enable or disable indexes before you click Remove. In either case, the index file is removed without warning.
If you inadvertently delete an index, you can always reload the index by clicking Add. Placing index files in a directory where you can easily access them is a good idea. To avoid confusion, try to keep indexes in a common directory or a directory together with the indexed PDF files. Acrobat doesn't care where the index file is located on your hard drive or server—it just needs to know where the file is located and the file needs to keep the relative path with the support files. If you move the index file to a different directory, be certain to reestablish the connection in the Index Selection dialog box.
When a number of index files are installed on a computer or server, the names for the files may not be descriptive enough to determine which index you want to search. If more-detailed information is desired, the information provided by the Index Information dialog box may help identify the index needed for a given search. To open the Index selection dialog box click Select Index in the Look In pull-down menu. Click Info in the Index selection dialog box to display the index information.
Note
Index information may be particularly helpful in office environments where several people in different departments create PDFs and indexes are all placed on a common server. What may be intuitive to the author of an index file in terms of index name may not be as intuitive to other users. Index information offers the capability of adding more-descriptive information that can be understood by many users.
Fortunately, you can explore more-descriptive information about an index file by clicking Info in the Index Selection dialog box. When you click Info, the Index Information dialog box opens, displaying information about the index file, as shown in Figure 31.21. Some of the information displayed requires user entry at the time the index is built. Catalog automatically creates other information in the dialog box when the index is built. The Index information dialog box provides a description of the following:
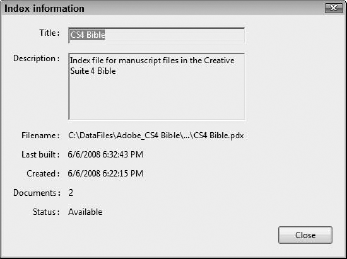
Title: The user supplies title information at the time the index is created. Titles usually consist of several words describing the index contents. Titles can be searched so the title keywords should reflect the index content.
Description: Description can be a few words or several sentences containing information about the index. (In Figure 31.23, the description was supplied in Catalog when the index was created.)
Filename: The directory path for the index file's location on a drive or server displays with the last item appearing as the index filename.
Last built: If the index file is updated, the date of the last build is supplied here. If no updates have occurred, the date is the same as the date of creation.
Created: This date reflects the time and date the index file was originally created and is, therefore, a fixed date.
Documents: Indexes are created from one or more PDF documents. The total number of PDF files from which the index file was created appears here.
Status: If the index file has been identified and added to the list in the Index Selection dialog box, it will be Available. Unavailable indexes appear grayed out in the list and are described as Unavailable.
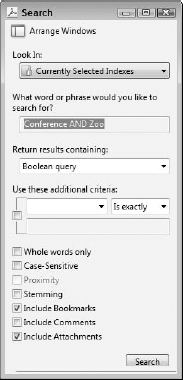
After your index file is prepared and loaded in the Index Selection dialog box, it's ready for use. You search index files in the Advanced Search pane. From the Look In pull-down menu, select Currently Selected Indexes.
All the options discussed earlier for advanced searches are available to you. Select from the Return Results Containing pull-down menu, enter your search criteria, and select the options you want. Click Search and you'll find the search results reported much faster than using other search methods.
Index files can be created from PDF collections contained on external media where the index file can remain on your computer without the need for copying the PDF documents to your hard drive. When you insert a media disc like a CD-ROM, your search index is ready to use to search the media. To understand a little more about creating search indexes and using them with external media, follow these steps.
STEPS: Creating Index Files from Media Storage
Set preferences. Choose Edit

Open Catalog. Choose Advanced
Open the New Index Definition dialog box. Click New Index in the Catalog dialog box and the New Index Definition dialog box opens in the foreground.
Add an Index title. Click in the first field box, and type a title for your index file. The example in Figure 31.22 uses "Aussie 2020 AD Conference" for the title.
Add an Index Description. Type a description for the index. You can use any text you want to help remind you later what this index file is used for. An example description appears in Figure 31.22.
Change Options. Click Options to open the Options dialog box where you can make options choices. Check Do Not Warn for Changed Documents When Searching. Click OK.
Add a folder to the Include These Directories list. Click the first Add button adjacent to the list for Include These Directories. The Browse for Folder dialog box opens. If you have a folder you want to catalog, select the folder in the Browse for Folder dialog box. If you have a CD where your files are stored, click the CD drive where the CD containing the files is located. Click OK in the Browse for Folder dialog box.
Build the index. Click the Build button in the Catalog dialog box. Acrobat prompts you with the Save Index File dialog box for the location to save your index file. Select the location on your hard drive where you want to save your file. Type a name in the File Name field. Use a short name for the file. The extension defaults to PDX. Leave the default extension and click Save.
Acrobat Professional reads all the files on the CD-ROM and writes the Index file. Let your computer continue writing the index until it finishes the build.
Examine the build results. When Acrobat completes the build, the Catalog dialog box reports the results of the build. The last line in the results list reports the index build as successful.
Quit Catalog. Click Close to quit Catalog.
Load the index file. Click the Search button in the Acrobat File toolbar or press

Review the index information. Select the index file in the Index Selection dialog box. Click Info to open the Index Information dialog box. Review the contents and notice the description appears as you added it in the Index Description dialog box. Click Close to return to the Index Selection dialog box. Click OK in the Index Selection dialog box to return to the Acrobat Document pane.
Search the new index file. The index file is loaded and active. Be certain the menu option for Currently Selected Indexes is active in the Look In pull-down menu. Enter Search word AND second search word in the first field box. We used Conference AND Zoo in our example. Select Boolean Query from the Return Results Containing pull-down menu. Click Include Bookmarks and Include Attachments at the bottom of the Search pane, as shown in Figure 31.23.
Invoke the Search. Click Search at the bottom of the Search pane. The results are reported in the list within the Search pane. Click any text highlighted in blue to open the file and page where the results are found.
Practice searching your new index file using different options and search criteria. To compare the difference between using a search index file and using the advanced search options, you can choose the Browse for Location menu item and search the CD-ROM for the same criteria. Go back and forth to see the differences between searching folders and searching an index file. It should be obvious that when using an index file your search results are reported much faster.
A computer network server, another computer on your network, a CD-ROM, a DVD-ROM, an external hard drive, or a removable media cartridge is considered external to your local computer hard drive(s). Any of these devices can be indexed and the index file can be located on any of the devices you index. If you want to save an index file on a device different from where the PDF collection is stored, be certain to open the Preferences dialog box for the Catalog Preferences and enable the check box for Allow Indexing on Separate Drives. This preference setting enables you to index across media devices.
Note
When you want to write index files to read only media such as CD-ROMs and DVDs, you need to create the index file from PDFs stored on your hard drive. After the index file is created, copy the index file, the supporting files, and the PDFs to your media and burn the disk.
When you want to search an index, you can activate the index in the Index Selection dialog box and invoke a search, whether your external media is mounted and accessible or not. The search index returns results from the index PDX file and the IDX files without looking at the PDFs that were indexed. You can examine the results of the search in the Search pane and find the files where the search criteria match the PDF documents in the index collection.
If you want to open the link to the PDF document where a result is reported, you need to have the media mounted and accessible. If a network server or other computer contains the related files, the server/computer must be shared with appropriate permissions and visible on your desktop. If you use external media-storage devices, the media must be mounted and visible on your desktop in order to view the PDFs linked to the search results. If you attempt to view a document when the device is not mounted, Acrobat opens an error dialog box.
If you see an error dialog box, click OK in the dialog box and insert your media, connect an external hard drive, or access a computer or network server. Wait until the media is mounted, and click a search result. Acrobat opens the linked page and you're ready to continue your search.
A search-index file created on one computer can be moved or copied to another computer. To copy an index file to another computer, be certain you copy the index file (PDX) and all supporting files in the folder created by Catalog.
You can load the index file and external media on another computer and perform the same searches as were performed where the index file was created. When you're distributing CD-ROMs and DVDs, you can copy these index files to your media and all users can access the index files. If you access an index file on a network server and the PDF collection is stored on an external device such as a CD-ROM, you cannot open files from another computer unless the CD-ROM is mounted. You may see your network server, but the associated devices with the server need to be individually mounted in order to open PDF files remotely.
If you work with large files, where only one file or a few files are copied to a CD or hosted on a network server, having an index file embedded in a PDF file is more practical. Acrobat 8 Professional and Acrobat 9 Pro offer you an option for creating and embedding index files using one simple menu command.
Open a file that you want to use with an embedded index, and choose Advanced
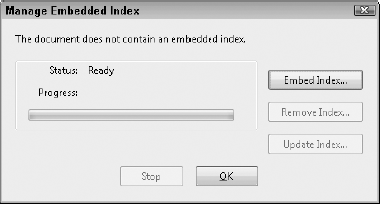
Figure 31.24. Choose Advanced
If the Embed Index button is not grayed out, click the button and Acrobat completely automates creating and embedding an index. The file is saved with the embedded index, and when you copy the file to a CD or another computer, any user with an Acrobat viewer can search using the embedded index file. No special search options need to be selected when searching an embedded index. Just open the Search pane and click the radio button for In the Current Document. Acrobat automatically uses the embedded index.
You can reduce file sizes with the Reduce File Size menu command.
You use the PDF Optimizer, available with Acrobat Professional, to reduce file sizes and eliminate unnecessary data in PDF files. PDF Optimizer can often reduce file sizes more than when using the Reduce File Size command.
Selecting options in the Clean Up tab in the PDF Optimizer other than the default options can interfere with the PDF functionality.
Users determine initial views when setting preferences for all files saved with default views. When you save initial views in PDF files, they override user preferences.
Search index files are created in Catalog. Searching index files returns results much faster than Acrobat built-in search tools.
You can search document descriptions with advanced searches and via index file searches.
Index files can be built, rebuilt, and purged with Catalog. Old index files created with PDF formats earlier than version 6.0 need to be rebuilt with Catalog.
Tags and XML data can be searched with advanced searches and from index searches.
You can copy index files to other computers, network servers, and external media-storage units.
Index files can be embedded in PDFs using Acrobat 9 Pro and Pro Extended.