
Understanding workflow concepts
Setting up workflows for independent designers
Creating workflows for workgroups
Repurposing files
Setting up your workflow
The Adobe Creative Suite is built around the concept of facilitating design production in workflow environments. Designers and production artists create workflows either as independent workers or as participants in workflow groups. A workflow helps you perform your work quickly and intelligently, often by streamlining redundant tasks. Workflows are designed to dramatically reduce the time you need to perform your work and reduce the time required to train new workers.
This chapter covers the initial development of production workflows as they relate to using the Adobe Creative Suite 5 Design Premium edition. With all the tools at hand, you'll gain an understanding of how to use the CS5 applications in workflows and how to save time producing artwork.
Workflows as they pertain to the Adobe Creative Suite can be divided into several groups based on the individual or team doing the work. Another way to think of workflows is in terms of the final output. So you could have a workflow that defines a set of tasks for a digital artist, or you could have a workflow to produce a magazine ad for print.
As a graphic designer, you may be primarily concerned with production workflows where artwork creations originate in programs like Adobe Illustrator CS5 and Adobe Photoshop CS5. Document assembly may be performed in Adobe InDesign CS5, and from InDesign CS5 you may export files to Adobe PDF or to Adobe Dreamweaver. This is a simple workflow that tells management exactly which tools are needed by this individual.
You also may be concerned with a color-management workflow to ensure the color is consistent among all the applications you use to produce your artwork. This workflow might be a subset of your production workflow. The color-management workflow might extend beyond your office and continue to the print shop or service center. In this regard, you need to work together with service technicians working outside your environment.
Note
For information related to creating color-management workflows, see Chapter 5.
Yet another type of workflow is used to determine what is being produced. For example, consider creating a workflow for preparing a document for print. This workflow actually extends beyond a single individual or team and affects your final results when you prepare documents for print, but it also includes the production center printing your jobs. Printers and service bureaus develop workflows to run their production lines from digital file to final output. The bridge between you and the service center might include color management and file preparation to meet the standards set forth by your vendors. If you design files for print, you need to understand that the production center is part of your workflow and there is a great benefit to working together with your vendors to ensure your workflow is efficient and your product is delivered on time.
Understanding that a print workflow includes an external group becomes important as you begin to establish a workflow because you need to understand and adhere to the printing facility's workflow. You also need to include a way to verify the print run before proceeding with a large print run. This typically includes sending samples back to the client.
Note
For more information on prepress and printing, see Chapter 36.
If you design files for Web hosting, you can include your Internet Service Provider (ISP) or your client's ISP in your workflow if your designs end up hosted on a site other than your own ISP. Working with ISP vendors is as important as working with print vendors. It is, therefore, equally important for you to include professionals at an ISP in your workflow.
Note
For more information on Web hosting and creating Web pages, see Chapter 24.
Regardless of whether you design files for print or for the Web, realize that you have two kinds of workflows with which you'll continually interact. Your internal workflow where you produce your artwork is something over which you have complete control. The workflows that extend to your print shop or ISP are something over which you don't have complete control, so you need to negotiate standards with the vendors to develop consistent reliable output.
In this chapter, we look at workflows you create in your office for design production and understanding workflow concepts as they apply to the Adobe Creative Suite. In several later chapters in this book, we address how to set up the CS5 programs to suit your production workflow.
If you're an independent designer working in a one-person shop, you have some advantages in that you can customize and work with the Creative Suite applications as you see fit. You don't need to concern yourself with setting up your environment to suit the needs of multiple users. The advantage is having it all your way; the disadvantage is you have to do everything yourself—acting as the creative director, artist, image editor, layout artist, Web designer, and office manager.
As someone who works with all the CS5 programs, you'll want to take a little time to plan your workflow and take more time to become productive in using all the CS5 applications. An example of a workflow for an independent graphic designer is illustrated in Figure 4.1.
In the example workflow, you begin an assignment with a client meeting either personally or through e-mail or telephone calls. As you develop a concept and after interviewing your client, you prepare sketches or comps that are sent back to the client in an e-mail review using Adobe Acrobat Professional or you could use CS Live to begin a review session where the client can see your prototype through a Web browser without requiring that they have any of the CS applications. If more than one person is part of a committee that ultimately approves your commission, each committee member receives your draft via e-mail for review. When the final comp is approved, you begin your work on the project.

Note
When you prepare a PDF document for a review with your clients, be certain to enable the PDF with usage rights for Adobe Reader. The newest version of Acrobat takes care of this automatically. By enabling the PDF with rights, any member of a review team who doesn't use Acrobat Professional can use the free Adobe Reader program to participate in a review. For more information on enabling PDF documents, see Chapter 36.
You may start your project by creating a new folder in Adobe Bridge where all the assets for a client job are maintained. If you need illustrated art as well as photo images, you may spend some time in Adobe Illustrator CS5 and Adobe Photoshop CS5, where you create artwork. Document files are saved to the folder or subfolders you created with Adobe Bridge and the files are managed in the Bridge window. All layers are preserved in the documents, and you save your files in native formats.
If the copy is developed in a word processor foreign to you and not compatible with your text editors, you might ask your client to send you an RTF (Rich Text Format) file that you can place into Adobe InDesign CS5. You import the illustrations and images into Adobe InDesign, and fit the copy to the design.
You export the InDesign CS5 document as Adobe PDF and open the file in Adobe Acrobat Professional. You soft-proof the file to ensure that all colors will print as you expect and then repurpose the file for online delivery by reducing image resolution to create a smaller file. You may need to save this file as a copy with password security, which prevents your client from extracting data or printing the document. You enable the file with Adobe Reader usage rights and e-mail the enabled file to the client, who signs off on the design using a digital signature in the free Adobe Reader software. When you receive approval from your client, you e-mail or FTP the high-resolution PDF document to your printer.
Note
For information on enabling PDFs with usage rights, see Chapters 27 and 33. For information on soft-proofing color, see Chapter 35. For information on repurposing files, see the section on document repurposing later in this chapter.
If Web design is part of your work, you return to Adobe InDesign CS5 and export the file for cross-media using the File
Note
The Export to XFL feature is discussed in more detail in Chapter 21.
If point-of-sale order forms are part of your commission, you create the form designs in InDesign CS5 or Adobe Illustrator CS5 and export/save to PDF. You use Acrobat Professional to add form fields and JavaScripts to create interactive forms. If you are a Windows user, you have the option for using Adobe Designer to create the PDF form. You return to Dreamweaver and add hyperlinks to the PDF forms and upload the forms via Dreamweaver to the client's Web site.
One of the last important steps of the workflow, especially if you have interactive elements, is to test the site, including all the interactive elements. When you are comfortable with the results, you can have your client verify that it meets their needs as well, before turning over the project.
At the end of your job, you write all the files to a CD-ROM where PDFs contain attachments to quickly open the original application documents. You create a search index that you include on the CD to help you search PDF content. Metadata are supplied for files to permit searches and quick access to files. You collect your money and take a vacation, because you have an efficient workflow that saved you time.
As an independent designer, you benefit from knowing how to work effectively in the CS5 applications. You also derive extra benefits for keeping files reduced to a minimum by using only native file formats. If you need to return to a project, having fewer files that are well documented throughout the design process helps you to easily revise content and create new designs for the same client. Because you add your files to a project, you can use Adobe Bridge to return to the client's files and easily modify designs with alternates or new versions.
You may think that the workflow described in the preceding section doesn't require all the CS5 programs to perform the same steps. It's true that if all there were to creating a design piece was following the same steps in a linear fashion, you could substitute the use of an illustration program and/or use another layout program. You would miss the exporting XHTML for Dreamweaver if you don't use InDesign CS5, but some layout programs do support exporting to HTML. What's not mentioned in the workflow is handling design modifications. Design modifications may occur during the design process where you need to nudge and move objects to create the look you want or when your client requests changes to objects, images, colors, type fonts, and so on.
The advantage of using the Creative Suite is more obvious when making changes to designs. As you change files, you can save different versions of the same file or you can create alternates for files. If you need to change back to an earlier version, this process alone will save you lots of time. If you need to move or nudge objects, having files imported from native formats opens up your freedom for moving design elements without affecting underlying objects.
Another advantage of using the Creative Suite is the easy portability of assets that can help you prepare files properly for vendors. When designing for print, you can acquire color profiles prepared by your vendor, designed for output on their devices.
Note
For information on creating color-management workflows, see Chapter 5.
In addition to color management, you want to check your files for potential errors. When documents are preflighted, your files are analyzed for potential printing problems. Both Adobe InDesign and Adobe Acrobat Professional contain sophisticated preflight tools using built-in and/or custom preflight profiles. You can acquire preflight profiles from your service provider to use in InDesign/ Adobe Acrobat Professional for checking files for proper printing. You can acquire preflight profiles from vendor Web sites or have them e-mailed directly to you.
Note
For understanding more about preflight and information on importing and exporting preflight profiles, see Chapter 36.
If you work in a larger studio with coworkers participating in design projects, you need to be more concerned about the steps involved in your workflow and be consistent in all your tasks. Many studios that evolved with computer illustration and design often let employees determine which application software to use and which methods to employ for creating designs. The unknowing creative directors, who at times were computer illiterate, paid little attention to which tools were used and focused only on the final artwork. Today, some firms spend lots of time updating documents from a variety of programs that their current staff no longer uses.
The first step in developing an efficient workflow is to begin with standards that all employees in a firm use. Deciding which application software to use, setting standards for file naming conventions, determining which archiving methods to use, and developing policies for updating documents are all preliminary steps that you should integrate in a workflow schema before engaging in production tasks. The time spent on management is insignificant when you compare it to the time it takes to train current employees and hire new ones.
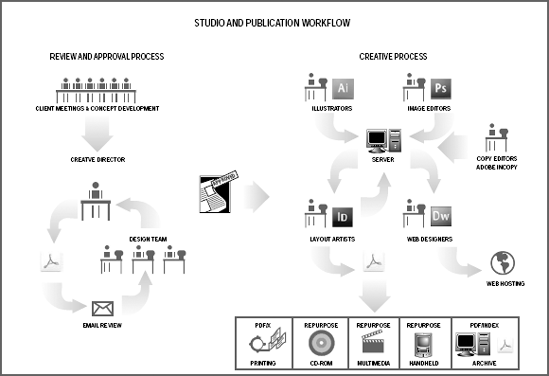
As an example of a studio or production-center workflow, Figure 4.2 shows how creative production personnel participate in a design project. After a project is approved, artists working in Adobe Illustrator CS5 and image editors working in Adobe Photoshop CS5 save files to a server. Copy editors save files to the server for the page layout artists to acquire. The page layout artists retrieve files, complete the designs, and save the completed designs back to the server. All the files are viewed and managed in Adobe Bridge where all users can view the same collection; PDFs are exported from InDesign CS5 for print, Web hosting, CD-ROM replication, porting to handheld devices and tablets, and document archiving. Web designers retrieve exported InDesign files and edit them in Dreamweaver. PDFs are retrieved from the server for documents included on the Web site.
In this facility, it's easy to see how developing standards is critical for the workflow environment. When new employees are hired, they need to quickly fit into the workflow. Training new staff is a much easier task when following standards. If individual artists determine their own methods and use different programs to produce artwork, getting new employees up to speed is likely to take more time than you can afford.
Document repurposing is taking a file suited for one output purpose and optimizing it for another output purpose. In regard to the Adobe Creative Suite, Acrobat is the application best suited for document repurposing.
If you design a piece for print in InDesign CS5, you have some options you can employ to repurpose a file. Because exporting to PDF is something you can do for printing, you can return to the InDesign file and export a second PDF document more suitable for Web hosting or screen displays. What goes on in InDesign CS5 is simply a matter of choosing the Adobe PDF settings most desirable for your output needs. To select the correct settings, follow these steps:
STEPS: Selecting the Correct Output Settings
Choose File

From the Format pull-down menu, choose Adobe PDF. You can select to use the Adobe PDF (Interactive) option if your document has interactive elements, or the Adobe PDF (Print) option if your document is going to the printer.
Supply a name for the file in the Save As field, and click Save. A second dialog box opens where you set the attributes for the PDF file.
From the top-level Preset pull-down menu, choose the Adobe PDF setting you want to use. Note that if you created presets either in InDesign CS5 or any other CS5 application, the preset appears in the Adobe PDF Preset pull-down menu. In Figure 4.3, a preset that was developed in Acrobat Distiller is selected from the menu list.
Export to PDF. Click Export to complete the file export to PDF.
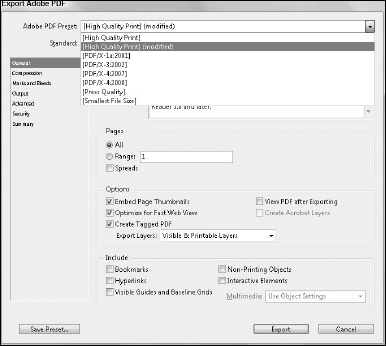
Figure 4.3. PDF presets that you develop in any CS5 application appear in the Adobe PDF Preset menu when you export to PDF.
In InDesign CS5 and all the other CS5 applications, any preset developed in Acrobat Distiller or any other CS5 application is available to all CS5 applications including Adobe Acrobat Professional and Acrobat Distiller for the purpose of creating PDF files.
When you choose a setting that contains options for downsampling images, the resultant PDF document becomes a smaller file than when you create PDFs with settings where you apply no downsampling.
Note
To learn more about exporting to PDF from Adobe InDesign CS5, see Chapter 36.
Another method you have for repurposing PDF documents lies in Adobe Acrobat Professional. You can open a PDF in Acrobat and select the Advanced
Note
To learn more about PDF Optimizer and creating Batch Sequences, see Chapter 31.
Repurposing documents is one of the true benefits of an efficient workflow. If you relied on other methods to repurpose a document from print to Web hosting, you must open files in Adobe Photoshop CS5, downsample files, and save them as new files to disk. After downsampling the images, you must open your layout application and relink all the image links. Obviously, using PDF as your output format provides you with a much more efficient alternative when you need to repurpose documents.
Note
Downsampling an image is the process of reducing file size by lowering the image's resolution (for example, taking a 300 ppi [pixels per inch] image and lowering the resolution to 72 ppi). You can downsample images in Adobe Photoshop and Adobe Acrobat, as well as use methods for downsampling from within Adobe Dreamweaver.
Whether you're an independent designer or you own or manage an agency, there are some considerations you should think about when designing your workflow. Too often, individuals or managers become subordinates to vendors, contracting professionals, or production personnel instead of taking control of their environment and encouraging others to fit within their workflow schema.
Instead of having others dictate or impose standards on you, try to give some thought to the way you want to work and how you want others to fit into your workflow. The following sections offer some suggestions you may want to consider.
When hiring employees or working with contract artists, ask people to use the same tools you use in your workflow. If you use all the programs in the Adobe Creative Suite, be certain to hire employees skilled in these tools and make it a necessary condition for all your contracting artists and professionals to use the same tools. The time to train people who fit in your workflow is dramatically reduced if they're skilled in using the same tools.
We often hear design professionals complain, "My print shop or vendor doesn't like to print from InDesign" (or another product). Having your vendor dictate what tools you use to perform your work is like the tail wagging the dog. After all, who is paying money to whom? If your vendor doesn't support one of the tools you use, and you produce even a moderate amount of work, tell your vendor that if they don't support your selection of software, you'll be forced to use their competitor across the street. Try this on for size and see how many vendors turn you down.
Creative professionals today are in a category similar to other professionals like medical workers, legal workers, psychologists, educators, and people in all kinds of professions that deal with government regulations. All these professions require continuing education units (CEU) to sustain licensure or maintain compliance with changing laws. As a design professional, you work in an ever-changing world of high technology. The world of the creative professional in some ways changes more rapidly today than that of almost any other occupation. New software upgrades are occurring every 18 months. This rapid change related to the tools you use requires you and your staff to engage in ongoing training and education.
To help you work more effectively in your workflow, try to set up training sessions that you can provide in-house or with your vendors. You might approach a vendor and ask them to sponsor an evening session to introduce a new product upgrade. You can find many Adobe professionals working in cities throughout the world who are willing and able to make visits to communities for speaking sessions without charging any fees. You can also ask local community colleges and universities to sponsor similar events and hold workshops and classes on products you use in your workflow. In large agencies, you can employ policies and provide time off for production artists to take classes and workshops benefiting your workflow.
Sometimes locating files and making file edits takes more time than designing a new piece from scratch. To avoid time lost due to searching for files, converting old files to newer versions, and locating fonts and assets contained in design projects, try to spend some time managing your artwork in an effective manner. With the CS5 programs, you can use Adobe Bridge to organize all files located on hard drives and networked servers. For archived files as well as the files you manage in the Bridge, use Adobe Acrobat and create data sheets using form fields. You can use the form template to fill in new forms for each project as well as the source and location for the files. Try to complete a form for every project and supply all pertinent information on the data sheet related to personnel involved in the project and all related software used to create the project designs. Figure 4.4 illustrates a sample form created in Adobe Illustrator CS5 and opened in Adobe Acrobat where form fields were added.
Tip
Files saved from Adobe Illustrator CS5 as native AI files with the Create PDF Compatible File option selected in the Illustrator Options dialog box can be opened directly in any Adobe Acrobat viewer including Adobe Reader.
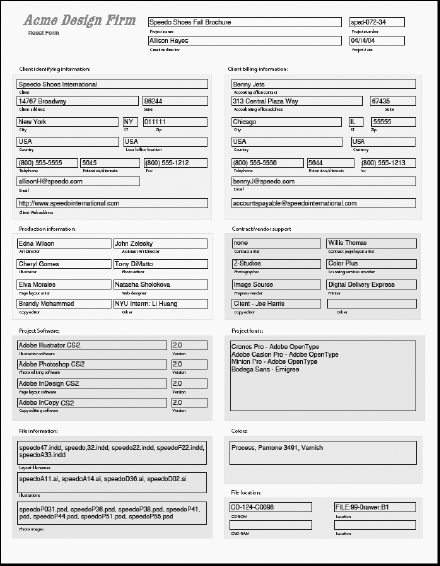
Figure 4.4. A sample form created in Adobe Illustrator CS5 and opened in Adobe Acrobat where form fields were added
As you can see in Figure 4.4, the agency personnel and contracting vendors are all listed by name. A separate document contains all the contact information for the contractors and vendors. The software and version numbers of the applications used in the project are listed, as well as design specifics such as fonts and colors. The fields in the lower-right corner describe the location of CD-ROMs and DVDs where the completed files are stored. You can store PDF forms like this on a network server and use Acrobat Search to search for them or you can create a collection where forms are searched using Adobe Bridge. In a matter of minutes, any employee in a company including new employees can locate the files for any given project.
You may find other helpful ideas that can assist you in managing your workflow and you may find other relevant information to add to data sheets. The most important issue at hand is realizing that a little time spent in managing and organizing your work always saves you more time when you need to rework files or produce new pieces for the same client.
Efficient workflows help you work quickly and intelligently by reducing redundancy. Workflow standards can help you reduce time in training new workers.
You have complete control over your internal workflow and what tools to use. Your workflow extends beyond your internal workflow and includes contractors and vendors.
Adobe Creative Suite 5 is a complete workflow solution for creative professionals, whereby all document files are fully integrated throughout the programs. Applications help you update files, change design elements, and create different design versions.
You use document repurposing when a file is designed for one output need and you're reworking the same file suited for a different output need.
Independent design professionals and creative art department managers are advantaged when planning workflows and attracting others to conform to standards set by an individual or agency.
When working with contract artists and vendors, you'll find it best to attract people who fit into your workflow rather than have others fit you into their workflow.
Keeping accurate data sheets on client projects helps you save time in relocating files and provides quick access for revisiting projects from the same clients. You can manage your data sheets using Adobe Bridge or Acrobat Search.
Continuing education is a necessary ingredient in a creative professional's work life. You can solicit help from vendors to support training sessions and utilize Adobe field specialists to help you stay abreast of new software upgrades.