Exporting text using the Clipboard
Exporting text using export commands
Exporting Acrobat comments to Word
Updating text in layouts
Although CS5 includes many programs that can work with type or text (which you can learn about in Part IV), a word processor is not included as part of the suite. Text for design purposes is very different from text produced with a word processor, but there are times in your design workflow when you want to export text from CS5 applications into a word processor.
Writing copy is often much easier in a word processor because its features focus on manipulating text rather than design. For example, Microsoft Word includes a grammar checker that benefits longer sections of text. You can take advantage of this feature by exporting text to a word processor, checking its grammar, and then importing it again.
Of the available word processors, Microsoft Word is the most popular. Most word processors available today have similar features, so we focus only on Word in this chapter. We also cover the text-export features found in the CS applications that enable you to move text to Microsoft Word and the other Office applications.
The chapters in Part IV focused on creating text within the Creative Suite applications, and the last chapter covered importing text. This chapter completes the topic by discussing how to export text from the various CS applications to Microsoft Word.
Note
Part IV covers creating text within the CS applications. Importing text from Word is covered in Chapter 18.
Before we discuss the techniques used in exporting text, we need to discuss the purpose behind exporting text. The first question to ask yourself is this: With all the power found in Creative Suite, why would you want to export text to an application like Microsoft Word? The answer lies in Word's ability to do what it does best—create text documents.
Many of the features found in Word are out of place in the Creative Suite applications. Here is a list of some of the Microsoft Word features of which you can take advantage when working with large portions of text:
Outline mode: Word can view documents in several different modes, including Normal, Web Layout, Print Layout, and Outline. The layout modes are a far cry from the features found in Illustrator, Photoshop, and InDesign, but the Outline mode is very helpful for organizing a table of contents or a large structured list of items. In Word's Outline mode, you can quickly promote and demote headings and rearrange entire structures by dragging.
Headers, footers, and footnotes: Word's ability to automatically create and adjust headers, footers, and footnotes is much easier to use than anything you find in Creative Suite (although anchored text in InDesign works better for inline graphics and sidebars). InDesign's text variables might also be used to create headers and footers. There are even specific variables for output.
AutoCorrect: Word's AutoCorrect feature is very helpful as you type long sections of text. This feature can automatically capitalize the first letter of a sentence, and that makes it worth the trouble to export the text into Word. With some fine-tuning, the AutoCorrect feature saves many keystrokes, allowing you to finish a document in less time.
Interactive spelling and grammar check: Word underlines all misspelled words in red and all grammatical errors in green as you type. This immediate feedback lets you fix the problems as you type, which offers a benefit over the spell-check features found in the CS applications.
Note
InDesign is perhaps the most powerful CS app for working with large sections of text. It even includes AutoCorrect and spell checker features that rival Word's.
This short list isn't exhaustive, nor does it do justice to the plethora of features found in Word, but it gives you a brief idea of the types of features that you can take advantage of by exporting text to Word.
All the CS applications deal with text, and all can export text to Word. There are essentially three different methods for exporting text from the various CS applications, and each of these methods has its advantages and disadvantages:
Copy and paste to the Clipboard: Most CS applications can take advantage of this feature. By selecting text objects or portions of text, you can cut (

Using an export command: Several applications include a File

Save to an importable file: The final method is to save the text using a text-file format (such as TXT or RTF) that you can import into Word.
Before exporting any text to Word, you need to locate and select the text that you want to move. For most CS applications, you select text using the Type tool. To select text, just click the Type tool and drag over the text that you want to select. The selected text is highlighted.
Illustrator and InDesign use text objects. If a text object is selected with the Selection tool, the borders that make up the text object are highlighted using its layer color and all text contained within the text object is selected. If multiple text objects are selected, all text contained within the selected text objects is selected. Use the Type tool and not the Selection Tool to select text.
Through the exporting process, the text formatting is often lost. Some techniques maintain formatting and others do not. Copy and pasting via the Clipboard typically discards formatting. Exporting text using the TXT file format also discards formatting. If you need to keep the formatting intact, look to export the text using the Rich Text Format (RTF), which maintains the formatting during export.
Tip
If you lose your formatting during an export, keep track of the changes that you make to the text in Word and manually enter those changes into the formatted text in the CS application.
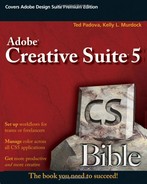
When exporting text from Illustrator, the export command offers you the chance to specify the Platform (Windows, Mac-PowerPC, or Mac-Intel) and Encoding (Default and Unicode). If the text includes foreign language characters, then choose the Unicode option. This lets you maintain your fonts as you export them, regardless of the system to which you export them.
Note
You can learn more about the OpenType font standard in Chapter 14.
The easiest way to export smaller pieces of text from the CS applications is to use the Clipboard. Although the Clipboard can handle large sections of text, it relies on the amount of available memory.
The Office Clipboard (Windows only) can copy many pieces of text to the Clipboard at a time (up to 24 by default). You can then select these different pieces from the Office Clipboard and paste them into the current Word document. You can make the Office Clipboard, shown at the right in Figure 19.1, appear by choosing Edit

To select text in Illustrator, either select the text object with the Selection tool or drag over a portion of text with the Type tool. Selected text within Illustrator is then copied to the Clipboard by choosing Edit
Warning
You can paste text that you cut or copy from an Illustrator document into Word as only unformatted text. Text you copy from InDesign and Acrobat maintains its formatting.
Word also includes a Paste Special menu command that opens the dialog box shown in Figure 19.2. This dialog box identifies the source application and allows you to paste the Clipboard contents as unformatted text, several image formats, or unformatted Unicode text. Text that you save on the Clipboard cannot be saved as an image using the Paste Special command.
Note
In Word 2007, you may need to open the Word Options dialog box and add Paste Special to your Quick Access toolbar in order to find the Paste Special command.
Warning
Be aware that any text you export to Word loses its positional constraints, such as wrapping around images or type on a path.

Figure 19.2. The Paste Special dialog box identifies the source application and offers several paste choices based on that application.
You move text in Photoshop and Flash to Word using the same Clipboard technique discussed for Illustrator in this section. The only exception is that you must select the text using Photoshop's Type tool. Selecting text in Dreamweaver is easy; you simply drag over the text to select. This text can be either in the Code or the Design views. Text copied and pasted from Dreamweaver to Word loses its formatting.
You move formatted text in InDesign to Microsoft Word using the Copy and Paste features. The standard Copy and Paste features retain the formatting created in InDesign.
Warning
In order to copy text in InDesign to the Clipboard, you need to select the Type tool and drag over the text. You can't just select the text object as you can in Illustrator.
Within Word, you also can choose Paste Special from the Quick Access toolbar (Windows). This action opens the Paste Special dialog box (refer to Figure 19.2), which includes the same options as those for Illustrator, except that it can handle RTF text.
You select text in Acrobat using the Select Text tool. You can then cut or copy the selected text to the Clipboard by choosing Edit
The Edit
Object Linking and Embedding (Windows Only)
Another exporting option is to create a link between the content created in a CS application and Microsoft Word using a technology known as Object Linking and Embedding (OLE). However, object linking works only with image content, not with text.
CS applications—including Photoshop, Illustrator, and InDesign—can act as an OLE 2.0 server. This allows you to copy and paste a piece of content into Word using the Paste Special menu command. This action causes the Paste Special dialog box to appear with a Paste Link option, which lets you paste an object as a recognized CS object. After you paste the object, you can double-click on the object in the Word document to load it within the native CS application for more editing. Changes made to the object are automatically forwarded back to the object in the Word document, thereby keeping the two in sync. You can force the documents to update by choosing File
When it comes to moving entire documents, the Clipboard isn't the best choice. Instead, you should rely on the export menu commands, typically found in the File menu. These export commands let you save CS documents to a format that is easily imported into Word.
Warning
Be aware that text in Photoshop is exported via the Clipboard only.
You export text from Illustrator by choosing File
The File

After clicking Export (Mac) or Save (Windows), another dialog box, shown in Figure 19.4, opens. This dialog box lets you specify the Platform as PC or Mac, as well as the Encoding standard to use. The Encoding options are Default Platform and Unicode. If the text you're exporting includes any foreign text or any special glyphs, use the Unicode Encoding option.
Note
The File
If you export text using the Default Encoding and not Unicode, you can open the file in Word without having to make any choices for conversion options.
Warning
Illustrator includes tight integration with Microsoft Office using the File
InDesign includes an Export command under the File menu that exports formatted text to a number of different formats. To export text, you must first select the text within a text object using the Type tool to select a portion of a story. If the text tool is not in a story the entire story is exported, and the Rich Text Format and Text Only options are available as file types in the Export dialog box.
Choosing File
If you export text from InDesign using a format other than RTF or Text Only, the file includes lots of additional mark-up information that you probably don't want to see.
Choosing File
Note
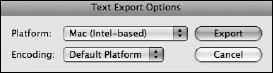
By default, any images contained within a PDF file that you save as a Word document are saved using the JPEG format. However, you can select the PNG format in the Settings dialog box if you prefer.
In Acrobat's file dialog box, you can click the Settings button, which opens the Save As Settings dialog box. The Save As DOC Settings dialog box is shown in Figure 19.5. The Settings dialog box for RTF is the same as that for the DOC format.
In the Save As DOC Settings dialog box, you can choose to include comments and/or images. You also can downsample the image resolutions, which is a good idea if you're exporting to Word to check just the text. You also may want to keep the text files small by specifying Grayscale as the Colorspace. PDF files that were saved in Acrobat using the RTF format that are subsequently imported into Word are easy to identify because each piece of content is separated from the others by a section break.
Occasionally, you may have PDF documents that need to be reworked, but you don't have the original InDesign documents. In this case, open a PDF in Acrobat and choose the File
Batch-Converting Files in Acrobat
You also can use Acrobat Pro to convert a large number of Acrobat files to Word or RTF files using the Batch Sequences dialog box. You can access this dialog box (which is available only within Acrobat Professional) by choosing Advanced
The Batch Sequences dialog box, shown in the figure, includes a predefined batch command called Save All as RTF. Selecting this command and clicking Run Sequence executes the command, allowing you to select the files you want to convert. The Batch Sequence dialog box includes a number of predefined commands, but you also can create a new sequence of commands or edit an existing one.

Clicking New Sequence or Edit Sequence lets you create a different set of commands for execution.
For exporting text to Word, choose Word Document. A Save As dialog box opens. In this dialog box, notice the Settings button. Click Settings, and you can make some choices for the export attributes.
For Word exports, you can choose to retain the text flow or retain the page layout, as shown in Figure 19.6. If you want to import the text into InDesign, choose Retain Flowing Text. Acrobat provides options for exporting images from another Export submenu command. If you don't want the images exported in the Word document, be sure to uncheck the Include Images box. Click OK to return to the Save As dialog box. Click Save, and your file is exported to Word format and can be imported nicely in Adobe InDesign.
Tip
If you do lots of conversions from PDF to InDesign, look into purchasing a third-party utility for converting PDFs to InDesign format. The folks at Recosoft (www.recosoft.com) developed an excellent tool called PDF2ID for converting PDFs to InDesign files. This product works superbly for converting complex documents containing tables, graphic elements, images, capturing styles, and more.
If you want the images contained in the PDF file to be included in a new layout, choose File

Figure 19.6. To export content from Acrobat, choose File
Tip
You can easily determine the file format for images by opening the Print Production toolbar in Acrobat. (Open a context menu on the Acrobat Toolbar Well and choose Print Production to access this toolbar.) Click the Output Preview tool to open the Output Preview dialog box. Click Object Inspector, and click the cursor on an image. The Output Preview dialog box shows you all the file attributes (such as file type, resolution, and color-space) you need to know to determine if it's worthwhile to export the images.
In addition to moving text to Word, Acrobat also offers an option to export all comments in the Acrobat document to Word. Choosing Comments
Note
Exporting comments to Word is available only in Acrobat running on Windows with Office 2002 or greater installed. Comment exports to Word are not available on the Mac.
Before you can export comments to Word, you must be certain to use the proper comment tools. The Text Edit tools are designed to mark text for insertions, deletions, underlines, strikethroughs, and so on that are exported to Word. If you know that you're going to export your comments to Word, be certain to inform all users in your workflow to use these tools. Inasmuch as Mac users can't export comments to Word, the Text Edit tools are available in Acrobat on the Mac and comments you make with these tools can be exported to Word from Acrobat running on Windows.
Note
For more information on using commenting tools, including the Text Edit tools, see Chapter 33.
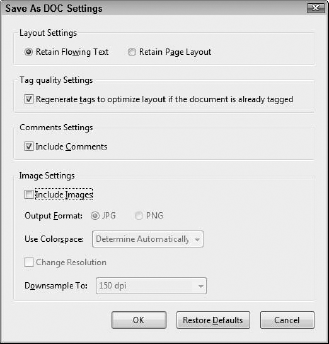
Using this menu command opens Word and presents the Import Comments from Adobe Acrobat dialog box, shown in Figure 19.7. Selecting a source PDF file and a destination DOC file and clicking Continue moves all the comments from the Acrobat file to the Word file. This dialog box also gives you options to export All Comments, All Comments with Checkmarks, or Text Edits Only. The Text Edits Only option includes only the text that has been edited with the Commenting toolbar. You also can select to turn on Word's Track Changes feature. Remember to save any comments added to the PDF file, or they won't be exported. Click Continue in the Import Comments from Adobe Acrobat dialog box, and another dialog box opens reporting the successful integration of the Acrobat comments in the original Word file.
Note
The Exporting Comments to Word command also can be initiated from within Word using the Adobe Comments
After you move the comments to Word, you can use the Acrobat Comments menu to review the changes, accept or delete all changes, and enable the Reviewing toolbar.
Exporting text from one of the CS programs is typically an exercise where you need to get copy back to Microsoft Word, create changes in the copy, and import the text back to your original design. The most likely candidates for this activity are Illustrator and InDesign. Unless you want to burden yourself with clumsy typesetting tools and extraordinary file sizes, you'll stay away from Photoshop.
Reintroducing type in an existing design can mean quite a bit of work. If the edits are extensive, you may need to delete long passages of text and then reformat pages in InDesign after importing the edited text. For Illustrator files, you have to deal only with single pages, but the complexity of the design could be quite complicated and take some time to rework the text.
Ideally, your best bet is to recompose a layout when you need to make major edits. However, in some circumstances, you may have moderate to light modifications to make in layouts. If you exported documents to PDF and need to make text changes, you need to return to the original authoring program, make your edits, and re-create the PDF document. In some workflows, this is a simple task, especially if all the native files are easily accessible. However, if you have only a PDF document and don't have access to the native application document, you may want to use another method by editing text and let the text edits dynamically change the PDF file.
Dynamic text editing is handled in Adobe Illustrator when text is targeted for editing from within Acrobat. You start in Acrobat and select the body of text you want to edit with the TouchUp Object tool. Click on the text line to be edited or marquee a paragraph, multiple paragraphs, or an entire page. When the text is selected, open a context menu and choose Edit Object. Alternately, you can press Option/Alt and double-click on the selected objects. This action launches Illustrator CS and opens the selected text in a document window. Unfortunately, the text is broken up in Illustrator, and all paragraph formatting including word wrap is lost. To reform the paragraphs, select all the text and click the Type tool in the document page at the same location where the first character in the first line of text was. Then cut the text with the Edit
To update a PDF document after making such edits in Illustrator, choose File
Warning
Be certain you have all the type fonts used in the original document loaded on your system before attempting to edit text externally in Illustrator. Also, check your work very carefully. Some edits may not be accurate, especially when you attempt to edit text with transparency and other forms of stylized fonts.
This process seems a little complicated, but after you've made a few text edits, you won't find it difficult to repeat. To illustrate the process further, look over the following steps where text is edited in Illustrator and dynamically updated in Acrobat.
STEPS: Dynamically Updating Text in PDF Documents
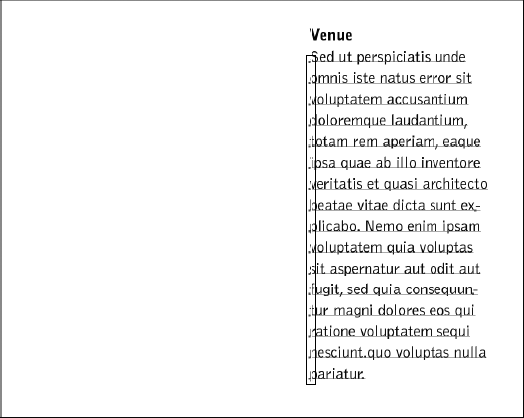
Open a PDF document in Acrobat. In Figure 19.8, a document is opened in Acrobat. The text in the column on the right needs to be edited. You could try to edit the text in Acrobat, but with text in a column the results can often be unsatisfactory. A document like this needs to have the text edited in an external editor.
Select the text needing editing. Selecting the text you want to edit can at times be a challenge. You can edit the entire page, but often you'll find it best to select just the text you want to edit. In this example, it makes sense to select the text column. To select the text shown in Figure 19.9, marquee through the text with the TouchUp Object tool. If you select other objects not needed for the edits, press the Shift key and click on selected objects to deselect them.
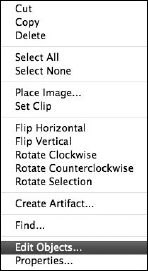
Open the text in Illustrator. From a context menu, open the selected text. Choose Edit Objects from the menu commands as shown in Figure 19.9. Alternately, you can press Option/Alt and double-click the selected text. (Be certain the TouchUp Object tool is used with either the context menu or the double mouse click.) Acrobat initiates the Illustrator CS launch, and the selected text is opened in a new document window.
Note
Depending on how your text was formatted, you may see some warning dialog boxes open, informing you that tags must be eliminated and the appearance of the page may appear different. Click Yes in the dialog boxes, and the file eventually opens in Illustrator.
Select all the text. Press
Draw guidelines. Drag guides from the ruler wells to the left, right, top, and bottom of the visible text. You want to create a rectangle around the text without encroaching on the territory occupied by the text.
Cut the text. Drag the Selection tool through the text to select it, and press
Select the Text tool, and draw an area text box by dragging at the guideline intersection points. The area text box should be a rectangle around the text box.
Note
Chapter 16 includes details on creating Area text frames in Illustrator.
Paste the text. The text should paste nicely within the area text box frame.
Save your edits. Be certain to choose File
Many Creative Suite applications can export text to Microsoft Word using several different methods. Some applications can export only the plain text, and others can export text with formatting intact.
One common method for exporting text to Word is to use the Clipboard. Illustrator and Photoshop can export text to Word using the Clipboard without formatting, but Acrobat and InDesign can export text to Word using Rich Text Format (RTF) with formatting intact.
Using export commands enables you to move text from Illustrator to Word without formatting, from InDesign to Word with formatting, and from Acrobat natively to the Word (DOC) format.
You can export comments in Acrobat to Word directly using the File
You can dynamically update text in Acrobat by selecting objects with the TouchUp Object tool and selecting Edit Objects from a context menu.
Text object editing is handled in Illustrator CS. When editing objects such as type from a PDF file, be certain to save the edits to dynamically update the PDF file.