
This chapter lays the groundwork for the rest of the book by creating a number of basic services that will be shared among all future modules: configuration classes to process custom sections and elements in web.config, base business classes and the Entity Framework model, caching strategies, and more. I'll show you the ListView control introduced in ASP.NET 3.5, and we'll build an n-tier architecture to manage interacting with the database.
Our website is made up of a number of separate modules for managing dynamic content such as articles, forums, photo galleries, events, and polls, and sending out newsletters. However, all the modules have a number of common "design" tasks that you must deal with:
Create a sound Entity Framework model that will manage the data access.
Create a base for a business logic layer to manage interaction with the Entity Framework and to validate data.
Expand and customize the business object architecture generated by the Entity Framework Wizard to expose the data retrieved by the data access layer in an object-oriented format. This will leverage the use of partial classes introduced in .NET 2.0.
Separate the business logic code from the presentation code (user interface) so that the site is much more maintainable and scalable. This is called a multi-tier design.
Support the caching of business objects to save the data you've already fetched from the data store so that you don't have to make unnecessary fetches to retrieve the same data again. This results in less CPU, and database resource usage and less network traffic, resulting in better general performance.
Create a class library to house various components and classes that compose the core infrastructure of the application.
Handle and log exceptions to help diagnose problems in the event of a system failure and to provide an audit trail.
Standardize a common user interface methodology to display list of records, details, and administrative editing.
Create a custom configuration section to hold site specific data.
Create a common location in which to store information about each page or resource in the site so that it can be distributed as needed.
Create a data-driven custom
SiteMapProviderthat will allow automatic updating of content as it is added to and removed from the site.Create a custom SiteMap.org
HttpHandlerto produce the appropriate feed, based on the current site structure.Create an infrastructure to ensure optimized search engine techniques.
Create an RSS infrastructure to syndicate items from the site, such as articles, photos, and the like.
The task in this chapter is to devise a common set of classes and guidelines to address these problems so that the common classes can be utilized by the various modules to be covered in later chapters. Once you finish this chapter, you'll have a foundation upon which to build, and you can even distribute the development of future modules to various other developers, who can leverage the same common code to build each module.
The "Problem" section identified many core tasks that must be addressed before we can proceed to building the site. Having a solid foundation is the most important aspect of building any application, in software development this starts with the operating system and bubbles its way up. We have established the use of the Windows platform and .NET as the application framework, so some core architecture decisions need to be made to implement the solution to the problems.
The .NET Framework now has so many ways to solve just about every problem you can have in an application that sometimes the hardest thing is to decide which solution to leverage. By defining a solid foundation, the Beer House will have a highly performant, flexible, and extendible architecture.
Class libraries are way to contain custom objects and resources in a common location that can be used by multiple applications. A class library is simply a .NET assembly or .dll file that can be added to the Global Assembly Cache (GAC) and referenced directly by any application on the machine, or added to the application's folder to be loaded at runtime. Housing common objects in one location makes the code more portable and manageable for large applications and systems. For example, the Beer House uses the web as a common user interface but is considering expanding the application's frontend to WPF and Silverlight in the near future. Separating common business logic and resources means that the user interface layer or application can be thinner and code will not need to be modified on the backend to implement the new media.
In the previous edition of this book, the majority of this code was added to the App_Code folder. In this edition most, of this code is added to a class library referenced by the web application. I am going to use just one class library, but as the application code grows, it will be beneficial to break this code into even more focused class libraries, such as Data, UI, SEO, and so on.
Visual Studio 2008 provides a couple of ways to add a new class library to a project; you can select File?Add?New Project, or you can right-click on the root node of the solution in the Solution Explorer window and select Add?New Project from the context menu. Either way, the Add New Project dialog opens (see Figure 3-1). Select Visual Basic in the Project Types list, and choose Class Library from the Visual Studio installed templates.

The new Class Library project is added to the solution with an initial class Class1. Delete that class file; you'll add files for the real classes as you work through this book.
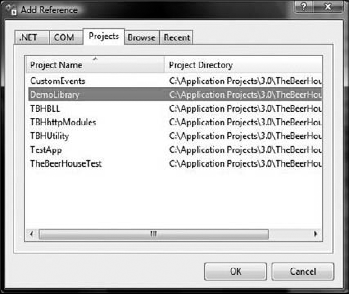
For the website to leverage the class library, it must reference the library. Right-Click on the website's root and select Add Reference from the context menu. The Add Reference dialog (see Figure 3-2) displays. Change to the Projects tab and select the new class library.
This adds a reference to the class library in the website. The class library should define a root namespace that can be assumed by all the classes contained in the library. That's not a requirement, but it makes things easier to manage. This is done by opening the properties page for the project by right-clicking the root of the class library project and selecting Properties at the bottom of the context menu. The page shown in Figure 3-3 is displayed, and the Root Namespace can be defined.

The namespace can be automatically imported by the website project by opening the site's property page the same way and selecting the References tab. At the bottom of the References tab is the Imported Namespaces section (see Figure 3-4). This section lists all the available namespaces with a checkbox. Namespaces that are imported on a global level are checked, if TheBeerHouse namespace is not selected, then it can be selected, making it available to all the pages and classes within the site.
You can designate any available namespace to be imported. Because the TheBeerHouse.Bll namespace is part of the referenced TBHBLL class library, it can be imported at an application level. Because that namespace is used quite a bit in the site, this very nice convenience saves you the trouble of importing it over and over.

If you have not heard of n-tier architecture, you will become familiar with it as you read through this book. As software development has evolved over the years, we have learned to separate logic or work into separate layers, typically a data store, and data access, business logic, and presentation layers. While there are times when these layers can be subdivided further, this is typically what you will see in most applications. Here are descriptions of each layer:
Data store: Where the data resides. This can be a relational database, an XML file, a text file, or a proprietary storage system, such as SQL Server, Oracle or MySQL.
Data access layer: The code that takes care of retrieving and manipulating the raw data saved in the data store.
Business logic layer: The code that takes the data retrieved by the data access tier and exposes it to the client in a more abstracted and intuitive way, hiding low-level details such as the data store's schema, and adding all the validation and authorization logic that ensures that the input is safe and consistent.
Presentation layer (user interface): The code that defines what a user should see on the screen, including formatted data and system navigation menus. This layer will be designed to operate inside a web browser in the case of ASP.NET, but there are so many more user interfaces in use today. WPF and Silverlight are some of the emerging new technologies to build desktop and web interfaces. Mobile applications are also increasing in demand as well. So never think your application will just be a web application.
Depending on the size of the project, you might have additional tiers, or some tiers may be merged together. For example, in the case of very small projects, the data access and business tiers may be merged together so that a single component takes care of retrieving the data and exposing it in the UI in a more accessible way. The SQLDataSource, AccessDataSource, and XmlDataSource controls introduced with ASP.NET 2.0, as well as the LinqDataSource and EntityDataSource controls introduced in ASP.NET 3.5, combine the UI, business, and data access layers into one layer in what is known as Line-of-Sight architecture, meaning that there is direct communication between the database and the user interface.
When discussing multi-tier architecture and design, the terms tier and layer are frequently used interchangeably, but there's actually a subtle difference between them: tiers indicate a physical separation of components, which may mean different assemblies (DLL, EXE, or other file types if the project is not all based on .NET) on the same computer or on multiple computers, whereas layers refer to a logical separation of components, such as having distinct classes and namespaces for the DAL, BLL, and UI code. Therefore, tiers are about physical separation and units of deployment, but layers are about logical separation and units of design.
In the last edition of this book the classes for the business, data tier, and utility classes were merged into the website in an effort to reduce the overhead of maintaining the code base. The argument was made that separating these classes is fine for large, enterprise-level sites but is not that good for small and medium applications. This is correct; now that the App_Code folder in ASP.NET 2.0 is available, it does help at least with organizing code for a website.
The Beer House business is increasing, and the demand for the site is growing. The owners are also starting to look into creating customized mobile, WPF desktop applications (for point of sale), SharePoint integration, and even Silverlight in a future version. This is a common scenario in today's world, and you need a strong, robust backend infrastructure with the capability to quickly add multiple frontend interfaces.
So, in this version of the Beer House, all the supporting classes that can be reused in multiple applications are placed in a class library. Eventually, you will want to separate the various classes into more targeted class libraries. But for this project, having one class library will keep it cleaner.
This book uses the Entity Framework as a data access layer. One of the main features of the Entity Framework is that it's inherently designed to be leveraged against any backend data store. Data providers, such as Oracle, DB2, or MySQL, can easily build custom providers that work with Entity Framework to access their database. So, in essence, the Entity Framework is the data provider layer for this version of theBeerHouse application.
The Entity Framework provides a rich foundation on which to build a data model for the application, while abstracting the actual data store from the rest of the application. The Entity Framework Wizard generates the data model and supporting classes to interact with the model and the Entity Framework. These classes can be extended and added upon to make a rich business logic layer.
Note
In the previous editions of this book the root namespace was MB, which stands for Marco Bellinaso. Because the application is built around the Beer House, I removed that level of the namespace, making TheBeerHouse the top-level namespace.
Having an infrastructure that is flexible when it comes to choosing a data store is important for some. If you are producing an application as a vendor who has clients that use different data stores for example. Most businesses chose a database vendor and stick with them rather that change every few years. Generally, in creating an application that will only be used internally, architecting for a data store change is not as important, because a change that drastic typically means drastic changes to the application itself.
But it is nice knowing that the core application architecture can easily support these types of changes, not only in the choice of the backend data store but also in all components of the application. Since the Entity Framework is designed to be flexible toward the backend database this gives you an instant advantage because we do not need to concern ourselves with that code. If the Beer House decides to change from SQL Server to another data store technology or vendor, as long as there is an ADO.NET data provider for that platform, the application can quickly be modified.
The Beer House has not changed its choice of database, SQL Server. So you will continue to build the application on top of SQL Server, but because the application is using Entity Framework, it will be built around the entities in the data model, rather than the data schema of the database.
The data access layer (DAL) is the code that executes queries to the database to retrieve data, and to update, insert, and delete data. It is the code that's closest to the database, and it must know all the database details — the schema of the tables, the name of the fields, stored procedures, views, and so on. Keep database-specific code separated from your site's pages for a number of reasons:
The developer who builds the user interfaces (i.e., the pages and user controls) may not be the same developer who writes the data access code. In fact, for midsized to large sites, they are usually different people. The UI developer may ignore most things about the database but still provide the user interface for it, because all the details are wrapped into separate objects that provide a high-level abstraction of the table, the stored procedure and field names, and the SQL to work with them.
Typically, some queries that retrieve data will be used from different pages. If you put them directly into the pages themselves, and later you have to change a query to add some fields or change the sorting, you'd have to review all your code and find every place where it's used. If, instead, the data access code is contained in some common DAL classes, then you'd just need to modify those, and the pages calling them will remain untouched.
Having hard-coded queries inside web pages would make it extremely difficult to migrate to a new relational database management system (RDBMS) or to support more than one RDBMS. Plus, they are often an easy target of SQL Injection attacks because the developers who hard-coded queries often neglect to parameterize the queries.
In 2006, Microsoft announced a new data framework, ADO.NET vNext. This has since become the ADO.NET Entity Framework (EF) and was released with .NET 3.5/Visual Studio 2008 SP1 in August of 2008. The Entity Framework is an entry from Microsoft into the object relational mapping (ORM) space. ORMs are data frameworks aimed at bridging the gap between data stores (databases) and applications. Entity Framework is an example of an ORM; Linq to SQL, nHibernate, Wilson ORM, and many others are also available for the .NET platform. All have attractive features and provide a way to abstract the database from the application to make it easier for developers to program an application based on business needs and not the database schema.
The Entity Framework's Entity Data Model (EDM) is composed of several elements and is ultimately based on Dr. Peter Chen's Entity Relationship (ER). ER is the conceptual representation of business elements and the relationships they have with each other. The EDM is what really differentiates the Entity Framework from other ORM products. The EDM builds a layer of abstraction above the ER model, but preserves the concepts of entities and their relationships.
What the Entity Framework does provide is a consistent way to program against a model that is abstracted away from the way the data is actually stored. As applications have evolved, the data is no longer necessarily stored in a manner that is easy to conceptualize in an application. Data is often optimized for speed, indexing, and other considerations for the actual data store technology, which can create a problem — often referred to as an impedance mismatch — when you're trying to efficiently create applications around the data model. This is where EF becomes a valuable tool to the developer because it abstracts the complex data storage schemas from the developer. The developer can then simply concern herself with the business entity model when architecting solutions.
The actual data model for the Beer House is pretty straightforward, so we will not be dealing with this issue as you might have to in more complex applications. All the entity mappings in the Beer House are one-to-one, instead of being an entity composed of related data in many tables.
The EDM (see Figure 3-5) consists of two concepts: entities and relationships. An entity is a thing, such as an article or an article category. A relationship is an association, such as the category an article belongs or a list of comments for the article. Article Categories, Comments, and Articles are all entities or things; the association they have to each other is the relationship. Typically, you can think of these as tables and foreign key relationships, and often this is how the model will be generated.

A group of entities is called an EntitySet, which is a collection of entities such as Articles, Categories, and Comments. The EntitySet class implements IList, ICollection, IList(of TEntity), ICollection(of TEntity), IEnumerable(of TEntity), IEnumerable, and IListSource. By implementing these interfaces, it provides a rich set of members to manage a collection of entities in a fashion familiar to those used to working with generics. Similarly, AssociationSets are a collection of associations. An EntityContainer wraps a group of entities and associations.
The EF introduces a new query language, Entity SQL (ESQL), which supports inheritance and polymorphism. These two concepts are not supported in existing SQL languages. Entity SQL does not query against the data store but against the modeled objects composed from the data store. Therefore, it needs to work against objects but still retain a familiar SQL-like syntax to make programming easier.
This also means that ESQL is not bound to a specific backend data store. For example, SQL Server SQL is slightly different than Oracle's SQL and IBM's SQL, and so forth. This abstraction frees developers from having to be tightly concerned with the vendor-specific version of SQL. The following ESQL code example shows how to retrieve a list of articles and their comments when at least one comment exists for the article.
Select a, a.Comment
From ArticlesModel.Articles as a
Where a.Comment.Count > 0
The Entity Framework comes with built-in support for SQL Server but has already been extended too many other vender platforms. Vendors need to simply create or modify existing ADO.NET data providers.
You may be asking yourself how does the Entity Framework actually communicate with the data store, or where is the actual SQL? Entity framework does the lifting for you because it creates an optimized, parameterized SQL query to communicate with the database. You can still use existing stored procedures and create your own, but you do lose some LINQ to Entities flexibility in querying over the results. Basically, calling a stored procedure returns a result set or just performs an action, and there is no IQueryable result to query against.
A platform specific Entity Framework provider typically extends an existing vendor-specific ADO.NET data provider by creating platform optimized syntax to interact with the database. This is a very nice feature because now you as the developer do not have to worry about this and have the freedom to build your application in the language you prefer, such as C# or VB.NET.
The EF introduces the EntityClient that runs on top of the ADO.NET providers. It leverages the existing Connection, Command, and DataReader objects with which all .NET developers should be familiar by now. There are special classes for each of these familiar objects, EntityConnection, EntityCommand, and EntityReader. You will not need to be concerned with using these objects in the scope of this book, but it is nice to know that you can leverage them if you want.
Object Services is a layer of abstractions that sits on top of the EntityClient. It acts a bridge between the application and the datastore. The EntityClient is responsible for the ORM aspects, and Entity Framework and object querying. You can think of Object Services as the workhorse of EF. The Object Services layer takes LINQ or ESQL queries, passes them to the EntityClient and returns an IQueryable(of T). The EntityClient is the data provider, customized for the data store.
What is more important to understand about the Object Services is the ObjectContext, which provides the interface for the developer to interact with the entities and, ultimately, the database. The ObjectContext also tracks changes to entities through the ObjectStateManager. That's because each entity is attached to the context. While an entity can be detached or retrieved unattached, this is not done by default. Attached entities can have their changes tracked (optimistic concurrency) by the ObjectStateManager. This is an important feature to understand, and you'll see how to take advantage of it when we revisit how to implement EF in the solution section.
Since Language Integrated Query (LINQ) was introduced with the release of .NET 3.5, there have been many implementations of LINQ, such as LINQ to Objects, LINQ to XML, LINQ to SQL, LINQ to DataSets, and so on. Entity framework has its own implementation of LINQ as well, LINQ to Entities. LINQ to Entities is a very thin layer built on top of Object Services that takes advantage of the ObjectQuery class to perform queries.
LINQ to SQL was the first LINQ extension released that allowed developers to interact with SQL Server. The big difference is LINQ to Entities does not talk directly to the database but instead queries the Entity Framework that does the talking. This means that LINQ to Entities can talk to any data store as long as there is an EF provider for the platform. LINQ queries are converted to expression trees and executed against the Object Services layer and return an IQueryable(of T) result (see Figure 3-6).

The EF ObjectServices layer exposes a conceptual view of the data, which is ideal for LINQ queries to manipulate. This gives the developer a Transact SQL-like programming experience in the application and development environment. LINQ also adds lambda expressions, making for an even richer development experience. Because the queries are written in the application, the developer has development aides, such as IntelliSense, compile-time syntax checking, and so forth, to make building queries against the Entity Model much easier. LINQ to Entities gives the developer the ability to create strongly typed queries that will have any errors in syntax caught by the compiler.
To perform LINQ to Entities, the application must reference System.Core.dll and System.Data.Entity.dll. It must also import the System.Linq and System.Data.Objects namespaces. Of course, the application must either contain or reference an Entity Data Model as well.
Many of the LINQ to SQL concepts are supported by LINQ to Entities, but there are a few instances where things are done slightly differently or are not supported at all.
The LINQ standard query operators are supported, so query results can be shaped, filtered, sorted, and grouped. Common operators like Select, Where, Join, and OrderBy, and the aggregate and set operators are all supported. For more details read more about standard query operators on MSDN at http://msdn.microsoft.com/en-us/library/bb738551.aspx.
A LINQ to Entities query is executed by creating an expression tree that is executed by EF against the data source. All EF queries are executed using deferred execution, meaning that they must be either explicitly executed or are not executed until they are used. The concept of implicit and deferred execution is important to understand when discussing ORM frameworks. You will also hear the term lazy loading in reference to deferred loading. This means that data is not actually loaded or queried from the database until it is explicitly requested.
In the following example, a Linq to SQL statement is used to load an article's comments into a ListView control, using deferred execution.
Using linqToSqlContext as new L2SDataContext()

lvComments.DataSource = linqToSqlContext.Articles.First().Comments
lvComments.DataBind()

End Using
Using the same pattern with an EF model will result in 0 comments being returned because EF does not support lazy loading. Instead, you must explicitly load the comments as illustrated in the following snippet because you have to tell EF you want to include an article's comments:
Using EFContext as new EFDataContext()

lvComments.DataSource = EFContext.Articles.Include("Comments").First().Comments
lvComments.DataBind()

End Using
Or
Using EFContext as new EFDataContext()

Dim lArticle as List(of Articles) = EFContext.Articles
lArticle.Comments.Load()
lvComments.DataSource = lArticle.Comments
lvComments.DataBind()

End Using
The reason for this is to make developers aware that they are accessing the database. The first example eagerly loads the list of comments when the article is retrieved. The second example explicitly loads the list of comments only when they are needed. Eagerly loading typically results in fewer hits on the database, which makes DBAs happy but can put more pressure on system memory because more data is loaded that may not be used; it also causes the extra data to travel across the wire. Explicit loading ultimately results in more hits on the database but uses less memory as well as resulting in a lighter load being sent across the wire. Ultimately, the choice is up to you, based on your system design and overall demands.
Because queries are deferred, multiple queries can be executed at once. The query variable actually stores the commands, as they are added and not executed until the command is iterated over. For example, you could designate a query to retrieve a list of articles, another to retrieve a list of categories and yet another query to get a list of approved comments against the same DataContext. These queries will not be executed until at least one is explicitly executed; that causes all three to be exectuted against the data store simultaneously. If you look at the connection string generated by the Entity Data Model Wizard, you will see that it sets MultipleActiveResultSets= true. MultipleActiveResultSets (MARS) allows applications to execute more than one SQL statement on a connection in the same request. EF leverages MARS by executing any statements that need to be executed in a single transaction, thus increasing application performance.
Immediate execution is done whenever a scalar query is executed, Avg, Max, Sum, Min, and so forth. These queries require all the query results to be returned so that the scalar value can be calculated. Immediate execution can also be forced by calling one of the enumeration methods: ToArray, ToDictionary and ToList. These methods return the results to a corresponding collection object.
The Visual Studio Entity Framework experience provides a helpful visual Designer to create and manage the Entity Model. The wizard creates a strongly typed ObjectContext and one or more custom entity classes derived from EntityObject. These objects can be easily extended using the partial class model, introduced in .NET 2.0.
While it may not be obvious at first glance, the Entity Framework is easily integrated into a standard n-tier model. The Entity Framework itself sits on top of the actual data access layer, ADO.NET 3.5. Above the Entity Framework sits a custom business layer. But the bridge between the Entity Framework and the business logic layer is a thin layer of customized objects that further customize the Entity Framework services.
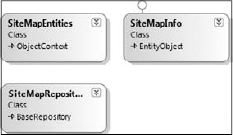
The n-tier architecture used in the Beer House consists of a custom ObjectContext class generated by the Entity Model Wizard, a series of entity repositories, and custom entity classes generated by the wizard and extended. The Repository model is similar to the Active Record model, except the entity just holds data that composes an object, for example a SiteMapInfo in the SiteMap. Instead of the entity also containing members responsible for retrieving records from the database, the Repository class contains members responsible for interacting with the database, such as doing standard CRUD operations. The Entity Data Model Wizard creates a series of classes that represent each of the entities and a derived ObjectContext with some basic members for interacting with EF. The classes the wizard generates are all marked partial, as are some of the class members. For example, each property in an entity has an OnChanging and OnChanged partial method. These partial methods can be extended or defined in your own partial class. The following code example demonstrates the generated SiteMapInfo's SiteMapId property code.
<Global.System.Data.Objects.DataClasses.EdmScalarPropertyAttribute(
EntityKeyProperty:=true, IsNullable:=false),
         Global.System.Runtime.Serialization.DataMemberAttribute()>  _
        Public Property SiteMapId() As Integer
            Get
                Return Me._SiteMapId
            End Get
            Set
                Me.OnSiteMapIdChanging(value)
                Me.ReportPropertyChanging("SiteMapId")
                Me._SiteMapId =
Global.System.Data.Objects.DataClasses.StructuralObject.SetValidValue(value)
Me.ReportPropertyChanged("SiteMapId")
Me.OnSiteMapIdChanged
End Set
End Property
Private _SiteMapId As Integer
Partial Private Sub OnSiteMapIdChanging(ByVal value As Integer)
End Sub
Partial Private Sub OnSiteMapIdChanged()
End SubThe two partial members are stubbed out in the generated class and marked as partial. These methods can be defined in your extension class, most likely to add some sort of validation to the process of changing the value. For example if the SiteMapId is out of an expected range of numbers, maybe a description is too long or a phone number is unacceptable. In the following example the SiteMapId has to be greater than 0; if it is a negative value, an ArgumentException is thrown. This exception can then be caught and handled appropriately, rather than letting the invalid data get caught by the database or, worse yet, committed to the database.
Public Class SiteMapInfo
Private Sub OnSiteMapIdChanging(ByVal value As Integer)
If value < 0 Then
Throw New ArgumentException("The SiteMapId cannot be less than 0.")
End If
End Sub
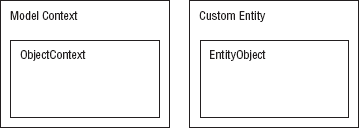
End ClassThe code generated by the wizard creates two types of classes, a custom ObjectContext class with some helper methods to facilitate interacting with the Entity Model and a EntityObject for each entity. Figure 3-7 shows these relationships.
The custom ObjectContext class not only wraps up all the members of the ObjectContext but also provides read-only properties that represent an ObjectQuery of each of the entities in the model. This makes querying each of the entity types fairly trivial as well as making LINQ queries much simpler. The following example shows the property that represents a collection of SiteMapInfos in the database:
Public ReadOnly Property SiteMaps() As Global.System.Data.Objects.ObjectQuery(
Of SiteMapInfo)
Get
If (Me._SiteMaps Is Nothing) Then
                    Me._SiteMaps = MyBase.CreateQuery(Of SiteMapInfo)("[SiteMaps]")
                End If
                Return Me._SiteMaps
End Get
End Property
Private _SiteMaps As Global.System.Data.Objects.ObjectQuery(Of SiteMapInfo)
In this code, SiteMaps is of type ObjectQuery(Of SiteMapInfo). The CreateQuery call processes the ESQL statement "[SiteMaps]" to return a collection of SiteMapInfo objects. The Get accessor also checks to see if the collection has already been built before it makes the query to the database, adding a little performance gain.
If you are familiar with basic LINQ syntax, the next example should be easy. The property exposes the data as an ObjectQuery(T), which can be further manipulated or used as is. ObjectQuery(T) is a query that uses the ObjectContext connection and metadata information to perform a query against an entity model. Before an ObjectQuery(T) actually executes the query against the entity model it can be further transformed, such as adding a Sort By or Where clause to the query. In the example, Categories is exposed as an ObjectQuery(T), and you can see how to retrieve a list of active SiteMapInfos using basic LINQ syntax.
Public Function GetSiteMapNodes() As List(Of SiteMapInfo)

Dim lSiteMapNodes As List(Of SiteMapInfo)

SiteMapctx.SiteMaps.MergeOption = MergeOption.NoTracking
lSiteMapNodes = (From lSiteMapNode In SiteMapctx.SiteMaps _
            Where lSiteMapNode.Active = True _
Order By lSiteMapNode.SortOrder).ToList()

Return lSiteMapNodes

End Function
In the example, I set the MergeOption to NoTracking, which means that the entities returned will not be attached to the context. This is important when returning collections of entities that will not need to have their state tracked by the context. This is common when caching content, and I will show this in practice later as I explore how a repository will be architected and results cached.
As I continue explaining how the Entity Framework can be leveraged in theBeerHouse application, I will continue to expand the model into a true n-tier architecture by extending the generated entity objects and creating corresponding object repositories to manage the queries to and from the database.
While there are command-line tools to generate a model for the Entity Framework, Visual Studio 2008 SP1 has a built-in wizard that takes care of making all the necessary code for a valid model. Once you have a model built with the wizard, you have a graphical surface to manage the model from, making it easy to apply updates and customize the model.
To add an Entity Model to a website, WPF application, or class library, first you add a new ADO.NET Entity Data Model to the project. This is added just like any new item, by right-clicking the root node or folder in the project and selecting Add New Item from the context menu (or by using the keyboard shortcut Ctrl+Shift+A) to open Visual Studio's Add New Item dialog (see Figure 3-8). For theBeerHouse application I am going to add the model to the class library I am creating to hold the business side of the application.

You will find the ADO.NET Entity Data Model item in the Common items, but you can probably find it more quickly by selecting the Data node in the Categories tree on the left side of the dialog.
Once you select the model type, give it a valid name. In this case, I am adding the SiteMap table that will be the foundation of all the navigation in the site and naming it SiteMapModel.
Click the Add button on the New Item dialog to start the Entity Data Model Wizard. In the first window (see Figure 3-9), select the option Generate From Database.
The next screen in the wizard builds the connection string needed by the Entity Framework to connect to the data source. If you already have a valid Entity Framework connection string available, you will see it in a drop-down at the top of the window. If you do not have a connection string or you need to create a new one, click the New Connection button to open the Connection Properties dialog (see Figure 3-10).
This should be a familiar dialog if you have ever set up a connection string from a Microsoft development tool like SQL Management Studio or Visual Studio. To use this dialog, enter the server name or address. If you are connecting to a database on your development machine, you can use (local) or just a "." as shown in Figure 3-10. Note that you can connect to a database file if you are using SQL Express. The connection string will be slightly different, but because the wizard creates it for you, there is nothing you need to do different in the rest of the wizard. Just use the connection dialog to make the connection to your SQL Express database the way you normally would.


Once you have created the connection string to the data source, you will notice the name has been predefined and consists of the server name, a period, the name of the database, another period, and dbo.
The Entity Connection String (outlined in Figure 3-11) shows you the real connection string used by the Entity Framework to connect to the data source.
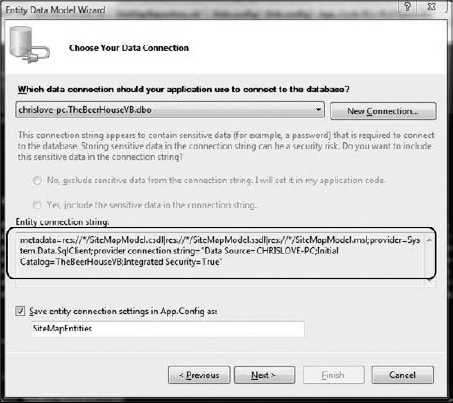
Notice that there is more information in this connection string than in a traditional .NET connection string. The Wizard will ultimately place a copy of the model's connection string in either web.config (if being added directly to a web site project) or app.config (if being added to a Class Library or non-web application project) as shown in the following snippet:
<connectionStrings>
<add name="TheBeerHouseEntities"
connectionString="metadata=res://*;provider=System.Data.SqlClient;
provider connection string="Data Source=.;
Initial Catalog=TheBeerHouseVB;
Integrated Security=True;
MultipleActiveResultSets=True""
providerName="System.Data.EntityClient"/>
</connectionStrings>
An Entity Framework connection string is actually composed of a series of semicolon-delimited values; metadata, provider, and provider connection string. The metadata pair specifies a pipe-delimited list of directories, files, and resources that contain metadata and mapping information for the Entity Framework. The wizard typically creates a generic value for this "res://*". This value tells the Entity Framework to load any possible values from the application, including all referenced assemblies and anything else that might be in the bin folder.
For a more detailed explanation of the Entity Framework Connection String please refer to the following MSDN article:
http://msdn.microsoft.com/en-us/library/cc716756.aspx.
Typically, the metadata will point to a file resource containing the EDM and metadata mapping; these values can be stored as a resource in an assembly. In this case, the values need to be supplied in the following format: res://<assemblyFullName>/<resourceName>. assemblyFullName would be the same complete format you would use to register an assembly in the references section of the web.config file; assembly file name, version, culture, and PublicKeyToken. The resourceName value points to the specific resource embedded in the assembly.
But the metadata value can be used to specify the location of particular resources that define the Entity Model. For example, the CSDL (Conceptual Schema Definition Language), SSDL (Store Schema Definition Language), and MSL (Mapping Specific Language) files. When the wizard generates the model for you, the content of these files is stored in the Designer file, .edmx. Unless you plan on generating the CSDL, SSDL, and MSL at the command line, you will never have to deal with these model definition files. In fact, it is in your best interest to not modify the content of these sections; remember that they are generated sections in the Designer file when using the wizard, because they are not well documented and very interrelated. The wizard generates a Designer file that contains each of these sections for the model. You can read more detail on these sections on MSDN (http://msdn.microsoft.com/en-us/library/bb399604.aspx); because intimate knowledge of these sections is not needed to work with Entity Framework I will not pursue them any further. Any changes you want to make to these sections can be done through the Designer in Visual Studio and will be done correctly.
The provider pair specifies the type of provider for the Entity Framework to use. Remember Entity Framework is not database-specific, and various providers are available to work with it. When working with SQL Server, this value is System.Data.SQLClient, which is the familiar namespace we have been using since the beginning of .NET to connection to SQL Server.
The Provider Connection String pair is where the value of the more traditional connection string is located. So, if you have an existing connection string to connect to the database, you can still use that; you would need to place it in this section of the Entity Framework-specific connection string.
At the bottom of the wizard, check the box to Save entity connection settings in App.Config as. That stores the connection string in the config file of the application, which will save you work later because the wizard will create the correct connection string instead of you having to do it.
Note
Creating an Entity Model in a class library causes the wizard to add an App.Config file to the class library. Because this is a DLL and not an application, it is not used directly, it but should be referenced to copy the connection string for your application, whether it is a website (web.config) or desktop application (app.config). Of course, if you generate the Entity Model within a website (in the App_Code folder), the connection string is added to the web.config file.
Clicking the Next button takes you to the Choose Your Database Objects page (see Figure 3-12), which displays a list of tables, views, and stored procedures you can use to build the model. For this example, you are going to build a model around the site map, so expand the Tables node and scroll down the list of tables till the SiteMap table is displayed. Check the node so that it will be used to build the model. If there were more tables to add to the model, you would check them as well. You will do this in later chapters.

At the bottom of the page, specify the name of the Entity Model, in this case enter SiteMapModel. This will be used to identify the Entity Model and context for the site map. Click Finish to create the model. When the model has been created, the Designer will be displayed, showing a list of entities in the model. This looks a lot like the class diagram that was introduced with Visual Studio 2005, as shown in Figure 3-13.
Before you save the model, rename the entity something other than SiteMap to avoid confusion with the SiteMap already built into the .NET framework. I chose SiteMapInfo. It is also smart to change the Entity Set Name. The wizard will call it SiteMapSet, which just does not sound natural; I changed it to SiteMapInfos.
You can change both of these values by selecting the SiteMap entity in the Model Designer and pressing F4. This opens the entity's properties, which allows you to modify these properties as shown in Figure 3-14.


Additionally, you can change the property names in the entity by bringing up their property window or clicking on the name itself in the Designer. You can change even more of a property's values in the Properties window (see Figure 3-15), accessed by selecting the property in the Designer and pressing F4.

Each property has a getter and a setter, and the access modifier can be changed from the default Public to Internal, Private, or Protected. It is interesting to note the getter and setter of a property can have differing access modifiers.
To make the Entity Framework check for optimistic concurrency on the property, change the Concurrency Mode to Fixed.
You can also set a default value for the property, which you should do for the Active field in the tables. This field is used to indicate if a record has been deleted, so it should be set to true. As I review more entities in the site, you will see that there are a few other fields that should have default values. These default values are assigned to the properties backing property. For example Active's backing property, _Active : Private _Active As Boolean = true.
Active is a new field added to each of the tables in the database from previous versions of the BeerHouse. I was taught early in my career when dealing with records in a database to rarely actually delete a record from the database. In many cases, there are legal reasons for this, but practically it can make running your application much easier. A common scenario is that a user accidentally deletes a record from the database; if you physically deleted the record from the database, you would have to either go through a full database restore to return the record or reenter the record. The first resolution is a major task that may or may not be allowed by the system DBAs. The latter method often means you have corrupted data, since the original data is gone along with any relationships and activity trail. If you add the extra Active field to a table, you can simply flip the bit to true or false. If a record needs to be restored, this can be done with a simple operation, instead of a major one.
The Documentation property gives you a place to store a long description and a summary for the entity. Entity Key is true if the field is part of the primary key of the associated table(s). Typically, you will want to let the wizard determine this for you.
The Name property is the Name used to access the value of the field. For example, you may have a field name that is not the friendliest of names or more commonly the name of a relationship. Later I will explain the architecture of the Articles module, which has a relation between the Articles table and the Categories table. There is only one category per article, so renaming the property to Category makes more sense.
Nullable indicates if the field accepts null values or not. This actually sets the EdmScalarPropertyAttribute's IsNullable property. This basically indicates that the database field can accept null as a valid value.
Finally, the Type property indicates what type of object is represented by the property. For example, value types like String and Integer or any custom object you may want to use.
Note
The actual classes created by the Entity Framework Model Wizard are located in a code-behind file associated with the model's .edmx file. If you expand the node for the Designer, you will see this file. It contains the custom ObjectContext and entity classes for the model. Try to avoid customizing the code in this file because any future changes to the model will result in them being overwritten by the code generator. I will make a few slight modifications to the file to make sure that the classes are part of the correct namespace, but that is it. All other modifications will be done in partial classes.
I want to step ahead a little and talk about customizing relationships in the Designer. Because the SiteMap consists of just one table, I am going to use the model for the Articles module. I will go over this model in detail in Chapter 5, but for now I want to focus on the relationships.
When an entity has a relationship to another entity a Navigational Property is generated. This will be initially defined as the name of the foreign entity. So, in the case of an Article, it has a many-to-one relationship to Categories and a one-to-many relationship to Comments. Just like the names of the entities, the name of the Navigational Property can be changed. Just click on the name in the entity and change it to the desired name. The Navigational Property can also be opened and the name changed there as well.
Notice the other Navigation properties are disabled (see Figure 3-16). That's because they are tied to the underlying data store and should not be changed in the Designer.

After customizing any values in the entity Designer, save the model. Behind the Designer is a code-behind file (in this case, SiteMapModel.Designer.vb) that contains a custom ObjectContext class and a custom EntityObject class to represent any entities.
Back in the Data Connection step of the wizard, it asks the developer to designate the Model Namespace value, for the SiteMap model, I designated SiteMapEntities as the name. This value is used as the name of the custom ObjectContext class the wizard generates.
Partial Public Class SiteMapEntities
    Inherits Global.System.Data.Objects.ObjectContext
Each model has one class that derives from System.Data.Objects.ObjectContext, SiteMapEntities in this case. The System.Data.Objects.ObjectContext class actually does the heavy lifting to interact with the Entity Framework. The ObjectContext class has numerous methods and properties and the SavingChanges event. I'll explain many of these as I review how the repositories work.
The following table describes the class's methods.
Method | Description |
|---|---|
Accepts all changes made to objects in the object context. | |
Adds an object to the object context. | |
Applies property changes from a detached object to an object already attached to the object context. | |
Attaches an object or object graph to the object context when the object has an entity key. | |
Attaches an object or object graph to the object context in a specific entity set. | |
Creates the entity key for a specific object, or returns the entity key if it already exists. | |
Creates an | |
Marks an object for deletion. | |
Removes the object from the object context. | |
Releases the resources used by the object context. | |
Determines whether the specified | |
Executes the given stored procedure or function against the data source to return an | |
Returns an object that has the specified entity key. | |
Overloaded. Updates specific objects in the object context with data from the data source. | |
Overloaded. Persists all updates to the data source. | |
Returns an object that has the specified entity key. |
Here's a look at the properties of the ObjectContext class:
Property | Description |
|---|---|
Gets or sets the timeout value, in seconds, for all object context operations. | |
Gets the connection used by the object context. | |
Gets or sets the default container name. | |
Gets the metadata workspace used by the object context. | |
Gets the object state manager used by the object context to track object changes. |
The SavingChanges event occurs when changes are saved to the data source.
The custom ObjectContext has three public constructors: one parameterless, one that accepts a connectionString, and one that accepts a connection string and an existing EntityConnection.
Public Sub New()
            MyBase.New("name=SiteMapEntities", "SiteMapEntities")
            Me.OnContextCreated
End Sub

Public Sub New(ByVal connectionString As String)
            MyBase.New(connectionString, "SiteMapEntities")
            Me.OnContextCreated
End Sub

Public Sub New(ByVal connection As
Global.System.Data.EntityClient.EntityConnection)
            MyBase.New(connection, "SiteMapEntities")
            Me.OnContextCreated
End Sub
Typically, the first constructor will be used, taking advantage of the settings in the web.config connections element. But depending on the way your application is configured you may want to use the second constructor.
As I evolve the business architecture, I will start explaining the use of a class repository. The repository classes create a context used to interact with the entity model. Therefore the repostories will ultimately be responsible for passing along the connection string value to the context, as shown in the following example:
Private _SiteMapctx As SiteMapEntities
Public Property SiteMapctx() As SiteMapEntities
Get
                If IsNothing(_SiteMapctx) Then
                    _SiteMapctx = New SiteMapEntities(GetActualConnectionString())
                End If

                Return _SiteMapctx
End Get
Set(ByVal Value As SiteMapEntities)
                _SiteMapctx = Value
End Set
End Property


Public Sub New(ByVal sConnectionString As String)
            ConnectionString = sConnectionString
            CacheKey = "SiteMap"
End Sub

Public Sub New()
            ConnectionString = Globals.Settings.DefaultConnectionStringName
            CacheKey = "SiteMap"
End Sub
The next major member is the SiteMaps property, an ObjectQuery(of SiteMapInfo). Remember that I named the site map entity SiteMapInfo to avoid confusion with other classes already in use in the .NET Framework. An ObjectQuery is special generic class that represents a collection of entities returned from a query (select statement) through the Entity Framework.
Public ReadOnly Property SiteMapInfos()
As Global.System.Data.Objects.ObjectQuery(Of SiteMapInfo)
            Get
                If (Me._SiteMapInfos Is Nothing) Then
                    Me._SiteMapInfos = _
                       MyBase.CreateQuery(Of SiteMapInfo)("[SiteMapInfos]")
                End If
                Return Me._SiteMapInfos
            End Get
End Property
Private _SiteMapInfos As Global.System.Data.Objects.ObjectQuery(Of SiteMapInfo)
The property checks to see if it has already created a list of SiteMapInfo objects; if not, it calls CreateQuery to get an ObjectQuery of SiteMapInfo objects. The CreateQuery method accepts a query string and an optional ObjectParameter collection. It returns an ObjectQuery that allows you to construct queries against the SiteMapInfo entity. Think of an ObjectQuery as a generic List(of T), but it has special features that allow it to be queried by LINQ. Notice that the private _SiteMapInfos variable is an ObjectQuery of SiteMapInfo objects.
The SiteMapInfos property is defined so LINQ to Entities can be executed to return data. The LINQ engine uses the ObjectQuery to work its magic.
There is only one method to the custom context, AddToSiteMaps, which accepts a SiteMapInfo object. This method is basically a helper method that allows new or disconnected entity objects to be added and updated within the context.
Public Sub AddToSiteMaps(ByVal siteMapInfo As SiteMapInfo)
            MyBase.AddObject("SiteMaps", siteMapInfo)
        End Sub
When entities are retrieved from the database via the Entity Framework, they are returned attached to the context by default so that the framework can manage changes to each entity and subsequent concurrency issues.
Entities can exist without being attached to a context; they are just normal objects after all. TheBeerHouse application uses detached entities in many instances, typically when a list of entities is cached. In order to save any entity through the Entity Framework, it must be attached to the context and the AddToSiteMaps helper method manages this operation by calling the ObjectContext's AddObject method. It passes the name of the data set and the entity it belongs to.
Adding the entity to the context adds the object to the ObjectStateManager, which is used by the ObjectContext to manage how to treat an entity when the SaveChanges method is called. When SaveChanges is called the Entity Framework context will perform any necessary insert, update, or delete operations needed by iterating over an internal collection of entities. Each will have an assigned EntityState value to indicate the type of operation to be performed: Added, Modified, Deleted, Detached or Unchanged.
All the classes generated by the Entity Framework Wizard are partial and use partial members where appropriate. If you are not familiar with partial classes they allow you to literally split a class across multiple files. Partial classes were introduced with the .NET 2.0 Framework and primarily used to split the generated user interface support code from the code used to program the page in an ASP.NET site or forms in a Windows application. This provides a nice clean surface to write the business code of the page.
The feature has been leveraged by the Entity Framework generated classes as well. Think of the classes generated by the Entity Framework classes as the user interface support code generated by Visual Studio for a Web Form that has been separated out.
Taking advantage of the partial class methodology the custom ObjectContext class, SiteMapEntities, can be extended by adding a new partial class to the project, also named SiteMapEntities.
Public Class SiteMapEntities

        Private Sub SiteMapEntities_SavingChanges(ByVal sender As Object,
ByVal e As System.EventArgs) Handles Me.SavingChanges
            Dim typeEntries = (From entry _
         In Me.ObjectStateManager.GetObjectStateEntries(EntityState.Added Or
 EntityState.Modified) _
        Where TypeOf entry.Entity Is IBaseEntity).ToList()

            For Each ose As System.Data.Objects.ObjectStateEntry In typeEntries

                Dim lBaseEntity As IBaseEntity = DirectCast(
ose.Entity, IBaseEntity)

                If lBaseEntity.IsValid = False Then
                    Throw New BeerHouseDataException(
String.Format("{0} is Not Valid", lBaseEntity.SetName), "", "")
                End If

            Next

        End Sub
    End Class
For the purposes of theBeerHouse architecture, I am going to add one event handler, SavingChanges. This event provides a way to intercept any changes being made to the context, that is, the objects being modified, added or deleted from the database. While I have not covered it yet, I am leveraging an interface called IBaseEntity that has an IsValid property that must be implemented by each of the entity objects, more about that shortly.
The SavingChanges event handler iterates through any new or modified entities and makes sure the IsValid property returns true. If the entity does not meet its defined requirements to be a valid object a custom exception is thrown, keeping the update from executing.
A list of SiteMapInfo objects that have either an Added or Modified state is retrieved by calling the GetObjectStateEntries, passing in an ORed list of EntityStates. The list is then iterated over, casting each entity to an IBaseEntity object so the IsValid property can be checked.
Notice the use of LINQ to create the list of entries? This is a relatively basic LINQ query that returns a List of ObjectStateEntry objects. I will certainly go over more LINQ statements as this book progresses.
The DAL discussed in the previous section is made from the Entity Framework and some supporting classes that retrieve data from the database by running SQL queries and returning as a collection of custom entities that wrap the fields of the retrieved data. The data returned by the DAL is still raw data, even though it's wrapped in objects. These entity objects do not add any functionality per se; they are just strongly typed containers with a series of properties that map to the underlying data, typically a series of immutable properties and validation logic to represent data. Immutable properties wrap calculated values that cannot be explicitly set. Each entity can have its own logic that defines if it is in a valid or acceptable state. The BLL consumes data from the Entity Framework and exposes it to the UI layer adding validation logic, and adds instance and static methods to delete, edit, insert, and retrieve data in class repositories.
For a domain object, or entity, named Employee that represents an employee, there may be a property named Boss that returns a reference to another entity, Employee that represents the first object's boss. In middle-sized to large projects, there are usually dozens, hundreds, or maybe even thousands of such entities, with relationships between them. This object-oriented and strongly typed representation of any data provides an extremely strong abstraction from the database, which merely stores the data, and it provides a simple and powerful set of classes for the UI developer to work with, without needing to know any details about how and where the raw data will be stored, how many tables are in the database, or which relationships exist between them. This is one of the primary goals of the Entity Framework and why it is an ideal choice to use as the data access layer and the support classes it generates.
In the previous edition of the book, the Active Record pattern was used. This pattern adds a series of methods to interact with the DAL to manage data. This means an entity not only holds the data for one record, but it also holds the members to interact with the DAL. This is many developers' their pattern of choice, but if you believe in separation of concerns this will not work. The Repository Pattern separates the entity object from the worker methods. The worker methods are separated into a helper class known as a repository. Some take it so far as to create a corresponding interface for the members of the repository so that inversion of control and mocking can be done more easily. I also think this architecture is good because it identifies what the object is responsible for. It is commonly known as separation of concerns, but I like to think of it as delegating responsibility to objects that specialize in specific tasks, as managers should do with their people.
This makes the UI developer's job easier, and makes it possible for us to change low-level database structures without breaking any of the UI code (which is one of the primary reasons for using a multi-tier design). This can require more development time initially, and more talented and experienced developers to create this design (which is why you're reading this book) than would be required if you just used a DataSet to pass data around, but in the long run it pays off in the form of easier maintainability and increased reliability. The Entity Framework Wizard helps by generating a good base to start building a solid business layer.
Once you have a well-designed, completed BLL using entities and repositories, developing the user interface will be very easy, and can be done by less experienced developers in less time, so some of the upfront time you spend early in the project can be recovered later when you develop the UI.
Figure 3-17 illustrates the relationship between the Entity Framework and the entity repository.
The Active Record pattern contains a series of methods that interact with the database. These methods (I call them worker methods) make the record's object active, so to speak. An active record places all the worker methods in the entity object, which means that it is all one self-contained class, but that can lead to architecture issues as the application grows. This is a very popular pattern to use and keeps things pretty simple to manage. There are fewer objects to instantiate and manage; the problem that arises is separating concerns. Because all the business methods are built into the class, you cannot separate these from the values in the record itself.
Over the past few years I found myself creating classes to hold and self-validate records held in my databases. Because I wanted all my sites to follow a standard n-tier architecture, I designed a partner class that would hold all the members to perform any business logic and talk to the data access layer. This is known as the Repository Pattern.
The Repository Pattern separates the worker methods into a separate repository class and leaves the data specific members in the entity. By isolating the members responsible for managing data access, the repository can not only be separated into a separate tier but can also easily be transformed into a portable interface.
IoC containers such as Castle Windsor are used by many to allow them to program against a business domain without needing a real backend data store. The basic principle is to program against interfaces rather than actual objects. This way, you can easily swap providers to a different data store without having to reprogram the application. I decided not to go this far because the Entity Framework handles managing communication to any database you might use.
A repository is a class that contains members that interact with the data layer and validates data. Just like many other cases in programming there are always common methods and routines that are repeated throughout an application and across applications. These pieces of code should be refactored into either a common base class to derive from or a utility class that can be called from all sorts of objects in an application.
Imports System.Web
Imports System.Web.Caching
Imports System.Security.Principal

Namespace BLL

Public MustInherit Class BaseRepository
Implements IDisposable
In the previous edition of the book, a BizObject class was created to contain many of these methods. This version takes that class and changes it to a base repository class and adds some new functionality. The class, BaseRepository, is a MustInherit (VB.NET) or abstract (C#), which means it cannot be used directly but must be inherited by a subclass that can be instantiated.
The next thing to note is it implements the IDisposable interface, which means that it implements a Dispose method. Interestingly enough this interface method is not really implemented in the BaseRepository itself, but marked as MustOverride (abstract in C#) in the derived class.
Private disposedValue As Boolean = False        ' To detect redundant calls

        ' IDisposable
        Protected MustOverride Sub Dispose(ByVal disposing As Boolean)

#Region " IDisposable Support "
        ' This code added by Visual Basic to correctly implement the
disposable pattern.
        Public MustOverride Sub Dispose() Implements IDisposable.Dispose
This pattern is automatically created by Visual Studio when the IDisposable interface is implemented in a class. The Dispose method is used to clean up any resources created by the class that need to be released. In the case of a repository class, it needs to at least ensure that the ObjectContext object is disposed of.
Private disposedValue As Boolean = False        ' To detect redundant calls

        ' IDisposable
        Protected Overrides Sub Dispose(ByVal disposing As Boolean)
            If Not Me.disposedValue Then
                If disposing Then

                    If IsNothing(_SiteMapctx) = False Then
                        _SiteMapctx.Dispose()
End If
End If
End If
Me.disposedValue = True
End Sub
' This code added by Visual Basic to correctly implement the
disposable pattern.
Public Overrides Sub Dispose()
Dispose(True)
GC.SuppressFinalize(Me)
End SubThe first things defined in the BaseRepository class are a couple of constants that can be used by the child repositories, DefPageSize and MAXROWS. The DefPageSize constant is used when performing paging operations and is used as a default value for how many records the result or page will contain. The MAXROWS constant is set to the MaxValue an integer can be. This can be used as a limiting value to the number of records a query can contain.
Public Const DefPageSize As Integer = 50
Protected Const MAXROWS As Integer = Integer.MaxValue
The next section is a set of properties that help manage caching data in memory. The first two relate to caching, EnableCaching and CacheDuration. These values can be set at runtime but have default values, so they do not have to be set each time. If EnableCaching is set to false, then any data will not be cached from that instance of the repository. It also means that, if there is a cached version of the result set, it will not be used and a query will be made to the database. The CacheDuration value specifies how many seconds a result set will be stored in memory.
#Region " Properties "

        'Needs to be definable in the config file and stored in the app cache
        Private _enableCaching As Boolean = True
        Private _cacheDuration As Integer = 0

        Protected Property EnableCaching() As Boolean
            Get
                Return _enableCaching
            End Get
            Set(ByVal value As Boolean)
                _enableCaching = value
            End Set
        End Property

        Protected Property CacheDuration() As Integer
            Get
                Return _cacheDuration
            End Get
            Set(ByVal value As Integer)
_cacheDuration = value
End Set
End Property
Private _cacheKey As String = "CacheKey"
Public Property CacheKey() As String
Get
Return _cacheKey
End Get
Set(ByVal Value As String)
_cacheKey = Value
End Set
End Property
#End RegionThe CacheKey property is used by inheriting repositories as a prefix to the objects and collections they cache. The reason that a common CacheKey property is a member of the BaseRepository class is to help with managing the purging of cache objects. As repositories retrieve entities they can place them in memory as a named cache object. This will typically be a list of entities but can be individual entities as the situation warrants. Each cached object will have a name associated with it to access it. As entities are added to and updated in the data store, the cache may need to be purged, or possibly all the cached objects of a specific type may need to be purged. By prefixing all the cache objects with a common key for the repository, there should be a uniform way to access these objects.
If you examine the CacheData method in the code sample that follows, you can see that it takes a key and data to cache. The key is a string passed to it to identify the data being cached. The method checks to make sure that the data being passed in is not null and inserts it into the repository's Cache object. For this example, the Cache object is simply the current context's cache object.
#Region " Cache "

        Protected Shared ReadOnly Property Cache() As Cache
            Get
                Return HttpContext.Current.Cache
            End Get
        End Property

        Protected Shared Sub CacheData(ByVal key As String, ByVal data As Object)
            If Not IsNothing(data) Then
                Cache.Insert(key, data, Nothing, _
                    DateTime.Now.AddSeconds(120), TimeSpan.Zero)
            End If
        End Sub

        Protected Sub PurgeCacheItems(ByVal prefix As String)
            prefix = prefix.ToLower
            Dim itemsToRemove As New List(Of String)

            Dim enumerator As IDictionaryEnumerator = Cache.GetEnumerator()
            While enumerator.MoveNext
                If enumerator.Key.ToString.ToLower.StartsWith(prefix) Then
                    itemsToRemove.Add(enumerator.Key.ToString)
End If
End While
For Each itemToRemove As String In itemsToRemove
Cache.Remove(itemToRemove)
Next
End Sub
#End RegionThe PurgeCacheItems method accepts a prefix, which should correspond to the repository's CacheKey property. As I start examining the repositories, you will start to see that a repository may cache data in various forms based on a variety of data filters.
The next section of code focuses on the Entity Framework connection string. There is a ConnectionString property and a GetActualConnectionString function that returns the actual connection string from the site's configuration file. The ConnectionString property actually refers to the name of the connection string in the connection string section of the configuration file. This methodology forces the storage of the connection string in the configuration file and keeps it from being hard-coded as a piece of the application.
Private _connectionString As String = "Set the ConnectionString"
Public Property ConnectionString() As String
Get
                Return _connectionString
End Get
Set(ByVal Value As String)
                _connectionString = Value
End Set
End Property

Protected Function GetActualConnectionString() As String
Return ConfigurationManager.ConnectionStrings(ConnectionString).ConnectionString

End Function
The GetActualConnectionString function calls the ConfigurationManger's ConnectionStrings collection and retrieves the connection string for the model.
The following code comes from the SiteMapRepository's constructor methods. The first one accepts the name of a connection string and uses it, making it flexible enough to use a different connection string if needed. The second method uses the ConnectionString property from the TheBeerHouseSection class. A class that manages access to the site's custom configuration section. Both constructors set the CacheKey to "SiteMap".
Public Sub New(ByVal sConnectionString As String)
ConnectionString = sConnectionString
CacheKey = "SiteMap"
End Sub

Public Sub New()

    ConnectionString = Globals.Settings.DefaultConnectionStringName
CacheKey = "SiteMap" End Sub
The next section of code I want to discuss is what I call user information properties. At one time, they were contained in the BaseObject class, but because they can be used in many places outside of the repository or entity classes, I moved them to the Helpers class. The first property, CurrentUser, returns a reference to the current IPrincipal object. This simply wraps a call to the HttpContext.Current.User call. The CurrentUserName property returns the username if the user has been authenticated; if not, then it returns an empty string. Notice how it uses the CurrentUser property to reduce the amount of code it uses.
Both of these properties are used throughout the application concerning user authentication. You will see shortly that the CurrentUser property will play a role in extending the authentication properties of entities.
Protected Shared ReadOnly Property CurrentUser() As IPrincipal
Get
                Return HttpContext.Current.User
        End Get
End Property

Protected Shared ReadOnly Property CurrentUserName() As String
Get
                Dim userName As String = String.Empty
                If CurrentUser.Identity.IsAuthenticated Then
                    userName = CurrentUser.Identity.Name
                End If
                Return userName
        End Get
End Property

Protected Shared ReadOnly Property CurrentUserIP() As String
Get
                Return HttpContext.Current.Request.UserHostAddress
        End Get
End Property
The final property is CurrentUserIP, which returns a string of the client IP address. This is obtained from the Request's UserHostAddress property. This property is important because it can be used to analyze where the user is logged for analysis and authentication purposes, and so forth. As I introduce new concepts in later chapters, we will integrate Akismet spam comment filtering and wants the client IP address to determine if the comment is potentially spam or not. The CurrentUserIP property makes it very convenient to obtain this value.
The EncodeText function takes a string and encodes it so that it can be safely displayed in HTML. First, it runs the string through the HtmlEncode method, then it replaces double spaces with the HTML-encoded and line returns with a <br> tag.
Protected Shared Function EncodeText(ByVal content As String) As String
            content = HttpUtility.HtmlEncode(content)
content = content.Replace(" ", " ").Replace("
", "<br>")
Return content
End FunctionThe next method is ConvertNullToEmptyString, which is a safety method to make sure that the application does not attempt to use a null string. If a null string is used in an application, an exception will typically be thrown, converting it to an empty string is a safe way to keep this from happening. A null string happens when a string is created but not initialized.
Protected Shared Function ConvertNullToEmptyString(ByVal input As String) As String
            If String.IsNullOrEmpty(input) Then
                Return String.Empty
            Else
                Return input
            End If
End Function
More members can be added in a similar manner that can be used by child classes.
It all starts with a BaseRepository class that contains some common properties and methods that will be used by all the repositories in the BLL. It is marked as MustInherit, (abstract in C#), meaning that it cannot be instantiated on its own and must be inherited by another class and it can be instantiated. The BaseRepository class only provides common helper properties and methods that help you work with data.
The next class in the hierarchy is the BaseArticleRepository class, which contains one key member, Articlesctx. The Articlesctx property wraps around an ArticlesEntities object ArticlesEntities is a customized ObjectContext object created by the Entity Framework Wizard. The Articlesctx property wraps around a private variable. The property checks to see if an ArticlesEntities context has already been created, and if not, creates one and returns it. The structure and relationship of these classes is illustrated in Figure 3-18.
Private _Articlesctx As ArticlesEntities
Public Property Articlesctx() As ArticlesEntities
Get
If IsNothing(_Articlesctx) Then
               _Articlesctx = New ArticlesEntities(GetActualConnectionString())
            End If
            Return _Articlesctx
         End Get
         Set(ByVal Value As ArticlesEntities)
            _Articlesctx = Value
         End Set
End Property
The reason why there is a BaseArticleRepository class is that the news module consists of three entity types: Article, Category, Comment. I have created a targeted repository for each entity. In this example, I am showing the ArticleRepository class. The ArticleRepository class contains a series of methods to interact with the Entity Framework and database to retrieve, insert, update, and delete articles. I will detail the members in Chapter 5. The BaseArticleRepository holds common members used by each of the child repositories. In this case, it is a set of constructors and the ArticleContext object. Each of these members is used by the child repositories.

The Entity Framework Model Wizard generates a series of partial classes that can be extended to integrate custom logic and properties. Each entity in the Entity Model is derived from the System.Data.Objects.DataClasses.EntityObject class. This ensures each entity contains some base members that allow it to interact with the EF Object Services.
The Article class consists of a partial class distributed across two files. The Entity Framework Wizard generates the core class that consists of properties, methods, and events related to the data that represents a news article. All custom entities inherit from EntityObject and extend its functionality. The entity's class is adorned with attributes that describe it to the Entity Framework.
<Global.System.Data.Objects.DataClasses.EdmEntityTypeAttribute(
NamespaceName:="ArticlesModel", Name:="Article"), _
     Global.System.Runtime.Serialization.DataContractAttribute(
IsReference:=True), _
     Global.System.Serializable()> _
    Partial Public Class Article
        Inherits Global.System.Data.Objects.DataClasses.EntityObject
Each entity contains at least a series of properties that represent data. They are prefixed with a series of attributes that describe the property to the Entity Framework. Examining the code sample that follows for the ArticleID property, you can see it is an EntityKeyProperty and is not nullable. I assume that you are familiar with how tables are defined in SQL Server, so looking at these attributes, you can quickly ascertain this property probably represents at least one of the primary key fields in a table. In this case, it is the primary key in the database, and it is the primary key of the entity as well. Remember, an entity does not have to actually have a one-to-one mapping with database tables.
The setter portion of the property has some features I want to discuss. First, there are a couple of extra methods defined below it: OnArticleIDChanging and OnArticleIDChanged. These are both marked as partial methods, meaning that you can create another partial class to extend these methods and give them body. Typically, if you had some sort of custom validation logic that needed to be executed, extending these methods would be a good idea.
<Global.System.Data.Objects.DataClasses.EdmScalarPropertyAttribute(
EntityKeyProperty:=True, IsNullable:=False), _
Global.System.Runtime.Serialization.DataMemberAttribute()> _
Public Property ArticleID() As Integer
Get
                Return Me._ArticleID
End Get
Set(ByVal value As Integer)
                Me.OnArticleIDChanging(value)
                Me.ReportPropertyChanging("ArticleID")
                Me._ArticleID =
Global.System.Data.Objects.DataClasses.
StructuralObject.SetValidValue(value)
                Me.ReportPropertyChanged("ArticleID")
                Me.OnArticleIDChanged()
End Set
End Property
Private _ArticleID As Integer
Partial Private Sub OnArticleIDChanging(ByVal value As Integer)
End Sub
Partial Private Sub OnArticleIDChanged()
End Sub
This example creates the body of the OnArticleIdChanging method in a custom extension to the Article class to validate the value is 0 or greater. If it is not, a new ArgumentException is thrown explaining the issue.
Private Sub OnArticleIDChanging(ByVal value As Integer)
If value < 0 Then
Throw New ArgumentException("The ArticleId cannot be less than 0.")
    End If
End Sub
The next items to note are the calls to the ReportPropertyChanging and ReportPropertyChanged methods in the Set accessor of the ArticleID property. The ReportPropertyChanging method is part of the EntityObject class and is called to notify the IEntityChangeTracker that the value is about to change, so it can cache the initial value. Similarly, the ReportPropertyChanged method is called to commit the cached value and call the EntityMemberChanged method. This collectively works with the state manager to manage the current state of the entity. So, when the SaveChanges method is called on the entity context, it will know which entities to commit to the database.
The next thing to examine in the generated code is how references are handled. In the case of an article, it needs to belong to a category, which is a many to one foreign key relationship. This is indicated by the EdmRelationshipNavigationPropertyAttribute attribute. This attribute does the linking between the entity and the related entity. In this case, it defines the foreign key relationship to the category. The Category property manages the value of the category entity to which the article belongs.
<Global.System.Data.Objects.DataClasses.EdmRelationshipNavigationPropertyAttribute(
"ArticlesModel", "FK_tbh_Articles_tbh_Categories", "tbh_Categories"), _
Global.System.Xml.Serialization.XmlIgnoreAttribute(), _
Global.System.Xml.Serialization.SoapIgnoreAttribute(), _
Global.System.Runtime.Serialization.DataMemberAttribute()> _
Public Property Category() As Category
Get
                Return CType(Me,
Global.System.Data.Objects.DataClasses.IEntityWithRelationships)
.RelationshipManager.GetRelatedReference(Of Category)(
"ArticlesModel.FK_tbh_Articles_tbh_Categories", "tbh_Categories").Value
End Get
        Set(ByVal value As Category)
                CType(Me,
Global.System.Data.Objects.DataClasses.IEntityWithRelationships)
.RelationshipManager.GetRelatedReference(Of Category)(
"ArticlesModel.FK_tbh_Articles_tbh_Categories", "tbh_Categories").Value = value
        End Set
End Property

<Global.System.ComponentModel.BrowsableAttribute(False), _
Global.System.Runtime.Serialization.DataMemberAttribute()> _
Public Property CategoryReference() As
Global.System.Data.Objects.DataClasses.EntityReference(Of Category)
Get
                Return CType(Me,
Global.System.Data.Objects.DataClasses.IEntityWithRelationships)
.RelationshipManager.GetRelatedReference(Of Category)(
"ArticlesModel.FK_tbh_Articles_tbh_Categories", "tbh_Categories")
End Get
Set(ByVal value As Global.System.Data.Objects.DataClasses.EntityReference(
Of Category))
                If (Not (value) Is Nothing) Then
                    CType(Me,
Global.System.Data.Objects.DataClasses.IEntityWithRelationships)
.RelationshipManager.InitializeRelatedReference(Of Category)(
"ArticlesModel.FK_tbh_Articles_tbh_Categories", "tbh_Categories", value)
                End If
End Set
End Property
The CategoryReference property is of type EntityReference(Of Category . An EntityReference represents the navigational relationship between an article and a category in this case. If the relationship were one-to-many, it would have an associated EntityCollection property, which is the case for article comments. But since the article can only belong to one category, the Category property is simply a single category entity.
<Global.System.Data.Objects.DataClasses.EdmRelationshipNavigationPropertyAttribute(
"ArticlesModel", "FK_tbh_Comments_tbh_Articles", "tbh_Comments"), _
Global.System.Xml.Serialization.XmlIgnoreAttribute(), _
Global.System.Xml.Serialization.SoapIgnoreAttribute(), _
Global.System.Runtime.Serialization.DataMemberAttribute()> _
Public Property Comments() As
Global.System.Data.Objects.DataClasses.EntityCollection(Of Comment)
Get
                Return CType(Me,
Global.System.Data.Objects.DataClasses.IEntityWithRelationships)
.RelationshipManager.GetRelatedCollection(Of Comment)(
"ArticlesModel.FK_tbh_Comments_tbh_Articles", "tbh_Comments")
End Get
Set(ByVal value As Global.System.Data.Objects.DataClasses.EntityCollection(
Of Comment))
                If (Not (value) Is Nothing) Then
                    CType(Me,
Global.System.Data.Objects.DataClasses.IEntityWithRelationships)
.RelationshipManager.InitializeRelatedCollection(Of Comment)(
"ArticlesModel.FK_tbh_Comments_tbh_Articles", "tbh_Comments", value)
                End If
End Set
End Property
Notice the difference between the Comments property and the Category property is comments are a one-to-many relationship and, thus, require a collection of comments. In short, an EntityCollection represents the many end of the relationship.
In the last edition of this book, a common base class, BizObject, that contained several helper methods and properties. Since entities are derived from the EntityObject, this cannot be done in this architecture. Since most of helper members actually help in the interaction with the database, it does not make sense to hold those methods in the entity object structure anyway. Instead, I created the IBaseEntity interface that all entities should implement. This interface is pretty simple, it contains an IsValid and a SetName Property.
Public Interface IBaseEntity
        ReadOnly Property IsValid() As Boolean
        Property SetName() As String

        ReadOnly Property CanEdit() As Boolean
        ReadOnly Property CanRead() As Boolean
        ReadOnly Property CanDelete() As Boolean
        ReadOnly Property CanAdd() As Boolean

    End Interface
Earlier, I talked about using the IsValid property in the entity object; it is used to determine if the object satisfies a set of rules that determine if the object is complete. Each entity is responsible for checking the data to ensure that it is valid in its own unique fashion. For example, a SiteMapInfo entity should have at least a URL, a RealURL, and a Title to be considered valid. These are the minimum requirements needed to be able to actually function in the scope of the navigation infrastructure. If these values have not been set, then this entity is not valid and should not be committed. If these conditions are met, the property returns true; if not, it returns false, indicating that it is either not ready or cannot be used.
Public ReadOnly Property IsValid() As Boolean Implements IBaseEntity.IsValid
Get
If String.IsNullOrEmpty(URL) = False And _
                    String.IsNullOrEmpty(RealURL) = False And _
                    String.IsNullOrEmpty(Title) = False Then
                    Return True
                End If
                Return False
End Get
End Property
The SetName property is used when the name of the entity's set is needed. We will investigate these instances as we examine how modules are designed.
While the Entity Data Model Wizard generates a class that inherits from EntityObject, which contains series of properties to represent each field in the entity, it has built-in limitations. The entity classes can be extended by using partial classes and partial methods. Each generated property follows a pattern with the usage of EDM attributes, a common setter pattern, a private variable to hold the value, and pair of partial methods to indicate the value is changing and has changed.
<Global.System.Data.Objects.DataClasses.EdmScalarPropertyAttribute(
EntityKeyProperty:=True, IsNullable:=False), _
Global.System.Runtime.Serialization.DataMemberAttribute()> _
Public Property SiteMapId() As Integer
Get
                Return Me._SiteMapId
End Get
Set(ByVal value As Integer)
                Me.OnSiteMapIdChanging(Value)
                Me.ReportPropertyChanging("SiteMapId")
                Me._SiteMapId =
Global.System.Data.Objects.DataClasses.StructuralObject.SetValidValue(Value)
                Me.ReportPropertyChanged("SiteMapId")
                Me.OnSiteMapIdChanged()
End Set
End Property
Private _SiteMapId As Integer
Partial Private Sub OnSiteMapIdChanging(ByVal value As Integer)
End Sub
Partial Private Sub OnSiteMapIdChanged()
End Sub
Within the property setter, the OnSiteMapIDChanging method is called, allowing an opportunity to perform custom validation on the value being passed to the property. While the value can be validated, the only way to stop the process is to throw an exception.
Private Sub OnSiteMapIdChanging(ByVal value As Integer)
If value < 0 Then
                Throw New ArgumentException("The SiteMapId cannot be less than 0.")
End If
End Sub
After the changing event is executed, the ReportPropertyChanging method is called, letting the Entity Object Services indicate a value is changing. The object services then knows to track the property for changes in the ObjectStateManager. The tracking is completed by calling the ReportPropertyChanged method.
Finally, similarly to the OnSiteMapIDChanging method, the OnSiteMapID_Changed method is called at the end of the setting. Again, custom validation can be performed in this partial method.
Extending the generated entity class is done by creating custom members in a customized partial class. A common method of extending the entity is to create immutable properties that manipulate values. In this example, an article's Average rating is calculated by ensuring that there is at least one vote and averaging the TotalRating by the number of Votes.
Public ReadOnly Property AverageRating() As Double
            Get
                If Me.Votes >= 1 Then
                    Return CDbl(Me.TotalRating) / CDbl(Me.Votes)
                Else
                    Return 0.0
                End If
            End Get
End Property
There is no limitation on how much an entity can be directly extended by adding members by extending the partial class generated by the Entity Data Model Wizard.
In every site- or web-based application, there is some data that doesn't change very often, which is requested very frequently by a lot of end users. Examples are a list of article categories, an e-store's product categories and product items, a list of countries and states, and so on. The most common solution to increase the performance of your site is to implement a caching system for that type of data, so that once the data is retrieved from the data store, it will be kept in memory for some interval, and subsequent requests for the same data will retrieve it from the memory cache, avoiding a round trip to the database server and running another query. This will save processing time and network traffic and, thus, produce faster output to the user. In ASP.NET 1.x, the System.Web.Caching.Cache class was commonly used to cache data. The cache works as an extended dictionary collection, whereby each entry has a key and a related value. You can store an item in cache by writing Cache.Insert("key", data), and you retrieve it by writing data = Cache["key"]. The Insert method of the Cache class has a number of other overloads through which you can specify either the cached data's expiration time or how long the data will be kept in the cache, and whether it is a sliding interval (a sliding interval is reset every time the cached data is accessed), plus a dependency on a file or other cached item. When the dependent file is changed, the expiration time is reached, or the interval passes, the data will be purged from the cache, and at the next request, you will need to query the data directly from the database, storing it in the cache again.
The Cache class, which was greatly improved with the release of ASP.NET 2.0, has not changed in ASP.NET 3.5. Support for CacheDependency is still available and its child SQLCacheDependency is supported in tandem with Entity Framework. In fact, it has nothing to do with Entity Framework because entities and objects are cached after they are returned from Entity Framework; the SQLDependency simply hooks the cache object into database changes based on the dependency.
It is important to disconnect entities from the context before caching them because tying them to a particular context adds overhead and causes issues when trying to work with the entities against another context. The proper way to retrieve entities that will be cached is by setting the entity set's MergeOption to NoTracking. This retrieves the entities without their being attached to the context being used, reducing the overhead needed to retrieve them and have them in a state that is not attached to the context. The following method shows retrieving a list of SiteMapInfo with MergeTracking turned off to allow caching the results.
Public Function GetSiteMapNodes() As List(Of SiteMapInfo)

Dim lSiteMapNodes As List(Of SiteMapInfo)

If EnableCaching AndAlso Not IsNothing(Cache(key)) Then
                lSiteMapNodes = CType(Cache(key), List(Of SiteMapInfo))
End If

SiteMapctx.SiteMaps.MergeOption = MergeOption.NoTracking
                lSiteMapNodes = (From lSiteMapNode In SiteMapctx.SiteMaps _
                        Order By lSiteMapNode.SortOrder).ToList()

       If EnableCaching Then
                CacheData(key, lSiteMapNodes)
       End If

Return lSiteMapNodes

End Function
Looking at the GetSiteMapNodes function you can see that it also checks the EnableCaching property to verify that caching is enabled, and if so, it checks to see if the results already exist. If they do, it returns the results; if not, then it retrieves the values form the database. Again, if caching is enabled, it will cache the results before returning the them.
It is interesting the Entity Framework team is working on a transparent caching mechanism that will be data-store-agnostic. For now there is a way it can be done and detailed in a blog entry by the Entity Framework Design team;
http://blogs.msdn.com/efdesign/archive/2008/07/09/transparent-caching-support-in-the-entity-framework.aspx. The idea being that EF will cache the results and manage purging stale data from the cache. This would all happen above the DAL but below the object services layer. This way, it is done before any query is passed to the data store but still below where any queries would have access to query the cached data instead. The ultimate idea is to make caching a first-class or natural part of EF.
Transactions are automatically managed within the same object context by the Entity Framework Object Services. This includes multiple operations that are dependent on successful completion of queries or transactions that depend on distributed systems, such as e-mail or Microsoft Message Queue (MSMQ). Entity Framework operations can also be executed within a System.Transactions Transaction to ensure that the requirements are met.
The use of transactions and Object Services requires the following considerations: only operations against the data source are transacted, SaveChanges will use any existing transaction to perform the operation, and if none exists, it will create one. Changes to objects in the object context are not accepted until the entire transaction is complete. If you retry an operation within a transaction the SaveChanges method should be called with acceptChangesDuringSave set to false, then AcceptAllChanges should be called after the transaction operations have completed. Avoid calling SaveChanges after calling AcceptAllChanges; this will cause the context to reapply all the changes to the data source.
The web.config file is composed of multiple sections of related elements that are used by the application to determine how the site should work. There are numerous sections provided by ASP.NET out of the box, but this can be extended to add custom sections. The Beer House site contains numerous configuration sections for each of the modules that help define module defaults, paths, and so forth.
The BLL will need the caching settings, and the user interface will need other settings, such as the recipient's e-mail address for e-mail sent from the site's Contact Us form, the prefix for their subject lines (so that it's easy to spot them among all the other e-mails, and one to set up a rule to move them to a dedicated folder in your favorite e-mail client program). All these settings are saved in the web.config file, so it's easy for an administrator to change them using only a text editor. Anytime the web.config file is changed, ASP.NET will automatically reload it, and its modified settings will be used for new users, and will not require you to restart the IIS application (which would have terminated any users already online) because changes to the web.config file will automatically recycle the application.
Connection string settings have their own dedicated section in web.config: <connectionStrings>. Here's an example that shows how to store a connection string and give it a shorter and friendlier name that will be used to retrieve it later from code, or from other configuration elements of web.config:
<connectionStrings>
<remove name="LocalSqlServer"/>
<add name="TheBeerHouseEntities"
connectionString="metadata=res://*;provider=System.Data.SqlClient;
provider connection string="Data Source=.;
Initial Catalog=TheBeerHouseVB;Integrated Security=True;MultipleActiveResultSets=
True""
 providerName="System.Data.EntityClient"/>
<add name="LocalSqlServer" connectionString="Data Source=.;
Integrated Security=True;Initial Catalog=TheBeerHouseVB;"
 providerName="System.Data.SqlClient"/>
</connectionStrings>
These connection strings settings are referenced by many other configuration elements — for example, the element that configures the ELMAH system (Error Logging Modules and Handlers, which is used to log details about exceptions and gracefully handle them), or the SQL-dependency caching settings. By default, all these elements have a connectionStringName attribute set to LocalSqlServer (remember the EF has a different connection string, so having a traditional connection string is very important), which refers to a connection string pointing to a local SQL Server database called ASPNETDB.MDF — for convenience, we'll use that same file name for our database. If you choose to rename the file, you can create a new connection string element under <connectionStrings>, and change all elements' connectionStringName attribute to your new connection string name. A more drastic option would be to remove the LocalSqlServer entry from machine.config, and then register it again with the new connection string.
By doing this, all modules pointing to the LocalSqlServer setting will take the new connection string, and you won't have to change their individual connectionStringName attribute. However, I generally don't recommend changing machine.config because it creates deployment issues, and any syntax error in that file can render the whole web server (not just that site) inoperable. And, of course, a web hosting provider is not going to let you make this change. I mention it only for completeness and because it might be the right solution on a tightly controlled corporate intranet web server, for example.
To retrieve the connection strings from code, there's a new class called System.Web.Configuration.WebConfigurationManager, which has a ConnectionStrings dictionary property to retrieve the connection string by name, as follows (note the square brackets used to index into the dictionary):
Dim connString as = WebConfigurationManager.ConnectionStrings(
   "LocalSqlServer").ConnectionString
This class also has an AppSettings dictionary property that lets you read the values stored in the <appSettings> section. However, a better option would be to create a class that reads from a custom section in web.config, so each subapplication would have its settings isolated from one another. You just write a class that inherits from the System.Configuration.ConfigurationSection class and decorate its public properties with the ConfigurationProperty attribute to indicate that they need to be filled with settings read from the web.config file, and the actual reading will be done for you when your getter reads that setting from your base class! For elements nested under a parent custom section, you need to create a new class that inherits from ConfigurationElement (instead of ConfigurationProperty) and, again, define your properties with the ConfigurationProperty attribute. Here's an abbreviated example:
Public Class TheBeerHouseSection
    Inherits ConfigurationSection

    <ConfigurationProperty("defaultConnectionStringName",
DefaultValue:="LocalSqlServer")> _
Public Property DefaultConnectionStringName() As String
Get
Return CStr(Me("defaultConnectionStringName"))
End Get
Set(ByVal value As String)
Me("DefaultConnectionStringName") = value
End Set
End Property
<ConfigurationProperty("articles", IsRequired:=True)> _
Public ReadOnly Property Articles() As ArticlesElement
Get
Return CType(Me("articles"), ArticlesElement)
End Get
End Property
End Class
Public Class ArticlesElement
Inherits ConfigurationElement
<ConfigurationProperty("ratingLockInterval", DefaultValue:="15")> _
Public Property RatingLockInterval() As Integer
Get
Return CInt(Me("ratingLockInterval"))
End Get
Set(ByVal value As Integer)
Me("ratingLockInterval") = value
End Set
End Property
End ClassThis TheBeerHouseSection class will be mapped to a custom configuration section. It has a property named DefaultConnectionStringName that maps a "defaultconnectionstringname" attribute, which has a default value of "LocalSQLServer". It also has the Articles property of type ArticlesElement, which maps to a subelement named articles with the RatingLockInterval Integer attribute. Note that the ConfigurationProperty attribute of the ArticlesElement property has the IsRequired option set to true, meaning that the element is required to be present in the web.config file. The other properties do not have this constraint because they have a default value.
Once the class is ready you must register it in the web.config file and define the mapping to a section named "site", as follows:
<configuration xmlns="http://schemas.microsoft.com/.NetConfiguration/v2.0">
   <configSections>
      <section name="theBeerHouse" type="TheBeerHouse.TheBeerHouseSection,
TBHBLL, Version=3.5.0.1, Culture=neutral, PublicKeyToken=null"/>
   </configSections>

<theBeerHouse defaultConnectionStringName="TheBeerHouseEntities"
siteDomainName="[Add Your Base URL Here]">
<articles RatingLockInterval="10" /> </theBeerHouse> <!— other configuration sections... —> </configuration>
To read the settings from code, you use the WebConfigurationManager's GetSection to get a reference to the "theBeerHouse" section, and cast it to the TheBeerHouseSection type. Then, you can use its properties and subproperties:
Public Shared ReadOnly Settings As TheBeerHouseSection = _
CType(WebConfigurationManager.GetSection("theBeerHouse"), TheBeerHouseSection)
This book's sample site requires a number of settings for each module, so there will be a single custom configuration section with one subelement for each module. Each module will have its own connection string and caching settings. However, it's useful to provide some default values for these settings at the section level, so that if you want to use the same connection string for all modules, you don't have to specify it separately for each module, just once for the entire site. In the "Solution" section of this chapter, you'll see the custom section class, while the module-specific elements will be added in their specific chapters later in the book. Also in this chapter, we'll develop a class to map a subelement named contactForm with settings for sending the e-mails from the Contact Us page (the subject line's prefix, and the To and CC fields).
With the data and business layers covered, it is time to start defining how the data will be presented to and collected from the user. ASP.NET provides a great set of resources to produce a very rich interface for customers and staff to be productive and interactive with theBeerHouse site. Layout issues were discussed in the preceding chapter, so here we'll discuss design issues pertaining to a common pattern for displaying and administering data.
When adding a new Web Form (Page) to an ASP.NET website, Visual Studio automatically adds the corresponding code-behind file with a class for the page that inherits from System.Web.UI.Page. When building an application like theBeerHouse, there is always common code that each page uses. Adding redundant code is a sign of poor programming because it adds unnecessary maintenance to the application.
In the previous edition of the book, a BasePage class was leveraged to contain those common members. This class inherits from System.Web.UI.Page and, thus, inherits all the features of the Page class needed by the BasePage class. As you examine the code of theBeerHouse site, there will be other page classes that inherit from the BasePage class. For example, there is an ArticlePage class that contains common members related to article management.
Public Class BasePage
        Inherits System.Web.UI.Page
I am going to review a few of the new members I have added to the BasePage class since the last edition. The first members manage moving Hidden Fields (think ViewState) to the bottom of the page. A hidden field is used by pages to hold values that need to be passed back to the server but not displayed to the user. The reason they exist is because the web is stateless, meaning that each request or action against the site is a completely independent action. Cookies and hidden fields are used to link requests from the server's perspective.
ViewState is unique to ASP.NET and is used to hold a variety of values, typically for web controls, but it is not limited to that duty. One of the problems with the ViewState is that it can get very bloated very quickly. It is also rendered at the top of the content. There are two problems with this; it hurts search engine optimization and it hurts perceived client-side performance.
I have seen a few studies that show search engines tend to only index the topmost parts of the content of a page. This means that if the content you want to get indexed has been pushed down the page by a large ViewState, it might not be indexed because the ViewState counts towards those precious bytes.
Large ViewState aside, page content is rendered as it is received by the browser, and hidden fields at the top of the page only hinder this by being at the front of the content stream. There are many factors that play into how fast content is rendered, but that is way outside the scope of this book. However, moving these hidden fields to the bottom of the page is important to help rendering and on-page SEO. There are drawbacks to this technique because there are many instances where ASP.NET AJAX is involved because it relies on the ViewState being present to properly function. So, if you have the ViewState moved to the bottom of the page and have issues with AJAX functioning properly, then return the ViewState to the top of the page.
Since hidden fields are injected into the content rendered by the page typically at the top of the content by ASP.NET the request has to be intercepted right after it has been rendered by the page and any controls but before it is sent down the wire. The Page class has a Render method that can be overwritten, which provides the opportunity needed to massage the content.
The BasePage class has a MoveHiddenFields Boolean property that tells the custom Render method if it should move the hidden fields to the bottom of the page. One problem I have seen with moving the hidden fields is that some controls do not execute correctly because they are looking for those fields during the page load event processing. For example, the FCKEditor does not function if the hidden fields are moved.
Private _moveHiddenFields As Boolean = True
Public Property MoveHiddenFields() As Boolean
            Get
                Return _moveHiddenFields
            End Get
            Set(ByVal Value As Boolean)
                _moveHiddenFields = Value
            End Set
End Property

Private Function MoveHiddenFieldsToBottom(ByVal html As String) As String
            Dim sPattern As String = "<input type=""hidden"".*/*>|
<input type=""hidden"".*></input>"
            Dim mc As MatchCollection = Regex.Matches(html, sPattern, _
                 RegexOptions.IgnoreCase & RegexOptions.IgnorePatternWhitespace)
Dim sb As New StringBuilder
For Each m As Match In mc
sb.AppendLine(m.Value)
html = html.Replace(m.Value, String.Empty)
Next
Return html.Replace("</form>", sb.ToString & "</form>")
End FunctionIf MoveHiddenFields is true the custom Render method calls the MoveHiddenFieldsToBottom method, passing the string that contains the HTML to be rendered in the browser. This method uses a regular expression to match all the hidden fields and loop through them, removing them and appending them to a StringBuilder. Once the loop is done, all the hidden fields have been stripped from the HTML, but the last line of the method inserts them back in at the very bottom of the <form> tag. It is important to insert the hidden fields before the form tag close because they need to be included in the post back to the server managed by the form.
Protected Overrides Sub Render(ByVal writer As System.Web.UI.HtmlTextWriter)

            Dim stringWriter As New System.IO.StringWriter
            Dim htmlWriter As New HtmlTextWriter(stringWriter)
            MyBase.Render(htmlWriter)
            Dim html As String = stringWriter.ToString()

            If MoveHiddenFields Then

                html = MoveHiddenFieldsToBottom(html)

            End If

            writer.Write(html)

End Sub
Finally, the Render method writes the optimized HTML to the HTMLTextWriter, which ultimately sends the content down the wire to the client. The overall process incurs negligible overhead to optimize the page content.
The next element I want to discuss is the PrimaryKeyId property. This a common pattern used to check for the existence of a primary key being passed in the URL or stored in the page's ViewState. It first checks to see if the value has been stored in the ViewState, and if not, it then checks to see if it was passed in the URL's QueryString. If either of those criteria is not met, then it returns 0. This value will be used in pages to retrieve content, such as an article, from the database.
Public Property PrimaryKeyId(ByVal vPrimaryKey As String) As Integer
            Get
                If Not IsNothing(ViewState(vPrimaryKey)) AndAlso
 IsNumeric(ViewState(vPrimaryKey)) Then
                    Return CInt(ViewState(vPrimaryKey))
ElseIf Not IsNothing(Request.QueryString(vPrimaryKey))
AndAlso IsNumeric(Request.QueryString(vPrimaryKey)) Then
ViewState(vPrimaryKey) = CInt(Request.QueryString(vPrimaryKey))
Return CInt(Request.QueryString(vPrimaryKey))
End If
Return 0
End Get
Set(ByVal Value As Integer)
ViewState(vPrimaryKey) = Value
End Set
End PropertyIn this example, the ArticleId property of the ArticlePage class calls the PrimaryKeyId property to retrieve the value.
Public Property ArticleId() As Integer
Get
                Return PrimaryKeyId("ArticleId")
End Get
Set(ByVal Value As Integer)
                PrimaryKeyId("ArticleId") = Value
End Set
End Property
There are other members of the BasePage class that will be used as the balance of the book is presented. There are also helper classes or what I think of as utility classes that are also used to contain common methods. The reason they are important is these methods are not page-specific (meaning tied to a specific page) and might need to be used in other classes. For example, the site takes advantage of user controls and Web Parts as part of its UI architecture. They will need to access some of these methods, too.
The ListView control is new in ASP.NET 3.5 and combines the functionality of the Repeater, GridView, and Datalist controls but adds the capability to page and sort the data naturally. While it is not as lightweight as the Repeater or DataList control, it is pretty close and adds the paging and sorting capabilities built into the GridView control. Editing capabilities are also available with the ListView control, but I will not leverage this feature. All these features make it a very rich tool to display tables of data on the web.
Most examples and demos of the ListView control show how to bind the control to one of the DataSource controls. While the previous edition of this book leveraged the ObjectDataSource control and there is an EntityDataSource control, I will not use them to bind data. This technique is often not done in high-demand production sites and reduces an n-tier architecture to a flat model by making databinding line of sight to the database. Since it is very easy to bind collections to a ListView from a business layer, I have opted to use this technique.
Once data is bound to a ListView, it is displayed in an ordered fashion by using templates. If you have ever used a Repeater, a DataList, or templates to build the layout of a GridView, this will seem like second nature. There are a few new twists to the template model used in the Repeater and DataList controls, but they are minor. The ListView offers a rich set of possible templates to control how data is displayed to the end user.
The ListView displays data using a set of templates, allowing declarative and code-behind databinding. It actually uses a nested layout structure where everything starts with the LayoutTemplate and proliferates from there. The only real requirement for the LayoutTemplate is that it contains at least one control marked as a placeholder.
For the administration pages of theBeerHouse application, I use a table to create the layout of the ListView control. The first row of the table contains the header row of the data. In the example, there are Title, Edit, and Delete column. These columns are mapped to the Title property of the bound entities, followed by a column that contains image buttons that will either link to a page to edit the record or delete the record from the database.
<asp:ListView ID="lvSiteMap" runat="server">
<LayoutTemplate>
            <table cellspacing="0" cellpadding="0" class="AdminList">
    <THead>
                    <tr class="AdminListHeader">
                            <td>Title</td>
    <td>Edit</td>

    <td>Delete</td>
</tr>
    </THead>
    <TBody>
<tr id="itemPlaceholder" runat="server"></tr>
    </TBody>
</table>

</LayoutTemplate>
</asp:ListView>
The next row is changed to a server control by adding the runat="server" attribute. It has the ID of itemPlaceholder, which is important because this tells the ListView to use this control to add items to the list. In this case, the item templates should be a table row <tr> with the appropriate table cells <td>.
<EmptyDataTemplate>
<tr>
<td colspan="3"><p>Sorry there are no Categories available at this time.</p></td>
</tr>
</EmptyDataTemplate>
<ItemTemplate>
<tr>
<td class="ListTitle"><a href='<%# String.Format(
"AddEditSiteMap.aspx?categoryid={0}", Eval("siteMapid")) %>'>
<%# Eval("Title") %></a>
</td>
<td><a href="<%# String.Format(
"AddEditSiteMap.aspx?categoryid={0}", Eval("siteMapId")) %>">
<img src="../images/edit.gif" alt="" width="16" height="16"
class="AdminImg" /></a>
</td>
<td><asp:ImageButton runat="server" ID="ibtnDelete" ImageAlign="Middle"
 ImageUrl="~/Images/Delete.gif" AlternateText="Delete Node" /></td>
</tr>
</ItemTemplate>
The actual templates are declaratively defined as the table row to fill the placeholder control designated in the LayoutTemplate. The first template is the EmptyDataTemplate. It defines what is displayed if there are no records returned from the data source. Figure 3-19 shows an example of how this page looks.

The next template is the ItemTemplate, it defines how data is displayed in each row. An AlternatingItemTemplate that defines the layout for every other row is also available, giving you a chance to change the visual appearance on every other row.
The template use declarative databinding, which is code embedded between <%# %>. The data is actually bound to the ListView in the code-behind. The binding methods take advantage of the Using syntax that uses an object that implements the IDisposable interface to clean up its resources in a transparent fashion. In the example, a CategoryRepository is created and the GetCategories method is called to bind the records to the ListView.
Private Sub BindCategories()

        Using Categoryrpt As New CategoryRepository

            lvCategories.DataSource = Categoryrpt.GetCategories()
            lvCategories.DataBind()

       End Using

End Sub
I think it is important to note a difference between the previous edition of the book, where data was retrieved in small chunks or pages of data and this version. The former version involved getting a matching row count for the full set of records matching the query results and doing math behind the scenes. This was done to reduce the amount of data carried across the wire from the database, but this approach causes more hits on the database.
I like to cache data in memory to reduce the number of times I need to hit the database. The ListView has the logic baked into it to correctly calculate the number of pages, how to display the navigation in the DataPager, and so forth. So, I think trying to duplicate this effort is not a productive use of time.
Manipulating the records displayed in the ListView is important to make it effective; this is typically done by paging and sorting the data. The ListView provides built-in mechanisms to help make developing these routines easy.
ASP.NET 3.5 added the DataPager control, which is a complementary control designed to page through the ListView control contents. It is added to the LayoutTemplate in the position in which you want it to appear. I tend to add it at the bottom, but you are not limited to that. It can actually be added outside the ListView control all together, the DataPager control has a PageControlId property that needs to be set to the id of the ListView.
<div class="pager">
<asp:DataPager ID="pagerBottom" runat="server" PageSize="15">
            <Fields>
                    <asp:NextPreviousPagerField ButtonCssClass="command"
 FirstPageText="«" PreviousPageText="<" RenderDisabledButtonsAsLabels="true"
ShowFirstPageButton="true" ShowPreviousPageButton="true"
ShowLastPageButton="false" ShowNextPageButton="false" />
<asp:NumericPagerField ButtonCount="7" NumericButtonCssClass="command"
CurrentPageLabelCssClass="current"
NextPreviousButtonCssClass="command" />
<asp:NextPreviousPagerField ButtonCssClass="command" LastPageText="»"
NextPageText=">" RenderDisabledButtonsAsLabels="true"
ShowFirstPageButton="false" ShowPreviousPageButton="false"
ShowLastPageButton="true" ShowNextPageButton="true" />
</Fields>
</asp:DataPager>
</div>
The DataPager control causes the ListView control to post back to the server and cause the PagePropertiesChanged event to be executed. In PagePropertiesChanged, the data needs to be rebound to the control; the ListView takes care of rendering the proper page.
Private Sub lvSiteMap_PagePropertiesChanged(ByVal sender As Object,
ByVal e As System.EventArgs) Handles lvSiteMap.PagePropertiesChanged
BindSiteMapNodes()
End Sub
The ListView content can be sorted as well. The only requirement is to add a postback control (Button, LinkButton, or ImageButton,) with the CommandName of "Sort" and a CommandArgument with the name of the sort criteria. The ListView automatically handles changing the sort order from ascending to descending. The same PagePropertiesChanged event used to manage paging. The ListView has the SortExpression and SortDirection properties that can be used to build the query to retrieve the data. I hope you see why I chose not to retrieve just the page of records that will displayed and instead chose to cache the full recordset to be manipulated by the ListView.
ASP.NET 3.5 has added the ASP.NET AJAX framework to the user interface tools that can be quickly integrated in a site to build rich user interfaces. The framework is a set of JavaScript methods built to mirror the .NET Framework in organization, classes, and methods that help build client-side functionality. It has a set of web controls: ScriptManager, ScriptManagerProxy, UpdatePanel, Timer, and UpdateProgress.
Each page that needs to use the ASP.NET AJAX framework must have a ScriptManager control. When a master page is used the content page must have a ScriptManagerProxy control, so the content page can leverage the ScriptManager on the master page.
The UpdatePanel control is the poor man's JavaScript helper, it allows blocks of content to be contained in the UpdatePanel control and all requests are automatically converted to AJAX instead of a traditional postback. This means that you do not have to lift a finger to change an existing page that performs postbacks to the server to change those postbacks to an asynchronous operation. This means the user will not have to see the page flicker associated with the postback.
The ListView control works naturally inside an UpdatePanel control, making the paging and sorting methods work asynchronously. Once the page is working an UpdatePanel just needs to be added with the ListView embedded in the panel's ContentTemplate.
[f0000.xxx]    [f0000.xxx]    [f0000.xxx]    [f0000.xxx]    [f0000.xxx]
    [f0000.xxx]    [f0000.xxx]    [f0000.xxx]<asp:UpdatePanel runat=
"server" ID="uppnlComments">
<ContentTemplate>
<asp:ListView ID="lvComments" runat="server">
<LayoutTemplate>
Nothing more is required; the UpdatePanel will make the postback to the server; that, in turn, causes the normal page request to be performed on the server. The updated content is then parsed by the UpdatePanel, and it manages updating the ListView content based on the server's response. It is that simple! I will go over some more involved AJAX scenarios in later chapters.
In the previous edition of theBeerHouse application, FormViews were used to bind data to edit and insert records into the database. In this edition, I am going to slim things down a bit in the user interface and take more control in the code-behind. The edit form is laid out in a table, with the appropriate controls used to represent the data. These can be a TextBox, CheckBox, DropDownList, and so forth. When possible, controls and extenders from the ASP.NET AJAX control toolkit are used. At the bottom of the form is a series of buttons to perform inserting, updating, deleting, or canceling.
One of the reasons I do not like to use the
FormViewandDetailViewcontrols is that they tend to limit the capability to customize the display, or add complexity to the form that ultimately defeats the purpose theViewcontrols are meant to serve.
The ASP.NET AJAX Control Toolkit is a set of controls and control extenders that Microsoft produces the toolkit and maintains it on CodePlex at www.codeplex.com/AjaxControlToolkit. It is a community project though which anyone, including you, can suggest changes and report bugs. The source code of the entire toolkit is available for downloading, so you can make changes and examine how the controls are built. Figure 3-20 shows how the AddEdit form for the Category entity looks.

The administrative form's code-behind is responsible for retrieving the entity, displaying the data, updating the data, and storing it. All this responsibility is handled by five methods: the Page Load event handler, ClearItems, the Bind Entity method, and the Cancel and Submit event handlers. The page also inherits from the AdminPage class or possibly a descendant of the AdminPage class.
The AdminPage contains a PreInit event handler that sets the MoveHiddenFields to false. This is done because the FCKEditor is used on many of the administration pages and does not work when the hidden fields are moved.
Private Sub Page_PreInit(ByVal sender As Object,
ByVal e As System.EventArgs) Handles Me.PreInit

MoveHiddenFields = False

End Sub
The remaining properties of the AdminPage are to help manage primary keys that I detailed earlier.
In the Page Load event handler checks to see if a primary key was passed to the form, and if so, then binds the entity to the controls; if not, it clears the form.
Protected Sub Page_Load(ByVal sender As Object,
ByVal e As System.EventArgs) Handles Me.Load
If Not IsPostBack Then

            If CategoryId > 0 Then
                BindCategory()
            Else
                ClearItems()
            End If

        End If

    End Sub
The ClearItems method is called when the form is being loaded to add a new entity to the database. Notice the last item in the method sets the status literal control text to instruct the user what to do. The status control is used to provide feedback to the user as to the status of the form.
Private Sub ClearItems()

        ltlCategoryID.Text = String.Empty
        ltlAddedDate.Text = String.Empty
        txtTitle.Text = String.Empty
        txtImportance.Text = String.Empty
        txtDescription.Text = String.Empty
        txtImageUrl.Text = String.Empty
        ltlUpdatedDate.Text = String.Empty
        iLogo.Visible = False

        ltlStatus.Text = "Create a New Category."

    End Sub
The bind method, BindCategory in the example, retrieves the entity that corresponds to the primary key value passed to the page. It then binds the data to the appropriate controls as needed.
Private Sub BindCategory()

        Using Categoryrpt As New CategoryRepository

            Dim lCategories As Category = Categoryrpt.GetCategoryById(CategoryId)

            If Not IsNothing(lCategories) Then

                ltlCategoryID.Text = lCategories.CategoryID
                ltlAddedDate.Text = lCategories.AddedDate
                ltlAddedBy.Text = lCategories.AddedBy
                txtTitle.Text = lCategories.Title
                txtImportance.Text = lCategories.Importance
                txtDescription.Text = lCategories.Description

                If String.IsNullOrEmpty(lCategories.ImageUrl) = False Then
                    txtImageUrl.Text = System.IO.Path.GetFileName(
lCategories.ImageUrl)
                    iLogo.ImageUrl = lCategories.ImageUrl
Else
iLogo.Visible = False
End If
cbActive.Checked = lCategories.Active
ltlUpdatedDate.Text = lCategories.UpdatedDate
ltlUpdatedBy.Text = lCategories.UpdatedBy
ltlStatus.Text = String.Format("Edit The Category - {0}.",
lCategories.Title)
Else
CategoryId = 0
ltlStatus.Text = "Create a New Category."
End If
End Using
End SubThe Submit button's click event manages changing, updating or creating a new entity. First, it gets a copy of the existing version of the entity if a primary key value has been supplied.
Then each field gets updated if the value has been changed. This is done because the Entity Framework will create a SQL Update command that updates only the changed fields, making it perform slightly better.
Private Sub UpdateCategory()
        Using Categoryrpt As New CategoryRepository

            Dim lCategory As Category

            If CategoryId > 0 Then
                lCategory = Categoryrpt.GetCategoryById(CategoryId)
            Else
                lCategory = New Category()
            End If

            lCategory.Title = txtTitle.Text
            lCategory.Importance = CInt(txtImportance.Text)
            lCategory.Description = txtDescription.Text

            lCategory.ImageUrl = GetItemImage(fuImageURL, txtImageUrl)
            lCategory.Active = cbActive.Checked

            lCategory.UpdatedBy = UserName
            lCategory.UpdatedDate = Now

            If lCategory.CategoryID = 0 Then
                lCategory.Active = True
                lCategory.AddedBy = UserName
                lCategory.AddedDate = Now
            End If

            If Not IsNothing(Categoryrpt.AddCategory(lCategory)) Then
IndicateUpdated(Categoryrpt, "Category", ltlStatus, cmdDelete)
cmdUpdate.Text = "Update"
IndicateUpdated(Categoryrpt, "Category", ltlStatus, cmdDelete)
Dim sURL As String = SEOFriendlyURL( _
Settings.Articles.CategoryUrlIndicator & "/" &
lCategory.Title, ".aspx")
Dim sRealURL As String =
String.Format("BrowseArticles.aspx?Categoryid={0}", lCategory.CategoryID)
CommitSiteMap(lCategory.Title, sURL, sRealURL, _
lCategory.Description.Substring(0,
If(lCategory.Description.Length >= 200, 199, lCategory.Description.Length - 1)), _
If(String.IsNullOrEmpty(lCategory.Title) = False,
lCategory.Title, String.Empty), "Category")
Else
IndicateNotUpdated(Categoryrpt, "Category", ltlStatus)
End If
End Using
End SubAfter the fields have been updated, the UpdatedBy and UpdatedDate values are set to the current username and the current time. It then checks to see if it is a new entity or an update to an entity by checking the CategoryId value. If it is greater than 0, then the entity's repository Update method is called. If not then the entity is added to the database by calling the AddCategory method.
Based on the result of the Add or Update method, the status message is updated to reflect the outcome.
When the Cancel button is clicked, it causes the response to be sent to the entity's list administration page.
Private Sub btnCancel_Click(ByVal sender As Object,
ByVal e As System.EventArgs) Handles cmdCancel.Click
        Response.Redirect("ManageCategories.aspx")
End Sub
Clicking the Delete button calls the Delete method of the entity's repository class. According to the outcome of the Delete method, the page's status is updated to let the user know what happened.
Protected Sub cmdDelete_Click(ByVal sender As Object,
ByVal e As System.EventArgs) Handles cmdDelete.Click

        Using Categoryrpt As New CategoryRepository
            If Categoryrpt.DeleteCategory(CategoryId) Then
                Response.Redirect("ManageCategories.aspx")
            Else
                ltlStatus.Text = "Sorry the Category was not Deleted."
            End If
        End Using

End SubTracking exceptions with any application is very important to understand what has happened when something goes wrong. No matter how many unit, integration, and manual tests are created and rerun, every application will eventually hit a moment where something goes wrong and an exception is thrown. Fortunately, there are numerous ways to log exceptions in .NET applications.
In the last edition of this book, Marco showed how to use health monitoring and instrumentation to log and monitor an application. This is a great way to plug into the application and track down issues. Another popular choice is the Logging Application Block available in the Microsoft Enterprise Library, http://microsoft.com/patterns. But I wanted to add to the choices for monitoring your applications with the Error Logging Modules and Handlers (ELMAH) components, www.raboof.com/Projects/ELMAH.
ELMAH is a free utility built by Atif Aziz and added to by several members of the ASP.NET community. It is a class library with a collection of httpModules and httpHandlers to log and report application exceptions. The real power ELMAH offers ASP.NET developers is ease of configuration and multiple means to alert site administrators to issues. You can read more details about implementing ELMAH in an article by Scott Mitchell and Atif Aziz, http://msdn.microsoft.com/en-us/library/aa479332.aspx.
With ELMAH, exceptions can be logged to a SQL database, XML file, e-mail, or a variety of other data stores. This provides a very flexible reporting platform. The e-mail option is particularly helpful because this can be set up to alert several administrators at once. The database and XML options keep a permanent record of exceptions that later can be reviewed, transformed, or brought into a reporting platform, such as SQL Server Reporting Services.
Errors are logged by a custom httpModule that hooks into the ASP.NET pipeline's OnError event. The same error information is logged that is displayed in the error page, also known as the Yellow Screen of Death by many. Once the exception is logged, processing continues without interfering with the normal user experience.
For production sites, it is a good idea to designate an error page to be displayed instead of the default exception reporting page. This creates a better user experience when things are not going so well. It also suppresses sensitive error information from being rendered to the user. This is not only abrasive to a typical user, but it also exposes information that can be very valuable to a hacker for launching a successful attack against the application.
Once exceptions are logged, they can be retrieved through a set of custom httpHandlers that provide a secure and organized reporting infrastructure. The main reporting interface is a nonexistent page with the .axd extension, shown in Figure 3-21. This extension is commonly used in ASP.NET as a resource extension for content streamed by custom httpHandlers. The handler produces a page that lists all the errors in the log, allowing you to page through exceptions if there are many that have been logged. Each exception in the list has a link that will display a detailed report of the exception.
The detailed exception shows the exception details and the page's trace log. This is the same trace information that would be displayed at the bottom of the page if tracing were enabled. All this information is helpful to trace the source of the exception and examine the state of the request.

The report information can be protected by configuring ELMAH to require authentication. ELMAH automatically leverages the ASP.NET authentication configured for the site, protecting this sensitive information from prying eyes.
Another feature I like about ELMAH as an error-logging and reporting tool is that it also provides and RSS feed that can be used to monitor a site for exceptions.
Search engine visibility or placement is one of the most important aspects of any public website. Obtaining high rankings is one of the most important aspects of online marketing and can be the difference between success and failure for many online businesses. Obtaining those top positions can be extremely difficult, but it is not impossible.
While this book is not going to cover details of search engine fundamentals, there are standard things that can be done from a technical perspective that can be done to make an ASP.NET website more search-engine-friendly. The pages of an ASP.NET site should contain site-, page-, and content-level optimizations, much of which can be controlled or aided by good application architecture.
Search engines are known for penalizing sites for duplicate content, which can commonly happen when multiple URLs can retrieve the same content. While search engines have gotten a lot better, accounting for common duplications, such as www and non-www access, it helps to have only one true URL for content.
The first way this needs to be addressed is eliminating the ability for visitors to use the www alias of the website. Second-level domains, and third-level domains controlled by site owners, should be the way a site is accessed. The www prefix to a domain is really an artifact from the early days of the web and stands for World Wide Web. It was prepended to the domain to indicate the protocol being used as a domain alias or CNAME. When the Internet gained mainstream traction, this did not change. A good website should respond to both the www alias and the actual domain.
The problem with this is that search engines will index both URLs, potentially earning a duplicate content penalty; if not, it will certainly dilute the actual score the search engine gives the page by spreading it between both URLs. This is also referred to as canonicalization. In ASP.NET, this can be dealt with in either the global.asax file or a custom httpModule.
Inevitably, you will one day restructure your site by changing the landscape of the URLs used on the site, or retiring content and adding new content. It could be a simple change like changing the URL ~/ShowProduct.aspx?ProductId=3 to ~/Gadgets-for-beer-fanatics/Beer-Cap.aspx. But whatever the need, using 301 redirects not only tells visitors where the content is located but also tells search engines how to reindex existing resources on your site in a way that will not cause you to lose your rankings.
A 301 redirect refers to the HTTP status code sent from the server to the client. In this case, a status code of 301 tells the client that the resource requested has been permanently moved to a new location, which is added to the response location header.
This technique is also good for ensuring against duplicate content issues discussed in the previous section. In the previous product example, the old URL still works and, ultimately, is what the ASP.NET engine actually processed, but this URL should not be used as the way to access the content. While not using the old URL on the site is one way to eliminate the URL from being indexed, there is no 100% way to eliminate this link from being indexed. What must be done is a 301 redirect for the URL to the new URL at the site application level.
Organizing the structure of a website is another important aspect of search engine optimization because it not only tells the search engines about the content but also guides potential visitors looking at results to click on a page. URLs should be organized by category, department, or other logical groups. In the case of theBeerHouse application, there are various application modules that produce content of different types. News, for example, can be identified by the 'News' container, which is analogous to a folder or directory. From there, each article is contained within a selected category and, finally, the title of the article. A sample article URL might be represented by '~/News/Beer-related-articles/Top 10-of-brewing-methods.aspx'. This relays the content of the article is about brewing methods and is a topic about beer. It also indicates it is a news article, also important in identifying the content. So, a person searching for online articles about brewing beer could feel pretty confident that this might be the article for them, and they will be more likely to visit the site.
Notice that "-" is used to separate words in the example of the URL. This is done intentionally to delineate words in a URL because it is thought that search engines tend to understand this better. It is also easier for visitors to quickly look at a URL and isolate the words into a readable format. If you simply
URLEncodean article's title, it replaces spaces with "+", which is not as easy for a human to distinguish between words. There are some cases, such as "Beer-related" that contain dash that will have to be dealt with in the core architecture, but this can be handled in ASP.NET.
It has long been known that having the proper content on a page helps you get better search engine visibility. In the early days of the Internet, sites could rely on the content of their header tags to get them reasonable visibility in most cases. That is not as true today but is still a very relevant task that should be done for each page in a site. This includes having valid, targeted content in the page's Title, and META tags.
The Title tag is one of the most important pieces of the page because it is one of the primary factors search engines use to determine the content of the page. It is also used as the page's clickable text in the search engine results and is displayed at the top of the browser every time it is displayed. The text of the Title tag should be compelling, relevant, and less than 65 characters long. Search engines typically do not display more than 65 characters in their results.
Figure 3-22 shows the results for my blog on live.com. I have highlighted the Title tag used to link to my blog from the result list.

Viewing the source of my blog's home page, you will see the same text contained in the Title tag.
<head>
<title>Chris Love's Official Blog - Professional ASP.NET</title>
</head>
All Title tags in the site should be unique and should never start with "Welcome to... ." If you do a quick search for "Welcome to" you will see how many sites are indexed for that term. The title should include content that describes the page's content and is targeted to specific keyword phrases if at all possible. Generic terms like "Welcome to" just reduce the relevance of the page. Avoiding this common mistake could be the difference between a first page listing and a fifth page listing.
The Description META tag no longer carries the significance it once had with place in search engine results, but it is very important for each page to have a unique description. The content of the Description META tag is often used by search engines as the description in the search results. Having a relevant description will help a site get more visitors from search engines. If this tag is not added to a page, the search engine is forced to assume the description from other sections of the page, thus taking it out of your control.
Searching for "Chris Love" on Live.com returns the following result. I have highlighted the content located in the title tag of my blog, Figure 3-23. Notice how it appended more content from the page to help add more content to the result? I will talk more about this shortly.

Viewing the source of my blog's home page, you can see the Description META tag and see where Live.com gathered the initial content for the description in the search result.
<meta name="description" content="Chris Love's official Blog,
I cover ASP.NET programming related issues." />
Like the Description META tag, the Keyword META tag is not leveraged by search engines to determine placement and indexing, but it should still be used to add a list of relevant phrases for each page. The reason this is no longer used by search engines is that it was spammed by many in the mid-1990s to gain higher rankings. Yet it should not be disregarded, as it can always add some value to the page.
<meta name="keywords" content="ASP.NET, VB.NET, C#, Silverlight,
SQL Server, SharePoint" />
One of the most direct ways to talk to a search engine spider is through the robots.txt file, but each page can also contain a Robots META tag to further dictate how a search engine can index a page. The Robots META tag can contain a collection of the following directives: index, noindex, follow, nofollow. The index directives tell the search engine if it should index the content or not. The following directive tells tell it not to follow the links on the page.
<META NAME="robots" CONTENT="index, nofollow"/>
You can only use one directive per action, either follow or nofollow, for example. You can also use all and none to tell the spider to index and follow or noindex and nofollow, respectively.
Using Header Tags, such as <H1>, and modifier tags tell search engines to use the enclosed text with higher relevance when ranking the page.
Header tags, such as <H1>, <H2>, and the like, are used to indicate important phrases; typically, they help segment or outline a document's content, too. They add value to the visitor because they can serve as a section title; for example, Use Header Tags and Modifiers would be an <H4>, if this entire chapter were a page. <H1> carries the highest significance, and the significance progressively decreases at each level.
<H1>Planning an Architecture</H1>
<H2>Search Engine Optimization Techniques</H2>
<H3>Page Level Optimizations</H3>
<H4>Use Header Tags</H4>
Search engines are looking text that is emphasized, and header tags do just that. Often you will want to wrap keyword phrases in header tags to help set them apart. This also forces you to write more targeted content.
You do not have to rely upon header tags to provide emphasis; text modifiers also add value to phrases. A modifier is simply a tag that should make a phrase stand out from the surrounding text, <Strong>, <B>, <I> and <EM> are all modifiers. So, as you compose the text of a page and design the layout, consider how these tags will be used to draw attention to the text they contain. The use of header and modifier tags helps to identify the content on the page a search engine should emphasize when ranking it.
Valid HTML is important to help search engines spider and parse the content of a web page. Invalid HTML can hinder a spider from properly reading the content. If a spider tries to parse an improperly formatted HTML element, this could cause the spider to stop processing the page or cause it to improperly read the page. It can also cause the page to not render properly in some browsers, resulting in users becoming frustrated with the site.
The World Wide Web Consortium (W3C) creates the standards for HTML and Cascading Style Sheets. They also provide a handy online tool to validate the markup of a page, http://validator.w3.org. By using this tool, you can quickly identify potential problems that might keep spiders or visitors from reading a page.
While it is not proven the common thinking among the search engine optimization community is that including a Company Information or About Us and a Privacy Policy pages adds to a site's credibility. Search engines are known to look for common features of a site to distinguish a valid site from a spam site. Simply adding these two pages to the site can add value for overall search engine placement, not to mention customer satisfaction.
The Direct Marketing Association has an online tool to help create a privacy policy for your website. You can access its online generation tool at
www.dmaresponsibility.org/PPG.
Creating a sound navigation system for a data-driven website is a fundamental component of a successful website. This includes one that allows the URLs to be naturally understood by both users and search engines alike. The ASP.NET SiteMapProvider can also be dynamically driven from the database. There should also be an available SiteMap.org file for spiders to know the most current version of the site's structure.
Building web applications has long meant leveraging the QueryString to pass parameters to the application. For example, to retrieve an article in theBeerHouse application an ArticleId parameter would be added to the URL, ShowArticle.aspx?articleid=28. While this is not terribly bad, it can quickly become a long series of parameters. There is a great deal of competition in the market to garner search engine visibility for targeted keywords. It is equally important to reduce potential attack surfaces for potential hackers to hit. URL Rewriting can help in both of these cases.
Creating friendly URLs is pretty easy in ASP.NET, but it does require the use of a custom httpModule. An httpModule is registered with the ASP.NET application and allows developers to create an event handler or a series of event handlers to hook into the ASP.NET life cycle.
In short, httpModules are classes that implement the IhttpModule interface, which requires methods to handle the Init and Dispose methods. Each module must also be registered in the site's web.config file, in the httpModules section. Once the module is registered the ASP.NET engine will call the Init method when the application first starts. The Dispose method is called when the application is closed.
<httpModules>
<add name="URLRewrite" type="URLRewrite"/>
<add name="ScriptModule" type="System.Web.Handlers.ScriptModule,
System.Web.Extensions, Version=3.5.0.0, Culture=neutral,
PublicKeyToken=31BF3856AD364E35"/>
</httpModules>
In the Init method, you are not limited to what you can do, but generally event handlers are wired to specific life cycle events. For the case of URL rewriting, it is advisable to intercept the request in the AuthorizeRequest event.
Public Sub Init(ByVal context As System.Web.HttpApplication)
Implements System.Web.IHttpModule.Init
AddHandler context.AuthorizeRequest, AddressOf AuthorizeRequest
End Sub
This provides the capability to intercept the request, check to see if the requested URL should be rewritten, rewrite the requested URL using the RewritePath method if necessary, and proceed with the request. For theBeerHouse application, URL rewriting leverages the list of entities in the site's site map, stored in the database. Each module that creates a potential URL in the site must be responsible for storing its URLs in the SiteMap database table.
Maintaining an up-to-date map of theBeerHouse application is important for two reasons: breadcrumbs and search engines. Breadcrumbs are a way to provide the user a sense of where they are and how to easily navigate back up the tree. Letting search engines know what the site currently consists of is important so that your content gets indexed. It is also helpful to leverage a custom site map so that URL rewriting can be done easily.
To maintain a central site map for the site, it should be stored in a table in the site's database, Figure 3-24. The table needs to store the URL, the actual URL on the site, a title, description, keywords, a reference to a parent URL, what type of node it is, and a value to indicate its order with sibling nodes. Of course, the table should have a SiteMapId primary key and fields that indicate if the node is active, and when it was added or updated and by whom.

There are two URL-related fields: the URL and the RealURL. The URL field holds the path from the site's domain that will be publically available. In other words, this will be the URL used by visitors to access the page but not necessarily the URL to the item in the site. For example, articles will be accessed by requesting a URLEncoded version of the article's title suffixed with the .aspx extension. This URL is mapped to the traditional ShowArticle.aspx?ArticleId=X url that was used in the previous edition of theBeerHouse application.
In the previous edition of this book, a SiteMap.xml file was used to manage the nodes in the SiteMapProvider. This is fine when a site is small and does not change very often. But theBeerHouse site is a dynamic application that can change quite often. A physical file needs to be maintained on each change in the site. Since changes to the site are made in the database this can be leveraged for a custom SiteMapProvider based on the database.
Jeff Prosise wrote a few articles for MSDN magazine in 2006 (http://msdn.microsoft.com/en-us/magazine/cc163657.aspx) that walked through creating a SQL SiteMapProvider, which serves as a good starting point to be creating a custom provider for theBeerHouse application. A good custom SiteMapProvider will quickly build a site map for the site, based on the page hierarchy stored in the database, and honor any security requirements.
The custom provider inherits from StaticSiteMapProvider, an abstraction of the SiteMapProvider class. A custom SiteMap provider must be registered in the web.config's system.web section.
<siteMap defaultProvider="TBHSiteMapProvider" enabled="true">
<providers>
<add name="TBHSiteMapProvider" type="TheBeerHouse.TBHSiteMapProvider"
 securityTrimmingEnabled="true"/>
</providers>
</siteMap>
There can be more than one provider registered in the site. The SiteMapPath control and the SiteMapDataSource control can both designate which provider to use if more than one is registered.
A few years ago Google created a standard way for site owners to let the search engine's spiders know what content comprises the site. Later, other search engines, such as Yahoo.com and Live.com, adopted the standard, which is known as a SiteMap.org site map file. It is an XML document containing information about the URL. The details of the site map format are available at SiteMap.org.
<?xml version="1.0" encoding="UTF-8"?>
<urlset xmlns="http://www.sitemaps.org/schemas/sitemap/0.9">
   <url>
      <loc>http://www.example.com/</loc>
      <lastmod>2005-01-01</lastmod>
      <changefreq>monthly</changefreq>
      <priority>0.8</priority>
   </url>
</urlset>
The search engine spiders use this file to know what to index. It also tells them when the content was last updated, how often it changes, and a priority. Knowing if a URL has changed since a spider last visited it allows the search engine to avoid spidering the resource if it has not changed. This is a big bandwidth and resource saver for sites because the spider should not request resources that have not changed since it last visited.
When the search engine spider comes to your site, it will begin its quest by asking for the latest sitemap.xml file. You can, and typically will, register another site map file name with each search engine, if you want; in that case, it will ask for that file. No matter, the spider tries to consume the up-to-date site map file. Since the website is a living application that changes its composure at any time, maintaining a static file is not feasible. Because the site map information is stored in the database, it can be retrieved as needed to compose the site map file.
A custom httpHandler is an ideal way to compose the required XML from the information stored in the database. A custom httpHandler is one of the core elements used to compose content in ASP.NET. In fact the Page class is actually an httpHandler. A custom httpHandler is a class that implements the IHttpHandler interface and can either register as the handler for specific requests, or a generic handler, the .ashx file, that is requested directly from the client.
Imports System.Linq
Imports System.Xml.Linq
Imports System.Web
Imports TheBeerHouse.BLL
Imports <xmlns:xsi="http://www.w3.org/2001/XMLSchema-instance">

Public Class SiteMapsHandler
    Implements IHttpHandler
The IHttpHandler interface requires two methods are implemented by the class: IsReusable and ProcessRequest. The IsReusable property indicates to the ASP.NET engine if the httpHandler can be used simultaneously by more than one request. In other words, is there anything in the handler that has to be mutually exclusive with other requests. For requests that produce static output, this can be true; with dynamic requests, this can vary depending on what the handler is performing.
The ProcessRequest method is invoked by the ASP.NET engine to begin actual processing and composition of the content sent to the client. A reference to the current context is passed to ProcessRequest; this gives the handler access to the Request and Response objects.
Public Sub ProcessRequest(ByVal context As System.Web.HttpContext)
Implements System.Web.IHttpHandler.ProcessRequest

        BaseContext = context
        CreateSiteMap()

        Response.Flush()
        Response.End()

End Sub
The site map handler composes the site map content in a method called CreateSiteMap. Since the site map format is XML, the Response.ContentType or MIME type is set to "application/xml". Before composing the XML content, a request is made to the database to retrieve the site map nodes by creating a SiteMapRepository and retrieving a List(of SiteMapInfo) entities.
In VB.NET the map is composed using XML Literals; in C#, it requires a little more complex coding using the LINQ XDocument classes.
Using XML Literals is a very intuitive way to compose and parse XML content in .NET that were introduced with VB 9 (.NET 3.5). With XML Literals XML can be processed in a declarative manner in a VB class member. Instead of having to deal with unnatural classes, XML is managed in its natural format, making it much easier to see XML structure in the code.
Note
Site map files can contain no more than 50,000 URLs and can be no more than 10MB in size, which can be an issue for large sites. HTTP compression (GZIP or Deflate) can be used to reduce the size of the files as they are transported to the spider. The SiteMap.org protocol allows for multiple site map files to be specified by providing a site map index file that lists all the site map files. There can be no more than 1000 index files, and the index file itself cannot exceed 10MB in size.
<?xml version="1.0" encoding="UTF-8"?>
<sitemapindex xmlns="http://www.sitemaps.org/schemas/sitemap/0.9">
   <sitemap>
      <loc>http://www.example.com/sitemap1.xml.gz</loc>
      <lastmod>2004-10-01T18:23:17+00:00</lastmod>
   </sitemap>
   <sitemap>
      <loc>http://www.example.com/sitemap2.xml.gz</loc>
      <lastmod>2005-01-01</lastmod>
   </sitemap>
</sitemapindex>
To create a site map using XML Literals, it is ideal to paste the required components of a valid site map into the code itself, then manipulate the code snippet to produce the desired dynamic output. The XML content is set to an XDocument object, xSiteMap. The site map XML is composed by integrating a LINQ query using declarative syntax much as you would do in ASP.NET to integrate server-side coding using the <% %> syntax. The LINQ query is a select statement executed on the list of SiteMapInfo entities, returning a list of <url> elements that compose the resulting site map file.
VB.NET
Private Sub CreateSiteMap()

        Response.ContentType = "application/xml"

        Dim lsiteMapNodes As List(Of SiteMapInfo)

        Using siteMaprpt As New SiteMapRepository
            lsiteMapNodes = siteMaprpt.GetSiteMapNodes
        End Using

        Dim xSiteMap As XDocument = <?xml version="1.0" encoding="UTF-8"?>
        <urlset xmlns="http://www.sitemaps.org/schemas/sitemap/0.9">
                   <%= From lSiteMapNode In lsiteMapNodes.AsEnumerable _
            Select <url>
                <loc><%= lSiteMapNode.URL %></loc>
                <lastmod><%= lSiteMapNode.DateUpdated %></lastmod>
                <changefreq>weekly</changefreq>
                <priority>0.8</priority>
                  </url> %>
        </urlset>

        Response.Write(xSiteMap.ToString)

    End Sub
Finally, the xSiteMap content is written to the Response content by calling the ToString method.
Composing the content in C# is not quite as simple because it requires more formal use of the LINQ to XML classes. I call the special classes in the LINQ namespace related to XML "X classes" because they are all prefixed with X followed by the object type: XDocument, XElement, and XAttribute, for example.
C#
private void CreateRSSFeed()
      {
         TheBeerHouseSection Settings = Helpers.Settings;
         this.Response.ContentType = "application/xml";
         using (ArticleRepository lArticlectx = new ArticleRepository())
         {
            List<Article> lArticles = lArticlectx.GetActiveArticles();
var xRss = new XDocument(new XDeclaration("1.0", "utf-8", "yes"),
new XElement("rss",
new XAttribute("version", "2.0"),
new XElement("channel",
new XElement("title",
"The Beer House Articles"),
new XElement("link", "http://www.TheBeerHouseBook.com/"),
new XElement("description",
"RSS Feed containing The Beer House News Articles."),
from item in lArticles
select
new XElement("item",
new XElement("title", item.Title),
new XElement("description", item.Abstract),
new XElement("link",
Helpers.SEOFriendlyURL(Settings.Articles.URLIndicator +
"/" + item.Title, ".aspx")),
new XElement("pubDate",
item.ReleaseDate.ToString())
)
)
)
);
this.Response.Write(xRss.ToString());
}
this.Response.Flush();
this.Response.End();
}Once the content of the document is composed, the request is wrapped up by flushing the content to the browser and ending the response.
Before this handler can respond to the request for sitemap.xml, it has to be registered in the httpHandlers section of the web.config file. All the request for the sitemap.xml file are GET requests, so the verb should reflect that and the path is set to "sitemap.xml", limiting the scope of this handler to only that resource name.
<add verb="GET" path="sitemap.xml" validate="false"
type="TheBeerHouse.SiteMapsHandler, TBHBLL, Version=3.5.0.1,
Culture=neutral, PublicKeyToken=null"/>
Once the handler is registered the only thing left is to verify that the sitemap.xml file is properly composed and served. Retrieving the file in a browser should produce the desired content as shown in Figure 3-25.
Because the site map handler composes the XML from the database, each time a spider requests the document you can be assured that the content is up to date, ensuring that your site is properly indexed by each search engine.

The "Solution" section of this chapter is thinner than those found in most of the other chapters. In fact, in this chapter you've been presented with some new controls and features that won't be part of a common custom framework but will be used in most of the upcoming chapters as parts of other classes to be developed. The discussion about the DAL and BLL design will be extremely useful for the next chapters, because they follow the design outlined here. Understand that ASP.NET 3.5 already has a number of built-in common services to handle many of your general framework-level needs, which allows you to focus more of your time and efforts on your specific business problems. The rest of the chapter shows the code for the small base classes for the DAL and the BLL, the custom configuration section, and the code for raising and handling web events.
Following is the code for the classes that map the <theBeerHouse> custom configuration section, and the inner <contactForm> element, whose meaning and properties were already described earlier:
Public Class TheBeerHouseSection
    Inherits ConfigurationSection

    <ConfigurationProperty("defaultConnectionStringName",
DefaultValue:="LocalSqlServer")> _
    Public Property DefaultConnectionStringName() As String
        Get
            Return CStr(Me("defaultConnectionStringName"))
        End Get
        Set(ByVal value As String)
            Me("DefaultConnectionStringName") = value
        End Set
    End Property

    <ConfigurationProperty("devSiteName", DefaultValue:="BeerHouse35")> _
    Public Property devSiteName() As String
        Get
            Return CStr(Me("devSiteName"))
        End Get
        Set(ByVal value As String)
            Me("devSiteName") = value
        End Set
    End Property

    <ConfigurationProperty("siteDomainName", DefaultValue:="localhost")> _
    Public Property SiteDomainName() As String
        Get
            Return CStr(Me("siteDomainName"))
        End Get
        Set(ByVal value As String)
            Me("siteDomainName") = value
        End Set
    End Property

    <ConfigurationProperty("defaultCacheDuration", DefaultValue:="600")> _
    Public Property DefaultCacheDuration() As Integer
        Get
            Return CInt(Me("defaultCacheDuration"))
        End Get
        Set(ByVal value As Integer)
            Me("defaultCacheDuration") = value
        End Set
End Property
<ConfigurationProperty("contactForm", IsRequired:=True)> _
Public ReadOnly Property ContactForm() As ContactFormElement
Get
Return CType(Me("contactForm"), ContactFormElement)
End Get
End PropertyThe TheBeerHouseSection class must be mapped to the <theBeerHouse> section through a new element under the web.config file's <configSections> section. Each module has its own custom configuration section that resides within theBeerHouse element. Once you've defined the mapping, you can write the custom settings as follows:
<theBeerHouse defaultConnectionStringName="TheBeerHouseEntities"
siteDomainName="[Add Your Base URL Here]">
<contactForm mailTo="[email protected]"/>
<articles pageSize="10" twitterUrserName="[Username]"
twitterPassword="[Password]" enableTwitter="true"
 akismetKey="12abcdf23456" enableAkismet="True"/>
<polls archiveIsPublic="true" votingLockByIP="false"/>
<newsletters fromEmail="[email protected]"
fromDisplayName="TheBeerHouse" archiveIsPublic="true"
hideFromArchiveInterval="10"/>
<forums threadsPageSize="8" hotThreadPosts="10"
bronzePosterPosts="10" silverPosterPosts="20"
goldPosterPosts="50"/>
<store sandboxMode="true" businessEmail="[email protected]"/>
</theBeerHouse>
To make the settings easily readable from any part of the site, you will add a public field of type TheBeerHouseSection in the Globals class and set it as follows:
Public NotInheritable Class Globals
    Public Shared ReadOnly Settings As TheBeerHouseSection = _
        CType(WebConfigurationManager.GetSection("theBeerHouse"),
TheBeerHouseSection)

End Class
The WebConfigurationManager class is used to access configuration content, including custom sections such as TheBeerHouseSection. As you can notice in the preceding code, TheBeerHouseSection is retrieved and the values are cast into a TheBeerHouseSection object.
To see how these settings are actually used, let's create the Contact.aspx page, which enables users to send mail to the site administrator by filling in a form online. Figure 3-26 shows the page at runtime.

The following code is the markup for the page, with the layout structure removed to make it easier to follow:
Your name: <asp:TextBox runat="server" ID="txtName" Width="100%" />
<asp:RequiredFieldValidator runat="server" Display="dynamic" ID="valRequireName"
   SetFocusOnError="true" ControlToValidate="txtName"
   ErrorMessage="Your name is required">*</asp:RequiredFieldValidator>

Your e-mail: <asp:TextBox runat="server" ID="txtEmail" Width="100%" />
<asp:RequiredFieldValidator runat="server" Display="dynamic" ID="valRequireEmail"
   SetFocusOnError="true" ControlToValidate="txtEmail"
   ErrorMessage="Your e-mail address is required">*</asp:RequiredFieldValidator>
<asp:RegularExpressionValidator runat="server" Display="dynamic"
   ID="valEmailPattern"  SetFocusOnError="true" ControlToValidate="txtEmail"
   ValidationExpression="w+([-+.']w+)*@w+([-.]w+)*.w+([-.]w+)*"
   ErrorMessage="The e-mail address you specified is not well-formed">*
</asp:RegularExpressionValidator>

Subject: <asp:TextBox runat="server" ID="txtSubject" Width="100%" />
<asp:RequiredFieldValidator runat="server" Display="dynamic" ID="valRequireSubject"
   SetFocusOnError="true" ControlToValidate="txtSubject"
   ErrorMessage="The subject is required">*</asp:RequiredFieldValidator>

Body: <asp:TextBox runat="server" ID="txtBody" Width="100%"
   TextMode="MultiLine" Rows="8" />
<asp:RequiredFieldValidator runat="server" Display="dynamic" ID="valRequireBody"
   SetFocusOnError="true" ControlToValidate="txtBody"
   ErrorMessage="The body is required">*</asp:RequiredFieldValidator>

<asp:Label runat="server" ID="lblFeedbackOK" Visible="false"
   Text="Your message has been successfully sent." SkinID="FeedbackOK" />
<asp:Label runat="server" ID="lblFeedbackKO" Visible="false"
   Text="Sorry, there was a problem sending your message." SkinID="FeedbackKO" />

<asp:Button runat="server" ID="txtSubmit" Text="Send" OnClick="txtSubmit_Click" />
<asp:ValidationSummary runat="server" ID="valSummary"
   ShowSummary="false" ShowMessageBox="true" />
When the Send button is clicked, a new System.Net.Mail.MailMessage is created, with its To, CC, and Subject properties set from the values read from the site's configuration; the From and Body are set with the user input values, and then the mail is sent:
Protected Sub txtSubmit_Click(ByVal sender As Object,
ByVal e As System.EventArgs) Handles txtSubmit.Click
            Try
                ' send the mail
                Dim msg As New MailMessage
                msg.IsBodyHtml = False
                msg.From = New MailAddress(txtEmail.Text, txtName.Text)
                msg.To.Add(New MailAddress(Globals.Settings.ContactForm.MailTo))
                If Not String.IsNullOrEmpty(
Globals.Settings.ContactForm.MailCC) Then
                    msg.CC.Add(New MailAddress(
Globals.Settings.ContactForm.MailCC))
End If
msg.Subject = String.Format( _
Globals.Settings.ContactForm.MailSubject, txtSubject.Text)
msg.Body = txtBody.Text
Dim client As New SmtpClient()
client.Send(msg)
' show a confirmation message, and reset the fields
lblFeedbackOK.Visible = True
lblFeedbackKO.Visible = False
txtName.Text = String.Empty
txtEmail.Text = String.Empty
txtSubject.Text = String.Empty
txtBody.Text = String.Empty
Exit Try
Catch ex As Exception
lblFeedbackOK.Visible = False
lblFeedbackKO.Visible = True
End Try
End SubThe SMTP settings used to send the message must be defined in the web.config file, in the <mailSettings> section, as shown here:
<configuration xmlns="http://schemas.microsoft.com/.NetConfiguration/v2.0">
   <system.web> <!-- some settings here...--> </system.web>
   <system.net>
      <mailSettings>
         <smtp deliveryMethod=" Network " from="[email protected]">
            <network defaultCredentials="true" host="(localhost)" port="25" />
         </smtp>
      </mailSettings>
</system.net> </configuration>Applying good search engine optimization techniques is not always the easiest thing to do from a programming perspective, but creating a good SEO-friendly architecture can make this very easy to accomplish.
In the "Design" section of this chapter, I talked about various search engine optimization techniques that should be employed to help the site earn better search engine placement. Two of those techniques involved search-engine-friendly URLs and 301 redirecting requests going to one version of the domain instead of both the www alias and the actual domain name. Both of these tasks can be handled in a custom httpModule called URLRewrite.
If you are not familiar with httpModules, they are part of the foundation of the ASP.NET model and provide a means to hook into the ASP.NET pipeline to intercept requests and modify them according to your business rules. In this case, the module will intercept the request, analyze the requested URL, and reroute it as necessary.
A custom httpModule implements the IHttpModule interface, which consist of two methods: Init and Dispose. The Dispose method is the same as I discussed earlier; it is called when the module is being destroyed and allows you to release any resources that may be opened by the module. In the case of the URLRewrite module, there are no ongoing resources in use, so this method will be empty.
Imports Microsoft.VisualBasic
Imports System.IO
Imports TheBeerHouse.BLL
Imports System.Web
Imports System.Text.RegularExpressions

Public Class URLRewrite
    Implements IHttpModule
There is one variable declared in the module, wwwRegex, a regular expression used to match the requested URL to see if "www." has been used. If you are not familiar with regular expressions or feel a little intimidated with the syntax, I encourage you to investigate them further. They are a great way to parse text efficiently. Another nice thing is they are essentially language agnostic, meaning that they are used with just about every platform and programming language. There are a few subtle differences across languages, but they seem to be minor.
This regular expression looks for a URL string that contains "http://www." or "https://www.", which is important because this is a way to catch SSL and non-SSL requests. The expression looks almost exactly like the pattern I am trying to catch. The first deviation is the ? after https. This tells the regular expression parser to look for 0 or 1 of the previous characters. The next deviation is ., which is simply an escape character "" to tell the parse to look for a period.
Private Shared wwwRegex As New Regex("https?://www.",
RegexOptions.IgnoreCase Or RegexOptions.Compiled)
The next parameter combination is the regular expression options for the Regex object. In this case, Regex is instructed to ignore the case of the characters it is matching and to compile the expression. Compiling the expression means that it will be part of the assembly and perform slightly faster. The RegexOptions Enum can be ORed together, as shown in the example. There are many other options available for regular expressions that can be used to control how an expression performs its matching.
The Init method is called by the ASP.NET engine the first time a request is made to the website. This method is called only once, and it is typically used to register event handlers. In the URLRewrite module, I am registering a single event handler to intercept the BeginRequest event. There are over 20 events in the ASP.NET page life cycle. I talk about these and many more concepts related to httpModules in a WROX BLOX, Leveraging httpModules for Better ASP.NET Applications, which is available from the WROX website.
Public Sub Dispose() Implements System.Web.IHttpModule.Dispose

    End Sub

    Public Sub Init(ByVal context As System.Web.HttpApplication)
Implements System.Web.IHttpModule.Init
AddHandler context.BeginRequest, AddressOf BeginRequest
End SubAll the events in the ASP.NET page life cycle have the standard Microsoft event signature: an Object named sender and an EventArgs object named e. The sender object is the application, an HttpApplication object. The BeginRequest method uses this parameter by casting the sender to an HttpApplication object named app. I then create local variables for the Request and Response objects as well to save some coding.
Following the declaration of those variables the method declares a series of variables; sRequestedURL, bWWW, and redirectURL. The sRequestedURL variable holds the URL requested by the user, converted to lower case. This is important because all string comparisons are case sensitive. The bWWW Boolean variable is a flag that indicates if there was a match to the regular expression to catch requests made using the www. prefix. The redirectURL variable is initially set to an empty string and will ultimately be set to the real URL if the method needs to perform a 301 redirect.
Private Sub BeginRequest(ByVal sender As Object, ByVal e As EventArgs)
        Dim app As HttpApplication = CType(sender, HttpApplication)
        Dim Request As HttpRequest = app.Request
        Dim Response As HttpResponse = app.Response

        Dim sRequestedURL As String = Request.Url.ToString.ToLower

        Dim bWWW As Boolean = wwwRegex.IsMatch(sRequestedURL)
        Dim redirectURL As String = String.Empty
        If bWWW Then
            redirectURL = wwwRegex.Replace(sRequestedURL,
String.Format("{0}://", Request.Url.Scheme))
        End If

        Rewrite(app)

    End Sub
If there was a match to the regular expression, then the RegEx object is used to perform a quick replace to remove the www. from the URL and set the updated version to redirectURL. The next section of code checks to see if the redirectURL contains any text, and if so, then proceeds to do a 301 redirect. Before the redirect, it does another check to see if the URL ends with "default.aspx," which is important because you need to minimize the use of default.aspx as the home page. Again, this is to avoid duplicate content penalties.
Here is an interesting situation that ASP.NET poses: this will only check for the use of "
default.aspx" if the user requested "http://www.thebeerhouse.com/default.aspx" and not "http://thebeerhouse.com/default.aspx". The reason goes to the root of ASP.NET and IIS. The ASP.NET engine is an ISAPI filter that is registered with IIS to process request for specified file name extensions, such as.aspx. You can map any extension you like to be processed by the ASP.NET engine; just realize there will be a slight bit of added overhead for this choice. In fact, you could do a wildcard mapping, which means you tell IIS to use the ASP.NET engine to process all requests to the site. If you wanted to use URLs that did not have a file extension you would have to do this for example. That is also the way you can get around the "default.aspx" issue.
Note
If you make a request to the core domain without specifying a file, IIS will, by default, change the URL and append the default file to the end of the URL and process it accordingly. In this case, default.aspx has been configured to be the default page for the site and, because it has the .aspx extension, it will be processed by the ASP.NET engine. If the request did not append the default file name to the requested URL, it would not be processed by ASP.NET, which is not what we want.
So, why did I check for this in the BeginRequest method? In this case, the 301 redirect is being sent back to the client without default.aspx appended, which means the search engine will only see the actual domain as the URL. The file name is appended only on the server. If this were checked, say in the regular expression, it would cause an infinite loop because the module would be continually sending 301 redirect notices to the browser or spider because each request would keep having default.aspx appended to the end of the URL. Figure 3-27 shows an example of the expected result.
This still leaves us with a potential hole in the module to allow duplicate content to be indexed by the search engine. Unfortunately, without mapping every request through the ASP.NET engine, it leaves to the URL the responsibility to not use any links to the home page of the site with default.aspx file appended. This takes discipline, and there is no good answer as to how to avoid this without investing in a third-party ISAPI filter.
The last piece of the duplicate content checking code actually performs the 301 redirect. The RedirectLocation of the Response object is set to the redirectURL variable. The StatusCode property of the Response is set to 301. The StatusCode refers to the HTTP Status code returned to the client (a browser or search engine spider) that lets the client know how the request was processed. For example, a normal request returns a status of 200; one where the user is not authenticated to access the resource returns a 403 status code. This tells the client what to do next. In the case of a 301 status code, the client knows it should look for the Location header to see where the URL has been permanently moved to. Search engines see this and know not to index the first URL and instead index the new URL.
Finally, if the requested URL does not need to be redirected from the www version, it still needs to be checked against the site map. The Rewrite method accepts the requestedPath and a reference to the HttpApplication object.
Private Sub Rewrite(ByVal app As HttpApplication)

        Using lSiteMapRst As New SiteMapRepository()
            Dim lSiteMap As SiteMapInfo =
lSiteMapRst.GetSiteMapInfoByURL(
Path.GetFileName(app.Context.Request.RawUrl))

            If Not IsNothing(lSiteMap) Then
                HttpContext.Current.RewritePath(lSiteMap.RealURL)
            End If
        End Using

    End Sub
The logic in the Rewrite method is wrapped in a using statement, where a new SiteMapRepository object is created. In the using statement the GetSiteMapInfoByURL method is called, passing the file name of the requested resource. The reason the file name is used instead of the domain portion of the URL is that should be the same value for every request.
The GetSiteMapInfoByURL method makes a simple LINQ query over the SiteMap and returns either the first match to the requested URL or nothing. The return statement wraps the LINQ query in () and called the FirstOrDefault method, which returns the first object matching returned from the data source or null if there are no matches in the database. If just First was used and there were no matches, it would throw an exception; FirstOrDefault manages that scenario.
Public Function GetSiteMapInfoByURL(ByVal URL As String) As SiteMapInfo

            Return (From lai In SiteMapctx.SiteMaps _
                Where lai.URL = URL).FirstOrDefault

        End Function
The next line of code checks to see if a match was found; if there was, then the requested path is rewritten by calling the RewritePath method. This method does not do a 301 redirect; it actually transforms the requested URL to the desired URL and lets the ASP.NET engine continue processing the request. In essence, it tricks the engine into thinking the client requested a URL they didn't. The only trick you need to have is a way to transform the requested URL to the URL you want ASP.NET to process. There are several ways to manage this; I have found that, for larger sites, it is easier to do this with a database table maintaining various types of information that makes up a page and using that as the ultimate transform. Regular expressions are also very popular.
Note
Microsoft has also recently released the ASP.NET MVC framework, which is featured in the MVC version of the Beer House (ASP.NET MVC Problem–Design–Solution). It uses a routing subsystem that has been made available to all forms of ASP.NET to leverage. You can find more information about using the Route subsystem at http://msdn.microsoft.com/en-us/library/system.web.routing.aspx.
Implementing good search engine practices not only helps the site garner better search engine placement but also makes the overall user experience on the site better. In the base page class, there are several properties to manage the page description, keywords, and other META tag members.
In ASP.NET, there are two basic types of controls: web and HTML. While the web controls garner the vast majority of attention, the HTML controls are very useful. For search engine optimization purposes, the HtmlMeta control renders a META tag used for description, keywords, and other tags. The BasePage class contains a method that creates an HtmlMeta control and adds it to the page's header, composing it with the appropriate tag name and value. It takes care to work with both a master page and a page without a master template.
Public Sub CreateMetaControl(ByVal sTagName As String, ByVal TagValue As String)

            Dim meta As New HtmlMeta()
            meta.Name = sTagName
meta.Content = TagValue
If Not IsNothing(Master) AndAlso Not IsNothing(Master.Page) Then
Master.Page.Header.Controls.Add(meta)
Else
Page.Header.Controls.Add(meta)
End If
End SubSimilarly, retrieving the value of a META tag is just as important. This is done by interrogating the page for the metatag control. This is done by using the FindControl method and returning the content of the control.
Public Function GetMetaValue(ByVal sTagName As String) As String

            Dim meta As HtmlMeta

            If Not IsNothing(Master) Then
                meta = Master.Page.Header.FindControl(sTagName)
            Else
                meta = Page.Header.FindControl(sTagName)
            End If

            If Not IsNothing(meta) Then
                Return meta.Content
            End If

            Return String.Empty

End Function
The BasePage class contains targeted properties to get and set the values of these metatags. The setter creates the META tag by calling the CreateMetaControl method. It gets the value by calling the GetMetaValue method.
Protected Property PageKeyWords() As String
            Get
                Return GetMetaValue("KEYWORDS")
            End Get
            Set(ByVal value As String)
                CreateMetaControl("KEYWORDS", value)
            End Set
End PropertyThe nice thing about configuring ELMAH is that it takes very little effort. First, you download the library, http://code.google.com/p/elmah. You can download a setup project or the source code and compile your own copy.
Once the ELMAH library has been compiled or installed on the development machine, a reference to ELMAH needs to be added to theBeerHouse site, Figure 3-28. Right-click on the root node of the site, and select Add Reference. Then find the ELMAH library either in the machine's GAC or browse for the DLL.

The next step is to add a couple of entries in the site's web.config file. First, add a sectionGroup element to the configSection of the web.config file. You can grab this and copy it from the supplied sample site that comes with the ELMAH library.
<sectionGroup name="elmah">
<!— NOTE! If you are using ASP.NET 1.x then remove the
                 requirePermission="false" attribute from the section
                 elements below as those are only needed for
                 partially trusted applications in ASP.NET 2.0 —>
<section name="security" requirePermission="false"
type="Elmah.SecuritySectionHandler, Elmah"/>
<section name="errorLog" requirePermission="false"
type="Elmah.ErrorLogSectionHandler, Elmah"/>
<section name="errorMail" requirePermission="false"
type="Elmah.ErrorMailSectionHandler, Elmah"/>
<section name="errorFilter" requirePermission="false"
 type="Elmah.ErrorFilterSectionHandler, Elmah"/>
</sectionGroup>
Once the ELMAH sectionGroup has been added to the configuration, the actual ELMAH section can be added to the file. The ELMAH section contains several child elements that allow configuration of the various pieces of the tool. The first section is security, which has only one attribute, allowRemoteAccess. This can be set to 0 to allow anyone to access the ELMAH reports. If ELMAH is to be protected, the value can be any of the following: true, yes, on, and 1.
<elmah>
<security allowRemoteAccess="0"/>
<errorLog type="Elmah.SqlErrorLog, Elmah" connectionStringName="LocalSqlServer"/>
<errorFilter>
<test>
<equal binding="HttpStatusCode" value="404" valueType="Int32"/>
</test>
</errorFilter>
</elmah>
The errorLog element, which defines which type of data store the errors are logged. For theBeerHouse site the errors are logged to SQL Server and the same database with the rest of the site's data. Notice that the connectionStringName is not set to the same connection string as the Entity Framework's connection string. That's because the Entity Framework has all the metadata built into the string. There are many other potential data stores that can be used with ELMAH, such as an XML or SQLLite file.
The next section is the errorFilter element. It holds a series of rules that can be used to limit the errors that are logged. The preceding example is designed to eliminate 404 or page not found errors. This keeps certain errors from being overreported and clogging up the logs.
If you want errors sent to an e-mail address, then the errorMail section needs to be properly configured.
<errorMail
            from="[email protected]"
            to="[email protected]"
            subject="Exception in the Beer House Site"
            async="true"
            smtpPort="25"
            smtpServer="mail.thebeerhouse.com"/>
For ELMAH to actually log errors, the modules must be registered. This is actually a set of modules; notice that the e-mail module is optional. HttpModules are registered in the httpModules element of the system.web section.
<add name="ErrorLog" type="Elmah.ErrorLogModule, Elmah"/>
<!--
                Uncomment the entries below if error mail reporting
                and filtering is desired.
        -->
<add name="ErrorMail" type="Elmah.ErrorMailModule, Elmah"/>
<add name="ErrorFilter" type="Elmah.ErrorFilterModule, Elmah"/>
The final configuration steps register the ELMAH custom handler to report the errors. Like httpModules, httpHandlers are registered in the httpHandlers section of the system.web configuration section.
<add verb="POST,GET,HEAD" path="elmah.axd"
type="Elmah.ErrorLogPageFactory, Elmah"/>
This chapter provided several guidelines for building a flexible, easily configurable and instrumented site. First, we discussed implementing the Entity Framework for data access. Next, we covered a business logic layer built on the top of the DAL, which exposes the data in an object-oriented way, with the required validation logic, event logging, and caching. Finally, we examined the user interface presentation layer, which takes advantage of the new ListView, and UpdatePanel controls to quickly generate complex and feature-rich data-enabled UI controls. In the "Solution" section, we created custom configuration sections and implemented the ELMAH framework.
You now have a good foundation to start building the site upon! In the next chapter, you'll discover the ASP.NET's Membership system to manage user's account subscriptions and profiles and will build a complete administration area for managing users, profiles, preferences, roles, and security settings.