
In this chapter, we'll implement a simple working e-commerce store for The Beer House, to enable users to shop for mugs, T-shirts, and other gadgets for beer-fanatics. In addition to the existing patterns and knowledge we have covered in this book the store gives us a chance to extend the application of AJAX and custom profile objects. We'll also drill down into e-commerce-specific design and coding issues as we implement a persistent shopping cart, and we'll integrate a third-party payment processor service to support real-time credit card transactions. At the end of the chapter you'll have a complete e-commerce module that you can easily adapt to suit your own needs.
The Beer House wants to extend its brand and turn the website into a direct revenue stream instead of just a promotional vehicle. Many bars and restaurants sell branded products to customers, which is both profitable and actually provides valuable free advertising. Nothing like customers who are willing to pay you to promote your business!
This chapter covers the design and implementation of an e-commerce store — this option was chosen for our demo website because it's a good example of nontrivial design and coding, and it gives you a chance to examine some additional ASP.NET technology in a real-world scenario. Building an e-commerce store from scratch is one of the most difficult jobs for a web developer, and it requires a good design up front, including accounting for security, leading the shopper to place a profitable order, and the most important thing — collecting money. It's not just a matter of building the site to handle the catalog, the orders, and the payments; a complete business analysis is required. You must identify your audience (potential customers), your competitors, a marketing strategy to promote your site, marketing offers to convince people to shop on your site rather than somewhere else, and plan for offers and other incentives to turn an occasional buyer into a repeat buyer. You also need to arrange a supplier for products that you can sell (if you are not producing them yourself), which involves the order management and shipping functions, and some consideration of local laws (licenses, tax collection, etc.). All of this could require a considerable amount of time, energy, and money, unless you are already running some kind of physical store that you merely want to extend. In this case, we assume that the sample site will use a pub that already has the business knowledge needed to answer the marketing-related questions, and we'll focus on the technical side of this project (a reasonable assumption because we are software developers and not marketing specialists).
I recommend any web developer building public-facing sites take some time to learn some basic online marketing skills because doing so can go a long way toward understanding how to effectively build a business's public interface.
For the sample project, let's say that the owner of TheBeerHouse wants to add an electronic store to the site — to sell beer glasses, T-shirts, key chains, and other gift items for beer enthusiasts. She needs the capability to create an online catalog that lists products divided into categories, one that provides a detailed and appealing description for each product, has pictures of products, and allows users to add them to an electronic shopping cart and pay for them online using a credit card (with a possible option of letting users phone in their orders in case they don't want to divulge their credit card information online). The owner needs the capability to run special promotions by setting up discounts for certain products, and to offer multiple shipping options at different prices. All this must be easily maintainable by the store keeper herself, without routine technical assistance, so you must also provide a very complete and intuitive administrative user interface. Finally, she also needs some kind of order-reporting page that retrieves and lists the latest orders, the orders with a specific status (completed orders, orders that were confirmed but not yet processed, etc.) or orders for a specific customer. It should also enable her to change the order status, the shipment date, and the shipment tracking information, and, of course, see all order details, such as the customer's full address and contact information. In the next section, you'll find a detailed list of requirements and features to be implemented.
Customer service is a very important aspect of any retail business, but there are differences between online and brick-and-mortar service. In person, a customer with a question or product problem can interface directly with a clerk or manager. This is not always the case with online stores, but there are steps that can be taken to improve the user experience when something goes wrong. The most basic features include a contact form or phone number prominently displayed on the site. This gives customers a sense of comfort; they can always contact you if they need help. Because the Beer House site is a demonstration site, no phone number is displayed, but you should do this for any small online store.
One of the most overlooked customer service features any online store can have is a policies or terms and conditions page. Simply put this is your policies and procedures concerning common issues that happen, such as broken merchandise, lost items in shipping, returns, and the like. My experience over the years is this is the one statement that can give you leverage against a bad customer. Most of the time you will not have to deal with this situation, but it will occur. The other important aspect is a privacy policy; this should also be have a link from every page in the site.
As you can gather from the "Problem" section, implementing a custom e-commerce module can easily be a big challenge, and entire books have been devoted to this subject. With this in mind, and because of space constraints, this is the only chapter to cover that subject, including selected features that any such store must have. Although this module won't compete with sites like Amazon.com in terms of features, it will be complete enough to actually run a real, albeit small, e-store. As you've done in other chapters, you'll leverage much of the other functionality already developed, such as membership and profile management (see Chapter 4), and our general DAL/BLL design, ASP.NET AJAX, and URL Rewriting (see Chapter 3). Therefore, the following list specifies the new functionality you'll implement in this chapter:
Support for multiple store departments, used to categorize products so that they're easy to find if the catalog has a lot of items
Products need a description with support for rich formatting, and images to graphically represent them. Because customers can't hold the product in their own hands, any written details and visual aids will help them understand the product and may lead to a sale. It is also very important in earning high search engine position for search phrases. A small thumbnail image will be shown in the products listing and on the product page, while a bigger image can be shown when the user clicks on the small image to zoom in.
Products will support a discount percentage that the storekeeper will set when she wants to run a promotion for that item. The customer will still see the full price on the product page, along with the discount percentage (so that she can "appreciate" the sale, and feel compelled to order the product), and the final price that she will pay to buy the product.
As you've already done for the articles and forums modules, this module will also expose an RSS feed for the products catalog, which can be consumed on the home page of the site itself, or by external RSS readers set up by customers who want to be notified about new products.
Also the use of Search Engine Friendly URLS will be implemented like the Articles module. Both the store department and individual product pages will use friendly URLs.
Some simple stock availability management will be needed, such as the possibility to specify how many units of a particular item are in stock. This value will be decreased every time someone confirms an order for that product, and the storekeeper will be able to see which products need to be reordered (i.e., when there are only a few units left in stock).
The storekeeper will be able to easily add, remove, and edit shipping methods, such as Standard Ground, Next Business Day, and Overnight, each with a different price. Customers will be able to specify a preferred shipping option when completing the order.
The module needs a persistent shopping cart for items that the customer wants to purchase. Making it persistent means that the user can place some items in the shopping cart, close the browser, and end her session, and come back to the site later and still find her shopping cart as she left it, so that she doesn't need to browse the entire catalog again to find the products she previously put in the cart. The customer may want time to consider the purchase before submitting it, she may want to compare your price with competitors first, or she may not have her credit card with her in that moment, so it's helpful for users to be able to put items in the cart and come back later to finalize the deal.
The current content of the shopping cart (the names of the items that were put inside it, as well as their quantity and unit price) and the subtotal should be always visible on each page of the catalog, and possibly on the entire site, so that the user can easily keep it in mind (you want it to be easy for customers to check out when they are ready, and you don't want them to forget to check out).
A user account is required to complete the order, because you'll need some way to identify users when they come back to the site after submitting the order, to see the status of their order. However, a well-designed e-commerce module should not ask users to log in or create a user account until actually required, to ease the shopping process. If a new user is asked to create an account (and thus fill up a long form, providing personal information, etc.) before even beginning to shop, this may be a bother and prevent visitors from even looking at your products. If, instead, you allow visitors to browse for products, add them to a shopping cart, and only ask them to log in or create a new account just before confirming the order, they'll consider this request as a normal step of the checkout process, and won't complain about it (and you've already hooked them into putting items in their cart).
To make the checkout process as smooth as possible, the shipping address information should be prefilled with the address stored in the user's profile, if found (remember that those details were optional at registration time). However, the shipping address may be different from the customer's address (possibly because the purchase is a gift for someone else), and thus the address may be edited for any order. The profile address should only be used as the default value. The billing address may be different also, but that will be collected by the payment processor service (more details later).
The storekeeper must have a page that lists the orders of any specific interval of dates, using the last n days as a default interval (n is configurable in the default
web.configfile). She may also need to retrieve all orders for a specific customer, or jump directly to a particular order if she already knows its ID. The list will show a few order details, while a separate page will show the complete information, including the list of items ordered, the customer's contact information, and the shipping address. Besides this read-only history data, the storekeeper must be able to edit the order's status (the number and title of order statuses must also be customizable by the store's administrator), the shipping date, and optionally the transaction ID and tracking ID (if tracking is available by the shipping method chosen by the customer during checkout).Add a Privacy and Terms and Conditions page to the site.
As anticipated, you may want, or need, to add many additional features. However, the features in the preceding list will give you a basic starting point for a working solution. In the following sections, you'll read more about some e-commerce-specific issues, such as choosing a service for real-time credit card processing, and then you'll create the typical design of the Entity Model, BLL, and UI parts of the module.
The user has visited your site, browsed the catalog, read the description of some products, and put them into the shopping cart. She finally decides that the prices and conditions are good, and wants to finalize the order. This means providing her personal information (name, contact details, and shipping address) and, of course, paying by credit card. You should plan for, and offer, as many payment solutions as you can, to satisfy all types of customers. Some prefer to send a check via snail mail; others prefer to provide the credit card information by fax or phone, and others are fine with paying via their credit card online.
The best option for the storekeeper is, of course, the online transaction, as it is the most secure (information is encrypted and no physical person sees it), it gives immediate feedback to the user, and it doesn't require the storekeeper to do anything. Several third-party services, called payment gateways, provide this service. They receive some order details, perform a secure transaction for the customer, and keep a small fee for each order — typically a percentage of the transaction amount, but it may also be a fixed fee, or possibly a combination of the two. You can integrate your site with these services in one of two ways:
The customer clicks the button on your site to confirm the order and pays for it. At this point, the user is redirected to the external site of the payment gateway. That site will ask your customer for her billing information (name, address, and credit card number) and will execute the transaction. The gateway's site resides on a secure server, that is, a server where the SSL protocol is used to encrypt the data sent between the customer's browser and the server. After the payment, the customer is redirected back to your site. Figure 9-1 illustrates the process.
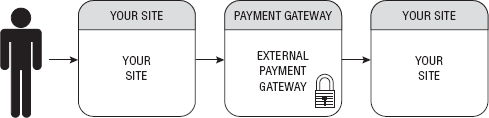
The Secure Sockets Layer (SSL) is a secure web protocol that encrypts all data between a web server and a user's computer to prevent anyone else from knowing what information was sent over that connection. SSL certificates are used on web servers and are issued by third-party certificate authorities (CA), which guarantee to the customer that the site they're shopping at really has the identity it declares. A customer can identify the use of SSL by the presence of "https:" instead of "http:" in the URL, and by the padlock icon typically shown in the browser's status bar. To learn more about SSL, you can search on Google or visit the websites of CAs such as GeoTrust, VeriSign, or Comodo. These providers ultimately offer the same security product, but their prices and requirements vary.
Our store's checkout page sends the payment gateway's page the amount to charge, the recipient account where it should place the money, the currency, and the URL where the customer will be redirected in case of a successful or canceled order, using an HTML form that posts the data contained in a few hidden fields. Here's an example:
<form method="post" action="https://payment_gateway_url_here">
   <input type="hidden" name="LoginName" value="THEBEERHOUSE">
   <input type="hidden" name="OrderAmount" value="46.50 ">
   <input type="hidden" name="OrderCurrency" value="USD">
   <input type="hidden" name="OrderID" value="#12345">
   <input type="hidden" name="OrderDescription" value="Beer Glass #2 (4 pieces)"
   <input type="hidden" name="ConfirmUrl"
      value="http://www.yoursite.com/order_ok.aspx">
   <input type="hidden" name="CancelUrl"
      value="http://www.yoursite.com/order_ko.aspx">
   <input type="submit" value="CLICK HERE TO PAY NOW!">
</form>
Every payment gateway has its own parameters, with different names, and accepts data following their own conventions, but the overall principle is the same for all of them. Many gateways also accept the expected parameters through a GET request instead of a POST, which means that parameters are passed on the querystring: in this case, you can build the complete URL on your site, possibly from within the Click event handler of your ASP.NET form's Submit button, and then redirect the customer to it (but this method is less desirable because the querystring is visible).
Most of the information you pass to the gateway is also forwarded to the store site once the customer comes back to it, either in the Order Confirmed or the Order Canceled page, so that the original order is recognized (by means of its ID) and the record representing it in your database is updated with the appropriate status code. Some payment gateway services encrypt the data they send to you and give you a private key used to decrypt the data, so that you can ensure that the customer did not manually jump directly to your order finalization page. Others use different mechanisms, but you always have some way to be notified whether payment was made (despite this automatic notification, it would be wise to validate that the payment was actually processed to ensure that a hacker has not tried to give us a false indication that a payment was made).
The advantage of using an external payment service is its ease of integration and management. You only forward the user to the external gateway (to a URL built according the gateway's specifications guide), and handle the customer's return after she has paid for the order, or canceled it. You don't have to deal with the actual money transaction, nor do you have to worry about the security of the transaction, which would at least imply setting up SSL on your site, and you don't have to worry about keeping the customer's credit card information stored in a safe manner and complying with privacy laws (if you only keep the customer's name and address you don't have to worry about the kinds of laws that protect account numbers).
The disadvantage is that the customer actually leaves your site for the payment process, which may be disorienting and inconvenient. While it's true that most payment gateway services allow the site's owner/developer to change their payment page's colors and insert the store's logo inside it, the customization often does not go much further, so the difference between the store's pages and the external payment page will be evident. This would not be a problem if you've just created and launched an e-commerce site that nobody knows and trusts. A customer may be more inclined to leave her credit card information on the site of a well-known payment gateway, instead of on your lesser known site. In that case, the visibility of the external payment service may actually help sales. For larger e-commerce sites that already have a strong reputation and are trusted by a large audience, this approach won't be as appealing because it looks less professional than complete integration.
The second approach to handling online payments also relies on an external payment gateway, but instead of physically moving the user to the external site and then bringing her back to your site, she never leaves your site in the first place: she enters all her billing and credit card information on our page, which you then pass to the external service behind the scenes (and you don't store it within your own system). The gateway will ultimately return a response code that indicates the transaction's success or failure (plus some additional information such as the transaction ID), and you can display some feedback to the user on your page. This approach is depicted in Figure 9-2.

The manner in which your page communicates and exchanges data with the gateway service may be a web service or some other simpler server-to-server technology, such as programmatically submitting a POST request with the System.Net.HttpWebRequest class of the .NET Framework, and handling the textual response (usually a simple string with some code indicating success or failure). The obvious advantage of this approach is that the customer stays at your site for the entire process, so that all the pages have the same look and feel, which you can customize as you prefer, and you don't need to worry about fake or customer-generated confirmation requests from the payment gateway, because everything happens from server to server during a single postback.
A disadvantages of this approach is that you're in charge of securing the transmission of sensitive information from the customer's browser to your site (even though you don't store the info, it will still be transferred to and from your web server), by installing a SSL certificate on your server, and using HTTPS to access your own checkout pages. If credit card information is hijacked somehow during the transmission, or if you don't comply with all the necessary security standards, you may get into big legal trouble, and you may lose all your other customers if they hear about the problem. Another disadvantage is that if your site is small and unknown, then some customers may be reluctant to give you their credit card number, something they would feel comfortable doing with a large and well-known credit card—processing service.
It should be clear by now which of the two approaches you may prefer, and this will be influenced by the size of the store, its transaction volume, its popularity among the customers, and how much money the store owner wants to invest. Implementing the second approach requires buying and installing a SSL certificate, it leaves more responsibilities to both you and the store's owner, so you might choose the first approach, which is simpler, more cost-effective, and still very good for small sites. Conversely, if you're implementing a new e-commerce storefront for a large site that is already selling online and is very popular, then the complete integration of the payment process into the store is definitely the best and most professional option.
For the e-commerce store of TheBeerHouse, we'll follow the simpler approach and implement a payment solution that forwards the customer to the external payment service's page. As the store grows, you may wish to upgrade the site to use a fully integrated payment mechanism in the future.
There are many payment services to choose from, but some of them can only be used in one country, or may only accept a small variety of credit cards. Because I wanted to implement a solution that could work for as many readers as possible and be simple to integrate with, I selected PayPal. PayPal is widely known as the main service used by eBay, and it accepts many popular credit cards and works in many countries.
PayPal started as a service that enabled people to exchange money from one user's account to another, or to have payment sent to the user's home in the form of a check, but it has grown into a full-featured payment service that is used by a huge number of merchants worldwide as their favorite payment method, for a number of reasons:
Competitive transaction fees, which are lower than most payment gateways.
Great recognition among customers worldwide. At the time of writing, it reports more than 86 million registered users. Much of their popularity stems from their relationship with eBay, but PayPal is definitely not restricted to use within eBay.
It is available to 56 countries, and it supports multiple languages and multiple currencies.
It supports taking orders via phone, fax, or mail, and processes credit cards from a management console called Virtual Terminal (available in the United States only).
Support for automated recurring payments, which is useful for sites that offer subscription-based access to their content, and need to bill their members regularly — on a monthly basis, for example.
Easy integration. Just create an HTML form with the proper parameters to redirect the customer to the payment page, and specify the return URL for confirmed and canceled payments.
Multiple products that target business of all sizes for online payment processing. PayPal offers integrated gateway products as well as PayPal hosted payment forms.
Almost immediate setup. However, your store needs to use a validated PayPal account, which requires a simple process whereby they can send a small deposit to your linked bank account, and you verify the amount and date of the transfer. This validation step is simple but necessary to prove that the electronic transfer works with your bank account, and it proves your identity.
It has some good customization options, such as changing the payment pages' colors and logo, so that it integrates, at least partially, with your site's style.
Multiple payment integration opportunities, including both types of gateway interfaces previously described.
It offers complete control over which customers can make a purchase (for example, only U.S. customers with a verified address) and enables merchants to set up different tax and shipping amounts for different countries and states.
It provides a robust sandbox to allow developers to test their applications without fear of running up transaction fees against the live payment gateway.
Choosing PayPal as the payment processor for TheBeerHouse allows you to start with its Website Payments Standard option, https://www.paypal.com/cgi-bin/webscr?cmd=_wp-standard-overview-outside, (the HTML form that redirects the customer to the PayPal's pages) and later upgrade to Website Payments Pro, https://www.paypal.com/cgi-bin/webscr?cmd=_wp-pro-overview-outside, or PayFlow Pro gateway, https://www.paypal.com/cgi-bin/webscr?cmd=_payflow-gateway-overview-outside. if you want to completely integrate the payment process into your site, hiding PayPal from the customer's eyes. All in all, PayPal offers a lot of options for flexibility, as well as support and detailed guides for merchants and developers who want to use it. I'll outline a few steps for setting up the PayPal integration here. See the official documentation at https://cms.paypal.com/us/cgi-bin/?cmd=_render-content&content_ID=developer/howto_html_landing and http://developer.paypal.com for further details and examples. Even without prior knowledge of PayPal, it's still trivial to set up, and it works well.
Of special interest for developers is the Sandbox, a complete replication of PayPal used for development and testing of systems that interact with PayPal (including all the administrative and management pages, where you configure all types of settings). This test environment doesn't make real transactions but works with test credit card numbers and accounts. Developers can create an account for free (on developer.paypal.com) and then create PayPal test business accounts for use within the Sandbox. These test accounts can then be used as the recipient for sample transactions. You only need to know a few basic parameters, described in the following table:
Property | Description |
|---|---|
| Specifies in which mode you're using PayPal's pages. A value equal to |
| A value of 1 indicates that you're using your own shopping cart. |
| Specifies the currency in which the other amount parameters (see below) are denoted. If not specified, the default value is USD (United States Dollar). Other possible values are AUD (Australian Dollar), CAD (Canadian Dollar), EUR (Euro), GBP (Pound Sterling), and JPY (Japanese Yen). We'll allow our site administrator to configure this setting. |
| The e-mail address that identifies the PayPal business account that will be the recipient for the transaction. For example, I've created the account [email protected] through the Sandbox, to use for my tests. You should create a Sandbox account of your own for testing. |
| |
| |
| |
| |
| |
| State |
| |
| A custom variable that can contain anything you want. This is called a pass-through parameter, because its value will be passed back to your store site when PayPal notifies you of the outcome of the transaction by calling our server-side page indicated by the |
| A descriptive string for the order the customer is going to pay for, for example, Order #25, or maybe "TheBeerHouse order 12345." |
| The amount the user will pay, in the currency specified by |
| The cost of the shipping, specified in the same currency of the amount, and in the same format. This will be added to the amount parameter to calculate the total price the customer must pay. Example: 6.00 |
| The URL the customer will be redirected to after completing the payment on PayPal's page, for example, |
| The URL to which the customer will be redirected after canceling the payment on PayPal's page, for example, |
| The URL used by PayPal's Instant Payment Notification (IPN) to asynchronously notify you of the outcome of a transaction. This is done in addition to the redirection to the return URL, which happens just after the payment, and which you can't trust because a smart customer might manually type in the URL for your site's order confirmation page, once she has discovered its format (possibly from a previous regular order). IPN is a mechanism based on server-to-server communication: PayPal calls your page by passing some information that identifies the transaction (such as the order ID, the amount paid, etc.), and you interrogate PayPal to determine whether this notification is real or was created by a malicious user. To verify the notification, you forward all the parameters received in the notification back to PayPal, making a programmatic asynchronous |
Instead of creating a form making an HTTP POST (and thus passing the required parameters in the request's body), you can make a GET request and pass all parameters in the querystring, as in the example that follows:
https://www.sandbox.paypal.com/us/cgi-bin/webscr?cmd=_xclick&upload=1&rm=2 &no_shipping=1&no_note=1¤cy_code=USD&business=thebeerhouse%40wrox.com &item_number=25&custom=25&item_name=Order+%2325&amount=33.80 &shipping=6.00¬ify_url=http%3a%2f%2fwww.yoursite.com%2fPayPal%2fNotify.aspx &return=http%3a%2f%2fwww.yoursite.com%2fPayPal%2fOrderCompleted.aspx%3fID%3d25 &cancel_return=http%3a%2f%2fwww.yoursite.com%2fPayPal%2fOrderCancelled.aspx
The preceding URL would redirect the customer to the Sandbox test environment. To handle real payments later, all you need to do is replace the "https://www.sandbox.paypal.com/us/cgi-bin/webscr" part with "https://www.paypal.com/us/cgi-bin/webscr". Later in the chapter you'll see how to dynamically build URLs for order-specific checkout pages, and how to implement the return and verification pages. For now, however, you should have enough background information to get started! So let's proceed with the design of the database, and then the DAL, BLL, and UI.
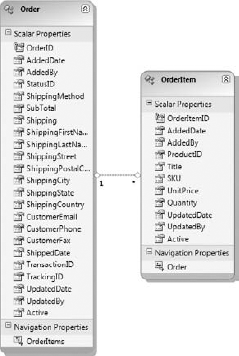
The e-commerce store module uses six tables for the catalog of products and order management, as shown in Figure 9-3.

All catalog data is stored in tbh_Departments (the categories of products, which is similar to tbh_Categories used by the articles module in Chapter 5) and tbh_Products, which contains the title, price, description, images, and other information about specific products. Note that it contains a UnitPrice field and a DiscountPercentage field, but the final price is not saved in the database; rather, it is dynamically calculated on the BLL. Similarly, there are the Votes and TotalRating fields (which have a similar usage to the tbh_Articles table), and the AverageRating information will be dynamically calculated later. The relationship between the two tables makes tbh_Products.DepartmentID a foreign key and establishes cascade updates and deletes, so that if a department is deleted, then all of its products are automatically deleted as well.
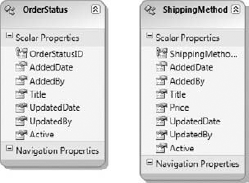
A similar relationship exists between tbh_Orders and tbh_OrderItems. The former stores information about the order, such as its subtotal and shipping amount, the complete customer's contact information and shipping address, shipping method, current order status, and transaction and tracking ID. The latter is the Details table of the master-detail relationship, and stores the order lines of the product, whereby a line describes each ordered product, with its title, ID, unit price, quantity, and stock-keeping unit (SKU) — a SKU is a marketing term designating a product; it's basically a model number (you will use the SKU to reorder more items of a given type). There are also two more support tables, which store shipping options and order status.
You may be wondering why the tbh_Orders and tbh_OrderItems tables maintain a copy of many values that could be retrieved by joining two tables. Take, for example, the tbh_Orders.ShippingMethod and tbh_Orders.Shipping fields, which you may assume could be replaced with a single ShippingMethodID foreign key that references a record in tbh_ShippingMethods. As another example, consider that tbh_OrderItems contains the title, price, and SKU of the ordered product, even if it already has a reference to the product in the tbh_Products table through the ProductID foreign key. However, think about the situation when a shipping method is deleted or edited, which changes its title and price. If you only linked an order record to a record of ShippedMethods, this would result in a different total amount and a different shipping method after the change, which obviously can't be permitted after an order was submitted and confirmed (you can't modify data of a confirmed order because it would be too late). The same is true for products: you can delete or change the price of a product, but orders made before the change cannot be modified, and they must keep the price and all other information as they were at the time of the order. If a product is deleted, the storekeeper must still be able to determine the product's name, SKU, and price, to identify and ship it correctly. All this wouldn't be possible if you only stored the ID of the product because that would become useless once the product were deleted. The product ID is still kept in the tbh_OrderItems table, but only as optional information that would enable you to create a hyperlink to the product page if the product is still available. The tbh_Orders and tbh_OrderItems tables are self-contained history tables.
The exception to this rule is the tbh_Orders.StatusID field, which actually references a record of tbh_OrderStatuses: there will be three built-in statuses in this table (of which you can customize at least the title), which identify an order waiting for payment, a confirmed order (PayPal redirected to the OrderConfirmed.aspx page), and a verified order (an order for which you've verified the payment's authenticity by means of PayPal's IPN notification). The tbh_Orders and tbh_OrderItems tables are also read-only for the most part, except for some information in the tbh_Orders table, such as the StatusID, ShippedDate, TrackingID, and TransactionID fields, which must be updatable to reflect the changes that happen to the order during its processing.
The configuration settings of the store module are defined in a <store> element within the <theBeerHouse> section of the web.config file. The class that maps the settings is StoreElement, which defines the following properties:
As usual, the Entity Model is created by running the wizard, which creates the entities for each table in the database and their relationships. After the wizard completes, the entity names and relationships should be adjusted to make them more human readable by removing the tbh_ prefix and adjusting the singular and plural state for the Set and entity name. Figures 9-4 through 9-6 show the Entity Model with the final names.

The business layer for the E-Commerce module follows the same rules that have been reviewed in previous chapters. Each entity has a corresponding repository class that inherits from a BaseShoppingCartRepository class. Each of these repositories contains members that manage querying, inserting, and updating records. Each entity also has a class that extends the partial class nature of the entity class. Here additional properties and validation logic is managed. Figure 9-7 shows the classes that manage the store's catalog.
Figure 9-8 illustrates the classes needed for managing orders: the shopping cart, the shipping methods, the order statuses, and the actual order storage.


Most of the classes displayed in the figure don't require further explanation. However, the classes related to the shopping cart are not typical, and we'll examine these now. As mentioned earlier, we want to make the shopping cart persistent between different sessions of the same user. Prior to ASP.NET 2.0, projects like this would have required creating your own tables, stored procedures or SQL statements, and classes for saving the shopping cart data in a durable medium, instead of using Session variables that would only last a short time. Now, however, we can create a domain class that represents the cart, and, assuming the class is serializable, you can use it as a data type for a profile variable, and let ASP.NET's profile module persist and load it for the current user automatically, including anonymous users!
The ShoppingCart class displayed earlier is such a class: its methods add, modify, and remove items (represented by ShoppingCartItem objects) to and from an internal Dictionary object (the generic version of Dictionary actually, which has been specialized for storing ShoppingCartItem objects, so that explicit casting is no longer necessary when retrieving an item from it), and its Total property dynamically calculates the shopping cart's total amount by multiplying the quantity by the unit price of each product, adding the result for each item. The other class, CurrentUserShoppingCart, provides static methods that just call the similarly named method of the ShoppingCart object for the current user. The CurrentUserShoppingCart class is used as the object referenced because it cannot directly reference a profile property in its TypeName property.
Finally, note the Order.InsertOrder method does not take a list of items, with all their details, to be copied into records of thb_OrderItems, but rather, takes an instance of the ShoppingCart class, which already contains all this data. Additionally, it also takes the customer's details and the shipping address, which is not contained in the ShoppingCart.
This module is made up of many pages. As usual, there is a complete administration console that allows you to edit practically all the data it uses. In addition to the existing roles (Administrators, Editors, Contributors, and Posters) a new role named StoreKeepers should be created to designate which users will be allowed to administer the store. A new role, separate from the current Editors role, was necessary because people managing articles, polls, and newsletters are not necessarily the same people who will manage products and orders (and vice versa). However, there are a few sensitive functions that only an Administrator can perform, such as deleting orders. Here is a complete list of pages and user controls used by the module:
~/Admin/ManageDepartments.aspx: Let's an administrator or storekeeper add, edit, and delete store departments.
~/Admin/AddEditDepartment.aspx: Lets an administrator or storekeeper add a new department or edit an existing one.
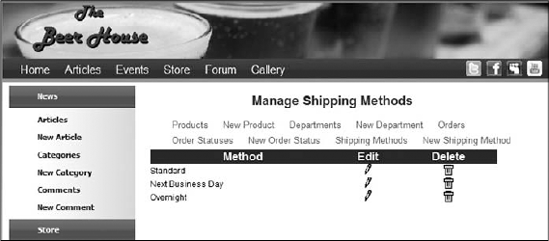
~/Admin/ManageShippingMethods.aspx: Lets an administrator or storekeeper add, edit, and delete shipping methods.
~/Admin/AddEditShippingMethod.aspx: Lets an administrator or storekeeper add a new shipping method or edit an existing one.
~/Admin/ManageOrderStatuses.aspx: Lets an administrator or storekeeper add, edit, and delete store order statuses.
~/Admin/AddEditOrderStatus.aspx: Lets an administrator or storekeeper add a new order status or edit an existing one.
~/Admin/ManageDepartments.aspx: Lets an administrator or storekeeper view the list of departments, with their title, description, and associated image. Also contains links and commands to edit, delete departments, and display the administration of the department's products.
~/Admin/AddEditDepartment.aspx: Lets an administrator or storekeeper add a new department or edit an existing one.
~/Admin/ManageProducts.aspx: Lets an administrator or storekeeper view the list of products, with their title, unit price, average rating, availability, and other information. Also contains links and commands to edit and delete products.
~/Admin/AddEditProduct.aspx: Lets an administrator or storekeeper add a new product or edit an existing one.
~/Admin/ManageOrders.aspx: Lets an administrator or storekeeper find and review orders by customer name, status, or ID. However, only administrators can delete orders.
~/Admin/EditOrder.aspx: Lets an administrator or storekeeper manage a specific order, that is, review all of its details and edit a few of its properties, such as the status, the shipping date, and the transaction and tracking ID.
~/ShowDepartments.aspx: This end-user page displays the list of store departments, with an image and a description for each of them, along with a link to browse their products.
~/BrowseProducts.aspx: Renders a list of products with paging support, for a specific department or for all departments. Information such as the product's title, unit price, discount, average rating, availability, and a small image are displayed.
~/ShowProduct.aspx: Shows all details about a specific product, allows a customer to rate the product, and allows them to add the product to their shopping cart, for later review or purchase.
~/ShoppingCart.aspx: Shows the current contents of the customer's shopping cart, allowing them to change the quantity of any item, remove an item, choose a shipping method, and then recalculate the subtotal, shipping, and total amounts. This page also provides a three-step wizard for checkout: the first step is the actual shopping cart just described; in the second step, the customers provide the shipping address (by default this is retrieved from the user's address, stored in their profile, if present), and in the final step customers can review all the order information, that it, the list of items they're about to order (with unit price and quantity), the subtotal, the shipping method and its cost, the total amount, and the address to which the products will be shipped. After the last step is confirmed, the order is saved in the database, and the customer is sent to the PayPal site to pay for the order.
~/PayPal/OrderCompleted.aspx: This is the page to which PayPal redirects customers after they pay for the order. The page provides some feedback to the user and marks the order as confirmed.
~/PayPal/OrderCancelled.aspx: This is the page to which PayPal redirects customers after they have canceled the order. The page provides some feedback to the customer, explaining that the order was saved, and that it can be paid for later.
~/PayPalIPN.ashx: This is the page to which PayPal sends the transaction's result, as part of the Instant Payment Notification. It confirms that the notification is verified, and if so, marks it as such.
~/OrderHistory.aspx: This lets customers review their past orders, to check their status, or if/when they were shipped, and so forth. For orders that were canceled during payment, a link to return to PayPal and complete the payment is provided.
~/Products.rss: This is a custom
HttpHandlerthat produces the RSS feed for the store catalog, returning a number of products (the number is specified by theRssItemsconfiguration setting described earlier) sorted according to a querystring parameter. For example, it may return the 10 most recent products, the 10 least expensive products, or the 10 most discounted products (great for immediate syndication of special offers).~/Controls/ShoppingCartBox.ascx: This user control statically displays the current contents of the customer's shopping cart, with the name and quantity of the products. It doesn't support editing but provides a link to the
ShoppingCart.aspxpage where this can be done. It also has a link to theOrderHistory.aspxpage. The control will be plugged into the site's shared layout, so that these links and information are easily reachable from anywhere on the site.~/Privacy.aspx: A static page contains the site's privacy policy.
~/Terms.aspx: A static page contains the site's terms and conditions.
We'll go very quickly through much of the implementation of the solution, as the structure of many classes and pages is similar to those developed for previous modules. In particular, creation of the database tables, the Entity Data Model, and the configuration code is completely skipped in this chapter, because of space constraints. Of course, you'll find the complete details in the code download. Instead, I'll focus this space on the implementation of code containing features not already discussed, and code containing interesting logic, such as the shopping cart profile class and the companion classes, as well as the checkout process and the integration with PayPal.
First, we'll examine the BLL classes related to the shopping cart, starting with the ShoppingCartItem class, which is a class that wraps data for an item in the cart, with its title, SKU, ID, unit price, and quantity. This class is decorated with the [Serializable] attribute, which is necessary to allow the ASP.NET profile system to persist the ShoppingCartItem objects. Here's the code:
<Serializable()> _
Public Class ShoppingCartItem

        Private _id As Integer = 0
        Private _title As String = String.Empty
        Private _sku As String = String.Empty
        Private _unitPrice As Decimal
        Private _quantity As Integer = 1

        Public Property ID() As Integer
            Get
                Return _id
            End Get
            Private Set(ByVal value As Integer)
_id = value
End Set
End Property
Public Property Title() As String
Get
Return _title
End Get
Private Set(ByVal value As String)
_title = value
End Set
End Property
Public Property SKU() As String
Get
Return _sku
End Get
Private Set(ByVal value As String)
_sku = value
End Set
End Property
Public Property UnitPrice() As Decimal
Get
Return _unitPrice
End Get
Private Set(ByVal value As Decimal)
_unitPrice = value
End Set
End Property
Public Property Quantity() As Integer
Get
Return _quantity
End Get
Set(ByVal value As Integer)
_quantity = value
End Set
End Property
Public Sub New(ByVal id As Integer, ByVal title As String, _
ByVal sku As String, ByVal unitPrice As Decimal)
Me.ID = id
Me.Title = title
Me.SKU = sku
Me.UnitPrice = unitPrice
End Sub
End ClassThe ShoppingCart class exposes a number of methods for inserting, removing, and retrieving multiple ShoppingCartItem objects to and from an internal Dictionary object instantiated for that type. When an item is inserted, the class checks whether the Dictionary already contains an item with the same ID: if not, it adds it; otherwise, it increments the Quantity property of the existing item. The RemoveItem method works similarly, but it decrements the Quantity if the item is found; if the Quantity reaches 0, it completely removes the item from the shopping cart. RemoveProduct suggests the same action, but it's actually different, because it removes a product from the cart, regardless of its quantity. UpdateItemQuantity updates an item's quantity, and is used when the customer edits the quantities in the shopping cart page. Finally, the Clear method empties the shopping cart by clearing the internal Dictionary. Here's the complete code:
<Serializable()> _
Public Class ShoppingCart
        Private _items As New Dictionary(Of Integer, ShoppingCartItem)()

        Public ReadOnly Property Items() As ICollection
            Get
                Return _items.Values
            End Get
        End Property

        ' Gets the sum total of the items' prices
        Public ReadOnly Property Total() As Decimal
            Get
                Dim sum As Decimal = 0.0
                For Each item As ShoppingCartItem In _items.Values
                    sum += item.UnitPrice * item.Quantity
                Next
                Return sum
            End Get
        End Property

        ' Adds a new item to the shopping cart
        Public Sub InsertItem(ByVal id As Integer, ByVal title As String, _
ByVal sku As String, ByVal unitPrice As Decimal)
            If _items.ContainsKey(id) Then
                _items(id).Quantity += 1
            Else
                _items.Add(id, New ShoppingCartItem(id, title, sku, unitPrice))
            End If
        End Sub

        ' Removes an item from the shopping cart
        Public Sub DeleteItem(ByVal id As Integer)
            If _items.ContainsKey(id) Then
                Dim item As ShoppingCartItem = _items(id)
                item.Quantity -= 1
                If item.Quantity = 0 Then _
                   _items.Remove(id)
            End If
        End Sub

        ' Removes all items of a specified product from the shopping cart
        Public Sub DeleteProduct(ByVal id As Integer)
            If _items.ContainsKey(id) Then
                _items.Remove(id)
            End If
        End Sub

        ' Updates the quantity for an item
Public Sub UpdateItemQuantity(ByVal id As Integer, _
ByVal quantity As Integer)
If _items.ContainsKey(id) Then
Dim item As ShoppingCartItem = _items(id)
item.Quantity = quantity
If item.Quantity <= 0 Then _
_items.Remove(id)
End If
End Sub
' Clears the cart
Public Sub Clear()
_items.Clear()
End Sub
End ClassIf you now go to the root's web.config file and change the <profile> section according to what is shown here, you'll have a fully working persistent shopping cart, also available to anonymous users:
<profile defaultProvider="TBH_ProfileProvider">
   <providers>...</providers>
   <properties>
      <add name="FirstName" type="String" />
      <add name="LastName" type="String" />
      ...
      <add name="ShoppingCart" type="TheBeerHouse.BLL.Store.ShoppingCart"
serializeAs="Binary" allowAnonymous="true" />
   </properties>
</profile>
Note
The ShoppingCartItem class is not serializable to XML, because a default constructor for the ShoppingCartItem is not present, and the ShoppingCart's Item property does not have a setter accessory. These requirements do not exist for binary serialization, though, and because of this I chose to use this serialization method and create more encapsulated classes.
With a few dozen lines of code we've accomplished something that in previous versions of .NET and most other frameworks would have required hours of work to accomplish by creating database tables, stored procedures, and DAL classes. Remember to update the Profile_MigrateAnonymous event handler in the global.asax file to migrate the ShoppingCart property from the anonymous user's profile to the profile of the member who just logged in. However, you must do it only if the anonymous customer's shopping cart is not empty, because otherwise you would always erase the registered customer's shopping cart:
Sub Profile_MigrateAnonymous(ByVal sender As Object,
ByVal e As ProfileMigrateEventArgs)
        ' get a reference to the previously anonymous user's profile
        Dim anonProfile As ProfileBase = ProfileBase.Create(e.AnonymousID)
   ' if set, copy its Theme and ShoppingCart to the current user's profile
        If anonProfile.GetPropertyValue("ShoppingCart").Items.Count > 0 Then
            Me.Profile.ShoppingCart = anonProfile.GetPropertyValue("ShoppingCart")
End If ... End sub
Next we'll look at the Order class, for which GetOrderByID looks like all the Get{xxx}ByID methods of the other business classes in other modules:
Public Function GetOrderById(ByVal OrderId As Integer) As Order

Dim key As String = CacheKey & "_" & OrderId

If EnableCaching AndAlso Not IsNothing(Cache(key)) Then
                Return CType(Cache(key), Order)
End If

Shoppingctx.Orders.MergeOption = MergeOption.NoTracking
Dim lOrder As Order = (From lai In Shoppingctx.Orders _
                Where lai.OrderID = OrderId).FirstOrDefault

If EnableCaching Then
      CacheData(key, lOrder)
End If

Return lOrder

End Function
Another interesting method is InsertOrder, which accepts an instance of ShoppingCart with all the order items, and other parameters for the customer's contact information and the shipping address. It must insert multiple records (a record into tbh_Orders, and one or more records into tbh_OrderDetails). Thanks to the transactional nature of the Entity Framework, you do not have to use a TransActionScope object to manage the insertion process. Each item in the customer's shopping cart is added to the Order's OrderItems list before the object graph is committed to the database in one single transaction. TransactionScope can still be used to wrap code using the Entity Framework to update the database but is best served in situations where the transaction involves coordination with external services such as MSMQ. The following code shows how it's used in a real situation:
Public Function InsertOrder(ByVal vshoppingCart As ShoppingCart,
ByVal shippingMethod As String, _
            ByVal shipping As Decimal, ByVal shippingFirstName As String,
ByVal shippingLastName As String, _
            ByVal shippingStreet As String, ByVal shippingPostalCode As String,
ByVal shippingCity As String, _
            ByVal shippingState As String, ByVal shippingCountry As String,
ByVal customerEmail As String, _
            ByVal customerPhone As String, ByVal customerFax As String,
ByVal transactionID As String) As Order

            Dim lOrder As Order

                Dim userName As String = Helpers.CurrentUserName

                ' insert the master order
lOrder = Order.CreateOrder(0, DateTime.Now, _
userName, 1, shippingMethod, vshoppingCart.Total, shipping, _
shippingFirstName, shippingLastName, shippingStreet,
shippingPostalCode, _
shippingCity, shippingState, shippingCountry, customerEmail,
customerPhone, _
customerFax, Now, True)
lOrder.TransactionID = transactionID
'insert the child order items
For Each item As ShoppingCartItem In vshoppingCart.Items
lOrder.OrderItems.Add(OrderItem.CreateOrderItem(0,
DateTime.Now, userName, _
item.ID, item.Title, item.SKU, item.UnitPrice,
item.Quantity, DateTime.Now, True))
Next
lOrder = Me.AddOrder(lOrder)
Return lOrder
End FunctionThe StatusCode enumeration used in the preceding code includes the three built-in statuses required by the module: waiting for payment, confirmed, and verified, and is defined as follows:
Public Enum StatusCode As Integer
        WaitingForPayment = 1
        Confirmed = 2
        Verified = 3
        Shipped = 4
        Canceled = 5
End Enum
Note, however, that because the StatusID property is an integer, an explicit cast to int is required. The StatusID type is int and not StatusCode because users can define their own additional status codes, and thus working with numeric IDs is more appropriate in most situations.
The Store module has a dedicated helper class, StoreHelper, which contains several methods to help with common routines that could be used in various places in the store. The GetPayPalPaymentUrl returns the URL to redirect the customer to PayPal to pay for the order. A valid Order entity must be passed to the method to compile a valid URL to post to PayPal. It dynamically builds the URL shown in the "Design" section with the amount, shipping, and OrderID values taken from the current order, plus the recipient business e-mail and currency code taken from the configuration settings, and the return URLs that point to the OrderCompleted.aspx, OrderCancelled.aspx, and PayPalIPN.ashx pages described earlier:
Public Shared Function GetPayPalPaymentUrl(ByVal vOrder As Order) As String

        If Not vOrder.IsValid Then
            Return "Not a valid order"
End If
Dim serverUrl As String
If Globals.Settings.Store.SandboxMode Then
serverUrl = "https://www.sandbox.paypal.com/us/cgi-bin/webscr"
Else
serverUrl = "https://www.paypal.com/us/cgi-bin/webscr"
End If
Dim amount As String = vOrder.SubTotal.ToString("N2").Replace(",", ".")
Dim shipping As String = vOrder.Shipping.ToString("N2").Replace(",", ".")
Dim firstname As String = HttpUtility.UrlEncode(vOrder.ShippingFirstName)
Dim lastname As String = HttpUtility.UrlEncode(vOrder.ShippingLastName)
Dim address As String = HttpUtility.UrlEncode(vOrder.ShippingStreet)
Dim city As String = HttpUtility.UrlEncode(vOrder.ShippingCity)
Dim state As String = HttpUtility.UrlEncode(vOrder.ShippingState)
Dim zip As String = HttpUtility.UrlEncode(vOrder.ShippingPostalCode)
Dim baseUrl As String =
HttpContext.Current.Request.Url.AbsoluteUri.Replace
(HttpContext.Current.Request.Url.PathAndQuery, "") & _
HttpContext.Current.Request.ApplicationPath
If Not baseUrl.EndsWith("/") Then baseUrl &= "/"
Dim notifyUrl As String = HttpUtility.UrlEncode(baseUrl
& "PayPal/PayPalIPN.ashx")
Dim returnUrl As String = HttpUtility.UrlEncode(baseUrl
& "PayPal/OrderCompleted.aspx?OrderID=" & _
vOrder.OrderID.ToString())
Dim cancelUrl As String = HttpUtility.UrlEncode(baseUrl
& "PayPal/OrderCancelled.aspx")
Dim business As String = HttpUtility.UrlEncode(
Globals.Settings.Store.BusinessEmail)
Dim itemName As String = HttpUtility.UrlEncode(
"Order #" & vOrder.OrderID.ToString())
Dim url As New StringBuilder()
url.AppendFormat( _
"{0}?cmd=_xclick&upload=1&rm=2&no_shipping=1&no_note=1¤cy_code={1}
&business={2}&item_number={3}&custom={3}&item_name={4}&amount={5}
&shipping={6}¬ify_url={7}&return={8}&cancel_return={9}
&first_name={10}&last_name={11}&address1={12}&city={13}
&state={14}&zip={15}", _
serverUrl, Globals.Settings.Store.CurrencyCode, business,
vOrder.OrderID, itemName, _
amount, shipping, notifyUrl, returnUrl, cancelUrl, firstname,
lastname, address, city, state, zip)
Return url.ToString()
End FunctionNote that the method uses a different base URL according to whether the store runs in real or test mode, as indicated by the Sandbox configuration setting. Also note that PayPal expects all amounts to use the period (.) as a separator for the amount's decimal parts, and only wants two decimal digits. You use variable.ToString("N2") to format the double or decimal variable as a string with two decimal digits. However, if the current locale settings are set to Italian or some other country's settings for which a comma is used, you'll get something like "33,50" instead of "33.50." For this reason you also do a Replace for "," with "." just in case.
As stated earlier, the Shopping Cart module is composed of many pages to manage the store and allow customers to shop. There are really two distinct user interface sections: administrative and consumer.
Many administrative and end-user pages of this module are similar in structure of those in previous chapters, especially to those of the articles module described and implemented in Chapter 5. For example, in Figure 9-8 you can see how similar the page to manage departments is to the page to manage article categories.

The page to manage a shipping option (see Figure 9-10) is also similar: the controls used to list and insert/modify records just define different fields, but the structure of the page is nearly identical.
In the page for managing order status, status records with IDs from 1 to 5 cannot be deleted, because they identify special, hard-coded values. For example, you've just seen in the implementation of the Order class that the UpdateOrder method checks whether the current order status is 2, in which case it decrements the UnitsInStock field of the ordered products. Because of this, you should handle the ItemDataBound event of the ListView displaying the records, and ensure that the Delete ImageButton is hidden for the first three records. Following is the code to place into this event handler, and Figure 9-11 shows the final result on the page:
Protected Sub lvOrderStatuses_ItemDataBound(ByVal sender As Object,
ByVal e As System.Web.UI.WebControls.ListViewItemEventArgs)
Handles lvOrderStatuses.ItemDataBound

        Dim lvdi As ListViewDataItem = DirectCast(e.Item, ListViewDataItem)

        If lvdi.ItemType = ListViewItemType.DataItem Then

            Dim btnDelete As ImageButton = CType(lvdi.FindControl("btnDelete"),
ImageButton)
            Dim lOrderStatus As OrderStatus = CType(lvdi.DataItem, OrderStatus)

            If Not IsNothing(lOrderStatus) And Not IsNothing(btnDelete) Then

                If lOrderStatus.OrderStatusID <= 5 Then
                    btnDelete.Visible = False
                End If

            End If

        End If

End Sub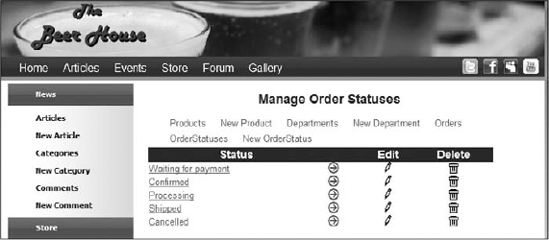
The AddEditProduct.aspx page uses a familiar set of controls with some AJAX control extenders to provide client-side validation, and enables to you to edit an existing product or insert a new one according to the presence of an ProductID parameter on the querystring. The same thing was done (and shown in detail) in Chapter 5, so please refer to that chapter to see the implementation. Figure 9-12 shows the resulting page.

The ManageProducts.aspx page shows the list of the products of a specific department if a DepartmentID parameter is found on the querystring; otherwise, it shows products from all departments. The page contains a ListView control that defines the following columns:
An
IMGtag that shows the product's small image, whose URL is stored in theSmallImageUrlfield. The IMG is wrapped by an anchor tag that links to the product's detail admin page (AddEditProduct.aspx).A column containing the product's Title, anchored to its detailed admin page. Below the title the product's SKU is displayed.
A column that displays all the pricing information, including the
UnitPrice, the Discount Percent and the units currently available.The final two columns contain the edit and delete Image Buttons used in all the admin list pages.
Finally the ListView contains an AlternatingItemTemplate that uses a slightly different background color to help differentiate the rows. Here's the code that defines the ListView just described:
<asp:ListView ID="lvProducts" runat="server">
    <LayoutTemplate>
        <table cellspacing="0" cellpadding="0" class="AdminList">
            <tr class="AdminListHeader">
                <td colspan="2">
                    Product
                </td>
                <td>
                    Price Info
                </td>
                <td>
                    Edit
                </td>
                <td>
                    Delete
                </td>
            </tr>
            <tr id="itemPlaceholder" runat="server">
            </tr>
            <tr>
                <td colspan="5">
                    <div class="pager">
<asp:DataPager ID="pagerBottom" runat="server" PageSize="10"
PagedControlID="lvProducts">
    <Fields>
        <asp:NextPreviousPagerField ButtonCssClass="command"
FirstPageText="<<" PreviousPageText="<"
            RenderDisabledButtonsAsLabels="true" ShowFirstPageButton="true"
ShowPreviousPageButton="true"
            ShowLastPageButton="false" ShowNextPageButton="false" />
        <asp:NumericPagerField ButtonCount="7" NumericButtonCssClass="command"
CurrentPageLabelCssClass="current"
            NextPreviousButtonCssClass="command" />
        <asp:NextPreviousPagerField ButtonCssClass="command" LastPageText=">>"
NextPageText=">"
RenderDisabledButtonsAsLabels="true" ShowFirstPageButton="false"
ShowPreviousPageButton="false"
ShowLastPageButton="true" ShowNextPageButton="true" />
</Fields>
</asp:DataPager>
</div>
</td>
</tr>
</table>
</LayoutTemplate>
<EmptyDataTemplate>
<tr>
<td colspan="5">
<p>
Sorry there are no Productss available at this time.</p>
</td>
</tr>
</EmptyDataTemplate>
<ItemTemplate>
<tr>
<td>
<a href="<%# String.Format("AddEditProduct.aspx?ProductId={0}",
Eval("ProductId")) %>">
<img id="Img1" runat="server"
src='<%# Eval("SmallImageUrl") %>' alt='<%# Eval("Title") %>'
border="0" /></a>
</td>
<td>
<a href="<%# String.Format("AddEditProduct.aspx?ProductId={0}",
Eval("ProductId")) %>">
<%# Eval("Title") %></a>
<br />
<%# Eval("SKU") %>
</td>
<td>
<%#FormatPrice(Eval("UnitPrice"))%>
<br />
Discount:
<%# Eval("DiscountPercentage") %>%
<br />
Units in Stock:
<%# Eval("UnitsInStock") %>
</td>
<td align="center">
<a href="<%# String.Format("AddEditProduct.aspx?ProductId={0}",
Eval("ProductId")) %>">
<img src="../images/edit.gif" alt="" width="16"
height="16" class="AdminImg" /></a>
</td>
<td align="center">
<asp:ImageButton runat="server" ID="btnDelete"
CommandArgument='<%# Eval("DepartmentID").ToString() %>'
CommandName="Delete" ImageUrl="~/images/delete.gif"AlternateText="Delete" CssClass="AdminImg"
OnClientClick="return confirm('Warning: This will delete the
Product from the database.')," />
</td>
</tr>
</ItemTemplate>
<AlternatingItemTemplate>
<tr class="AltAdminRow">
<td>
<a href="<%# String.Format("AddEditProduct.aspx?ProductId={0}",
Eval("ProductId")) %>">
<img id="Img1" runat="server"
src='<%# Eval("SmallImageUrl") %>' alt='<%# Eval("Title") %>'
border="0" /></a>
</td>
<td>
<a href="<%# String.Format("AddEditProduct.aspx?ProductId={0}",
Eval("ProductId")) %>">
<%# Eval("Title") %></a>
<br />
<%# Eval("SKU") %>
</td>
<td>
<%#FormatPrice(Eval("UnitPrice"))%>
<br />
Discount:
<%# Eval("DiscountPercentage") %>%
<br />
Units in Stock:
<%# Eval("UnitsInStock") %>
</td>
<td align="center">
<a href="<%# String.Format("AddEditProduct.aspx?ProductId={0}",
Eval("ProductId")) %>">
<img src="../images/edit.gif" alt="" width="16" height="16"
class="AdminImg" /></a>
</td>
<td align="center">
<asp:ImageButton runat="server" ID="btnDelete"
CommandArgument='<%# Eval("DepartmentID").ToString() %>'
CommandName="Delete" ImageUrl="~/images/delete.gif"
AlternateText="Delete" CssClass="AdminImg"
OnClientClick="return confirm('Warning: This will delete
the Product from the database.')," />
</td>
</tr>
</AlternatingItemTemplate>
<ItemSeparatorTemplate>
<tr>
<td colspan="5">
<hr />
</td></tr>
</ItemSeparatorTemplate>
</asp:ListView>There are other controls on the page, such as DropDownList controls to choose the parent department and the number of products to list on the page. The Department's DropDownList is bound in the Page Load event by calling the BindDepartmentsToListControl method defined in the AdminPage class. This method is used to bind a list of departments to a ListControl, which the DropDownList control inherits. I chose to bind the list to the base ListControl class because the RadioButtonList, BulletedList, RadioButtonList and ListBox all inherit from ListControl and the members needed to accomplish the data binding are all defined in the ListControl class. The method takes two parameters, the ListControl and a Boolean to indicate if an extra instructional item should be added at the top of the list. It also automatically sets the SelectedValue based on the current value of the DepartmentId property also defined in the AdminPage class:
Public Sub BindDepartmentsToListControl(ByVal vDepartmentListControl
As ListControl, ByVal bAddInstruction As Boolean)

            Using lDepartmentrpt As New DepartmentRepository

                vDepartmentListControl.DataValueField = "DepartmentId"
                vDepartmentListControl.DataTextField = "Title"

                vDepartmentListControl.DataSource = lDepartmentrpt.GetDepartments
                vDepartmentListControl.DataBind()

                If bAddInstruction Then
                    vDepartmentListControl.Items.Insert(0,
New ListItem("All Departments", 0))
                End If

                vDepartmentListControl.SelectedValue = DepartmentId

            End Using

End Sub
If you look closely at the column that displays the product's price, you'll see that it calls a method named FormatPrice to show the amount. This method is added to the Helpers class and wrapped in BasePage class to help with legacy code based on previous versions of TheBeerHouse. It formats the input value as a number with two decimal digits, followed by the currency code defined in the configuration settings:
Public Shared Function FormatPrice(ByVal vPrice As Object) As String
Return Convert.ToDecimal(vPrice).ToString("N2") & " " &
 Globals.Settings.Store.CurrencyCode
End Function
Amounts are not displayed on the page with the default currency format (which would use the "C" format string) because you may be running the store in another country, such as Italy, which would display the euro symbol in the string, but you want to display USD regardless of the current locale settings. Figure 9-13 shows the page at runtime.

Presenting a good clean, easy to use store front is one of the most important things to make an e-commerce site work. This does not mean there has to be over the top graphics and eye candy, but customers must feel they can trust you, find the products they want, and be able to check out easily and intuitively. Making a customer think or work hard to place an order quickly leads to an investment that loses the company money.
The BrowseProducts.aspx page is a very simple page that displays a list of store departments with links to a product listing for each department. So we can jump straight to the product-specific ShowProduct.aspx page. This shows all the possible details about the product whose ProductID is passed on the querystring: the title, the average rating, the availability icon, the HTML long description, the small image (or a default "no image available" image if the SmallImageUrl field is empty), a link to the full-size image (displayed only if the FullImageUrl field is not empty), and the product's price. As for the product listing, the UnitPrice amount is shown if the DiscountPercentage is 0; otherwise, that amount is rendered as crossed out, and DiscountPercentage along with the FinalUnitPrice are displayed. Finally, there's a button on the page that will add the product to the customer's shopping cart and will redirect the customer to the ShoppingCart.aspx page. Following is the content of the .aspx markup page:
<div>
        <div id="ContentTitle">
            <h1>
                <asp:Label runat="server" ID="lblTitle" /></h1>
            <asp:Panel runat="server" ID="panEditProduct">
<asp:HyperLink runat="server" ID="lnkEditProduct"
ImageUrl="~/images/edit.gif" ToolTip="Edit product"
NavigateUrl="~/Admin/AddEditProduct.aspx?ID={0}" />
<asp:ImageButton runat="server" ID="btnDelete"
CausesValidation="false" AlternateText="Delete product"
ImageUrl="~/Images/Delete.gif" OnClientClick="if
(confirm('Are you sure you want to delete this product?') == false)
return false;" />
</asp:Panel>
</div>
<div id="ContentBody">
<div id="ProductImage">
<asp:HyperLink runat="server" ID="HyperLink1"
Target="_blank"></asp:HyperLink>
</div>
<div id="productinfo">
<b>Price: </b>
<asp:Literal runat="server" ID="lblDiscountedPrice"><s>{0}</s>
{1}% Off = </asp:Literal>
<asp:Literal runat="server" ID="lblPrice" />
<br />
<b>Availability: </b>
<asp:AvailabilityImage runat="server" ID="availDisplay" />
<br />
<b>Rating: </b>
<asp:Literal runat="server" ID="lblRating" Text="{0} user(s)
have rated this product " />
<br />
<div class="ProductThumb">
<img runat="Server" id="imgProduct" class="ProductThumb"
src="~/Images/noimage.gif" /><br />
</div>
<asp:HyperLink runat="server" ID="lnkFullImage"
Target="_blank"></asp:HyperLink>
<asp:Literal runat="server" ID="lblDescription" />
<br />
<asp:Button ID="btnAddToCart" runat="server" Text="Add to
Shopping Cart" />
<br />
<hr class="ProductHR" />
<div class="sectiontitle">
How would you rate this product?
<asp:UpdatePanel ID="UpdatePanel1" runat="server">
<ContentTemplate>
Rate This Product:<br />
<asp:Rating ID="ProductRating" runat="server"
BehaviorID="ratDisplay" CssClass="ArticleRating"
StarCssClass="ratingStar"
WaitingStarCssClass="savedRatingStar"
FilledStarCssClass="filledRatingStar"
EmptyStarCssClass="emptyRatingStar">
</asp:Rating>
</ContentTemplate>
</asp:UpdatePanel></div>
<asp:Literal runat="server" ID="ltlAvgRating" Text="The average
rating for {1} is {0} beer(s)." />
<asp:Literal runat="server" ID="lblUserRating" Visible="False"
Text="Your rated this product {0} beer(s). Thank you for your feedback." />
</div>
</div>You can see that there's no binding expression in the preceding code, because everything is done in the BindProduct method, which is called from the Page_Load event handler, after loading a Product object according to the ProductID value read from the querystring; actually, it is a PrimaryKey property defined in the base page classes. Remember the shopping cart is using search engine friendly URLs, just like we used in the Articles module. So, there should be a valid ProductId passed in the URL via the URL Rewrite function. If not, the page throws an ApplicationException with the message a parameter is missing in the querystring. Assuming that there is a ProductId, the product BindProduct method is called, and then the user rating for the product is set:
Protected Sub Page_Load(ByVal sender As Object, ByVal e As System.EventArgs)
Handles Me.Load
        If Me.ProductId < 1 Then
            Throw New ApplicationException("Missing parameter on the querystring.")
        End If

        If Not Me.IsPostBack Then
            ' try to load the product with the specified ID, and raise an
exception if it doesn't exist
            BindProduct()

            ' hide the rating box controls if the current user has already voted
for this product
            Dim userRating As Integer = GetUserRating()
            If userRating > 0 Then _
                ShowUserRating(userRating)
        End If
    End Sub
The BindProduct method follows the standard pattern we have used to bind value to the controls on the page. Notice the method is the use of String.Format to apply values to specific textual controls on the page. For example, the lblRating Literal control has its Text property defined in the markup as "{0} user(s) have rated this product". In the BindProduct method the number of users that have submitted product ratings is inserted to the control's Text.
Private Sub BindProduct()

        Using lProductrpt As New ProductsRepository

            Dim lproduct As Product = lProductrpt.GetProductById(ProductId)
            If IsNothing(lproduct) Then _
               Throw New ApplicationException("No product was found for the
specified ID.")

            ' display all article's data on the page
            lblTitle.Text = lproduct.Title
Title = lproduct.Title
lblRating.Text = String.Format(lblRating.Text, lproduct.Votes)
availDisplay.Value = lproduct.UnitsInStock
lblDescription.Text = lproduct.Description
panEditProduct.Visible = Me.UserCanEdit
lnkEditProduct.NavigateUrl = String.Format(lnkEditProduct.NavigateUrl,
ProductId)
lblPrice.Text = Me.FormatPrice(lproduct.FinalUnitPrice)
lblDiscountedPrice.Text = String.Format(lblDiscountedPrice.Text, _
Me.FormatPrice(lproduct.UnitPrice), lproduct.DiscountPercentage)
lblDiscountedPrice.Visible = (lproduct.DiscountPercentage > 0)
ltlAvgRating.Text = String.Format(ltlAvgRating.Text,
lproduct.AverageRating, lproduct.Title)
If lproduct.SmallImageUrl.Length > 0 Then _
imgProduct.Src = lproduct.SmallImageUrl
imgProduct.Alt = lproduct.Title
If lproduct.FullImageUrl.Length > 0 Then
lnkFullImage.NavigateUrl = lproduct.FullImageUrl
lnkFullImage.Visible = True
Else
lnkFullImage.Visible = False
End If
End Using
End SubThe page's markup lays out where the product image and details are displayed. The image is wrapped in its own DIV tag to make it easier to apply different styles to the image via themes. The balance of the product descriptive information is a series of Hyperlink and Literal controls to hold the product's information. It also has the very important Add to Shopping Cart button, this does just what it says, adds the product to the customer's shopping cart. Below that is a Rating control, wrapped in a dedicated UpdatePanel. The functionality of the rating control was discussed in the Article module chapter. Another important feature is the availability control. I will detail this web control very shortly.
<div id="ProductImage">
                <asp:HyperLink runat="server" ID="HyperLink1"
Target="_blank"></asp:HyperLink>
            </div>
            <div id="productinfo">
                <b>Price: </b>
                <asp:Literal runat="server" ID="lblDiscountedPrice"><s>{0}</s>
{1}% Off = </asp:Literal>
                <asp:Literal runat="server" ID="lblPrice" />
                <br />
                <b>Availability: </b>
                <asp:AvailabilityImage runat="server" ID="availDisplay" />
                <br />
                <b>Rating: </b>
                <asp:Literal runat="server" ID="lblRating" Text="{0} user(s) have
rated this product " />
                <br />
<div class="ProductThumb">
<img runat="Server" id="imgProduct" class="ProductThumb"
src="~/Images/noimage.gif" /><br />
</div>
<asp:HyperLink runat="server" ID="lnkFullImage"
Target="_blank"></asp:HyperLink>
<asp:Literal runat="server" ID="lblDescription" />
<br />
<asp:Button ID="btnAddToCart" runat="server" Text="Add to
Shopping Cart" />
<br />
<hr class="ProductHR" />
<div class="sectiontitle">
How would you rate this product?
<asp:UpdatePanel ID="UpdatePanel1" runat="server">
<ContentTemplate>
Rate This Product:<br />
<asp:Rating ID="ProductRating" runat="server"
BehaviorID="ratDisplay" CssClass="ArticleRating"
StarCssClass="ratingStar"
WaitingStarCssClass="savedRatingStar"
FilledStarCssClass="filledRatingStar"
EmptyStarCssClass="emptyRatingStar">
</asp:Rating>
</ContentTemplate>
</asp:UpdatePanel>
</div>
<asp:Literal runat="server" ID="ltlAvgRating" Text="The average
rating for {1} is {0} beer(s)." />
<asp:Literal runat="server" ID="lblUserRating" Visible="False"
Text="Your rated this product {0} beer(s). Thank you for your feedback." />
</div>Figure 9-14 shows the result.

When the customer clicks the Add to Shopping Cart button, we call the InsertItem method of the ShoppingCart object returned by the profile property, and pass in the product's data read from the Product object. Finally, we redirect the customer to the ShoppingCart.aspx page, where he can change the quantity of the products to order and proceed to the checkout process:
Protected Sub btnAddToCart_Click(ByVal sender As Object,
ByVal e As System.EventArgs) Handles btnAddToCart.Click
        Using lProductrpt As New ProductsRepository
            Dim lProduct As Product = lProductrpt.GetProductById(ProductId)
            Dim lprofile As ProfileBase = Helpers.GetUserProfile
            Dim lShoppingCart As ShoppingCart = Profile.ShoppingCart
            lShoppingCart.InsertItem(lProduct.ProductID, lProduct.Title,
lProduct.SKU, lProduct.FinalUnitPrice)
            Profile.ShoppingCart = lShoppingCart

            Me.Response.Redirect("ShoppingCart.aspx", False)
        End Using

End SubIn the previous edition of TheBeerHouse a user control was defined called AvailabilityImage.ascx, which was used to visually indicate how many items were in stock for a particular product. Red meant it was out of stock, yellow meant running low, and green meant there were plenty available. There was one public property, Value, that was set when a product was bound to indicate how many units were in stock. For this edition, I took that user control and made a WebControl out of it, AvailablityImage. By making this into a more flexible WebControl, it can potentially be used for more than just an indicator of units in stock and on many other sites when a three-way visual indicator is needed.
Like the Country and State DropDownList controls inherited from an existing WebControl, I have already discussed, the AvailabilityImage control inherits from an Image WebControl. There are eight public properties available to customize the way the image is rendered. Three properties — RedImage, YellowImage, and GreenImage — set the corresponding images that can be used. The RedAlt, YellowAlt, and GreenAlt properties set the Alt attribute values rendered for the image. The LowAvailability property is the value used to indicate an item is in short supply. Finally, Value indicates the number of units in stock for the product.
<ToolboxData("<{0}:AvailabilityImage runat=server></{0}:AvailabilityImage>")> _
Public Class AvailabilityImage
    Inherits System.Web.UI.WebControls.Image

    Private _RedAlt As String = "Currently not available"
    <Category("The Beer House"), DefaultValue("Currently not available")> _
Public Property RedAlt() As String
        Get
            Return _RedAlt
        End Get
        Set(ByVal value As String)
            _RedAlt = value
        End Set
    End Property

    Private _YellowAlt As String = "Few units available"
<Category("The Beer House"), DefaultValue("Few units available")> _
Public Property YellowAlt() As String
Get
Return _YellowAlt
End Get
Set(ByVal value As String)
_YellowAlt = value
End Set
End Property
Private _GreenAlt As String = "Available"
<Category("The Beer House"), DefaultValue("Available")> _
Public Property GreenAlt() As String
Get
Return _GreenAlt
End Get
Set(ByVal value As String)
_GreenAlt = value
End Set
End Property
Private _RedImage As String = "~/images/lightred.gif"
<Category("The Beer House"), DefaultValue("~/images/lightred.gif")> _
Public Property RedImage() As String
Get
Return _RedImage
End Get
Set(ByVal value As String)
_RedImage = value
End Set
End Property
Private _YellowImage As String = "~/images/lightyellow.gif"
<Category("The Beer House"), DefaultValue("~/images/lightyellow.gif")> _
Public Property YellowImage() As String
Get
Return _YellowImage
End Get
Set(ByVal value As String)
_YellowImage = value
End Set
End Property
Private _GreenImage As String = "~/images/lightgreen.gif"
<Category("The Beer House"), DefaultValue("~/images/lightgreen.gif")> _
Public Property GreenImage() As String
Get
Return _GreenImage
End Get
Set(ByVal value As String)
_GreenImage = value
End SetEnd Property
Private _lowAvailability As Integer = 5
<Category("The Beer House"), DefaultValue("5")> _
Public Property LowAvailability() As Integer
Get
Return _lowAvailability
End Get
Set(ByVal Value As Integer)
_lowAvailability = Value
End Set
End Property
Private _value As Integer = 0
<Category("The Beer House"), DefaultValue("0")> _
Public Property Value() As Integer
Get
Return _value
End Get
Set(ByVal value As Integer)
_value = value
SetProperties()
End Set
End Property
Private Sub SetProperties()
If _value <= 0 Then
MyBase.ImageUrl = RedImage
MyBase.AlternateText = RedAlt
ElseIf _value <= LowAvailability Then
MyBase.ImageUrl = YellowImage
MyBase.AlternateText = YellowAlt
Else
MyBase.ImageUrl = GreenImage
MyBase.AlternateText = GreenAlt
End If
End Sub
Protected Overloads Overrides Sub OnInit(ByVal e As EventArgs)
SetProperties()
MyBase.OnInit(e)
End Sub
End ClassAs described earlier in the "Design" section for the user interface, this page is actually more complex than a page that just manages the shopping cart, as it includes a complete wizard for the checkout process, which includes steps to provide the contact information and the shipping address, and to review the order a last time before being redirected to PayPal for the payment. The page uses the Wizard control, which allows you to define different views within it, and it automatically creates and manages the buttons/links at the bottom of the wizard to move backward and forward through the wizard's steps. The control's structure is outlined in the following code:
<asp:Wizard ID="wizSubmitOrder" runat="server" ActiveStepIndex="0"
 CancelButtonText="Continue Shopping"
    CancelButtonType="Link" CancelDestinationPageUrl="~/BrowseProducts.aspx"
DisplayCancelButton="True"
    DisplaySideBar="False" FinishPreviousButtonType="Link"
StartNextButtonText="Proceed with order"
    StartNextButtonType="Link" Width="100%" StepNextButtonText="Proceed with order"
    StepNextButtonType="Link" StepPreviousButtonText="Modify data in previous step"
    StepPreviousButtonType="Link" FinishCompleteButtonText="Submit Order"
FinishCompleteButtonType="Link"
    FinishPreviousButtonText="Modify data in previous step">
    <WizardSteps>
        <asp:WizardStep ID="WizardStep1" runat="server" Title="Shopping Cart">
        </asp:WizardStep>
        <asp:WizardStep ID="WizardStep2" runat="server" Title="Shipping Address">
        </asp:WizardStep>
        <asp:WizardStep runat="server" Title="Order Confirmation">
        </asp:WizardStep>
    </WizardSteps>
    <StepNextButtonStyle CssClass="BHButton" />
    <StartNextButtonStyle CssClass="BHButton" />
    <FinishCompleteButtonStyle CssClass="BHButton" />
    <FinishPreviousButtonStyle CssClass="BHButton" />
    <StepPreviousButtonStyle CssClass="BHButton" />
</asp:Wizard>
There's a <WizardSteps> section used to define one <asp:WizardStep> control for each step you want the wizard to have. The WizardStep is a template-based control used to declare the content of that step. The parent Wizard control has a number of properties that enable you to completely customize the visual appearance of the commands at the bottom, in addition to their text. The properties used in the preceding code are self-explanatory. The Wizard control also exposes a number of methods that a developer can handle to run code when the current step changes, or when the user clicks the button to complete the wizard. There will also be a Cancel command in each step that we'll use as the command to continue shopping, so it just redirects the user to the BrowseProducts.aspx page.
The entire Wizard is wrapped by an UpdatePanel, which makes stepping through the check out process seamless to the end user. It does however introduce some changes to the code that runs behind the scenes to manage the shopping cart information. Stepping through the wizard is an automatic operation; it is managing changes to the quantity of items and shipping selection that has to be effectively handled differently than in the previous version of TheBeerHouse, but more on that later.
Let's start with the first step. It defines a ListView control that binds to the list of ShoppingCartItem objects returned by CurrentUserShoppingCart.GetItems in the BindShoppingCart method in the code-behind. The BindShoppingCart method is called when the page first loads or a change is made to the contents of the shopping cart by the user. The list has a column for the item's title, a column that shows the item's price, a column with an editable textbox with the quantity for that product, and finally a column with a command link to completely remove that item from the shopping cart (which would be the same as manually setting the product's quantity to 0 and clicking the button to update the totals).
<asp:ListView ID="lvOrderItems" runat="server" DataKeyNames="ID">
        <LayoutTemplate>
            <table>
                <tr class="AdminListHeader">
                    <td class="CartProductName">
                        Product
                    </td>
                    <td>
                        Price
                    </td>
                    <td>
                        Quantity
                    </td>
                    <td>
                    </td>
                </tr>
                <tr runat="server" id="itemPlaceHolder">
                </tr>
            </table>
        </LayoutTemplate>
        <ItemTemplate>
            <tr>
                <td>
                    <asp:HyperLink runat="server" ID="hlnkProduct"
ForeColor="#800000" NavigateUrl='<%# SEOFriendlyURL( _
                                Path.Combine(Settings.Store.ProductURLIndicator,
Eval("Title").ToString()), ".aspx") %>'>
<%# Eval("Title") %></asp:HyperLink>
                </td>
                <td class="AdminRightCell">
                    <%# FormatPrice(Eval("UnitPrice")) %>
                </td>
                <td class="AdminRightCell">
                    <asp:TextBox runat="server" ID="txtQuantity"
Text='<%# Bind("Quantity") %>' MaxLength="6"
                        Width="30px" AutoPostBack="true"
OnTextChanged="QtyChanged"></asp:TextBox>
                    <asp:RequiredFieldValidator ID="valRequireQuantity"
runat="server" ControlToValidate="txtQuantity"
                        SetFocusOnError="true" ValidationGroup="ShippingAddress"
Text="The Quantity field is required."
                        ToolTip="The Quantity field is required."
 Display="Dynamic"></asp:RequiredFieldValidator>
                    <asp:CompareValidator ID="valQuantityType"
runat="server" Operator="DataTypeCheck"
                        Type="Integer" ControlToValidate="txtQuantity"
Text="The Quantity must be an integer."
                        ToolTip="The Quantity must be an integer."
Display="dynamic" />
                </td>
<td>
<asp:ImageButton runat="server" ID="btnDelete"
CommandArgument='<%# Eval("ID").ToString() %>'
CommandName="Delete" ImageUrl="~/images/delete.gif"
AlternateText="Delete" CssClass="AdminImg"
OnClientClick="return confirm('Warning: This will delete
the Product from the shopping cart.')," />
</td>
</tr>
</ItemTemplate>
<EmptyDataTemplate>
<b>The shopping cart is empty</b></EmptyDataTemplate>
</asp:ListView>Below the list you define a Panel containing several controls that display the total cost of the order, a drop-down to select shipping method and a grand total including the shipping. The Update Totals button is retained from the previous version of TheBeerHouse, just in case a user has disable JavaScript, or there just happens to be an unforeseen JavaScript error on the client. The totals are recalculated as soon as an item's quantity or shipping selection is changed by the user. The UpdatePanel makes this possible because the quantity TextBoxes and shipping method DropDownList are set to AutoPostback and a server-side event handler is defined to handle the OnTextChanged and SelectedIndexChanged events. The event handlers call the UpdateTotal method that review the quantity values in the cart list and the selected shipping method to update the active shopping cart and the values echoed in the browser.
<asp:Panel runat="server" ID="panTotals">
        <div style="text-align: right; font-weight: bold; padding-top: 4px;">
            Subtotal:
            <asp:Literal runat="server" ID="lblSubtotal" />
            <p>
                Shipping Method:
                <asp:DropDownList ID="ddlShippingMethods" runat="server"
DataTextField="TitleAndPrice"
                    DataValueField="Price" AutoPostBack="true">
                </asp:DropDownList>
                <asp:RequiredFieldValidator ID="valRequireQuantity"
runat="server" ControlToValidate="ddlShippingMethods"
                    SetFocusOnError="true" ValidationGroup="ShippingMethod"
Text="A Shipping method is required."
                    ToolTip="A Shipping method is required."
Display="Dynamic" InitialValue="0"></asp:RequiredFieldValidator>
            </p>
            <p>
                <u>Total:</u>
                <asp:Literal runat="server" ID="lblTotal" />
            </p>
            <asp:Button ID="btnUpdateTotals" runat="server" Text="Update totals" />
            <br />
            <br />
        </div>
    </asp:Panel>
The UpdateTotals method is also called when a row is deleted from the ListView (a product was completely removed from the shopping cart). Before calling UpdateTotals after a product has been removed, the BindShoppingCart method must be called. If UpdateTotals was called without rebinding the ListView to the items in the shopping cart, UpdateTotals would operate over the previous version of the cart. If you call BindShoppingCart first, the ListView will reflect the most current shopping cart list. UpdateTotals loops through the rows of the ListView control, and for each row it finds the textbox control with the product's quantity, reads its value, and uses it to update the quantity of the product stored in the shopping cart, by means of the ShoppingCart.UpdateItemQuantity method.
Notice that I also used an index i to track the cart item being processed; this is because access to the row's ShoppingCartItem DataItem is not guaranteed upon postback not initiated by a ListView event, such as the OnTextChanged event. After looping through the cart items the order's subtotal and total amounts are displayed according to the updated quantities and the currently selected shipping method. Finally, it checks whether the shopping cart actually contains something, because if that's not the case, it doesn't make sense for the customer to proceed to the next step of the checkout wizard. Curiously, the Wizard control has no properties to explicitly disable the Next and Previous commands, but you can do that by setting the command's text to an empty string, so that they won't be visible. The property to set in this case is StartNextButtonText, because you are in the Start step (i.e., the first one), and you want to disable the Next command. Here's the implementation for this first part of the wizard:
Protected Sub UpdateTotals()

        Dim i As Integer = 0

        For Each lvdi As ListViewDataItem In lvOrderItems.Items

            Dim lCartItem As ShoppingCartItem =
DirectCast(lShoppingCart.Items(i), ShoppingCartItem)

            If Not IsNothing(lCartItem) Then

                Dim id As Integer = lCartItem.ID
                Dim quantity As Integer = Convert.ToInt32(CType(lvdi.FindControl(
"txtQuantity"), TextBox).Text)
                lShoppingCart.UpdateItemQuantity(id, quantity)

            End If

            i += 1

        Next

        ' display the subtotal and the total amounts
        lblSubtotal.Text = FormatPrice(lShoppingCart.Total)
        lblTotal.Text = FormatPrice(lShoppingCart.Total + _
           Convert.ToDecimal(ddlShippingMethods.SelectedValue))

        ' if the shopping cart is empty, hide the link to proceed
        If lShoppingCart.Items.Count = 0 Then
            wizSubmitOrder.StartNextButtonText = String.Empty
            panTotals.Visible = False
Else
wizSubmitOrder.StartNextButtonText = "Proceed with order"
End If
Profile.ShoppingCart = lShoppingCart
BindShoppingCart()
End SubFigure 9-15 shows this first step at runtime.

The second step is simpler than the first one; it's just a form that asks for contact information and the shipping address. This information is prefilled with the information stored in the customer's profile, if provided, but customers can change everything in this form if they're buying a gift for someone and want the product(s) to be shipped directly to that person. Also, at this point a user account is required to proceed, so if the current user is anonymous, then she will be asked to log in or create a new user account, instead of displaying the input form. To do this, a MultiView control with two views is used, and the index of the desired view will be dynamically set when the page loads if the index of the wizard's current step is 1 (second step), according to whether the user is authenticated. This version uses a MaskedEditExtender to format data such as a phone number as the user enters it and the StateDropDown control. In practice, it's just a wizard control under the hood without the automatically created buttons to move forward and backward. Here's the markup code:
<asp:MultiView ID="mvwShipping" runat="server">
        <asp:View ID="vwLoginRequired" runat="server">
            <p>
                An account is required to proceed with the order submission. If you
 already have
                an account please log in now, otherwise <a href="Register.aspx">
create a new account</a>
for free.</p>
</asp:View>
<asp:View ID="vwShipping" runat="server">
<p>
Fill the form below with the shipping address for your order.
All information is
required, except for phone and fax numbers.
</p>
<table cellpadding="2" width="410">
<tr>
<td width="110" class="fieldname">
<asp:Label runat="server" ID="lblFirstName"
AssociatedControlID="txtFirstName" Text="First name:" />
</td>
<td width="300">
<asp:TextBox ID="txtFirstName" runat="server"
Width="100%" />
<asp:RequiredFieldValidator ID="valRequireFirstName"
runat="server" ControlToValidate="txtFirstName"
SetFocusOnError="True"
ValidationGroup="ShippingAddress" Text="The First Name field is required."
ToolTip="The First Name field is required."
Display="Dynamic"></asp:RequiredFieldValidator>
</td>
</tr>
<tr>
<td class="fieldname">
<asp:Label runat="server" ID="lblLastName"
AssociatedControlID="txtLastName" Text="Last name:" />
</td>
<td>
<asp:TextBox ID="txtLastName" runat="server"
Width="100%" />
<asp:RequiredFieldValidator ID="valRequireLastName"
runat="server" ControlToValidate="txtLastName"
SetFocusOnError="True"
ValidationGroup="ShippingAddress" Text="The Last Name field is required."
ToolTip="The Last Name field is required."
Display="Dynamic"></asp:RequiredFieldValidator>
</td>
</tr>
<tr>
<td class="fieldname">
<asp:Label runat="server" ID="lblEmail"
AssociatedControlID="txtEmail" Text="E-mail:" />
</td>
<td>
<asp:TextBox runat="server" ID="txtEmail" Width="100%" />
<asp:RequiredFieldValidator ID="valRequireEmail"
runat="server" ControlToValidate="txtEmail"
SetFocusOnError="True"
ValidationGroup="ShippingAddress" Text="The E-mail field is required."
ToolTip="The E-mail field is required."Display="Dynamic"></asp:RequiredFieldValidator>
<asp:RegularExpressionValidator runat="server"
ID="valEmailPattern" Display="Dynamic"
SetFocusOnError="True"
ValidationGroup="ShippingAddress" ControlToValidate="txtEmail"
ValidationExpression=
"w+([-+.']w+)*@w+([-.]w+)*.w+([-.]w+)*"
Text="The E-mail address you specified is not well-formed."
ToolTip="The E-mail address you specified is not
well-formed."></asp:RegularExpressionValidator>
</td>
</tr>
<tr>
<td class="fieldname">
<asp:Label runat="server" ID="lblStreet"
AssociatedControlID="txtStreet" Text="Street:" />
</td>
<td>
<asp:TextBox runat="server" ID="txtStreet" Width="100%" />
<asp:RequiredFieldValidator ID="valRequireStreet"
runat="server" ControlToValidate="txtStreet"
SetFocusOnError="True"
ValidationGroup="ShippingAddress" Text="The Street field is required."
ToolTip="The Street field is required."
Display="Dynamic"></asp:RequiredFieldValidator>
</td>
</tr>
<tr>
<td class="fieldname">
<asp:Label runat="server" ID="lblPostalCode"
AssociatedControlID="txtPostalCode"
Text="Zip / Postal code:" />
</td>
<td>
<asp:TextBox runat="server" ID="txtPostalCode"
Width="100%" />
<asp:RequiredFieldValidator ID="valRequirePostalCode"
runat="server" ControlToValidate="txtPostalCode"
SetFocusOnError="True"
ValidationGroup="ShippingAddress" Text="The Postal Code field is required."
ToolTip="The Postal Code field is required."
Display="Dynamic"></asp:RequiredFieldValidator>
</td>
</tr>
<tr>
<td class="fieldname">
<asp:Label runat="server" ID="lblCity"
AssociatedControlID="txtCity" Text="City:" />
</td>
<td>
<asp:TextBox runat="server" ID="txtCity" Width="100%" />
<asp:RequiredFieldValidator ID="valRequireCity"
runat="server" ControlToValidate="txtCity"
SetFocusOnError="True"ValidationGroup="ShippingAddress" Text="The City field is required."
ToolTip="The City field is required."
Display="Dynamic"></asp:RequiredFieldValidator>
</td>
</tr>
<tr>
<td class="fieldname">
<asp:Label runat="server" ID="lblState"
AssociatedControlID="ddlState" Text="State / Region:" />
</td>
<td>
<asp:StateDropDownList runat="server" ID="ddlState"
Width="100%" CssClass="formField">
</asp:StateDropDownList>
<asp:RequiredFieldValidator ID="valRequireState"
runat="server" ControlToValidate="ddlState"
SetFocusOnError="True"
ValidationGroup="ShippingAddress" Text="The State field is required."
ToolTip="The State field is required."
InitialValue="0" Display="Dynamic"></asp:RequiredFieldValidator>
</td>
</tr>
<tr>
<td class="fieldname">
<asp:Label runat="server" ID="lblCountry"
AssociatedControlID="ddlCountries" Text="Country:" />
</td>
<td>
<asp:CountryDropDownList ID="ddlCountries" runat="server"
CssClass="formField">
</asp:CountryDropDownList>
</td>
</tr>
<tr>
<td class="fieldname">
<asp:Label runat="server" ID="lblPhone"
AssociatedControlID="txtPhone" Text="Phone:" />
</td>
<td>
<asp:TextBox runat="server" ID="txtPhone" Width="100%" />
<asp:MaskedEditExtender ID="MaskedEditExtender1"
runat="server" TargetControlID="txtPhone"
Mask="(999)999-9999" MaskType="Number"
ClearMaskOnLostFocus="false">
</asp:MaskedEditExtender>
</td>
</tr>
<tr>
<td class="fieldname">
<asp:Label runat="server" ID="lblFax"
AssociatedControlID="txtFax" Text="Fax:" />
</td>
<td>
<asp:TextBox runat="server" ID="txtFax" Width="100%"/><asp:MaskedEditExtender ID="MaskedEditExtender2"
runat="server" TargetControlID="txtFax"
Mask="(999)999-9999" MaskType="Number"
ClearMaskOnLostFocus="false">
</asp:MaskedEditExtender>
</td>
</tr>
</table>
</asp:View>
</asp:MultiView>Following is the code-behind that prefills the various textboxes if the current user is logged in. Also note that UpdateTotals is called in this event so that the totals are updated correctly even when the customer has changed some quantities and proceeded to the next step without clicking the Update Total button and the AJAX updates did not fire:
Private Sub wizSubmitOrder_ActiveStepChanged(ByVal sender As Object,
ByVal e As System.EventArgs) Handles wizSubmitOrder.ActiveStepChanged

        If wizSubmitOrder.ActiveStepIndex = 1 Then

            UpdateTotals()

            If Me.User.Identity.IsAuthenticated Then

                If txtFirstName.Text.Trim().Length = 0 Then _
                   txtFirstName.Text = Profile.FirstName
                If txtLastName.Text.Trim().Length = 0 Then _
                   txtLastName.Text = Profile.LastName
                If txtEmail.Text.Trim().Length = 0 Then _
                   txtEmail.Text = Membership.GetUser().Email
                If txtStreet.Text.Trim().Length = 0 Then _
                   txtStreet.Text = Profile.Address.Street
                If txtPostalCode.Text.Trim().Length = 0 Then _
                   txtPostalCode.Text = Profile.Address.PostalCode
                If txtCity.Text.Trim().Length = 0 Then _
                   txtCity.Text = Profile.Address.City

                If ddlState.SelectedIndex = 0 AndAlso Not
String.IsNullOrEmpty(Profile.Address.State) Then _
                    ddlState.SelectedValue = Profile.Address.State

                If ddlCountries.SelectedIndex = 0 AndAlso Not
String.IsNullOrEmpty(Profile.Address.Country) Then _
                   ddlCountries.SelectedValue = Profile.Address.Country

                If txtPhone.Text.Trim().Length = 0 Then _
                   txtPhone.Text = Profile.Contacts.Phone
                If txtFax.Text.Trim().Length = 0 Then _
                   txtFax.Text = Profile.Contacts.Fax
            End If
' Code to handle the last step ...
End Sub
Figure 9-16 shows what this step looks like on the page at runtime.

The last step allows the customer to review all data inserted so far: the name, price, and quantity of the products she's about to order; the subtotal amount; the shipping method and its cost; and the total amount, as well as her personal contact information and the shipping address. The WizardStep template defines a number of Labels for most of this information, and a Repeater control bound to the items in the shopping cart:
<div id="ContentBody">
<p>
Please carefully review the order information below.
If you want to change something
click the link below to go back to the previous pages and
make the corrections.
If everything is ok go ahead and submit your order.
</p>
<img src="Images/paypal.gif" style="float: right" alt="" />
<b>Order Details</b>
<br />
<asp:Repeater runat="server" ID="repOrderItems">
<ItemTemplate>
<img src="Images/ArrowR3.gif" border="0" alt="" />
<%# Eval("Title") %>
-
<%# FormatPrice(Eval("UnitPrice")) %>
<small>(Quantity =
<%# Eval("Quantity") %>)</small>
<br />
</ItemTemplate>
</asp:Repeater>
<br />
Subtotal =
<asp:Literal runat="server" ID="lblReviewSubtotal" />
<br />Shipping Method =
<asp:Literal runat="server" ID="lblReviewShippingMethod" />
<br />
<u>Total</u> =
<asp:Literal runat="server" ID="lblReviewTotal" />
<br />
<b>Shipping Details</b>
<br />
<asp:Literal runat="server" ID="lblReviewFirstName" />
<asp:Literal runat="server" ID="lblReviewLastName" /><br />
<asp:Literal runat="server" ID="lblReviewStreet" /><br />
<asp:Literal runat="server" ID="lblReviewCity" />,
<asp:Literal runat="server" ID="lblReviewState" />
<asp:Literal runat="server" ID="lblReviewPostalCode" /><br />
<asp:Literal runat="server" ID="lblReviewCountry" />
</div>When this step loads, you confirm that the wizard's ActiveStepIndex is 2 and then show all the information in the controls:
ElseIf wizSubmitOrder.ActiveStepIndex = 2 Then
            lblReviewFirstName.Text = txtFirstName.Text
            lblReviewLastName.Text = txtLastName.Text
            lblReviewStreet.Text = txtStreet.Text
            lblReviewCity.Text = txtCity.Text
            lblReviewState.Text = ddlState.SelectedValue
            lblReviewPostalCode.Text = txtPostalCode.Text
            lblReviewCountry.Text = ddlCountries.SelectedValue

            lblReviewSubtotal.Text = Me.FormatPrice(lShoppingCart.Total)
            lblReviewShippingMethod.Text = ddlShippingMethods.SelectedItem.Text
            lblReviewTotal.Text = Me.FormatPrice(lShoppingCart.Total + _
               Convert.ToDecimal(ddlShippingMethods.SelectedValue))

            repOrderItems.DataSource = lShoppingCart.Items
            repOrderItems.DataBind()
The results of this step are displayed as shown in Figure 9-17.
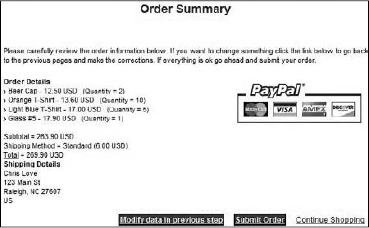
If the Finish button is clicked, the wizard's FinishButtonClick event handler will save the shopping cart's content as a new order in the database, clear the shopping cart, and use the StoreHelper's GetPayPalPaymentUrl method to get the PayPal URL with the customer's shipping information, then you'll redirect the customer to pay for the ordered products. However, before doing all this, you must determine whether the customer is still authenticated. In fact, consider the situation in which the customer gets to this last step and then goes away from the computer, maybe to find her credit card. When she comes back, her authentication cookie may have expired, in which case you'd get an empty shopping cart for an anonymous user when accessing Profile.ShoppingCart. Therefore, if the current user is not authenticated at this point, you'll redirect her to the page that requests the login; otherwise, you'll go ahead and send her to the PayPal site:
Private Sub wizSubmitOrder_FinishButtonClick(ByVal sender As Object,
ByVal e As System.Web.UI.WebControls.WizardNavigationEventArgs)
Handles wizSubmitOrder.FinishButtonClick

        If Me.User.Identity.IsAuthenticated Then

            Dim shippingMethod As String = ddlShippingMethods.SelectedItem.Text
            shippingMethod = shippingMethod.Substring(0,
shippingMethod.LastIndexOf("(")).Trim

            Dim lorder As Order
            Using lorderrpt As New OrdersRepository

                Dim lShoppingCart As ShoppingCart = Profile.ShoppingCart

                lorder = lorderrpt.InsertOrder(lShoppingCart, shippingMethod, _
                    Convert.ToDecimal(ddlShippingMethods.SelectedValue), _
                   txtFirstName.Text, txtLastName.Text, txtStreet.Text,
txtPostalCode.Text, txtCity.Text, _
                   ddlState.SelectedValue, ddlCountries.SelectedValue,
txtEmail.Text, txtPhone.Text, txtFax.Text, "")

                lShoppingCart.Clear()

                Profile.ShoppingCart = lShoppingCart

            End Using

            Me.Response.Redirect(StoreHelper.GetPayPalPaymentUrl(lorder), False)

        Else
            Me.RequestLogin()
        End If
End Sub
Figure 9-18 shows the PayPal payment page run from inside the Sandbox test environment. The subtotal, shipping, and total amounts are exactly the same as those in the previous figures.

When the customer cancels the order while she's on PayPal's page, she is redirected to the OrderCancelled.aspx page, which has just a couple of lines of static feedback instructions explaining how she can pay at a later time. If she completes the payment, she'll be directed to the OrderCompleted.aspx page instead. It expects the ID of the order paid by the customer on the querystring, so that it can load an Order object for it. It then it updates its StatusID property from "waiting for payment" to "confirmed" but not yet "verified":
Protected Sub Page_Load(ByVal sender As Object, ByVal e As System.EventArgs)
Handles Me.Load

            Using lorderrpt As New OrdersRepository

                Dim order As Order = lorderrpt.GetOrderById(Convert.ToInt32(
Me.Request.QueryString("OrderID")))
If order.StatusID = CInt(StatusCode.WaitingForPayment) Then
order.StatusID = CInt(StatusCode.Confirmed)
lorderrpt.AddOrder(order)
End If
End Using
End SubFigure 9-19 shows both pages.
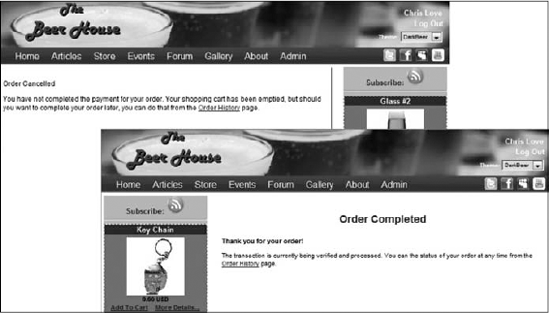
The PayPalIPN.ashx generic handler is the one that receives the IPN notification. (In a previous version of TheBeerHouse, this was a full-blown Web Form, which is completely unnecessary because a browser never opens the response and a form is not needed.) As explained earlier, the first thing you do in this page is verify that the notification is real and was not faked by a dishonest user. To do this, you send the notification data back to PayPal using HttpWebRequest, and see if PayPal responds with a VERIFIED string:
Protected Function IsVerifiedNotification() As Boolean
        Dim response As String = String.Empty
        Dim post As String = Request.Form.ToString() & "&cmd=_notify-validate"
        Dim serverUrl As String
        If Helpers.Settings.Store.SandboxMode Then
            serverUrl = "https://www.sandbox.paypal.com/us/cgi-bin/webscr"
        Else
            serverUrl = "https://www.paypal.com/us/cgi-bin/webscr"
        End If

        Dim req As HttpWebRequest = CType(WebRequest.Create(serverUrl), _
HttpWebRequest)
req.Method = "POST"
req.ContentType = "application/x-www-form-urlencoded"
req.ContentLength = post.Length
Dim writer As New StreamWriter(req.GetRequestStream(), _
System.Text.Encoding.ASCII)
writer.Write(post)
writer.Close()
Dim reader As New StreamReader(req.GetResponse().GetResponseStream())
response = reader.ReadToEnd()
reader.Close()
Return (response = "VERIFIED")
End FunctionThis method is called from inside the ProcessRequest method, and if the check succeeds, you extract some data from the request's parameters, such as custom (the order ID), payment_status (a string describing the current status for the order transaction), and mc_gross (the order's total amount). Then you get a reference to the Order object according to the order ID obtained from the notification, and you check whether the total amount stored in the database matches the amount indicated by the PayPal notification. If so, you update the order status to "verified." Here's the code:
Public Sub ProcessRequest(ByVal context As HttpContext)
Implements IHttpHandler.ProcessRequest

        Request = context.Request
        response = context.Response

        If IsVerifiedNotification() Then

            Dim orderID As Integer = Convert.ToInt32(Me.Request.Params("custom"))
            Dim status As String = Me.Request.Params("payment_status")
            Dim amount As Decimal = Convert.ToDecimal(
Me.Request.Params("mc_gross"), _
               CultureInfo.CreateSpecificCulture("en-US"))

            Using lorderrpt As New OrdersRepository

                Dim order As Order = lorderrpt.GetOrderById(Convert.ToInt32(
Me.Request.QueryString("OrderID")))
                Dim origAmount As Decimal = (order.SubTotal + order.Shipping)
                If amount >= origAmount Then
                    order.StatusID = CInt(StatusCode.Confirmed)
                    lorderrpt.AddOrder(order)
                End If

            End Using

        End If

End Sub
In the preceding code, when parsing the mc_gross string to a decimal value, a CultureInfo object for en-US (English for U.S.) is passed to the Convert.ToDecimal call. This is because PayPal always uses a period (.) as separator for the decimal part of the number, but if the current thread's locale is set to some other culture that uses a comma for the separator, the string would have been parsed incorrectly without this code.
You should also make a mental note that supplying PayPal with an Instant Pay Notification URL on your local machine (using the built-in development server with localhost in its URL) will not allow you to test that page. PayPal is an external party and it cannot see your localhost, so to test the handler you must have this on a public server.
Note
There can be many more parameters that PayPal passes to your page in the IPN notifications than those used here. I strongly suggest you to refer to PayPal's documentation for the full coverage of these parameters, and for the guide on how to activate and set up the IPN notifications from your PayPal's account settings, which is not covered here.
So far I haven't shown any links to the ShoppingCart.aspx page, but we want the cart to be visible on any page. The shopping cart's current content should always be visible as well, so that the customer does not need to go to ShoppingCart.aspx just to see whether she's already put a product into the cart. We also want customers to see the subtotal so they won't get any surprises when they proceed to checkout. All this information can easily be shown on a user control that will be plugged into the site's master page, so it will always be present. The ShoppingCart.ascx control defines a ListView control that's similar to the one used earlier in the last step of the ShoppingCart.aspx page, which shows the current list of shopping cart items with their name, unit price, and quantity. Below that is a label for displaying the shopping cart's total amount, and a hyperlink to the full ShoppingCart.aspx page, where the customer can change quantities and proceed with the checkout. It also defines a link to the OrderHistory.aspx page, which you'll create next:
<asp:ListView runat="server" ID="lvOrderItems" ItemPlaceholderID="itemPlaceHolder">
<LayoutTemplate>
<div runat="server" id="itemPlaceHolder">
</div>
</LayoutTemplate>
<ItemTemplate>
<div id="ShoppingCartItem">
<asp:Image runat="Server" ID="imgProduct"
ImageUrl="~/Images/ArrowR3.gif" GenerateEmptyAlternateText="true" />
<%# Eval("Title") %>
-
<%#CType(Me.Page, BasePage).FormatPrice(Eval("UnitPrice"))%>
<small>(<%# Eval("Quantity") %>)
<br />
</small>
</div>
</ItemTemplate>
<EmptyDataTemplate>
<div><asp:Literal runat="server" ID="lblCartIsEmpty"
Text="Your cart is currently empty."
meta:resourcekey="lblCartIsEmptyResource1" /></div>
</EmptyDataTemplate>
</asp:ListView>
<br />
<b><asp:Literal runat="server" ID="lblSubtotalHeader"
Text="Subtotal = " meta:resourcekey="lblSubtotalHeaderResource1" /><asp:Literal
runat="server" ID="lblSubtotal" /></b>
<br />
<asp:Panel runat="server" ID="panLinkShoppingCart"
meta:resourcekey="panLinkShoppingCartResource1">
<asp:HyperLink runat="server" ID="lnkShoppingCart"
NavigateUrl="~/ShoppingCart.aspx"
meta:resourcekey="lnkShoppingCartResource1">
Detailed Shopping Cart</asp:HyperLink><br />
</asp:Panel>
<asp:HyperLink runat="server" ID="lnkOrderHistory"
NavigateUrl="~/OrderHistory.aspx"
meta:resourcekey="lnkOrderHistoryResource1">Order History
</asp:HyperLink>In the control's code-behind class, you just handle the Load event to bind the ListView with the data returned by the Items property of the Profile.ShoppingCart object, show the total amount in the label, and hide the panel with the link to ShoppingCart.aspx if the cart is empty:
Protected Sub Page_Load(ByVal sender As Object, ByVal e As System.EventArgs)
Handles Me.Load
        If Not Me.IsPostBack Then

            Dim lBasePage As BasePage = CType(Me.Page, BasePage)
            Dim lShoppingCart As ShoppingCart = Profile.ShoppingCart
            lvOrderItems.DataSource = lShoppingCart.Items
            lvOrderItems.DataBind()

            If Not IsNothing(lShoppingCart) AndAlso
lShoppingCart.Items.Count > 0 Then

                lblSubtotal.Text = lBasePage.FormatPrice(lShoppingCart.Total)
                lblSubtotal.Visible = True
                lblSubtotalHeader.Visible = True
                panLinkShoppingCart.Visible = True
            Else
                lblSubtotal.Visible = False
                lblSubtotalHeader.Visible = False
                panLinkShoppingCart.Visible = False
            End If
        End If
End Sub
Figure 9-20 shows how the control looks — both empty and with items.

Constantly promoting catalog products on every page in the site is a great way to tempt visitors to place an order. The FeaturedProducts.ascx control does just that by randomly selecting an active product from the database and displaying its details in promotional square on the side of selected pages in the site. Like the Shopping cart control, it tries to take up just a small piece of the page to promote the product, so it shows only the title, thumbnail image, price, and links to add the product to the shopping cart or view the product details.
<asp:HyperLink ID="hlnkProductImage" runat="server"></asp:HyperLink>
<br />
<b>
<asp:Literal ID="ltlUnitPrice" runat="server"></asp:Literal></b>
<br />
<asp:LinkButton ID="lbtnAddToCart" runat="server">
Add To Cart</asp:LinkButton>
<asp:HyperLink ID="hlnkMoreDetails" runat="server">More Details...</asp:HyperLink>The product is retrieved in a way similar to that used by the ShowProduct.aspx page; if there happens to be a ProductId passed in the querystring, it will display that product; if not, a random product is selected.
Private Sub BindData()

        Using Productrpt As New ProductsRepository

            Dim lProduct As Product

            If ProductId > 0 Then
                lProduct = Productrpt.GetProductById(ProductId)
            Else
                lProduct = Productrpt.GetRandomProduct()
                ProductId = lProduct.ProductID
            End If

            If Not IsNothing(lProduct) Then

                ltlTitle.Text = String.Format("<b>{0}</b>", lProduct.Title)

                Dim sURL As String = Helpers.SEOFriendlyURL("~/" & _
                                Path.Combine(
Helpers.Settings.Store.ProductURLIndicator,
lProduct.Title), ".aspx")

                hlnkProductImage.Text = lProduct.Title
hlnkProductImage.ImageUrl = ResolveUrl(lProduct.SmallImageUrl)
hlnkProductImage.NavigateUrl = sURL
ltlUnitPrice.Text = Helpers.FormatPrice(lProduct.UnitPrice)
hlnkMoreDetails.NavigateUrl = sURL
End If
End Using
End SubThe GetRandomProduct function returns a randomly selected product by retrieving a list of products then getting a random number and returning the product matching that index in the list.
Public Function GetRandomProduct() As Product

    Dim lProductList As List(Of Product) = Me.GetProducts
    Dim lRandProdIndex As Integer = MyBase.GetRandItem(0, lProductList.Count - 1)
    Return lProductList.Item(lRandProdIndex)

End FunctionThis page contains a ListView wrapped in an UpdatePanel that lists all past orders for the current authenticated user. The ListView's template section shows the order's title, the total amount, and the title of the current status, plus the detailed list of all items in the order, rendered by a Repeater, similar to those used earlier. If the order's StatusID is 1 (waiting for payment), it also renders a link to the PayPal payment page, retrieved by means of the order's GetPayPalPaymentUrl method, already used in the last step of the ShoppingCart.aspx page's Checkout Wizard. At the end of the template, it also displays the subtotal amount, and the shipping method's title and cost:
<asp:ListView runat="server" ID="lvOrders" DataKeyNames="OrderId">
        <LayoutTemplate>
            <div runat="server" id="itemPlaceHolder">
            </div>
            <div class="pager">
                <asp:DataPager ID="pagerBottom" runat="server"
PageSize="5" PagedControlID="lvOrders">
                    <Fields>
                        <asp:NextPreviousPagerField ButtonCssClass="command"
FirstPageText="<<" PreviousPageText="<"
                            RenderDisabledButtonsAsLabels="true"
ShowFirstPageButton="true" ShowPreviousPageButton="true"
                            ShowLastPageButton="false"
ShowNextPageButton="false" />
                        <asp:NumericPagerField ButtonCount="7"
NumericButtonCssClass="command" CurrentPageLabelCssClass="current"
                            NextPreviousButtonCssClass="command" />
                        <asp:NextPreviousPagerField
ButtonCssClass="command" LastPageText=">>" NextPageText=">"
RenderDisabledButtonsAsLabels="true"
ShowFirstPageButton="false" ShowPreviousPageButton="false"
ShowLastPageButton="true" ShowNextPageButton="true" />
</Fields>
</asp:DataPager>
</div>
</LayoutTemplate>
<ItemTemplate>
<div class="sectionsubtitle">
Order #<%#Eval("OrderID")%>
-
<%# Eval("AddedDate", "{0:g}") %></div>
<br />
<img src="Images/ArrowR4.gif" border="0" alt="" />
<u>Total</u> =
<%# FormatPrice(CDec(Eval("SubTotal")) + CDec(Eval("Shipping"))) %>
<br />
<img src="Images/ArrowR4.gif" border="0" alt="" />
<u>Status</u> =
<%# Eval("StatusTitle") %>
<asp:HyperLink runat="server" ID="lnkPay" Font-Bold="true"
Text="Pay Now" NavigateUrl='<%# StoreHelper.GetPayPalPaymentUrl
(CType(Container.DataItem, Order)) %>'
Visible='<%# (CInt(Eval("StatusID"))) = 1 %>' />
<br />
<br />
<small><b>Details</b><br />
<small>
<asp:Repeater runat="server" ID="repOrderItems">
<ItemTemplate>
<img src="../Images/ArrowR3.gif" border="0" alt="" />
[<%# Eval("SKU") %>]
<asp:HyperLink runat="server" ID="lnkProduct"
Text='<%# Eval("Title") %>' NavigateUrl=
'<%# "~/ShowProduct.aspx?productID=" & Eval("ProductID") %>' />
- (<%# Eval("Quantity") %>)
<br />
</ItemTemplate>
</asp:Repeater>
</small>
<br />
Subtotal =
<%# FormatPrice(Eval("SubTotal")) %><br />
Shipping Method =
<%# Eval("ShippingMethod") %>
(<%# FormatPrice(Eval("Shipping")) %>) </small>
</ItemTemplate>
<ItemSeparatorTemplate>
<hr style="width: 99%;" />
</ItemSeparatorTemplate>
</asp:ListView>The page's code-behind contains only a couple of lines that bind the ListView with the list of orders returned by the Order.GetOrdersByUser method, which accepts the name of the current user:
Dim lOrders As List(Of Order) = lOrderrpt.GetOrdersByUser(Helpers.CurrentUserName)
lvOrders.DataSource = lOrders
lvOrders.DataBind()
Figure 9-21 shows the page.

This administrative page is used by storekeepers to retrieve the list of orders in a certain status created in a specified date interval, or to retrieve the list of all orders made by a given customer. If the storekeeper already knows the OrderID of a specific order and wants to update it, there's a form that lets her enter the OrderID and click the button to jump to the edit page.
The form utilizes some of the AJAX extenders and the Membership web service introduced back in Chapter 4 to provide some client-side help. First the Order Status drop-down sets the AutoPostBack property to true, meaning anytime a new selection is made the list of orders is changed to reflect that choice. The OrderStatusId property is set the selected value and the BindOrders method is called. BindOrders has logic that checks for each of the possible filters and applies them as needed.
Next, the date range can be selected by the user to limit the number of orders. It uses two TextBoxes extended with the AJAX Calendar and MaskedEdit extenders. There is an accompanying Submit button to apply the desired date range. The filter is designed to let the user specify either a from or to date or both. If only one of the date values is entered, it is used as a cutoff point in the desired direction. Additionally, a CompareValidator is employed to make sure that the two values entered are not the same; if they were, then no records would be displayed.
Next, orders can be filtered for specific users. A TextBox allows the user to type in the username. Once the username is entered, there is a Submit button that can be pressed to submit the user filter. While the user is typing the username, an AutoCompleteExtender displays a list of possible matches in a hint drop-down. This helps when the user is not quite sure what the username actually is.
<fieldset>
        <legend>Orders by status</legend>Status:
<asp:DropDownList ID="ddlOrderStatuses" runat="server"
DataTextField="Title" DataValueField="OrderStatusID"
AutoPostBack="True" />
<br />
Order Date from:
<asp:TextBox ID="txtFromDate" runat="server" Width="80px" />
<asp:Image runat="Server"
ID="iFromDate" ImageUrl="~/images/Calendar.png" />
<asp:CalendarExtender ID="ceEventDate" runat="server"
TargetControlID="txtFromDate"
PopupButtonID="iFromDate">
</asp:CalendarExtender>
<asp:MaskedEditExtender ID="meeEventDate" runat="server"
TargetControlID="txtFromDate"
Mask="99/99/9999" MessageValidatorTip="true"
OnFocusCssClass="MaskedEditFocus"
OnInvalidCssClass="MaskedEditError" MaskType="Date"
DisplayMoney="Left" AcceptNegative="Left" />
to:
<asp:TextBox ID="txtToDate" runat="server" Width="80px" />
<asp:Image runat="Server" ID="Image1" ImageUrl="~/images/Calendar.png" />
<asp:CalendarExtender ID="CalendarExtender1" runat="server"
TargetControlID="txtToDate"
PopupButtonID="iToDate">
</asp:CalendarExtender>
<asp:MaskedEditExtender ID="MaskedEditExtender1" runat="server"
TargetControlID="txtToDate"
Mask="99/99/9999" MessageValidatorTip="true"
OnFocusCssClass="MaskedEditFocus"
OnInvalidCssClass="MaskedEditError" MaskType="Date"
DisplayMoney="Left" AcceptNegative="Left" />
<asp:Button ID="btnListByStatus" runat="server" Text="Load"
ValidationGroup="ListByStatus" />
<asp:RequiredFieldValidator ID="valRequireFromDate" runat="server"
ControlToValidate="txtFromDate"
SetFocusOnError="true" ValidationGroup="ListByStatus" Text="<br />
The From Date field is required."
ToolTip="The From Date field is required."
Display="Dynamic"></asp:RequiredFieldValidator>
<asp:CompareValidator runat="server" ID="valFromDateType"
ControlToValidate="txtFromDate"
SetFocusOnError="true" ValidationGroup="ListByStatus" Text="<br />
The format of the From Date is not valid."
ToolTip="The format of the From Date is not valid."
Display="Dynamic" Operator="DataTypeCheck"
Type="Date" />
<asp:RequiredFieldValidator ID="valRequireToDate"
runat="server" ControlToValidate="txtToDate"
SetFocusOnError="true" ValidationGroup="ListByStatus"
Text="<br />The To Date field is required."
ToolTip="The To Date field is required."
Display="Dynamic"></asp:RequiredFieldValidator>
<asp:CompareValidator runat="server" ID="valToDateType"
ControlToValidate="txtToDate"
SetFocusOnError="true" ValidationGroup="ListByStatus"Text="<br />The format of the To Date is not valid."
ToolTip="The format of the To Date is not valid."
Display="Dynamic" Operator="DataTypeCheck"
Type="Date" />
<br />
<div class="sectionsubtitle">
Orders by customer</div>
Name:
<asp:TextBox ID="txtCustomerName" runat="server" />
<asp:Button ID="btnListByCustomer" runat="server"
Text="Load" ValidationGroup="ListByCustomer" />
<asp:RequiredFieldValidator ID="valRequireCustomerName"
runat="server" ControlToValidate="txtCustomerName"
SetFocusOnError="true" ValidationGroup="ListByCustomer"
Text="<br />The Customer Name field is required."
ToolTip="The Customer Name field is required."
Display="Dynamic"></asp:RequiredFieldValidator>
<asp:AutoCompleteExtender runat="server"
ID="autoComplete1" BehaviorID="AutoCompleteEx"
TargetControlID="txtCustomerName"
ServicePath="~/MembersService.asmx" ServiceMethod="SearchUsersByName"
MinimumPrefixLength="2" CompletionInterval="500"
EnableCaching="true" CompletionSetCount="12" />
<br />
<div class="sectionsubtitle">
Order Lookup</div>
ID:
<asp:TextBox ID="txtOrderID" runat="server" />
<asp:Button ID="btnOrderLookup" runat="server"
Text="Find" ValidationGroup="OrderLookup" />
<asp:Label runat="server" ID="lblOrderNotFound" SkinID="FeedbackKO"
Text="Order not found!"
Visible="false" />
<asp:RequiredFieldValidator ID="valRequireOrderID" runat="server"
ControlToValidate="txtOrderID"
SetFocusOnError="true" ValidationGroup="OrderLookup"
Text="<br />The Order ID field is required."
ToolTip="The Order ID field is required."
Display="Dynamic"></asp:RequiredFieldValidator>
</fieldset>The filter criteria are shown in Figure 9-22
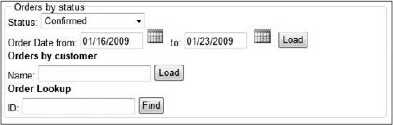
Finally the OrderId lookup lets the user type in an OrderId to bring up the order information. If the OrderId does not exist, an informational message is displayed to the right of the Submit button. All the filtering and potential empty result messages is done pretty seamlessly because the entire form is wrapped in an UpdatePanel, which means without writing any code all the filter submissions are done instantaneously without a full page postback.
Protected Sub btnOrderLookup_Click(ByVal sender As Object, _
    ByVal e As System.EventArgs) _
    Handles btnOrderLookup.Click

        Using lOrderrpt As New OrdersRepository

            Dim lOrder As Order = lOrderrpt.GetOrderById(txtOrderID.Text)
            If IsNothing(lOrder) Then
                lblOrderNotFound.Visible = True
                Exit Sub
            End If

            Response.Redirect("AddEditOrder.aspx?orderid=" & txtOrderID.Text)

        End Using

End Sub
The ListView that actually displays the found orders, with their title, list of order items (through the usual Repeater as utilized in other areas of the store, which shows the SKU field in addition to the others, as this is useful information for storekeepers), the subtotal amount, and the shipping amount. On the right side of each order row, there's also a button to delete the order, but that will only be shown to Administrators, not to StoreKeepers, as it's a sensitive operation that should only be performed rarely, and never by accident:
<asp:ListView ID="lvOrders" runat="server">
    <LayoutTemplate>
        <table cellspacing="0" cellpadding="0" class="AdminList">
            <tr class="AdminListHeader">
                <td>

                </td>
                <td>
                    Items
                </td>
                <td>
                    Cost
                </td>
                <td>
                    Edit
                </td>
                <td>
                    Delete
                </td>
            </tr>
            <tr id="itemPlaceholder" runat="server">
            </tr>
<tr>
<td colspan="5">
<div class="pager">
<asp:DataPager ID="pagerBottom" runat="server" PageSize="15"
PagedControlID="lvOrders">
<Fields>
<asp:NextPreviousPagerField ButtonCssClass="command"
FirstPageText="<<" PreviousPageText="<"
RenderDisabledButtonsAsLabels="true"
ShowFirstPageButton="true" ShowPreviousPageButton="true"
ShowLastPageButton="false" ShowNextPageButton="false" />
<asp:NumericPagerField ButtonCount="7"
NumericButtonCssClass="command" CurrentPageLabelCssClass="current"
NextPreviousButtonCssClass="command" />
<asp:NextPreviousPagerField ButtonCssClass="command"
LastPageText=">>" NextPageText=">"
RenderDisabledButtonsAsLabels="true"
ShowFirstPageButton="false" ShowPreviousPageButton="false"
ShowLastPageButton="true" ShowNextPageButton="true" />
</Fields>
</asp:DataPager>
</div>
</td>
</tr>
</table>
</LayoutTemplate>
<EmptyDataTemplate>
<tr>
<td colspan="5">
<p>
Sorry there are no Orders available at this time.</p>
</td>
</tr>
</EmptyDataTemplate>
<ItemTemplate>
<tr>
<td>
<%#Eval("AddedBy")%>
on
<%#String.Format("{0:d}", Eval("AddedDate"))%><br />
Shipping: <%#Eval("ShippingMethod")%>
</td>
<td>
<small>
<asp:Repeater runat="server" ID="repOrderItems"
DataSource='<%# Eval("OrderItems") %>'>
<ItemTemplate>
<img src="../Images/ArrowR3.gif" border="0" alt="" />
[<%# Eval("SKU") %>]
<asp:HyperLink runat="server" ID="lnkProduct" Text='<%# Eval("Title") %>'
NavigateUrl='<%# "~/ShowProduct.aspx?productID=" & Eval("ProductID") %>' />
- (<%# Eval("Quantity") %>)
<br />
</ItemTemplate></asp:Repeater>
</small>
</td>
<td>
Sub Total:
<%#String.Format("{0:C2}", Eval("SubTotal"))%><br />
Shipping:
<%#String.Format("{0:C2}", Eval("Shipping"))%><br />
Grand Total:
<%#String.Format("{0:C2}", Eval("GrandTotal"))%>
</td>
<td align="center">
<a href="<%# String.Format("AddEditOrder.aspx?OrderId={0}",
Eval("OrderId")) %>">
<img src="../images/edit.gif" alt="" width="16"
height="16" class="AdminImg" /></a>
</td>
<td align="center">
<asp:ImageButton runat="server" ID="btnDelete"
CommandArgument='<%# Eval("OrderId").ToString() %>'
CommandName="Delete" ImageUrl="~/images/delete.gif"
AlternateText="Delete" CssClass="AdminImg"
OnClientClick="return confirm('Warning: This will
delete the Product from the database.')," />
</td>
</tr>
</ItemTemplate>
</asp:ListView>When the page loads, the textbox for the end date of the date interval is prefilled with the current date, while the textbox for the start date is prefilled with the current date minus the number of days specified in the DefaultOrderListInterval configuration setting:
Protected Sub Page_Load(ByVal sender As Object, ByVal e As System.EventArgs)
Handles Me.Load

If Not IsPostBack Then
            BindOrderStatuses(ddlOrderStatuses)

            txtToDate.Text = DateTime.Now.ToShortDateString()
            txtFromDate.Text = DateTime.Now.Subtract( _
               New TimeSpan(Helpers.Settings.Store.DefaultOrderListInterval, _
                0, 0, 0)).ToShortDateString()

            BindOrders()
        End If

End Sub
The BindOrders method takes on the responsibility of tracking what filters are in play. It is designed to allow one or more filter criteria to be applied to the list of orders by first retrieving the entire list of orders and applying the criteria one at a time, until the desired list is finally bound to the ListView control. Now here is where an architectural decision was made out of convenience. If the site gets large numbers of orders a complicated ESQL query will be more desirable because it will apply these filters before it queries the database, which is more efficient. This is not the easiest thing to achieve. And because the list of orders in TheBeerHouse is still relatively small this is a much faster way to get things running.
Private Sub BindOrders()
        Using lOrdersrpt As New OrdersRepository

            Dim lOrders As List(Of Order)

            lOrders = lOrdersrpt.GetOrders

            If OrderId > 0 Then
                lOrders = (From lOrder In lOrders Where
lOrder.OrderID = OrderId).ToList
            End If

            If OrderStatusId > 0 Then
                lOrders = (From lOrder In lOrders Where
lOrder.StatusID = OrderStatusId).ToList
            End If

            If OrderStatusId > 0 Then
                lOrders = (From lOrder In lOrders Where
lOrder.AddedBy.StartsWith(CustomerName)).ToList
            End If

            If FromDate > DateTime.MinValue Then
                lOrders = (From lOrder In lOrders Where
lOrder.AddedDate > FromDate).ToList
            End If

            If ToDate > DateTime.MinValue Then
                lOrders = (From lOrder In lOrders Where
lOrder.AddedDate < ToDate).ToList
            End If

            lvOrders.DataSource = lOrders
            lvOrders.DataBind()

            Dim pagerBottom As DataPager = lvOrders.FindControl("pagerBottom")

            If Not IsNothing(pagerBottom) Then
                If lOrders.Count <= pagerBottom.PageSize Then
                    pagerBottom.Visible = False
                Else
                    pagerBottom.Visible = True
                End If
            End If
        End Using
    End Sub
Figure 9-23 shows this page in action.

The EditOrder.aspx page defines a form with controls that allows an administrator to edit a few fields of the order whose OrderID is passed on the querystring. The code is not presented here because it's similar to the other AddEdit{xxx}.aspx pages developed for this module (but actually simpler because most of the data is read-only), and other modules. Figure 9-24 shows the page, however, so that you can get an idea of what it looks like and what it can do.

As mentioned in the "Problem" section, a Policies page can go a long way toward making customers feel comfortable doing business with you, as well as give you a firm standing when problems escalate. Because you are not a lawyer and The Beer House's owner is not either, you need to get a lawyer to draft a policy page for the site, copy and modify one from a similar site, or use the online Policy Wizard at www.the-dma.org/privacy/privacypolicygenerator.shtml (see Figure 9-25).

The wizard asks a series of questions about how you collect and use visitor data. Based on the answers you select, it will produce a privacy policy you can use on your site. Figure 9-26 shows a basic privacy page for The Beer House site.
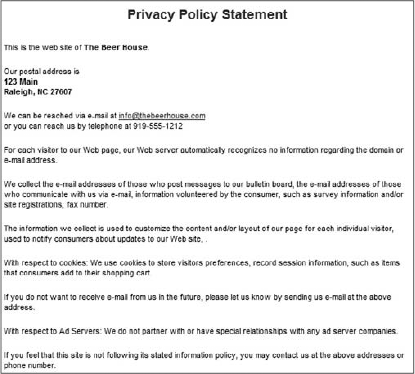
An e-commerce module is a big challenge for any site developer, and there are a lot of features we couldn't implement in this chapter that you may find useful, especially for larger sites. In fact, you can find many commercial modules for managing electronic stores among third-party vendors, and sometimes it can be cheaper to buy one than to develop one yourself. You need to consider the features that you want and weigh the cost of commercial solutions against the cost of doing it yourself. One thing that seems to be very common is that customers always want a highly customized solution but do not always want to pay what it takes, so find the best compromise to get a viable solution online in a timely manner. The module in this chapter may be entirely adequate for small sites, or for a small store of a larger site, but you might also want to add some advanced features such as the capability to list a product under multiple categories, handle tax calculations on the store itself instead of leaving it to PayPal, support products with variations (color, size, etc.) that could also affect their price, support customer-level discounts (so that loyal customers get a better discount percentage, for example), support bundle offers and discounts based on the quantity of ordered products and the total price reached, integrate the shipment tracking offered by some shipping companies such as FedEx and UPS, and much more.
Nevertheless, in this chapter we've implemented a fully working e-commerce store with most of the basic features, including complete catalog and order management, a persistent shopping cart, integrated online payment via credit card, product rating, and more. All this required a fairly short amount of time to design and implement.