
We live in a global community consisting of people from many countries. The term localizing refers to the capability to present a site in the language of the local user, and to use the correct symbols for currency, decimals, dates, and so on. ASP.NET 2.0 added some new features to its arsenal for localizing a site that make it easier than ever before. Since then the proliferation of AJAX means there is a new set of issues that need to be tackled. The developer is freed from writing clumsy code for managing multiple languages and locale settings, and translated strings and other resources can be compiled into independent files that can be easily plugged into the site, even after deployment, to add support for a new language that wasn't even considered when the site was designed. In this chapter, you'll look at the importance of localization and learn how ASP.NET features can help you localize your site with little effort.
These days, it seems that the word globalization is used everywhere. The beauty of the Internet and the World Wide Web is that you can reach anyone who has a computer and a phone line or some other sort of Internet connection, be it for fun, passion, business, or another purpose. Nevertheless, if you want to be able to communicate with people, you must speak (or write) a language the people can understand. Due to the proliferation of English as a primary or secondary language, many sites use English as their base language, even if they are not run by people for which this language is the main tongue. However, offering a site in the user's first language is often a great advantage over competitors that don't, because all users find it easier and more comfortable reading their primary language even when they can understand others. This is true not only for text but also for the format used to display and parse numbers, dates, and currency names. In fact, an Italian would interpret 07/02/2006 as the February 2, whereas an American would interpret it to be July 2. And while this may cause misunderstandings when reading the date, it may cause errors when users insert data in one format when the system expects a different one. For this reason, any modern site that wants to target a worldwide audience must be multi-language, displaying numbers and dates according to the user's local settings, and translating the full site's text (or at least the most important parts) into the user's primary language.
Fully localizing a site based on dynamic content (articles, products, forums, polls, etc.) is an extremely difficult task, and there are a number of ways to approach it. The difficulty varies considerably, depending on whether you intend to localize everything or just static content (text on the page layouts, menus, links, and page, section and field titles and descriptions, and so forth). ASP.NET has features that significantly simplify localizing static parts of a site, and this is what I'll cover in this chapter. The ASP.NET AJAX framework has also been designed to be conscience of language needs. Conversely, localizing the dynamic content would be much harder and would require quite a lot of rework on the database, the UI structure, and the object model. If that's what you really need to achieve, it's usually better to create separate language-specific sites with their own content.
The first thing you need to decide when localizing a site is whether you want to localize only static content (menus, links, copyright notices, usage agreement, titles and descriptions for pages, tables, fields, buttons, and other controls) or whether you want to provide a translation for everything, including articles, poll questions, product listings, and so on. Let me state up front that adding support for complete localization would be very difficult at this stage of development, as it would require a complete reworking of the database design, the DAL, the BLL, and the UI. It's something that should be planned very early, during the initial site design and the foundations development. Complete localization in a single website is not a common requirement: you normally wouldn't translate every article on the site, forums, polls, and newsletters, but rather, only those that have a special appeal to one country or language-specific audience. You may also want to present information differently for different languages — changing something in the site's layout, for example. Because of this, most sites that want to be fully localized "simply" provide multiple copies of their pages under different subdomains or folders, one copy for each language. For example, there could be www.contoso.com/en and www.contoso.com/it or http://en.contoso.com/ and http://it.contoso.com/. Each copy of the site would target an independent database that only contains data for that specific language. If you take this approach, you'll only need to make static content localizable, and then install the site multiple times for multiple languages. Another advantage of this strategy is that, with completely separate websites, you can have different people managing them independently, who would be able to create content that best suits the audience for that particular language. In this chapter, we'll localize the site's static content, and we'll support the different locale settings for dates and numbers in different languages.
Our sample site will only be installed once, and the language for which the site is localized will be specified by each user at registration time or later from the Edit Profile page. This setting is mapped to the Preferences.Culture profile property, which was described and implemented in Chapter 4. An alternative would be to detect the user's favorite language from her browser's settings, which is sent to the web server with the request's header. However, many nontechnical users don't understand how to set this, and it would be difficult to explain it on your site and answer support questions from people who don't understand this. Therefore, it's better to directly ask users which language they'd like to use, so they understand what the language choice is for and how to change it. The next section provides an overview of the ASP.NET features regarding localization of static content.
Although the previous framework had technology for localizing sites, the solution outlined in the preceding section had a number of problems that made the process unwieldy and prone to error. The most significant issues were as follows:
You had to create the resource files manually, in a folder of your choice. However, the final name of the resource class would change because of the inclusion of the folder name, and many developers didn't realize this. This often resulted in errors whereby resources could not be found.
You had to specify the resource key as a string, and if you misspelled this string, it resulted in errors whereby resources could not be found. If this were an enumeration, you could avoid the possibility of misspelling it.
You had to invent your own naming convention to choose key names that would identify the same resource but for different pages, such as
Page1_TitleandPage2_Title. This was the case because there were only sitewide global resources, and not page-specific resources. You could also create different.resxfiles, one for each page and thus simulate page specific resources. This was merely a way to physically separate resources as they were still accessible by any other page.Above all, you had to manually write the code to set the
Textproperty (or any other localizable property) to the proper string loaded by means of aResourceManager, as there wasn't a declarative way to do it from the.aspxmarkup file.
With ASP.NET 2.0, all this changed considerably, and even though under the cover things work pretty much the same, from the developer's viewpoint, things are much easier and more intuitive now. Here's a list of improvements, which are described in detail in the following subsections:
Strongly typed global resources: Once you create a global resource file (like the ones you may have used under ASP.NET 1.x), it is dynamically compiled into a class, and you can immediately see and access the class listed under the
Resourcesnamespace. Each resource of the file is accessible as a property, and IntelliSense is provided by Visual Studio to make it easier to select the right one. No more mistyped resource names!Page-level resources: In addition to global resource files, you also have page-specific resource files, so that you can place the resource strings only in the page that uses them. This enables you to have a resource called
Titlefor every page, with different values, as they are stored in separate files. You no longer have to come up with a naming convention such as using the page name as the prefix for the resource keys.New localization expressions: Similar to data binding expressions, these enable a developer to associate an expression to the properties to localize directly in the
.aspxmarkup file, so you don't need any C# code. A special declarative syntax is also available to bind all localizable properties to resources in a single step. Programmatic localization is still possible, of course, and has been improved as mentioned before for the global resources.Improved Visual Studio designer support: This enables you to graphically associate a localization expression to a resource string from a dialog box, without requiring the developer to write any code. There's also a command to automatically generate the neutral language page-level resource file for the current page, which you can copy, rename, or translate to another language.
Auto detection of the Accept-Language HTTP header: This is used to automatically set the page's
UICultureandCultureproperties, which correspond to the current thread'sCurrentUICultureandCurrentCultureproperties.Custom providers: Should you want to store localized resources in a data store other than
.resxfiles, such as a database, you can do that by writing your own custom provider. This enables you to build some sort of online UI for managing existing resources, and create new ones for additional languages, without the need to create and upload new resource files to the server.
Global resources are shared among all pages, controls, and classes, and are best suited to store localized data used in different places. When I say "data," I don't just mean strings but also images, icons, sounds, and any other binary content. Although this was already possible in ASP.NET 1.x, VS.NET 2003 had worse graphical support for resource files. Now you access a resource file item (from the Add Item dialog box) under a folder named App_GlobalResources, which is a special folder, handled by the ASP.NET runtime and VS2008; and you can insert data into the grid-style editor represented in Figure 12-1.
If you click the arrow on the right side of the editor's Add Resource toolbar button, you will be able to create an image or icon, or insert any other file. Figure 12-2 shows the window after choosing Images from the drop-down menu of the first toolbar icon (where Strings was selected in Figure 12-1) and after adding a few image files.

After adding a few strings and a few images, you can go to a .vb file in the editor and type Resources. IntelliSense will pop up a drop-down list with the names of the resource files added to the project, that is, Messages in the example shown in Figure 12-1. Then, when you type Resources.Messages, it will list the string and image resources added earlier; and if you look closely at Figure 12-3, you'll also note that image resources are returned with the proper type of System.Drawing.Bitmap.

This results in less manual typing, less probability of mistyping a resource or key name, and less casting.
Programmatic access of resources is necessary in some cases, particularly when you need to retrieve them from business or helper classes, and in this case you'll be happy to know that IntelliSense for dynamically compiled resources works also! However, when the resource will be used as the value for a property of a control on a page, there's an even easier approach: just select the control in the page's graphical designer and click the ellipses button on the right side of the "(Expressions)" item in the Properties window. From the dialog box that pops up, you can select the property you want to localize, select Resources as the expression type, and select then the resource class name and key, as shown in Figure 12-4. Note that you just select the resource you want from a prefilled drop-down list, so you don't need to type that yourself.
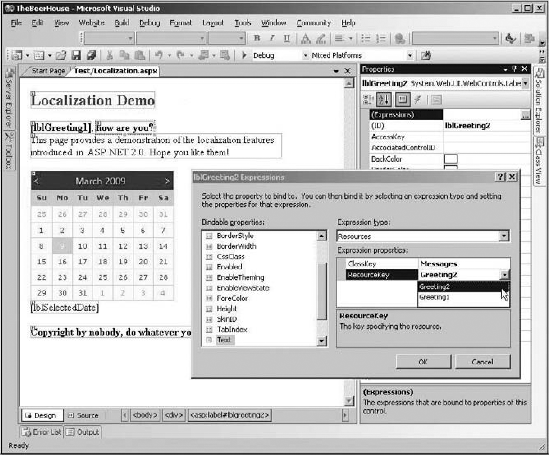
After using this dialog box on an ASP control, if you go to the Source View, the declaration of the localized Label control will look like this:
<asp:Label ID="lblGreeting2" runat="server"
   Text='<%$ Resources:Messages, Greeting2 %>' / >
The Text property is set to a new localization expression (also called dollar-expression, because of the leading $ character), which at runtime will return the resource string from the Greeting2 item of the Messages class. You can also write these expressions yourself if you prefer coding your pages directly in the Source View (as I do). In either case, these expressions in the .aspx code are much better than manually writing C# code in the code-behind file, as you had to do with ASP.NET 1.x.
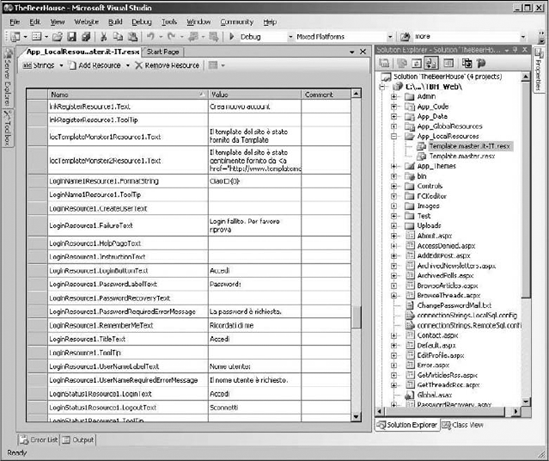
You can create page-level resources by generating resource files, just as you do for global resources, but placing them under a folder named App_LocalResources (as opposed to App_GlobalResources used for global resources) located at the same level as the page to localize. For example, if the page is in the root folder, then you'll create the App_LocalResources under the root folder, but if the page is under /Test, then you'll create a /Test/App_LocalResources folder. This means you can have multiple App_LocalResources folders, whereas you can only have one App_GlobalResources folder for the whole site. The name of the resource filename is also fundamental, as it must be named after the page or control file for which it contains the localized resources, and include the culture name: for example, a culture-neutral resource file for Localization.aspx would be named Localization.aspx.resx, whereas it would be named Localization.aspx.it-IT.resx for the Italian resources. In Figure 12-5, you can see the organization of files in the Solution Explorer and the resource file being edited in the grid editor.

You can still use the Expressions dialog shown in Figure 12-4 to bind a control's property to an expression pointing to a localized resource: when you point to a page-specific resource you just leave the ClassKey textbox empty. Following is the generated expression:
<asp:Label ID="lblCopyright" runat="server"
   Text="<%$ Resources:CopyrightMessage % >" /  >
It differs from the expression shown in the previous section, as it doesn't include the class name; it just specifies the resource key. If you want to access local resources programmatically, you use the page's GetLocalResourceObject method, which takes the resource key name and returns an Object that you must cast to string or to the proper destination type (such as Bitmap if you stored an image):
string copyrightMsg = (string)this.GetLocalResourceObject("CopyrightMessage");Even with localization expressions and local resources, localizing full pages will be a slow task if you need to create the expressions for dozens of controls, and things get worse if you need to localize multiple properties for the same control, such as Text, ToolTip, ImageUrl, NavigateUrl, and so on, which is often the case. To speed things up, Visual Studio offers the Tools
Localizable properties are those that are decorated with a
[Localizable(true)]attribute, which you can add to the properties of your custom controls. However, even when you add it to properties of user controls, resources for those properties will not be automatically generated by the Generate Local Resource command. You can create the local resources for those properties yourself, and write the localization expressions to make the association: everything will work perfectly at runtime, so this is only a design-time limitation. In addition, you'll have to write the localization expressions manually, because the (Expressions) item is not available from the Properties window when a user control is selected.
Figure 12-6 shows the resource editor for the Localization.aspx.resx local resource file after executing the Generate Local Resource command on the test page.

Besides the automatic generation of the resource file (or the addition of the resource items, if a resource file for that page was already present in the proper folder), what's even more interesting is that each control's declaration is modified as follows (note the code in bold):
<asp:Label ID="lblTitle" runat="server" Font-Size="X-Large" ForeColor="#C00000"
   meta:resourcekey="lblTitleResource1" Text="Localization Demo"
   Text="This page provides a nice demo of new ASP.NET 2.0 localization features"
/ >
A meta:resourcekey attribute is added to the declaration and is set to the prefix used in the local resource file to identify all localized properties of that control, such as lblTitleResource1.Text and lblTitleResource1.ToolTip. These are called implicit localization expressions (expressions used earlier are considered explicit). At runtime, the framework parses all resources and applies them to the properties of the corresponding controls, making the mapping of the first part of the key with the value of meta:resourcename. This means that the control's declaration is decorated with just a single new attribute, but may make multiple properties localizable. Later, if you want to localize a property that you didn't take into account originally, you just need to go to the resource editor and add an item following the naming schema described above, or edit its value if it already exists.
Note
Note that the controls retain their original property declarations after running the Generate Local Resource command. These declarations are no longer necessary, though, as the property's value will be replaced at runtime with the values saved in the resource file; therefore, you can completely remove the definition of the Text, ToolTip, and the other localized properties, from the .aspx files to avoid confusion.
This behavior works with the page's title as well, originally defined in the @Page directive, which is modified as follows:
<%@ Page Language="C#" meta:resourcekey="PageResource1" ...other attributes... % >
All content that you want to localize must be displayed by some sort of server-side control, such as the Label or Literal controls. You'll typically want to use a Literal over a Label if you don't need the appearance properties of a Label, either because you don't need to format the text or because the formatting is done through raw HTML tags present directly within the text, which is frequently the case for static text such as section and field titles, descriptions, copyright notices, and so on. An alternative to Literal is the new Localize control, listed in the last position under the Toolbox's Standard tab. If you declare it manually from the Source View, it's identical to a Literal. If, however, you work in the graphical designer, you'll notice that it doesn't have any properties listed in the Properties window beside the ID, not even a Text property. The way you fill it with text in the Designer is to place the caret inside it and type the text directly. Figure 12-7 shows the test page with the description text under the title placed inside a Localize control.

A LINK element can be added to the header of a page that specifies the hreflang attribute to associate an alternate version of the page in a specific language.
The declaration produced, after executing the Generate Local Resource command, is the following:
<asp:Localize ID="locDescription" runat="server"
   meta:resourcekey="locDescriptionResource1" Text="The page provides a demo... "
/ >
As mentioned earlier, you can completely remove the Text property from the declaration, as it will be set from the localized resources at runtime.
Note
When wrapping static content in a Localize or Literal control, it's advisable that you don't include HTML formatting tags in the control's Text, because that would go into the resource when the page is localized. If you were to pass that resource file to a nontechnical translator, she may not understand what those HTML tags are and may modify them in some undesirable way. Because of this, if you have static content with HTML tags in the middle, then it may be wise to split it into multiple Localize controls, leaving the HTML formatting outside.
Once you've modified your page with localization expressions for the various controls displaying static content, and you've created local or global resource files for the different languages you want to support, it's time to implement some way to enable users to change the page's language. One method is to read the Accept-Language HTTP header sent by the client to the server, which contains the array of cultures set in the browser's preferences, as shown in the dialog box in Figure 12-8.

In ASP.NET 1.x, you would set the current thread's CurrentCulture and CurrentUICulture properties to the first item of the UserLanguage array of the Request object, which would contain the first language in the list. You would execute this code in the Init or Load event of a page (typically a BasePage class, so that all others would inherit the same behavior), or from the Application's BeginRequest event, as shown here:
Private Sub Application_BeginRequest(ByVal sender As Object, ByVal e As EventArgs)
    If Request.UserLanguages.Length  > 0 Then
        Dim culture As CultureInfo =
CultureInfo.CreateSpecificCulture(Request.UserLanguages(0))
        Thread.CurrentThread.CurrentCulture = culture
        Thread.CurrentThread.CurrentUICulture = culture
    End If
End Sub
In ASP.NET 2.0 and above, however, you only need to set the culture and uiCulture attributes of the web.config file's <globalization > element to "auto", so that the user's favorite language will be retrieved and used automatically:
<configuration>
   <system.web>
      <globalization culture="auto" uiCulture="auto" />
      ...
   </system.web>
</configuration>
You can also specify these setting at the page-level, with the Culture and UICulture attributes of the @Page directive:
<%@ Page Culture="auto" UICulture="auto" ... %>
Figure 12-9 shows what the same page looks like when loaded for the American English or Italian language selected in the browser.

The "auto" setting only saves a few lines of code, but it's nice to have. In many situations, however, you'll prefer to set the culture by yourself anyway, because you'll need to extract the current culture from the user's profile, from a session variable, or according to some other logic (I mentioned earlier that it's a good idea to let users specify their language of choice). If that's the case, the preceding code showing how to handle the application's BeginRequest is still valid, but you may actually prefer handling the application's PostAcquireRequestState event, so that the profile and session variables have been initialized already with the proper values. An even better solution is to override the page's new InitializeCulture method, to programmatically set the page's Culture and UICulture properties to the culture string (and not to a CultureInfo object as you do with the Thread properties). Here's an example:
Protected Overloads Overrides Sub InitializeCulture()
    Dim culture As String = Helpers.GetCurrentCulture()
    Me.Culture = culture
    Me.UICulture = culture
End Sub
Helpers.GetCurrentCulture is a custom function that would return something like "en-US" or "it-IT" after reading the desired current culture from somewhere. In the "Solution" section, you'll read the culture from the user's profile, and override this method in the custom BasePage class, so that all pages inherit this behavior without the need to replicate the code more than once.
Note
The Generate Local Resource command automatically sets the Culture and UICulture attributes of the @Page directive to auto. If you use one of the application's events in the Global.asax file to programmatically set the current culture, you must remember to remove those attributes from the @Page directive after running the command on .aspx pages; otherwise, the automatic settings will override what you do by hand, because the page is parsed after the global.asax events you would typically use. (There is no such problem when generating localization resources for user controls, though, because the @Control directive doesn't have those page-level attributes, of course.) If you follow the approach of overriding the page's InitializeCulture event, this isn't important, because this method is raised after the page is parsed, so your code will override the culture set by the framework, as desired.
As a sample implementation for this chapter, I fully localized the command layout stored in the template.master file, and most of the user controls, especially those that are part of the site's common structure, such as NewsletterBox, PollBox, ShoppingCartBox, ThemeSelector, WelcomeBox, and PersonalizationManager. To do this, you start by editing the template.master file and wrapping the static text you want to localize (such as the copyright notices, or the acknowledgments to Template Monster for providing the sample layout) in Localize controls. Then, from the Design View, you execute the Generate Local Resource command for the master page, thus creating a Template.master.resx file under the root App_LocalResources special folder. You copy this file into the same folder, rename it to Template.master.it-IT.resx (for Italian), open it in Visual Studio's resource editor, and translate all string values to the destination language. Figure 12-10 shows the resource file for Italian opened in the editor.
Then you follow the exact same process for the previously mentioned controls, which will produce a number of resource files under /Controls/App_LocalResources, as shown in Figure 12-11.
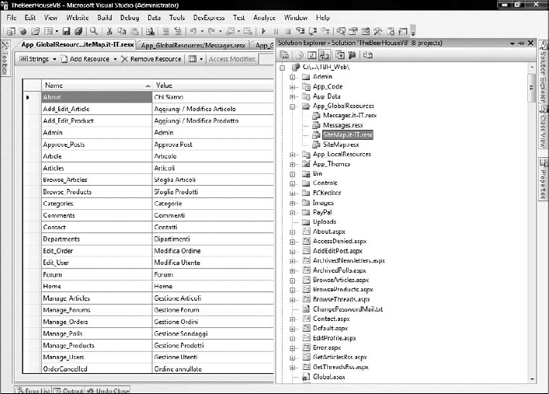
Yet another thing you want to localize is the Web.sitemap file. There isn't a command that localizes this automatically for you, however, so you must manually create global resource files for it, named SiteMap.resx and SiteMap.it-IT.resx, and located under the root App_GlobalResources folder. You create a key-value pair for each link defined in the site map, and translate them to the other language. At this point, the Solution Explorer and the resource file for the localized site map look like the example shown in Figure 12-12.


You then modify the original Web.sitemap file, by replacing the value of the title attribute with a localization expression referencing the proper key in the shared SiteMap resource file. Here is partial content of the modified file:
<siteMap xmlns="http://schemas.microsoft.com/AspNet/SiteMap-File-1.0"
   enableLocalization="true">

   <siteMapNode title="$Resources: SiteMap, Home" url="~/Default.aspx">
      <siteMapNode title="$Resources: SiteMap, Articles"
         url="~/ShowCategories.aspx">
         <siteMapNode title="$Resources: SiteMap, Browse_Articles"
            url="~/BrowseArticles.aspx">
            <siteMapNode title="$Resources: SiteMap, Article"
               url="~/ShowArticle.aspx" />
         </siteMapNode>
      </siteMapNode>
      <!-- more nodes here... -->
   </siteMapNode>
</siteMap>
Finally, you override the InitializeCulture method in the custom BasePage class, from which all your pages inherit, and set the page's Culture and UICulture properties to the Preferences.Culture profile property:
Public Class BasePage
    Inherits System.Web.UI.Page
    Protected Overloads Overrides Sub InitializeCulture()
        Dim culture As String = TryCast(HttpContext.Current.Profile,
ProfileCommon).Preferences.Culture
        Me.Culture = culture
        Me.UICulture = culture
    End Sub
' the rest of the class here...
End Class
Recall that in Chapter 4 this profile property was made accessible for anonymous users also, with a default value of "en-US", so you don't need to verify that the current user is authenticated to safely read this property. You're now ready to test the localized home page: run the site and log in with your test user, go to your profile page, switch the language to Italian (or to whatever language you've added support for), and return to the home page to see how it is translated. Figure 12-13 shows the home page fully translated to Italian, except for the dynamic data (such as poll questions and options, and forum thread and article titles) stored in the database, of course.
If you intend to fully localize all the pages of the site, you'll find some hard-coded strings in a few .cs code-behind files. To localize them you can add resource strings into the Messages.resx and Messages.it-IT.resx global resource files created earlier as a test in the "Design" section, and replace the hard-coded strings with something like Resources.Messages.ResourceKeyName, as described earlier.

While much of an AJAX application should be concerned with application logic, there are still times when resources might need to be localized in the scripts. ASP.NET AJAX is sensitive to this need and provides a way to embed localized scripts in assemblies. The framework actually uses this to create debug and release versions of the scripts, too. Scripts are added to an assembly with the culture appended to the file name before the .js extension, Script.en-CA.js for Canadian English or Script.it-IT.js for Italian, and the like.
To embed localized scripts you must be using Visual Studio 2008, as the Visual Web Developer Express does not allow class libraries to be created. Once you have an AJAX-enabled website created, add a class library project to the solution and make the website reference the class library project. The class library must also reference the System.Web and System.Web.Extensions libraries.
Add the script file to the class library, Validation.js. Then add ValidationResources.resx for language-neutral resources and ValidationResources.it.resx for Italian resources. In the script file add the following code:
function IsValidFirstName(firstName) {
    if (firstName == '') {
        alert(Validation.InValidFirstName);
    } else {
    alert(Validation.InValidFirstName);
    }
}
The script uses Validation as a placeholder to reference the desired resource strings. In the ValidationResources.resx file add two resource strings, ValidFirstName and InValidFirstName. Add the following values respectively: 'This is a valid First Name.' and 'This not is a valid First Name.' Next open the Italian resource file and add the same two resource strings, but this time set the values to the following phrases: 'Ciò è un nome valido.' and 'Ciò è un ne nome valido.' Before compiling the class library, the following code should be added to the assembly's AssemblyInfo.vb file:
<Assembly: System.Web.UI.WebResource("LocalizingResources.Validation.js",
"text/javascript")>
<Assembly: System.Web.UI.ScriptResource("LocalizingResources.Validation.js",
"LocalizingResources.ValidationResources", "Validation")>
Compile the class library. Not only do you get the normal .dll assembly, but there is also a subfolder "it" created that contains the Italian resources in its own assembly, TBHBLL.resources.dll. You can really see this if you examine the binary files created in the ASP.NET AJAX Control Toolkit, shown in Figure 12-14.

To enable the ScriptManager control to leverage the language resources, the EnableScriptLocalization property must be set to true. In addition, the UICulture and Culture page directives must be set to "auto". In the Beer House application this can be accomplished in the TBHMain.master file.
<%@ Master Language="VB" AutoEventWireup="false" CodeBehind="TBHMain.master.vb"
Inherits="TBH_Web35.TBHMain"
    UICulture="auto" Culture="auto" %>

....
    <form id="form1" runat="server">
    <asp:ScriptManager ID="ScriptManager1" runat="server"
AllowCustomErrorsRedirect="true"
        EnablePartialRendering="true" LoadScriptsBeforeUI="false"
ScriptMode="Auto" EnableScriptLocalization="true">
        <Scripts>
            <asp:ScriptReference Path="~/TBH.js" />
            <asp:ScriptReference Assembly="TBHBLL"
Name="LocalizingResources.Validation.js" />
        </Scripts>
    </asp:ScriptManager>
If you run a page that calls the IsValidFirstName function, the response string will be returned in the appropriate language.
This chapter described the localization features of ASP.NET. Automatic resource generation, implicit and explicit localization expressions, strongly typed, dynamically compiled global resources, and good Visual Studio Designer support can all greatly speed up the implementation of localization support in your website. The "Solution" section of this chapter was fairly short because you only need to follow a few simple steps, repeating them for all the pages you want to localize. It only took me a couple of hours to fully localize the site's common layout and the home page. I know from personal experience that this would have taken much longer with the previous version of ASP.NET and, of course, infinitely longer with even older technologies. If this power and flexibility still isn't enough for your needs, I invite you to go deeper and study the provider model for localization, which enables you to store and retrieve resources to and from any data store you prefer.
Now that the site is 100% feature complete, you can start thinking about its packing, distribution, and publication to the Internet for global usage. The next chapter shows you how to deploy the site to both a shared hosted server and a dedicated server under your control, and how to create redistributable installers for packaged applications.