
Standing Out
THE ANIMATION FIELD SHOWS NO SIGNS of slowing in the near future. in this growing field, you need to do all you can to distinguish yourself from the crowd. and to set yourself apart from the rest, you have to know a few cheats to spruce up your animation. We'll walk through a few of these cheats in this chapter.
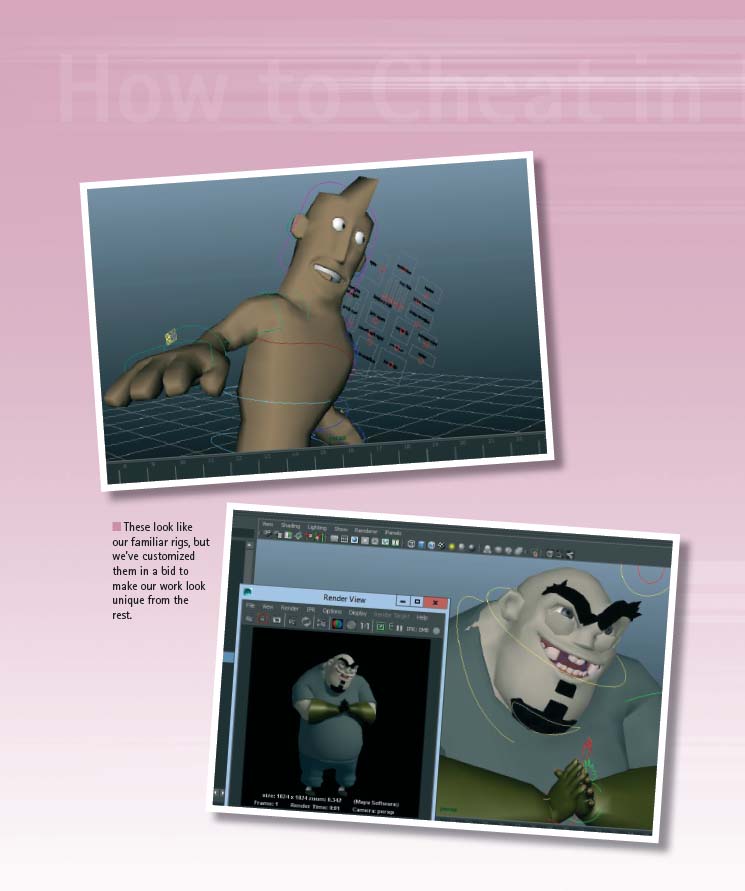
From adding some hair and fur to your characters, to customizing a model with your own embellishments, anything you can do to make your reel look unique may be the leg up you need to get a job as an animator.
Adding BlendShapes
Doubtless you are experimenting with many online rigs to produce work for your demo reel. There is nothing wrong with that, in fact it truly is the best way to expose yourself to different control sets and rigging styles. You will be aptly prepared for production.
On the other hand, using rigs you downloaded means you are opening yourself up to the possibility that recruiters will feel like they've “seen your reel before”. Nothing can be more detrimental to your chances of getting a job than a feeling of too much familiarity when a recruiter watches your work.
To combat this, we're going to walk through a cheat of adding a custom BlendShape to an already completed rig. When you have practiced this method enough, hopefully you will customize all of your rigs to give yourself an edge in the job race.

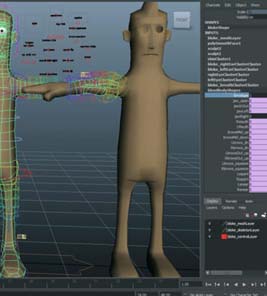
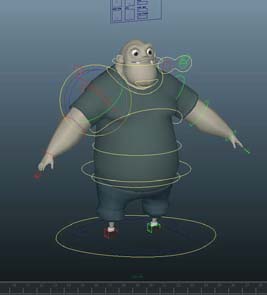
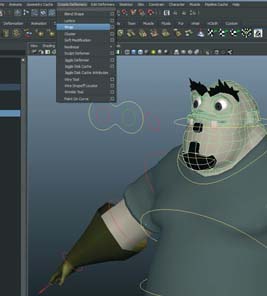
1 Open custom_Start.ma. Good ol' Bloke is standing in T-pose on the grid. He has been around the block a few times, so let's spruce him up.

4 Another way to find the BlendShape nodes in a scene is to click on Window>Animation Editors>Blend Shape. Select Bloke's body mesh.

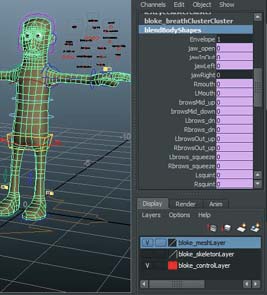
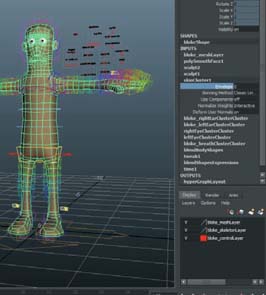
3 ¾ of the way down the Inputs we see he has an input called blendBodyShapes. Click on that and see all of the facial blends there are.

custom_Start.ma
custom_Finish.ma
HOT TIP
When you are creating a rig on your own, always keep a copy of the body mesh BEFORE deforms are added, so that you can add BlendShapes later.
5 We need to be sure we are working from a clean base mesh. One by one, change the “Envelope” channel to 0 in the channel box on all the deforms from the BlendShape node upwards.

6 With Bloke selected, ![]() . Select all his transform channels in the channel box and right click and choose “Unlock Selected”. Rename this new copy “custom_Blend” and move it to the side.
. Select all his transform channels in the channel box and right click and choose “Unlock Selected”. Rename this new copy “custom_Blend” and move it to the side.
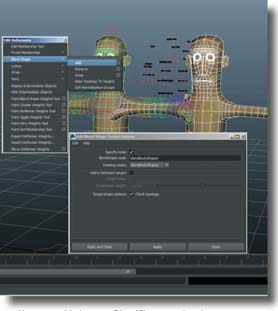
8 Check the option “Specify Node” and choose blendBodyShapes. Hit Apply and Close. Now go back through the deformers on Bloke's body mesh in the channel box and turn the Envelope settings back to 1.

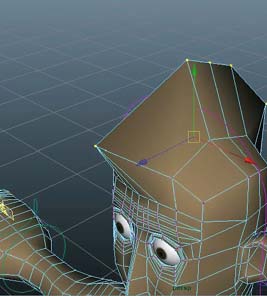
11 We can also give him a prominent chin. Remember that hitting ![]() turns on the soft selection allowing you to make smooth adjustments to the mesh.
turns on the soft selection allowing you to make smooth adjustments to the mesh.

12 Last, let's slim the waist a little bit so Bloke looks a little more heroic.


10 Let's also give Bloke some muscles, so move the vertices in his chest and arms to give a more muscular physique.
HOT TIP
Don't forget that Bloke has a smooth channel. On characters that have a smooth channel, you should test your custom blends with the smooth turned on, to see the final result.
13 Clean up the scene by hiding the custom_Blend ![]() .
.
14 Test that the BlendShape is working well by posing Bloke and seeing if any vertices are misbehaving. Now enjoy your customized model!
Adding Clusters
When it comes to customizing downloaded rigs, BlendShapes are a great first start. But you can't just rely on custom geometry: you need to add control to these customizations or they will be static and boring. Since the rigging is already done, it would be very disruptive to add more bones and controls to the rig. This is where clusters work great.
Though clusters can add substantial scene overhead, and are finicky with their object space, they do offer some of the easiest control when it comes to customizing a complete rig. To demonstrate the proper workflow for adding clusters, we will add a wobble cluster to the Mohawk that we added to Bloke in the last cheat.
First, the position of the cluster and the weight of the cluster need to be decided. Next, we have to reorder the deforms on the mesh so that the clusters do not interfere with the BlendShapes or the skincluster nodes. Then we'll set up the controls and link up the clusters into the head rig.
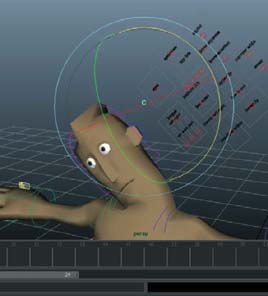
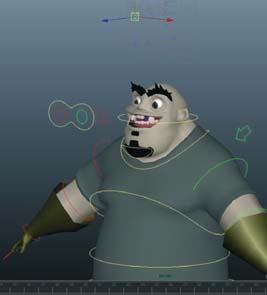
1 Open clusters_Start.ma. Here is the finished customized Bloke with the BlendShape that we added in the last cheat.

4 You might think that we are almost done, but do this experiment: rotate the head in any direction, then rotate the cluster that is left behind. Yikes, this result is not what we are looking for.

3 Switch to the Animation menu set by pressing F2. Click on Create Deformers>Cluster.
clusters_Start.ma
clusters_Finish.ma
HOT TIP
A cluster's are created in the average center between the selected components at creation time. If you'd like to move the cluster to a different location, change the “origin” attributes in the Attribute Editor under the cluster's shape node.

5 We need to reorder the deformers first. Undo the head rotation and then RMB click and hold on Bloke's body mesh. Choose Inputs>All Inputs.

6 See how the cluster is on the very top of the list? This means that it is calculating after everything. We want it to calculate just before the skincluster. MMB-drag the cluster6 node below the skinCluster1 node.
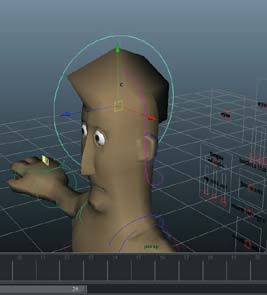
8 Press F8 to go into component mode, and move the CVs in the circle to more closely match the orientation of Bloke's Mohawk. It's a good idea to have controls that resemble the part they move.

11 Rename this group “Mohawk_OFFSET” and MMB drag it into Bloke's rig group for good housekeeping.

12 Select Bloke's head control, Ctrl+select the Mohawk_OFFSET group in the Outliner, and in the Animation menu set (F2) click on Constrain>Parent.


10 We need this control to ride around with the head, but it cannot have values in its channels (you will see why in a minute). So a constraint or a parent won't work yet. Click on the Mohawk_CTRL and press ![]() to group it.
to group it.
HOT TIP
Clusters' pivot point is slightly below where the “C” icon shows up for the cluster. Don't let the slightly odd pivot placement trick you into thinking you haven't snapped the Mohawk_ Control's pivot correctly.
13 Select the Mohawk_CTRL and press ![]() to switch to the Move tool. Hold down the
to switch to the Move tool. Hold down the ![]() key to activate the Move Pivot mode, and hold down
key to activate the Move Pivot mode, and hold down ![]() to snap to points. Snap the control's pivot to the cluster by MMB clicking on it, still with
to snap to points. Snap the control's pivot to the cluster by MMB clicking on it, still with ![]() and
and ![]() pressed.
pressed.
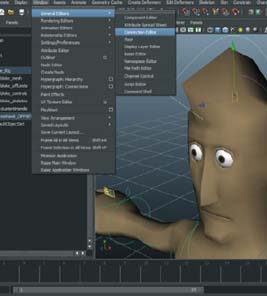
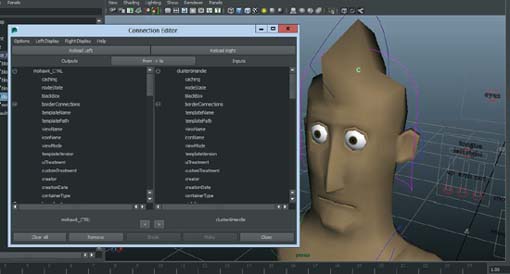
14 We can't use a constraint right now or the cluster will have double transforms again. Instead we will use a simple connection of the transforms of the control and that of the cluster. Select the Mohawk_Control and click on Window>General Editors>Connection Editor.

17 Let's do a little housekeeping again. Select the Mohawk_CTRL and in the channel box, select the translate and scale channels, right click on them, and choose “Lock and Hide Selected”.

HOT TIP
If you like, you can smooth the influence of the cluster by painting cluster weights. Select Bloke's body mesh, and in the Animation menu set (F2), click on Edit Deformers>Paint Cluster Weights Tool.
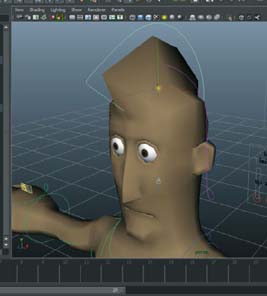
18 Test it out! Move Bloke into a pose, and try rotating your new controller. You can now animate the overlap on this Mohawk and give your scenes some customized animation that no other animator has.
Wrap Deformer
TO FURTHER CUSTOMIZE YOUR CHARACTERS, you may want to add new geometry to the rig. Sometimes constraining the geometry won't work, especially if you are trying to attach new geo in an area that is deforming. Parenting has the same issues, and adding the new geometry to the skin deformer is normally not an option either. So what can you use to make further customizations to your rigs? The Wrap Deformer saves the day.
I will start off by saying that this deformer can be a little finicky in that certain conditions need to be met. First, you should only wrap a piece of geometry to one other piece of geometry. Meaning, if your character has separate geometry for the head and the neck for instance, then you would not have much luck wrapping a scarf that covers the seam between the objects. Next, if your geometry has parts that are very close together, the wrapped geometry may not work. For instance, you will probably not be able to wrap eyelashes on closed eyelids; the upper and lower lid will ‘fight’ for the vertices of the lashes. if the eye was open, however, it may work fine. Next, the Wrap Deformer works best if the source and the target are close together. So while it causes problems if geometry is close together on the source (the one deforming the wrapped geometry), you also run into trouble if the wrapped geo is too far away from the mesh. an example would be the Mohawk that we created in the last cheat. if that Mohawk was a separate piece of geometry, then it would not be a good wrap candidate because of how far away the tip of the Mohawk is from the scalp. The bottom would deform fine, the top would get funky. in general, Wrap is commonly used for things like adding geometry to clothing or to the skin of the character.
Last, the Wrap Deformer can cause scene slowdown, so you should add it later in the lifespan of the shot, and add it in the referenced rig file instead of the scene file. referencing is covered in chapter 10.
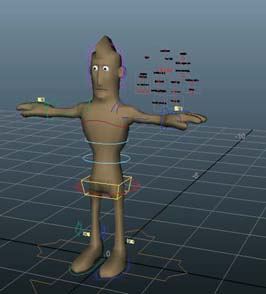
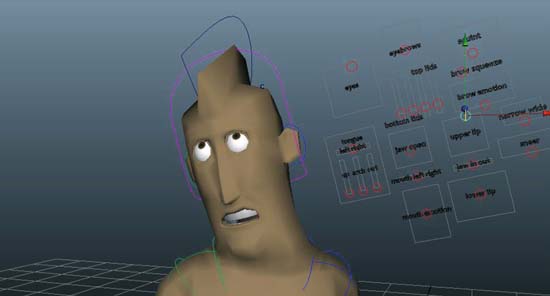
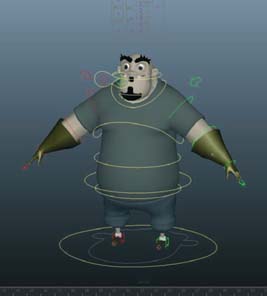
1 Open wrap_Start.ma. Groggy is standing in the scene, and looking like normal. Let's turn him into EVIL Groggy for a scene we might be working on.
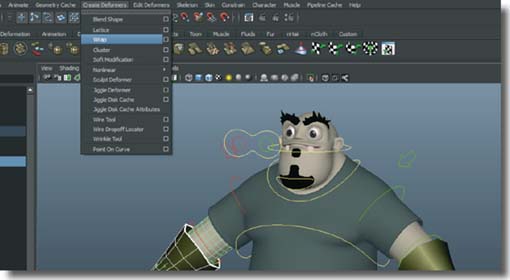
4 Now let's add the evil goatee. Select the goatee geometry, then Groggy's head, and click on Create Deformers>Wrap.

3 Let's do the gloves first. Hit F2 to switch to the Animation menu set. Select the right glove, then the right arm, and click on Create Deformers>Wrap. The default options are fine for us. Repeat this step for the left side.
wrap_Start.ma
wrap_Finish.ma
HOT TIP
The gloves were made by duplicating the arms, moving the vertices around the cuffs outwards to create a flare, and then doing a tiny bit of sculpting to get the geometry to be slightly off the skin. Duplicating body parts is a common starting point for using the Wrap Deformer.
5 We should test that the Wrap is working correctly. Use the facial controls above Groggy's head to dial in some face poses, and make sure the goatee is being wrapped correctly.

6 Let's do the eyebrows now. Select the right eyebrow and the head, and then click Create Deformers>Wrap. Repeat on the left side.

9 As you can see, the Wrap doesn't work. We need to wrap higher smooth levels. Undo the arm movement, and start over wrapping the geometry to the smoothed Groggy again.

HOT TIP
You can smooth geometry that has been wrapped to another object without it breaking. Just hit ![]() to use the Mental Ray Smooth Mesh Preview, as I did on the goatee.
to use the Mental Ray Smooth Mesh Preview, as I did on the goatee.

10 If you want to wrap the geometry to an even higher smooth level, just create new Wraps at that level. Text all of the wrapped geometry out by posing Groggy in an evil pose. Et voila, instant villain!
Adding Hair & Cloth
HAIR AND CLOTH WERE SO TECHNICALLY difficult and computationally expensive that it would be crazy to attempt putting them on your reel. Today, however, adding these effects to characters is achieved through a few mouse clicks. and though the animation quality will actually be what makes your reel stand out from the crowd, knowing how to add these effects to your characters can serve you on the job.
If you are using characters that have been downloaded from a free site, normally the artists that created them do not want to confuse animators with things like hair and cloth. That doesn't mean that adding these effects are overly difficult. actually there are just a few considerations to keep in mind. For example, you normally want to start your animation on f101 when dealing with hair and cloth. The reason for this is that you want to have enough frames in the beginning of the scene to run the simulations and let the effects settle. also, you will want to learn how to turn off evaluation of dynamics so you can animate at 24fps until it's time to view your effects.
Hair and cloth also add a layer of animation in your scene, just like how in the rigging chapter we talked about adding dynamic motion to your scenes as a way to visually “fill in” the gaps in the animation. it may be a cheat, but it works.

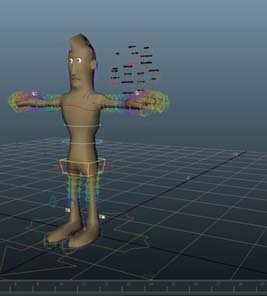
1 Open hair_Cloth_Start.ma. Our pal Moom is standing with some shorts and Nurbs curves sticking out of his head. We will apply hair and cloth to these objects.
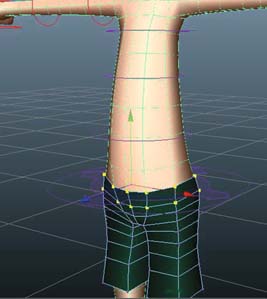
4 On f01, select the shorts, and press F8 to change to component mode. Select the vertices of the belt loop (top two edge loops). Then ![]() select Moom's body geo.
select Moom's body geo.
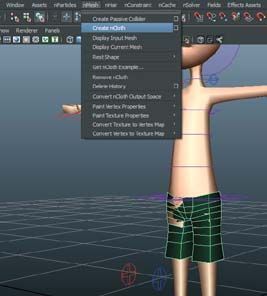

3 Select Moom's body geo, and click on nMesh>Create Passive Collider. Now if you press play, you will see the shorts stick to Moom. They can still fall down though, so we'll also add an nConstraint.
hair_Cloth_Start.ma
hair_Cloth_Finish.ma
HOT TIP
You may have to adjust the “thickness” setting in the nCloth collision settings to make sure the pants do not intersect the leg when it animates. Also, explore the presets in the nCloth shape to get different effects on this cloth.
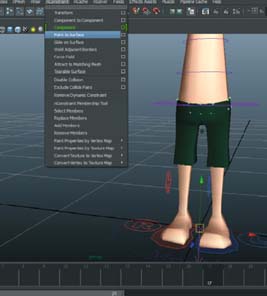
5 Click on nConstraint>Point to Surface. This creates a constraint, almost like a Wrap deform, where selected vertices are linked to a nearby surface. Now Moom's pants won't fall off.

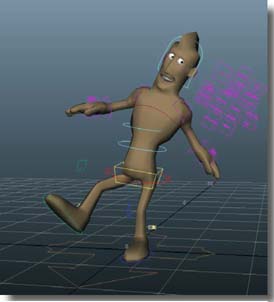
6 Test that the clothes are working by setting a keyframe on f01 with the foot on the floor, and then raised on f48. Looks pretty good!
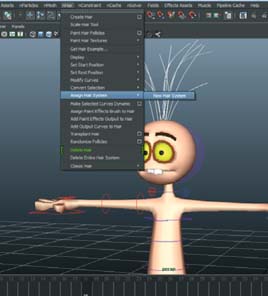
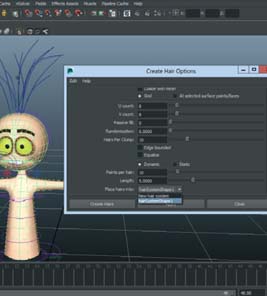
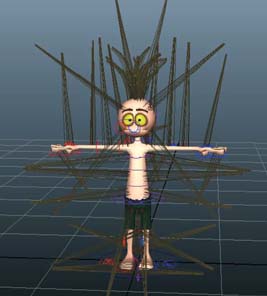
8 Select Moom's head and click on nHair>Create Hair>. In the dialog box that opens, select HairSystemShape1 at the bottom where it says “Place Hairs Into”. Click “Create Hairs”.
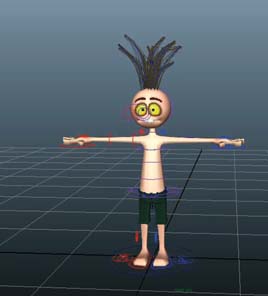
11 After they are deleted, the hair is looking how we designed it to with the crazy curves coming out of the top of his head.
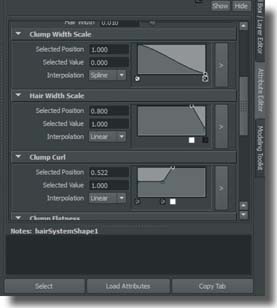
12 Let's customize the hair just a little bit. Select the hair, go into the Attribute Editor ![]() and go to the hairSystemShape tab. Change the Clump Width Scale and the Clump Curl attributes to match mine.
and go to the hairSystemShape tab. Change the Clump Width Scale and the Clump Curl attributes to match mine.

10 In the Outliner, open the hairSystemFollicles group. Select all of the follicles in the group with the prefix “moomFinal”. Delete them.
HOT TIP
We are creating the dynamic objects and rewinding to f01 to see the effects, but remember when you are using this customized character you want to start your animation on f101. You also must animate your character starting in T-pose on f01 and transitioning into your start pose on f101.

13 Check out your custom Moom! He has snazzy shorts and a rockin' hairdo. Not only is this character customized for you, these dynamic objects really add some visual continuity to your scene, letting you get away with snappy movements.
Shoot Right
Make the Most of Your reference Video
by Kenny Roy
REFERENCE VIDEO IS THE MAINSTAY OF MANY animator's planning process. it can also provide some of the most unexpected “happy accidents” in the lifespan of a scene. Regardless of how much you use reference video in your workflow, you should be aware that workflow itself extends to the process of shooting your own reference video. yep, workflow pervades all!
Let me start by describing what most beginner animators do when they shoot their own reference video. We'll take a dialog shot as an example for this scene. most animators turn on the camera, play the dialog in the background, and try to lipsync and act out the scene at the exact same time. There are many problems with this approach.
The first problem is that the memorization of the lines was not done prior to turning on the camera. in the meisner Technique (a-well known method approach to acting), memorization is done by stripping away all of the emotion in the words, and running through the dialog repeatedly. Then doing it again, and again, and again. Pretty soon you can run through the dialog without thinking; and this is the trick. Practicing the dialog so much that it becomes automatic is how you get PAST the words that are being said, and start focusing on the characters themselves. Practice running through the dialog with no intonation, inflection, or a hint of emotion and watch how as you gain speed and accuracy, your brain is now freer to do things like control your posing and movement. When done correctly, it's almost like a magic trick.
Once you have memorized the dialog ad nauseum , it's only now time to get in front of the camera. But wait! Keep the audio turned off on your computer for now. That's right; we do not want the audio from the scene distracting us. it is highly disruptive to hear the words and try to match the timing perfectly, and there is no better way to lose all of the freedom you have gained by memorizing the lines so thoroughly. so while the lines are fresh in your head, do some takes on camera of YOU doing the performance. no audio to fall back on, no cues, just you doing your absolute best performance of the line. What you will later go back and look for in these takes are subtle actions and movements that you would otherwise have not performed if you were caught up in matching the audio with your voice. Do some takes that are absolutely over the top! Who knows, you may see a pose, an arc, a facial expression, or something else that clues you in to where you can exaggerate in this shot. Do some takes that are totally out of character too. even the bad takes will have something that is valuable in them.
The third step in the workflow is to do some takes with the audio playing again. However, rather than let yourself get caught up trying to match the voice perfectly, do your performances without speaking this time. instead, gesture with your arms and legs and move around the scene, just without speaking. again, we are trying to free our minds to come up with beautiful accidents that will improve our finished animation immensely. Do multiple takes where you are trying to simply let your weight rise and fall with the energy of the dialog. Zero in on the body language of the character as you hear it in the delivery, and exaggerate it fully. The great advantage of this second type of performance is that it will give you some very solid clues as to the timing of your scene. Whereas the first type (spoken by you, no audio cues) allows you to be free with pose and unrestricted by timing, this type of video will be priceless for extracting valuable timing tricks for use in your shot. Look closely at weight shifts and how you are leading up to the big actions. Watch the eyelines, head directions, and even the timing of the micro gestures that you do with your fingers. all of these little things can be a nightmare to try to guess the timing of so you can save yourself hours by spending just a few minutes of extra takes of the second type of video performance.
So let's recap. no more turning on the camera and jumping in front of it, unprepared! Take on this three-step workflow to get the most out of your reference video:
1. Memorize the lines without emotion, getting just the words CEMENTED into your brain.
2. Turn on the camera, but keep the audio on your computer off! Do many takes where you are performing the line as if you are the original actor in the film.
3. Next turn the audio back on, but don't bother lipsyncing. Just focus on getting great poses, and look back on this footage with a keen eye for timing — your choices will be inspired.
Remember reference video is not cheating, it's just plain smart!