Referencing
UP UNTIL THIS POINT, WE'VE BEEN USING scene files that have all of the rigs imported into the shot. The reason we've done that is to make sure that you are focusing solely on the cheat at hand, and not trying to overcome any technical hurdles unrelated to the chapter.
Now, we're going to dive right in to referencing and hopefully be able to use referenced scene files from now on without leaving any readers behind. Our referencing cheats will surely make your animation a lot more efficient (at the very least) and possibly save your entire project. It's time to take advantage of the power of referencing!
Referencing Basics
REFERENCING HAS BEEN A PART OF MAYA for many versions, and even before the system was perfected, artists and technicians realized the value of re-using assets in multiple scenes. The concept is simple; instead of having unique copies of frequently used assets in every single scene, create “links” instead to the source files. This way, changes to the original file will propagate down to the multiple scene files, and you will save immensely on scene overhead and file size. It is not uncommon for an animation file with dozens of referenced rigs (all between 20–50mb) to still be only 1–2mb or so when finished.

1 Instead of importing characters and sets into a scene, we're going to reference from now on. In an imported scene, the data from all of the imported scenes combines to create a lot of scene overhead. In the referenced scene, the only data that is saved is changes to attributes, like animation curves for instance. The result is a far slimmer scene with less overhead, smaller file size, and the ability to make changes to assets and have those changes propagate into all of your referenced scenes.

3 Choose “ball_Rig.ma” in the file dialog that appears. Maya will load the file as a reference and bring you back to your panel. It looks like it's imported but let's take a closerook. Open the Outliner/Persp panel layout by clicking it's icon in the toolbox.

4 See the blue diamond next to the ball_Rig:all group? That means the node is referenced. You can see all of the reference nodes by right clicking in the Outliner and checking the “Show Reference Nodes” box.

5 Go to File>Reference Editor. This box will give you control over adding, substituting, and removing references from your scene. It is also where you might go to troubleshoot a reference.

blank_Scene.ma blank_Scene_finish.ma
HOT TIP
You can change the namespace in the reference editor, which is recommended if your filename is very long — shorten the namespace to something more manageable.

7 Open the Reference Editor. Uncheckthe box of the reference node. This unloads the reference, so the bal disappears. The reference is still there, it's just temporarily not in the scene. Check the box again and play back your animation.

10 Let's replace this reference with a ball with a different color. Go to File>Reference Editor, select the rig, and click File>Replace Reference. Choose “ball_Rig_Yellow.ma”. Since the naming and hierarchy is the same, the animation stays intact.

11 In the Reference Editor, click the Duplicate Reference button. This is handy if you want to populate a scene with multiple references of the same file, but as you'll notice, animation isn't copied because it is considered an “edit” done in this scene.

9 blank_Scene.ma has a display layer called “env_GEO”. Our rig file has the same layer, and so objects in the referenced file are loaded into this layer when you check “Display Layers” in the reference options. Turn the visibility of this layer on and see.

12 Notice how the display layers are still shared even when you duplicate a reference. You want to make sure your reference settings are correct before you duplicate anything. In the Reference Editor, select this new reference and remove it by hitting the Remove Reference button.
HOT TIP
Come up with a standardized naming convention for your display layers and you'll find that you can get away with having as little as 4 or 5 that will allow you to handle hiding/showing all the objects in your scene!
Offline Edits
THE REFERENCE PIPELINE IS DESIGNED to give artists the ability to manage a massive number of scenes, first and foremost. Most of the functionality built into referencing is geared towards this goal. Even the tool we're going to use now, “Export to Offline File,” is geared towards being able to make edits to multiple scenes. We're going to cheat by using it as yet another way to export animation.
Reference edits come in all shapes in sizes, literally. Modifying an objects components, changing a texture's color, scaling the rig, even setting a keyframe is considered an edit. By allowing animators to export Reference Edits to an offline file, Maya 2014 has actually created a robust, and rock solid way to export animation. In fact, this method is by FAR the most full-featured and fool-proof method to export animation in Maya now.
Why? Exporting animation via AnimExport, Copy keys, and even the relatively new AtomExport only exports channels that have keys on them. Since changing ANYTHING is considered a reference edit, this Offline File you export from the Reference Editor contains all attributes that have changed in your scene, even if there are no keyframes on it. I can't tell you how many times I've tried to import animation from an animator's scene only to discover they did not put any keyframes on the master control. I then have to go into the animation file, put a keyframe on all controllers (even unchanging ones) to be fully sure I am importing the entire performance. Not any more. In fact, this Offline File will even recreate nodes that are related to the changes to your reference file, meaning constraints, layers, EVERYTHING. This tool was meant for propagating changes to multiple files, but we're going to cheat and use it as our favorite animation export tool.

1 start.ma. You will recognize this file as we just made it! Select the ballAnim control and notice there are no keyframes on the rotation channels. In rotation X, Y, and Z, put values of 1, 2, and 3, respectively.

3 Let's also add the locator and the ball rig to a new render layer. In the Outliner select “locator1” and “ball_Rig:all group”. In the Layer Editor's Render tab, click the New Layer from Selected button. Name this layer “testLayer”.

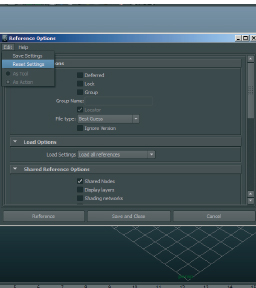
4 Now we export the Reference Edits.. Open the Reference Editor, select the ball rig reference, and go to File>Export to Offline File☐. In the export dialog go to Edit>Reset Settings. Hit “Export to Offline File”, and name it “ball_anim. EditMA”.

ref_Offline_start.ma
ref_Offline_finish.ma
HOT TIP
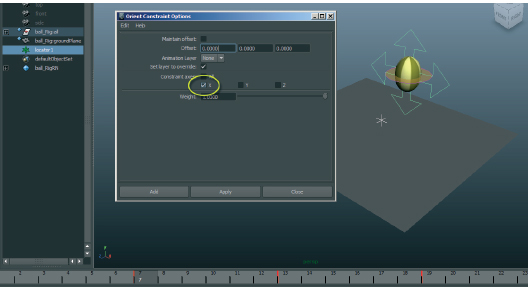
We added a locator that controls a channel in our referenced file using an orient constraint. If the direction was reversed (the referenced file controlling an object in the scene) then exporting the reference edits would NOT include the locator.

7 Check it out! First play back the animation and you'll see the animation has transferred. Also notice the locator1 has been brought into the scene as well. Select the ballAnim control. The constraint is in place, and the values of 2 and 3 in Y and Z rotation have come through too, even though there are no keyframes on those channels.
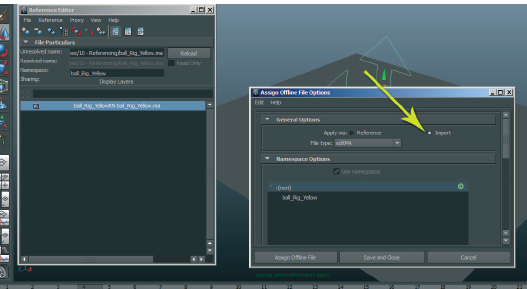
6 Now select the ball_rig_ Yellow reference in the Reference Editor, and go to File> Assign Offline File☐. Change the setting “Apply ia” from “Reference” to “Import”. We don't want to load another reference of the edits themselves, we want the animation and nodes imported into this scene. Hit “Assign Offline File” and choose “ball_anim.editMA”.

8 Select the render layer “testLayer”. See how the locator1 and the ball rig are loaded into this render layer? Excellent. Absolutely every single reference edit, modified attribute, animation curve, even render layer has been exported and imported perfectly. This tool may have been intended to propagate changes to many files, but we're going to cheat and use it to copy animation from now on!
HOT TIP
This tool is super powerful at exporting information. Be careful, it exports ALL reference edits. If you mess up a material accidentally, for instance, that edit will be in there too, unless you remove the reference edit using the “List Reference Edits” menu in the Reference Editor.
Saving Reference Edits
WE'RE IN THE HOME STRETCH of a project, and a change needs to be done to a referenced asset. But maybe the fix needs to be done in an animation scene and not the referenced file itself. What kind of change would that be?
Any time you need to fix an asset and the problem only presents itself in an animated scene, like a weighting, a rig, material change issue, it could be possible that we'd only see this kind of problem as we animate our character. The normal workflow would be to note the change you want to make, save and close the file, open up the referenced file, try to recreate the problem, make the change, save the file, open up the animation scene, see if the change you made in the referenced file actually solves the problem, and repeat as necessary.
Yikes. Using the Save Reference Edits command, we can fix problems much more efficiently.

1 Open edits_Start.ma. The reference file is not found. No big deal. Navigate to the Chapter 10 folder and find Moom.ma. Check both “Make path changes permanent” and “Remember these settings”.
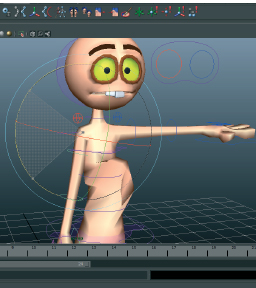
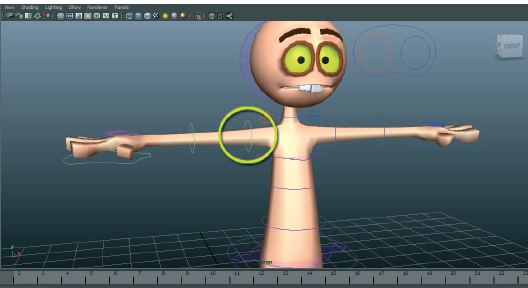
3 Rotate it down against his body.

4 Yikes. He clearly has some weighting issues. Let's work these out and save the edits back into the rig file. Hide the display layer named “displayBody” and show the layer named “skinnedBody”. This geometry is the one we'll do the weight painting on.

edits_Start.ma
HOT TIP
We normally check weighting in as many poses as possible when skinning. A great way to check if your weights are good is to use a modular rig system and to load animation onto your rig in the rig file itself, instead of being surprised later on.

8 Turn off the display layer “skinnedBody” and turn the “displayBody” back on. Open the Reference Editor. Right click on the Moom reference and choose File> Save Reference Edits. It will inform you that you cannot undo this change. Choose “Save”.

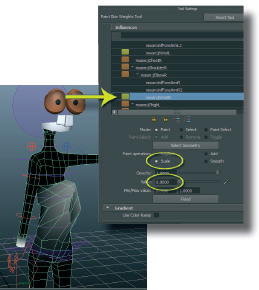
7 Paint the zero weight on the body to remove the wrist's influence. Once all of the influence is removed from the body, select the upper arm control and rotate it around to check and see. If you see body vertices moving, repeat steps 5–7.

9 Let's test it! Open up Moom.ma in this chapter's scene folder. Grab his arm control and move it all around — the skin weights are now working correctly!
HOT TIP
You have to make sure you are not sharing any layers when you load your references if you want to be able to save reference edits. A good idea might be to load references without anything shared to begin with, then switch to shared layers when you are sure you are past making edits.
Planning Cartoony Shots
by Kenny Roy
WHEN PLANNING CARTOONY SHOTS, WE ARE SOMETIMES LEFT a little underwhelmed by the tools at our disposal. our bodies cannot stretch and move the way that we want them to. it can be frustrating to have a dynamic, wild idea in your mind only to turn on your video camera and remember that, in fact, real world physics can be so boring. so how do we make the most of the tools at our disposal, and really get some valuable reference for our cartoony shots? it starts with knowing what makes animation cartoony in the first place.
See, most beginner animators think that cartoony animation, is simply exaggerated animation. Turn up the squash and stretch to 11, and bam, cartoony. This could not be further from the truth. in actuality, cartoony animation stems from our ability to give a strong impression on the audience. cartoony animation is thus, impressionistic animation. for instance, we can normally come up with visual similes that describe the cartoony action that we are trying to create. like, after the coyote gets flattened by the anvil, he floats to the ground like a piece of paper. or, after his arms are stretched 50ft long when holding onto a falling piano, his arms flop to his sides like wet noodles. in both of these examples, and all of the examples you could come up with, we describe parts of the body that resemble other visuals. notice, however, that we are always referencing real-world things. and, we have PLENTY of reference for these real-world things.
We know what a spring that is pulled too far looks like, what a water balloon looks like dropped from a third floor window, and how an arrow vibrates when it sticks into a bullseye. if those are the images that you are referencing when you animate a character, you will be creating strong impressions. instead of trying to animate a character unrealistically, animate these images TOTALLY realistically, just use the character's body to do it. put that spring in the arms and legs, create the huge rubbery squash of a water balloon in the spine controls, and animate the whole body vibrating like an arrow when the character comes to a very sudden stop. even though it seems like cartoony means we are animating very silly things that have never been seen before, it will be how closely we can match the real world THROUGH our characters that will be our measure of success.
So, now that we have identified that we are thinking of real-world objects, the world of video reference opens back up to us. youTube, Rhino house, and other resources are back on the list of possible sources of great video reference. your job then becomes to animate the character's body in a way that gives a strong impression of the real-world thing you are referencing. Using a lot of reference, you can't go wrong. if you are animating a character that is flapping his feet and hovering off the ground, then search for butterflies, birds, anything that the real world offers that you can then turn into body movements. if you are animating a character that is doing a zippy almost like being shot like a rubber band, then you should gather all of the rubber band footage you can get your hands on. This is what i had to do for the scene that you see in the Workflow chapter.
What about putting it all together? is there a way that you can assemble the reference you've gathered or determine the real beats and timing of the shot? my favorite way is to ‘perform’ the action with my hands. for starters, you can use your hands to puppet actions much quicker and snappier than you can with your full body. also, it is much safer to do these actions with hand puppets than it is to throw your body around the room. last, combined with your voice cues, the resulting video reference with your hands serves as an AMAZING timing tool. We talk in the Workflow chapter about using this reference far into the lifespan of your shot.
Regardless of the level of ‘cartooniness’ you are trying to achieve, you need to approach the problem head-on or you will flounder when researching your shot. Remember, cartoony animation is not achieved by merely exaggerating your entire shot, or going overboard on the fundamentals. instead, cartoony animation is the result of getting the audience to see familiar dynamics within the character's performance. if you can successfully do this, you will get laughs every time.

