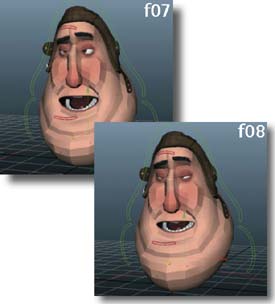
Facial Animation
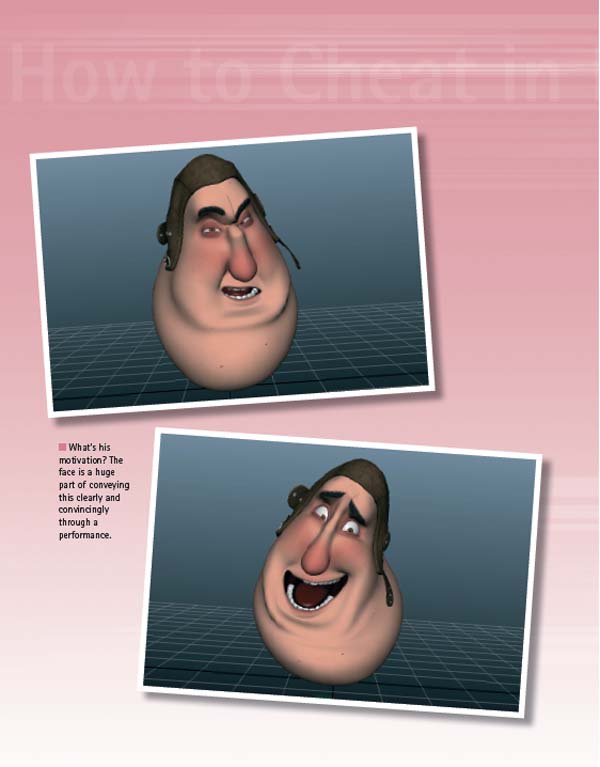
ANIMATING A CHARACTER'S face is one of the most interesting and enjoyable parts of the animation process. We can convey much with the body poses, but this is the really good stuff: the detail that literally breathes life into our characters. The drama and emotion that the face contains really makes us look inside ourselves and seek to understand and identify with a character. If animating the body makes us entertainers, then animating the face makes us actors.
Facial animation could fill many volumes on its own, but here we'll get into the bread-and-butter techniques that give us a great starting point. No two animators work through the face the same way, and you can build your own dramatic philosophies on the essential tools in this chapter.
Planning and Prep
WE ARE GOING TO WORK THROUGH some facial animation techniques using a simple example of a typical close-up shot. This keeps the staging simple and makes it easy to focus on just the face, while also being a very common shot style found in film, TV, and games. To make the exercises as straightforward as possible, the body has been blocked in for you, so you only need to worry about the face.
When doing any kind of dialog shot, it's important to thoroughly plan your animation. Don't just dive right in and start keyframing. Listen to the audio by itself, over and over, until all its accents and nuances are thoroughly ingrained in your mind. Also think about the context of the line, along with the character's internal thought process and motivation for saying it. It's quite possible to animate a line in completely different ways, yet when played in context with the surrounding shots, only a specific approach will ring true.
In our case, we don't have a context, just a single line to use for practicing some animation technique. For the sake of consistency, we'll pretend that the ideas in this planning section are what a director has instructed us to do. In the real world, this planning and prep would have been done before the body was animated, as it would influence our decisions in that regard as well.
1 In the Sounds folder in this chapter's project directory is a .wav file with a short dialog clip (nothingtosay.wav). Open it in your favorite media player and listen to it on looped playback. Use headphones if possible. Write down the line and listen to its nuances.

4 Reference is always a good idea. Act out the line and create some video reference for yourself. Make notes on the brow poses, eye darts, blinks, etc. You can also make thumbnails, have a friend act it out, whatever you find useful in determining what you will animate.
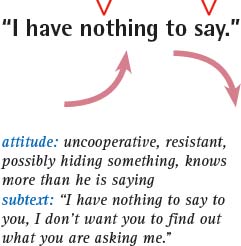
3 Next I think about the tone of the line and the subtext it may be communicating. The way he says it sounds like he's being uncooperative. It feels like he means “I have nothing to say to you in particular”, to whomever he's speaking to. This is more material for our notes.

5 Once you've decided on the acting choices and know why you've made them, it's time to start working on the face. Some animators do the lip sync first, while others do it last. I find it helpful to first do a few full face poses to use as a structure. Open FaceAnimation_START.ma. The main head control has animation, but the face is stuck in its default blank stare, which we'll fix soon enough!

FaceAnimation_START.ma
FaceAnimation_END.ma
HOT TIP
To import a sound file into your scene, go to File > Import and select the audio file. Then right click on the timeline and choose the file from the Sound menu.
Core Poses
IT'S VERY FEASIBLE to animate the face in a layered fashion, but I've found I get better results when I first block in some initial expressions to use as a foundation. The accents we indicated in our planning stage create a perfect framework on which to base these poses. This also helps make the work stronger, since we can focus on just a few expressions and not worry about making fluid motion yet. We'll put in four poses in total: the accents on “nothing” and “say,” the anticipation pose on “to,” and the starting pose. Things will get moved around a little when we refine them, but you'll likely find that these core poses really help keep you on track.
Cenk is a very powerful and versatile rig. We're also going to try to make sure to take a very simple approach to the facial posing so that we don't get inundated with keyframes early on in the process. You will also notice we are referencing the Cenk rig into our scenes now, so don't forget the great referencing cheats from last chapter!
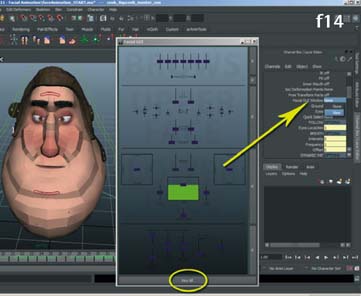
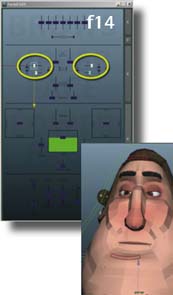
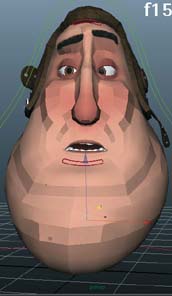
1 Open faceAnimation_START.ma. Select Cenk's master control and in the channel box, select “Facial GUI Window” and select “View”. Now change the time slider to f14 and hit the “Key All” button on the facial GUI.

5 At f32, set a key on the face controls. Bring the brows down, lift the lids some, and expand and shape the mouth for “say”.

6 Copy f14's pose to f18 by selecting all face controls and MMB dragging in the timeline to f18 and setting a key. This will hold that pose for five frames.
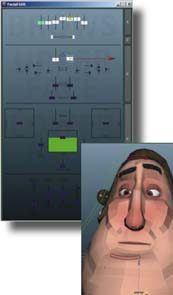
3 Start with the brows, raise them and make the shape slightly asymmetrical. Raise the lower lids a bit and make the L eye upper lid slightly higher to complement the higher L brow.

4 For the mouth, bring the corners down and inward. It's roughly the mouth shape for “ha-“, but we don't need to be concerned with it too much right now. Curl the lips out a bit and shape the mouth.
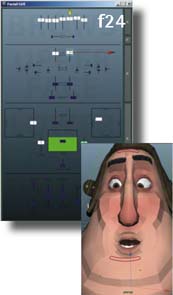
7 Key the face at f24. Raise the brows even more, lift the lids, and shape the mouth for the “to” sound.

8 Key the face at f01 and create the starting pose. We want to convey him being slightly defiant. Lower the brows, but not enough so he looks angry.
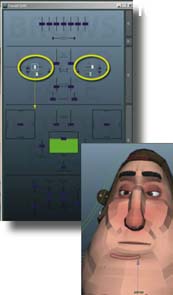
9 A slightly open frown helps show that he's displeased about the situation, but not gruff or stewing.

FaceAnimation_START.ma
FaceAnimation_END.ma
HOT TIP
In the timeline's right click menu, go to the sound options box. There you'll find an offset attribute if you need the sound file to start a given number of frames earlier or later.
Lip Sync 1 — Jaw Motion
WITH THE CORE POSES COMPLETED, we're in a good spot to start on the lip sync. As we've seen time and time again, the approach of starting broadly and adding detail in phases will work beautifully here. We won't worry about mouth shapes yet, just the jaw movement. Once that is working, everything else usually falls into place pretty smoothly. It's easy to overlook the variety of timing in the jaw movement. In a given line of dialog, there is usually a wide range of sharp and smooth movements. One trick that helps make them a bit more tangible is to say the line while holding your hand underneath your jaw. You'll be able to feel the words with sharper timings and then translate that into your curves. I found that the biggest accents were on “I”, “nothing”, and “say”.
Normally rigs come with a “face cam” that is used for animating lip sync. This is especially useful in scenes where the character is moving all over the place, doing twists and turns, etc. Cenk does not come with a face cam, partly due to the fact that he is basically one giant face to begin with. If you want to create one, simply create a camera and position it in front of his face. Then select his head head_local_con and parent constraint the camera to it.
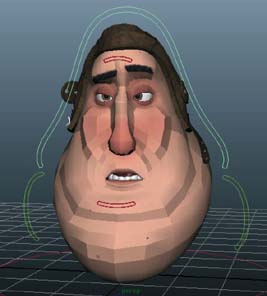
1 Start with the scene you just animated, or from my corePoses.ma.

4 This is the curve I came up with for the first pass. Notice the accents on “I”, “nothing,” and “say”, while “have” and “to” are much smaller.

3 Do a first pass just to add the open/close movement. Just get the general timing for now. Do an open/close for each open mouth shape, or four total. Keep in mind that you want the open to be a few frames before the actual sound.

5 Tweak the timing and get the little bump that happens on “-thing”. I like to save these secondary bumps for after the main accent so the mouth doesn't get too chattery.
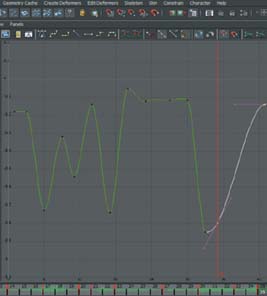
6 Work on the timing of “say”, which he draws out longer in the clip. I added a key to hold it open longer, and a longer ease in at the end.

CorePoses.ma
LipSync1.ma
HOT TIP
Animate the physical movement of what's being said, rather than simply basing it on the words. If you open/close every syllable, the mouth will chatter pop. Analyze yourself saying the line and only put in what you actually see.
Lip Sync 2 — Mouth Corners
THE JAW IS JABBERING AWAY, so it's time to work on the mouth corners. With this rig, the corners are accessible using the left_Mouth_Con and the right_Mouth_con in the facial GUI. The four directions are labeled Smile, Frown, Narrow, and Wide. The two directions we're focusing primarily on in this pass are Narrow and Wide. Other rigs might have more controls for the mouth shapes, but the idea at this point is the same: add another level of detail without going overboard. There's plenty of passes left to refine, so we don't need to do everything at once. Because the mouth rig is so simple, we're basically only worrying about if the corners are in or out at a given time. As for up and down, they will stay in a downward frown position for the entire shot. This is the point where we can start thinking about basic mouth shapes and phonemes. If you're new to animating lip sync, there are plenty of charts online and in classic animation books to study extensively. For this exercise, we'll just walk through the ones we need for the dialog. Remember, we're not doing the full mouth shapes yet, just the positioning of the corners to get us on the right track.

1 At f07, move both corners out for the “I” sound.
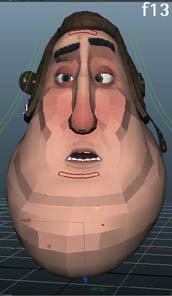
2 Move to f13 and bring them in some for the “ah” sound in “have”.
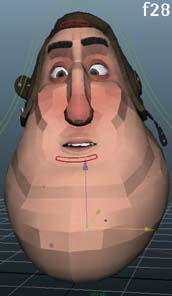
6 At f28 bring the corner back in for the “to” sound.

7 Hold that shape until f34, then at f40 the corners come out again for “say”. Bring out his L corner more to give a nicer shape on this last word, so it has a slight drawl to it.

4 On f18, we need an “O” shape for “nothing”.

5 Copy the key from f18 to f20, and on f24, give him a nice wide shape.
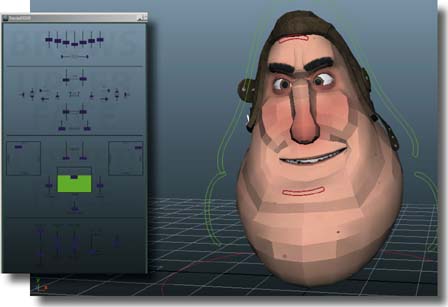
8 Finally, we want a nice ease in to the ending pose as the mouth relaxes into his final expression.

LipSync2.ma
HOT TIP
Don't forget to animate to the camera primarily, rather than the face cam if your shot has one. Use the face cam as a helper, but ultimately the shapes need to look their best in the shotCam.
Lip Sync 3 — Mouth Shapes
LET'S CONTINUE REFINING our lip sync by fleshing out the mouth shapes. This is one of the more organic parts of the process, where you need to experiment a little and do some back and forth to get things working. The following cheat is a guideline, rather than a step-by-step process.
Remember that less is normally more. With the jaw open/close pass working with the lip corners narrow/wide pass, we generally are about 85% of the way done. These two passes need to be really close to perfect in order for the lip sync to read well to an audience. By adding this pass of custom shapes, we're getting much closer to the final performance.

1 I removed the keyframe on the jaw on f03, and on f07, the corners of the mouth need to be wider to get the “I” shape.

2 On f14, create the “F” shape by using the bottom lip roll slider in the facial GUI.
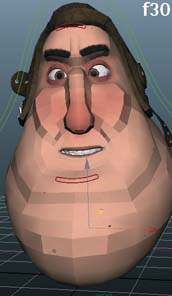
6 Key the lip up/down controls, as well as the jaw and sneer controls on frame 28, then build a nice, toothy, snarly “S” shape on frame 30.

7 I keyed all of the mouth controls on frame 30, then slid all of the keys starting on frame 31 3 frames forward. He needs to hold the “S” longer.
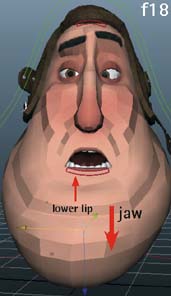
4 The “O” shape was a little too overdone on f18. I toned it down.

5 Let's get another nice read on the teeth on f20.

8 Finish that hold on the “S” by MMB-dragging the key on f30–f32 on all mouth controls except the jaw.

9 Watching the animation back a few times, it definitely feels like there is too much of a pose change in the corners of the mouth at the very beginning. I think this wider start pose feels better.

LipSync3.ma
HOT TIP
Be sure to give any closed shapes at least 2 frames. Ms, Bs, Ps, Fs, Vs, etc. all need to be held at least that long to not look like mistakes or hitches
Lip Sync 4 — Tongue
THE FINAL STEP TO REALLY SELL the lip sync is getting the tongue moving on the right sounds, in particular “no-“ and “-thing”, the “T” sound on “to”, and the “S” sound on “say”. Unless it's an extreme close-up or something like that, the tongue mainly just needs to be seen when it's touching the top of the mouth, such as on “N” sounds, and when it moves back to the lower palette. Otherwise it generally just needs to stay out of the way.
We can get away with a lot of cheating when keyframing the tongue. Again, since a viewer will normally only see the tongue peripherally when watching the animation, we can build a tongue “flick” and copy to the correct frames later.

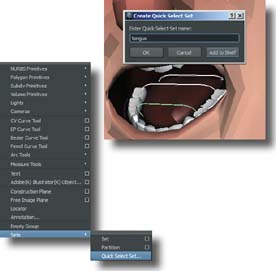
1 On f37 (because the mouth is open), select the master controller and turn on the Inner Mouth controls by either typing in “1” or “on” and pressing ![]() .
.
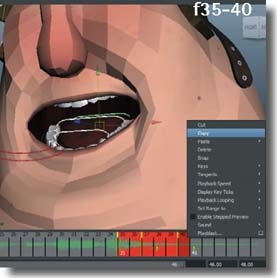
4 On the timeline, press ![]() +LMB and draw a selection from f35-f40. Right click on this range and choose “Copy”. Now anywhere we need this tongue “flick”, we can paste it.
+LMB and draw a selection from f35-f40. Right click on this range and choose “Copy”. Now anywhere we need this tongue “flick”, we can paste it.

3 On f35 and f40, hit ![]() to set a key with the tongue in default position. On f37, key the tongue in an upward pose like this. The tongue controls can be translated as well as rotated.
to set a key with the tongue in default position. On f37, key the tongue in an upward pose like this. The tongue controls can be translated as well as rotated.

5 On f14 (2 frames before we need the tongue in the up position), right click on the timeline and hit Paste>Paste. All 3 keys are pasted and are still in the clipboard for us to paste again.
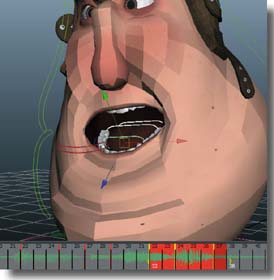
6 Paste this animation again at f20, and f27. Delete the animation on f35-f40 and paste your clipboard again on f32, or, if you feel comfortable, in the Graph Editor, delete the keys on frame 35 and slide the keys on f37 and f40 backwards 3 frames.

LipSync4.ma
HOT TIP
Most of the time you don't need to get crazy detailed with the tongue for lip sync, unless it's an extreme closeup or realistic style animation. If it's at the top of the mouth when it should be, and we see it travel down when it needs to, that's usually enough to sell it for many situations.
Blinks
BLINKS ARE A VITAL PART of facial animation and acting, and a great way to add more life and interest to your character. Before we continue with the lip sync animation, let's take a look at doing a typical, standard blink. This is a common approach to doing them, but you want to make sure you don't do all your blinks this way. There are many different kinds of blinks — fast, slow, half blinks, fluttering eyes, takes, disbelief, etc. The approach you use will be dictated by the emotion and thought process of the character. Nevertheless, this is a tried and true way to get a nice, organic-looking blink and is a great starting point for building a “blink library” in your animation toolset.
Remember we've learned some great ways to copy keys to the clipboard and export animation, so you can take a blink that you create in one file and use it throughout your animations over and over. Just be sure to add some customization and ‘flavoring’ of each blink to match the scene.

1 Open Blinks.ma and switch to a front view. Select the eyelid controls, and at f01 key the upper and lower lid controls where they are.
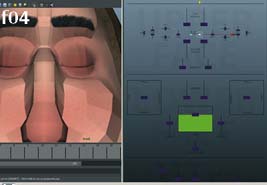
4 On f04 the lids are closed. Normally the upper lids come down about 75% and the lower lids 25% — on the Cenk rig, we control this contact point with the “Eye Height” control.

7 At f07 both lids are almost back to the starting pose. Unless the eyes are completely open or closed, I generally like to keep the lids touching the irises on the way up or down, as it makes the blink feel smoother.
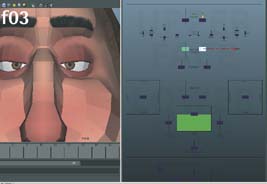
3 At f03 bring the upper lids down so they touch the top of the pupil, and start bringing the lower lids up slightly.
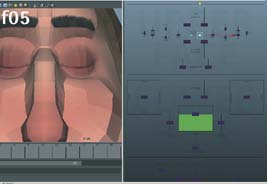
5 We'll hold the eyelids closed for 2 frames, but move the contact point down just a bit. Use the “Eye Height” control to key this.
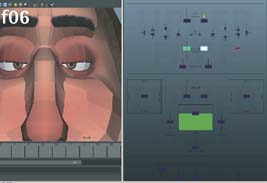
6 At f06, the eyes are opening back up. For a standard blink, I like the upper lids to be around halfway past the irises on the way back up. The lower lids start to go back down as well.

8 Instead of ending on f08, do a nice ease in from f07-f10 to cushion into the pose and make it feel more organic.
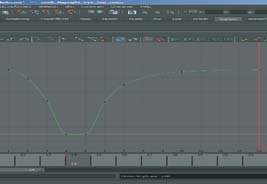
9 For an extra bit of polish, do another 4 frames of very subtle ease in cushioning on the upper lids. This is what the curves look like. Look at Blinks_End.ma for the final result.

Blinks.ma
Blinks_End.ma
HOT TIP
Another nice touch for blinks can be adding some very slight up and down in the brows. It depends on the situation, but sometimes adding a barely perceptible amount of motion here can help make things more organic.
Blink & Brows
LET'S REFINE THE BROWS and add a blink to our face animation. We'll have Cenk blink when his head raises, since its speed fits well with the motion we have going. We'll keep it fairly close to a standard blink, except that the closing will be a bit slower since that fits his uncooperative, slightly indignant attitude. Then we'll tighten up the timing of the brows raising, and add an accent in the brows and eyes to bring out the final word of the shot, “say”.
You may find that you are doing a little bit of back and forth with the timing of lids and brows. Indeed, you need to have a workflow that allows this process to happen so you can ‘discover’ the best performance within. We'll go through adding some blinks and brow movement to the scene, but experiment with some different values and timings in your own shot to get the best result.
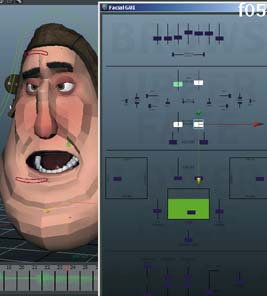
1 Start the blink on f05. Key the upper and lower lids in their current position.
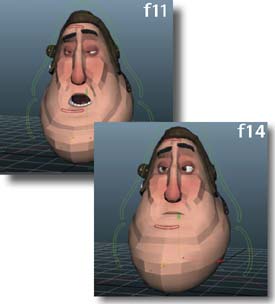
4 A slower opening fits this blink as well. The eyes start opening at f11, and at f14 the tops and bottoms of the irises are still touching the lids.
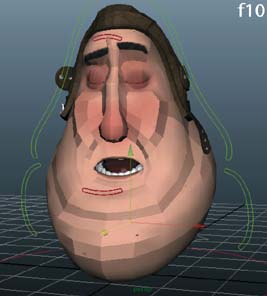
3 On f09 and f10 we have the closed pose.

5 The eyes continue to ease into their pose at f18.

6 Now let's work on the brows during the blink. We want to have some overlap, with the brows going up leading the eyes opening slightly. Select all the brow controls.

7 Move the start of the brows' motion to f08, right before the eyes are closed at f09. At f14 they should hit their up pose.

BlinkBrows.ma
BlinkBrows_End.ma
HOT TIP
When doing any kind of blink, keep the irises partially visible in all of the opening and closing poses. Thisavoids flashes of only eye whites, which will pop in an unappealing way.
Blink & Brows (cont'd)

8 A quick trick for doing cushions for the flat curve sections is to move to the frame before they hit the pose, in this case f13.

9 MMB-drag in the timeline from f13 to f14 and set a key. Now f14 is almost the same value it was, but drifts through to f19. Fix the tangent handles and you instantly have a nice subtle drift to make things more organic and not frozen for a stretch of frames.

13 At f36, set a key on the brows so they have the same pose as f32. Then at f32, pull the brows down just a small amount to create a little overshoot.

14 Key the brows at f40 and add a little cushion starting at f36.

11 Those are the apex of the brow pose, so select their keys at f08 and f14 and slide them one frame earlier to lead the rest of the brows. It's subtle but a nice little touch.

12 Let's move to the end of the animation, on the word “say”. Right now the brows and eyes just stop on that last pose at f32, so let's add a little accent. Select the brow controls.
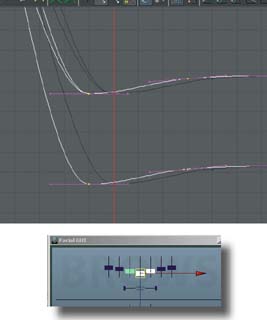
15 Select the 3 middle brow controls and move from f32 onward one frame earlier so they lead the rest of the brows.

16 Make a very small complementary squint with the eyes that trails the brow by a frame. It will help feel that his face is working as an organic unit, rather than an assembly of moving parts. See BlinkBrows_End.ma for the end result.
HOT TIP
The brow sections that lead the rest depend on the pose you're hitting at a given time. Use the apex as a guide.
Eye Darts
ANOTHER IMPORTANT ELEMENT of organic facial animation is eye darts. They're often used for “keep alive” moments, where a character isn't really moving much but needs to still look like they're living beings. They show that a character is thinking about something and that they have an internal monologue happening. And on just a practical level, our eyes rarely stay focused on the exact same spot for more than a second or so, and usually less.
Eye darts can definitely go deeper than that, however, and should be thought about with as much attention as any other element in a character's performance. An eye dart at the right moment can communicate things that nothing else could. A character's eyes darting away as they're trying to convince someone of something can convey them thinking, “Are they buying this?”, or show worry, realization, doubt, or any other internal emotion. This is something that we as animators need to be constantly thinking about.
We'll go through a simple eye dart workflow, but keep in mind it's a starting place. Your decisions about eye darts ultimately involve what you need to communicate about the character's internal mental state.
Rather than bouncing them around randomly, it helps to create a subtle pattern with the darts. Shapes like triangles, rectangles, etc. can be good guides for plotting the path the darts make, provided you don't make them too obvious. Varied timing and amounts of movement can help with this. Shapes make sense because we often look back and forth between a person's eyes and mouth when we're conversing. For this exercise, we'll do three darts, and form a triangle shape with their path. They're traced in the example as they're very hard to see in still pictures. Be sure to follow along with the Maya file.


1 Open EyeDarts_Start.ma. If your eye control is not visible, select the master control and change the “eyes” attribute to “on” or “1”. Then switch to the front panel to key this action. Hit ![]() to set a key on f07.
to set a key on f07.
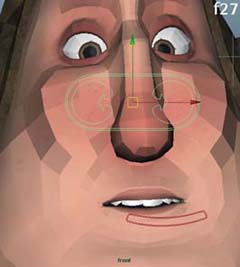
4 Now we'll bring it back to the start position, starting on f25 and ending on f27. You can even MMB-drag the key from f7 to f27 to be sure.

3 Now do another dart, this time downwards. Key the eyes where they are on f13, then move the eye target downwards and slightly back towards the middle on f15.

5 I did one more eye dart from f38-f40 from right to left. Often our eyes dart between the eyes of the person we're speaking to, so this last dart reinforces the idea Cenk is talking to someone directly.

6 Here's what the curves look like for these darts. Our eyes move VERY quickly, so it's not necessary to spend too much time cleaning this up. Watch EyeDarts_End.ma for the final result.

EyeDarts_Start.ma
EyeDarts_End.ma
HOT TIP
Our eyes tend not to smoothly track things, at least not without turning our head with it. If the head isn't moving, it's common to do a series of sequential darts, rather than a smooth pan across.
Final Touches

WE're AT THE HOME STRETCH with this face animation! All that's left is some tweaks and polishing to make it look as good as possible, which we'll go over in this cheat. No matter what kind of facial rig you run into throughout your career, the principles remain the same. The face is working as an organic whole, yet some parts are influencing others (brows can influence the lids, mouth corners can push up the cheeks, etc.) From ears to nose flares to a dozen lip controllers, modern production rigs are capable of most any expression possible. Remember, the face has to support the body animation.
Most novices get very excited when they first encounter a sophisticated facial rig, like Cenk. The result is normally a very finely tuned face performance on a lackluster body. Do not do this! The great thing about Cenk is that he is a bouncing ball, so there is no reason that your ‘body’ performance shouldn't be really solid before moving on to the face. And when you venture out into the animation world and use different characters, remember the basics you learned with Cenk. Happy animating!

1 The first thing to do is give a slight anticipation down before the brows move up. It's another detail that will help things feel less mechanical and more organic. Select the brow controls.

4 Another subtle polish thing is to make sure the mouth corners have nice little arcs in them when moving in and out. It's another one of those details that isn't obvious, but just helps everything feel a little nicer.

3 On second look, it looks like the up pose at f14 is still hitting a bit too hard. Select the keys at f13 and f14 and pull them down to make the cushion a little bigger. Now they won't stop so quickly and will look more natural.

5 I added more snear to the “N” of “nothing”. The nose is easy to over-animate, so be careful when doing your own.

6 For some very final texture, I added the head control to an animation layer and animated a little shake on the word “nothing”. I animated it just a little too big, and then used the weight parameter to dial it down until it looks nice and subtle. Watch the final in faceAnimation_END.ma.

faceAnimation_END.ma
HOT TIP
Always have a reason for everything you're doing when it comes to acting choices. If you can't justify something by what the character is thinking, you probably don't need it (or need something else).
Is This a Business Worth Getting Into?
by Kenny Roy
I WOULD BE REMISS IN MY DUTIES IF I WERE TO NOT at least mention the turmoil that has befallen our beloved industry. With all that is happening right now, is it even a good idea to become an animator? I say whole-heartedly yes, but let me explain.
For years now, VFX houses have found it increasingly hard to compete with shops set up in countries such as India, China, Korea, and others where government subsidies make business more lucrative for them. Add on top of that the fact that most of the aforementioned countries have labor much cheaper than the US, and you are not only getting substantial tax benefits for sending your work overseas, but your budget stretches even further. Finally, and perhaps the scariest issue facing us as artists, is that labor laws surrounding the VFX industry are weak. Long hours and little stability are the norm.
So why would I still advise entering this industry? Because I truly believe that we are on a cusp. I believe that in the next few years, methods of independent digital distribution will offer small teams of artists the outlets they need to reach an audience and make a living producing their own content. Already, many of my friends have opted to work with programmers and web developers to create online content, mobile games, and interactive applications. ITunes and Google Play Store level the playing field; when you are not competing for billboard space against a major movie studio, things change. Small teams of artists collaborating on projects, communicating and working over the internet, can accomplish what it took hundreds of people to do only ten years ago. And recently, major studios have acquired YouTube channels for sums in the millions. It goes to show that you can be successful if you are prolific and consistent, and can build a following for your content.
This might be the best time to be an animator! Sure, it would have been amazing to be in Walt Disney Studios in the years surrounding Snow White, again in the last 80's and early 90's with the new Masterpieces, or up at Pixar to be a part of Toy Story in 1995. These high points in our past may have been exciting, but only now is the most valuable change to the industry in full effect: individual artists have the ability to produce and distribute content all on their own, with the potential for literally millions of people to see their work.
At every point up until now, the act of distributing content has been left up to very time- and labor-intensive processes. The complexity of logistics would baffle (and bankrupt) individuals trying to do it all on their own. Not anymore.
You may not be as inclined to want to create your own animated content, but this is a great time for animators still. Why? With the way things are going, it looks like major VFX houses may try to restructure the current business to make filmmaking much more collaborative between studios and VFX houses. This change will mean that, fundamentally, there will be more work, and better understanding and planning of the process, which will all hopefully lead to improved conditions for all digital artists. If studios are involving the VFX houses at the very beginning of a project, then we will surely gain a foothold in the approval process (the main point of contention that forces VFX houses to go to great lengths to deliver more work for a fixed bid). When project expectations are communicated clearly at the beginning, then everyone can be held accountable.
We may have seen some ugly things recently; major VFX houses closing or moving countries just to stay afloat, huge snubs by directors and the Academy in the Oscars' broadcast in 2013, and a general lack of understanding from the public and the government alike.
All that said, we are lucky enough to be animators during the major paradigm shift in entertainment. A shift away from traditional distribution and towards digital means. A shift away from a huge barrier to entry for content creators and towards both the hardware and software being affordable for all. A shift away from the studios pitting VFX houses against each other and towards long-term partnerships to produce amazing visuals together. I don't know about you, but I can't think of a more exciting time to be right in the middle of it all.

