Rigging Cheats
EVERY ANIMATOR HAS RUN INTO PROBLEMS with a rig at some point in their career. be it a hidden controller or bad weighting, a rig problem can ruin your day quickly. this is why knowing a few cheats about rigs is a good idea. in the latest version of maya, these rig cheats are ultra stable and time-saving. You'll (hopefully) never again be working on a scene only to be stopped in your tracks by a misbehaving skeleton. We've scoured the web to find a few new rigs to include with this edition of how to Cheat in maya, so let's go ahead and dive into the best rigs the web has to offer and see what we can find…
Rig Testing
LET'S FIRST RUN THROUGH a few of the things you should identify in your rigs before you start working with them.
In an ideal production setting, you are given enough time to test your rigs before you have to animate shots. This is in an ideal setting. Not very many productions are ideal! Schedule sometimes demands that you are producing work on day one. When the deadlines are that tight, we need to have a quick list of things to check to make sure our rigs are going to behave how we want them to.
Some of these cheats will reveal characteristics about a rig that aren't necessarily an indication that the rig is broken or low quality. These characteristics might include scaling breaking after a certain point, IK/FK switch channels being on the same control that you are using frequently for posing, or proxy meshes hidden in the rig. It would be quite a shame if you completed a shot using a new rig only to see later on that an attribute or parameter was set incorrectly.
Since all rigs are slightly different, the locations, names, and even geometry type of the controls we point out in the following cheats may not be the same in your production rigs. However, there is a certain amount of standardization inherent in rigging, and we'll expect you can always find the “IK hand controller”, or the “FK head controller” no matter what character you're working with. To get used to this, in this chapter we'll use the semi-standardized names to describe the rigs.
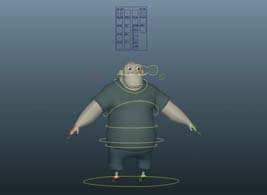
1 Open “Groggy_Test.ma”. We're going to test two things right now, controller symmetry, and controller object space.

2 Select his IK hand controllers, his IK feet controllers, and his IK pelvis controller. The first thing you want to check is that all of the controllers move in the same world space, and that they are symmetrical.
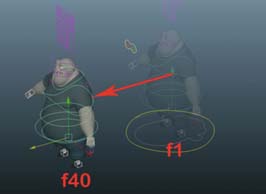
3 Set a key on f01 with the controllers in place. On f40, move the controllers forward in world space substantially off of his master controller like so.

4 Now we check if the controllers are in world space. With the controllers still selected, open the Graph Editor. Uh oh. Look at all of the different translations on these controllers!
If you look closely, the arm's object space is not aligned with the feet or the pelvis. What this means is we need to be careful when we are posing the character, especially in cycles, because this rig was not set up with “FORWARD” being represented by only the Translate Z channel. Below you can see that if we move the controllers in the Z channel alone, the results are totally unpredictable. This rig would be very unwieldy if we used IK arms in a walk cycle. If you must use this character with arms IK mode, then it's easiest to pose the character using “WORLD” translation mode by holding down ![]() and LMB-dragging to the left on the marking menu that appears. Also, the infinity curve type will be “cycle with offset” for all three translation channels (not just Z like normal) for a character like this. More on that in Chapter 9, Cycles.
and LMB-dragging to the left on the marking menu that appears. Also, the infinity curve type will be “cycle with offset” for all three translation channels (not just Z like normal) for a character like this. More on that in Chapter 9, Cycles.
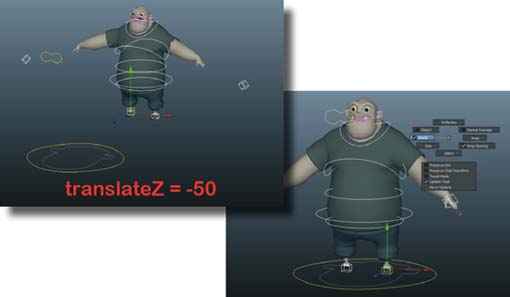

Groggy_Test.ma
HOT TIP
You can also check in the channel box to see if all world controllers are moving in world space by moving them, and then selecting each individually and seeing if the values change.
RIGS CAN HAVE IDIOSYNCRACIES that you come to learn over time. We took a look at the Groggy rig in the last section and found that IK arms will require us to have a few extra steps to make our cycles perfect (again, more on that in the “Stride Length” section in Chapter 9). There are many reasons that rigs have different characteristics though. Different proportions, the rigging pose, and the general use for the rig (some rigs are designed to be able to blend mocap data into a robust control system, e.g.). But there ARE a few things that pretty much all rigs should have under control, pun intended.
The first is that setting all of the controller's attributes to zero, or “zeroing”, puts the rig back into the initial pose. This is vitally important for avoiding gimbal lock while animating, dealing with animation curves while you are polishing your scene, and creating cycles with a set stride length.
The second requirement is that animation can be copied and pasted on the rig. With most rigs, this works fine. However, sometimes rigs have very complex hierarchies filled with connections and nested constraints that mean that your animation is not copied perfectly. We'll try both AnimExport and good ol' Copy Keys to get to the bottom of this.
While many of the quirks of a rig are workable, such as the slightly different object space on Groggy's IK hands, some things are show stoppers. Let's see how this rig stacks up on these two essential issues.
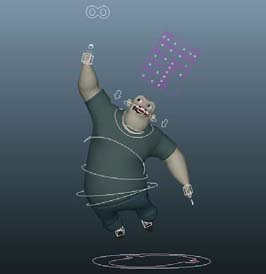
1 Open Groggy_Zero.ma. See how Groggy is in a pose? Let's try “zeroing” him out. Drag a selection around his whole rig to choose all of his controls.

4 Now just type 0. But don't press ![]() yet. You'll see Maya automatically puts the zero in the upper right cells when you have selected multiple cells, rows, or columns.
yet. You'll see Maya automatically puts the zero in the upper right cells when you have selected multiple cells, rows, or columns.

2 Now let's open the Attribute Spreadsheet. This is a very under-utilized panel in Maya. It displays in spreadsheet format ALL of the attributes for the selected objects. Nice!

3 Now to zero all of the controls back to their origins, we're going to select all of the Translate and Rotate Columns. LMB click and drag across the very top of the Attribute Spreadsheet, selecting all 6 columns.

5 Now press ![]() . Groggy passes the test! He snaps right back to his initial pose. This is great.
. Groggy passes the test! He snaps right back to his initial pose. This is great.

6 We only “zeroed” his Translate and Rotate channels. If there were other channels (IK switches, foot roll, etc.) you would have to find them in the All Keyable tab of the Attribute Spreadsheet.

Groggy_Zero.ma
HOT TIP
The Attribute Spreadsheet is very underutilized. Spend some time making changes to multiple cells by shift-selecting them, or by dragging a selection box on an area and typing in values.

1 Open Groggy_Copy.ma. This is a completed animation scene but what do we do if we need to copy the animation onto another rig? We're going to show you the normal way with AnimExport, and a great cheat using Copy Keys that works even faster.

2 First we need to enable the AnimExport plugin. Go to Window>Settings/Preferences>Plugin Manager. FindanimImportExport.mll and check both the “Loaded” and “Auto load” boxes.

5 Let's try this using just the clipboard. This is much quicker and useful if you don't need to save the animation, just need to copy it fast. (Very common if there's a rig update in production.) Open Groggy_Copy.ma again and select “groggy:root_Group” in the outliner.

6 Go to Edit>Keys>Copy Keys ![]() . This dialog is the same as the AnimExport dialog, because what you are doing is the same, except you are only copying keys to the clipboard and not saving them for later. Copy the settings above.
. This dialog is the same as the AnimExport dialog, because what you are doing is the same, except you are only copying keys to the clipboard and not saving them for later. Copy the settings above.

3 Now in the outliner, select the animated Groggy's rig group node, “Groggy:root_group”. Go to File>Export Selected. In the Export dialog, change the type to “animExport” and leave everything default except change “Hierarchy” to “Below”. Name the file groggy_Anim.
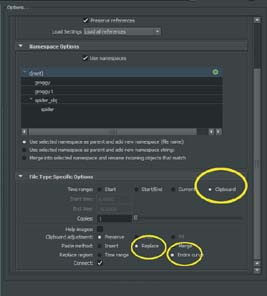
4 Now we'll import that animation onto the static Groggy rig. Select his main rig group “groggy1:root_Group”. Go to File>Import. Make sure the file type is set to “animImport”, and copy the rest of the settings circled above. The animation copies perfectly.

7 When you press the “Copy Keys” button, the script editor returns “// Result: 281” in the Command Line. That means 281 curves were copied to the clipboard. Now select the static groggy's rig group “groggy1:root_Group”.

8 Go to Edit>Keys>Paste Keys ![]() . Copy my settings above and hit Paste Keys. Beautiful. The curves in the clipboard are pasted onto Groggy and he moves as expected. This is extremely useful if Replace Reference does not work and you need to copy animation onto a new rig!
. Copy my settings above and hit Paste Keys. Beautiful. The curves in the clipboard are pasted onto Groggy and he moves as expected. This is extremely useful if Replace Reference does not work and you need to copy animation onto a new rig!

Groggy_Copy.ma
HOT TIP
At its core, Maya handles AnimExport and Copy Keys the same way. One just writes a file and the other stores it in your clipboard. The nice thing about Copy Keys is you don't have to hunt for the saved file, AND, you can copy keys from one scene and open another scene to paste them into — Maya keeps the curves in the clipboard.
Sprucing It Up
ONE OF THE BEST WAYS to cheat in animation is to take advantage of the fact that Maya interpolates motion for you. For example, in 2D animation done for TV, it is still typical for the animation to be done on “2's” — every other frame is held for two frames, giving you effectively 12 frames per second instead of the normal 24. Well, this looks choppy to the well trained eye. In 3D, unless we are using stepped mode, there will ALWAYS be motion on every frame. When people say “on 2's” in Maya, what they mean is they have set key poses every two frames — but there is still motion on every frame.
The way we can cheat using this property of 3D is to “spruce up” a rig with some dynamic objects. We can get away with using far fewer poses and less movement, because the dynamic objects will be constantly moving. It will take away the choppy feeling and make it look like the “world” in which the character is living is smooth and continuous, even with staccato movement in the character itself.
We're going to take a scene that has VERY crude animation on Moom, and add a ponytail and earrings using two very different dynamic methods. You will then see when we play back the animation, that the scene has taken on a more dynamic quality. The mere addition of these dynamic objects and the secondary motion they create helps us cheat the animation. When you are on extremely tight deadlines and can only afford the time to set a few key poses in a shot, this cheat will save you.

1 Open moom_Dynamics_Start.ma. I've done a lot of the work for you, by setting up the earring and ponytai geometry and starting the process of creating the dynamics objects.
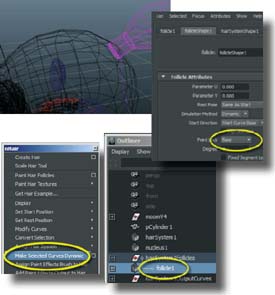
4 Select the curve and go to nHair> Make Selected Curves Dynamic. In the Attribute Editor under the Dynamics tab of HairSystemShape1, change Bend Resistance to 10. Select FollicleShape1 in the Outliner in the hairSystem1Follicles group, and change the Point Lock attribute to “Base”.

2 Let's first create the ponytail dynamics. We're going to use a simple hair curve and wrap the geo to it. Switch to the side view and draw a Nurbs curve through the ponytail like so using the EP curve tool.
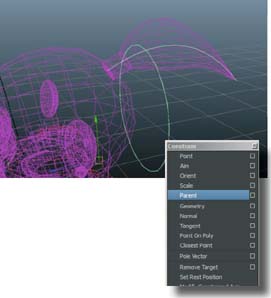
3 Now select Moom's head control, and shift select the new curve you created. Hit F2 to bring up the Animation menu set, and choose Constrain>Parent. Hit F5 to switch to the Dynamics menu set for the next step.
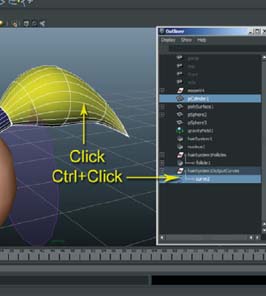
5 On f01, select the ponytail mesh. In the Outliner, find the newly created hairSystem1OutputCurves group. Curve2 inside is the result of the dynamics applied to curve1 that you created. ![]() +click curve2.
+click curve2.

6 Hit F2 to bring up the Animation menu set again and go to Create Deformers>Wrap. Press play and see the ponytail whipping back and forth. See how the scene has a sense of fluidity even though the animation is really rough? You cheater, you.

moom_Dynamics_Start.ma
moom_Dynamics_Finish.ma
HOT TIP
Depending on your computer performance, you may not be able to watch the dynamics play at speed. Maya solves dynamics in real time, so normally every frame must play. To watch complex dynamics or to watch on a slower machine, change your playback to “Every Frame” in the time slider preferences.

1 Hair curves are a quick solution but are not ideal for meshes that shouldn't deform. We're going to use rigid bodies to make the earrings dynamic. On f01 select the head control, ![]() +select the top of the earring, and go to Constrain>Parent.
+select the top of the earring, and go to Constrain>Parent.

2 Now let's make the two other spheres rigid bodies. Select both of them, and hit F5 to switch to dynamics. Go to Soft/Rigid Bodies>Create Active Rigid Body. With both of them still selected, click on Fields>Gravity.

5 There's a few settings we need to change to make the earrings move correctly. First in the rigidBody1 tab with the bottom sphere selected, find the “Rigid Body Attributes” section and change “Damping” to 5.

6 Next, scroll down in the Attribute Editor to find the “Performance Attributes” section. Turn off collisions. Select the middle sphere, navigate to the rigidBody2 tab and repeat the last two steps.
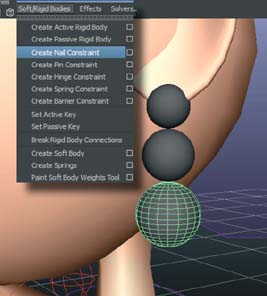
3 We need to set up these spheres to move in correlation with each other. The Nail Constraint is perfect for this. Select the bottom sphere and go to Soft/Rigid Bodies>Create Nail Constraint.

4 Move the new Nail Constraint to the bottom of the middle sphere, ![]() +select the middle sphere and hit
+select the middle sphere and hit ![]() to parent it. Now repeat the last two steps for the middle sphere, creating a Nail Constraint and then parenting it to the top sphere.
to parent it. Now repeat the last two steps for the middle sphere, creating a Nail Constraint and then parenting it to the top sphere.

7 Select gravityField1 in the outliner and change the Magnitude attribute to 7.

8 Now hit the play button! Watch how the ponytail flops around with the head movement, and how the earrings swing nicely from Moom's ears. As crude as the motion is in the scene, there's something soothing to the eye to see nice smooth dynamic movement.

moom_Dynamics_Start.ma
moom_Dynamics_Finish.ma
HOT TIP
The Nail Constraint is the perfect dynamic constraint for swinging objects like earrings. There are many other types of dynamic constraints and I encourage you to try them all. Hinge Constraints are like Nail Constraints but they only rotate on one axis, and Spring Constraints are like Nail Constraints but they stretch!
Rigging Props
NO MATTER WHAT TYPE OF ANIMATION YOU DO, chances are your character will interact with props quite often. To make sure that you are not animating the wrong object, most props should be rigged. There's a little bit of an art and a science to rigging props, but I've simplified it down to this simple cheat to get you back to animating as soon as possible.
Since we are also using a referencing pipeline, rigging props allows you to turn the prop file into a format that can be standardized across multiple scenes. Instead of bare geometry floating around in your shot, using this cheat you will be able to create an asset that all the animators working with you can utilize.
We start by creating a group that will hold all of the geometry for the prop. This is done so that no matter what is added to the prop, the rig will still function in all of the scenes that it has been referenced into. Next we create a simple controller that will move the prop around. Last, we group all of the controls, geometry, and other nodes into a single group and name it our rig.
In a production, animators should know how to rig their own props so that if there is a need to do so, you are not taking valuable time away from the character riggers. Any time you can troubleshoot your own scenes, take care of problems, and put out fires yourself, you are proving how valuable an asset you are to your company. Cheating is job security!
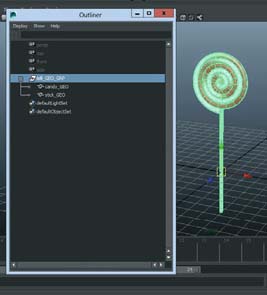
1 Open prop_Start.ma. There is a lollipop sitting lonely in our scene. Start by selecting all of the geometry and hitting Ctrl+g to group it. Name this new group “lolli_GEO_GRP”.
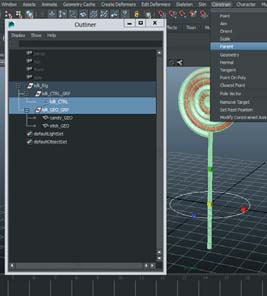
4 We want the circle to control the geometry, but we are going to constrain the group. Press F2 to change to the Animation menu set. Select the circle, ![]()
![]() “lolli_ GEO_GRP” in the Outliner, and click on Constrain>Parent.
“lolli_ GEO_GRP” in the Outliner, and click on Constrain>Parent.
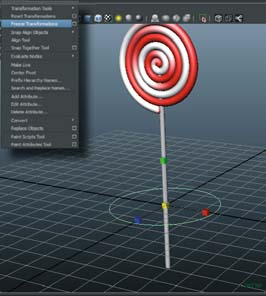
2 Now create a Nurbs circle at the origin. Rename the circle “lolli_CTRL”, and when you are done scaling it to an appropriate size, click on Modify>Freeze Transformations.

3 Group this circle as well and name it “lolli_CTRL_GRP”. Select this new group and the lolli_GEO_GRP and group them once again. Call this group “lolli_Rig”.

5 You are done! Select the control and move and rotate the lollipop around. You may even want to test the feature of the geometry group by dropping some geo into that group and watching how the controller still moves the objects inside. This is great for when you need to update the geometry of a prop that is referenced into many scenes.

prop_Start.ma
prop_Finish.ma
HOT TIP
In general, you want to use the scale of the controller only if it is animated. The overall scale of the prop (sizing the prop relative to the scene) should be done using the rig group, not the controller.
Listen Closely
How to REALLY Break Down Your Dialog
by Kenny Roy
IN ORDER TO GET ALL OF THE NECESSARY INFORMATION from a piece of dialog, you need to listen closely. VERY closely. Now even closer still. you are probably already breaking down your audio files phonetically, and making notes on the inflection and intonation, but you are missing a lot of the magic in the noise…
Have you noticed that some animation just really seems to “nail” the dialog? that's because the animator is picking up on a myriad of other things in the sound file that go unnoticed to the novice animator. While they are nearly impossible to point out, combined these little nuances really bring the audience into the scene. here's how to find them.
First, listen for the “anchors”. anchors are what I like to call all of the NON¬VERBAL sounds that the character is making. these could be breaths, pauses, stutters, mutterings, lip smackings, breathing sounds, puff sounds, teeth clicking, tongue snapping, interrupted words, repetition, grunting, growling, harsh delivery or odd emphasis in the middle of a word, a rasp in the voice, loss of air or voice cutting out, and many, many more. these non-verbal sounds, when animated correctly, really “anchor” the character into the scene, which is why I like to call them that name. It solidifies the character by making them seem like they truly are breathing the air in the scene, and creating noises with their bodies. Without anchors, characters seem to be opening their mouths only to let us hear a radio that is playing sound in their bellies. If you can get the audience to feel like the character is actually creating all of the sounds that we pick up on subconsciously, then your engagement of their attention will be far greater. they will be far more immersed in the scene. anchors have the power to do that. the trick is to animate these anchors much too large for the sound they create, and then tone it down. don't try to be subtle with it; create an exaggerated movement to explain an anchor, then go back into the right size.
Next, listen closely next for the ENERGY of a piece of dialog. the energy will clue you in as to where in your shot you need to rely on subtle movements, and where you should have broader gestures. the energy might not necessarily be expressed in volume, but it might be hidden within the anchors. a waviness in the voice might actually be a result of a character starting to get so angry that their body starts shaking. a character's voice cutting out suddenly could actually be a result of them losing the energy they need to go on and stopping short in exasperation. and the voice crack of a boy in his teen years might make us chuckle, but imagine what his energy would do after that happens. the embarrassment he might feel could lead the energy of the scene to do some interesting things. When you have listened very closely for the cues in energy shifts, you can combine that with the anchors and get some very engaging results.
Last, listen for body movement. you don't want to necessarily get caught in the trap of having to “explain” every single little sound of cloth and feet moving, but if you miss a step (pun intended) you will immediately pull your audience out of the scene. Listening very closely to the movement of the character will give you cues as to how the character needs to be posed. that is, some performances just aren't possible sitting down. Other performances would seem forced if delivered by a standing character. all humans are very adept at piecing together the posture of a character from the sound of the voice. It's built into our dNa to pick up on ultra-subtle cues. things like how much the voice sounds like it is coming from the nasal cavity or deep in the back of the throat can lead us to conclude the character is either standing, or curled into a ball on the ground. a slight muffling of the voice at points in the audio could be explained by a character who is holding their head in their hands, and as the palms cover the mouth briefly, the sound changes. the real point is that animators rarely take all of these clues into consideration and their animation lacks for it.
so first, find literally ALL the sounds the character is making, purposefully or not. If you haven't been adding them before, this first step will add the most to your scenes for the least amount of work. Next, find the energy of the scene in the audio and let the energy dictate some of your animation choices like broadness of movement, and strength of pose. Last, listen even closer to see if you can discern the extremely subtle hints of body position and posture. the audience can detect when you are stretching the character past what the performance can sustain. Implement these three new steps in your audio workflow and see if you are able to get that subtle, hard-to-pinpoint magic that some of the best scenes have.

