
Techniques
FOR EVERY ANIMATOR there are a variety of techniques that are used throughout the animation process. As you develop your skills, a portfolio of mantras that you call upon regularly will also develop: your kung fu, so to speak.
This chapter contains a wide selection of very useful tools and techniques for animating. While creating a piece of animation, you may call upon some of these techniques dozens of times, others only once, but all of them will make a regular appearance in any animator's workflow. Prepare, grasshopper, for efficiency lies within…
Auto Key
HAVING TO PRESS THE ![]() KEY incessantly while animating does two things: gets tedious, and wears out your
KEY incessantly while animating does two things: gets tedious, and wears out your ![]() key. So in the interest of preventing tedium and extending your keyboard's life, let's look at the different ways we can use Maya's Auto Key. This feature eliminates most of your manual keying, and while it's pretty straightforward, it works great with the Hold Current Keys option, which is easy to overlook.
key. So in the interest of preventing tedium and extending your keyboard's life, let's look at the different ways we can use Maya's Auto Key. This feature eliminates most of your manual keying, and while it's pretty straightforward, it works great with the Hold Current Keys option, which is easy to overlook.
1 Open AutoKey.ma. The quickest way to turn Auto Key on or off is the button in the bottom right corner. Make sure it's red to indicate Auto Key is on.

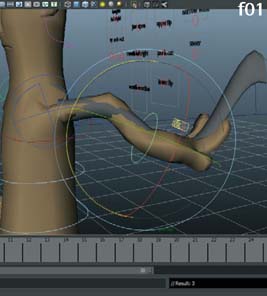
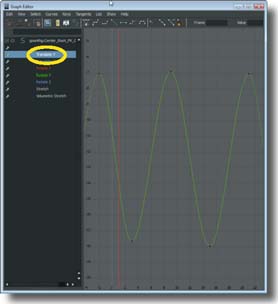
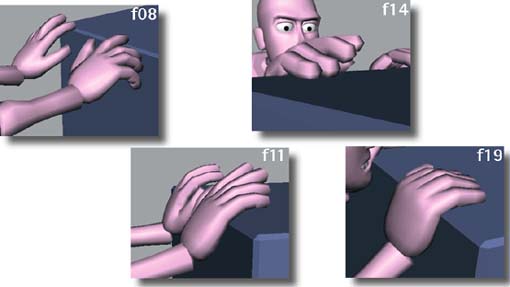
4 Looking at the Graph Editor, we see that there are keys on all the hand attributes at f01, but only on Translate Y at f08.

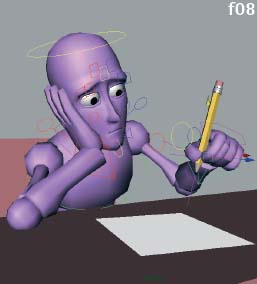
3 Go to f08 and move the hand in Translate Y. Now a key O will be set, but only on Translate Y. By default Auto Key only sets a key on the attributes that are changed, not the entire control.
5 In the channel box, select the last of the attributes on the L hand control, right click and choose Delete Selected to erase all keys on this channel.

6 Move to f14 and go to Animate > Hold Current Keys. When using Auto Key, you may want to keep some attributes unkeyed, yet still set a key on all keyed attributes. Using this menu option will set a key on all keyed attributes of a control, but not on unkeyed ones.

AutoKey. Ma
HOT TIP
You can manually key just the Translate, Rotate, or Scale attributes by pressing ![]() +
+![]() ,
, ![]() +
+![]() , or
, or ![]() +
+![]() , respectively.
, respectively.
Timeline Techniques

THE TIMELINE is the interface element you will use more than any other when animating in Maya. It has a lot of functionality beyond scrubbing, but its simple appearance can hide how powerful it is. There are lots of edits you can do without ever leaving it, from copy and pasting keys, to reordering them or setting tangent types. Even playblasting is readily available. After working through this cheat, you'll have some timeline chops that will serve you as long as you animate.
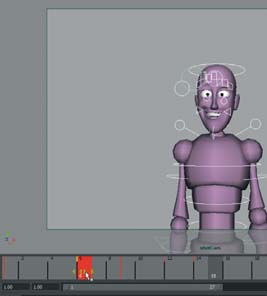
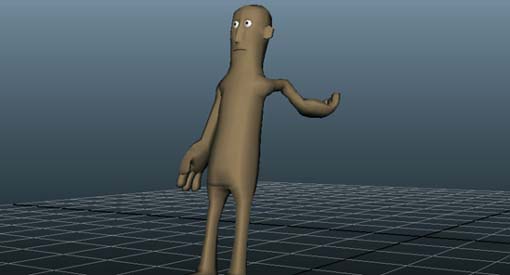
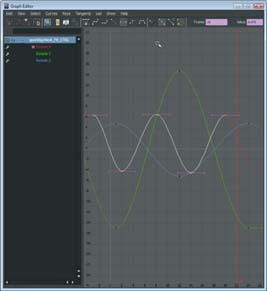
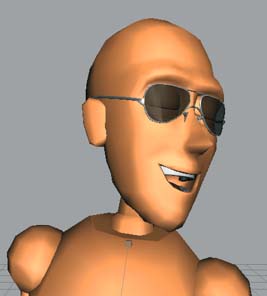
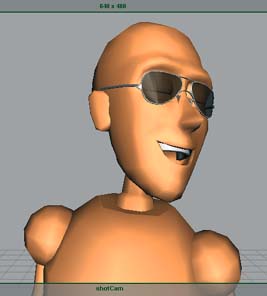
We're going to use a simple animation of the Goon doing a take. We have three basic poses and right now that's all they are: poses that interpolate to each other. Let's use some fancy timeline editing to make it less poses and more animation.
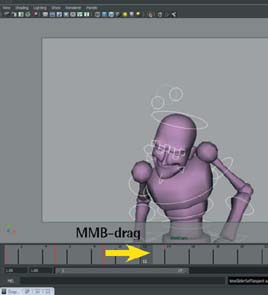
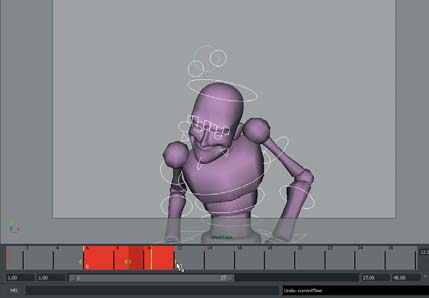
3 Now he doesn't move to the anticipation pose until f05, but he needs to hold there also. MMB-drag from f09 to f 12 and set a key to copy that pose also.
2 In the timeline MMB-drag from f01 to f05. The animation doesn't change like when you scrub. MM dragging holds the frame on wherever you started, so it's a quick way to copy poses. Make sure the tangents are set to Auto, and set a key at f05.
4 It's looking better, but let's make the transition into the anticipation a little snappier, ![]() -click f05 and it will turn red.
-click f05 and it will turn red.
5 Click and drag on the two center arrows to move the key to f06. Now the transition is only three frames, which feels better.
Timeline.ma
Timeline_end.ma
HOT TIP
You can hold down ![]() and drag in the viewport to scrub without being on the timeline.
and drag in the viewport to scrub without being on the timeline.


8 That feels much better, but the scaling has put the key between f11 and fl2, which can make refining more unpredictable and cause motion blur problems. Right click on f11 and choose Snap to snap the key to the closest frame, which puts it back on f11.
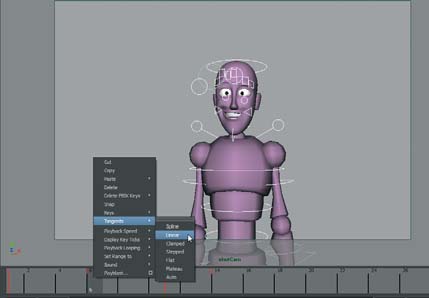
9 The timeline right click menu has many options. You can change the tangents of keys without the Graph Editor, playblast, adjust speed and display options, and more. Use these for speeding up your workflow considerably.
HOT TIP
The timeline is where you can activate sound for dialog animations. Import the sound file through the File menu, then right-click on the timeline and select the sound to activate it during scrubbing and playback.
Cartoony Motion
CARTOONY STYLE IS A VERY DIFFICULT style to attain. Most novices make the mistake of trying to push all of the fundamentals. By exaggerating EVERYTHING, they feel like the animation will automatically become cartoony. This could not be further from the case.
To create cartoony movement, we need to create the IMPRESSION of an exaggerated movement by picking a visual simile. What does that mean? Choose a motion that is realistic, and can be observed in everyday life, and put that motion into your character.
You've seen it all before — a character's head rings LIKE A BELL after he gets punched. A character falls to the ground LIKE A SHEET OF PAPER after he gets flattened. A character's arm wobbles LIKE SPAGHETTI after he gets a shot of Novocain in his arm. All of these examples reference REALISTIC motions that when we put them into the body of our character, become cartoony. You will notice none of these examples mention anything about exaggerating. We're going to be creating the last example of the numb arm in this cheat, using some reference geometry Using reference geometry, we do not have to guess the motion we're trying to get out of the wobbly arm, it's right there in front of us to copy. Use this cheat whenever you need to closely reference any motion for cartoony styled animation.

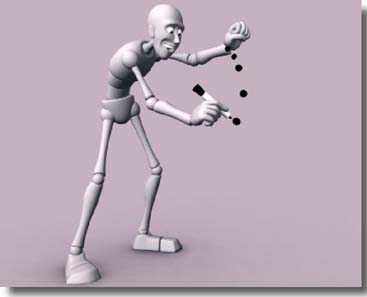
1 Open “cartoony_Start.ma”. We have a character just gliding through the scene. I We can imagine they are running away. We want to give the impression his arm is totally numb, and flopping around like spaghetti. Let's get started.

4 Continue going through the animation on 2's, and then back again on 1 's, until the arm matches the movement of the cylinder in the entire shot.
3 Now that the cylinder is wobbling very Spaghetti-like, let's key our arm to follow it. Grab all of the arm controls and set a key matching the pose on f01.
5 Done! Hide the cylinder and play your animation back and watch the awesome wobbly motion come to life. Remember, we didn't just exaggerate, we used motion inspired by real life. This is how true cartoony action comes to life.
cartoony_Start.ma
cartoony_End.ma
HOT TIP
We used a wave deformer to get this wave action, but there are many different ways to get some awesome cartoony movements, including deformers, dynamics, and even hair and cloth. Think about the IMPRESSION you want to give, and then create some reference geometry that is as easy as copying into your character's body.
Trax Editor
THE TRAX EDITOR, apart from being the best place to import and manipulate audio, was actually built to load animation “clips” onto character sets. This can be very fun and intuitive.
Manipulating clips is kind of like “mixing” animation. You can create a library of clips and mix and match the animation to create entire performances, or perhaps more applicable, multiple permutations of background animation. Imagine how easy it would be to animate a small crowd if you can just drag and drop animation clips onto the characters, mixing in movement into cycles and blending between clips. The Trax Editor does just that.
Some things to know about using clips is that the character sets normally have to be identical, so working with a finished rig is highly recommended. Also, you want to make sure your animation is created to be mixed and matched. Meaning you should be thinking about creating actions that are modular, and/or layered to be used in a non-linear fashion.
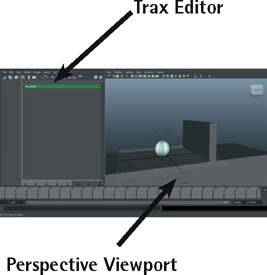
1 Open “trax_Startma” and set up your panels like mine are arranged, with the Trax Editor on the left and persp camera on the right. Just go to Panels> Panel> Trax Editor.
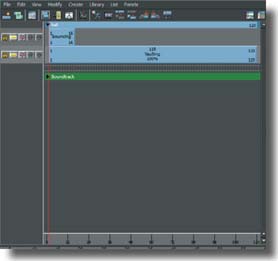
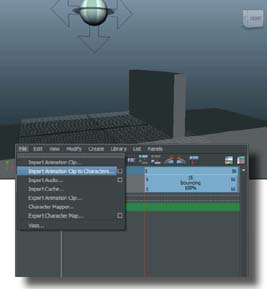
4 Import another clip by going to File>lmport Animation Clip to Characters. Choose “Vaulting_Clip.ma” and it will load into a new track.
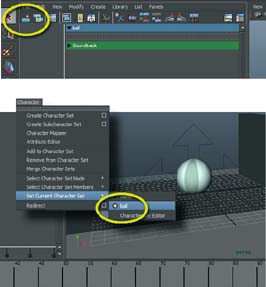
3 Import the first animation clip, (the ball bouncing) by going (in the Trax Editor) to Filolmport Animation Clip to Characters. Choose “Bouncing_Clip.ma” It will load into the Trax Editor and you can find it using the normal camera tools or by hitting ![]() to frame it.
to frame it.
5 Now copy the bouncing clip by selecting it and hitting ![]() +
+![]() Paste it twice by hitting
Paste it twice by hitting ![]() +
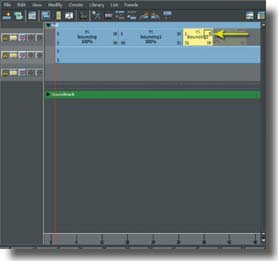
+![]() , and arrange them one after another on the same track. Drag the clip range of the last clip to end on f08 of the clip, by grabbing the top right corner and dragging it left to “8”.
, and arrange them one after another on the same track. Drag the clip range of the last clip to end on f08 of the clip, by grabbing the top right corner and dragging it left to “8”.

6 Finally, drag the “Vaulting_Clip” so that f01 lines up with f08 of the third “Bouncing_Clip”. Play back the animation, and you'll see the ball bounces twice, then lands, and vaults over the wall.
trax_Start.ma
trax_End.ma
HOT TIP
These clips were exported with the animation taking place in “relative” space. This setting means that the position of the controls will start from the end position of the last clip. So, you can have a clip where a character starting at O walks forward 5 units, and then in the next clip he'll automatically walk from 5 to 10.
Copying Curves
COPYING DATA GOES BACK to the earliest functionality of computers, and it is alive and well in computer animation. Maya's curve-copying abilities are rather extensive, and it offers many options for shuffling animation data around to save time and effort. We're going to build on the previous exercise and apply the curves on the character's head to his neck and body to make him much more, well, animated.
As we'll see in this cheat, copying isn't only for putting the same curve on another control. Any attribute's curve can be copied to any other attribute. This is great for taking a curve that is similar in shape to what we want on another control (even if it's a rotate going to a translate, for example) and using it as a starting point. Tweaking a curve can be much faster than positioning the control and setting keys. Faster = good.

1 Open CopyingCurves_start.ma for the completed exercise found in the previous cheat.
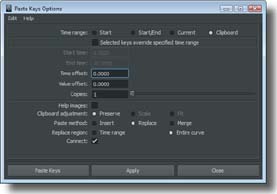
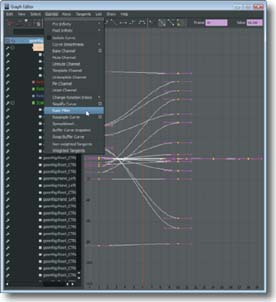
4 Select the neck control. Before we paste these curves, go to Edit > Paste > options box. Set the Time range to “Clipboard” (to use the curves we just copied) and Paste method to “Replace” and Replace region to “Entire curve”. Then press Paste Keys.

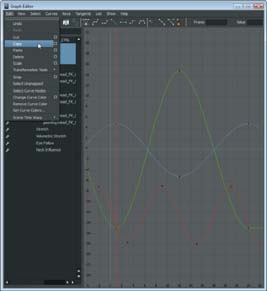
3 Go to Edit > Copy in the Graph Editor menu to copy the curves.

5 The curves will automatically be placed on the same attributes they were copied from if nothing is selected in the Graph Editor. They've been copied to the neck, but now his head is back a bit too far.
6 I moved up the entire Rotate X curve to bring his head forward, then scaled the whole curve down. Now his movement is bigger, but not too much.
CopyingCurves_start.ma
CopyingCurves_end.ma
HOT TIP
This is a perfectly valid method for blocking in simple animations, but works best with things that are short, or loop, such as a dance or other cycle.

8 Select the chest control and set a key at f01. Since we'll be putting the head's Rotate Z on the chest's Rotate Z and Rotate Y, we need to be able to select those attributes in the Graph Editor. Without a key they won't appear.
11 Finally, let's add some bounce on his body. The curve most similar to what we want is the head's Rotate X, so select that attribute on the head and copy the curve.
12 Select the main body control and set a key at f01. Select its Translate Y attribute and paste the curve onto it. He'll move out of frame because of the values, so let's quickly tweak this curve.

10 I shifted both curves one frame earlier for a little offset, and scaled them up. Now his movement is much more energetic.

13 I edited the curve so it starts on f01 and his bounces stay in frame. There are also some differences in the values so everything doesn't feel exactly the same.
14 The animation can be refined a lot from here, including adding some bounce in the shoulders, but now you see how we can quickly get a smooth starting point simply by copying curves and not doing any character positioning.
HOT TIP
Copying curves is a great technique, but it's almost always best for quickly giving you a curve to start refining, rather than a finished result. It can also work well for starting overlapping action on things like tails and floppy ears.
Editable Motion Trails
IN ORDER TO GET APPEALING, polished animation, it's a good idea for the motion to travel in pleasing arcs. After all, it is one of the 12 animation principles! There have been plenty of tools made for Maya to track arcs, but what about fixing them directly in the viewport? Wouldn't that be nice? Or even adjusting your spacing without having to go into the Graph Editor? If only there was a way…
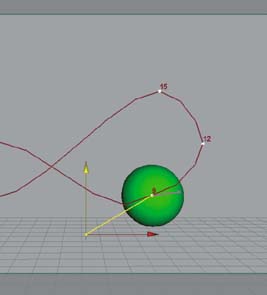
There is. One of the best features in Maya 2014 for tracking and editing arcs (and other things) is the Editable Motion Trail. Not only does it show you the path an object is taking through 3D space, but it also allows you to edit that path directly in the viewport. Needless to say, this has been a feature animators have desired for quite some time, and Maya 2014 makes it a reality.
Editable Motion Trails give you lots of power. They work in conjunction with the other keyframe tools (Graph Editor, Dope Sheet) so anything you edit on them will be reflected everywhere else. You can adjust the path of action, timing, and spacing, as well as add, delete, and move keyframes right on the path. This cheat will give you all the ins and outs of this most welcome addition to Maya's animation toolset.

1 In the project file EditableMotionTrail.ma, double check that your tangents are weighted, and that the tangent type is set to Auto. (See Chapter 2 for more info.) The motion trail's behavior is dictated by what tangent settings are present on the curves. Select the ball and go to Animate > Create Editable Motion Trail.

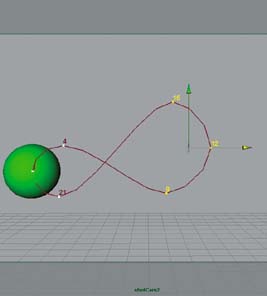
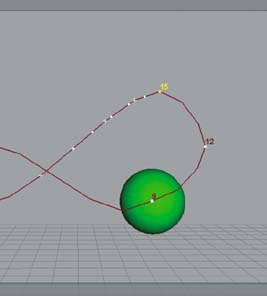
4 Select the move tool ![]() and select the key at f04. Just like moving an animation control, you can move the key in 3D space and adjust the path instantly.
and select the key at f04. Just like moving an animation control, you can move the key in 3D space and adjust the path instantly.

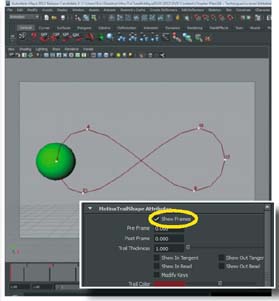
3 The trail shows the path the object takes in 3D space. The white beads show where keyframes exist along the trail. Click the Show Frames box in the Attribute Editor to display the frame number for each key.
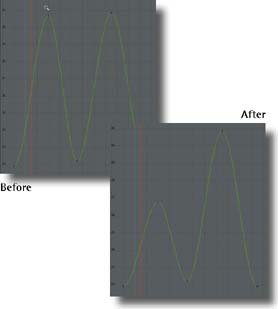
5 Notice the Translate Y curve before and after the change I made in the previous step. Adjusting keys in the motion trail is really just another more visual and natural way of editing the curves.
6 You can select multiple keys and move them just as easily. ![]() -dragging will move the selected keys perpendicular to the viewport (i.e., backwards/forwards), which is great for not having to change cameras to make an edit.
-dragging will move the selected keys perpendicular to the viewport (i.e., backwards/forwards), which is great for not having to change cameras to make an edit.
EditableMotionTrail.ma
HOT TIP
The Trail Color slider is very handy for when you have multiple motion trails happening. Keeping the colors different makes it easier to remember what is what.

8 Marquee select the handle and you can use it to edit thespacing in the motion path, just like in the Graph Editor. Editing handles is easiest when you only use one axis on the manipulator at a time, rather than grabbing them in the middle and dragging all axes freely.

11 Simply clicking and dragging on the beads lets you adjust the spacing. Remember, if you don't see any beads, it's because your tangents on this key are not weighted.

12 Click the Modify Keys box in the Attribute Editor or right click menu. When this is turned on, simply clicking on the trail will add keys, which will use whatever tangents are currently set to default.
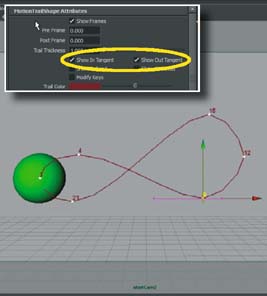
10 Select the key at f 15 and click Show Out Bead in the Attribute Editor or right click menu. Beads representing the in-between keys appear on the trail. Notice that you cannot show both tangents and beads at the same time, as they're really just different representations of the same thing — spacing of the in-betweens.

13 For making quick timing changes with Modify Keys, simply hold S and MM drag keys. You'll see the frame number adjust, as well as marks indicating the current position of the in-between frames. Very nice!
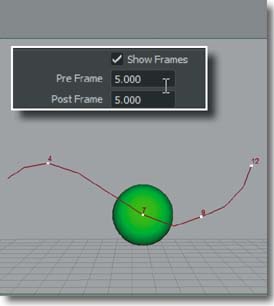
14 In the Attributes, you can enter Pre and Post Frame values. This controls how many frames before and after the current frame to display. This helps if the path crosses over itself multiple times in a small space, which makes the trail hard to read. Setting 0 shows all frames.
HOT TIP
The “Pinned” option means that the trail will stay present all the time. If you turn it off, it will only appear when the object with the trail is selected.
IK and FK
ALMOST ANY RIG that is intended for character animation will have the arms and legs available in two modes, IK (inverse kinematics) and FK (forward kinematics). Many animators have a mode they prefer to use when either is viable, but there will often be times when you have to use a specific mode, at least for part of the animation. If your character is going to plant his hand on something to support his weight or push or pull it, you will have no choice but to use IK arms if you want acceptable results. Switching between the modes can seem tedious at first, but when you understand how switching works, it's really quite simple.
For a quick refresher, FK (forward kinematics) means that the position of the hand (or foot) is dependent upon the joints leading up to it. This is how our bodies work in the real world. To reach up and grab something with your hand, your shoulder must rotate, taking your upper arm with it, which take? your forearm with that, which takes your hand up to the object. You can't raise your hand without at least raising your elbow, and so on. With FK, if you move the character's body, it will move the arm as well. This works well for things like walks and gesturing, but not for pulling or pushing things.
IK (inverse kinematics) is the opposite. The hand is positioned on its own, and Maya figures out where the rest of the arm would be angled based on that. You can think of the hand almost as a separate object that's tethered to the body. If you move the body the hand will stay where it is, making it ideal for pushing or pulling. This way we can work on the body animation without losing the positioning of the hand.

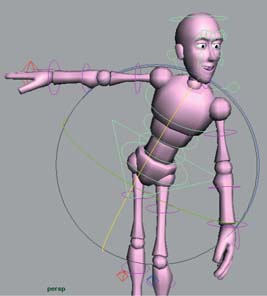
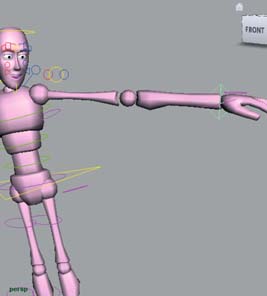
1 Open IK_FK.ma. The left arm is currently in FK. Rotating any of the body controls brings the arm along with it.
4 When Chest Influence is 0, the FK arm will follow with translation of the body, but not rotation. Some animators prefer this because you need to do much less correction on the arms if you change the body.

3 Undo everything and select the hand control. In the channel box is the chest influence attribute. Change it to 0. The arm may jump slightly when you do this, which is normal.

5 Undo everything. Select the hand control and set the IK weight to 1 (100%). The arm will move to the IK contro and is now an IK arm. Move the body and the hand will stay in place no matter what you do.
6 On the IK control, if you set Auto Stretch to 1, the geometry will stretch between the hand and body, rather than separating at the wrist.
IK_FK.ma
HOT TIP
Some rigs have advanced options for IK arms. These hands are in world space, but it's possible to switch that if it's built into the rig. For example, it can have a root space option, which means the IK will move if the root does, but nothing else.
IK/FK Switching
WHEN PLANNING AN ANIMATION, an important step is determining if it's best to use IK, FK, or both at differenl times. When we need to use both, switching between them in a way that's smooth and seamless is the key to quality work. While some animators may dread this element of animating, when you keep in mind how switching works under the hood, it's very straightforward.
The thing to realize is that there are actually two different arms as far as the joints underneath the geometry are concerned. One arm isn't switching between IK and FK modes, we're actually moving the geometry to another joint skeleton. So when you switch from, say, FK to IK, keep in mind that in the frame where IK takes over, the FK arm is still in its last position, following along (albeit invisibly). Remembering that there are two arms at work will make switching more clear in your mind.
While it's possible to blend into the other arm over several frames, I believe it's almost always best to do the switch over a single frame. When you blend, there are frames where the geometry is partially attached to both arms, so both controls affect the geometry to varying degrees. This makes it difficult to be precise in both posing and timing. It can work, of course, but I always prefer complete control at every frame.
Some rigs do have IK/FK snapping, which makes life much easier by automatically lining either arm to the other. Many rigs don't, however, and you just have to pose the switching frame manually, which is how we'll do it here.

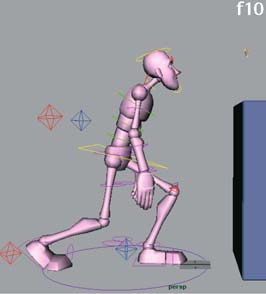
1 Open IKFKswitching_start.ma. There's a simple blocking I animation of the character standing, then stepping to push the box. The arms aren't animated yet and they start in FK.

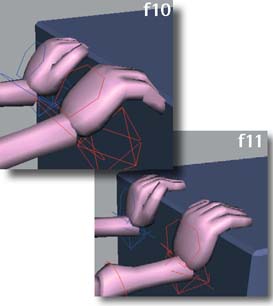
4 At f11, key the IK weight attribute at 1 (for 100% IK). The arms will snap back to where the IK arm skeletons are located.

3 At f10, in the channel box right click and choose Key Selected on the IK weight attribute. This keys it again at 0 so we hold in FK up to f10.

5 At f11, pose the IK hands and fingers on the box. Use the shoulders to help you get a good pose. When doing a switch, it's helpful to first establish the pose you're switching to, rather than basing it off the transition into the pose.
6 At f10, key the FK arms and pose them going into the IK pose. Try to ignore the fingers and just focus on the palm since we'll need to edit them again anyway. It won't be perfect yet, since we'll also have to adjust the IK pose again in a moment, so just get it in the ballpark.
IKFKswitching_start.ma
IKFKswitching_end.ma
HOT TIP
For any kind of IK/FK switching, don't sweat the small stuff until the transition is working. Focus on just the hands and hide or ignore the fingers until the foundation is set.


8 Go back to f11 and pull the IK controls away a bit and rotate them down slightly. Again, focus only on the palm and don't worry about the fingers yet. Make the palms ease in nicely to fl4 to give a feeling of the palms pressing.

10 You probably noticed that once you get the switch frame, the rest is just normal animating except you're switching between two different types of controls.

11 You may or may not have the problem of his arms going crazy during the transition. If so, it's because of gimbal lock, which can happen from time to time.
12 To fix it, select all the FK arm curves in the Graph Editor and use Curves > Euler Filter.

13 Now his arms interpolate to the push pose the way we'd expect and we can continue to refine the animation from there.
HOT TIP
In most FK to IK switches where the hand is planting on something, take care that it just doesn't stick and remain frozen on the object. The hand should feel organic and that the flesh is slightly squishing against it.
Character Sets
DURING PART OR ALL of their animation process, some animators like to use Character Sets, which are basically selection sets you don't need to select to key. They're kind of a legacy feature, as they've been around since the earlier versions of Maya, but a number of animators still find them useful. Personally, I think they work best in situations where you have to do a lot of keyframing on specific channels of a control, such as the fingers, and for that they can be handy. In this cheat we'll look at how to create and edit character sets.
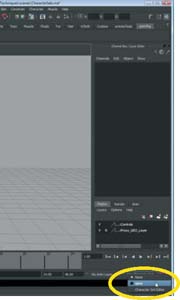
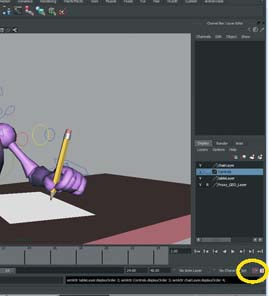
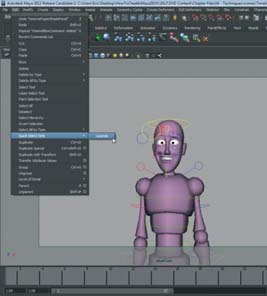
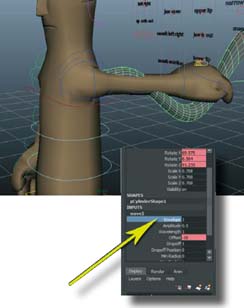
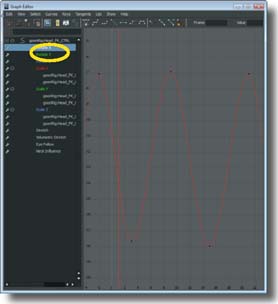
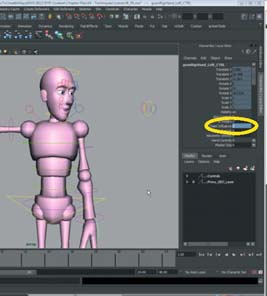
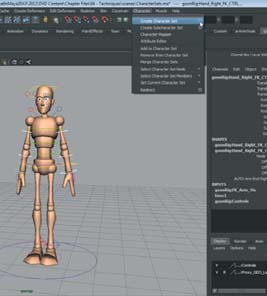
1 Open CharacterSets.ma. The Character Set selection menu is at the bottom right, next to the Auto Key button. Click the arrow next to it and select “spine”.
2 Without selecting anything, press ![]() to set a key. This set contains all the spine controls, so they will automatically be keyed with any key. Notice their channels are yellow, indicating they are connected to a set.
to set a key. This set contains all the spine controls, so they will automatically be keyed with any key. Notice their channels are yellow, indicating they are connected to a set.
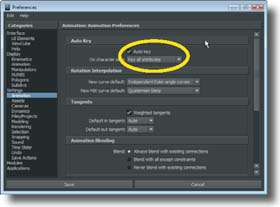
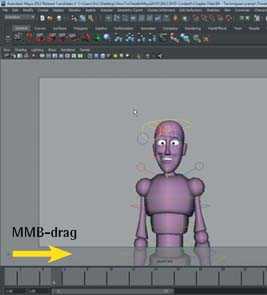
5 With the arms set selected, setting a key will now key all the controls. Open the Animation Preferences and turn on Auto Key if it isn't already. On character sets, set to Key all attributes.
6 Now adjusting any of the arm controls will set a key on all the other arm controls automatically. This can be handy for blocking if you make a set for all controls.
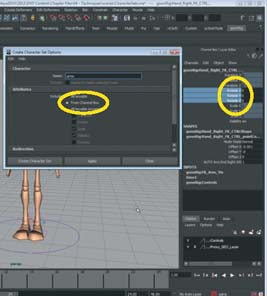
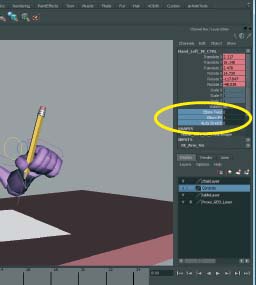
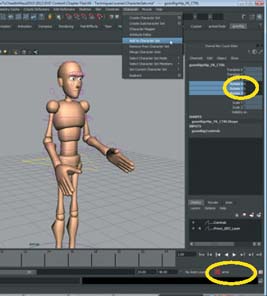
4 In the options, name the set “arms” and select “From Channel Box”. Highlight the rotate XYZ channels in the channel box, and click Create Character Set.
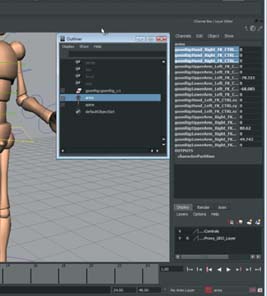
7 To remove attributes, go to Window > Outliner and select the set you want to edit. The attributes will appear in the channel box. Select the attributes you want to remove and go to Character > Remove From Character Set.
8 To add to a character set, have it selected in the list at the bottom, select the objects/attributes you wish to add, and go to Character > Add to Character Set.
Characters ets.ma
HOT TIP
It's best to create character sets before you start animating. If you need to create a set with controls that are already animated, create a new set with nothing selected. Then add the controls/ attributes to the set using Add to Character Set.
Grease Pencil Tool
ONE OF THE MOST VALUABLE and long-sought updates to Maya 2014 is the Grease Pencil tool. In traditional animation, a grease pencil was simply that; a pencil that leaves a greasy or waxy mark on eels or glass. You could make marks on a drawing and rub the mark off easily. Nowadays, CG animators clamor for tools that allow us to more easily access our creativity. Tools like the Grease Pencil that allow our imagination, our off-the-cuff ideas, and our gestures to infiltrate Maya's otherwise stoic Ul.
Many Grease Pencil or Blue Pencil (as it is otherwise known) scripts have existed in Maya for years, but none have the ease of use, functionality, or the advantage of being built in.
It should be noted that you will get very little benefit from the Grease Pencil tool without the use of a pen tablet, tablet PC, tablet monitor like a Wacom Cintiq, or a touchscreen monitor. It is nearly impossible to get any useful gestural strokes from a mouse. I have been a longtime proponent of the use of a pen tablet for general mousing for ergonomics reasons. If you have not made the change yet, perhaps it is time you considered it.
We will be starting very slowly with the Grease Pencil tool by creating some simple poses for a bouncing ball animation using the Grease Pencil. You will see that it is much quicker and easier to draw the frames you want before going into a rig and posing the model or character. Your workflow will improve immensely by having a multi-discipline approach to your animation. Let's get started.
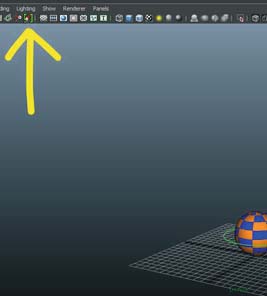
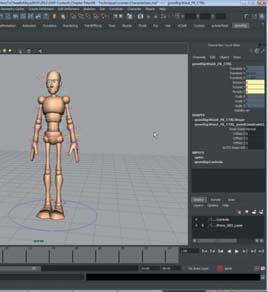
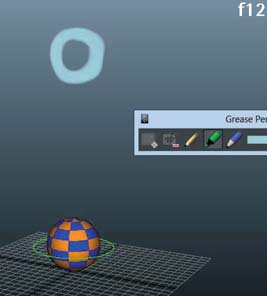
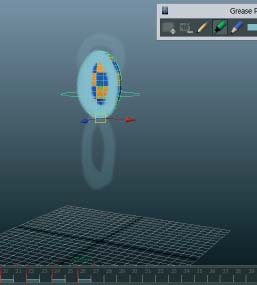
1 Open “grease_Pencil_Start.ma”. You will see there is a bouncing ball rig waiting for you to animate it. Turn on the Grease Pencil tool by clicking the button at the top of the Persp Panel.

4 Advance the timeline to f03 and click Add Frame again on the Grease Pencil tool. On f03, draw the sphere squashed down in anticipation.


3 Switch to the Soft Pencil tool by clicking on it. This style is good for rough drawings. On f01, draw the sphere as it sits on the grid.
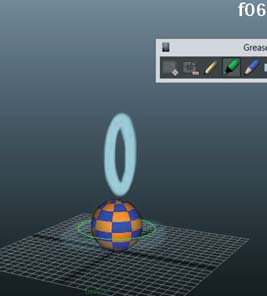
5 On f06, add another frame and draw the sphere stretched out, flying up into the air.
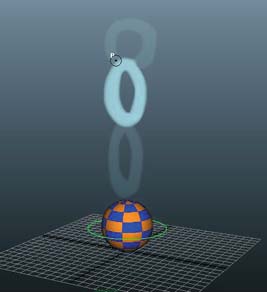
6 On f12, add another Grease Pencil frame and draw the sphere at the top of its arc in the air with no squash and stretch.
grease_Pencil_Start.ma
grease_Pencil_End.ma
HOT TIP
Use a color that contrasts with your scene when using the Grease Pencil. Light blue is default but you normally can't go wrong with yellow.

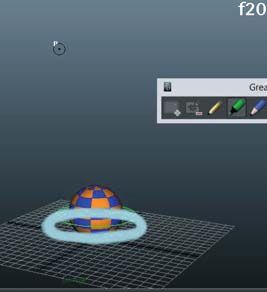
8 On f20, add another frame and draw the sphere flattened on the ground.

11 You can add in-betweens by looking at where the I drawings are using ghosting. Turn on the preframe ghosting and the post frame ghosting by clicking their buttons in the Grease Pencil tool.
12 Add a few in-betweens by moving the timeline to a frame, adding a Grease Pencil frame, and making a drawing that is in-between the two ghost frames that you can see.


10 Finally, on f24, add another frame and draw the W sphere in its resting position. If you make a mistake, you can always use the eraser.
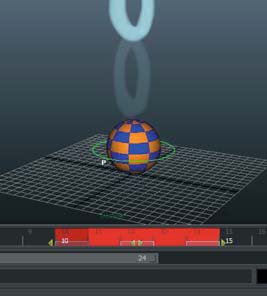
13 Now that you have the hang of it, adjust the timing of this bounce by moving the Grease Pencil keys on the timeline the same way you would with object keyframes. Shift_LMB selects a frame or a frame range, MMB a selected key moves it.
14 Once you are done, simply use the controller on the T sphere to ‘match’ what you have created with the Grease Pencil tool. See how much easier it is to quickly thumbnail the animation than it is to pose the character?
HOT TIP
When using the Grease Pencil tool to create rough posing for characters, remember that the drawings move with the camera. It is a very good idea to have near final camera animation in your scene before starting to use this tool.
Grease Pencil & Trails
As you saw in the last section, the Grease Pencil is great for coming up with pose and timing choices, but it can also be used to determine and refine the arcs in your scene. We are going to use the new Grease Pencil tool in conjunction with Maya's powerful Editable Motion Trails to really hone in on a perfect arc.
Used together, the Grease Pencil and Editable Motion Trails offer you real-time and in-panel feedback on your work. Best of all, your planning stages can seamlessly be integrated into your blocking stage. This creates a much more coherent workflow going from planning to animating.
We are always looking for ways for our planning to help us make decisions deep into the animation process. In other words, we are trying to squeeze as much information out of thumbnails, reference, etc., all in a bid to let these planning materials improve our final animation. By marrying the Grease Pencil and Editable Motion Trails, we are doing just that.
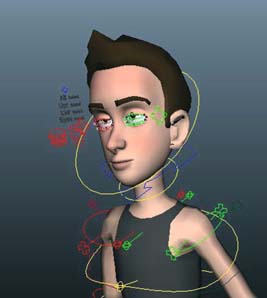
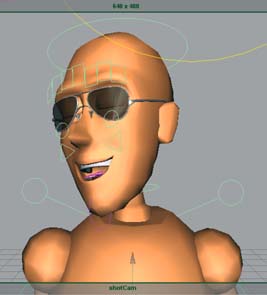
1 Open “grease_Trail_Start.mb”. You will notice a camera framed with a character in a start position.

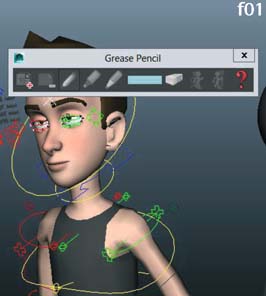
4 If you don't get it at first, erase and redraw. You can undo (![]() key), use the Erase tool, or even delete the frame and add a new frame again. Any method will work.
key), use the Erase tool, or even delete the frame and add a new frame again. Any method will work.
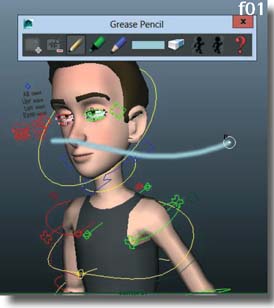
3 In f01, draw a nice arc, starting on Morpheus's nose and tracing a smooth arc to the right.

5 Now create a locator and snap it to Morpheus's nose by holding down the ![]() key as you move it.
key as you move it.
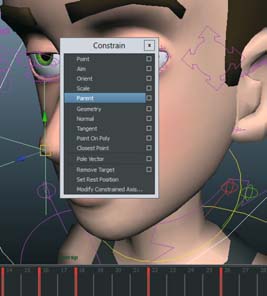
6 Select Morpheus's head control, ![]() select this new locator, and in the Animation menu set (press F2) click on Constrain>Parent.
select this new locator, and in the Animation menu set (press F2) click on Constrain>Parent.
grease_Trail_Start.mb
grease_Trail_End.mb
HOT TIP
The grease pencil brush can be resized by LMB-dragging in panel with the ![]() key pressed, and the opacity is changed by holding the
key pressed, and the opacity is changed by holding the ![]() key down and LMB-dragging. Just like all other brushes in Maya!
key down and LMB-dragging. Just like all other brushes in Maya!

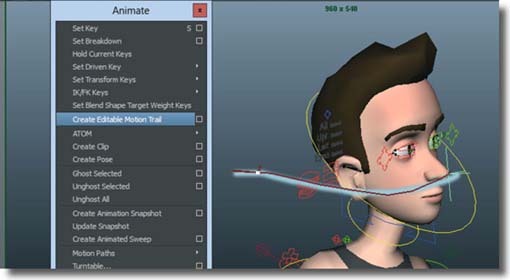
9 Select the locator on the nose and click on Animate>Create Editable Motion Trail.


10 Now adjust the head turn even further to match the arc that you drew in panel. With this new method of arc tracking, your planning will help you LONG into the life of your shot!
HOT TIP
The Editable Motion Trail is a visual guide only in this use; the handles on the Editable Motion Trail will not adjust your head position, only rotating the head will.
All in the Hips
Do They Always Lead the Action?
by Kenny Roy
SIMPLY PUT, YES! But there's more to this story.
This was a question asked of me by a student on my website www.kennyroy.com. When I answered the question I only succeeded in confusing the student even further. In short, I said that when you are planning a character from the very beginning, it can be fun to choose a part of the body that the character “leads” with. This obviously contradicts the edict that the hips lead all actions. I will try to dispel the confusion here.
Let's start at the very beginning with the concept of the hips leading each action. All characters will constantly find balance in their poses and their movements. That is, if they are standing still, their weight is over their hips so that they don't fall over. And if they are in motion, they are extending their legs to catch the ‘controlled fall’, again to keep from face-planting. It just so happens that the biggest weight that we can move to achieve this equilibrium is our entire torso, controlled in major part by our hips. If we are standing still, and want to lift our left leg, we automatically use the muscles in our legs, hips, back, stomach and all stabilizers to shift our weight over the right leg. As the weight comes off the left leg, we are able to lift it. Similarly, if we are starting to walk from a standstill, the muscles of the legs and torso allow the body to lean forward and build momentum. We say that the hips lead the action because, in addition to the muscles making the weight shift prior to a leg being lifted, the hips move to take on the new weight. They are our “gauge” as animators to see where the weight is distributed.
So in short, the answer is yes, the hips always lead the action because we have to change our balance to change our pose or motion; and the hips are constantly shifting to take on the new weight.
However! It is also true what I said to the student before: choosing a part of the body to “lead” the action is a fun way to come up with an interesting character. This is an exercise we would do all the time in Improv class to come up with interesting characters. In fact, why don't you try it right now:
Stand up and take a moment to breathe and relax. Now think of a really nasty villian. Take on a little bit of the physicality of this character, but now choose any part of your body that will “lead” the action. It can be anything. Your elbows, knees, chin, top of your head, even your butt. Now spend a little more time thinking about how this body part is really pulling you through space. Imagine a string is tied to this body part and you are being tugged around by the string. Start pacing around the room with this “body lead” and feel the villian's character take shape. Why does this character move this way? What is the back-story, why did this person become a vi I Ma n ? As you continue to pace around as this vi I Ma n, with a strong body lead, you may notice that you take on an even deeper physicality to your gait. If you chose the chin as the leading body part, then you might actually feel your neck craning to push the chin out further. Your back may become bent and you may take long steps and thrust your chin forward with each step. It's amazing how much physicality can come from a simple body lead. As you continue to explore this character, you will also find that the deeper physical choices are calling for some very strong character choices as well. Test out an action other than walking for this character. Maybe pick up a pencil, look around and make sure nobody is watching, and steal it. Now before we get too carried away, do the action you chose one more time, but slower and paying very close attention to where your weight is. Notice how even though you have a very strong body lead, the weight is always seeking balance. Your hips are also still telegraphing the placement of the weight on your legs.
Alright, we're getting a little carried away. Shake out your arms and legs and relax. Try this exercise with many different body leads. Better yet, try this exercise in front of a full-length mirror, and perform some actions while watching the weight shifts in your body. Watch how the hips are where the “idea” of all the movements in the body really start, but you can still have a strong body lead elsewhere. Record some reference of this new vi Mia n character you've invented. And when you are totally comfortable and sure that you've fully explored this new physicality, animate this character!