

Splines
SPLINE CURVES, or just “splines” (or even just “curves”), are the lifeblood of computer animation. They're a surprisingly efficient and comprehensive method of representing motion. Much of your time animating will be spent perusing these little red, blue, and green intertwined curves, so it makes sense to get comfortable with them. This chapter is all about facilitating your comfort.
Opening the Graph Editor to what looks like a spaghetti dinner gone bad can be intimidating, but we'll make understanding splines a quick study. We'll go through the simple concepts that make reading them easy and powerful. Then we'll try out some cheats on editing splines that will have you wrangling them under control in no time. Get ready to meet your new best friends in animation!
How Splines Work
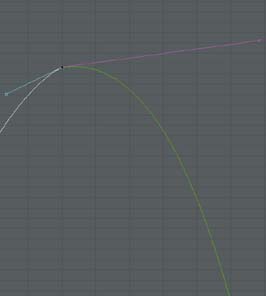
UNDERSTANDING HOW SPLINES display their information is the key to making them work for you. Some beginner animators are intimidated when they see all those intertwined curves, but the concepts behind them are really quite straightforward. It takes a little practice to make it second nature, but only a few moments to really grasp the concepts we'll go over in this cheat. In no time, you will find that they are a surprisingly elegant way of working with your animation, and understanding them thoroughly will quickly create a noticeable improvement in your work. The main idea with splines is that they represent changes in value over time. As the curve travels to the right, frames are ticking by. As the curve raises and lowers, it's an increase (traveling up) or decrease (traveling down) in the value of the attribute. If the curve changes direction, as it does at the middle key in the following diagram, the object it represents will change direction. The thing to remember, and where it's easy to get confused, is that up and down do not

necessarily correspond to up and down for what you are seeing in the viewport. That may seem counterintuitive at first, but it has to do with how the character rig is set up and there are many possible scenarios with that. For some attributes, like Translate Y, the curve will actually look like what the body part is doing, but most don't. The thing to take from this cheat is that up and down are simply changes in value, not a direct visual correlation to what you see in the viewport.

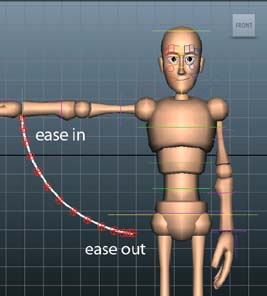
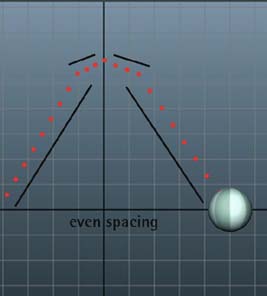
1 Open HowSplinesWork.ma. From f01–f16 the character is raising his arm. Take note of how even the movement is. Every frame, the arm moves the same amount.
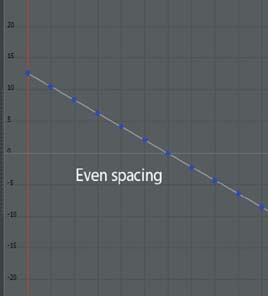
3 If I plot each frame along the curve, we see that they are all equidistant, just like the spacing tracked in the viewport. (Some curve colors in this chapter were changed in Photoshop for better clarity on the page.)
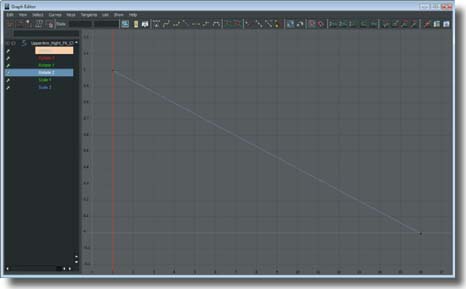

4 Also notice that the curve is traveling downward while his arm is raising. Remember that we said the up/down in curve direction is simply a change in value, not a direct representation of the viewport.

HowSplinesWork. ma
HOT TIP
When you first start working with splines, one of the best things to do is have both a viewport and Graph Editor open. Instead of manipulating the character with the tools or channel box, move the keys in the Graph Editor and observe how it affects the character. Then do the opposite, moving the character in the viewport and observing the changes in the splines. This will help you learn how everything correlates.
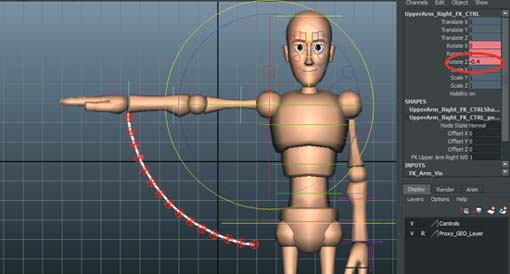
5 Select the upper arm control and rotate it in Z while watching the channel box value. Notice that rotating the arm up makes Rotate Z increase in negative value. This has to do with how this particular character was rigged and is why the curve travels down, since down is an increase in negative value in this case.

8 Continue making adjustments to the keys in the curve and watching the animation until you're comfortable with the concepts. Here I switched the positions of the keys and now he does the opposite motion.


7 Since the curve travels downward a much shorter distance, therefore increasing negative value only a little, his arm now moves up only a short distance. Tracking the motion shows us how much tighter the spacing is.

9 Hold ![]() and MMB click the curve at f08 to insert a key. Select the entire curve and press the flat tangents button. Then use the move tool to MMB drag f08's key down and f16's up to look like above.
and MMB click the curve at f08 to insert a key. Select the entire curve and press the flat tangents button. Then use the move tool to MMB drag f08's key down and f16's up to look like above.
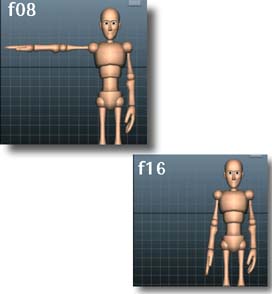
10 From f01–f08 the arm travels up. When the curve changes direction, the arm travels back down.
HOT TIP
Every character can be rigged differently. While rotating this one's arm up in Z increases the negative value of the attribute, another could increase the positive. That's why it's important to get a grasp on up/down simply representing value, not direction.
Splines and Spacing
LET'S TAKE A MORE IN-DEPTH look at how changes in our spline curves affect the spacing of a motion. If the curve's direction over a given range of frames is mainly horizontal, the value is not changing much. Therefore the attribute will be moving very little in the viewport.

If the direction over the frame range is predominantly vertical, a larger change in value is happening and the movement will be large.

Finally, if the curve is perfectly horizontal for a frame range, that curve's attribute will hold perfectly still, as there is no change in value. We'll try some things in this cheat that will make these ideas perfectly clear.
Throughout this cheat, we'll make some pretty stark changes in the speed of the movement while never changing the number of frames (timing) it happens over. Timing and spacing are intertwined, but problems in spacing tend to be less forgiving than the number of frames you're using.

1 Open TimingSpacing.ma. We'll start with the upper arm moving up with linear, even spacing. Open the Graph Editor and select the R upper arm's Rotate Z curve.
3 Play the animation and notice how the movement is much smoother. There is an ease-out when the arm starts moving, and an ease-in to where it stops.

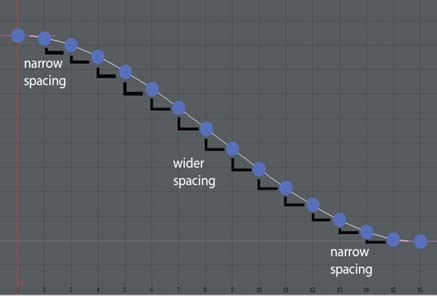
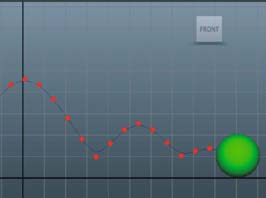
4 Plotting the spacing on the Rotate Z curve shows how the curve's spacing corresponds to what we see in the viewport. The arm moves shorter distances in the beginning and end, and wider in the middle.
TimingSpacing.ma
HOT TIP
To track the spacing of a movement, many animators use dry erase markers right on their monitor. If your monitor is an LCD, put clear plastic over it to protect the screen, and press very gently. CRT monitors should be fine as is since they have glass screens.


6 Use the move tool ![]() and
and ![]() MMB drag the key up so it's a little under the value of the first key.
MMB drag the key up so it's a little under the value of the first key.

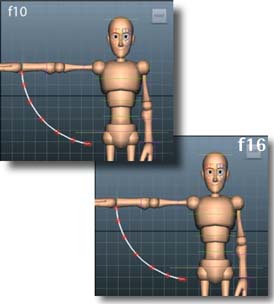
9 Now the opposite happens, where the arm moves quickly at the beginning, and eases in to the end pose more gradually.

10 Select the last key at f16 and look at the value field. In my case it's -0.4.


8 Edit the key at f10 so it's close to the value of the end key.

11 Select the key at f10 and enter the value of f16's key into the field to make it the same. Since we set this key to AutoTangent, it will automatically become flat. This will ensure that the curve holds at the same value through those frames.
12 Now the arm travels with an ease-out and ease-in from f01–f10, but holds still until f16. Since there is no change in the up or down of the curve while the frames tick by, the arm holds still.
HOT TIP
We'll go over spline technique in later cheats, but it's good practice to avoid letting curves drift past the value of a key where it changes direction, like in step 11. Curves that do this are much more trouble to edit predictably.
Tangent Types
TANGENTS AND THE STYLES AVAILABLE in Maya are the other side of understanding splines. If you've used graphics programs like Illustrator, tangents will be familiar to you. They're the handles that exist around a keyframe and are used to adjust the curve's angle and direction before and after the key. As we've just seen in the previous cheats, the curve's slopes have a profound effect on the animation's spacing, so having a solid grasp on how tangents work is invaluable.

Maya has several different tangent types, which are really just preset angles for the handles (albeit useful ones). The handles are completely customizable, and Maya's tangent types are mostly a starting point. Using only the “out of the box” tangent types tends to make the motion look very “CG” and uninteresting. However, knowing which ones will bring you most of the way to your desired result will go a long way towards speeding up your workflow.
Here we'll take a look at Maya's tangent types and what sort of situations they're best for. The icon with the “A” over it is the AutoTangent function, which is a great time saver. This isn't a tangent type per se, it's a setting that will adjust your keys' tangents automatically depending on their location. Keys at the extremes (wherever a change in curve direction happens ) will be flat, while transitional keys (keys where the curve is the same direction on both sides) will be smooth. As you edit the keys, the tangents will automatically orient to whatever situation they're in. Awesome!

1 The tangent type icons are along the top of the Graph Editor. Simply select any or all keys and click whichever type you need. The first icon (with the “A”) will enable the AutoTangent functionality for the selected keys and/or curves.

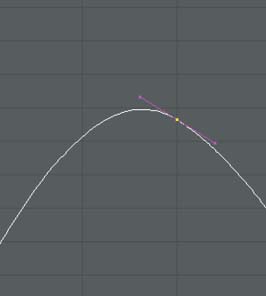
4 Spline tangents will make a smooth transition between keys and don't flatten out. They're great for keys that are transitional (going the same direction each side of the key), but with extremes (keys at which the curve changes direction) they can overshoot, which is difficult to control.
3 Select the ball control (Show > Nurbs Curves in the viewport menu if you don't see it) and open the Graph Editor. Select all the curves and click the spline tangents button. Notice how the ends of the curves become straight.

5 Select all the curves and press the clamped tangents button. Clamped are almost the same as spline tangents, except they will not overshoot on adjacent keys that are the same value or very close in value. Notice that the overshoots from before are now flat.

6 Next press the linear tangents button. Linear tangents simply make a straight line from key to key and therefore make very sharp angles and transitions.
TangentTypes.ma
HOT TIP
Once you're refining an animation, you usually won't use one tangent type for all keys, but rather the appropriate type for the particular keys and situation you're working on.

8 Next are flat tangents, which make a plateau at each key. They're common at the extreme keys, where a curve is changing direction, easing in and out of the key. In transitional keys, they will make the object slow down in mid path.

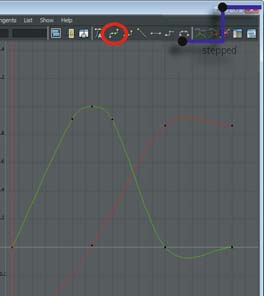
11 We see here that the ball pops to each position when it gets to that frame. Stepped keys are most commonly used for blocking in full animations, and for attributes that need to change over a single frame, like IK/FK switching or visibility.

12 Finally we have plateau tangents, which are almost identical to clamped in that they won't overshoot, and will flatten out extreme keys. The main difference is that they also flatten the start and end of the curve as well.


10 Next are stepped keys, which do not interpolate at all. They will hold still until the next keyframe. Because of this they create these stair-like keys.

13 To recap, here's a chart of some common uses for different tangent types. To reiterate, these are just starting pointsthat may be helpful, and not rules by any means. AutoTangent isn't a tangent type, but rather an automation function. It basically sets keys to spline or flat tangents dynamically as you edit keyframes, depending on the situation. Keys at extremes (where the curve changes direction) are made flat, while transitional keys (where the curve continues in the same direction) are smoothed to a spline tangent.
HOT TIP
Plateau, clamped, or auto tangents are the best all-around choice when you're moving out of stepped blocking into splined curves. They're a great starting point since you don't have to worry about cleaning up overshoots, and manually making transitional keys spline and extreme keys flat.
Tangent Handles
NOW THAT WE HAVE A GOOD UNDERSTANDING of Maya's tangent types, we can look at customizing the handles to create any type of curve we want. Maya's tangent handles offer the ultimate flexibility of any animation/graphics programs, so we should obviously take advantage of this power. Keep thinking about the spacing you want for your animation, then how a spline should look when it has that spacing, and use the handles to make it happen.

There are two types of tangent handles, weighted, and non-weighted. We'll go over them in this cheat, but they're really just styles of working and all up to preference in the end. Everything we talk about here is simply a way to get differing levels of control using the tangent handles. Note that I didn't say more control! Any curve shape you can get using handles you can also get by using more keyframes. At the end of the day, it's up to you and how you like working, so experiment with everything. My philosophy is it's best to get a handle (ahem) on all of the tools available, and then pick the best one for the job at hand.
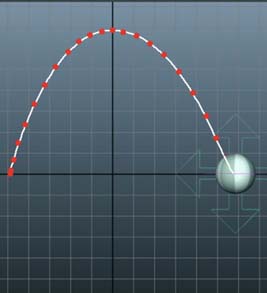
1 Open TangentHandles.ma and you'll find a simple bouncing ball animation. Select the ball control and open the Graph Editor.

4 Select a handle and press the break tangents button. The left handle will turn blue, indicating they are now independent and you can drag select and then move them individually to get any curve shape you want.

3 Select the move tool ![]() and select any handle. MM drag it to rotate it. These handles are unified, which means they are attached and act as a single piece when moving either of them.
and select any handle. MM drag it to rotate it. These handles are unified, which means they are attached and act as a single piece when moving either of them.

5 You can break tangents, position them, and then press the unify tangents button to lock them in that shape. They will then rotate as a single unit again. You may get erratic curve behavior if you do this with a very sharp angle, however.

6 Undo all your edits and select the entire translate Y curve. In the Graph Editor, go to Curves > Weighted Tangents and the handles will change.

TangentHandles.ma
HOT TIP
As powerful as tangent handles can be, they do add another layer of complexity to your spline editing. Don't break handles or free their weights needlessly. Using the simplest solution is always the best.


8 You can break and manipulate the handles just like with non-weighted, but you have an additional option with weighted tangents. Select a key and click the free tangent weight button.
10 You can even break the tangent handles as we did before to create any shape of curve possible.

11 Continue to experiment with the tangent handles and learn how to create the spacing you want using them.

12 Remember that using handles is just another way to approach animating, not something you need to do or should never do (depending on who you talk to). Some animators never use tangents and only set keys, others use broken weighted handles all the time, but many use both methods when necessary. It's up to you in the end, but here are some factors to consider with the various methods. Ultimately, choosing the best approach for the task at hand will ensure that everything stays as simple as possible.
HOT TIP
If you're new to animation, it may be a good idea to hold off on a lot of tangent handle weighting and breaking. Once you learn to control the animation using only keys, it will be much easier to understand what the handles are doing to the spacing.
Spline Technique
YOU NOW HAVE a good grasp on the capabilities splines have and how you can approach using them, so let's go over some things that can tighten up your spline workflow. We're all about making things easier here, and there are a few tendencies splines have which can sabotage that. Having good spline technique means you have control, and that means you're making the animation look the way you want, not the way the computer happens to do it.
As I've said before, none of these things are really rules and there will be situations where actually doing them may be the best approach. But those are the exceptions and for general guidelines, especially if you're still becoming acclimated with splines, this cheat will go a long way towards helping you get ahead.

1 Open SplineTechnique.ma and select the ball's move control. Look at the Translate Y curve at f12. F13 is the extreme key, but the tangents are making f12 a higher value, also known as an overshoot. Use flat or linear tangents at extremes and adjust the eases to what you need.

3 Look at the Translate X curve. Often when setting keys on all controls, we can get a lot of redundant keys. Splining can turn these curves into a wobbly mess. Only use the number of keys you need and make sure the tangents are the way you want them. Too many keys makes changes very difficult. Since this curve should be a smooth translation, we can delete almost all of these keys.

2 At f21, there's another type of overshoot, where the curve was shaped this way purposely with tangent handles. While this may look fine in the viewport, it's definitely not the best way. When the extremes have keys representing them, it makes things clear, easy to edit, and the values can't be changed without us knowing. With any kind of overshoot, moving an adjacent keyframe or handle can change where your extreme is. As much as we all love Maya, we don't want it making these kinds of decisions for us!

4 Look at f24-f28 on the Rotate Z curve. Extreme angles are sometimes necessary, but if you need sharp angles, you're better off using keys rather than handles. Handles change when you shift keys around, but keys will always hold their value. It's good to avoid even 1 frame glitches like f27-f28 that aren't seen in the viewport. Some studios use motion blur that look in between the frames and will give strange results at render time with curves like this. This can actually be used to make motion blur look the way the animator wants, but unless this is intentional, don't do it!
SplineTechnique.ma
HOT TIP
As awesome as the AutoTangent functionality is, don't let it make you lazy! In the end it's still spacing and slow ins/ outs generated by a computer algorithm. It will get your curves closer to what you want with less work, but you still need to maintain control of what the computer is doing. Finely calibrated curves are the mark of a great animator.
Spline Reference
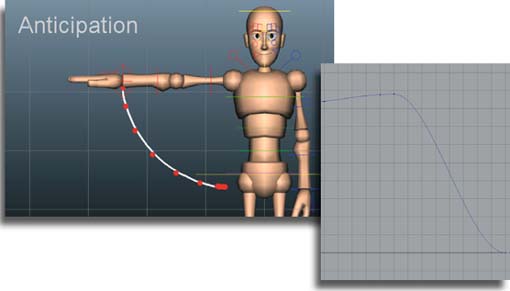
WE'VE SEEN THAT SPLINES are simple tools, yet capable of describing any movement to pinpoint accuracy. It takes some practice to make looking at them second nature, and as you keep animating, you'll get better at reading them. One thing many beginning animators don't realize at first is that reading splines is just recognizing common shapes. An ease-in will always look pretty much the same as far as the general spline shape goes. The size and angle of the shape will simply determine how big (or small) of an ease-in it is. You know when a circle is a circle regardless of how large or small it is. It's really the same idea.
The file for this cheat, SplineReference.ma, contains six spline shape examples that you can use as a reference for common animation spacings. Every 50 frames has a separate animation and description. Move the time range slider to start at frames 1, 50, 100, 150, 200, and 250 to see each one. The upper arm's Rotate Z curve has the animation. Memorizing these shapes will make looking at the Graph Editor an enlightening experience, rather than a puzzling one. Happy wrangling!
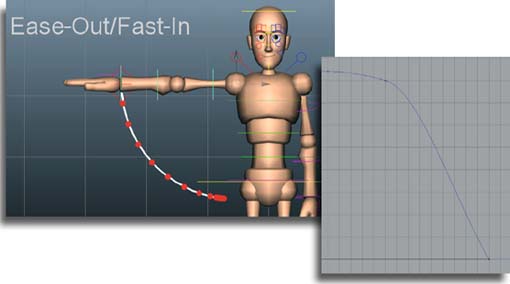
2 f50–f99: Ease Out/Fast In


3 f100–f149: Fast Out/Ease In
SplineReference.ma
HOT TIP
Adding an extra key to shape your ease-outs and ease-ins will really help make them better. Maya's default eases are always the same ratio and tend to feel a bit flat timing-wise.

6 f250–f299: Follow-through

HOT TIP
Linear tangents are a great starting point for any key where an object is hitting another and ricocheting off it, such as when a bouncing ball hits the ground.
If I Had to Start Over
by Kenny Roy
I WAS ASKED ONCE BY A STUDENT OF MINE, “If you had to start over learning animation, what would you do differently?” My answer? “Everything!” Well, of course I would love to have known everything I know now back when I was learning, but where's the fun in that? I would probably try to develop a few more of my outside hobbies and draw more, but there is a single thing that I would change for sure. I thusly changed the question to “If I had to start over learning animation, and you could only change ONE thing about how you learned, what would it be?” The answer is so simple, it might surprise you.
I would do a whole lot LES animation.
Alright, now that doesn't seem right. What the heck does that mean? It means that I, like nearly all animators that came before and who have come after, always took on WAY too much when I was in the middle of learning. If I saw a new tool or learned of a new technique, I would try it out in 300 frame multi-character dialog sequence with multiple camera cuts, and with some special FX and crazy lighting thrown in for good measure. Since I took on EPIC shots while I was still learning, it meant that nearly all of the mini projects I started were never finished. This cycle fosters a dangerous attribute of most young animators; fast blocking but no polishing skills. By year three of my almost five-year self-taught animation training, I could block a scene like lightning, but could not even see the problems that kept my work from achieving a level of finish that I saw in my head. It was frustrating. More importantly, it was avoidable, so this is my advice:
If you are in school, and you get an assignment that has a range of options for you to choose from, DO THE SIMPLEST ONE YOU CAN. For instance, if you are given an assignment that you can animate one or two characters in a simple scene, and the frame range for this assignment is 150-250 frames, then do one character in a 150 frame shot. Seriously. Can you guess why the animator that does LES will actually learn faster? Simply put, the more practice you give your workflow from start to finish, the faster you will become at all stages of a scene's lifespan. Giving yourself assignments that are bite sized means that you will finish everything you start as well, which is a huge motivational boost right when you need it. You'll need plenty of those learning animation.
The students of mine who took on less work would demonstrate a deeper understanding of the concepts, and a greater ease of applying the concepts in their work. Although it may seem like animation is much more subjective than this, it is almost as if it is not the quality of the shots you do as you are learning, but the quantity. One of my illustration teachers used to say that everyone has 10,000 bad drawings “in them”. And the sooner you just get those 10,000 bad drawings out of you, the sooner you will get to the good drawings that are waiting behind the bad ones. In fact, he would just encourage us to draw, even mindlessly. Literally, you don't have to even think about what you are drawing because all that is important is getting that bad drawing “out of you”. It was funny sometimes when he'd pick up a student's artwork, and sometimes say “Oh my god look how bad this is. That is fantastic. It is such good news that now you've gotten that one out of you. Think of how good a drawing there must be waiting behind that one!” We all had a good laugh thinking about the stacks of drawings waiting to just come out…
Here is a list of some good animation tests that are the perfect complexity totackle in your short tests:
A ball bouncing.
A rolling ball.
An obstacle course for your ball.
Adding anticipation and overlap to a ball with a tail.
A flour sack test.
The sack standing and stretching.
The sack trying to jump over a wall.
The sack pulling on a stuck door.
The sack doing a weight shift from one foot to the other.
The sack waking up from sleep.
A person taking out their phone.
A person answering their phone.
A person sneezing.
A person coughing into a hanky.
A person jumping straight up.
A person jumping forward.
A person ducking a swinging object.
A person with a sword swinging it wildly.
A person with a sword stabbing a dummy.
Someone jumping on a trampoline.
A person doing any simple action from any sport.
Kicking a soccer ball.
Shooting a basketball.
Swinging a golf club, etc.
Character interacting with any heavy object (crate, box, barbells,
A character sitting down/standing up.
Someone doing a simple acrobatic (somersault, roll, flip).
Someone checking the time.
Someone being scared by a loud noise.
Someone smelling something awful.
Eating an apple.
Climbing up on a ledge.
Climbing down from a ledge.
Walking on thin ice.
Winning the lottery.
A run cycle.
A walk cycle with character.
Getting hit in various places in the body with a bullet.
Putting on clothes.
Putting away dishes.
Cooking a meal.
Picking up a baby.
Having an uncontrollable itch.
Fending off an attacking bee.
Taking off wet clothes.
Getting into a car.
Brushing your hair.
Brushing your teeth.
Tying your shoes.
Turning a large valve.
Opening the refrigerator.
Passing out.
So to put it simply, if I had to learn animation all over again, I would do a lot more, of a LOT LES. Instead of the crazy, 300-frame dialog sequences with three or four characters, I would do 48–96 tests. A simple turn. A character picking up a ball. A character chuckling to himself. A character pulling out a chair and sitting down. Another shot of a character pushing away his plate, then standing up. All the practice I could get, in huge quantities. I'm confident that I would be able to shave at least HALF of my learning time off if I followed that one simple piece of advice.
Plus, I'd be a lot closer than I am now to getting out those 10,000 bad animations.