
Whenever we visit a home studio, or host a Q&A session somewhere, one question that comes up on a very regular basis is, “what does ‘mastering’ actually do?” The perception of mastering in music production and delivery has actually changed quite significantly over the last couple of decades, and the job itself has evolved with the way music is distributed and the public’s adoption of new ways of listening.
Back when vinyl ruled the earth, the job of the mastering engineer involved equalising tracks recorded at different times to make them sound as though they belonged on the same album, sort out the optimum running order and gaps between tracks, and get the resulting master transferred onto the lacquer. While the first part of the process focuses on the artistic aspects of the album, the latter half is very technical and is about overcoming the limitations of the medium itself. For example, bass sounds had to be moderate in level and in-phase across the two channels of the stereo otherwise the stylus might jump out of the groove, while the amount of top end also had to be controlled carefully taking into account the way the lacquer would ‘relax’ after cutting, losing HF detail. Also, since louder tracks require wider groove spacing, the knock on is a shorter playing time, so the mastering engineer had to strike a critical balance between both technical and artistic issues to arrive at the optimum solution.
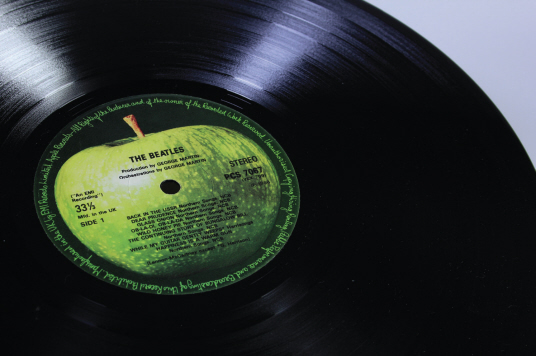
The mastering engineer for a vinyl cut has to strike a balance between technical and artistic issues, juggling loudness, playing time and frequency response to arrive at the optimum solution.
Mastering evolved over the years to develop ways of optimising tracks for radio broadcast, taking into account the effects of FM processing, and as vinyl gave way to CD many of the previous artistic and technical limitations were removed. New stages were introduced into the process, too, such as the need to encode metadata to define track start points (P and Q coding). Working with digital media also made it possible to make everything sound bigger, louder and brighter than was ever possible with vinyl mastering – and so it was, often to considerable excess!
With the rise of downloads and data-reduced digital formats such as MP3, the mastering engineer’s job has again evolved to develop ways of compensating in advance for the effects of ‘lossy’ data-reduction processes. The prevalence of downloads also now means that a lot of people only put individual hit tracks on their personal MP3 players rather than whole albums, and the ubiquitous ‘Shuffle’ mode means album tracks are no longer listened to in any specific order, but mastering is still the stage at which an artist’s material is organised to form a cohesive album and to share a consistent tonal character, as well as sound great when played in isolation.
Frustratingly, many people still seem to think mastering is mainly about making the tracks sound as loud as possible. In reality, mastering engineers need to take care of all of the technical parameters appropriate to every release medium, as well as apply a final polish and gloss to the sources mixes, correcting for deficiencies at the mixing stage, making the different tracks on an album sound consistent in level and tonality, and setting the correct relative levels and gaps.
Although adding a sense of loudness and power is often a legitimate part of the mastering process, we’ve come across many project studio mixes (and some commercial ones) that have had all the life squeezed out of them at the mastering stage in an attempt to make them sound louder than the loudest recordings ever released. Not only is an excessive degree of compression and limiting counterproductive – it actually robs the tracks of punch and dynamic interest – it can also make the tracks so fatiguing to listen to that the listener simply reaches for the volume control to turn it down. If the mastered track’s waveform looks like a freshly mown lawn, we know we have work to do!
The ubiquity of digital formats led to signal levels being peaknormalised in a way that wasn’t possible with analogue media, with hyper-compression being used to squeeze the audio up towards that peak-level ceiling to maximise perceived loudness at the expense of dynamic range. The current fashion for hyper-compressed masters may be about to change, though, with the recent international adoption of loudness-normalisation standards in TV (and shortly radio) broadcasting.
Loudness-normalisation involves the use of new metering systems that measure and quantify the subjective loudness of music rather than just the peak or average levels. Since the absolute levels of different tracks are then matched to give the same subjective loudness regardless of their peak levels, the direct result is that hyper-compression becomes entirely counter-productive and, instead, dynamic range becomes highly desirable once again! Heavily compressed ‘loudness at all costs’ mixes end up having their level reduced automatically to match the loudness level of other material, and that actually makes them sound considerably weaker than mixes that have been mastered to retain more dynamics.
TIP : The ‘Sound Check’ feature in Apple’s iTunes and iPods works in a very similar way to the international loudness metering standards, automatically adjusting the perceived loudness of tracks to about −16dBFS. There is considerable industry pressure to persuade Apple to turn this facility on by default, and if that happens the ‘loudness wars’ will end virtually overnight!
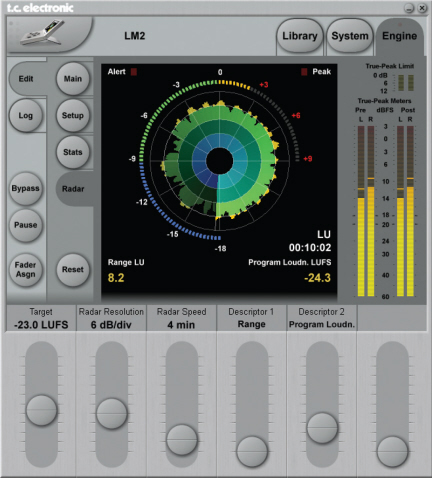
The new loudness-normalisation metering systems measure and quantify the subjective loudness of music, rather than just the peak or average levels, making hyper-compression entirely counter-productive.
Home or Pro Mastering?
It is possible to produce perfectly acceptable mastering results in a home studio provided that you have a reasonably accurate monitoring system, take care over what you are doing, and check your work on as many different speaker systems as possible before signing off on it. While many professional mastering engineers often use exotic analogue equipment to polish the audio, it’s possible to achieve just about any processing function you might require using software – either bespoke mastering software or even the plug-ins that come with your standard DAW.
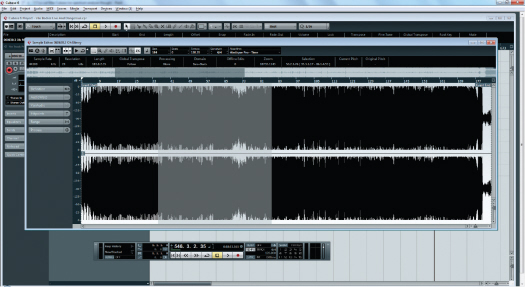
If your mix looks like this before you give it to a mastering engineer, there’s almost nothing he’ll be able to do to rescue it.
We should say at the outset that if you’re planning to have your track or album released commercially, then you are likely to get a better result having it mastered in a reputable commercial facility. After all, they have the best monitors, set up in rooms that have been designed specifically for mastering – and more importantly, they have a lot of experience. It follows therefore that where professional mastering is envisaged you shouldn’t apply your own mastering processes to the finished mix before sending it off. Inappropriate processing is pretty much impossible to undo, and even if you do the job tastefully, the professional mastering engineer almost certainly has better tools and skills to give a more polished-sounding result.
Where a little overall mix bus compression is part of the sound of your mix, though, that should obviously be left in place as the way you balance a song will change depending on the settings of the bus compressor – just remember to mix leaving a little headroom (typically between 3 and 6dB), and don’t apply limiting or any EQ to the overall mix.
TIP : It can help the mastering engineer if you send maybe three different mixes with the vocals sitting at slightly different levels in each, as some types of mastering processing can change the subjective level of the vocals. Send one mix that you think is optimised, and at least two more with, for example, the vocals 1dB higher than your original mix and 1dB lower. Some people even send separate ‘track minus main vocal’ and dry vocal tracks leaving the mastering engineer to balance the vocal as a part of the mastering process (as well as adding suitable compression, EQ and reverb). This feels to us just a bit too much like offloading some of the mix engineer’s most important creative decisions onto the mastering engineer, but this approach might work well in some circumstances if the mastering engineer is up for it!
Evaluation Mastering
Even if you plan to have your material mastered commercially, you may still want to try to set up your own chain of mastering processors just to give you an idea of how your mix might sound alongside commercial records. In this case you’d proceed exactly as if you were mastering the track for real but then switch off the mastering plug-ins before creating the mix that will be sent to the professional mastering house. This is often a useful strategy, as listening to your unmastered mix alongside a commercially mastered record doesn’t really give a true comparison.
The Process
There are several quite simple mastering techniques you can employ to make your mixed tracks sound more polished and cohesive, but the most important tool is the ear of the person doing the job. Listen critically to as much music as you can and try to figure out what techniques were used at the mastering stage. Importantly, start out with fresh ears – don’t try to master a song straight after spending all day mixing it.
After your own ears, the most important requirement is an accurate monitoring environment, which means very good speakers with a reasonable bass response and a neutral tonality. You also need to work in an acoustically treated space as even the best speakers will produce inaccurate results in a bad-sounding room. A good-quality pair of semiopen headphones will enable you to hear problems that your speakers might miss, and as many people now listen to music on ear buds anyway it is useful to check how your mastered mixes sound when auditioned that way.
We’ve come across people trying to mix and master on all kinds of inappropriate speakers, from hi-fi speakers with their tweeters poked in, to PA speakers that they also use for gigs! We can’t stress too highly the importance of accurate monitoring – without it you really have no idea what your music actually sounds like. If you don’t have access to good speakers and a decent room, you’re probably better off doing all your mixing and mastering using good quality headphones – but always check your work on speaker systems elsewhere such as friends’ studios, the car, the kitchen, the hi-fi...
In a typical home studio you’re unlikely to be able to hear any accurate bass below around 60Hz over your monitor speakers, so it is best to avoid applying EQ below that frequency other than to cut unwanted ultra-lows. Headphones can reproduce those low frequencies but in our experience, the subjective level of bass can vary from one listener to another depending on a number of factors, including ear shape and the fit of the headphones. Earbuds vary even more in this respect.
Mastering EQ
Tracks that weren’t all mixed at the same time can sound very different, so you may sometimes need to use a little overall EQ on some tracks to make them sit comfortably alongside each other. Mastering EQ is also used to compensate for any fundamental problems in the spectral balance resulting from shortcomings in the monitoring system used for the mixes, such as an excess of deep bass or a recessed midrange.
When trying to get dissimilar mixes to work together, listen first to the bass end of each song to see how that differs and use the EQ to try to get a similar character and weight of bass. The best approach is usually to apply cut in the areas where sounds are too strong before going on to boost where they’re too weak, but keep any boosting gentle using a low Q (wide bandwidth) and use cut rather than boost when a more radical change is needed. Also, be prepared to remove any spurious low-frequency information below 30Hz or so using an 18dB/octave low-cut filter if your spectrum analyser shows up significant activity in this area. Muddiness and congestion can often be reduced by applying some EQ cut in the lower midrange, between 150Hz and 400Hz, as appropriate.
If you need to add brightness first try a high-frequency shelving equaliser set to between 8 and 10kHz as this can add a little ‘air’ to the sound, opening up the mix without making it sound harsh. Alternatively, you can use a parametric EQ set to a wide bandwidth, centred around 10 or 12kHz.
If the mix fails to respond to one or two decibels of high-frequency boost it might mean that your original mix is actually lacking high-frequency information – in other words, there might be nothing there for the EQ to lift up!

Mastering EQ is usually fairly gentle, but may be required to get dissimilar-sounding tracks to work together, or compensate for any fundamental problems in the spectral balance resulting from shortcomings in the monitoring system used for the mixes.
We tend to consider harmonic enhancer/exciters as something of a last resort, but if applied very sparingly in mastering they can enhance the apparent clarity of a difficult mix. However, it’s very easy to get carried away as we all like things to be louder and brighter, so as a precaution against over-processing your mix keep a CD player patched into your system and make frequent comparisons between your results and a selection of commercial recordings in a similar style. It is all too easy to lose perspective and start adding unnecessary top boost as your ears get used to the sound.
Whereas headroom is vital when tracking and mixing, very little is needed once a track has been mastered, and so it is common to raise the peak signal level as close as possible to digital full-scale as part of the mastering procedure. Often this is done using a process called normalisation (the file is automatically increased in level so the highest sample peak is at, or close to, digital full scale), but this should only be done after all other processing has been completed, otherwise you risk clipping.
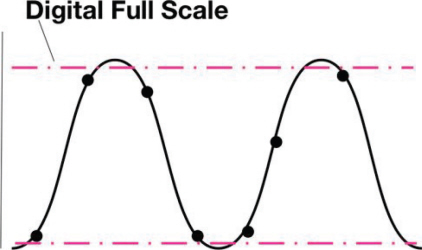
When the audio waveform represented by the samples is reconstructed in the D–A converter, the true peak level can actually end up slightly higher than the sample amplitudes on either side. When reconstructed by the DAC filters, the waveform peaks will be in excess of digital full scale and may suffer clipping within the digital filters.
People find it surprising, but even an EQ cut can actually result in an increased level at another frequency, either because of a resonance peak created by the filter slope, or because you may have cut a frequency that was originally partially cancelling something else. In general, we’d advise that you keep sample peaks below –0.3dBFS, and ideally lower still as sample peaks below full scale can still cause overload distortions in some D–A converters and when converting the file to the MP3 format. The reason for this is a phenomena called ‘inter-sample peaks’ – in essence, when the full audio waveform represented by the samples is reconstructed in the D–A or as part of a complex data-reduction process, the true peak level may well end up slightly higher than the sample amplitudes on either side. In tests, inter-sample peaks have been found as much as 6dB higher than the actual sample values in some circumstances!
The simplest way to adjust the peak level of a track is to place a limiter at the end of the processing chain with its threshold set to around –0.3 to 0.5dB, then adjust the input gain of the limiter so that the appropriate amount of gain reduction is applied to the signal peaks – listening critically and lowering the limiter threshold if you hear any peak distortion.
Mastering Dynamics
Dynamics processors – compressors, limiters, gates, expanders, and similar units – change the level of an audio signal according to its level. To make a track sound louder when it’s already peaking close to digital full scale, you might use a compressor followed by a limiter to bring up the average level without raising the peak level. Using a well-designed limiter, you can often increase the average level by 3–4dB, and sometimes more depending on the style of music, without generating any noticeable side-effects. What actually happens is that the top few decibels of short peaks, such as drum transients, are reduced in level which allows the rest of the audio to be increased in volume by the same amount as has been trimmed off the top. Since these peaks are of very short duration and the amount of gain reduction is fairly modest, the limiting is inaudible and the track sounds louder because the average level is now higher.
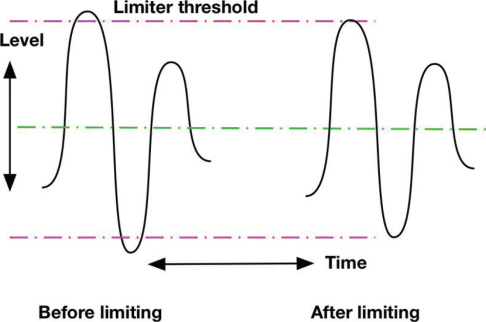
A limiter reduces the level of the top few decibels of short duration peaks, such as drum transients, which allows the rest of the audio to be increased in volume by the same amount as has been trimmed off the top. After limiting the peak doesn't exceed the limiter threshold, but signals below that level are unaffected. Depending on the limiter design, some distortion may be introduced, as the limiter changes the shape of the signal peaks.
Importantly, the amount of limiting that can be applied before the process becomes noticeable often depends on how much dynamic processing has been applied to the various elements of the track previously – particularly the drums – when mixing. If the drums are already heavily compressed and limited, the amount of additional limiting you can apply to the entire mix in mastering may be restricted to just 1 or 2dB before the audio quality becomes too compromised. We’ve come across a scenario in which the initial mix featured compression on individual drums (and often limiting too), with more compression applied via the drum bus and a bus compressor strapped across the whole mix as well. That’s three stages of dynamic processing already, so it’s little wonder that any further processing in mastering has the capacity to achieve the opposite of what’s intended!
Mastering Compression
Using compression on a completed stereo mix can help add energy and even out the differences between the loudest and the quietest parts, making for a more pleasant listening experience in the presence of background noise that might otherwise drown out the quieter passages. Often, though, a compressor will slightly change the apparent balance of a mix, so you may need to use it in combination with a little EQ, placed after the compressor (but before any limiting).
Multi-band compressors were designed to overcome this interaction between the different parts of the audio spectrum that often occurs with conventional, single-band compressors – for example, a high-energy kick drum in a mix can cause very audible gain reduction, taking the rest of the frequency spectrum down every time it hits.
However, most mastering engineers still tend to prefer to use conventional full-band compressors, only resorting to multiband processing to deal with specific problems – for example, a track that becomes aggressively bright only during loud sections can be tamed by setting an upper mid-band compressor to pull down the level of just that part of the spectrum.
Gently Does It
As a rule, very low compressor thresholds used in combination with extremely gentle ratios below 1.5:1 (sometimes as low as 1.1:1) work best for mastering, as this allows an increase in the overall energy of a track and helps to make all the component parts seem better integrated, without making the end result sound obviously processed. With such a low ratio the processing has to start from very low levels, so you’ll need to set the threshold level to something like −35dBFS or lower to achieve the optimum 3 to 6dB of overall gain reduction.
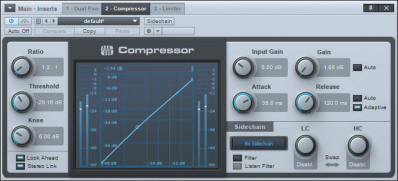
Where compression is used in mastering, it will generally be with a very low ratio, and a very low threshold, so most of the dynamic range will be subject to gentle gain-reduction most of the time.
This is very different from the normal use of compressors when mixing, where you tend to use a higher ratio and higher threshold, so that only the loudest parts of the signal are affected. The low-ratio mastering approach is far more subtle, as it applies a gentle amount of ‘squash’ across most of the dynamic range of the material. The practical outcome is that the track level becomes a little more consistent, with the lowest material lifted gently to increase the overall loudness, but the effect of the processing is very transparent and acts more like sonic ‘glue’ to help the voices and instruments integrate more tightly. If you can hear the compressor working (as opposed to the track just sounding better) you should reduce the ratio or lower the threshold slightly.
It follows from the above descriptions of compression and limiting that if you can apply say 4dB of gain reduction at the compression stage and then another 3dB by limiting the peaks, you’ll have brought the average level of the track up by around 7dB. In other words, it should sound considerably louder than simply normalising your mix. However, half a decibel makes negligible difference to the perceived loudness, so setting your limiter threshold to −0.5dB will avoid clipping problems when creating MP3s of your mix without compromising the apparent loudness to any significant degree.
TIP : The dynamics of a song can change between verses, choruses and solos, so choosing a compressor with an automatic release time setting can help keep the processing sound more natural.
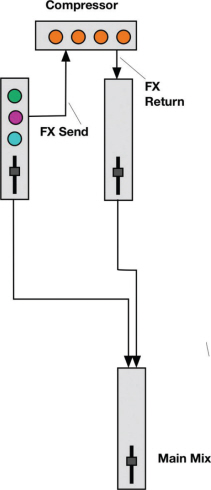
Many books and articles on compression only describe the use of compressors as in-line processes inserted into channel or mix-bus insert points, rather than as part of an aux send/ return loop. In the majority of cases this is exactly what’s necessary to get the desired result, of course, but mixing a ‘dry’, uncompressed signal with a compressed version of itself – referred to as parallel or ‘New York’ compression – can be a powerful tool, both when mixing and mastering.
To understand the fundamental difference in the results produced by these two configurations, you need to think through what a typical insert point, or ‘series-wired’ compressor actually does. Compressors have a threshold level below which no processing takes place and above which gain reduction is applied. This means that only the loudest signals are compressed or reduced in level, and signals that don’t reach the threshold pass through unaltered.
With parallel compression you would typically choose a high ratio (perhaps 6:1 or above), and a low threshold setting so that the gain reduction meter shows maybe 20 to 25dB of gain reduction during the loudest parts. Listening to the output of this compressor in isolation the signal will sound very obviously over-compressed, but don’t be put off! At this stage, you’d normally also adjust the compressor’s release time so that any gain pumping, which now will probably be quite noticeable, reinforces the tempo of the track.
The magic happens when this over-compressed signal is mixed with the ‘dry’, unprocessed signal – transient peaks, such as drum hits, are much louder in the ‘dry’ channel than in the ‘squashed’ channel, and hence the dynamics of the drum hits are barely affected, but when the level of the dry signal falls during the softer parts of the track the output of the compressor is still very strong and so makes a significant contribution to the mixed sound.
The overall effect is a mix that sounds more solid and dense, but without the original dynamics of the drum hits being compromised. If this still seems difficult to get your head around, try visualising a range of mountains; a conventional compressor reduces the height of the peaks above a certain altitude, whereas a parallel compressor leaves the peaks untouched, but fills in the valleys between them.
Parallel compression allows you to raise the average level of your track without the side-effects of attenuating the transient peaks.
Case Study
We were sent a dance mix to master which was generally very well balanced but lacking some of the punch and depth associated with the genre. After trying conventional compression, EQ and limiting we were still dissatisfied with the end result, so instead decide to give parallel compression a try. In no time at all the track was really pumped up, sounding much bigger and stronger, but losing none of its percussive dynamics. Part of the reason this works is that heavy parallel compression has the effect of ‘stretching’ bass and kick sounds by keeping up their levels as they decay. Percussive sounds always appear louder if they are made longer, even though their peak level remains the same.
Editing Tasks
With any tonality and dynamics polishing now taken care of, the next step is to silence any unwanted noise at the beginning and the end of each track, if this hasn’t already been taken care of at the mix. You may also want to fade out the very end of the song so that the last decaying sound ends smoothly in silence, but don’t start the fade until the natural decay of the sound is well under way or track might appear to end too abruptly.
The next task is to sort out the relative levels between concurrent tracks on an album. This will become less of an issue when loudness normalisation becomes the standard way of working, but while we are still tied to peak-normalisation schemes it’s necessary to adjust the relative levels of tracks to create the appropriate listener experience. There’s more to matching the relative levels of tracks on an album than giving every song the same subjective level, too – imagine if a heavy rock band track were to be followed by a track featuring a solo singer with an acoustic guitar with both of them at exactly the same perceived level. There are no rules here – this type of decision usually comes down to ‘does it feel right’? – but, when you are not sure, a useful guideline is to try to keep the perceived loudness of the vocal consistent between tracks.
There’s no point in applying heavy mastering processing to quieter tracks just to achieve more loudness if those tracks are to sit alongside loud songs. All you’d end up doing is reducing the overall level of the quieter songs when you come to build your album playlist. An experienced mastering engineer will anticipate this, and will probably apply less overall compression and limiting to the quieter songs so that their peak levels may still be as high as those of the louder tracks either side, but their subjective level will be lower allowing them to sit more naturally in the running order.
TIP : Ensure your individual track files start with at least 160ms of silence before placing them in a playlist – if you trim them exactly to the start of the audio some CD players may miss the very start of the song if that track is selected directly. Also, the very first track on a CD should have at least one second (and ideally two seconds) at the front to give the CD player’s laser system a chance to settle before the audio starts. These standard PQ offsets are sometimes taken care of automatically in the CD-mastering program.
Final Checks
Some DAWs include comprehensive CD-mastering and disc-burning facilities (like Adobe Audition, Sequoia, and SADiE), or you can use a dedicated audio CD-burning program like Roxio’s Toast. Our preferred option is to use a CD-burning program that can work with 24-bit source files, reducing the word-length and dithering to 16-bit only after all final level changes and fades have been applied. You’ll need to import or arrange the individual 24-bit/44.1kHz, fully-mastered, songs as separate WAV or AIFF files and adjust the gaps and relative levels between tracks as necessary. You are then ready to burn a reference or master production disc.
The CD-burning program must be able to produce a master CD-R disk in ‘disc-at-once’ mode using the ‘Orange Book’ format, as this will then allow correctly formatted ‘Red Book’ discs to be made from it by a disc pressing (replication) plant, or by using CD-R duplication to recordable discs.
TIP : The standard sample rate for mastered audio is 44.1kHz (although there is growing interest in some areas for ‘high resolution files’ with higher sample rates), so if you are mastering for someone else and have been sent files at a sample rate other than 44.1kHz you should convert them before assembling your playlist. We’ve had material sent to us with no project information where the original sample rate was actually 48kHz (the standard when working with audio-for-video), and many systems simply play that back around 10% too slowly and a semitone or so lower in pitch!

For creating your master CD, you’ll need an audio editing program that can work with 24-bit source files, importing the individual fully-mastered songs as separate WAV files, allowing you to adjust the gaps and relative levels between tracks as necessary. This example is Steinberg’s powerful Wavelab program.
Before burning your reference or master CD it is a good idea to listen to the finished playlist all the way through to check that the gaps between tracks feel comfortable. Many CD-burning programs default to a two second track spacing but this can seem too long if the preceding track has a long fade to its final note. This is an artistic choice, though, so just go with what feels right. Once you’ve burned your first CD, don’t make further copies until you’ve played the master on a few different systems to make sure that both your mixes and the CD itself are OK. In particular, check that each track starts cleanly when selected directly, and any CD-text data is reproduced correctly.
By the Book
If the CD is to be used as a master for commercial replication or duplication it will need to be a Red Book-compatible (strictly speaking, Orange Book, as the Red Book standard applies only to the pressed CDs produced from it), PQ-encoded master disk, containing all the necessary track start and pause codes, as well as a table of contents in the form demanded for consumer audio CDs.
A Red Book disc must always be written in ‘disk-at-once’ mode, rather than ‘track-at-once’, to avoid data errors being created between tracks. Always use good quality, branded CD-R blanks for important work and use canned, compressed air (available from photographic suppliers) to blow away any dust before burning. Blank CD-Rs are available in different burn-speed ranges, so make sure that the CD-burner speed set in your software is compatible with both the drive and the disc media. It’s worth experimenting with different discs and burning speeds to see if one combination proves more reliable than others. Check the writing surface (the underside) of the CD-R is spotlessly clean and free from fingerprints or scratches before attempting to write to it, and always hold the blank CD-R it by its edges, before and after burning.
Cheap disks only save a few pence but may not be reliable – many produce high error rates and may have poor long-term storage characteristics. Some Plextor Plexwriter CD-burners available for PCs include bespoke software that allows the disc error rate to be checked, but we aren’t aware of anything similar for Mac platforms.

Use good-quality, branded CD-R blanks for important work and make sure that the CD-burner speed set in your software is compatible with both the drive and the burn-speed range of the disc media.
Always burn two master CD-Rs – ideally using different media – and send both to the pressing plant so that if one is damaged or has an unacceptably high error rate, the other should be usable.
Internet Audio
In addition to making a CD master, you may also wish to prepare versions of your tracks or album for Internet playback or download. The most common audio format for internet use is MP3 because its data-reduction system can shrink the size of the audio file to less than a tenth of the original while retaining reasonable quality (at least when using the less extreme settings). MP3 files can be played back universally using computers and hardware MP3 players or smartphones.
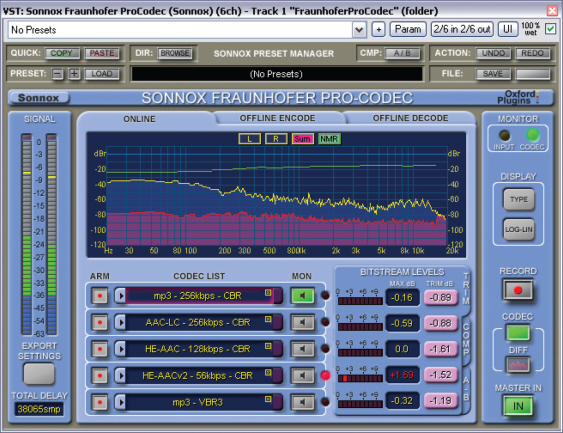
The Fraunhofer Pro-codec plug-in from Sonnox lets you audition the effects of various types and intensities of data compression in real time, which lets you know right away how your carefully mastered audio will sound once set loose in the virtual world.
In our experience, many musicians still don’t appreciate how much the use of heavy data-reduction affects the perceived sonic quality of the music. There are those end-users who will compress everything as much as possible (as this allows more songs to be stored in a given amount of memory), often choosing data rates of less than 96kbps, but in our experience it is best not to compress stereo audio files to less than 192kbps and ideally stick to 256kbps or above if a high subjective quality is to be maintained.