
Our Studio SOS visits don’t just involve improving the acoustic environment of the studio, as we are often also asked to diagnose problems with on-going mix projects. Our popular Mix Rescue column goes into forensic detail on a specific track each month, but there are some basic principles that are worth observing when mixing that we can pass on in this chapter, along with many practical tips and techniques.
Recording and mixing can be difficult for musicians without much studio experience, as the way a song is arranged for recording can be very different from the way it might be treated for a live performance. Commercial recording projects are most often set up with a producer directing the engineer, but in the project-studio world most of us have to double as engineer and producer, and quite often as the performer too. To get a good finished product we need to know a bit about arranging and producing, as well as engineering and performing.
Mixing is a skill that requires experience to develop, so if your first attempts are disappointing, you shouldn’t start to think that maybe you can’t do it – regard them as learning experiences rather than failures. You can learn a great deal about arranging, recording and mixing simply by listening more carefully to your record collection – all the great secrets of music production are there for the taking! As soon as you start to listen analytically, as opposed to just enjoying the music, you’ll start to be able to pick out the different elements and be able to see how they’re balanced and arranged, what effects are being used, and what the tonal qualities of the individual parts are. You can then apply these ideas to your own mixes.

Mixing a multitrack recording requires a unique blend of artistic and technical skills – it’s no surprise that it takes most people some time before they start feeling confident about their abilities.
The key to a good mix is a bit like the key to good cooking – get good ingredients, use the appropriate amounts, and process them correctly. And, as with cooking, too many flavours can confuse and compromise the end product, so question each element of your musical arrangement to ensure that it is there for a specific purpose. The mixing process will be much less challenging if you have managed to keep spill between instruments to a minimum – if you record one instrument at a time, of course, that won’t be a problem – but sometimes spill helps to gel everything together nicely too, so it shouldn’t be seen as necessarily a bad thing! It also helps to have left plenty of headroom while recording each source so that nothing clips if somebody sang or played louder than they did during the sound-check. Any hum or interference problems really should have been dealt with at source, before recording, rather than hoping you can sort it out later. Any instrument rattles, buzzes, humming or distortion (other than by intent, of course) that gets onto your original tracks will be very difficult, and sometimes impossible, to remove during the mix.
TIP : Those brought up on analogue gear often get into the habit of pushing the recording-level meters into the red, as analogue equipment has a big safety margin (headroom) built in above the point where the meters start saying ‘enough’. Digital gear has no built-in headroom, so you have to create your own by leaving space between your loudest recorded peaks and the top of the meter, indicating ‘digital full scale’, usually abbreviated to 0dBFS.

Keep it Clean
When recording audio in a one-room, computer-based studio, it helps to set up the mics as far away from the computer as possible and to use acoustic screening (improvised, if necessary) to further reduce the amount of fan and harddrive noise that reaches the mics. Even when the amount of noise seems quite low, it will become far more obvious if you subsequently apply compression to a track; every decibel of gain reduction you introduce knocks off the same amount from your signal-to-noise ratio. As we explained earlier in the book, compression also makes room colouration – sometimes referred to as ‘room tone’ – more obvious, so minimise this at source using your improvised absorbers as it is virtually impossible to correct or to adequately disguise room resonance in a recorded track after the event.
In the era of tape recording with analogue mixers and hardware outboard the detailed mixing work would only really start when all recording was complete. However, Digital Audio Workstation (DAW) software saves every parameter of your session, and whenever you open the file again it’s back exactly as you left it. Some people therefore like to build up the mix as they record, making incremental tweaks throughout the process until the entire track is finished. With this approach there is no actual ‘mixing stage’ as such, just a continuous process of creation and refinement – by the time you record the last part and apply any processing it requires, the mix is effectively finished. The way a part sounds in a track always depends on what else is playing at the same time, but because each part is heard fully in context as it is added under this scenario, there is perhaps less of a tendency to create parts that don’t fit or that have to be radically processed or re-recorded later.
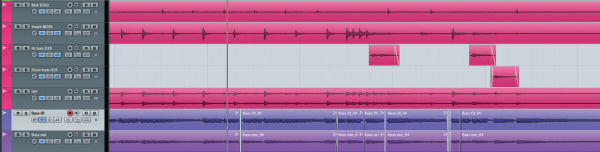
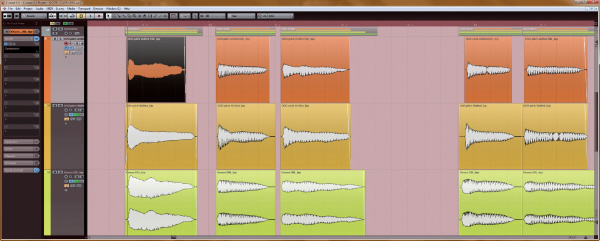
Again, back in the analogue world the studio’s ‘tape op’ would make up a track sheet detailing which instrument was recorded on which track of the tape, along with start and end times. Computer-based DAWs allow you to work without paper (although a notebook is still always valuable), but that doesn’t mean you don’t need to spend some time labelling things. In addition to naming individual source tracks, you may also wish to keep additional notes using the notepad facility of your computer, and maybe even use a digital camera to capture the control settings on any outboard equipment, such as analogue mixers or processors. If you save these files in the same directory or folder as the audio and project files you’ll always know where to find them. In some DAWs you can also assign graphic icons and colours to the tracks to aid navigation around the arrangement page – for example, colour all the vocal tracks yellow, drums brown, all guitars red, keyboards blue, and so on.

TIP : Try to develop a consistent system for labelling projects and versions and use a logical folder system for archiving them. We suggest including the date as part of a file name as the date assigned by the computer may change if you change or update the file.

Working with analogue-tape multitracks, it was always essential to keep an accurate log of where everything was recorded using a track sheet (opposite). On a DAW, you can see which tracks have been used and are far less likely to make a costly error, but it still worth naming tracks, channels and buses as you go along, especially if you never want to have to try rebuilding a corrupted session where all the files are labelled ‘Untitled Audio’...
Preliminary Housekeeping
Before starting the creative part of the mix – what some people might call ‘right-brain’ activity – it helps to get as much of the more technical ‘left-brain’ activity out of the way as possible. A touch of paranoia doesn’t go amiss at this stage, either!

Back up your session data, and then back it up again! Hard drives — even good ones like these — can, and do, fail without warning.
As firm believers that digital informati on doesn’t really exist unless copies are stored in at least three physically separate locations, we urge you to back-up any important projects before you start the mix: hard drives can and do fail, usually when it will cause the most grief! This double back-up approach also enables you to go back to the original files if any destructive waveform edits you perform go wrong. Whether your system is computer-based or a hardware digital recorder you should back-up the files as soon as you can, and update the back-ups regularly as you work through the project. Most computer systems have the ability to allow you to back-up your project using just the specific audio files actually used in the current arrangement, and it makes sense to use this approach to save drive space – there’s little point backing up discarded takes unless you think you might change your mind.
If you’re working on a collaborative project, ensure where possible that you have the uncompressed WAV or AIFF files to work with. MP3s are fine for sending test mixes back and forth, but you should avoid using MP3 audio files as part of a final mix as their quality has already been compromised by the MP3 data reduction process. This may not sound obvious at the time, but your finished mix will inevitably be converted to an MP3 at some point if you want to make it available as a download, and a double dose of MP3 data reduction can have a very noticeable effect on audio quality.
TIP : Don’t rely on backing-up files to a different partition on the same hard drive as you can still lose everything if that drive fails – back-ups must be saved to a physically separate drive. In addition to backing-up to hard-drives, also consider using recordable DVDs, local network storage systems (NAS), or online ‘cloud’ storage. Apple’s Time Machine or one of the Windows automatic backup systems can also save the day when things go badly wrong.
Before starting the mixing process it’s worthwhile going through the individual tracks one at a time, checking for unwanted noises or unintentional audio picked up before the playing starts or after it finishes. Unwanted sounds can be permanently silenced in the waveform editor or turned down using either fader or mute automation. Most of the more sophisticated hardware recorder/workstations include fader and/or mute automation so you can generally do this quite easily. It doesn’t matter how you decide to tidy up any unwanted noises as long as the job gets done, although a non-destructive method, such as fader automation, affords the luxury of undoing any mistakes. It is also common practice to mute audio during sections of the track where the instrument or voice isn’t playing: for example, muting the vocal track during instrumental bridges or solos, or cleaning up spaces in electric guitar tracks, as these are often quite noisy. With live drums we have already recommended (in Chapter Ten) that you mute the tom tracks between hits, and again it is often more reliable to do this manually using fader automation or destructive editing rather than using gates. It may also be beneficial to gate the kick drum to reduce spill and to cut off any excessive ringing – but we are choosing a gate in this instance as a more pragmatic solution since the kick drum is generally playing throughout the track, whereas the toms are employed only sporadically.
Cleaning up your tracks before you start trying to mix them will allow you to concentrate on the creative process, rather than constantly being distracted by the need for remedial action.
You might also want to check and adjust the audio levels of each individual track to make sure nothing was recorded at too low or too high a level. It is usually easiest to mix a song where the individual tracks peak between –18dBFS and –10dBFS as this leaves adequate headroom for the level to rise as the tracks are combined into your final stereo mix, without any significant system noise (assuming your interface is working with 24-bit conversion).
We see many cases where as soon as you start to build the rhythm-section mix it peaks close to (or even above) the maximum full-scale level, which means the output of the mixer will inevitably clip once other tracks are added (if it isn’t clipping already). In theory, the floating-point arithmetic used in typical DAW mixers makes them almost impossible to overload internally, but the output D–A converter will still clip unless you pull down the output fader to reduce the peaks levels at the output below 0dBFS. However, if you have any plug-ins on your master bus, they may still be clipping, even if the output isn’t. All in all, it just makes far more sense to work in the same way as we used to in the analogue domain, with sensible headroom margins. That means moderate source track levels and mix levels well short of digital maximum – and there is no compromise in removing any redundant headroom afterwards in mastering.
If you are recording your source material at 24-bit resolution, there is no advantage to be gained by keeping levels high, in fact you may well be clipping a plug-in somewhere without realising. It makes far more sense to turn up your monitoring, work with plenty of headroom in your software mixer, and make up the final level in the mastering.
Initial Balance
A question we are often asked is how to start balancing a mix. The answer seems to depend on who you talk to! There seem to be two main approaches to getting an initial balance, and the leading engineers and producers we interview seem to be pretty evenly split over which method is best. One method is to start with the rhythm section and then build up the mix one instrument at a time, while the other is to push up all the faders to the unity position and then balance everything in context. Others balance the rhythm section and the vocals (as the two most important elements of the mix) before bringing in the other instruments. In our opinion, for those with less experience, the ‘one section at a time’ option (starting with drums and bass) might be safest.
Buses and Sends
Having worked on a considerable number of Studio SOS and Mix Rescue projects where DAW bussing either wasn’t used at all, or wasn’t used effectively, we thought it might be useful to go over the basics of this relatively straightforward but nevertheless important subject. Routing every source track in your mix directly to the stereo mix-bus makes complex mixes harder to manage, especially if your project contains a large number of source tracks. Effective grouping allows you to control and balance your mix more efficiently using fewer faders.
A related topic, but equally important in mixing, is that of effects buses which are used to allow a single effect plug-in to be shared amongst multiple source tracks. Most DAWs handle bussing in a similar way to their hardware mixer counterparts, so perhaps the place to start is to explain the term ‘bus’. In ‘mixer speak’, a bus is the place to which a number of separate audio signals can be sent to be mixed together – hence the term ‘mix-bus’. In a hardware mixer, a mix-bus usually takes the physical form of a length of electrical conductor running the full width of the mixer, with each channel contributing some of its signal to the bus, as required. Just think of it as being like a river (the mix-bus) with streams feeding into it (the mixer channels or DAW tracks), terminating in an estuary where the river flows into the sea, which is analogous to the output that carries the mixed signal.

Routing logical sub-sections of your mix to buses can make a complex mix containing a large number of source tracks much easier to manage, reducing your final balancing process to just a small number of faders.
In a very simple mono mixer there may only be one mix-bus – the single main output mix – and the channel fader determines the channel’s contribution to the mix bus. In a basic stereo mixer there will be at least two buses, one for the left output mix and one for the right output mix, with the channel fader setting the overall contribution level and the channel pan-pot deciding how much of the signal goes left and how much goes right.
A larger mixer may have more buses than simply the left and right stereo mix. In the hardware world these additional buses are often called ‘sub-groups’ and usually feed separate physical outputs so that you can feed different signals or combinations of signals to a recording device or other destination. A popular mixer format might, for example, be 24:8:2, which means the mixer has 24 input channels, eight sub-group buses, and two main outputs (the stereo mix). The individual channels can usually be routed to any desired combination of the eight groups and stereo main outputs, and the groups themselves can also be routed to the stereo mix bus. For example, if you have ten separate channels of drums you can route them all to a sub-group bus (usually a stereo group bus), and then route the output from that mix-bus into the main stereo mix. The drum signals still get to the stereo mix, but as they now go via a sub-group bus the overall level of the drum mix can be controlled using just the bus fader. The advantage of this approach is that once you’ve balanced the various drum tracks contributing to the sub-group bus, you can then adjust the level of the entire drum kit within the overall song mix using just one fader – and that’s a whole lot easier than having to adjust ten faders while trying to keep their relative levels intact whenever you want to turn the drum kit level up or down!
In the software DAW world it is common to have more mix-buses available than we’ll ever need, and DAW buses can usually be configured for mono, stereo and even multi-channel applications. DAW mix-bus outputs can usually be routed directly to a physical interface output, or into other mix buses including the main stereo mix. On a hardware mixer this would be done using physical routing buttons, but in a DAW it’s usually done via a pull-down menu of possible destinations, and you can think of this almost as setting up a mixer within a mixer.
Using sub-group mix-buses you can set up any number of logical collections of source tracks to allow them to be balanced against other grouped instruments using their respective bus faders. For example, you might put all your drums in one group, all the pad or supporting keyboard parts in another, and all the backing vocals in yet another. Similarly, multiple supporting guitar parts can be sent to their own bus. Main vocals and solo instruments are not normally sent via group buses as these usually require independent control so they can go directly to the main stereo mix bus.
A further advantage of creating sub-groups using bussing is that most DAWs allow you to insert plug-ins into busses, just as you can into channels or into the main mix output. That allows everything sent to one group to be processed together, for example, adding a little overall compression to a multi-layered backing vocal mix to help glue it together, or perhaps some overall EQ to alter the general tonality of the sub-mixed parts.
Auxiliary Sends
Aux sends provide another way of sending signals from a channel to more dedicated mix-buses, and most mixers and DAWs offer the choice of whether the ‘send’ is derived ‘pre-fade’ or ‘post-fade’. As the names suggest, a pre-fade send picks up its signal before the main channel fader, so its level won’t change as you adjust the channel fader. Conversely, a post-fade send is sourced after the channel fader, so as you pull down the channel fader the amount of send signal reduces correspondingly. In a hardware mixer the aux sends usually have a master output level control and appear as a physical output on the connection panel. DAWs are typically more flexible, and these aux or send busses can usually be routed anywhere you like! As with the sub-group buses there is usually a main aux bus level fader so that the overall bus signal level can be changed as necessary.
So, why ‘pre-fade’ and ‘post-fade’? Pre-fade sends, being independent of the channel fader position, are ideal for setting up monitor mixer for the performers. The aux or send bus signal would, in this case, be routed to a physical output on the audio interface (assuming your interface has more than two outputs), and sent from there to a headphone amplifier for the performers to hear the backing tracks. The pre-fade aux send controls in each mixer or DAW channel allows a complete mix to be set up separately from the main stereo mix, allowing different sources to be emphasised or reduced as necessary to help the performer, without upsetting the actual recorded stereo mix. Whereas a small hardware mixer may have only one or two of each kind of send per channel, most DAWs are fairly generous in this area and the number of physical outputs on your audio interface is more likely to set a limit on the number of different monitor or ‘foldback’ mixes you can set up.

Pre-fade sends take their signal from a point before the channel fader and are best used for applications such as monitor feeds – the main mix can then be altered without risk of upsetting the performer(s). Post-fade sends are generally used for effects: with the feed to the effect being taken after the fader, the effect/dry ratio will remain the same, wherever the fader is positioned.
Post-fade sends are usually used to feed effects processors, like reverberation, so that if a source channel is faded out it no longer contributes to the reverb effect. In a hardware mixer the effects units are usually external processors, with the aux send connected to their input(s), and their outputs returned to the stereo mix bus via either dedicated ‘effects return’ channels, or other spare input channels. When using a DAW, the post-fade sends could be routed to physical outputs on the audio interface to feed external signal processors, but most people use software plug-ins to provide the effects instead. A typical scenario might be to use one of the post-fade sends to feed signals from each channel to a bus into which a reverb plug-in (set to 100% wet, 0% dry) has been inserted, with the bus output (which carries just the reverb signal) being routed into the main stereo mix. The various mainstream DAWs handle this kind of application in slightly different ways, but few stray far from the hardware mixer paradigm. Once set up, this arrangement allows the amount of reverb added to each mixer channel to be controlled using each channel’s post-fade send control, and the overall amount of reverb to be set with the bus fader. Obviously each channel will be treated with the same type of reverb – just as each real instrument placed in the same physical recording space will create the same-sounding room reverb – but the amount added to each is fully and independently controllable using the aux sends.
Sends and Groups
A slight complication arises if you set up post-fade sends from channels that are routed through a group bus. This is because the effect level won’t change as you adjust the group fader if the output of the effect process is routed directly to the main stereo bus. If you fade down the group, any send effects associated with contributing channels would remain active, and this isn’t usually what you want! (Although, you can use this to create the odd special effect where the dry signal fades to zero leaving just a ghostly reverb.) Fortunately, though, this problem is easy to remedy because all you need to do is to route the output from the effect bus back into to the same group so that when you fade down the group, the effects go down with it. The only restriction is that you have to make sure that the effects processor or plug-in is only dealing with signals from channels contributing to the same group bus.
Any effects sent from the source channels routed to a bus will not be attenuated when the bus fader is pulled down, thus inadvertently changing the wet/dry balance – if you have enough computer horsepower, you can solve this potential problem by using a dedicated effect with its returns routed to the same bus.

Where you need the same effect to work on other channels outside of that group you will have to copy the plug-in settings and insert another instance of it in a different effects bus wherever else you need it, but with the horsepower of a modern computer that’s rarely a problem.
Grouping the VCA Way
Another way to set up control over specific combinations of channels is to use fader grouping. This is available on some larger analogue and most digital hardware consoles, but is a function that almost all of the mainstream DAWs support. The concept is that instead of routing and physically combining multiple-channel audio signals via a separate mix-bus, the relevant channels are routed directly to the main mix bus, but their faders are linked together to make a ‘virtual group’ so that they all move together . This means that a number of related channels can be controlled as if they were a single entity, with a single fader, but their audio signals don’t have to be combined in an audio sub-group.
Most DAWs work in a way that is roughly equivalent to analogue mixer ‘VCA’ (or digital mixer ‘DCA’) groups, where selected channel faders are linked so that they operate together. The process usually involves assigning the required channel faders to a particular fader group – once linked, the group channel faders will all move together whenever any one of them is adjusted, each changing by the same proportional amount to retain the correct relative balance between member tracks. Multiple fader groups can be set up, although most DAWs don’t allow the same channel to be a member of more than one group – which is just as well as the result could be quite confusing! With VCA-style fader grouping any post-fade send effects will behave normally, changing in level along with the channel fader, as the ‘virtual group’ level is now being controlled by collectively changing the individual track faders directly.
The Art of Mixing
During the initial stages of mixing you shouldn’t need EQ, panning or effects: you just want to get a feel for how all the parts work together, and to listen for conflicting sounds that may be masking other important elements sharing the same frequency range. The lower midrange between 150Hz and 500Hz is particularly prone to this kind of congestion. Once you’ve balanced the drums and brought in the bass guitar, you can proceed to bring up the vocals and other instruments, accepting that you might need to adjust the bass or kick sounds later, as they can sound very different when everything else is playing.
If the original parts are all recorded well your rough initial-level balance should sound pretty good as it is, although drums often tend to need a little EQ as a close-miked drum is not really a natural-sounding source at all! Kick drums often need beefing up a bit too, but may also need some low-mid cut to avoid boxiness. It’s important that the arrangement leaves adequate space for the vocal, either by leaving temporal space between notes and phrases, or by leaving the vocal part of the frequency spectrum relatively uncluttered – or both. This is largely an arrangement issue, although there are some useful techniques we will explore that can help push the vocals to the front if that turns out to be a problem.
Polishing and Shaving
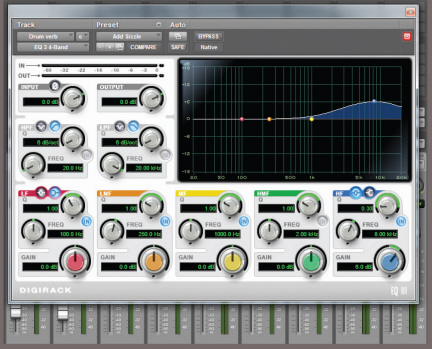
Once you have a workable initial balance you can scrutinise the various parts to see if anything would benefit from adjustment. If supporting parts, such as keyboard pads or acoustic guitars, are clouding the lower midrange, this can be remedied by thinning them out using low-cut EQ set at a slope of 12 or 18dB/octave. You might, in some instances, be able take the filter cut-off frequency as high as 300 or 400Hz, and although this will leave the instrument sounding very thin when heard in isolation, other parts will be providing the necessary low end in the track and in context it will still sound fine – but you’ll now have plenty of spectrum space to work with for the rest of the mix. If you want a part to really sit back in the mix so that it doesn’t fight with the vocals and solo instruments you can also take off a little of the higher frequencies, starting around 10kHz and working down until you achieve the desired effect. You’ll generally want to use a softer, 6dB/octave slope for this.
Vocal Levelling
Vocals usually sit better in a pop or rock mix if they are compressed to some extent, as compressors not only help level out the differences between the loudest and softest sections, but often also add a musically attractive density to the sound that helps push it to the fore. However, if you try to ‘level’ a vocal using only compression, you may find that you have to apply far too much compression to the louder sections to keep them under control, and that excessive compression affects the tonal quality as well as emphasising the background noise and room tone. Indeed, too much compression can undo the thickening effect of appropriate compression and allow the sound to slide back into the mix, rather than standing proud in front of it.
So, where the vocal levels fluctuate excessively – as it often does with less experienced vocalists – you’ll probably find that you get a better-sounding end result if you first use your track level automation to smooth out the worst variations so that the compressor doesn’t have to work quite so hard. However, since fader automation affects the signal after it has passed through any plug-ins in the channel, and we want the level automation to smooth the worst level changes before the compressor, one solution is to send the vocal to a bus and insert the compressor there. Alternatively, you can ‘bounce’ a version of the fader-automation levelled vocal track, and use that one instead in the mix with the compressor now installed back in that (pre-smoothed) channel.
You may also need to automate the overall vocal level throughout the track to help it sit correctly in different parts of the song where the backing level changes – for example, it may need to be a few decibels louder in the choruses if the arrangement gets busier there, or towards the end of the song where the intensity usually builds up.

If you want your vocal levels to remain fairly constant, as in most contemporary productions, it is not a good idea to expect the compressor to do all the work – some pre-levelling with fader automation (remembering to insert the compressor after the fader) will always produce a better result.
When it comes to setting up a compressor for vocals, as a general rule you should adjust the threshold control initially to show about 6dB of gain-reduction, and then listen critically to see if the vocal sounds over-compressed. The action of a compressor depends on the attack and release parameters, the ratio and make-up gain and, most importantly of all, upon the relationship between the threshold control and the level and dynamics of the input signal. There’s nothing wrong with using the presets supplied with plug-in compressors so long as you adjust the threshold (or input level) control to achieve the desired amount of gain reduction. If you don’t, the plug-in probably won’t work in the intended way! This is such an important point to make that we’ve included a section to cover the use of plug-in presets.
Where EQ is needed to hone the tonal quality of a vocal, try to keep it subtle and avoid using narrow-bandwidth (high-Q) boosts, as these nearly always sound coloured and unnatural. A common, nasal kind of harshness can often be located around 1kHz, where a little narrow dip can often sweeten things up. A good rule of thumb is to attenuate elements of the sound that you don’t like rather than boosting those you feel need to stand out more. If the overall sound is too soft and woolly apply some gentle, shelving low-cut, setting the frequency by ear. Sparkle and breathiness can be enhanced using a little HF shelving boost EQ above 8kHz or so.
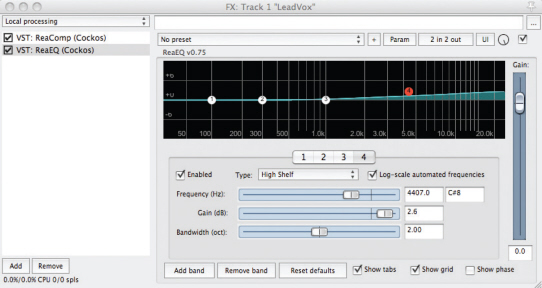
Lifting the whole of the top end with a broad ‘air’ EQ setting will bring out the detail in a vocal, without making it sound harsh.
Plug-In Presets: Good or Bad?
Presets for effects such as reverb, delay, modulation and pitch changers are often very helpful as you can usually find something that sounds good on a subjective level, and if you tweak the factory settings the results are immediately evident. Processing plug-ins, on the other hand, need to be handled with a little more care: as we’ve discovered on numerous Studio SOS visits, problems can and do arise when you start relying on presets for EQ, compression, gating and other ‘processor’ tasks. For example, EQ presets are created with no knowledge of what your original recorded track sounds like, so the parameter settings are based on assumptions that may be way off the mark. Furthermore, plug-ins relating to dynamic processing, such as compression or gating, have to make assumptions about the average and peak levels of the recorded track – and in many cases they’re completely unsuitable without proper adjustment. For example, you may call up a vocal compression preset,
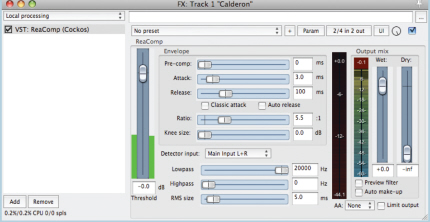
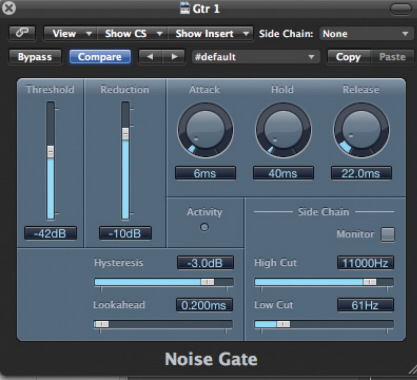
The Threshold setting determines the level at which the compressor will start applying gain reduction – set it too high and the processor won’t actually be doing anything.
but if you’ve left plenty of headroom while recording, as we advised earlier, then the signal level may never get high enough to reach the threshold setting included in that particular preset. We’ve come across exactly this scenario many times where a compressor has been inserted across a track and yet does absolutely nothing because its threshold is set way too high.
The ratio, attack and release times within the preset are fine for the suggested task but you’ll still need to adjust the threshold control to achieve the desired amount of gain reduction. For most tasks, something between 4 and 10dB of gain reduction will do the trick, and there’s invariably a gain reduction meter of some kind to show you what affect the threshold control is having on the amount of gain reduction. Once you get the gain-reduction meter showing between 4 and 10dB on the loudest parts of the track, you should be able to fine tune for the optimum amount by ear.
Exactly the same is true of gates and expanders – you’ll still need to adjust the threshold control to ensure the gate opens in the presence of signal and shuts down during pauses without chopping off any of the wanted sound. It wouldn’t be so bad if this information was made obvious when you open a dynamics processor plug-in preset, but in most cases inexperienced users are given no indication that further adjustment is necessary.

Watch out for software-instrument channel presets that also install a collection of processing plug-ins – not only will this eat up your resources unnecessarily, but also they are extremely unlikely to arrive with the right settings for your mix!
Also be wary of software-instrument channel presets that also install a collection of processing plug-ins, often ending with a reverb. Not only does this reinforce the impression that it is ‘normal’ to use lots of different reverb plug-ins within a mix, the EQ added is often designed to make the instrument stand out and sound impressive… and that’s not always what’s needed.
Case Study – EQ Presets
We helped out a reader who wrote and performed some really good songs that were well played and well arranged, but he freely admitted to knowing a lot less about recording and mixing than playing and performing. Because of this he’d used a lot of plug-in presets, including complete instrument and vocal channel presets comprising multiple plug-ins, and had also used a large number of reverb plug-ins in separate channels rather than setting up just one or two different ones on post-fade aux sends.
We listened to some of his mixes and although they seemed pretty well balanced, they were also very harsh-sounding and consequently fatiguing to listen to. There was obviously far too much upper mid-boost – the area we often associate with presence in the 2 to 4kHz range – across the mix, and when we looked at his plug-in settings the cause was obvious: most of his EQ plugins used presets that boosted in exactly this area. Presets are often designed to make the tracks to which they were applied sound big, bright and up-front. In every mix some sounds really do need to be up front, whilst others need to sit behind them in order to create some front-to-back perspective, but the preset designers can’t know how your song is arranged. So if you call up lots of presets, you may end up with everything trying to sound big and bright, pushing itself to the front of the mix, and resulting in a harsh flat mix as was the case here. Simply bypassing all the EQ plug-ins produced a marked improvement in the general sound of our case-study mix, and we could then show our reader how to apply the appropriate EQ to the appropriate sources for himself.
EQ presets are often designed for maximum presence and punch, which is fine when that’s what you need, but you can’t allow everything in your mix to compete for the same sonic space.
TIP : Even when you use plug-in presets just as a starting point, you still need to learn enough about how that particular plug-in works to be able to make further adjustments, according to the needs of the song. Dynamic plug-ins will almost always need you to adjust the threshold setting, while EQ is always best handled on a bespoke basis.
Panning
Stereo panning is an essential element of contemporary music mixing, as many sources are recorded in mono and then panned to suitable positions in the soundstage to create the impression of a stereo sound stage. In a stereo mix panning can also help to improve the aural separation between sounds, but is best not to rely on this as some people still consume a lot of their music in mono. Some mix engineers actually prefer to get their mixes sounding good in mono first (to make sure that any spectral congestion or masking is dealt with from the start), and only then think about the panning – although this usually means the mix levels need to be tweaked very slightly after panning to compensate for the inherent level changes that are imposed by the panning process (the extent being determined by the ‘pan law’ in use).
The soundstage of a typical pop mix usually approximates the way you might hear the musicians on stage, with the kick drum, snare, bass and lead vocal at the centre and other sources arranged towards the sides. Individual drums are usually panned to sound the correct way around from the audience’s perspective (although some mix engineers prefer a ‘drummer’s perspective), and for most musical genres it is important not to pan things too much, making the drum kit unnaturally wide. Close-miked drums should always be panned to match their subjective positions portrayed in the stereo overhead mics to avoid generating confusing and conflicting stereo image information.
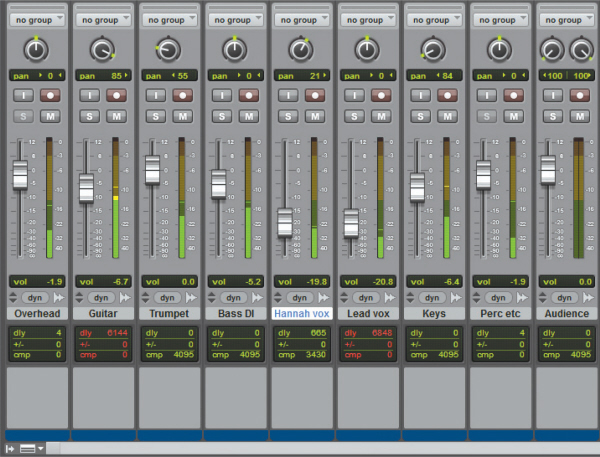
The panned soundstage of a typical pop mix often approximates the way you might see the players line-up on stage, with the kick drum, snare, bass and lead vocal at the centre and guitars and keyboards arranged further out towards the sides. Toms and stereo overheads will be panned out of centre to give the kit some perspective, but this can sound very unnatural if it is overdone.
Backing vocals and other instruments can be panned wherever your artistic aspirations dictate and, as a rule, you should try to create a fairly even balance left to right – but it’s probably wise not to pan any loud, low-frequency instruments too wide. Any instruments producing predominantly low frequencies, in particular the kick drum and bass guitars or synths, are normally panned to the centre so that their energy is shared equally between the two speakers. Stereo reverb effects returns are usually panned hard left and right to create the widest possible sense of space.
Reverb Space
Most reverb plug-ins expect a mono input signal but generate a stereo output. In a real acoustic environment the reverberation arrives at the listener from all directions from the side walls, floor and ceiling equally, regardless of where the original signal source is positioned inside the room. So artificial reverb should be the widest element in the mix, and all the other sound sources should be panned in a less extreme way to replicate being located within the acoustic space, in order to sound natural.
TIP : Adding stereo reverb inevitably ‘dilutes’ the precise positioning of a sound, so where you want to establish a stronger sense of position, try adding a mono reverb to that sound and then pan the reverb to the same position as the dry sound. This is one occasion where dropping a mono reverb plug-in into a track insert point might be the best option.
For instruments that have been recorded in stereo you need to judge that source’s stereo width in the final mix by ear, as much depends on the way the source was miked in the first place. Different stereo mic techniques, and the relative distance between the stereo mic array and the source, will produce different source image widths, but don’t worry if you need to turn the pan-pots inwards to reduce the apparent width (or offset them to one side), if that works better in the context of the complete mix.
Panning Tips
As a general rule, keep the bass instruments, including kick drums, to the centre of the mix so as to spread the load of these high energy sounds over both speakers.
Don’t pan your drum kit too widely. At a typical gig, a physical drum kit probably occupies less than 25% of the width of the stage, so it probably shouldn’t appear to occupy much more than this in your final mix.
Lead vocals are traditionally kept in the centre of the mix too, as they are the focus of the performance. You can be more adventurous with panning when you come to the backing vocals.
When you are deciding where to pan an instrument try to conjure up a mental picture of where that instrument should be on an imaginary stage, then close your eyes and adjust the pan control until the sound is where you want it. Go by your ears, not by the numbers around the pan dial.
Don’t pan stereo mics or the outputs from stereo electronic instruments too widely or they will appear to take up most of the stage. In particular avoid having a stereo piano where all the bass notes are on one side of the mix and all the treble notes on the other.
As a rule, pan the outputs from your stereo reverb unit hard left and right and ensure the reverb decays away evenly, without tending to drift towards one side or the other. Mono reverbs can be used to help focus the position of a sound. Delay outputs can be panned wherever your artistic fancy dictates.
Mix Perspective
If you rely only on panning for positioning sounds within a mix, the result can sound rather flat with all the sounds sitting along an imaginary line drawn between the two speakers. Achieving a sense of front-to-back perspective is also important in giving your mix interest and scale, but there are no dedicated front/back controls in a typical DAW mixer (unless you’re doing a surround mix) and you have to create the illusion of depth using other techniques. We have already pointed out the dangers of trying to optimise each sound in isolation before mixing, and in particular the problems that result from trying to make every track sound as detailed and up-front as possible (especially if you rely on plug-in presets). Everything will be fighting for a place at the front of the mix, leading to a congested and often aggressive sound. The answer is to treat the individual sounds to make the music sound more threedimensional, with key elements at the front and supporting instruments placed further back.
A fundamental rule of acoustics is that the intensity of the reverberation is essentially similar throughout the room, whereas the level of the direct sound from a source diminishes as you move away from it (according to the ‘inverse square law’). That’s why sounds heard from further away within a large space seem to be more reverberant. So in a real space the closer sound sources tend to be heard with less reverb and with a greater emphasis on strong early reflections from nearby hard surfaces, while sounds that are further away tend to comprise a larger percentage of reverberant sound, with the emphasis on the diffuse reverb tail.
Also, closer sound sources tend to be brighter while more distant sounds are heard with less high-frequency energy due to air absorption, and you can exploit these effects to enhance the perspective – for example, sounds that you want to appear at the front of the mix can be kept drier and brighter than those set further back. You can go some way towards mimicking these natural characteristics by setting up a couple of aux sends feeding two different reverb settings, one of which is bright and weighted in favour of the early reflections to create a ‘forward’ sound, and a second that is warmer and more diffuse to create the impression of distance. You can then add these in different proportions to individual tracks to help place them appropriately in the front–back axis. Using an ambience reverb based mainly on strong early reflections helps to reinforce the illusion of closeness, while still adding the necessary ‘ear candy’ to the vocal sound – and if you listen to the more intimate-sounding records you’ll often find that reverb has been used quite sparingly. Conversely, if you want to create a ‘stadium rock’ effect, where the band is supposed to be a fair distance away from the listener, you can use greater amounts of reverb combined with longer reverb pre-delay times (to make the walls appear further away) to help create this illusion.
EQ to Separate
Even though the ‘ideal’ is to try to arrange and record all your source sounds so that the mix sounds almost finished just by balancing the channel faders, you can often bring about a further improvement in a mix by the careful use of EQ. As you add more tracks the mix becomes more crowded and may start to sound congested, especially where the inappropriate choice of sounds or a musical arrangement brings several key parts into conflict. Before reaching for the EQ you should listen critically to the arrangement to see what the various parts are contributing, and consider rearranging them (use different chord inversions or orchestrations, for example) or even removing some parts altogether if they are contributing nothing particularly useful to the overall piece. Other parts can be dropped in level to push them further into the background.
If that approach doesn’t resolve the problem, equalisation gives you the ability to boost or cut the level of some frequency bands so as to change the frequency spectrum of the sound, but you must be aware that an equaliser can only boost frequencies that are actually present in the original sound – EQ is simply frequency-specific gain.
Case Study
We attended one Studio SOS session where the musician was using a default sampler sine wave tone for the melody lead line part but was concerned because he wanted a more ‘edgy’ tonality but couldn’t get it to sound any brighter by using EQ. If you take a pure sine wave tone and try to modify it using EQ you’ll find that it changes in level but not in tonality – and the reason is that a sine wave has no harmonics or overtones. That means that there’s nothing for an equaliser to adjust other than pure volume! EQ only
makes sense on harmonically complex sounds where it can change the balance of the various different frequency components that make up that sound. The only practical way of changing the tonality of a sine-wave bass sound is to process it via a distortion plug-in to add new harmonics which will then respond to EQ.
If you need to brighten a sound that has no natural high end, you could try a harmonic exciter as these actually synthesize new high-frequency components based on what’s happening in the midrange. Provided that you use them in moderation they can actually work very well, and we have found them particularly useful for adding ‘bite’ to dull-sounding snare drums. Similarly, sub-octave plug-ins can be used to add a lower octave to sounds lacking in deep bass, such as weak kick drums.
EQ ‘Bracketing’
EQ can be particularly useful in its role as a mix ‘decongestant’ when used to narrow down the frequency range occupied by certain instruments. Some engineers call this process ‘bracketing’, as it uses EQ roll-off at both frequency extremes to ‘enclose’ the frequency range covered, like brackets around words, and this technique helps reduce the amount by which the spectrum of one sound source overlaps other sounds occupying the same part of the frequency spectrum. For example, many pad sounds are rich in lower midrange frequencies that conflict with the lower end of the male vocal range, while any bright highs may merge with the sound of the guitars or conflict with the vocals. You can often squeeze them into a narrower range, without affecting their role in the track, by using high- and low-pass filters (with 12 or 18dB/octave slopes), or shelving EQ cut at both the high and low ends. Although the EQ’d sound might then seem thin or dull in isolation, you will invariably find that it sits better in the mix. A further benefit of bracketing is that as the mix becomes less congested, you may then be able to further lower the levels of some supporting sounds without them getting lost.
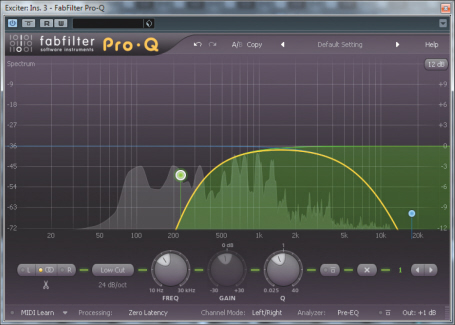
In a busy mix, it can help to narrow down the frequency spectrum of many instruments, thereby reducing their capacity to mask other sources.
An alternative technique is to use a parametric EQ to carve a ‘dip’ in the middle of the spectrum of some sounds to make room for other sounds at a similar frequency. One example of this is using a parametric EQ to place a dip in a bass guitar sound to help keep it separate from the kick drum. You have to find the optimum frequency by ear, but in the case of kick and bass, it’s usually in the 100 to 250Hz range.
It is always a good idea to first try to fix a spectrum congestion problem using EQ cut, reducing the level of what you don’t want, rather than boosting the bit that you want to hear more, especially if you want to achieve a natural sound. The human hearing mechanism seems to take far less notice of EQ cut than it does of boost, especially when the latter is concentrated in a narrow range. Where you do need to use boost EQ, keeping a wide bandwidth (low Q) sounds more natural than boosting a narrow (high Q) region of the spectrum.
Where the sounds are not natural (such as synthesised sounds or electric guitars), more radical EQ solutions may sound perfectly fine, although sticking to the ‘cut first’ rule still often produces the best-sounding results. Since these sources have no natural reference, the only rule is that if it sounds right it is right!
Vocals
In a typical pop song the vocals are usually the most important element, so once you have controlled the level using either compression, automation, or both, you need to move on to the matters of EQ, reverb and possibly delay – the main tools in shaping a pop vocal. If you’ve chosen a suitable mic for your singer you should need very little EQ unless there is something problematic about the voice in the first place. However, here are some strategies that may help you focus your EQ efforts. Even if you’ve recorded your vocal using a good pop shield some air disturbances or mechanical vibrations may still reach the microphone, so placing a steep low-cut filter at the start of your plug-in processing chain can improve things by removing unwanted sub-sonic rubbish that you probably can’t hear, but which will gobble up the headroom and make the speaker cones flap about to no useful effect! If you have a plug-in spectrum analyser it will often reveal unwanted activity in the region below 50Hz. A typical low-cut turnover frequency to employ with a vocal is 80 to 100Hz.
Cutting or boosting in the 2kHz to 5kHz range will allow you to fine-tune the amount of vocal ‘presence’, although adding significant boost here can cause harshness, too. An alternative strategy that avoids the risk of emphasising potentially aggressive presence frequencies is to apply a broad parametric boost at around 12kHz or an HF shelving boost above 8kHz, often known as ‘Air EQ’. Boxiness or any tendency to sound nasal can be improved by applying cuts around 250Hz (boxy) and 1kHz (nasal). You should always try to avoid excessive EQ on a vocal though, as it can all too easily make the voice sound unnatural.
Compression can be applied before or after EQ, but the results will be slightly different depending on the processing order. You get more control if the compressor comes before the equaliser as there is no interaction between the two processes, but putting the EQ first makes the compressor respond more strongly to areas in which you’ve used EQ boost and less strongly in areas where you’ve applied EQ cut. Effectively, the compressor is trying to ‘level’ out any frequency-selective amplitude changes you’ve imposed with the EQ, although in some situations this is what gives the best subjective sound so it’s usually worth trying both options and listening to the difference. However, we’d always advocate putting a low-cut filter before the compressor (or in its side-chain), otherwise there’s a risk that it will react to breath blasts and subsonic rumbles rather than to the actual vocal level.
Backing vocals can also benefit from low-end thinning to stop them fighting for attention with the lead vocal and you may also need to add less ‘air’ EQ so that they sit back a little behind the lead vocal. Other than panning to create the desired stereo image there’s no particular special treatment required for backing vocals, although where there are several layers of the same vocal part it can really help to tighten up the sound if you use your computer’s editing facilities to line up the timing of some of the phrases (unless of course the original timing was spot on), especially where consonants (like ‘S’ and ‘T’) are involved. It often helps to make sure that any audible breaths occur at the same place, too.
Backing vocals that use a lot of overdubbed parts can be difficult for the singer to keep completely tight. You can make a big difference to their impact in the mix with a little trimming and time alignment of the major consonants.
It can sometimes be helpful to have only one backing vocal part pronounce all of the consonants at the start and end of words during recording. If the others are sung to deliberately de-emphasise these you avoid the untidy effect of three or four ‘T’s all turning up at slightly different times. You can also fake this effect using level automation to tail off the beginnings and ends of offending words in all but one of the backing-vocal tracks.
Vocal Reverbs
It’s often a good idea to set up a specific reverb just for your vocals. Convolution reverbs are brilliant for conjuring up the illusion of a real space, but you’ll often find that a good synthetic reverb or plate emulation gives the most flattering vocal effect. Bright reverb sounds are popular on vocals but can also tend to emphasise any sibilance, so you may need to choose a warmer reverb if you detect any problems, or alternatively insert a de-esser plug-in into the reverb send. By de-essing just the reverb input signal, the process is much less obvious than if you de-ess the dry sound. It’s also a good idea to roll off the low end, either from the send or the reverb return, to avoid adding more low-mid congestion and clutter to the mix. Many modern vocal effects use a mix of delay (usually with some high-frequency cut to make the repeats less obvious) combined with a suitable reverb, with pre-delay of between 60 and 120ms.
Automatic Tuning
Where the vocal performance is reasonably well pitched an automatic pitch corrector such as Autotune or one of its equivalents can add that final professional polish, and so long as you don’t set the correction speed too high there will probably be no audible side-effects. The best results are usually be obtained by setting the correction scale to match the notes being sung, rather than using the default chromatic mode, where it will try to correct every note to the nearest semitone, regardless of whether or not it is in the correct scale. If the song contains a key change you can split the vocal onto different tracks and insert a different instance of the pitch-correction plug-in on each track set up with the correct scale notes for each section.
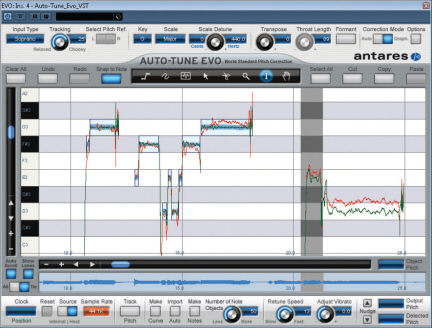
Pitch correction processes like Autotune and Melodyne are fantastically powerful studio tools that can be used for both subtle ‘invisible mending’ and spectacular creative abuse!

TIP : A very convincing doubletracking effect can be created by duplicating a vocal track, delaying it by around 50 to 80ms, and processing it with pitch correction.
If you ‘pitch-correct’ a number of double- or multi-tracked vocal parts, the result can sound somewhat ‘phasy’ as the pitch of each part is now virtually identical. You can avoid this by backing off the pitch-correction speed to different degrees on some of the tracks, or you can apply pitch correction to some layers but not to others. For really serious ‘pitch surgery’ an off-line pitch-editing solution will provide more precise results.
Case Study
We visited one reader who was recording his daughter’s singing over some well-arranged and recorded backing tracks. However, we both felt that the use of Autotune was too evident on the vocals and suggested reducing the correction speed. To our surprise he said he hadn’t used any pitch correction – that was how his daughter naturally sang! We know now that this is by no means an isolated case – it turns out that many young people sing to emulate what they hear on record and that extends to imitating the processing artefacts of pitch correction!
Bass Guitar
DI’ing a bass guitar may well produce a clean sound with lots of depth, but it can also tend to get lost when the rest of the faders come up. Purpose designed bass-guitarrecording preamps or plug-ins often give better results, as we discussed in Nine, because they add some of the colouration of a real amplifier and speaker cabinet, giving focus and character to the sound. It is possible to get a good DI’d bass sound by adding compression and EQ, but a dedicated recording preamp or plug-in is often the fastest way to get a sound that works if you don’t want to mic a bass speaker cabinet. To some extent, it depends on the type of music you are producing as well, since a DI’d bass may work perfectly well in a sparse arrangement, whereas bass-amp modelling may help the bass to cut through in a busy rock mix.
DI’d bass nearly always benefits from compression to firm it up a bit – an attack time of 20ms or so will help emphasise the transient attack at the start of each note, and the release time can be set anywhere from 50ms to 250ms, depending on the pace of the bass part and on how obvious you want the compression to be. A ratio of about 4:1 and a threshold setting to give a gain reduction of 4 to 10 dB on peaks is a good starting point, but you’ll always need to fine tune these parameters by ear, depending on how evenly the bass was played in the first place. On many of the mixes we’ve encountered in our Mix Rescue column, the bass part has suffered from the instrument not being played assertively enough. This tends to result in a sound that lacks punch no matter what processing you use, and fret rattle is also often a problem. Recording can only capture the original performance, so that performance has to be good if the end result is going to be up to standard. It might be better to use a sampled bass rather than a poorly played real bass.
The punch of a bass guitar sound within a mix comes as a combination of its low end and its mid-range. There’s very little signal content above about 4kHz other than finger noise, so to increase or decrease the amount of bass, you need to cut or boost between 70 and 120Hz – but remember that boosting the bass end too much will reduce the amount of headroom you have, forcing you to turn the overall bass level down. In fact, a lot of the apparent punch and tonal character of the bass guitar comes in the 200 to 300Hz harmonics range, and the best way to prove this is to listen to your mix on small speakers which have a weak response below 100Hz or so. If the bass seems to vanish from your mix you probably have too much deep bass and not enough going on in the 250Hz harmonics region. Use a low-cut filter to reduce anything below 30Hz or so, as any energy down there will probably be unwanted very low-frequency ‘noise’ caused by moving the strings slightly above the pickups, just by touching them.
Case Study
We were asked to improve a mix in which the bass guitar seemed to be getting a little lost. Rather than put it through a bass guitar amp model, we first tried using a simple overdrive plug-in to add just a hint of thickness to the sound, and then applied some EQ boost at around 200Hz to give it more definition in the lower mid-range. The result was surprisingly effective, which shows you don’t always need fancy or expensive plug-ins to get the job done.
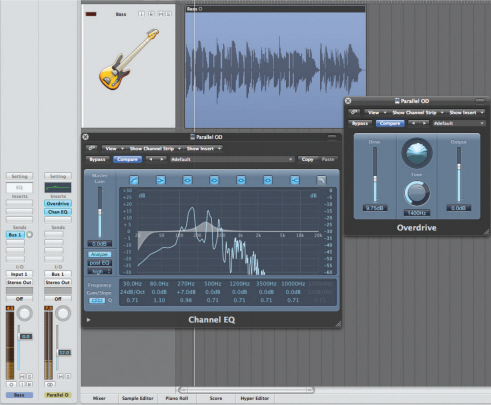
A clean, DI’d bass guitar may sometimes not have enough harmonic complexity to sit comfortably in a mix. A little parallel distortion, with its own EQ, can give it a more interesting midrange without it ever sounding noticeably ‘dirty’.
Electric Guitars
A typical electric guitar part covers mainly the 150Hz to 3kHz region of the spectrum – unless you use a clean DI, in which case it covers a lot more of the audible frequency spectrum.
A sharp, low-pass filter cut at 18dB/octave or more can be useful to smooth out a gritty top end without making the instrument sound dull, whilst boosting between 1kHz and 3kHz brings out the natural bite. Be careful not to overdo the latter – things can get very harsh very quickly!
Where there are two electric guitar parts you can use EQ to try to differentiate them, although this is best done at the recording stage with different pickup, chord shape, and amplifier settings. Panning them apart will also help, but a good mix sounds nicely organised in mono as well as in stereo. During our Mix Rescue series we’ve come across a number of tracks where the electric guitar has been so distorted that it has absolutely no dynamics at all. Worse still, if the parts are riffs or chords, played solidly with no breaks, they tend to trample all over everything else producing mid-range sounds, making it very difficult to get a satisfactory mix. You can use EQ to bracket them, which helps, but the real solution is to record using less distortion, and to organise the song arrangement so that there are some spaces and variety. If you need to create a sense of power with more sustain consider using less distortion combined with a compressor.
For ambience, a simulated spring or plate reverb often works best, although if you don’t want an obvious reverb effect, try using a hint of convolution reverb with a room, chamber or studio setting. This eliminates the dryness you get in close-miked guitar sounds (real or simulated), and adds a sense of room space but without washing out the sound with obvious reverberation. For ‘stadium-style’ rock solos, a delay of around 700ms either mixed in with the reverb or used instead of reverb works well.
Modulation effects such as chorus, phasing and flanging can be applied using conventional pedals during the recorded performance, or added afterwards using plug-ins. While plug-ins can usually achieve the right sound guitar players often need to be able to hear an effect whilst playing in order to perform most effectively. If you feel the need to preserve the flexibility to change the sound later, the simplest option is to take a second feed from the guitar as a clean DI and record this to a spare track just in case the effected version isn’t quite right. You then have the option to process this clean track in software using an amp-modelling plug-in or re-amp it, to replace or augment the originally recorded guitar track.
TIP : Old-fashioned CRT computer screens and laptop computers radiate a lot of electromagnetic interference that can affect magnetic guitar pickups, especially single coil types when used with overdrive and compression. Flat panel displays do not radiate the same type of interference and are far more ‘guitarfriendly’.
Acoustic Guitars
Where the guitar is part of an acoustic-band performance or playing a solo piece you’ll probably want to achieve a natural-sounding tonal balance in the recording. A gentle top or bottom cut or boost may be all you need to fine-tune the sound in the mix. If there is any honkiness or boxiness in your recorded sound, however, you can locate it accurately by first setting up a fairly narrow-Q parametric EQ boost, and sweep that across the frequency range of the guitar until the offending part of the sound really jumps out at you. Once located you can apply cut at that frequency to reduce the undesirable element within the sound.
If the recording has been made in a fairly dead room a convolution-based ambience reverb can reintroduce a bit of natural-sounding life to the sound without an audible tail. In a pop mix the low end of acoustic guitars may conflict with other lower mid-range sounds, so it’s a good idea to apply a low-cut filter or shelving EQ to thin out the bottom end. This keeps the body sound of the guitar away from the vocals and also stops it blurring into the low end of the electric guitars or the upper reaches of the bass. Listen to an Eagles album to hear how an acoustic guitar can really work well in an electric band context.
Judging the Balance
Level adjustments are almost always necessary during the mix, as the song evolves and builds, even if it is only riding vocal level changes so the compressor has less work to do or lifting guitars slightly during solos, and so on. You can make these small fader movements manually on simpler hardware systems, but mix automation makes this very easy, of course, and on a DAW you can simplify the mix further by putting different sections onto separate tracks. As a rule, avoid changing the levels of the drums or bass guitar as these provide the backbone of the track against which level changes in the other parts take place. Changes in intensity in the rhythm section should ideally come from the playing, rather than the mixing.
Even the best-performed tracks can still benefit from small pushes and fader rides in the mixing, to highlight certain phrases or allow other material to come through in places.
When you have your basic mix sounding close to how you feel it should be, it is always worth taking a break to listen to a couple of commercial tracks in a similar style. Do bear in mind however that the commercial tracks will also have been mastered, so your mix may sound less tight and punchy at this stage – you can get some idea of how your track might sound when mastered by inserting a compressor and limiter temporarily in the main mix output. Use a low compression ratio of say 1.2:1 and then set the compressor threshold to give you around 4dB of gain reduction so that the track’s entire dynamic range is squashed a little bit. Adjust the limiter so that it just catches the peaks giving 1 or 2dB of gain reduction, and if necessary adjust the output level control to match the level of your reference tracks. Remember to bypass these plug-ins when you resume mixing, as they are just for comparative listening.

If you are comparing your mix to reference tracks, try inserting a temporary mastering chain, consisting of a compressor and a limiter, to give your mix a similar density and loudness to the fully mastered material you are comparing to.
With that frame of reference fresh in your mind you can then make any adjustments to your mix that you feel necessary. Double-check the mix by walking around and listening to it without looking at the computer screen, and do this at several different listening levels, from quiet background music to fairly loud. Also listen to the mix from the next room, or the corridor with the adjoining door left open, as this seems to highlight any serious balance issues remarkably well. A lot of pros do this too, so it is a tip worth remembering. Finally, bounce a rough mix to an MP3 player or CD-R and check how it sounds on the car stereo, portable stereo system and earphones.
TIP : Always check your mix on headphones, as these tend to show up noise and distortion problems, as well as any duff edits, more effectively than speakers. They also give you an idea of how the stereo panning will sound on an MP3 player with earphones – one of the main ways music is experienced these days.
Problem Solving
Recording problems can be technical, such as spill, noise and distortion; or musical, such as when two full-on, distorted guitars are both playing busy rhythm parts all the way through a song. And then there are timing and tuning errors, or incorrectly played notes... One of the most prevalent technical problems used to be noise or hiss, although this is far less of an issue now than it was back in the days of analogue tape. Today, hiss is more likely to be due to lack of attention to setting up a proper gain structure, although it can also be generated by older synths, guitar amplifiers, effects pedals and so on. The simplest tool in the fight against hiss is the noise gate, although this has its limitations.
Noise Gate
A noise gate simply attenuates the signal during the pauses between sounds on the track to which it is applied. The amount of attenuation can range from a full mute to a more modest level reduction, depending on the gate’s design and control settings. Gating can be very effective, especially where you have a lot of tracks in your mix, so long as the ‘wanted’ sound is significantly louder than the noise you need to remove. If, for example, a guitar solo appears only once in the middle of a song, you can either trim both ends of the section by editing (the preferred option) or pass the track through a noise gate. The gate is more useful if there are lots of breaks or pauses in the performance, as these will be muted automatically (but would take a long time to edit out manually).
When gating vocal tracks, it is better to set the gate’s attenuation (sometimes called range or depth) to between 6 and 12dB, rather than allowing it to completely silence the track. This is because we still need to hear the breath noises, but at a reduced level, otherwise the performance can sound very unnatural. Ensure you set suitable hold and release times, so that the ends of the notes aren’t cut off abruptly.
You can use a noise gate to automatically clean up your recorded tracks prior to mixing, provided that there is a clear difference between spill and background noise and the level of the material you want to keep. If there isn’t, you may be better off using one of the other methods outlined here.
Constant broadband noise (hiss or other constant background sounds) can sometimes be dealt with using dedicated de-noising software plug-ins. Some of these work by taking a noise ‘fingerprint’ of the unwanted sound in isolation, and subtracting that from the wanted signal, whilst others involve a single-stage, multi-band filtering process. There will generally be a control that sets the amount by which the noise is reduced – trying to take it all out invariably introduces odd ‘ringing’ or ‘chirping’ artefacts, and better results are usually obtained by aiming for much more modest reduction to the noise of only a few decibels. If the noise is really bad, then doing two or three gentle passes usually sounds much better than one heavy-processing pass. Note that systems relying on a noise ‘fingerprint’ to calibrate themselves are only effective where the level and frequency spectrum of the noise is reasonably constant. Some of the more sophisticated de-noisers track the noise profile and adapt accordingly, although they can be fooled if the nature of the noise changes too abruptly.
TIP : If you need to use a noise gate in a track that also has a compressor patched in, put the noise gate before the compressor to ensure it triggers reliably. If you put the gate after the compressor there will be less of a differential between the levels of the loud sounds and the quiet ones, so the gate will tend to mis-trigger.
TIP : Reverb or delay can help hide any abrupt note endings caused by gating. If you try to gate after adding reverb or delay, you’ll invariably truncate or shorten the decay tail of the effect in an unnatural way – although that is also the basis of the once-popular Phil Collins gated drums effect.
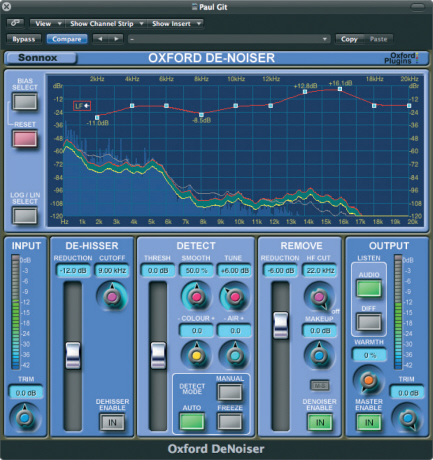
Dedicated digital de-noising processes can be remarkably effective, so long as you don’t push them too far, causing side-effects that are more objectionable than the original noise. Several gentle de-noising applications are usually more effective and less noticeable than one heavyhanded application.
Distortion
While distortion is often used as an effect, we can sometimes face the problem of unintentional distortion. Distortion can either be fairly gentle and musically beneficial, as in analogue overdrive, or very hard and unpleasant as in the case of digital clipping. If not too severe, analogue (harmonic) distortion can be softened by using a very sharp high-cut filter to attenuate the unwanted upper harmonics, but where possible it is better to re-record the part to avoid having to solve the problem in the mix.
DAW users can automate filter plug-ins to apply cut only when the distortion is present, which avoids compromising the clean parts of the recording. Digital clipping is more problematic as it generates anharmonic distortion artefacts that crop up at frequencies both below and above the source frequencies, so they can’t be tackled by high-cut filtering. Currently, other than very expensive specialised restoration software, there is no way to properly reconstruct distorted sounds, although it is likely that this technology will eventually percolate down to the project-studio price range where, it could be argued, it is most needed.
Simply the wrong sound
Sometimes you may be presented with a technically good recording, but the sounds still don’t seem to work in the context of the mix. Sometimes this is an arrangement issue that needs to be resolved through creative editing, or perhaps discarding or replacing some of the parts, but in other cases you can often use the EQ techniques already described to squeeze the sounds into shape. Where the problem can’t be corrected in this way you may find that instruments such as electric guitar, electric bass or drawbar organ can be improved by re-amping. The one problem that EQ never seems to entirely resolve is the over-distorted rhythm guitar part.
Case Study
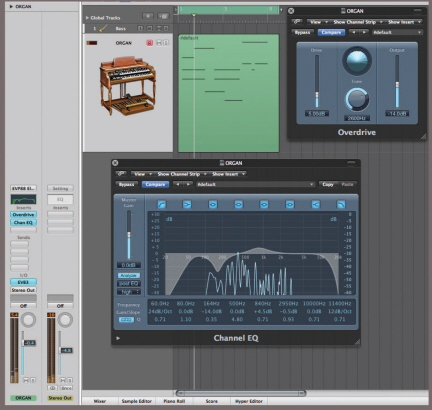
One Mix Rescue song we worked on suffered through having a rock organ sound that sounded far too ‘polite’ and didn’t cut through the mix. We added some fairly heavy upper-mid EQ boost and then fed it through an overdrive plug-in which we adjusted to dirty up the sound without making it too fizzy or raspy. This produced a perfectly usable result, but where processing fails re-amping may succeed. Re-amping simply involves routing the offending track to a physical output, then feeding it into a suitable amplifier and speaker that can be miked and re-recorded onto a new track. In this way, the amplifier and speakers modify the tone and allow additional distortion to be introduced where necessary. The same technique can be used to impart a more organic quality to guitar, bass guitar, bass synths, drawbar organs and other keyboard pad sounds.
Although you can feed a line output from the computer interface directly into a typical instrument amplifier (if you take care to reduce the line level signal down to instrument level), a dedicated re-amping box usually gives better results, as it deals with the signal level reduction in a convenient way, sorts out the balanced-to-unbalanced conversion, and provides a ground lift to avoid ground loops. Virtual re-amping is also possible if you use a DAW that has plug-in modelling guitar preamplifiers. By inserting one these on a track, it is easy to reshape a sound in a similar way to passing it through a miked external guitar amplifier and, of course, it is far more convenient.
Adding a small amount of controlled distortion, either from a plug-in or re-amping, can often make a part able to carve out its own space in the mix.
Many users record their stereo mix onto new tracks within the DAW, recording the results by ‘bouncing’ all the tracks to a new stereo audio file, after the mix has been set up and optimised. The use of (16-bit) DAT machines or CD-R recorders as mastering machines is far less prevalent now than it was in the past, as bouncing your mix within the computer is a lot more convenient and allows you to keep your final mix files at a high resolution. If you like to mix on an analogue mixer, either because you like the sound or the more tactile control it offers, the mixer’s analogue output can still be recorded back to a new stereo audio track within the computer project. This means there’s less requirement for dedicated stereo recorders for this application these days, although there are still plenty of portable stereo digital-audio recorders with 24-bit capability to choose from, if you have a need or preference for mixing onto a hardware platform.
Of course, some people still like to mix to analogue tape, simply for what it does to the sound, and then bounce that mix back into the digital domain as their master. If you are lucky enough to have a good quality two-track analogue tape machine that you can maintain and keep in good working order, then that’s certainly a viable option. Alternatively, you could use one of the many tape simulation plug-ins on the market, some of which are excellent, and some rather less so. Beware of any tape-sim that causes audible distortion without being overdriven; that’s really not the effect you are after, and not what analogue tape does to the sound at all!

Where an external, hardware stereo recorder is still preferred, a stand-alone solid-state or 'card' recorder capable of 24-bit operation is probably the best solution. The recordings made on such devices can also be backed up to any computer.
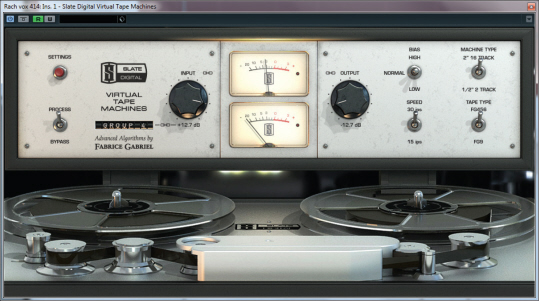
Some of the latest tape-emulation plug-ins, such as this one from Slate Digital, make excellent sound polishing and enhancement tools, regardless of whether you think they are accurate or not – and many users will never have actually heard a high-quality analogue tape machine in action!
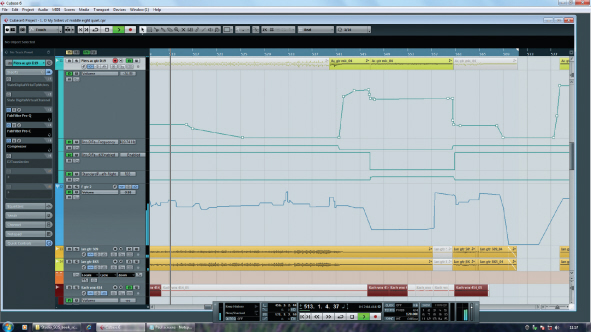
Combining Mix Automation with Advanced Editing
Not everyone likes to mix with full automation in action across the whole mix, so ‘final’ mixes are sometimes created by editing together different sections from different mix passes. The desired edit points will usually be on transitions between sections, and it is worth trying to position them shortly before a drum beat so any small discontinuities are likely to be masked by the beat. Cross-fades should be made as short as possible – typically 20ms or so – while still providing a smooth, glitch-free edit, and they shouldn’t overlap into drum beats.
Once you’ve edited a track, listen to it carefully on headphones to ensure that none of the edits are audible, as you can easily miss subtle editing problems when listening on speakers. Listen for and correct any level or tonal changes, as well as more obvious timing irregularities.
A common editing fault we hear is that although the timing of the edit may be correct and the edit made on a suitable beat, the decay of notes played before the edit are missing after the edit point. Once you’ve created a tight edit, wind back a few bars and then play through your edit, listening to the way the various instruments sound as you pass through the edit point. If there’s a problem you may need to choose a different edit point, or perhaps use an asymmetrical cross-fade to achieve the desired effect.

When you have an edit that just won’t work, try changing the crossfade parameters.