
Lesson Files | iLife08_Book_Files > Lessons > Lesson12 > Podcast_Open_Files iLife08_Book_Files > Lessons > Lesson12 > Band_Photos |
Time | This lesson takes approximately 90 minutes to complete. |
Goals | Create a new podcast episode Add and adjust the Speech Enhancer effects to voice tracks Add artwork to the Media Browser and Podcast Track Edit marker regions Build a title sequence in the Podcast Track Crop and resize artwork in the Artwork Editor Add a URL and URL title to a marker region Edit a project’s episode information |
Podcasts are one of the most popular sources of entertainment and information available on the Internet. Podcasts are similar to radio or television shows, in that they deliver audio and video to their audience. A key difference, though, is that a podcast is not broadcast using traditional means. Rather, a person subscribes to the show (usually for free) and then it is delivered to the subscriber’s computer.
One of the reasons for podcasting’s popularity is that shows can be viewed (or listened to) in a variety of ways. They can, of course, be watched on a computer, but they can also be sent to portable media players like iPods, as well as to television sets via an Apple TV or a Digital Video Recorder device.
With GarageBand ’08, you can create your podcast episodes and then upload them to the Internet using iWeb or another application. There are four primary types of podcasts: audio podcasts; enhanced audio podcasts with markers, artwork, and URLs; video podcasts containing a movie; and enhanced video podcasts containing a movie, markers, artwork, and URLs.
In this lesson, you’ll learn how to create a new podcast episode and set up voice tracks for recording. You’ll then work on an enhanced audio podcast with multiple tracks, markers, artwork, and URLs. Along the way, you’ll also build an opening title sequence, edit marker regions and artwork, and record sound effects directly to the Timeline.
Setting up a new podcast project is easy. GarageBand offers a useful New Podcast Episode template right in the GarageBand welcome screen. Let’s build the opening sequence to our podcasting episode.

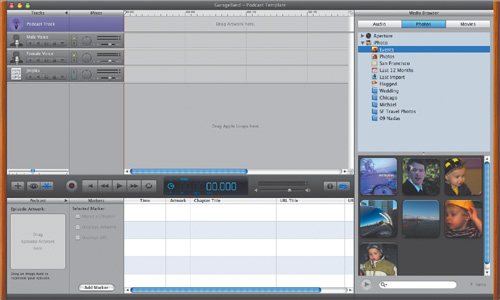
The Podcast Template project opens, with the empty Podcast Track, editor with marker information, and Media Browser already showing. The Media Browser contains buttons for three different types of media files (Audio, Photos, Movies), a browser that lets you navigate to the media files you want to use, and a media list showing the media files in the current location.
You can use movie files to create a video podcast. Likewise, any files in the Photos pane of the Media Browser can be used as episode artwork for your podcast.
Besides the default items from your iLife media library, you can add other folders of still images and photos to the Photos pane so you can access artwork files anywhere on your computer.
Note
To remove a folder from the Media Browser, hold down the Control key and click the folder. Choose Remove Folders from the pop-up menu that appears.
By using the New Podcast Episode template from the GarageBand welcome screen, all of the basic tracks and panes needed for a podcast are already showing. However, as you work on your own podcast projects, chances are you’ll need to show and hide some tracks and panes to maximize your Timeline workspace.
Choose Control > Hide Editor, or press Command-E, to hide the editor.
Choose Control > Hide Media Browser, or press Command-R, to hide the Media Browser.
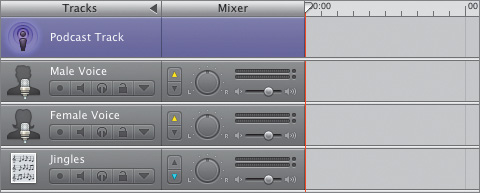
The podcast template includes a Podcast Track and three pre-built audio tracks, including Male Voice, Female Voice, and Jingles. You can always add more tracks or delete unneeded tracks from the Timeline.
To make your vocal tracks easier to hear, GarageBand has automatically enabled ducking. This means that some tracks take priority as lead tracks while others function as backing tracks. By default, the voice tracks are set as priority tracks, whereas the Jingles track is set as a backing track that will be ducked as needed to favor the voice tracks.

Choose Track > Hide Podcast Track, or press Shift-Command-B.
Hiding the Podcast Track while you’re working on a podcast is generally a bad idea. In fact, you’re more likely to want to show the Podcast Track in a project you may not have originally designated as a podcast.
Choose Track > Show Podcast Track, or press Shift-Command-B. Click the Podcast Track to select it.
The Podcast Track reappears along with the Track Info pane for the selected track. You’ll also see a Podcast Preview pane in the upper-right corner of the window. The Podcast Preview pane—which is similar to the Video Preview pane—allows you to see the podcast’s artwork as you play the project.
Press Command-R to show the Media Browser and automatically hide the Track Info pane.
Press Command-R again to hide the Media Browser.
Hiding the Media Browser will not make the Track Info pane reappear. When a pane is hidden to make room to show another pane in its place, the previous pane remains hidden until you choose to show it again.
Now that you are comfortable with showing and hiding the various panes you’ll be using during this lesson, let’s move on to setting up a microphone to record your podcast. If you don’t have a microphone, you can continue to read the lesson, and an audio file will be provided.
Recording audio for a podcast in GarageBand can be as easy or as complicated as needed for your project. For example, if your podcast needs only one voice track (which can contain more than one speaker), you can record the narration by connecting a microphone to your computer or by using the built-in microphone (if it has one). This could be the built-in iSight camera, which includes a fully functioning microphone. Additionally, you can record remote interviews directly to GarageBand with iChat users.
Voice tracks you record for a podcast are Real Instrument tracks, which means you can record a maximum of eight tracks simultaneously. To record more than one track at a time, you’ll need to use an external audio interface, which is explained in more detail below.
Note
For this lesson, the audio tracks have already been recorded, so you’ll just need to record the opening narration to the show. If your computer doesn’t have a microphone, you can use an audio file in the Lessons folder.
Due to the popularity of GarageBand, a variety of third-party recording equipment is available. You don’t have to invest in additional hardware, but most podcasters purchase a standalone microphone.
To record the introduction to the podcast, I used the Blue Snowball USB microphone, which plugs into any USB port. It doesn’t require any additional software or drivers, and it works well for these types of projects. There are several different brands to choose from, however, so be sure to explore your options.

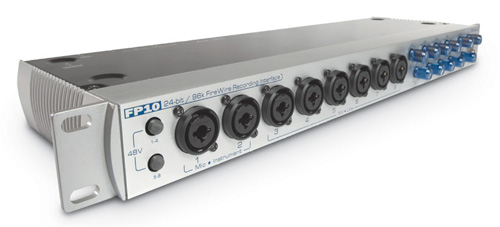
For the interviews with the band, we needed three microphones to be recorded discretely. For this, I used an FP10 24-bit/96K FireWire Recording System from PreSonus. The FireWire audio interfaces can allow for up to 8 audio sources to be recorded simultaneously.
Again, let me stress that additional equipment is not necessary to create a podcast. You can often get along with minimal equipment. A microphone, though, is a reasonable purchase and can greatly improve the sound of your podcast.
Before recording, make sure that your equipment is turned on and properly connected to the computer. For more specifics on the operation of your equipment, refer to the equipment manuals.
In order to improve the sound of a recorded voice, GarageBand includes microphone settings and vocal enhancement effects. These can be applied to a vocal track before or after recording. Let’s record a voice.
In the Timeline, double-click either the Male Voice track header or the Female Voice track header, depending on your gender.

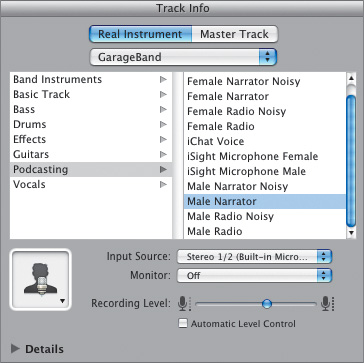
The Track Info pane appears for the selected track. Notice that the Podcasting instrument category has been selected, and Male Radio (or Female Radio) is the specific preset.
There are five Male Voice presets: iSight Microphone Male, Male Narrator Noisy, Male Narrator, Male Radio Noisy, and Male Radio. The same presets are available for Female Voice.
The presets with Noisy in the title include an automatic noise reduction filter to help eliminate unwanted background noise in the track.
The iChat and iSight presets are made for tracks using those types of recordings.
In the Track Info pane, select the Male Narrator or Female Narrator preset.
The preset effect changes, and the Track Header’s name changes to reflect the new preset.
In the Track Info pane, click the Details disclosure triangle in order to reveal the effect’s details.

This preset contains three effects to enhance a standard narrator voice recording. A Bass Reduction effect can pull out the low end (or rumble) in the recording. The slight Reverb effect can help fill in the sound by simulating reflections of sound. Finally, the Manual settings for the Speech Enhancer let you specify which type of microphone you’re using. This is a helpful way to improve the recorded sound if you’re using the built-in microphone on your computer.
Click the Edit button (which looks like a pencil) to open the Speech Enhancer controls for the Male (or Female) Narrator preset.

The Speech Enhancer controls include a preset pop-up menu, which will automatically change to Manual if you modify any of the current settings. There is also a Reduce Noise slider, which is currently at the lowest setting. In the Microphone Type menu, you can choose the type of microphone, and in the Voice Type menu, you can select the type of voice.
Select the Microphone Type box, then click the Microphone Type menu to see the different choices, ranging from MacBook to iMac Intel. Choose the microphone type that best fits your recording situation. Use Generic if you’re using an external microphone.
Choose a preset from the Preset menu at the top of the Speech Enhancer dialog. Try a preset that best suits the type of recording you might use in a podcast. If you’re unsure, try Male Narrator or Female Narrator.
An alert appears, showing that you’ve made changes to the current instrument settings.
Click Save As, then name the preset My Podcast Voice, and click Save.
In the Speech Enhancer dialog, choose your new preset from the menu. Then close the Speech Enhancer dialog to add your custom settings to the selected track.
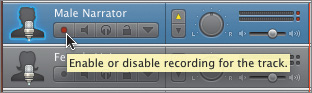
You now need to record the introductory voiceover for the podcast. Let’s take a moment and try recording to the track you just set up. You can use the shortcuts R to start recording and the spacebar to pause. Be sure that the track you want to record is selected and the Record Enable button is turned on.
If you have a microphone attached to your computer, you can read the script below.
Welcome to this week’s edition of the Listening Room, bringing you the best in live music. Join us each week for interviews and music with bands coming to your neighborhood.
This week’s episode is brought to you by Raster Vector. For the latest in computer graphics news, visit Raster Vector Dot Com.
This week’s guest is the Brindley Brothers, a Washington, DC-based band led by singer/songwriter Luke Brindley. Luke is joined by his brother Daniel on bass, keys, and vocals, and brother-in-law Jared Bartlett on guitar.
If you aren’t happy with your first try, you can stop the recording, erase it, and try again.
Now that you know how to create a new podcast project and set up your vocal tracks, let’s complete the show’s opening by adding sound effects and a jingle.
Continue working with your current podcast project or open the file 12_Podcast_Template_Stage_Two.band from the Lesson12 folder.
Click the View button (which looks like an eyeball) to show the Loop Browser.

You can now access a musical jingle to use in the show’s opening..
Use the following path to access a musical jingle: Jingles > Rock/Blues > Glide Long.

When you click the jingle, it begins to preview the audio. This is a useful way to audition clips. You can click other tracks to preview them.
Drag the Glide Long jingle into the Jingles track. Be sure to drag it all the way to the left to ensure that the music begins at the start of the Timeline.

Now that you’ve selected the music, let’s add a sound effect to complete the background audio. Because GarageBand ships with several sound effects, you can quickly perform a search based on a keyword.
Click Sound Effects, then, in the search field, type the word clap, as shown in the bottom center of the image below. Because the Podcast Sounds View is selected, GarageBand will search the available podcast sounds.

GarageBand should return four matches, three of a clapping crowd and one thunder clap.
Click each sound to audition it.
The sound Clapping Crowd Studio 03 should be the best match. It sounds like a small group and is the right intensity level for the audience size we’re simulating.
In the Timeline, position the playhead around 33:00 (your narration should be finished by this point).
Drag the sound effect Clapping Crowd Studio 03 to an empty area near the bottom of the Timeline and position it to start at 33:00.

A new track named People is created to hold the Clapping sound effect.
Click the “Go to Beginning” button in the transport controls to move the playhead to the beginning of the project.

Press the spacebar to play the project.
You’ll notice that the music and sound effects automatically play lower under the vocal track. This is because ducking is enabled (as indicated by the up and down arrows next to the track names). The vocal track has been set to behave as the lead track. The jingle and sound effects tracks have their arrows pointing down, which indicates that they’re backing tracks.
The overall volume of the Jingle track is a little high. To adjust its volume, use the track volume slider. Adjust until you find a value that balances with your voice. A negative value will work best.

If needed, adjust the volume of your narration track by moving your track volume slider.
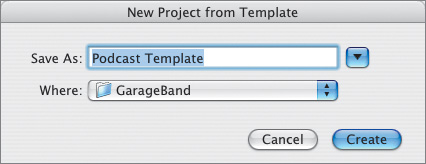
Choose File > Save As.
Name the File Podcast Open and select the checkbox for Save as Archive to bundle the project. Save the project to the default GarageBand folder inside your User folder ([User] > Music > GarageBand). If you store the project in the GarageBand folder, it will appear in the Media Browser.
Close the project by choosing File > Close.
When prompted, click Yes to include an iLife preview.
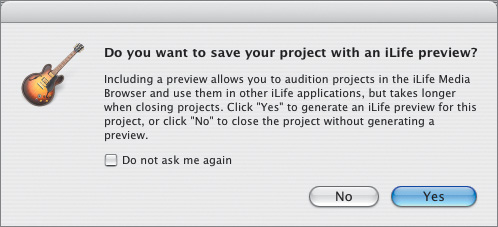
The preview file makes it easier to use the GarageBand project with the other iLife applications.
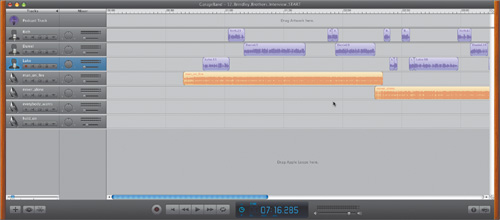
Now that you know how to set up and edit a basic podcast, we’ll jump forward in time and work with a mostly completed show. You’ll find a project called 12_Brindley_Brothers_Interview_START.band, which contains three recorded Real Instrument voice tracks, four music tracks containing orange (imported) Real Instrument regions, and one empty Podcast Track. Open this project so we are both working with the same project file.
You’ll notice that the ducking controls are hidden. Due to the complex nature of this project, we’ll use Automation Gain to manually mix the levels of the individual tracks. But before we mix our audio, there’s a little cleanup to be done.
The recording of the interviewer (Rich) contains a little background noise that can be removed. It’ll be easier to make this fix by isolating the track temporarily.
Move the playhead to 01:00 (1 minute) in the time display. This is right before the Interviewer (Rich) speaks for the first time.
Press C to show the Cycle Region Ruler. A gold bar appears at the top of the Timeline.
Drag the cycle region so it begins just before the first waveform for Rich. Then drag its right edge and extend it slightly beyond the end of the first question (from 01:00 to around 01:10).

This will keep the audio playing in just this area as we make adjustments.
If you do not already have the Track Info pane open for the selected track, double-click the Rich track header to open it. Then click the Details disclosure triangle to see the track’s details.
The track has the Speech Enhancer effect applied, with the Male Narrator preset.
Click the Edit button to open the Speech Enhancer controls.
Press the spacebar to begin playback of the cycle region.
Press S to solo the selected track (that is, to hear it independent of the other tracks).
You can hear a bit of room noise when Rich speaks. You may not be able to get rid of all the noise, but you can certainly remove some of it.
Continue playback and drag the Reduce Noise slider from the lowest setting (quiet noise) to the highest setting (loud noise). Feel free to choose a setting in between that you like better.

Can you hear the difference in the noise while he’s talking? Let’s also change the Voice Type effects preset on his track.
Continue playback and change the Voice Type pop-up menu from Male Solo to Male Voice Over.
Close the Speech Enhancer dialog and pause playback.
Press S to unsolo the Rich track, then press C to hide the Cycle Region Ruler.
As you can see, it’s easy to apply the Speech Enhancer effects to a track before or after it’s been recorded.
If you look at the entire Timeline, you’ll notice a gap at the start of the project. This is where you’ll place the show opening that you built at the start of the lesson. GarageBand makes it easy to import one project into another.
Note
In order to easily add one project to another you should save it to the default GarageBand folder and include an iLife preview. You did both of these steps earlier in this lesson.
Click the Go to Beginning button to rewind your podcast to the start.
If it’s not visible, press Command-R to show the Media Browser. Click the Audio button to show the Audio pane within the browser.
Your iTunes folder and default GarageBand folder are automatically showing in the Audio pane.
Click the GarageBand icon to show all of the contents of your GarageBand folder.

Scroll through the folder contents in the lower pane of the Media Browser.
Normal GarageBand project file icons look like a document (paper) with a guitar printed on it. GarageBand project files saved with an iLife preview show only a guitar icon.
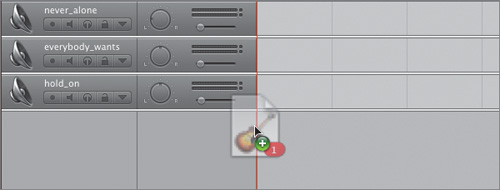
Drag the Podcast Open project from the Media Browser to the beginning of the Timeline and drop it in an empty area below your music tracks.
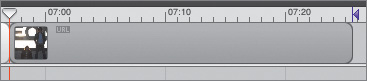
The project file appears in the Timeline as an orange Real Instrument region. The small guitar icon in the upper-left corner of the region shows that it’s a GarageBand project instead of a normal audio file.
Play the first part of the project to hear the Podcast Open and the start of the interview.
The open works well, but the applause noise starts a little early. Because the audio track is a GarageBand project, we can easily modify it.
Double-click the Podcast Open track to open it in the track editor.
Click the Open Original button to modify the track.
GarageBand confirms that you want to close the current project and open the Podcast Open file.
Cick the Open Original Project button, then click the Save button to save the current project, then click No to skip the iLife preview.
The original Podcast Open file is now ready to edit.
Position the playhead at 35:00.
Drag the applause sound effect to start at 35:00.
Choose File > Close and click Yes to save your changes. Click Yes as well for the iLife preview.
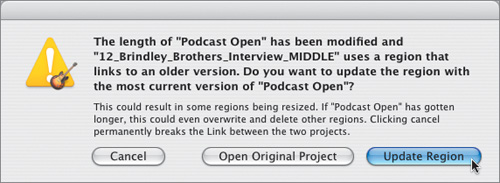
The Podcast Open project closes and you are returned to your full podcast project.
Because the duration of the audio file has changed, GarageBand prompts you to adjust the file in your Timeline. Click the Update Region button to make the fix.
Choose File > Save to capture your work so far.
You’ve successfully added a GarageBand project to the Timeline of another project. Although you could have just exported a finished mix of the Podcast Open and added the mixed audio file to a project the same way, it would not preserve your flexibility. By placing one GarageBand project inside another, you can easily make modifications using the Open Original button. Best of all, when you save the changes, the project automatically updates in the Timeline.
Although GarageBand’s ducking controls offer a quick way to mix between audio tracks, they do not offer precise control over audio levels. If you want a better mix you can harness automation curves to gradually adjust a track’s volume (or other properties).
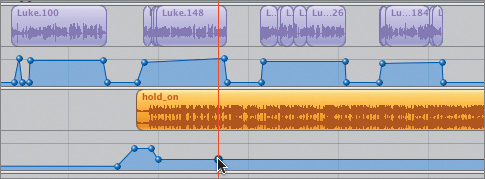
Click the arrows next to the Rich, Daniel, and Luke tracks to show the automation curves for the tracks.

This automation was previously added when the podcast project was built.
Click the automation arrow to disclose the automation for the music track called “hold_on.”
Scroll the Timeline to the right to see the end of the podcast.
Notice that the “hold_on” music track has some automation applied at its start, but it must be mixed for the remaining part of the podcast. The goal is to have the music gently swell around the vocal interview tracks.
Drag the “hold_on” music track up in the Timeline so that it’s directly below Luke’s audio track.

This will make it easier to control as we mix its volume in relation to the vocal interviews.
Scroll to approximately 5:50 (this is just before Luke finishes talking).
Click the automation curve to add a control point.
Control points allow you to adjust the automation over time.
Go forward to 5:55, then click to add another control point.
Drag the control point upward until it reads -6.0 dB.

The music now swells to fill in the space between the interview segments.
Go forward to 6:02 and click to add another control point.
This will hold the music at this volume for 7 seconds.
Go forward to 6:06, click to add another control point, and drag it down to approximately -20.2 dB.
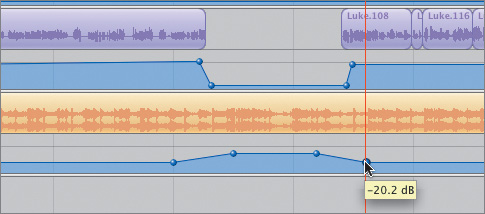
Drag the playhead to approximately 5:45 and then click Play to listen to the automation curve applied to the music.
On your own, add more control points to finish the automation curve. Adjust the levels so your audio track approximately matches the figure below. The goal is to swell the music in between the interview clips and then perform a gentle swell and fade at the very end.

The next step in building this podcast is to enhance it with artwork, photos, and markers. In this way, we can create a visual identity for the show and add photos of the band that will help the viewer better experience the music and interview.
When you add episode artwork to a podcast, the artwork appears when you play the podcast episode in iTunes (or on an iPod) and when you work with it in iWeb.
Artwork added to the Podcast Track creates a marker region the same length as the artwork in the Podcast Track. Marker regions are used in podcasts to literally mark a specific region in the Timeline to include artwork, a chapter title, or a URL. When you publish your podcast as an AAC file, iWeb or other software will use these marker regions to include the designated information for that region in the project.
You can edit, move, and resize marker regions at any time while creating your podcast project. You can also add and edit chapter title markers and URL markers in the Podcast Track. In addition to the artwork used as marker regions in the Podcast Track, you can designate the episode artwork in the editor. The episode artwork appears in the Podcast Preview pane whenever there is no artwork for the current marker region.
The artwork you’ll be using for this project is in two folders called Podcast_Open_Files and Band_Photos inside the Lesson12 folder. You can add artwork folders to the Media Browser by dragging the folders from the Finder into the Photos pane of the Media Browser.
In the Media Browser, click the Photos button to show the Photos pane.
In the Dock, click the Finder icon to open the Finder window. Locate the iLife Lessons folder on your computer’s Desktop.
In the Finder, open the Lesson12 folder and Shift-click to select the Podcast_Open_Files and Band_Photos folders. Drag them to the Photos pane of the Media Browser. Return to GarageBand.

The Photos for the GarageBand folder appear in the browser.
Click the disclosure triangle at the left of the Folders icon to view the folder’s contents, if they’re not already showing
You’ll see that it contains two folders: Podcast_Open_Files and Band_Photos.
Press Return to move the playhead to the beginning of the project.
Select the Podcast Track to see it in the Track Info pane.
The Podcast Track is where you can view and edit marker regions for a podcast episode.
Episode artwork represents the entire project—like a movie poster or CD cover. People will see it when they choose your podcast to download or preview. The project can have only one piece of episode artwork. Let’s take a moment and assign a file as the episode artwork for this podcast.
If the editor is not visible, press Command-E to show it.
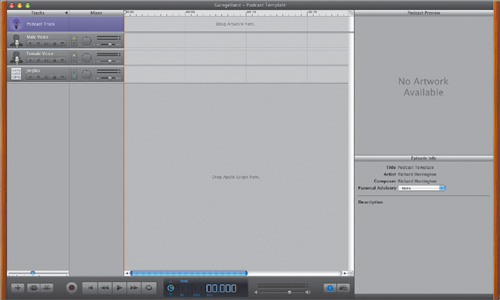
The editor appears for the Podcast Track. The Episode Artwork well on the side of the editor is currently empty.

The Podcast Preview pane shows that no artwork is available, because the playhead is at the beginning of the project where there is no artwork in the Podcast Track.
If the Media Browser is not visible, press Command-R to show it.
In the upper pane of the Media Browser, select the Podcast_Open_Files folder.

These titles are JPEG graphic files. You can create title graphics using programs like Keynote, Motion, and Adobe Photoshop.
Select the file Open3.jpg and drag it to the Episode Artwork well in the editor.
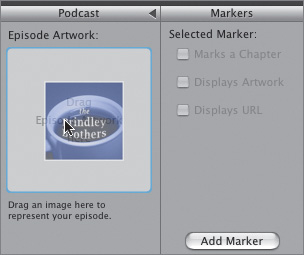
The episode artwork appears in the editor.
Press Command-I to show the Track Info pane.
The episode artwork appears in the Podcast Preview pane because there is no other artwork at the playhead position of the Podcast Track.
If you change your mind after you’ve added episode artwork, just drag the artwork from the well. Alternatively, you can add another piece of artwork to the well to replace the original.
Now it’s time to add artwork to the show. First you’ll add art to the opening introduction, then to the band interview. Let’s zoom in to the Timeline for a larger view of the Podcast Track as you add the artwork.
Press Control-right arrow until the ruler shows 10-second increments instead of 30-second increments.

Press Command-R, or click the Media Browser button, to show the Media Browser.
If you add artwork to the beginning of an empty space in the Podcast Track, it will automatically fill the space.
Drag the file Open1.jpg from the Media Browser to the beginning of the Podcast Track in the Timeline and release the mouse button.

A marker region appears and fills the empty space at the beginning of the Podcast Track.
Press the spacebar to play the podcast. When the announcer starts to discuss the show sponsor (around 13:00), press the spacebar to pause playback.
From the Media Browser, drag the file Open2.jpg into the Podcast Track.

Press the spacebar to play the podcast. When the announcer starts to discuss the show’s guests (around 23:00), press the spacebar to pause playback.
From the Media Browser, drag the file Open3.jpg into the Podcast Track.
Press Command-I to see the artwork for the current playhead position in the Podcast Preview pane.
Press the Return key to jump to the beginning of your podcast, then play the project from the beginning to see the artwork in the Podcast Preview pane.
You’re off to a great start, but you can further enhance the podcast by filling in some more photos. Keep in mind that although you don’t have to use photos in a podcast, they can often improve the entertainment value of your show.
Press Command-R to show the Media Browser. Then select the Band_Photos folder.
This folder contains 23 images that you will use to fill in the rest of the podcast.
Drag the photos into the Podcast Track and attempt to synchronize them with the interview.
There is no “right” answer as to where these should be placed. You can use the list below for guidance, or make your own decisions.
00:00:00.000
Open1.jpg
00:00:13.000
Open2.jpg
00:00:23.000
Open3.jpg
00:00:39.000
01_Cover.jpg
00:00:50.000
02_Luke.jpg
00:01:10.000
03_Daniel.jpg
04_Club.jpg
00:01:52.000
05_Roof.jpg
00:02:05.000
06_Club.jpg
00:02:21.000
07_Luke.jpg
00:02:35.000
08_Club.jpg
00:02:58.000
09_Brindley.jpg
00:03:09.000
10_Luke.jpg
00:03:37.000
11_Luke.jpg
00:03:57.000
12_Daniel.jpg
00:04:10.000
13_Luke.jpg
00:04:35.000
14_Brindley.jpg
00:05:00.000
15_Daniel.jpg
00:05:10.000
16_Club.jpg
00:05:20.000
17_New_Cover.jpg
00:05:45.000
18_Luke.jpg
00:05:55.000
19_Club.jpg
00:06:23.000
20_Club.jpg
00:06:35.000
21_Club.jpg
00:06:45.000
22_Club.jpg
00:06:57.000
23_Roof.jpg
Press Command-I to show the Track Info pane and Podcast Preview pane.
Watch the beginning of the project and listen to the audio.
Any thoughts? A few of the pictures are cropped and can be adjusted to improve their appearance.
GarageBand includes a handy Artwork Editor you can use to resize and crop your artwork to show all or part of the original image. To access the Artwork Editor, double-click the artwork in the project.
In the Marker list, click the artwork at approximately 00:05:45.000 (it’s a black-and-white shot of Luke).
Double-click the marker’s thumbnail to open the Artwork Editor.
Drag the photo down so the head and shoulders are visible.
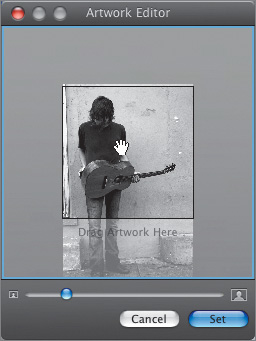
Click the Set button to apply the change.
In the Marker list, click the artwork at approximately 00:06:45.000 (it’s a shot of Luke from the back of the stage).
Double-click the marker’s thumbnail to open the Artwork Editor.
Drag the scale slider and reposition the photo so it’s more tightly cropped. You want to make the photo look different because you used it earlier.

Click Set to apply the change.
Modify the last marker in your list so it’s a tighter shot of Daniel and Luke.
Choose File > Save to capture your progress.
Good job. You’ve completed the podcast artwork. All that’s left is to add URL markers and publishing information.
You can see more information about a project’s markers, artwork, and marker regions in the editor. You can also select markers and change or update their information.
If the editor is not visible, press Command-E to open it.
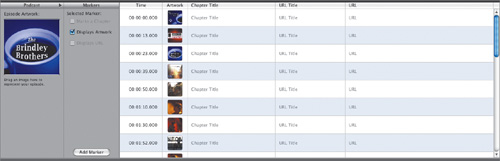
The marker regions are listed in chronological order from the beginning of the project. The editor includes columns that show Time, Artwork, Chapter Title, URL Title, and URL for each marker.
Drag the vertical scroller to scroll down through all of the project’s markers.
As you can see, there are several markers in this podcast.
The checkboxes in the Markers area of the editor show how the marker will be designated. Adding artwork to a marker region automatically selects the Displays Artwork checkbox for that marker.
You can add a URL (web address) to a marker region in a podcast or a marker in a movie and view the URL when you play the movie or podcast in iTunes. Not only will viewers see the URL when they play the finished project, but they can also click the URL onscreen to open the webpage in their browsers.
If you add a URL title, the title appears in the Album Artwork window of iTunes (in a published podcast) and clicking it opens the webpage for the URL. An example of a URL title might be “For More Information,” or “Check out our website.”
Let’s add a URL title and link to the end of the project. You’ll add the URL to an existing marker region. To get there, you could navigate in the Timeline or simply double-click the marker in the editor.
In the editor, locate the last marker in your list. Then double-click any blank area on the marker’s row in the marker list to jump to the marker’s location in the Timeline.

The playhead jumps to the marker’s location in the Timeline.
For the selected marker, click the URL Title field. Type Visit the Brindley Brothers and press Return.

For the selected marker, click the URL field. Type www.brindleybrothers.com and press Return.
GarageBand will automatically add http:// to the address.

Notice the checkmark for the Displays URL option after you add a URL to the marker.
The URL also appears on the marker region in the Podcast Track to show that the marker includes a URL.
If the Track Info pane is not visible, press Command-I to open it. Play the marker to see the URL title appear in the Podcast Preview pane.

Feel free to click the URL title in the Podcast Preview pane to open the webpage. If your computer is not currently connected to the Internet, your browser will try to open the page and then tell you that you’re not connected.
The URL title and link you added work great. But the URL isn’t onscreen very long. To give viewers enough time to see and click the URL, let’s add the same information to the previous marker as well. Select the marker region that starts at 00:06:45.000 and add the same URL title and URL as you did in the previous marker. You can retype the information in each field, or copy and paste the information from a field in one marker to the same field in another. When you’re finished, save your progress.
The last step needed to complete your podcast episode is to add the episode information, which includes the title, artist information, a description of the episode, and a parental advisory. The episode information is available when you work on the podcast in iWeb and when you view the podcast in iTunes.
Select the Podcast Track in the Timeline.
Show the Track Info pane, if it’s not already showing.
Click the Description area and type An interview with Washington, D.C. band the Brindley Brothers.
From the Parental Advisory menu, choose Clean.
Change the Artist name field to the Brindley Brothers.
Change the Title field to the Listening Room – Episode 45.

The description could be more in-depth if you’d like. You might include the names of the band members, list the songs included in the podcast, and provide other information.
Press Command-S to save the finished podcast.
Play the podcast from start to finish to see the completed project.
Note
If you didn’t complete all of the steps in this lesson and would like to see the finished version of the podcast, open the project 12_Brindley_Brothers_Interview_END.band from the Lesson12 folder.
Congratulations! You’ve created an enhanced podcast and gained a good working knowledge of how to build your own podcasts. Once you’ve created a podcast episode, you can publish it using iWeb. You’ll learn more specifics on how to export and share your finished podcast in Lesson 15.