
Lesson Files | iLife08_Book_Files > Lessons > Lesson11 |
Time | This lesson takes approximately 90 minutes to complete. |
Goals | Find and preview video files in the Media Browser Import a video file into a project View a video as you work Edit a video’s audio track Add and edit markers Assign chapter titles to markers Build a song using Apple Loops Use Automation Curves to adjust levels Modify a Software Instrument loop Save a project with an iLife preview |
One of the best features of GarageBand is its ability to work with iMovie. This allows you to easily bring your movie into GarageBand and create a custom score. Your video will look and sound even better with a great musical identity.
Not only can you create your own music for your iMovies and QuickTime-compatible video files, but you can also choose from hundreds of finished musical pieces and sound effects to complete the soundtrack. By investing a little bit of time and creativity, you can really make your soundtrack shine.
In our previous lessons, you edited a video about the Tour de Cure bicycle ride. This video follows the story of a rider in his journey to raise money and awareness. By striking the right balance musically, we can reinforce the emotion of the video and enhance the audience’s experience.
In this lesson, you’ll import a finished video, and then create a soundtrack from scratch using some of the musical pieces that come with GarageBand ’08. Along the way, you’ll also add and label chapter markers that will be used in iDVD when you export the finished piece.
A scored movie in GarageBand is similar to the default project setup. There are a few changes to make, though, to ensure that the tools you need are visible.
Open GarageBand. If GarageBand is already open, choose File > New.
In the GarageBand welcome screen, click the Create New Music Project button.

Save the project to your GarageBand projects folder as Bike Ride Score. The default options for tempo, signature, and key are okay.

If not already open, the GarageBand project opens, but needs to be customized to show the elements necessary to create a musical score.
Choose Control > Show Loop Browser.

You’ll use Apple Loops as the primary building block for your score. Apple Loops are prerecorded music files that can be used to add drum beats, rhythm elements, and other repeating patterns to a project. Loops contain musical patterns that can be repeated seamlessly as well as combined into new musical arrangements. You can extend a loop to fill any amount of time in a project.
You’ll also want access to the iLife Media Browser. To open it, choose Control > Show Media Browser.

The Media Browser contains buttons for various types of media files (Audio, Photos, Movies). This is an easy way to navigate to the media files you want to use.
Choose Track > Show Movie Track to add a track to hold the movie that will be scored.
In the next section, you’ll select a movie clip to place on this track for the project.
For this lesson, you’ll use the Bike Ride project you created in Lessons 8–10. If you haven’t done those lessons yet, we’ll give you a movie you can use instead.
Before you import the video file to your project, it’s a good idea to preview it. Finding the right video file in this case is easy because the name is very obvious, and there is only one video clip to choose from. However, in your real-life workflow you may have dozens, or even hundreds, of video clips in your Media Browser, and the selection process may not be as easy.
There are two simple ways to preview a video clip in the Media Browser: Select the file and click the Play button, or double-click the clip.
In the Media Browser, click the Movies button.
If the Movies folder on your computer includes movie files, they’ll be displayed in the lower pane of the Media Browser whenever you select the Movies folder.
The Movies pane of the Media Browser may include iTunes if you’ve created your own mp4 files compressed for your video iPod or have downloaded video podcasts. Protected iTunes media will not appear in the Media Browser. You can also add other folders to the Media Browser by dragging them in, so you can access media files anywhere on your computer from within GarageBand.
If the projects on your computer aren’t visible, click the disclosure triangle next to the iMovie icon to reveal them.
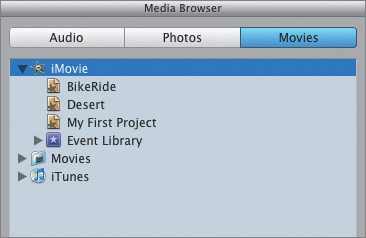
Select the project called BikeRide that you created in the previous lessons.
A large, shared movie is available with this project.
Double-click the Large shared movie file to preview it in the Media Browser.
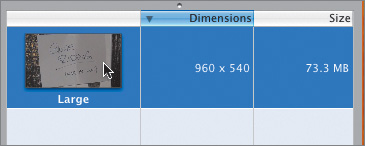
The movie icon becomes a small preview of the movie.
To stop the movie preview, press the spacebar.
You can import any one iMovie project or QuickTime-compatible video file from the Media Browser. The movie you’ll use in this lesson was created in iMovie. It was then added to the Media Browser by choosing Share > Media Browser. Let’s add the movie to our GarageBand project.
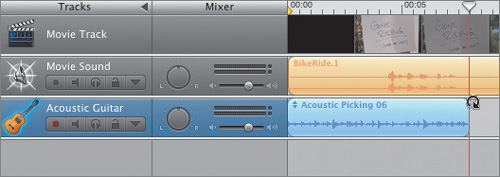
Drag the Large movie into the Movie Track.

GarageBand generates thumbnails for the track to represent the video clips. It also adds a track called Movie Sound, and creates a new AIFF file that contains the soundtrack of the movie. The original movie file remains unchanged.
Note
If you didn’t create the Bike Ride Movie in Lessons 8–10, then you’ll need to import a self-contained movie. You’ll find a file named BikeRide_to_Score.m4v in the Lesson11 folder. Simply drag that file onto the Movie track in GarageBand instead of the iMovie project.
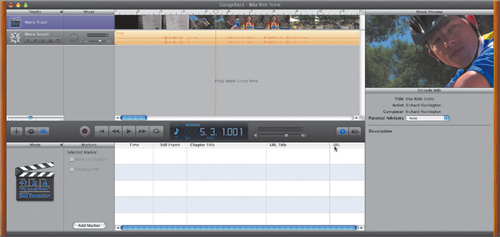
The Track Info pane also appears in place of the Media Browser, with the Movie Preview pane at the top where you can see the video as you play the project. The movie will update as you play the GarageBand project, which will make it much easier to synchronize the movie to the photo.
Select the Movie Track to see its info in the Track Info pane. Then select the Movie Sound track to see its information.
The Movie Preview pane will be visible as long as the Track Info pane is showing, no matter which track is selected in the Timeline.
Because we won’t be using the Grand Piano instrument track, select it and choose Track > Delete Track.
Your project is now ready to score.
Choose File > Save to capture your work so far.
Once the video file has been added to the project, it’s ready for you to begin scoring. However, there are a few things you should do first:
Watch the video to get ideas about what type of sound you want to add.
Clean up any problems in the video’s audio track.
Add markers that might be useful for planning the soundtrack or separating the project into chapters.
The Movie Preview pane is available for viewing your video as long as the Movie Track and Track Info pane are both showing. Because this project is based on video instead of music, you can change the time display to absolute time rather than musical time.
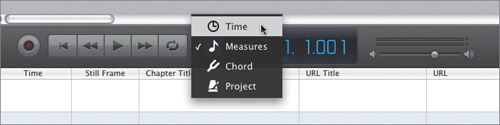
In the time display, click the Absolute Time button to view the project in absolute time (Hours:Minutes:Seconds.Fractions).
Press the End key to move the playhead to the end of the project.
The time display indicates that the project is about three minutes in length.
Press Return or the Home key to move the playhead to the beginning of the project.
Play the project once from the beginning to see the movie file in the Movie Preview pane.
The video has three major sections that we will score.
Press Return to move the playhead back to the beginning of the project.
This movie was edited in sections that can be divided into chapters for a DVD or played consecutively as a movie. To make the movie easier to navigate, you’ll add chapter markers later in the lesson. First, let’s clean up the audio track.
You can make basic edits and change the mix for the Movie Sound track. This includes muting the track, and adjusting its volume and its panning (what portion of the audio is sent to each speaker in a stereo mix). Although you can edit the Movie Sound track anytime, it’s always a good idea to clean up any obvious problems early, before you build the rest of the soundtrack.
Note
If the movie has any major problems that you want to fix, you can always return to iMovie and update the project. Just be sure to share the project with the Media Browser when you close and save.
There are a handful of small things we can enhance. The sound of bike gears clicking is a bit loud in a few spots. We also have different volume levels for the interview soundbites that can be adjusted to match more closely.
You won’t need the Movie Preview pane for this audio procedure, so let’s close it temporarily to make more room in the Timeline for the task at hand.
Press Command-I to close the Track Info and Movie Preview panes.
Double-click the orange Large audio region in the Movie Sound track to open it in the editor.
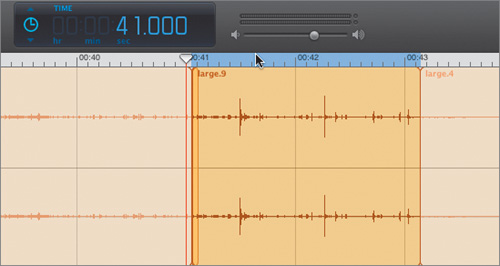
Move the playhead to around 40 seconds in the Timeline (00:00:40.000).

Tip
You can use the time display to navigate to a specific time by double-clicking the numbers in the display and typing the desired time. Press the right or left arrow keys to select a different field within the display. Press Return to send the playhead to the location in the display. You can also move the playhead in the Timeline by pressing the left and right arrow keys.
Press Control-right arrow several times to zoom into the waveform in the editor.
Listen to the track between 0:40 and 00:44.
You can hear several loud clicks as the bike riders begin to lock their cleats into their pedals and start the ride.
Move the pointer over the waveform in the editor until the pointer changes to crosshairs. Click near the center of the track and drag from left to right with the crosshair pointer from 00:41 to 00:43.

Once the selection is complete (blue), release the mouse button and click the selected area once to make it a separate selected region.
Move the playhead back to around 00:36 and play through the edited section.
The loud clicks are gone. You’ll add music that will mask the silence in the Movie Sound track.
Choose File > Save to capture your work so far.
As you can see, the audio in the Movie Sound track can be edited just like any other Real Instrument region. The only difference is that it’s orange, which indicates that it was imported.
For this project, you’ll add chapter markers between each of the movie’s sections, which you can use in iDVD to create chapters for a DVD. The chapter markers can also be handy for navigating to different parts of the finished movie as you build the soundtrack.
In this exercise, you’ll add four chapter markers that separate the different parts of the movie. You can add markers to the Movie Track in the editor. Because the editor is already showing, all you’ll need to do is select the Movie Track.
Select the Movie Track to show marker information in the editor.
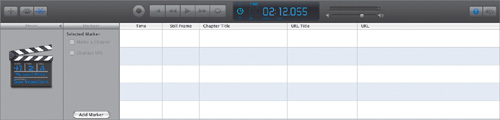
The editor changes to Marker view and contains the marker list with columns showing the start time, still video frame, and chapter title for each marker. The first chapter marker you’ll add will be for the beginning of the video.
If the Track Info and Movie Preview panes aren’t visible, press Command-I to open them.
Press Return to move the playhead to the beginning.
In the editor, click the Add Marker button to add a marker at the playhead position.

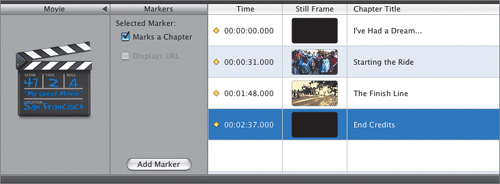
The first marker appears in the marker list. Also, the time position where you added the marker appears in the Time column, and the frame of the video at that position appears in the Still Frame column. The beginning of the video fades in from black, so the still frame for the first marker will also be black.
Click the Chapter Title text field and type I’ve Had a Dream..., then press Return.

Naming the chapter marker in the Chapter Title field automatically designates the marker as a chapter. If you want to name a marker without making it a chapter marker, you can deselect the “Marks a Chapter” option.
Chapter markers you create in GarageBand will be recognized when you play the movie in iTunes, iDVD, or QuickTime Player.
Now it’s your turn to add the remaining three markers. First, you’ll navigate to the right position in the Timeline, then click the Add Marker button. Once you’ve created the marker, you can name it accordingly. The last step is to press Command-S to save your progress.
00:00:31 – Starting the Ride
00:01:48 – The Finish Line
00:02:37 – End Credits
Tip
Because you’re working with whole timecode numbers and not fractions of a second, start with the playhead at the beginning of the Timeline so you’ll have all zeros in the time display. Then you can simply type in the time where you’d like to move the playhead.
Now that you’ve viewed the project and added markers, it’s time to add some music. In this exercise, you’ll create and mix music in the Timeline, using some of the professional-quality prerecorded music selections and loops that come with GarageBand ’08. As you add music, you’ll adjust its levels to complete the project.
This is a good time to mention the two different ways you can watch the playhead in action. When you play a long take or a full song, or simply navigate to a marker, your playhead may actually leave the screen. If you like to watch your playhead scrub across the tracks, click the Playhead Lock button. It’s called that because it also lets you lock the playhead in the Timeline and the playhead in the editor so they remain onscreen.
The Playhead Lock button is located on the far-right side of the window, and it looks like two playheads, one on top of the other.

Playheads unlocked

Playheads locked
If the two playheads are lined up in the middle of the button, the playheads in the Timeline and the editor are moving in sync with one another (ganged). It also means that the playheads will stay locked in view in the Timeline, and the tracks will move behind the playhead. By default, the playheads in the Timeline and the editor stay centered in the middle of the GarageBand window once they reach the center.
If the button shows two playheads that are not aligned, the playheads in the Timeline and editor are not locked to the center of the screen. The playhead will continue moving left to right and can continue to move off screen as it plays the tracks in the Timeline. Sometimes you may want to see a different part of the song in the editor than the one shown in the Timeline. To do this, you can unlock the two playheads, so that the Timeline and editor can show different parts of the song.
Let’s lock the playheads so that when you navigate to a marker, the playhead will be visible in the center of the screen even if you’re zoomed in to the Timeline.
There are several strategies you can use when adding a soundtrack to your iMovie or video clip. One option is to import the video into GarageBand and add music and sound effects to the edited video. Or, you can create a song in GarageBand, then export it to iTunes, where you can then bring it into your video editing software such as iMovie and edit the picture to the music.
For this project, you’ll use Apple Loops to create an original song. This process involves a fair amount of experimentation as you search for combinations to use. For the purpose of this lesson, the choices will be identified for you. Your goal in this exercise is to create a piece of music that works well with the video.
Press Command-E to hide the editor. Make sure the playhead is at the beginning of the project by pressing the Return key. Markers are shown as yellow diamonds at the top of the Timeline.
Play the project from the first marker to the second marker (around 30 seconds) and watch the video.
What type of music do you think would work well with this piece? Let’s try some upbeat music that builds in intensity as it progresses.
Press Command-L to open the Loop Browser.
When the Loop Browser opens, the Track Info pane automatically closes.
Drag the gray bar above the Loop Browser upwards to make more room.
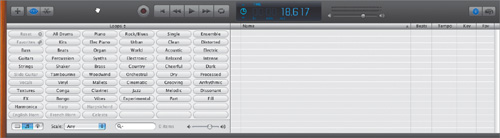
Click the Guitars keyword type to narrow your search.
Click some of the items in the results list in the right column.
Note
There are two types of Apple Loops: Real Instrument loops and Software Instrument loops. The color of a loop’s icon indicates which type each loop is. Real Instrument loops (which are recordings of real instruments) have a blue icon with an audio waveform. Software Instrument loops (which are generated by the computer using a synthesizer) have a green icon with a musical note.
Select the Loop Acoustic Picking 06 and drag it to an empty area of the Timeline. Be sure to drag it all the way to the left so the loop starts at the beginning of the video.

The loop is added to the Timeline and lasts for 8 seconds.
Choose Control > Snap to Grid and Control > Show Alignment guides to make it easier to drag your loop to the precise spot you desire. If these options are already enabled, leave them on.
Click play and listen to the guitar. It seems to work, but the loop can be longer.
Choose File > Save to capture your work so far.
You now need to extend the guitar loop so it lasts for the duration of the first section. The whole process is incredibly easy. Loop regions are designed to repeat (loop) over and over seamlessly. To extend a loop region, all you have to do is click the upper-right corner and pull.
Move your pointer over the upper-right corner of the Acoustic Picking 06 loop region.
The pointer becomes a loop pointer, a curved arrow, which indicates the pointer is in the correct position to drag the loop to repeat.
Drag the upper-right corner of the guitar loop region and extend it so the loop repeats 5 times (to the 40-second mark).

You can identify a loop segment by the indented marks (like a capsule) at its ends. You don’t have to extend a loop for the full length of the original region. If you make the looped section shorter than the original, you will hear only the notes included in the new loop segment.
Notice that as the loop repeats, you can see notches that show the beginning and end of the original loop within the new region.
Press Return to move the playhead to the beginning of the Timeline, then press Play.
The loop works well, but seems a little repetitive. We can modify the loop so it switches to a different, but compatible sound.
By splitting a loop, you can make separate parts that can be modified individually. This makes it easier to use loops from the same family when building a song.
Move your playhead to the 00:16 mark (this is just after the loop has been played for the second time).
Select the Acoustic Picking 06 track so that it’s active in the Timeline.
The track turns a brighter blue.
Choose Edit > Split or press Command-T.

The track splits into two parts. The first has two regions and the second has three regions.
Note
If the track splits into multiple pieces, you didn’t accurately position the loop at the start of your Timeline. To fix it, undo the split, then return to the start of your Timeline. Zoom in so you can easily see your location, then drag the loop so it starts at the exact beginning.
To make it easier to work with loops, they’re often grouped into families. You’ll see loops in the Loop Browser that have the same name, but with a different number at the end. For example, Acoustic Picking 06 and Acoustic Picking 07 belong to the same family. Loops in the same family often work well together.
Click an empty area of the Timeline to deselect any loops.
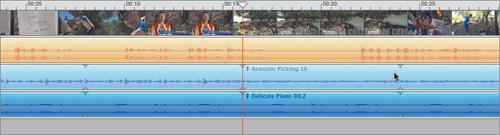
In the Timeline, select the second instance of the loop called Acoustic Picking 06.2.

In the Timeline, click the up and down arrows in the upper-left corner of the loop region to try different loops out.
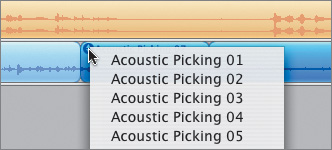
Be sure to listen to how the two loops fit together by playing your Timeline.
Set the second region to Acoustic Picking 16.
Choose File > Save to capture your work so far.
The loops are working well, but could use another instrument to complement them.
Let’s add a piano to the guitar. Earlier you learned about the two types of Apple Loops: Real Instrument Loops and Software Instrument Loops. For this part of the lesson, we’ll use a Software Instrument loop.
In the Loop Browser, click the Reset button to remove the keyword filters.
Click the Piano, then select the Cheerful keyword type to narrow your search.
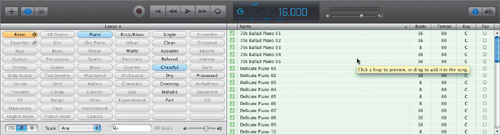
Click the Delicate Piano 08 loop to audition it.
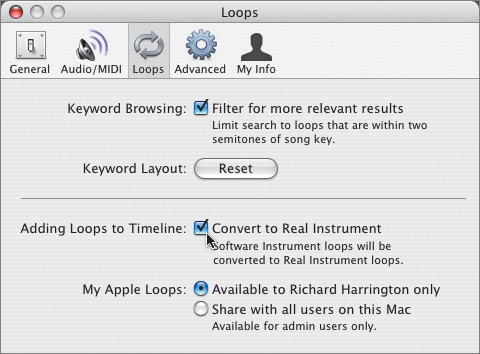
This loop works well and can be added to the Timeline. When you add a Software Instrument loop, you can convert it to a Real Instrument loop. Real Instrument loops require less processing power for playback. This allows you to use more tracks and effects in a project without impacting your computer’s performance.
Choose GarageBand > Preferences and make sure the Convert to Real Instrument checkbox is selected.
Drag the Delicate Piano 08 loop to an empty area of the Timeline.
The piano loop is added below the guitar loop.
Drag the upper-right corner of the piano loop region and extend it so the loop repeats 5 times (to the 00:40 mark).

The yellow alignment guides make it easy to tell when you’ve dragged the loop to the correct spot.
Press Return to move the playhead to the beginning of the Timeline, then press Play.
The loop works well, but again, could use some more variety.
Move the playhead to the 00:16 mark.
Select the piano track so that it’s active in the Timeline.
Choose Edit > Split.
Move the playhead to the 00:24 mark and choose Edit > Split.
The piano track is now divided into three regions.
Change the middle piano region to Delicate Piano 10.

Press Return to move the playhead to the beginning of the Timeline, then press Play.
The music is working well for this section. It just needs to be mixed so that its volume swells at the appropriate time, then dips beneath when people are talking.
Choose File > Save to capture your work so far.
To allow you to mix your music like a pro, GarageBand supports automation curves. These let you create changes in volume, pan, and other parameters over time. This means that you can take precise control over properties like volume change. After adding an automation curve to a track, you add control points where you want the change to occur. For example, if you add two or more control points to a track volume curve, you can then drag the control points to different values. The volume for the track will increase or decrease smoothly between the control points.
Every track has automation curves for volume, pan (except the master track), and other parameters. The track must be visible if you want to modify it.
Click the triangle next to the Lock button in a track’s header. Do this for both the Acoustic Guitar and Piano tracks.
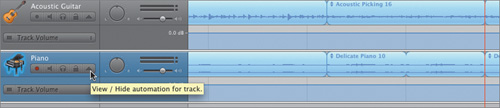
A new row for the volume and pan curves appears below the track in the Timeline.
By default, the Track Volume curve is selected.
Click the square next to the Track Volume label to turn on the curve for editing. Do this for both the Acoustic Guitar and Piano tracks.
Now you need to add control points to modify the automation curve. To add an automation control point, simply click the curve. To mix the track over time, we’ll need several control points. These are chosen based on when there is narration in the movie.
Tip
An easy way to see gaps in the narration is to look at the audio waveforms in the Movie Sound track.
Move the playhead to the 4.000 mark.
Click the automation curve for the Piano track and add a control point. Repeat for the Acoustic Guitar track.
You’ll need several more control points for this mix.
Add control points for both tracks at the following times:
5.500, 16.000, 18.000, 20.000, 23.500, 30.000, and 35.000.

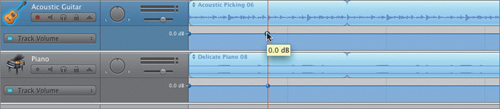
Now that you have control points, you can adjust the volume over time. The higher the control point is on the track, the louder it is. As you drag a control point, you’ll see its volume displayed next to it in decibels (dB).
Shift-click to select the control points at the 5.500 and 16.000 marks for the piano track.
Drag the control point down to about -18.00 dB.

Repeat steps 4 and 5 for the guitar track.
The rest of the control points need to be mixed for both tracks.
Adjust the following control points to these approximate levels:
18.000
-6.0 dB
20.000
-6.0 dB
23.500
-18.00 dB
30.000
-18.00 dB
35.000
-144.00 dB

Press the Return key to move the playhead to the beginning of the Timeline, then press Play.
The music is working well for this first section. We can now go on and build the remaining two sections.
Choose File > Save to capture your work so far.
As you start to work with multiple tracks, you’ll often need to limit what you hear. Otherwise, it can be overwhelming as you try to make decisions about the audio content and levels in your Timeline. Fortunately, GarageBand makes it easy to mute specific tracks. You can also solo individual or multiple tracks so only they can be heard. Using these two features together makes it easier to build and mix your musical score.
You can silence, or mute, a track in your Timeline so that you hear only the other, un-muted tracks. This can be very useful when you want to hear how a track affects the overall project, compare tracks, or try different loops in a project.
Move the playhead to 26.000 in the Timeline.
In the Loop Browser click the Reset button. Then type Electric Guitar Swell into the search field at the bottom, and press Return.

The results list shows Electric Guitar Swell 01, which we want to use.
Drag the loop so it starts at the playhead.
Press Play to hear the audio.
All four tracks playing at once is a little busy. You can mute the Movie Sound track so you can focus on just the music.
Click the Mute button (shaped like a speaker) for the Movie Sound track.
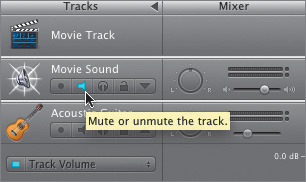
The track’s contents are dimmed to indicate that they’re muted.
Move the playhead to the start of the guitar swell and press Play.
Now it’s easier to hear how the tracks interact.
Using the Automation Curve, adjust the track’s volume so it fades in, rises gently, then fades out. You can use the following information and figure for guidance.
26.000
-144.0 dB
30.000
-10.9 dB
38.000
-3.1 dB
42.000
-144.0 dB

Click the Mute button for the Movie Sound track to toggle the mute status and restore the track.
Besides muting an individual track, GarageBand offers the ability to listen to individual tracks. This is called soloing. Soloing effectively silences the other tracks and is useful when you want to work on a track or region individually. In this case, we’ll use the soloing feature to work on the music for the middle of the video.
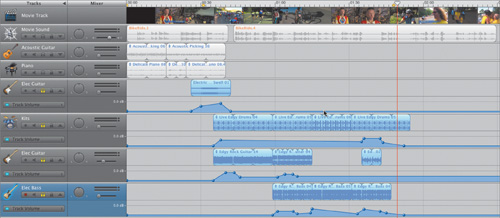
So far, you’ve done a great job adding and sequencing loops. You’ve also effectively harnessed automation curves to control the volume of your tracks. To save you some time, you’ll now open up a GarageBand project that has the rest of the Apple Loops added. This score, however, still needs some work before it’s finished.
Open the file Bike Ride Score_Stage3.band from the Lesson11 folder.
This file is partially built, but you still need to mix the tracks and modify the ending.
Choose File > Save As and name the file Bike Ride Score FINAL.band. Save the file to your default GarageBand folder (located in your Music folder).
Move the playhead to about 24.000 and press Play. Listen to the music tracks.
Chances are, it’s hard to hear because so many sounds are happening at once.
Click the Solo button (the one with the headphones icon) in the track header for the Kits track.

The other tracks in the Timeline are dimmed. They are now inaudible.
Click the Solo buttons for the Electric Guitar and Electric Bass tracks as well.

Move the playhead to about 24.000 and press Play. Listen to the music tracks.
It should be easier to hear the loops that need to be mixed.
Choose File > Save to capture your work so far.
Now it’s your turn to mix these three tracks. The goal is to have the music fade in quickly, swell when there is no narration, then quickly fade out. Make your own choices here about how to use automation curves. You can use the following figure for guidance when it comes to mixing your tracks.
Tip
After you make an initial mix for your track, click the Solo button so you can hear the Movie Sound track as well. Adjust your Automation Curve until you’re happy with the mix.
When finished with your mix, un-solo your tracks by clicking the illuminated (yellow) headphone icons. Then choose File > Save to capture your work so far.
The last track in the Timeline contains a Software Instrument loop. You can tell the loop is different by both its color (green) and the appearance of notes within it. This type of loop works very similarly to the Real Instrument loops; the key difference is you can actually edit the notes within the loop.
Click to reveal the Automation Curve for the track.
Click the square next to Track Volume to turn the curve on.

Add control points and adjust their volume using the following information for guidance:
1:46.000
-144.0 dB
1:53.000
-8.0 dB
1:57.000
-14.0 dB
2:27.000
-14.0 dB
2:31.000
0 dB
Move the playhead to about 1:44.000 and press Play. Listen to your music until the end of the video.
Everything sounds good except for a few stray notes at the very end. Because this is a Software Instrument Loop, we can edit its contents to change what music is played. The first step, though, is to isolate the region.
Move the playhead to 2:54.000.
Select the bottom-most Piano track and choose Edit > Split.

Double-click the last region to open it in the editor.
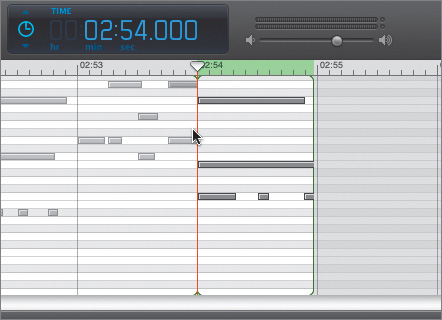
The gray bars indicate the notes that are being played. The default view is the Graphic view, but you can always switch to Notation view to see the notes. You’ll find icons for both in the bottom-left corner.
Examine the notes that are being played. The small “twitter” you hear at the end is the bottom-most gray bars.
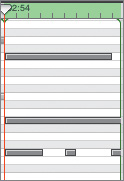
Shift-click the three bottom notes so they’re selected. As you click each to add it to the selection, you’ll hear the music play.

Press the Delete key to remove the notes from the region.

The notes are now gone and you’ve modified the Software Instrument loop.
Move the playhead back about 10 seconds and press Play. Listen to the modified ending of your score.
Sounds pretty good. You are now ready to save the project so it can be used by other iLife applications.
When you finish a GarageBand project, you have some important choices to make. It’s a good idea to save your project properly so it can be shared easily between applications.
Close your GarageBand project by choosing File > Close.
If you have made any changes, you’ll be prompted to click the Save button to capture your changes.
When asked about saving your project with an iLife preview, click Yes.
This option generates an iLife preview that makes it easy to use or preview your project from within other iLife and iWork applications.
Tip
You can also send the GarageBand project directly to other iLife applications with ease. With a project open, simply click the Send menu and click the Share menu. You can choose to send the project to iTunes, iWeb, or iDVD. The chapter markers that you’ve added will come through as chapters that work in iTunes, QuickTime, or a DVD player.