
iLife08_Book_Files > Lessons > Lesson10 > Start_project_10 iLife08_Book_Files > Lessons > Lesson10 > Finished_project_10 | |
Time | This lesson takes approximately 60 minutes to complete. |
Goals | Normalize clip volumes to ensure consistency Learn how to use audio ducking for automatic track mixing Add sound effects to your project Stack and mix multiple audio tracks for rich audio results Learn how to mix and fade tracks Work with background music and tracks in iMovie |
Up until now, you’ve focused on creating a movie that looks great, delivers a strong and clear narrative or message, and has tight, clean edits that go virtually unnoticed. To finish your movie as professionally as possible, you need to make sure your audio is as polished as your picture.
The audio tools in iMovie are surprisingly sophisticated. Although iMovie ’08 simplifies audio editing and approaches it differently from its predecessor and traditional video editing systems, it’s important not to underestimate what you can achieve.
In this lesson you will adjust the levels of your audio for consistent sound quality, learn how to fade, mix and duck your audio tracks quickly and easily, add and layer sound effects to create a full, dynamic sound, and look at two ways of working with music, to ensure the level of control that’s right for you.
Working with audio is fun, and brings your movie to life.
If you completed Lessons 8 and 9, your edited movie should be ready to start this lesson, and you should skip this section.
Note
If you completed Lessons 8 and 9, continue with Lesson 10 using the BikeRide project in your Project Library. You do not need any other project files for this lesson.
If you’d prefer to use the prepared file that came on the DVD, or if you skipped Lessons 8 and 9, follow these steps. If you skipped Lesson 8, you’ll need to import the Events as well, so please refer to Lesson 8’s “Preparing Your Project.”
If iMovie is open, close it.
Open and arrange two Finder windows as described in Lesson 8.
From the top Finder window, navigate to the Lessons > Lesson10 > Start_project_10 folder. Inside, find the BikeRide_AUDIO.rcproject file, and Option-drag it to the User > Movies > iMovie Projects folder in the bottom Finder window.
Open iMovie.
If the Project Library is not visible, click the Show or Hide Project Library button at the bottom of the Project Browser.
Select BikeRide_AUDIO from the list.

Click the Show or Hide Project Library button to hide the Project Library.
Note
The BikeRide_AUDIO project file references the same Events used in the previous lessons. If you didn’t copy those Events into your iMovie Events folder in Lesson 8, please do so before continuing.
Note
If you skipped Lesson 8, be sure to swap the vertical positions of your Events area and Project area to ensure that the screenshots here match what you’re seeing.
You’re now ready to get started on the project.
As you play your movie back, the first thing you’ll notice is that you need to fix the audio levels. Some sounds are very loud whereas others are soft. Sounds compete for attention, making it difficult for the audience to follow the logic of the story. Background sounds like crowds and traffic start or end abruptly on the edit points.
Adjusting audio can be done at any stage of editing, and in practice, when you’re familiar with all of iMovie’s audio tools, you’ll probably adjust audio levels while you’re editing.
We’ll start with one of the easiest and handiest audio features of iMovie—its ability to normalize the audio level of a track. Normalizing audio means bringing its volume to the same level as all the other clips. For example, Michael’s interview audio is much lower than the voiceover you recorded; normalizing brings them both to the same level.
With the click of a button, normalizing your audio ensures audio consistency throughout your project.
Select the first 5.4-second interview clip of Michael, where he says, “My dream as a kid was to ride cross-country.”
Drag the playhead to the front of the clip and press the spacebar to hear the current level of the audio. Press the spacebar again to stop playback when the clip has finished.

Click the Adjust Audio button, or press the A key to open the Audio Adjustments window.

Click the Normalize Clip Volume button in the Audio Adjustments window.

iMovie displays a status bar as it processes the audio track to normalize the clip volume.

Play the clip again to hear the (much louder) normalized audio level.
Because all of Michael’s interview footage was recorded at the same audio level, you’ll need to normalize the volumes of every interview clip.
Keeping the Audio Adjustments window open, click to select the next interview clip where you see Michael talking, which comes just before the establishing shot of the start of the bike ride. When you’ve selected it, click Normalize Clip Volume in the Audio Adjustments window.
When you have multiple clips that need the same adjustment, you can paste the adjustments in the same way you can paste video adjustments.
Close the Audio Adjustments window, or click Done.
Select one of the two clips you’ve already normalized, and choose Edit > Copy.
Command-select the three remaining interview clips and the clip of Michael’s wife on the cell phone, and choose Edit > Paste Adjustments > Audio.
Note
If the Edit > Paste Adjustments > Audio menu is dimmed, be sure that you actually selected the clip in step 8. If you attempt to Edit > Copy before you’ve selected the normalized clip, the Paste Adjustments properties won’t be available to you.
The three clips are automatically normalized.

Tip
Before you edit, you can normalize the volume of all the clips in the Event Browser, and then when you edit them into your movie, the volumes will be normalized already. Because we’ve edited everything first and worked with audio last, you’ll need to individually normalize each clip. Normalizing clips in the Event Browser will not affect any clips in the project.
Even with sound normalized, audio tracks can compete with one another, and cause sounds or dialogue you want your audience to hear to be inaudible or unclear. iMovie enables you to choose a track as your primary sound source and duck all the others behind it, automatically changing their levels.
Here’s how to normalize and set audio ducking for extracted clips and VOs.
Select the extracted audio track you placed at the start of the overhead crowd shot after Michael’s first interview (it’s the green one), and open the Audio Adjustments window.

The extracted audio from the interview is so soft it gets lost amidst the crowd walla (walla is industry lingo for that indiscernible background chatter). We need to normalize this audio, but we also need to drop, or duck, the crowd noise behind it.
Click Normalize Clip Volume.
Select the Ducking checkbox.

By default, iMovie ducks all audio on any other overlapping tracks to 15% of their original volume. This default setting has a pleasant effect in most situations and is generally preferable for longer tracks that extend over multiple edits, such as the voiceover tracks in your project.
But when you play this clip back to hear the results, you’ll notice that the crowd volume is extremely low, and when the interview audio finishes, the crowd suddenly gets very loud. You can soften this by moving the ducking slider to keep it from dropping the other tracks too low.
Drag the Ducking slider to 35%.
This creates a more natural mix for these clips.
Normalize the volumes of each of the remaining extracted interview audio tracks and voiceover tracks in your project. Select the Ducking checkbox for each and accept the default value of 15%.
Click Done when you’re finished.
When you’ve finished normalizing and ducking, play back your entire project, listening carefully to the audio tracks.
One thing you might notice is that the interview clips fade in slightly at the start and fade out slightly at the end. That’s because iMovie automatically adds a half-second fade to the audio in all your clips to smooth transitions between clips.
This automatic fade feature makes iMovie incredibly easy to use when you’re quickly creating simple movie projects. But when you’ve made careful and specific edits as we have, you’ll need to adjust fades manually.
Select the first clip of Michael’s interview in your project (the first clip you normalized earlier) and open the Audio Adjustments window.
The automatic Fade In works nicely for this clip. But the Fade Out at the end drops the volume of his words, which stretch over the start of the next clip. To keep the volume through the cut, let’s eliminate the fade.
Drag the Manual Fade Out slider all the way to the left, so that the number on the right reads “0.0s”.

You can also fix the cutaway sequence of interviews in the middle of the project. In both of these cases, the clips follow from dialogue over the previous clip, so we’ll remove the Fade Ins and leave the automatic Fade Outs.
Select the 5.8-second interview clip after the shot of Michael riding.

Slide the Manual Fade In slider to zero seconds.
Select the next 4.5-second interview clip, and adjust its Manual Fade In slider to zero.
Click Done when you’re finished.
A powerful way to add texture to your video is the use of sound effects. iMovie comes with hundreds of professionally produced sound effects you can use to breathe new life into your video.
Ambient background sounds, such as traffic noise or the natural sounds of a forest, can stretch over many clips, creating an aural unity that makes the clips feel like they belong to part of a whole.
Let’s start by adding some traffic sounds under the bike riding sequence.
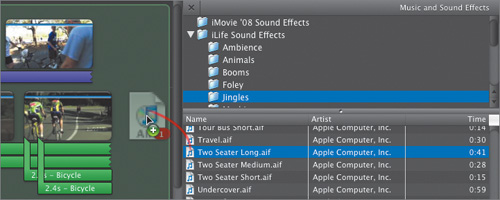
Click the Music and Sound Effects button to open the Music and Sound Effects Browser.

In the Music and Sound Effects Browser, navigate to iLife Sound Effects > Ambience.

Drag the Traffic.aif sound effect file to your project, and place it on the first of the riding clips, just after the start of the ride, being careful to avoid releasing the mouse button when the entire project area’s background turns green.

Note
Don’t worry if your clips aren’t in the same position on your screen as shown in the image above—that will vary depending on your screen settings. As long as they’re in the right order, you’re fine.
The truth is, we don’t want traffic noise to run through the background of this video. What we want is a subtle ambience that brings the picture to life. So let’s drop the volume of the traffic sound to keep it soft in the background.
Select the Traffic track you just added, and open the Audio Adjustments window.

Drag the Volume slider to 18%.

The result is a consistent background sound that has the effect of smoothing out the cuts of your movie.
Tip
You can adjust the overall volume of any track, adjust its fade in and out points, and choose whether to have other tracks automatically duck behind it, giving you exceptional control over the audio of your movie.
Spot effects are those that match the onscreen action. If two cars are in a shot, you can add the sound of a car horn, and the audience will believe that the car onscreen honked at the other one.
You can create a richness to your movie by stacking multiple sound effects in the same place.
Locate the third riding clip, a 2.9-second clip of cyclists riding away from the camera.

In the Music and Sound Effects Browser, select the iLife Sound Effects folder.

Type coast into the search bar at the bottom.
The search happens dynamically as you type, and the number of matching items in this folder or its subfolders appears at the right.

Select Bicycle Coasting.aif and drag it over the 2.9-second riding clip, being careful not to drop it on the green background.

Select the track and align it with the front of the clip.

Drag a second copy of the sound effect to the same clip, but shift its start point to the right of the first sound, as shown here.

When you play it back, it’s clear that the effect should be trimmed to the length of the clip.
Drag the right edge of the sound effect track to the left, until it’s at the edge of the clip.

Adjust the other bicycle coasting sound effect track to the end of the clip.
Note
As you shortened the lengths of the sound effects, their stacking order changed. iMovie displays sound tracks in such a way that tracks that extend to the next clip will appear higher in the stack than tracks that end on earlier clips. Note that the order in which the stacks are displayed does not affect volume or ducking levels.
The sound effect is great, but it ends rather abruptly now, and the volume is too loud.
Add a 1.7-second Manual Fade Out to one of the bicycle coasting sound effect tracks, and a 2-second Manual Fade Out to the other. Adjust the volume of one to 60%, and the other to 70%.
Click Done in the Audio Adjustments window when you’re finished.
By giving them different volumes, start times and fade times, you create an authentic sound effect that feels like a natural part of the clip.
Clear the word “coast” from the search box so that you’ll be able to browse the Sound Effects library later.
Before we add music to the project, let’s share this project to the Media Browser, so you’ll have a clean copy of the movie available for Lesson 11.

As you saw in Lesson 5, adding professionally produced music to your video—such as an iLife Sound Effects jingle or a song you downloaded from the iTunes store—can instantly elevate your movie’s quality by giving it professional production values.
You can add music to your movie in two ways: either as background music, or as a track.
Note
If you use professionally produced music in your movies, you are not legally allowed to publish them to the Internet or record them to DVD without the written permission of the copyright owner, because professional music is subject to royalties. Be sure to use royalty-free music, or create your own in GarageBand. All the music and sound effects included with iLife ’08 are royalty-free.
For quick-and-easy music in iMovie, you can drag a music track onto the background of your project, as you discovered in Lesson 5. But you can also get a lot more precise by pinning the background music to an exact moment of your video.
And if your music track isn’t long enough, you can add another track to the background, and iMovie will automatically cross-fade into it when the first song finishes.
Note
When you proceed with this exercise, iMovie will warn you that you’ve made changes to a published project. Simply click OK and continue with the exercise.
In the Music and Sound Effects Browser, navigate to the iLife Sound Effects > Jingles folder.
Scroll down to find the Two Seater Long.aif track, and drag it onto the background of your project, releasing your mouse button only when the background has turned green.
In the Music and Sound Effects Browser, scroll up to find Daydream.aif and drag it onto the background of your project. Don’t release your mouse button until the gray area beneath the green area of the previous track turns green.
The second track begins at the end of the first one.

Drag Time Lapse.aif onto the background of your project.
In the background of your project, select the Time Lapse.aif track.
When you select a background music track, its border will turn yellow.
Hold the mouse button down on the name of the track—Time Lapse—and drag the whole background music selection to the end of the 4.5-second clip of cyclists in green and orange jerseys coming toward the camera (top, middle in the figure below).
If you timed your voiceovers correctly, the music selection will turn purple, and a pin icon will appear in the upper left corner of the track to denote that you have pinned the music to a specific frame of video.

As you play the music back to review what you’ve done, you might notice that the Two Seater Long music completely changes the tone of the intro to this video. In iMovie, you can easily swap the order of your background music.
Choose Edit > Arrange Music Tracks, or right-click/Control-click any background music in your project, and choose Arrange Music Tracks.
This opens the Floating Music Tracks field.
In the green Floating Music Tracks area, select Two Seater Long and drag it beneath Daydream.
As you drag the name of the song, a thin black line will appear to indicate where it will be placed when you release the mouse button.
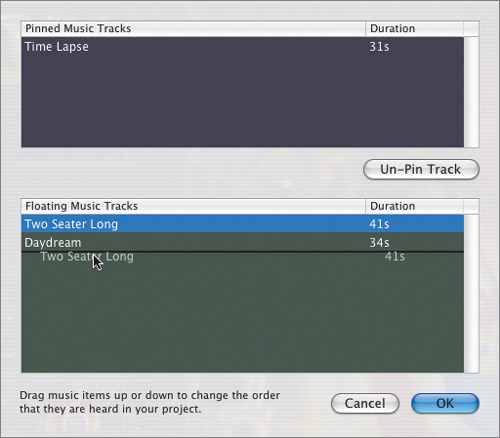
Click OK.
When you play it back, the Daydream.aif track is a much more effective way to start Michael’s sponsorship movie. But it feels like the music should fade into the Two Seater track around the start of the ride.
You can achieve that with the Trim Music tool.
Click the Trim icon (it looks like a clock) on the Daydream track.

In the Trim Music area, drag the right handle to shorten the clip to 42 seconds.
As you drag the handle, the viewer displays the current frame in your project at that moment of the audio.

Click Done when you’re finished.
Adding background music is easy, and offers you significant control over the way your music plays, and where it starts and stops. But you can also add music to your movie as a track, which has the added benefit of enabling sophisticated crossfades with other music tracks.
Let’s add another copy of the Daydream track to the end of the project, creating an audio bookend to the movie. But let’s do it by setting it as a music track.
In the Music and Sound Effects Browser, scroll to find the Daydream.aif track.
Drag it from the Music and Sound Effects Browser onto the sunset shot at the end of the riding sequence in your project, making sure to avoid the green background.

Move the new music track to align with the start of the sunset clip.

When you play back your movie to listen to the music you’ve placed, you’ll notice that the audio levels of your track have shifted. Some of the ducking has an unintended effect on the music.
So before you send your movie out into the world, take the time to go through your project and apply the skills you’ve learned in this lesson.
Adjust the volume levels of each clip.
Check the ducking levels, and change the ducking percentage if it sounds better.
Manually Fade In or Out to smooth the start and end points of clips.
Move or Trim any clips that need it.
When you’ve finished, press the Play Full Screen button to watch your completed movie.
As you discovered in this lesson, the audio tools of iMovie ’08 give you the flexibility to create a rich and detailed audio score for your movie project.
But the iLife ’08 suite has another application that will enable you to infuse the audio side of your movie with your own unique creativity, while adding an even greater degree of precision: GarageBand.
In the next lesson, you’ll discover how to create a custom music score that fits your project exactly as you imagine.